D-Link DMP-210 - 32 MB Digital Player User manual

DMP-210/220
Portable MP3 Player
User’s Manual
Rev. 2004-10-13

Contents
Introduction....................................................................................................1
Package Contents......................................................................................1
Introduction to MP3......................................................................................2
Precautions....................................................................................................3
Maintaining Good Performance ...............................................................3
Using Headphones ....................................................................................3
Cleaning the Player...................................................................................3
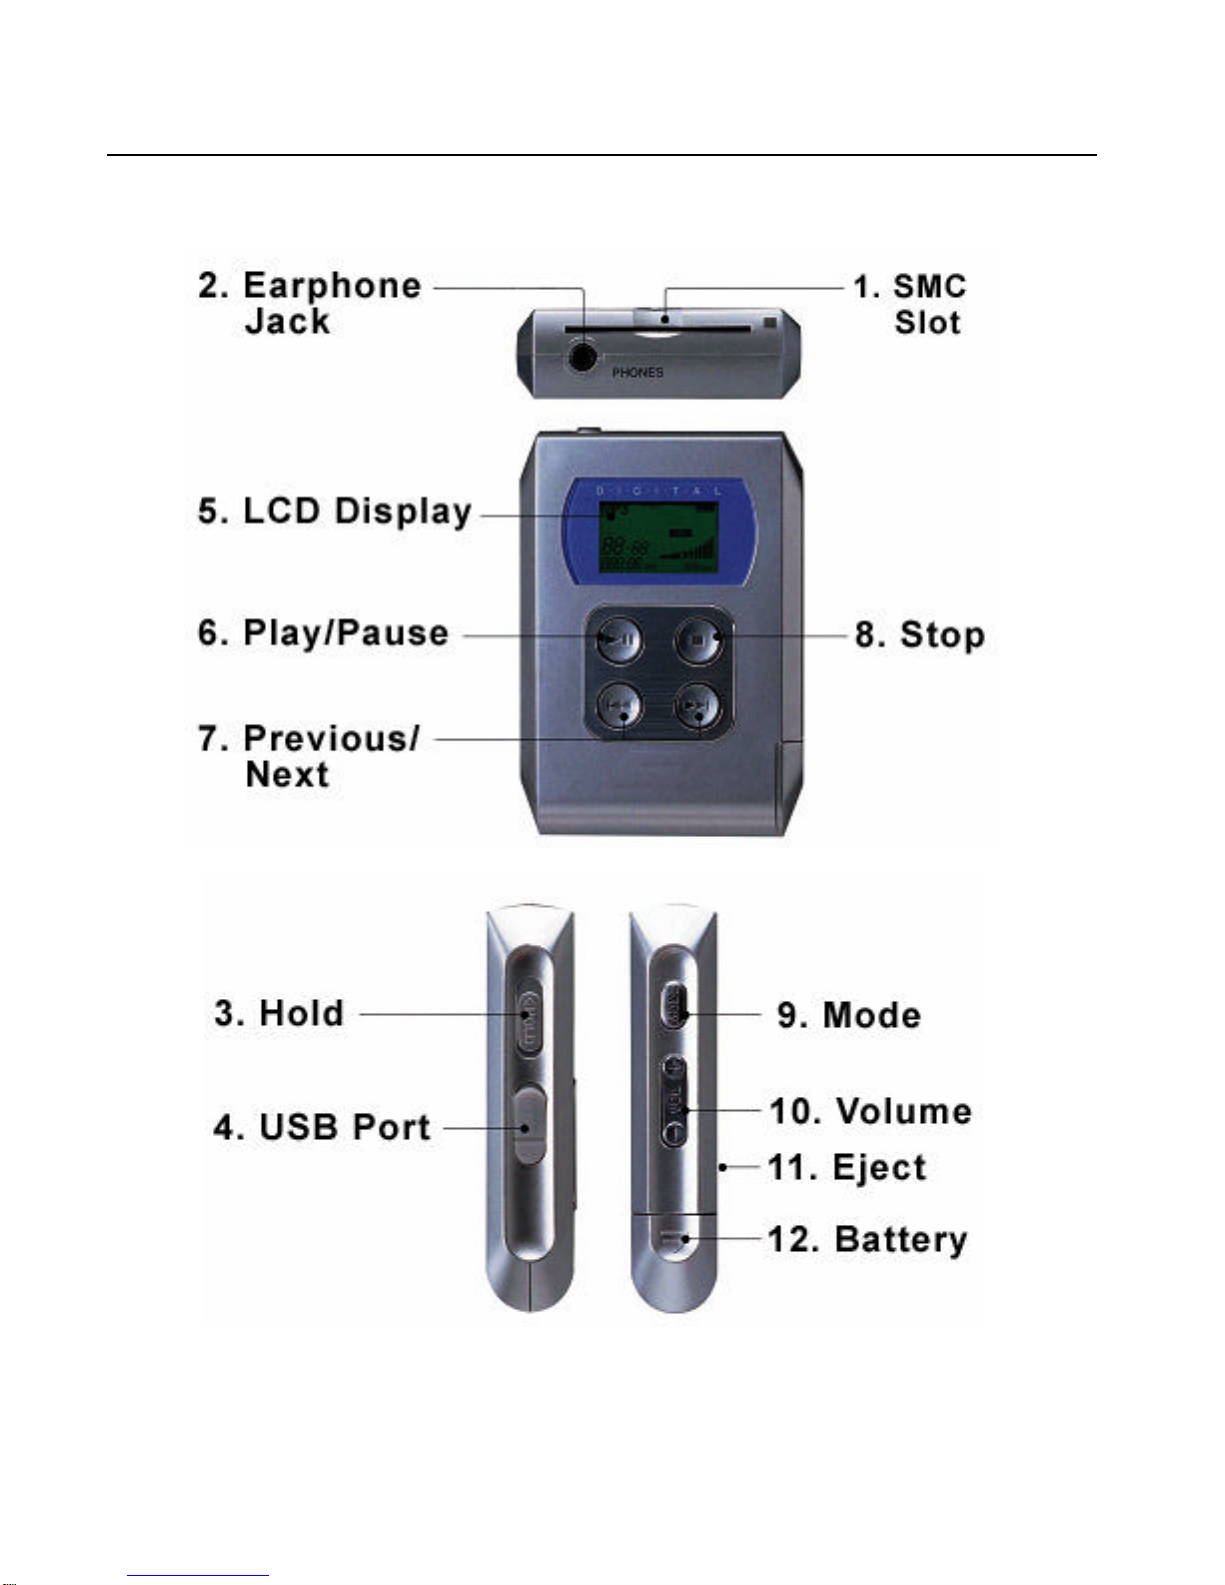
Overview of the DMP-210/220 MP3 Player .............................................4
Button and Feature Layout .......................................................................4
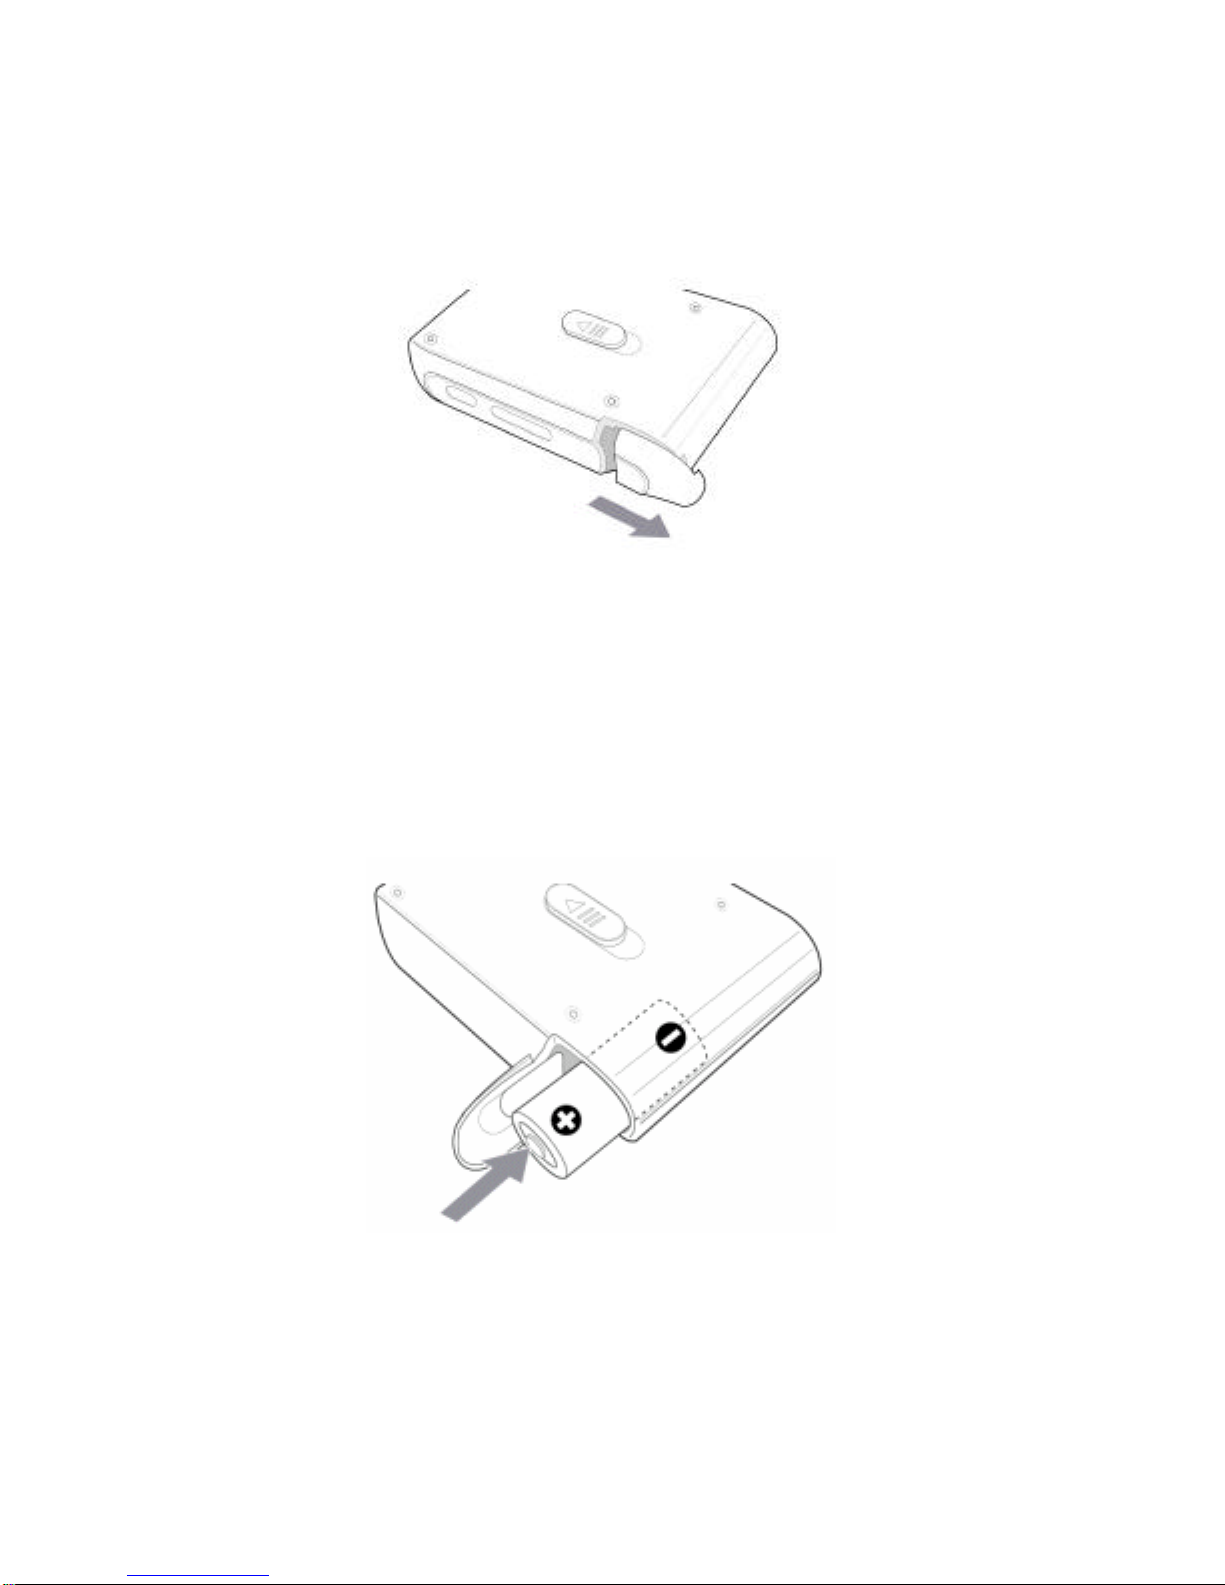
Inserting the Battery.................................................................................7
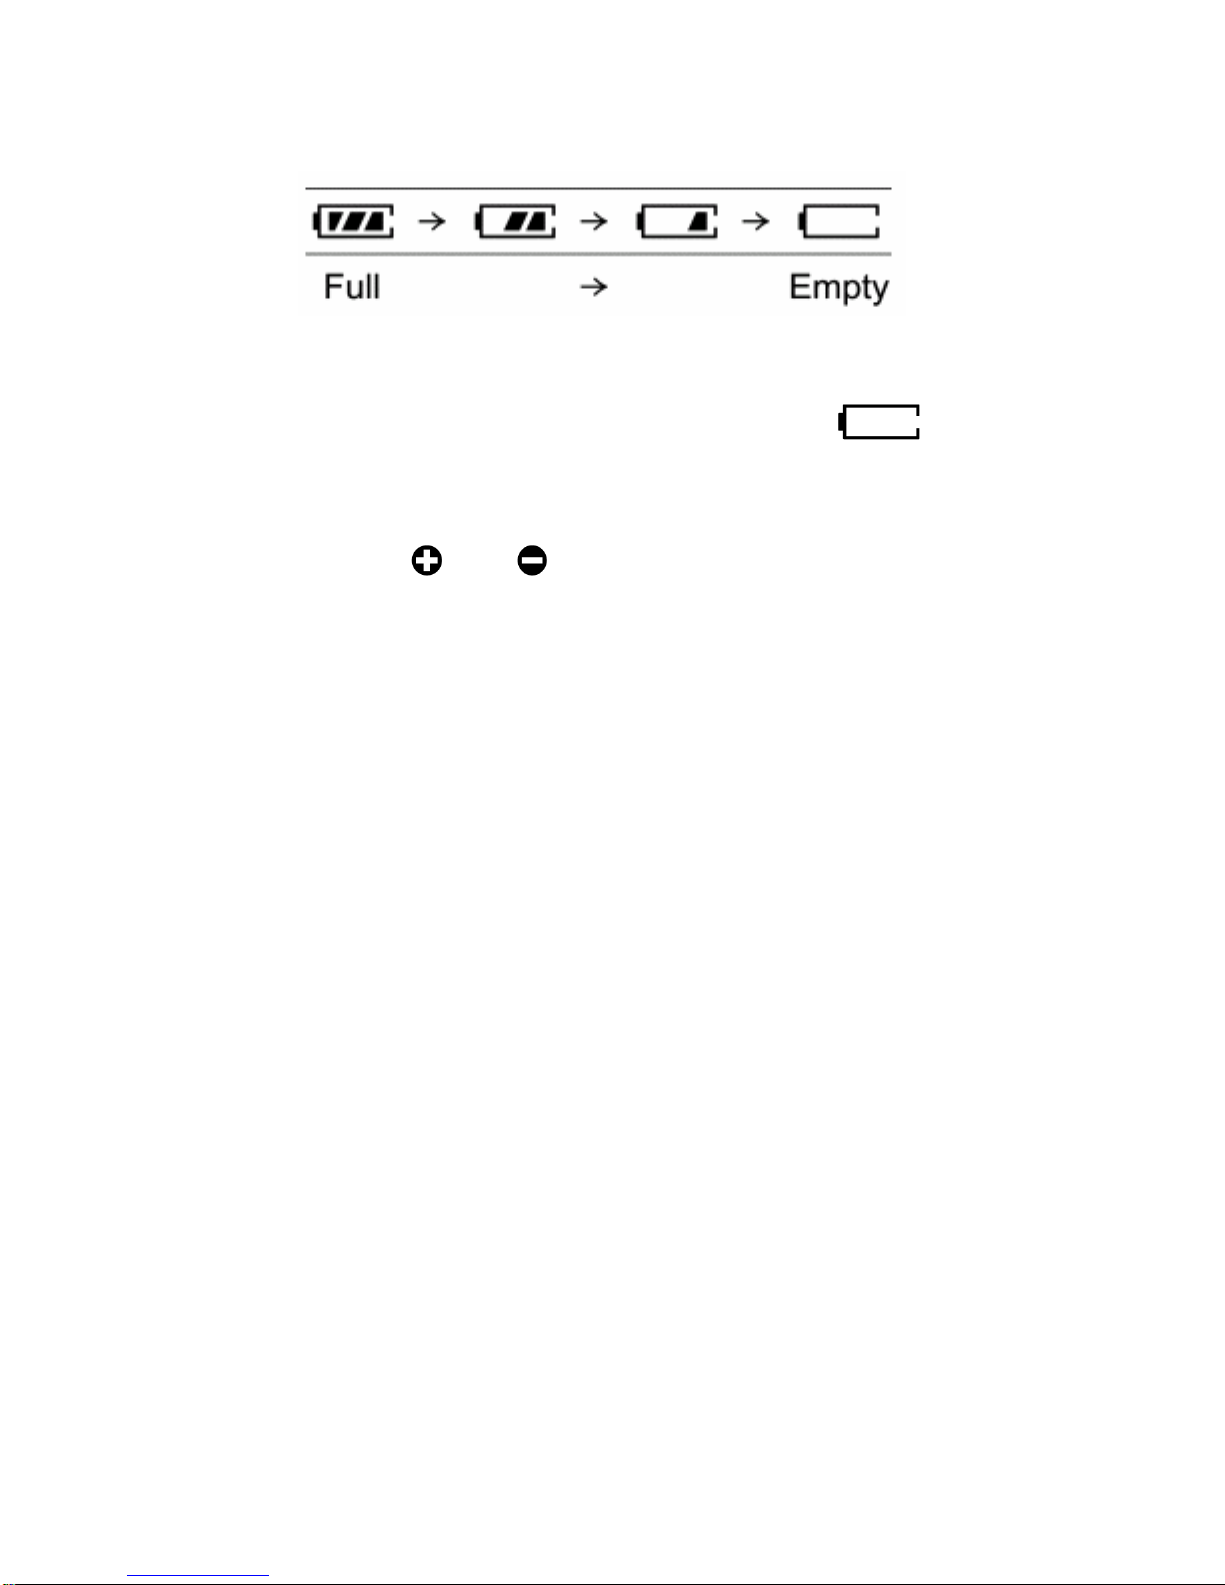
Understanding The Battery Indicator ...............................................8
Battery Replacement.........................................................................8
Note on Dry Cell Battery..................................................................8
Basic DMP-210/220 Operation...................................................................9
Turning the DMP-210/220 On and Off ....................................................9
MP3 Playback.........................................................................................10
Understanding the LCD Display............................................................12
SmartMedia Card Installation.................................................................14
Connecting The DMP-210/220 To Your PC..........................................15
Using the DMP-210/220 Manager Software.........................................16
Preparing MP3 Files...............................................................................16
Diagram of the Manager Software .........................................................17
Uninstalling the Manager Software ........................................................23
Troubleshooting.........................................................................................24
Specifications.............................................................................................27
D-Link Offices.............................................................................................28
Limited Warranty........................................................................................29
Registration ...............................................................................................34

1
Introduction
Congratulations on your purchase of the D-Link DMP-210/220. The
DMP-210/220 enables you to listen to digitally encoded MP3 audio files.
This guide explains the features and functions of the DMP-210/220.
Note: There is no difference in operation between the DMP-210 and
DMP-220. The DMP-210 includes 32 Megabytes of built in flash memory
and the DMP-220 includes 64 Megabytes.
Package Contents
DMP-210/220
USB Cable
Stereo Earphones
Installation CD
User’s Manual
1.5V AA Battery

2
Introduction to MP3
The term “MP3” stands for Moving Picture Experts Group Audio Layer-3.A
German company, Fraunhofer Gesellschaft, originally developed the
algorithm used in MP3 in 1987. They patented the technology in Germany
in 1989, and in the United States in 1996. The MP3 format became popular
very quickly because of the size of MP3 files compared to other formats.
The previous format used by most computer users was .WAV, which was
developed by Microsoft and introduced in Windows 3.1. Microsoft WAV
files in an uncompressed state tend to be very large.
In 1998, several companies released MP3 players that could be used as
portable audio players for MP3 files. These players became popular because
of the smaller, more convenient size and because the players had no moving
parts which resulted in the elimination of skipping, a problem with some CD
players and other devices. At this time, companies and computer users began
to put MP3 files on the Internet that could be downloaded by anyone. And
because the sizes of these files are relatively small, the time it takes to
download MP3 music is fast. With the advent of Broadband Internet
connection like Cable and DSL, downloading MP3 files takes only a few
minutes.
There are several ways to get MP3 music. The most popular method is to
download MP3 files from the Internet. There are many unknown artists
producing their own MP3 tracks and are making them available on the
Internet. Another popular method is to convert your own CD collection into
MP3 format. This is knows as ripping. There are many software titles
available that can rip, play, and even stream MP3 content from the Internet.

3
Precautions
The following are precautions that you should keep in mind when using the
DMP-210/220. Anyviolation of one or more of the following precautions
may cause damage and will void the warranty.
Maintaining Good Performance
§Avoid exposure to heat, moisture and static electricity.
§Do not use the player in places that are extremely hot, cold, dusty, or
humid.
§Do not keep the player in a high humidity area such as a bathroom,
near a heater or in an area exposed to direct sunlight (e.g., inside a
parked car).
§When you carry the batteryin your pocket, do not have other metal
objects such as coins or keys in the same pocket. Friction caused
from the metal and the battery rubbing together may cause a fire.
Using Headphones
§Listen at a moderate volume to avoid hearing damage.
§Listening to loud music for extended periods of time may damage
your ears and may result in hearing loss.
§Do not wear the headphones while driving or cycling.
Cleaning the Player
Never use chemicals to clean the case of the player. This may change the
color of the player or damage the surface. Use a soft towel to clean the
surface of the player.

4
Overview of the DMP-210/220 MP3 Player
Button and Feature Layout

5
1. SmartMedia card slot
Insert your SmartMedia card (16MB, 32MB, or 64MB) into this slot.
2. Earphone jack ( )
Connect the supplied earphone.
3. HOLD switch
Release before activating other buttons. When not in use, set it to the HOLD
position to prevent unintentional operation.
4. USB port connector
Connect the Series B connector of the supplied USB cable to connect the
DMP-210/220 to your PC.
5. Display window
This shows information about functions and track status.
6. POWER ON button ( )
Keep pressed for 1 second to turn on the power.
Press to start playback of an MP3.
Press during playback to pause, and press again to resume.
7. PREVIOUS button ( )
Press to go back to the beginning of the current track or previous track.
Keep pressed during playback to search for a desired point.
7. NEXT button ( )
Press to skip to the beginning of the next or succeeding track.
Keep pressed during playback to search for a desired point.

6
8. POWER OFF button ( )
Press to stop playback.
Keep pressed for 1 second to turn off the power.
9. REPEAT/EQUALIZER MODE button
Press and hold this buttonpressed for 1 second to toggle betweenRepeat
and Equalizer mode. Pressing the Mode button quickly will change the
current mode function only.
If you want to switch from Repeat mode to Equalizer mode, press the Mode
button for 1 second.
10. VOLUME button
Press to adjust the volume.
Press the top of the Volume button to increase volume.
Press the bottom of the Volume button to decrease volume.
11. EJECT
The Eject switch is used to eject a SmartMedia card.
12. Battery Compartment
The battery compartment holds the battery. A battery with available power is
required for the DMP-210/220 to function.
Insert a 1.5V (size AA) alkaline battery or a rechargeable AA size 1.2V to
1.5 Ni-Ca or Ni-MH battery

7
Inserting the Battery
An alkaline battery is recommended for use with this player.
1. Open the cover of the battery compartment.
2. Insert a 1.5V (size AA) alkaline battery. Pay close attention to the
proper polarities (+ and -). Inserting the battery the wrong way
may result in damage to electronic components and the player
will not work. Note: You may use any 1.5V AA size battery, but
alkaline batteries tend to last longer. You can also use a
rechargeable AA size 1.2V Ni-Ca or Ni-MH battery.

8
Understanding The Battery Indicator
The battery indicator on the display changes depending on the remaining
power of the battery.
Battery Replacement
Replace the battery when the battery indicator is empty.
Note on Dry Cell Battery
§Make sure that the and marks are correctly aligned.
§To prevent the risk of electrolyte leakage or explosions, never recharge
the battery, apply heat to it, or take it apart.
§When not using the battery, remove it to prevent batterydischarge.
§If liquid leaks out from the battery, wipe thoroughly to remove and
dispose of it quickly.

9
Basic DMP-210/220 Operation
Turning the DMP-210/220 On and Off
Make sure that the HOLD switch is turned to the OFF position.
Turning the Player On
Press the Play/Pause button to turnthe unit on.
Turning the Player Off
Press the Stopbutton pressed for 1 second to turn the unit off.
The DMP-210/220 incorporates advanced power features that save battery
power. If the player is turned on but isn’t playing anything, the power will
be turned off automatically after 30 seconds. And if the HOLD switch is on
and no track is playing, the power will be turned off automatically after 4
minutes.
To turn off the power before the Auto Power Off function turns off the
power, press the Stop button for 1 second.

10
MP3 Playback
1. Connect the supplied earphonesto the earphone jack of the player.
2. Press the Play/Pause button to start playback.
Playback starts from the MP3 file that you played the last time you used
the DMP-210/220.
3. Adjust the volume to a comfortable level.
4. Press the or button to change the track number.
5. To stop playback, press the Stopbutton.

11
Selecting Equalizer Effects
Press the MODE button repeatedly to select a desired equalizer mode.
(If the Playback Repeat mode is selected, press and hold the MODE button
for more than 1 second.)
Normal –Normal sound setting
Jazz – Optimized sound setting for Jazz music
Rock – Optimized sound setting for Rock music
Classic – Optimized sound setting for Classic music
Selecting Repeat Modes
Press the MODE button repeatedly to select a playback mode. Each time the
button is pressed, the playback mode changes in the following order.
(If the Equalize mode is selected, press and hold the MODE button for more
than 1 second.)
Normal Plays all stored MP3 songs in order, and thenstops
after the last song.
Repeat Plays the current song over and over.
RepeatAll Plays all stored MP3 songs over and over in order.
Random Plays all stored MP3 songs in random order.
Random
RepeatAll Plays all stored MP3 songs in random order, then
repeats over and over.

12
Understanding the LCD Display
1. Playback Repeat Mode icon
This indicates the selected playback repeat mode.
(No Icon) Normal Plays all stored MP3 songs in order,
and then stops after the last song.
RepeatPlays the current song over and over.
Repeat All Plays all stored MP3 songs over and over
in order.
Random Plays all stored MP3 songs in random
order.
Random Repeat
All Plays all stored MP3 songs in random
order, and thenrepeats over and over.
2. Hold Icon
This indicates that the HOLD switch is set to the HOLD position.
If the HOLD switch is on, the buttons will not respond until the HOLD
switch is turned off.
3.Battery Indicator
This displays the remaining battery power.
Refer to the Inserting the battery section for more information.

13
4. Status
This iconshows information on the current status of play and pause.
The Play icon will show if the player is playing a song.
The Pause icon will show if the current song is paused.
5. Volume
This indicates the volume level.
The volume is louder the further the indicator gets to the right.
The volume is software the further the indicator gets to the left.
6. Bit-rate
This displays the bit-rate that the current MP3 file was encoded at.
A higher bit-rate means better quality and bigger file size.
7. Elapsed Playback Time
This indicates the elapsed time in minutes and seconds separated by a
colon of the track currently being played.
8. Total Number Of Tracks
This indicates the total number of MP3 files.
9. Current Track Number
This indicates the file number of the current MP3 file.
10.Equalizer
Shows the current equalization setting.
Normal – Normal sound setting
Jazz – Optimized sound setting for Jazz music
Rock – Optimized sound setting for Rock music
Classic – Optimized sound setting for Classic music

14
SmartMedia Card Installation
Before inserting a SmartMedia Card, be sure to turn off the power of the
player and disconnect the USB plug from the USB port connector.
Insert the SmartMedia Card into the slot in the
correct direction as follows:
Insert the SmartMedia Card completely into the slot.
If it is not inserted completely, the Manager
software will not recognize the data in the
SmartMedia Card.
When using a SmartMedia Card for the first time,
initialize the SmartMedia Card using the Manager
software.
Note: The MP3 files in the SmartMedia Card cannot be played back on
other players. To use a SmartMedia Card with other player, you need
to initialize the SmartMedia Card.
To eject the SmartMedia Card, slide the EJECT
switch toward the SmartMedia slot opening.
You can also store any data files such as doc, gif, bmp,
wav, etc. as long as the files are no larger than the
available memory.

15
Connecting The DMP-210/220 To Your PC
Use the supplied USB cable to connect the DMP-210/220 to your PC.
Connect the series B connector to the USB port connector of the player and
the other plug to the USB port connector of your PC.
If a USB cable is already connected to the USB port connector of your PC,
disconnect it before connecting this player.
Do not disconnect the USB plug during downloading or uploading the files.
Doing so will result in data loss and possible lock-up of your PC.

16
Using the DMP-210/220 Manager Software
The DMP-210/220 Manager is software that interacts with the player
through the PC. MP3 files and data files can be downloaded using this
software.
However, you can upload only data files to the PC. This section describes its
features. Refer to the Quick Install Guide for instructions on how to install
the manager software if you haven’t done so already.
Open the DMP-210/220 Manager by clicking on the shortcut icon on the
desktop or Windows Start Menu.
Preparing MP3 Files
It is a good idea to prepare your MP3 files before transferring them to the
DMP-210/220. Arranging your files in folders can be very helpful in
locating specific files in the future.
On the supplied Installation CD, MusicMatch software is provided. You may
install MusicMatch by opening the Autorun program and clicking on the
“Install MusicMatch” button. MusicMatch allows you to convert your audio
CD’s to MP3 files.
After preparing your MP3 files on your PC, you can download them to the
DMP-210/220 for play back.

17
Diagram of the Manager Software
1. Option button
Pressing the Option button brings up the Setup menu that allows you to
specify the path for an MP3 software player on your PC. This allows you to
play MP3 files from the manager software without needing to start the MP3
player software.Youcan also access the Setup dialog box from the
Tools/Option menu.

18
Click the Browse button and select your preferred MP3 player, then click
OK.
2. Firmware button
You may not need to use this button for usual operation. This button
reprograms the firmware. Instructions for updating the firmware will be
provided with the download of the updated firmware from D-Link Technical
Support
3. About button
Clicking on this button will displaythe version of the DMP-210/220
Manager and its copyright information.
4. Cut, Copy, Paste, Delete, and Rename buttons
These buttons work the same as those of Microsoft Windows Explorer.
You can cut, copy, paste, delete, rename or move the files you select in the
display list box (local display list box) of the PC. However, folders will not
be moved or copied.
Other manuals for DMP-210 - 32 MB Digital Player
1
This manual suits for next models
1
Table of contents
Other D-Link MP3 Player manuals

D-Link
D-Link DMP-210 - 32 MB Digital Player User manual

D-Link
D-Link DMP-110 - 32 MB Digital Player User manual

D-Link
D-Link DMP-90 User manual

D-Link
D-Link DMP-120 User manual

D-Link
D-Link DMP-100 User manual

D-Link
D-Link DMP-120 User manual

D-Link
D-Link DMP-100 User manual

D-Link
D-Link DMP-110 - 32 MB Digital Player User manual

D-Link
D-Link DMP-100 User manual

D-Link
D-Link DMP-110 User manual