Danelec DM800 User manual

User Guide
DANELEC DM800 ECDIS G2
Version1.1

DANELEC User Guide V1.1
2
1
Data Management
4
2
The User Permit Number (UPN)
5
3
The Public Key
6
4
Deleting ENC Data
8
5
Deleting ENC Permits
9
6
Installing ENC Permits
12
7
Installing AVCS DVDs
13
8
Installing AVCS Base CDs
16
9
Installing AVCS Update CDs
19
10
Installing Exchange Set using USB
22
11
Viewing an ENC
23
12
Installing AIO Permits
23
13
Installing AIO Data
23
14
Using the AIO
23
15
System Checks
23
16
Troubleshooting
23

4
DANELEC User Guide V1.1
1. Data Management
This User Guide refers to Version 2.13 of the DANELEC DM800 ECDIS G2.
All Chart licensing and data management operations are carried out on the ‘Nav Data’screen from the Main Menu.
Navigation chart data comes as geospatial databases distributed over the Internet or on portable data storage devices.
The data is made up of official ENC geodatabases protected with S-63 data protection scheme.
ENC data installed to the ECDIS is converted to the system ENC format (SENC). For SENC protection, the same S-63
scheme is used as for ENC.
To open a panel, open the Main Menu by pressing the Main Menu button in the lower-left corner of the
chart view and press the ‘Nav Data’button in the Main Menu.

5
DANELEC User Guide V1.1
2. The User Permit Number (UPN)
The ‘User ‘Permit Number’ is a 28 character alphanumeric string that is unique to each ECDIS installation or group of
ECDIS (e.g.
multiplebridgeinstallations).The ‘User Permit Number’ shouldhave beensupplied at the timeof deliveryand
mustbe usedwhen
orderingan AVCSlicense.
The‘User PermitNumber’can be viewed within the ‘Settings’Tab from the Main Menu:
In ‘Settings’, select ‘System’.
The System information panel opens displaying the ‘User Permit Number’:
This ‘User Permit Number’can be saved to a Removable Media, by clicking on ‘Save’, to be sent to AVCS Licence
providers.

8
DANELEC User Guide V1.1
3.The Public Key
The Admiralty Vector Chart Service requires a Scheme Administrator Certificate, or Public Key, to be installed on the
ECDIS system. The Certificate currently used is the IHO.CRT, issued by the International Hydrographic Organization,
to
authenticate itsAVCSENCs.
Before installing AVCS ENCs, theuser must check thatthecorrect Public Key is installedon the system.
Usually it is pre-installed, but if the System Administrator issues a new Certificate, you must be able to install it on the
ECDIS.
The IHO public key is included in all AVCS Media. To load the IHO Public Key you must first load the AVCS Media into the
ECDIS.
1.
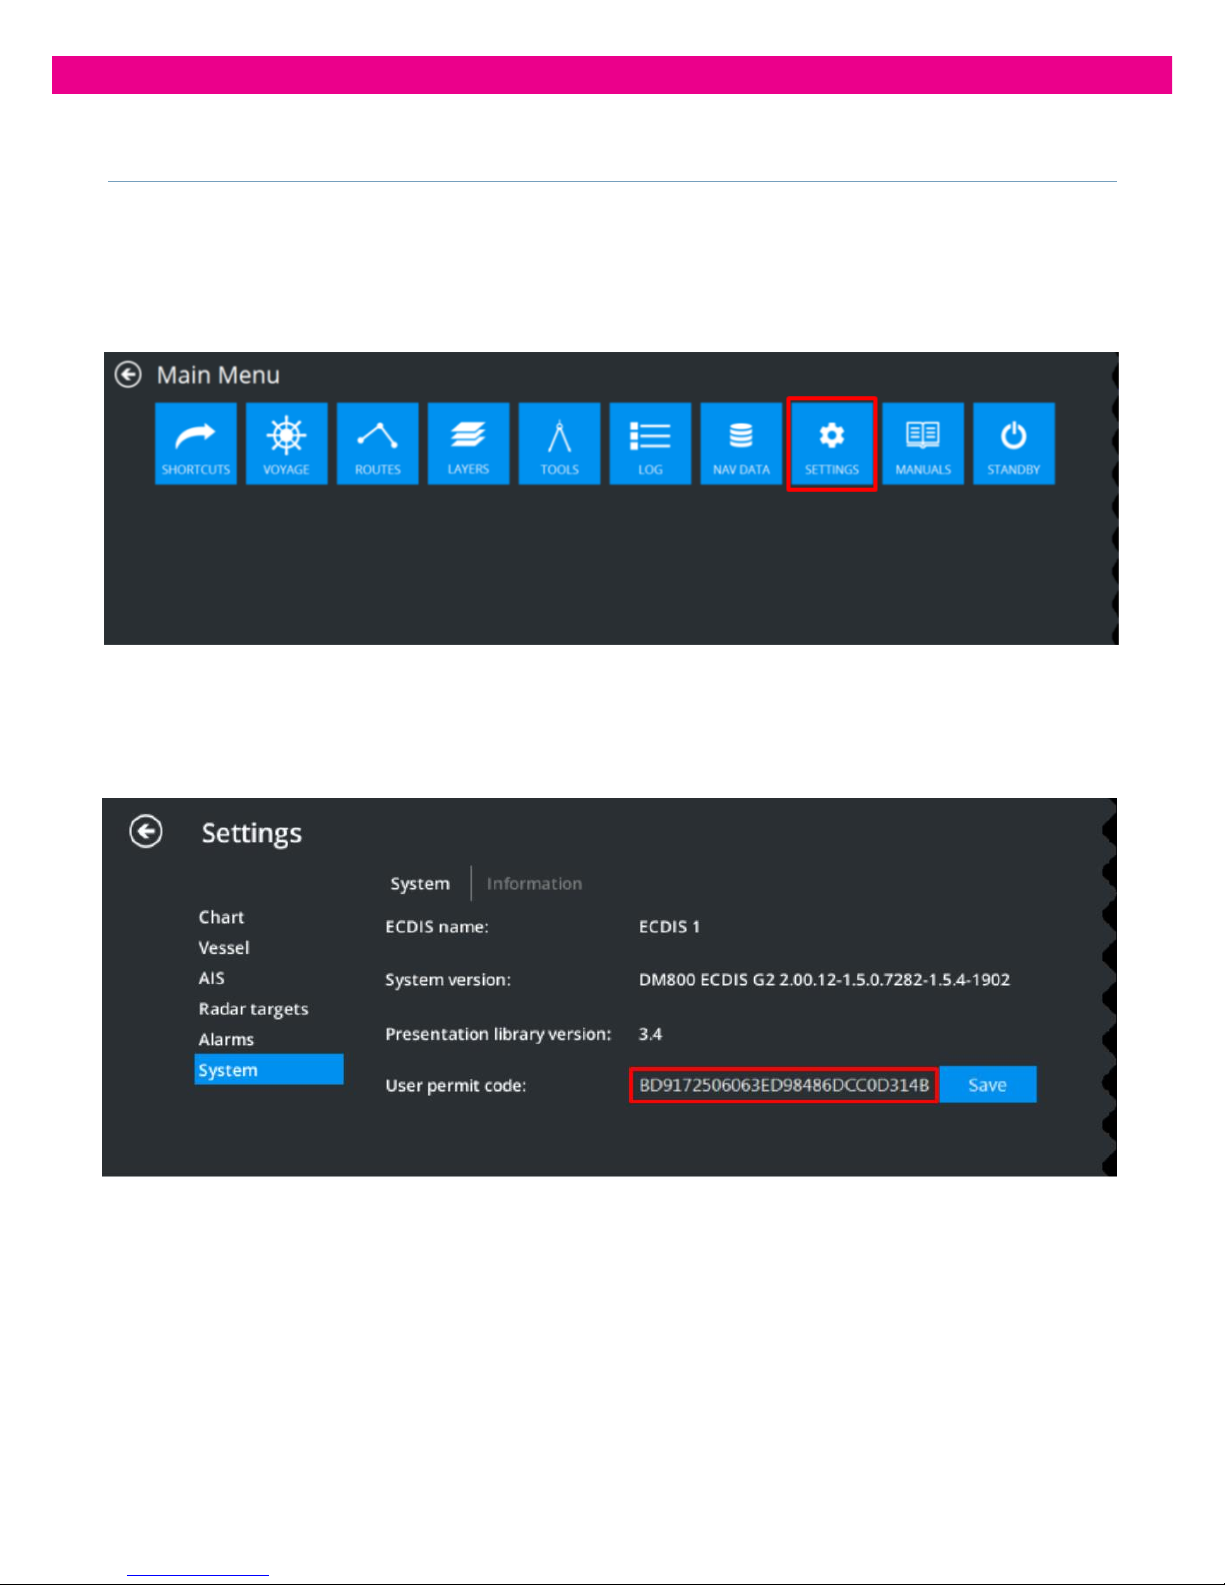
Select the‘Settings’Tabfrom the Main Menu:
2.
3.
2. Select‘System’ and ‘SA Certificates’

8
DANELEC User Guide V1.1
3. When the ‘SA Certificates’ panel is opened for the first time afterECDISlaunch, the SA Certificates search starts automatically. To
refreshthe SACertificates listmanually,pressthe‘Refresh’’ button in the upper-rightcornerofthepanel:
Installingnew SACertificate
1. Press the ‘Install’’ button on the ‘Systems’ window:
2. The Certificate data opens. Compare the displayed data with the SA Certificate published on the website of the Scheme
Administratorandpress ‘OK’ ifthedataisidenticalor‘Cancel’ if youfindanydiscrepancies:
3. After youhavepressed ‘OK’,theCertificateisinstalledintheECDISand anotificationmessageappears.Press‘OK’.
Note:If you install a newly issued SA Certificate, it overwrites the old Certificate.
If you install an SA Certificate of a different Scheme Administrator, it is installed alongside the previously installed Certificates.

8
DANELEC User Guide V1.1
DeletingSACertificate
Pressthe ‘Delete’ button on the ‘System’ windowandconfirm theoperation.TheCertificateis removed.
RestoringSACertificate
Pressthe ‘RestoreIHO.CRT’buttonon the ‘System’ windowandconfirmtheoperation.ThelastdeletedCertificateisrestored.

8
DANELEC User Guide V1.1
4.Deleting ENC Data
New AVCS customers who had previously subscribed to other ENC services are strongly recommended to remove
(purge) all ENC Permits and ENC Data from the system before installing AVCS. For more information please refer to the
‘Data Cleansing’ section in the generic AVCS User Guide.
In the Danelec ECDIS, you can delete both installed ENC Databases and Datasets.
Deleting ENC Database
1.
Select the‘Nav Data’TabintheMainMenu
2.
Select ‘Chart Library’
3.
Find the Database to be deleted in the list of Databases and press the ‘Delete’ button
Deleting ENC Dataset
1.
Select the‘Nav Data’TabintheMainMenu

8
DANELEC User Guide V1.1
2.
Select ‘Chart Library’
3.
Open the Catalog of the Database whose Dataset is to be deleted by pressing the ‘Catalog’
button
4.
Find the Dataset to be deleted in the list of Datasets. Press the ‘Delete’ button of the Dataset
Confirm the operation twice. The Dataset is deleted.

8
DANELEC User Guide V1.1
5. Deleting ENC Permits
New AVCS customers who had previously subscribed to other ENC services are strongly recommended to remove
(purge) all
ENC Permits and ENCs from the system before installing AVCS. For more information, please refer to the
“Data Cleansing’
sectionin theAVCSUserGuide.
1. Select the‘Nav Data’ Tab from the Main Menu:
5. .
Deleting one ENC Permit
2. To delete one of installed ENC Permits, press its ‘Delete’button and confirm the operation: the
specified ENC Permit is deleted from the system.
Deleting Selected ENC Permits
To delete several installed ENC Permits, select the Permits you want to delete by ticking their check boxes
Press the ‘Delete Selected’’ button and confirm the operation. The selected installed ENC Permits are
deleted from the system:

8
DANELEC User Guide V1.1
Deleting All ENC Permits
To delete all installed ENC Permits, press the ‘Select All’ button on the above ‘Navigational Data’ screen
Press the ‘Delete Selected’ button and confirm the operation. All selected installed ENC Permits are
deleted.
Clearing Selection of ENC Permits
To clear the selection of selected Permits, press the ‘Clear Selection’ button on the above ‘Navigational
Data’ screen
Restoring deleted ENC Permits
To restore the deleted ENC Permits, press the ‘Restore Deleted’button on the above ‘Navigational
Data’ screen and confirm the operation. The Permits list is restored to its previous state.

13
DANELEC User Guide V1.1
6. Installing ENCPermits
Install Cell Permits
1. Select the‘Nav Data’ Tab from the Main Menu:
2. Select‘Install Charts’. Click on ‘Install Permits’ The ‘Install Permits’ panel opens:
3. Press the ‘Refresh’ button in the upper-right corner of the panel and the ECDIS starts searching for ENC
Permits:
To stop the search, press the ‘Cancel’ button in the upper-right corner of the panel.
The search stops and the ‘Cancel’button changes to the ‘Refresh’ button. To restart the search, press
the ‘Refresh’button and the search restarts.
4. Once the search is completed, all found ENC Permits are displayed in the panel.
Select the ENC Permit file you want to install and the installation starts immediately.

14
DANELEC User Guide V1.1
At the end of installation, a message appears giving notification of the result. Press ‘OK’to close the message:
The installation status of the Cell Permits opens: ‘OK’ or ‘Fail’ appears to confirm the installation of the Permits. Warning
messages notify the user of any errors occurring during installation:
View Installed Cell Permits
Once ‘Install Charts’ is selected, the list of all installed cell permits with brief information is displayed:

15
DANELEC User Guide V1.1
7.Installing AVCS DVDs
When using the AVCS DVD Service, one or two discs need to be installed (depending on which Volume or Country Cells are to
be installed). No other CDs need to be installed as these DVDs contain all the Base ENCs and Updates up to the date of their
issue.
DVD 1 –Bases1 –5
DVD 2 –Bases6 –9
The loading process of the AVCS DVD within the ECDIS is the same as the one for the AVCS Base and Update CD
Service and is detailed below:
Insertthe first AVCS DVDintothe CD/DVDDrive.
1. Select the‘Nav Data’ Tab from the Main Menu:
2. Select ‘Install Charts’ and then ‘Find and Install Charts’. A list of all ENC Exchange Sets found on removable data storage
devices connected to the ECDIS appears:
When you open the ‘Find and Install Charts’ panel for the first time, the ECDIS automatically searches for Exchange Sets on all
removable data storage devices connected to the system.
To start a new search, press the ‘Refresh’ button in the upper-right corner of the panel. The search then starts and the
‘Refresh’button changes to ‘Cancel’’ . Press it to stop the search.
Note: Ensurethelatestpermitshavebeen installedbeforeattemptingto installany data

16
DANELEC User Guide V1.1
Note: When a new Database is created, it is not open for display. To see the data, set the Display switch of the database to the
‘On’position.
3. In the ‘Find and Install Charts’ list, find the Exchange Set to install and select it.
4. Enter a name for the new Database and press ‘OK’. The installation starts.
5. At the end of the installation, an information message confirms the completion of the operation: press ‘OK’
6. The installation summary is displayed and the result and warning messages window opens. To close the window,
press the ‘Cancel’ button in the upper-right corner of the window.
7. If the data was successfully converted and installed, the new Database is added to the Chart Library and you can start using
it:

17
DANELEC User Guide V1.1
Once the first AVCS DVD has been successfully installed, if then needed, repeat the same installation procedure for
the
secondAVCSDVD.

DANELEC User Guide V1.1
21
8. Installing AVCS Base CDs
Insert theAVCS Base CD into the CD/DVDDrive
1. Select the‘Nav Data’ Tab from theMain Menu:
2. Select ‘Install Charts’ and then ‘Find and Install Charts’. A list of all ENC Exchange Sets found on removable data storage
devices connected to the ECDIS appears:
When you open the ‘Find and Install Charts’ panel for the first time, the ECDIS automatically searches for Exchange Sets on all
removable data storage devices connected to the system.
To start a new search, press the ‘Refresh’ button in the upper-right corner of the panel. The search then starts and the
‘Refresh’button changes to ‘Cancel’’ . Press it to stop the search.
3. In the ‘Find and Install Charts’ list, find the Exchange Set to install and select it.

DANELEC User Guide V1.1
22
Note: AVCS Base CDs are re-issued about every 6 to 8 weeks. The AVCS update disc will indicate which Base disc week
must have been installed. It is important that users do not attempt to load an Update CD that is not consistent with the Base
CDs
Note: When a new Database is created, it is not open for display. To see the data, set the Display switch of the database to the
‘On’position.
4. Enter a name for the new Database and press ‘OK’. The installation starts.
5. At the end of the installation, an information message confirms the completion of the operation: press ‘OK’
6. The installation summary is displayed and the result and warning messages window opens. To close the window,
press the ‘Cancel’ button in the upper-right corner of the window.
7. If the data was successfully converted and installed, the new Database is added to the Chart Library and you can start using
it:

DANELEC User Guide V1.1
23
Note: AVCS Base CDs are re-issued about every 6 to 8 weeks. The AVCS update disc will indicate which Base disc week
must have been installed. It is important that users do not attempt to load an Update CD that is not consistent with the Base
CDs
9. Installing AVCS Update CDs
The loading process of the AVCS Update CD within the ECDIS is the same as the one for the AVCS Base CD Service
and is detailed below:
Insert theAVCS UpdateCDintothe CD/DVDDrive
1. Select the‘Nav Data’ Tab from the Main Menu:
2. Select ‘Install Charts’ and then ‘Find and Install Charts’. A list of all ENC Exchange Sets found on removable data storage
devices connected to the ECDIS appears:
When you open the ‘Find and Install Charts’ panel for the first time, the ECDIS automatically searches for Exchange Sets on all
removable data storage devices connected to the system.
To start a new search, press the ‘Refresh’ button in the upper-right corner of the panel. The search then starts and the
‘Refresh’button changes to ‘Cancel’’ . Press it to stop the search.
3. In the ‘Find and Install Charts’ list, find the Exchange Set to install and select it.

DANELEC User Guide V1.1
24
Note: When a new Database is created, it is not open for display. To see the data, set the Display switch of the database to the
‘On’position.
4. Enter a name for the new Database and press ‘OK’. The installation starts.
5. At the end of the installation, an information message confirms the completion of the operation: press ‘OK’
6. The installation summary is displayed and the result and warning messages window opens. To close the window,
press the ‘Cancel’ button in the upper-right corner of the window.
7. If the data was successfully converted and installed, the new Database is added to the Chart Library and you can start using
it:
Other manuals for DM800
1
Table of contents
Other Danelec Marine Equipment manuals