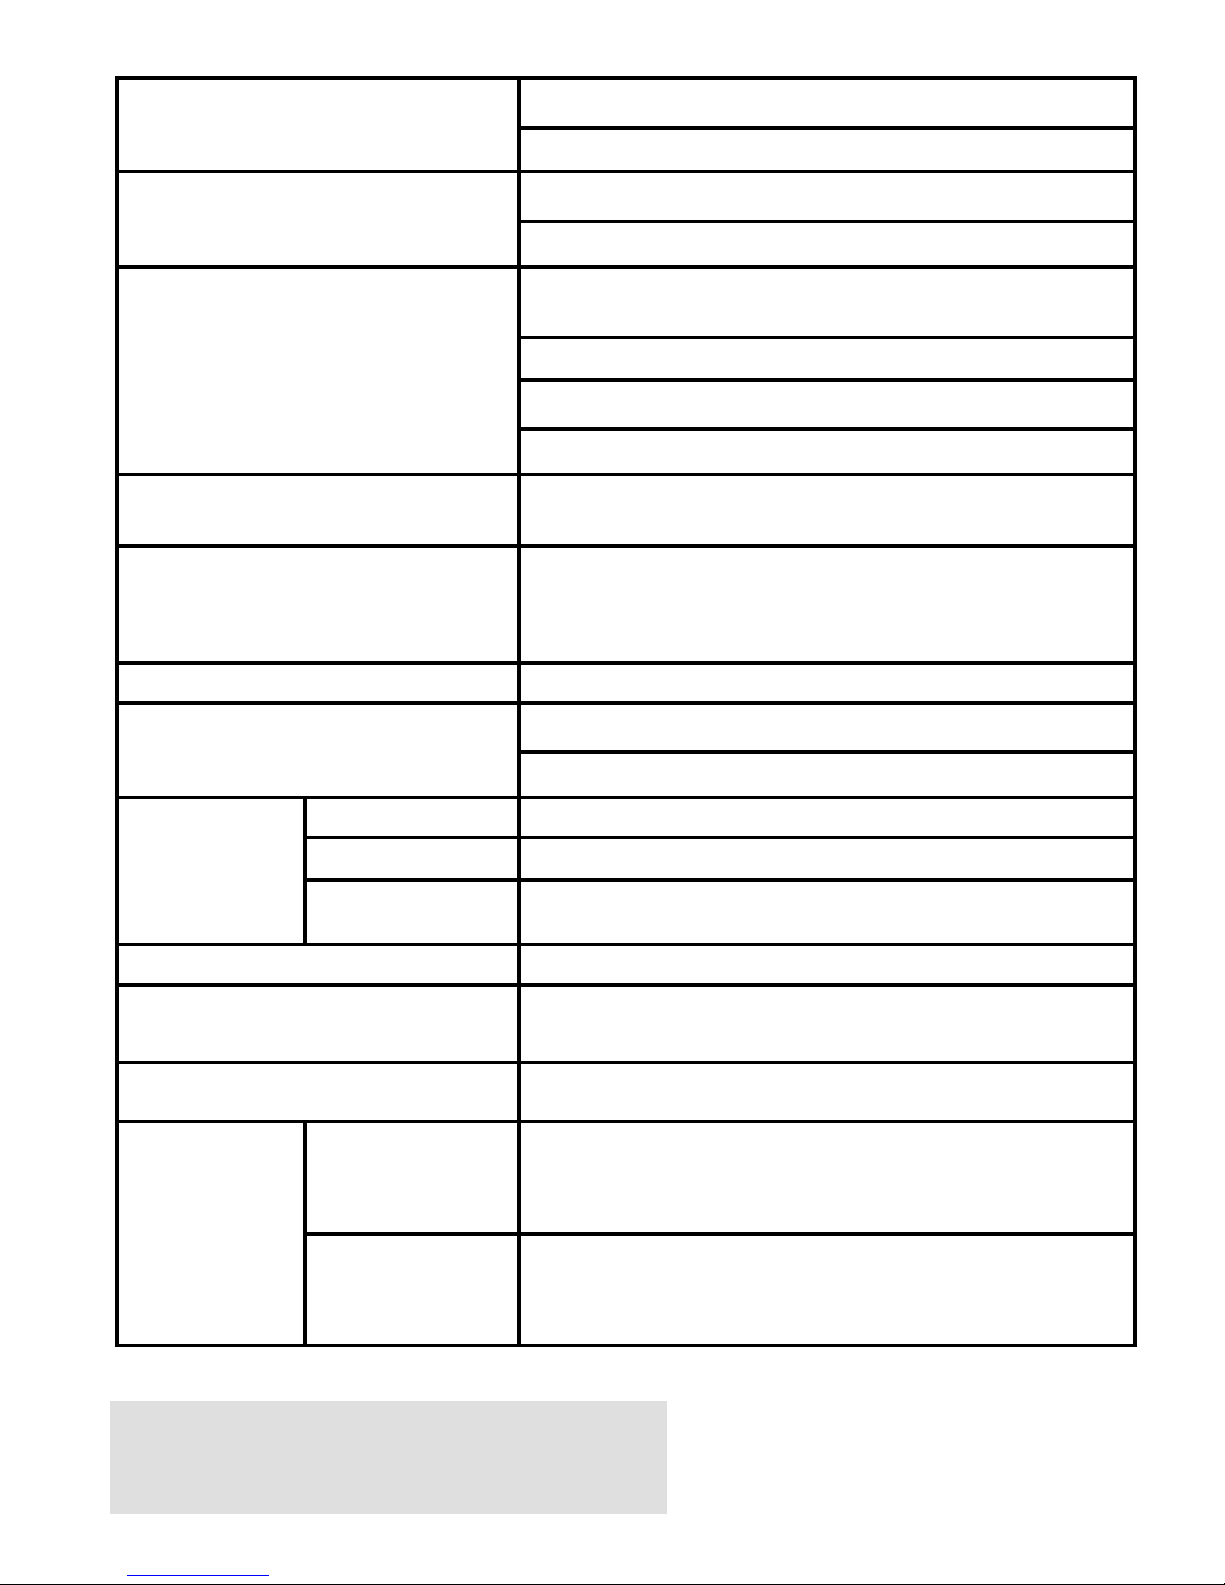
Datecs DPP-350 User manual

ESC/POS Thermal Printer
User’s Manual
DP
P
-
350

. . . . . .
. . . . . . . . . . . . . . . .
Page 2
DPP-350 User Manual
The information in this document cannot be reproduced in any mechanical, electrical or electronic
way and under any circumstances without the written consent from Datecs Ltd.
1784 Sofia, Bulgaria, tel: +359 2 974 00 55, fax: +359 2 974 11 00
e-mail: sales@datecs.bg
Version 04.2009 (1.50)

. . . . . .
. . . . . . . . . . . . . . . .
Page 3
DPP-350 User Manual
Contents
Technical Data..........................................................................4
Box Contents ...........................................................................6
Compatible Devices ...................................................................7
Getting Started......................................................................... 8
About Your DPP-350 ..................................................................9
Charging the DPP-350 ............................................................. 10
Status & Operating Modes ........................................................ 11
Loading Paper ........................................................................ 12
Power On Self-test .................................................................. 13
Self-test................................................................................ 14
Dip Switch Settings ................................................................. 15
DIP Switch Location................................................................. 16
Printer Configuration ............................................................... 17
Connecting Device .................................................................. 18
Bluetooth® Setup .................................................................... 23
Loading Drivers ...................................................................... 24
Magnetic Card Reader (MS Version)............................................ 25
Smart Card Reader (SC Version)................................................ 26
MIFARE Reader (MF Version)..................................................... 27
Replacing Battery.................................................................... 28
Developing Solution ................................................................ 29
Troubleshooting...................................................................... 30
List of commands for ESC/POS mode.......................................... 31

. . . . . .
. . . . . . . . . . . . . . . .
Page 4
DPP-350 User Manual
Technical Data
Feature Specification
Emulation ESC/POS
Printer mechanism FTP-638MCL103
Printing Method Thermal-line dot method
Dot structure 576 dots per line
Dot pitch (Horizontal) 0.125 mm (8 dots/mm) - Dot density
Dot pitch (Vertical) 0.125 mm (8 dots/mm) - Line feed pitch
Effective printing area max 72 mm
Paper Feed System step
Printing Speed Maximum 60mm/sec. (480 dot line/sec.) at 8.5 V
Head life
* Pulse resistance: 100 million pulses/dot (under
our standard conditions).
* Abrasion resistance: paper traveling distance
50km (print ratio: 25% or less)
Font А: 12 x 24 dots, 48 characters per line
Font B: 9 x 16 dots, 64 characters per line
Loadable Font C: 12 x 24 dots, 48 char. per line
Loadable Font D: 9 x 16 dots, 64 char. per line
Font E (JIS and Shift-JIS): 24 x 24 dots, 28
characters per line - Japanese version only
Fonts
Font F (GB2312): 24 x 24 dots, 28 characters per
line - Chinese version only
Logo Registration 1 Black & White BMP format ( 1-bit per pixel);
Size: 576 x 248
Barcode printing EAN 13, EAN 8, UPC-A, UPC-E, CODEBAR,
CODE 39, CODE 128, PDF417, QR Code
FLASH Memory 1 Mega bit
RAM Memory 36 864 bytes (option 131 072 bytes)
Interfaces RS-232 interface, type RS-232C, max 115200 bps

. . . . . .
. . . . . . . . . . . . . . . .
Page 5
DPP-350 User Manual
USB interface, type USB v 1.1, compatible with 2.0
Bluetooth interface (optional)
RS-232 interface cable
Cables
mini USB А to mini USB B cable (optional)
Magnetic Card Reader - 3 track head, ISO7811
(optional)
Smart Card Reader, ISO 7816-1/2/3 (optional)
MIFARE Reader, ISO 14443-A (optional)
Configuration options
SD card slot for SD card (optional)
Battery Rechargeable Li-ion battery - 7.4 V / 2 Ah
Battery capacity: Print 30 000 lines per charge
Power supply
AC adapter, model: SA110C
Input: AC 100 – 240 V / 0.3 A ; 50/60 Hz
Output: DC 9 V / 1 A
Power switch ON/OFF
Button LF – Paper feed, Self test, Dump mode
Operation switches
Button ON/OFF- Switch On and Switch OFF
Width, mm 80 or 58 / 60
Diameter, mm 50
Recommended
Paper
Thickness, m 60 to 100 (some paper in this range may not be
used because of paper characteristics)
Dimensions, (W x D x H) mm 108 x 111 x 62
Weight, g 400 (w/o paper)
460 (with paper)
Safety standards and EMI "Drop" test – up to 110 cm and "Waterproof"
Operating
temperature
humidity
0°C to + 50°C
20 to 85% RH (no condensation)
Operating
environment Storage
temperature
humidity
-20°C to + 60°C
5 to 95% RH (no condensation)
Table 1

. . . . . .
. . . . . . . . . . . . . . . .
Page 6
DPP-350 User Manual
Box Contents
Your DPP-350 comes with the following items listed below:
Item Part Number Descriptions Image
1 DPP-350xx DPP-350 Thermal printer
2 - AC charger
3 - 1 Roll of thermal paper
4 - User's manual
5 - RS232 Interface cable
6 - Partition (2 pcs) for 58/60mm
X 50mm diameter paper rolls*
Table 2
* With the help of 2 pcs. Partition for 58/60mm wide paper roll
DPP-350 printer can be used with different width paper rolls.
1. Turn off the printer power.
2. Open the paper cover.
3. Attach the 2 pcs. “Partition” supplied with the printer to the holes
in bottom of printer. By switching places of the two “Partition”
can be used either 58mm or 60mm wide paper rolls
4. Referring to the section of DIP switch setting change the paper
width setting to 58 mm.
Software ( Drivers & SDK ):
Because of the continually evolving Driver & SDK to support new
mobile devices, Drivers & SDK are distributed online and is available
for download at our website indicated below. For details on using the
DPP-350 Drivers & SDK, please refer to the SDK’s documentation.
http://datecs.bg/support.php?cat=4&soft=1#1

. . . . . .
. . . . . . . . . . . . . . . .
Page 7
DPP-350 User Manual
Compatible Devices
The DPP-350 (Serial & USB) / DPP-350 (Bluetooth®) portable
ESC/POS thermal printer is designed specifically for use with most
PDA & Smartphone devices.
The DPP-350 can be used in a variety of applications where Printing
/ Card Reading is required.
User Notes:
Compatibility depends on the type of communication method
“Serial / USB / Bluetooth®” your PDA or Smarphone supports and
the availability of DPP-350 driver for your device.
Determine the method of communications your device supports.
Next determine if your device is supported by the DPP-350
Drivers & SDKs.
Because of the continually evolving Driver & SDK to support new
mobile devices, visit our developer web site at:
http://datecs.bg/support.php?cat=4&soft=1#1

. . . . . .
. . . . . . . . . . . . . . . .
Page 8
DPP-350 User Manual
Getting Started
The DPP-350 allows you to printer information from your PDA &
Smartphone. Before using the DPP-350 thermal printer the battery
should be properly charged. The following Quick Start guide will
help to get your DPP-350 ready for use.
Quick Start:
Steps What to do Purpose Where to find more
information
1
Charge the
DPP-350
rechargeable
battery pack as
recommended in
this manual.
The Lithium Ion
battery pack
should be fully
charged before
use to ensure
long battery life.
Charging Battery, Page 9
2
Load DPP-350
print media
(Thermal Paper)
DPP-350 requires
Thermal paper for
printing.
Loading Paper, Page 11
3 Setup Bluetooth
Pairing.
Setup Bluetooth®
pairing to allow
DPP-350 to
communicate with
Bluetooth®
devices.
Bluetooth® Setup, Page 16
4 Install DPP-350
Software
To print
information from
your device,
software needs to
be installed onto
your device.
Printing software is not
provided by Datecs.
Please contact your DPP-
350 reseller for
recommendations on
Third-Party solutions.
Developers should refer to
the section in this manual
on “Developing Solutions”.
Table 3

. . . . . .
. . . . . . . . . . . . . . . .
Page 9
DPP-350 User Manual
About Your DPP-350
DPP-350 left view
Figure 1
DPP-350 right view
Figure 2
Paper Feed
(LF)
Paper Cover Lever
Magnetic Card Reader
Power On/Off Switch
Serial RS232
Port
Mi Fare Reader
(Optional)
Mini
USB Port
Charging LED
Status (
ON/OFF & Error
)
LED
Charger Input
Magnetic Card
Reader Activation
LED
Smart Card Reader (Optional)

. . . . . .
. . . . . . . . . . . . . . . .
Page 10
DPP-350 User Manual
Charging the DPP-350
The DPP-350 uses a Lithium Ion rechargeable battery pack. Before
first use, the DPP-350 battery pack should be charged for at least 4
hours.
To prevent electrical damage to the DPP-350 and/or battery pack,
please use approved AC Charger only.
Figure 3
Solid RED = charging
Solid GREEN = fully charged (~4 hrs.)
AC Char
ger

. . . . . .
. . . . . . . . . . . . . . . .
Page 11
DPP-350 User Manual
Status & Operating Modes
The DPP-350 uses LEDs to indicate various conditions of operation.
This may be charging, active or online, battery low conditions. The
following explains these conditions and LED indication.
Figure 4
Printer Status
Solid GREEN = Battery at full
charge
Charging LED
Solid RED = Battery charging
Flashing once per second =
Power ON
Status
(ON/OFF & Error )
LED
Flashing once per second = Error
condition(s)
Low battery
No Paper
Thermal Head
Overheating
Table 4
Status
(ON/OFF & Error) LED
Charging LED
Line Feed (LF) Button
Power Button
ON/OFF

. . . . . .
. . . . . . . . . . . . . . . .
Page 12
DPP-350 User Manual
Loading Paper
The DPP-350 uses a drop-and-load design making paper loading
easy and trouble free. To load paper, simply lift up the paper cover
latch and drop in the new roll as shown in the steps below.
1. Lift the paper cover latch to unlock
the paper cover as shown in the
figure on the right.
F
igure 5
2. Lift the paper cover.
3. Drop in the new roll of thermal
paper media as shown in the
figure on the left.
Be sure to pull at lease ½ inch
or more of media above the top
of the printer before closing.
Figure 6
4. Close the paper cover until it
snaps lock.
Figure 7

. . . . . .
. . . . . . . . . . . . . . . .
Page 13
DPP-350 User Manual
Power On Self-test
The DPP350’s LF switch/button is used for entering various printer
modes. These modes can be used to assist developers in debugging
problems related to programming and communication. The
following explain how to access the various operating modes.
Step #1: Make sure the printer is OFF (On-line LED is OFF) before
performing step #2.
Step #2: Press and hold the line feed button (LF). While pressing
the (LF) button, press the (ON) button momentarily and
release when the Status LED turns green. Release LF
button after the printer Beep once. Shortly after the LF
button is released the printer will print self-test.
LF Button Operation Modes
Short Push N/A Paper feed
1 - beep Self-test print
2 - beeps Hex Dump mode
3 - beeps Long-test print
Push and
Hold -
release after
the number
of beeps
4 - beeps Program mode
Table 5
Note: Care must be taken when entering operating modes to prevent the
clearing of factory preset configuration information.

. . . . . .
. . . . . . . . . . . . . . . .
Page 14
DPP-350 User Manual
Self-test
The DPP-350 has a built-in test pattern that shows the printer’s
current configuration as well as the various resident printer fonts.
The self-test can also be used as a troubleshooting tool to
determine printing problems or battery level. The steps below
show how the self-test is printed activated.
• Resident font sizes
• Characters per line
• Text formatting
• Resident character set
• Resident barcode symbols
• Printer’s Configuration
Figure 8

. . . . . .
. . . . . . . . . . . . . . . .
Page 15
DPP-350 User Manual
Dip Switch Settings
The DPP-350 is designed to use different methods of
communications. Care must be taken to ensure that the DIP
Switches are not changed from its default factory configuration
unless required.
DIP SWITCH SETTINGS:
The printer has two absolutely different operation modes.
They are determined by the state of switch Sw2:
OFF ESC/POS mode
ON Hex Dump mode
Switch
OFF ON
Sw1 Wide paper roll
(78 mm)
Thinner paper roll
(58 mm)
Sw2 ESC/POS mode Hex Dump mode
Sw3 Hardware protocol Xon/Xoff protocol
Sw4 Normal operation mode Protocol mode
Table 6

. . . . . .
. . . . . . . . . . . . . . . .
Page 16
DPP-350 User Manual
DIP Switch Location
Figure 9
Figure 10
DIP Switch

. . . . . .
. . . . . . . . . . . . . . . .
Page 17
DPP-350 User Manual
Printer Configuration
The DPP-350 uses nonvolatile memory for storing some of the
printer default configuration. The following table shows the
available options.
Memory Switch Options
Memory Switch
(see command reference GS command) 1000000010
BAUD RATE 115200 bps
POWER OFF TIME 10 minutes
PRINT DENSITY 100%
CHARACTER TABLE WESTERN (1252)
Table 7
See page 18 for instructions on how to set memory switches.

. . . . . .
. . . . . . . . . . . . . . . .
Page 18
DPP-350 User Manual
Setting Memory Switch
MEMORY SWITCH SETTINGS:
Step #1: Make sure the printer is OFF (STATUS LED is OFF) before
performing step #2.
Step #2: Press and hold the Power (ON) button. The Status LED
flashes Green and after about 4 seconds holding
the Power button the Status LED flashes Red and
then turns solid Red.
Step #3: Release the button and wait for the printer to print out the
current memory switch settings and instructions. Follow the
printed instructions to make the necessary changes.
Note: Care must be taken when changing factory preset
configuration information.

. . . . . .
. . . . . . . . . . . . . . . .
Page 19
DPP-350 User Manual
Memory Switch Details
SW1: Enable/Disable buzzer.
SW2: Execute <CR> Carriage Return as <LF> Line Feed.
SW3: Disable <LF> Line Feed command.
SW4-7: Reserved for future features.
SW8: Prevents others from discovering printer when set to ENABLE. Must
be set after pairing is completed.
SW9: Allow the use of USB port for communications.
SW10: (OFF) set USB as the host mode.

. . . . . .
. . . . . . . . . . . . . . . .
Page 20
DPP-350 User Manual
Pairing Info Details
BAUD RATE: Default is 115200
AUTO OFF TIME: Default is 5 minutes
PRINT DENSITY: Default is 100%
CHARACTER TABLE: Default is WESTERN (1252)
PAIRING INFO: DEFAULT is (SAVE = No)
Notes:
When saving pairing information, the printer remembers Bluetooth
information of the last device connected (paired) to the printer.
Saving pairing info prevents the printer from asking for passkey
upon initialization. The process for using this option is described
below.
"To speed this programming process, you may bypass the memory
switch settings by indicating "NO" via pressing of the <ON/OFF>
button when the printer prints "CHANGE MEMORY SWITCHES" as
shown on page 17. This will advance you to the next level of
setting where pairing can be found".
Saving Pairing Info:
1. Following instruction on page-17, change the Pairing Info
option to [Save = Yes].
2. Turn the printer on and pair the printer to your Bluetooth
device.
3. The printer will now remember the pairing information and
not prompt user for a passkey on every printer initialization.
Clearing Pairing Info:
1. Following instruction on page-17, change the Pairing Info
option to [Save = No].
2. Turn on the printer and pair the new Bluetooth device to the
printer.
3. The printer will prompt user for a passkey on every printer
initialization.
Table of contents
Other Datecs Printer manuals

Datecs
Datecs PP-60 User manual

Datecs
Datecs WPP-250 Quick start guide

Datecs
Datecs FP-2000 User manual

Datecs
Datecs LP-50H User manual

Datecs
Datecs EP-60 Operating and maintenance manual

Datecs
Datecs PP-55 User manual

Datecs
Datecs DPP-250 User manual

Datecs
Datecs DPP-255 User manual

Datecs
Datecs DPP-450 User manual

Datecs
Datecs EP-50 User manual