DDS Calorimeters CAL3K-A User manual

DDS CALORIMETERS
www.ddscalorimeters.com
Manufacturers of CAL2K/CAL3K Oxygen Bomb Calorimeters
CAL3K-A INSTALLATION GUIDE V1.1 | www.ddscalorimeters.com | [email protected].za
CAL3K-A INSTALLATION GUIDE
VERSION 1.1
MANUFACTURED BY DIGITAL DATA SYSTEMS (PTY) LTD.
AND PART OF THE DDS CALORIMETERS BRAND

DDS CALORIMETERS
www.ddscalorimeters.com
Manufacturers of CAL2K/CAL3K Oxygen Bomb Calorimeters
CAL3K-A INSTALLATION GUIDE V1.1 | www.ddscalorimeters.com | [email protected].za
Contents
PURPOSE OF THIS MANUAL........................................................................................................................................ 4
HOW TO USE THIS MANUAL ....................................................................................................................................... 4
WARNING SYMBOL ................................................................................................................................................. 4
INFORMATION (NOTE) SYMBOL ............................................................................................................................. 4
................................................................................................................................................................................ 4
THE CAL3K-A System CHECK LIST ................................................................................................................................ 5
THE 3K-A CALORIMETER WITH EXTERNAL oxygen filling ............................................................................................ 6
THE 3K-2 AIR COOLER ................................................................................................................................................. 6
THE 3K-5 BAYONET VESSEL......................................................................................................................................... 7
THE CAL2K-3 OXYGEN FILLING STATION ..................................................................................................................... 7
.................................................................................................................................................................................... 7
UNPACKING AND INSPECTION.................................................................................................................................... 7
SETTING UP................................................................................................................................................................. 8
PREREQUISITES ....................................................................................................................................................... 8
SITE SELECTION....................................................................................................................................................... 8
................................................................................................................................................................................ 9
CALORIMETER (3K-1_A) .............................................................................................................................................. 9
FILLING STATION (CAL2K-3) ........................................................................................................................................ 9
HIGH PRESSURE OXYGEN ...................................................................................................................................... 10
COOLER (3K-2) .......................................................................................................................................................... 10
VESSEL (3K-5)............................................................................................................................................................ 10
HOW TO TEST CAL3K-A HARDWARE......................................................................................................................... 12
HOW TO TEST THE VESSEL ........................................................................................................................................ 12
3K-5 SELF DIAGNOSTIC TEST ................................................................................................................................. 12
3K-5 VESSEL TEST .................................................................................................................................................. 13
KEYBOARD COMMANDS........................................................................................................................................... 13
MASS ENTRY ......................................................................................................................................................... 14
SAMPLE IDENTIFICATION...................................................................................................................................... 15
GROUP IDENTIFICATION ....................................................................................................................................... 15
SPIKE MASS........................................................................................................................................................... 15

DDS CALORIMETERS
www.ddscalorimeters.com
Manufacturers of CAL2K/CAL3K Oxygen Bomb Calorimeters
CAL3K-A INSTALLATION GUIDE V1.1 | www.ddscalorimeters.com | [email protected].za
BALANCE MASS..................................................................................................................................................... 15
OPEN LID............................................................................................................................................................... 15
VESSEL USER TEST................................................................................................................................................. 15
TERMINATE USER TEST ......................................................................................................................................... 16
.............................................................................................................................................................................. 16
CAL3K-A USER TEST............................................................................................................................................... 16
.............................................................................................................................................................................. 16
SUBJECT HELP ....................................................................................................................................................... 16
OTHER KEYBOARD COMMANDS ............................................................................................................................... 16
ABORT................................................................................................................................................................... 16
FIRE MANUAL ....................................................................................................................................................... 16
CALIBRATION ........................................................................................................................................................ 16
READ RESULT ........................................................................................................................................................ 17
CONNECTING TO A BALANCE.................................................................................................................................... 17
.................................................................................................................................................................................. 17
CALIBRATION ............................................................................................................................................................ 18
INTELCAL CALIBRATION ............................................................................................................................................ 18
VESSEL CALIBRATION WITH MORE THAN ONE CALORIMETER ................................................................................. 18
ROUTINE CALIBRATION............................................................................................................................................. 19
PURPOSE OF PRODUCT WARRANTY ......................................................................................................................... 20
OWNER’S WARRANTY............................................................................................................................................... 20
EXCLUDED (NON-WARRANTY) PARTS....................................................................................................................... 20
WARRANTY – REPAIRED products ............................................................................................................................ 21
GENERAL – WARRANTY VOID ................................................................................................................................... 21

DDS CALORIMETERS
www.ddscalorimeters.com
Manufacturers of CAL2K/CAL3K Oxygen Bomb Calorimeters
CAL3K-A INSTALLATION GUIDE V1.1 | www.ddscalorimeters.com | [email protected].za
INTRODUCTION
Digital Data Systems (Pty) Ltd (dds) specializes in the design and manufacture of scientific bomb calorimeter systems
for various types of industries and applications from the coal mining industry to educational institutes. dds bomb
calorimeter systems are the most advanced combustion calorimeter systems available today. The system is used to
measure the calorific value of both solids and liquids. dds has a wide range of systems to suit different applications
and sample requirements. Please visit our website: www.ddscalorimeters.com to find out more
You have chosen the CAL3K-A Bomb Combustion Calorimeter System, which is best suited for fast and accurate
calorimetry operations.
PURPOSE OF THIS MANUAL
It serves as a short introduction to the CAL3K-A system and the various components. It explains the very basics of
operation and guides you to perform hardware tests and do the first determination. It relies on the DEFAULT setting
and the factory calibration.
But there is more: Information and capability! This is not explained here but in an ON-LINE version. It is safe to say
that you need a PC or laptop to change from the basic operation to a more sophisticated or suitable one.
HOW TO USE THIS MANUAL
This Manual makes use of some informative symbols or icons, in order to bring your attention to the text.
WARNING SYMBOL
This yellow triangle with an exclamation mark inside it, indicates a WARNING message or a message
that is instructing you NOT to do something. Please take note of this message, because if you ignore it
you could damage the Calorimeter equipment.
INFORMATION (NOTE) SYMBOL
This white hand with a finger pointing, indicates a NOTE or INFORMATIVE message. It indicates
something that you need to pay attention to. Please take note of this message, as it provides special
or detailed information about a particular item.
USER INFORMATION AND HELP AIDS
Included in your shipment is this printed Installation Guide.
The on-line Help Guide for basic system operations, trouble-shooting and solutions, application notes as well as how
everything functions is available on-line and can be found at www.ddscalorimeters.com. Please note the CAL3K-A
Windows Software can be downloaded from the following link: www.ddscalorimeters.com/software/cal3k
DDS CALORIMETERS
www.ddscalorimeters.com
Manufacturers of CAL2K/CAL3K Oxygen Bomb Calorimeters
CAL3K-A INSTALLATION GUIDE V1.1 | www.ddscalorimeters.com | [email protected].za
SYSTEM COMPONENTS
THE CAL3K-A SYSTEM CHECK LIST
The system consists of the following:
3K-A
CAL3K-A Calorimeter with Manual Oxygen Filling
1
Received
3K-A-KT
CAL3K-A Calorimeter Installation Kit
1
Included in Kit:
3K-SM
Power Supply
1
KETTLECORD
Mains Cable 220V
1
3K-BC
Balance Cable D9
1
USBCABAB
PC Cable (USB)
1
CAL2K-KB
PC Keyboard (PS2)
1
3K-4-PS
Preparation Stand
1
TWEEZERS/S/S
Stainless Steel Tweezers
1
CAL2K-4-BA
Certified Benzoic Acid Tablets (50 x 0.5g Tablets per Bottle)
2
3K-A-INST
CAL3K-A Installation Guide Printed
1
3K-2
CAL3K Air Cooler
1
3K-2-KT
CAL3K Air Cooler Installation Kit
1
Included in Kit:
3K-SM
Power Supply
1
KETTLECORD
Mains Cable 220 V
1
CAL2K-3
CAL3K Filling Station
1
CAL2K-3-KT
CAL3K Filling Station Installation Kit
1
Included in Kit:
CAL2K-3-FR
Flow Adjustor O-Rings
2
CAL2K-3-NR
Nozzle O-Rings
5
CAL2K-3-OP
High Pressure Pipe 4mm (2m) (Clear)
1
CAL2K-3-RC
Oxygen Regulator Connection
1
CAL2K-3-DC
Defiller Cap
1
3K-5
CAL3K-A Bayonet Vessel
2
3K-5-KT
CAL3K-A Bayonet Vessel Installation Kit
2
Included in Kit:
3K-5-CE
Centre Electrode
2
3K-5-NR
Vessel Nozzle O-Ring
2
3K-5-OE
Outside Electrode
2
CAL2K-4-CB-
SINGLE
Crucibles
2
3K-5-DP
Deflector Plate
2
3K-5-FW
Firing Wire (1 packet of 5 wires)
1
3K-5-FC
Firing Cotton Packet (1 Packet of 200 Threads)
1
3K-5-LR-5
Lid O-Rings (1 packet of 5)
1
DDS CALORIMETERS
www.ddscalorimeters.com
Manufacturers of CAL2K/CAL3K Oxygen Bomb Calorimeters
CAL3K-A INSTALLATION GUIDE V1.1 | www.ddscalorimeters.com | [email protected]
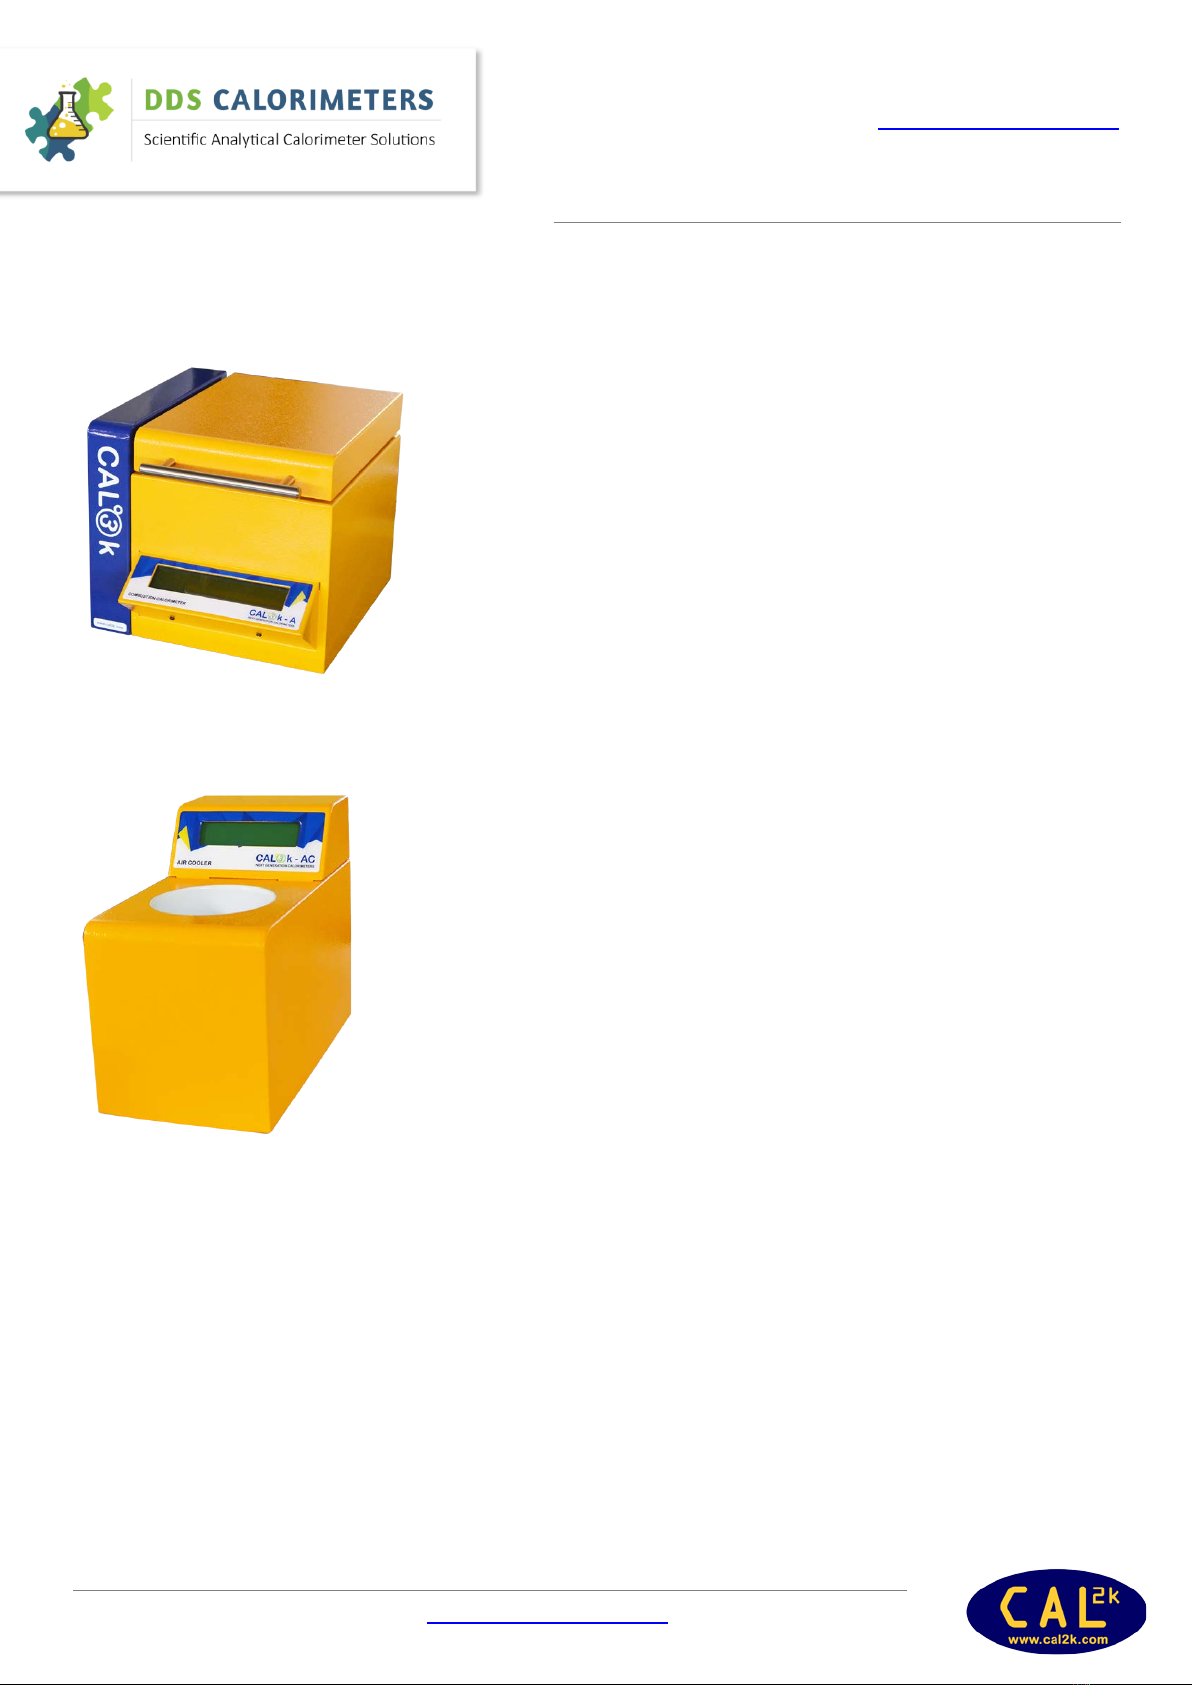
THE 3K-A CALORIMETER WITH EXTERNAL OXYGEN FILLING
The CAL3K-A uses the Dynamic method (Isiperibol) of determination while
still using the DRY method. The prepared vessel is filled with oxygen in the
external filling station and placed in the calorimeter and the lid is closed.
The rest is automatic!
Width - 270mm
Height - 200mm
Depth - 380mm
Weight - 8kg
Power - 220-240V / 12W
THE 3K-2 AIR COOLER
The air cooler requires no water, piping or other resources. The Air Cooler
is supplied with an external 12V power supply and a suitable mains cable.
The air cooler will cool the vessel in approximately 6-8 minutes to the
specified setting. The operation of the cooler can be set via the USB port
and the CAL3K-A application software or from the CAL3K-A The cooler is
factory configured before shipment.
Width - 155mm
Height - 235mm
Depth - 285mm
Weight - 3 to 4kg
Power - 12VDC

DDS CALORIMETERS
www.ddscalorimeters.com
Manufacturers of CAL2K/CAL3K Oxygen Bomb Calorimeters
CAL3K-A INSTALLATION GUIDE V1.1 | www.ddscalorimeters.com | [email protected]
THE 3K-5 BAYONET VESSEL
The ignition and burning process is contained within a chamber so that
the energy released can be measured in the form of heat. The Vessel has
temperature sensors built into it, so that the temperature rise can be
measured.
Because of the high pressure of oxygen required for combustion, the
Vessel is classified as a “Pressure Vessel” and is consequently tested by an
inspection authority to 10 times its normal pressure.
Diameter - 63mm
Height - 150mm
Weight - 1.9kg
THE CAL2K-3 OXYGEN FILLING STATION
The oxygen filling station is connected to the oxygen bottle via a regulator.
The regulator reduces the bottle pressure to 30bar, which is adjustable.
The regulated pressure is then supplied to the filling station, which shows
the supply pressure. Once a vessel is placed in the filling station and the
lever is lowered the vessel pressure is indicated and the actual filling
progress can be observed. The filling speed is adjustable to suit the sample
material.
Width - 220mm
Height - 450mm
Depth - 300mm
Weight - 4.5Kg
INSTALLATION
UNPACKING AND INSPECTION
There are no special precautions to be taken when unpacking your system. The following check list is for your
convenience:
1. Locate and tick-off the various system components as indicated on the CAL3K-A Check List as per above

DDS CALORIMETERS
www.ddscalorimeters.com
Manufacturers of CAL2K/CAL3K Oxygen Bomb Calorimeters
CAL3K-A INSTALLATION GUIDE V1.1 | www.ddscalorimeters.com | [email protected]
2. Unpack and inspect all the system components such as the 3K-1_A Calorimeter, 3K-2 Air Cooler, CAL2K-3
Filling Station and the 3K-5 Bayonet Vessels according to the instructions in the relevant sections in this
document.
3. Inspect everything for any physical damage during transit. If damaged, consult your Agent immediately.
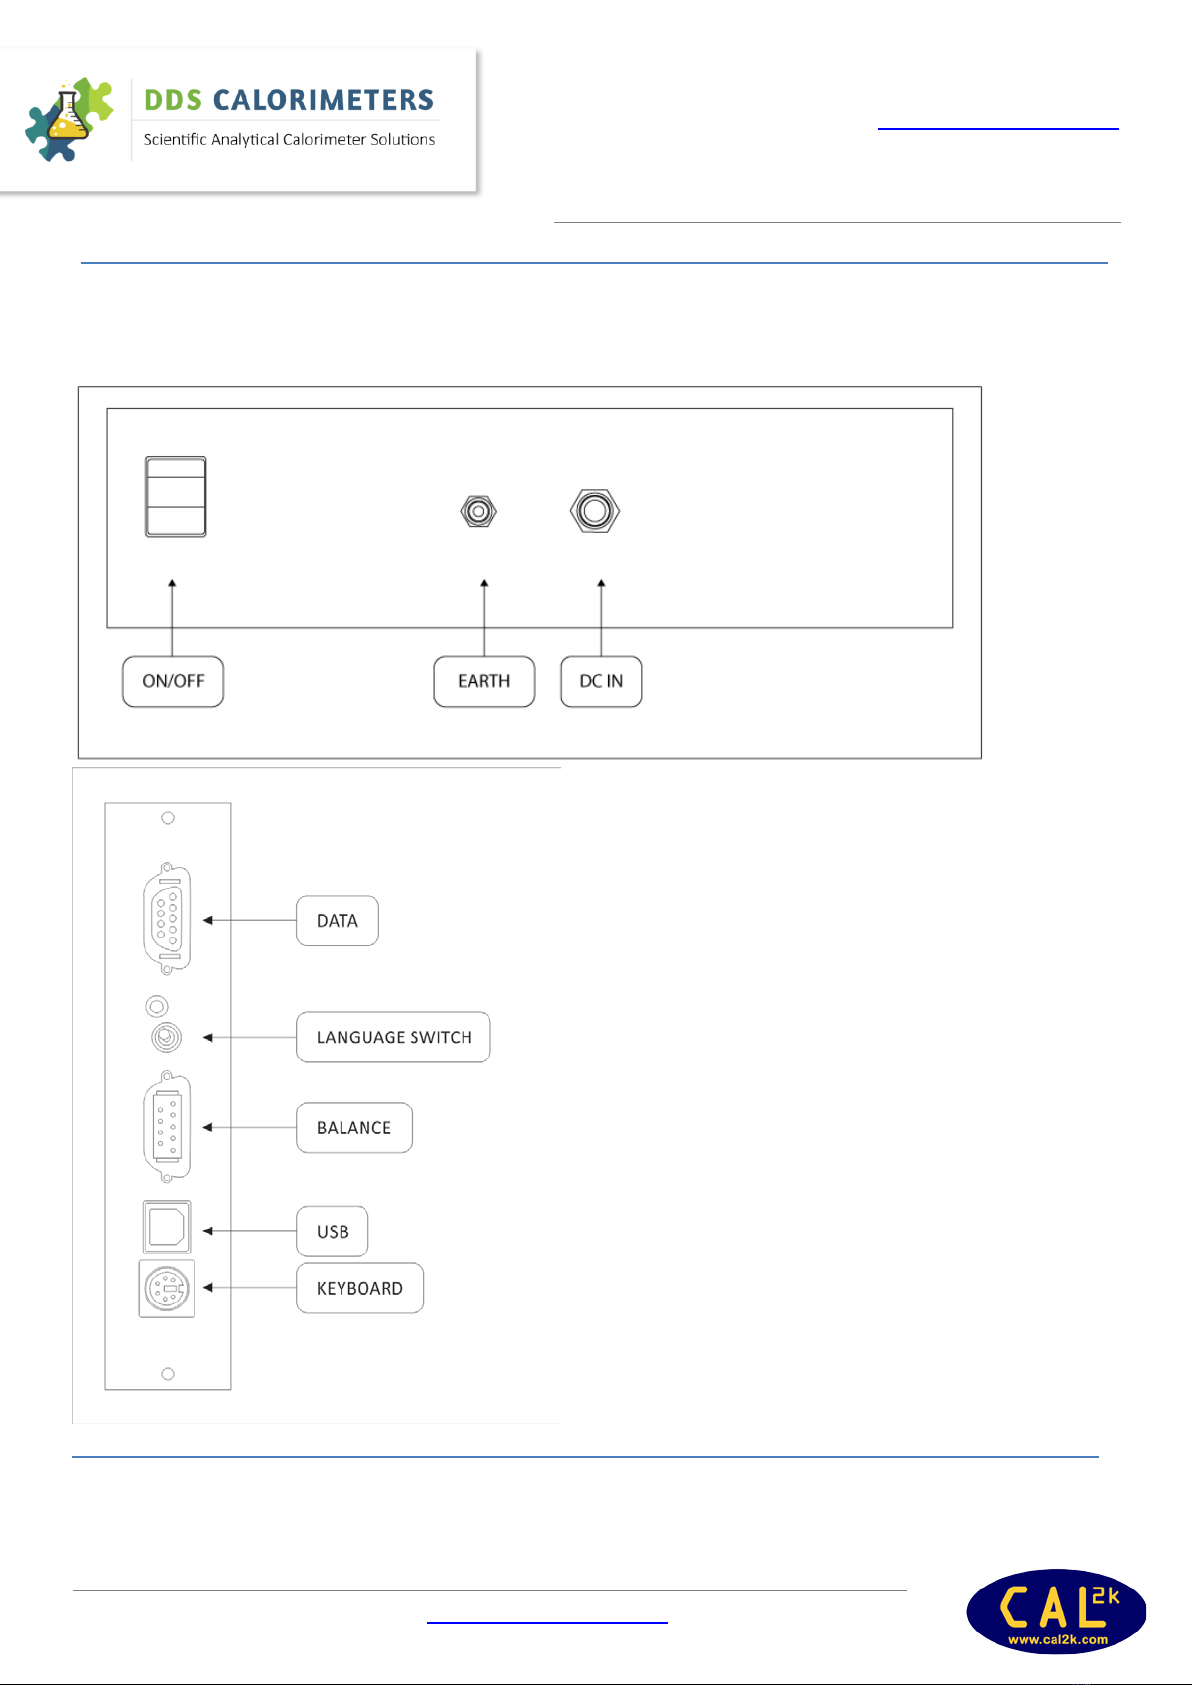
4. The Calorimeter has a GROUND (SAFETY EARTH) lug at the rear panel. This lug MUST be connected to the
EARTH supply to insure operating personal safety in case the power supply fails.
5. Verify the earth connection of the mains outlet, which you intend to use. Ask a qualified electrician to check
it.
6. Connect the power supply to the mains power and to the Calorimeter. Any power supply with 12V output,
3000mA capacity, centre pin POS, can be used.
7. Do the same for the COOLER.
8. Observe that the Display on the Calorimeter comes ON. If not, check the mains connections or consult your
Agent immediately.
9. Observe that the Display on the COOLER comes ON. If not, check the mains connection or contact your
agent.
SETTING UP
PREREQUISITES
Prior to installation of the CAL3K-A System, the User must provide the following:
1. A mains outlet for the 3K-1_A Calorimeter and a mains outlet for the 3K-2 Air Cooler power supplies.
2. A supply of oxygen at a pressure of 3.0-3.5Mpa (30-35 bars) (3000Kpa) within 4 meters of the 3K-1_A
Calorimeter. If bottled oxygen is used, a suitable high pressure oxygen regulator must be supplied. Digital
Data Systems can supply a single stage high pressure oxygen regulator; contact your agent for more
information.
3. If a balance is supplied, ensure that a sturdy, stable weighing surface is available. A mains outlet and Balance
connecting cable will also be required (balance cable supplied as part of kit).
SITE SELECTION
The 3K-1_A Calorimeter is a desktop unit, which can be installed wherever the laboratory space permits, with two
restrictions:
1. The CAL3K-A system, consisting of 3K-1_A Calorimeter, 3K-2 Air Cooler, should be connected to a mains
circuit without heavy inductive or SCR switched equipment. It is safe to have balances or other small
electronic apparatuses on the same circuit. Good installation practice would be to have a separate fused
mains circuit with separate earth leakage supply (or an earth current monitor, if applicable) for every system
component. Future computers and peripherals installed can be connected to the same circuit.
DDS CALORIMETERS
www.ddscalorimeters.com
Manufacturers of CAL2K/CAL3K Oxygen Bomb Calorimeters
CAL3K-A INSTALLATION GUIDE V1.1 | www.ddscalorimeters.com | [email protected]
Please see above for the dimensions, weights and power requirements per unit. The BALANCE data
would be dependent on the make and model that you will be using.
SAFETY PRECAUTIONS
CALORIMETER (3K-1_A)
•Electrical Shock: There are no user serviceable parts inside.
•Do not open the bottom panel unless the supply cable has been disconnected.
•Dangerous voltages will be present inside the unit after the supply cable has been disconnected.
DO NOT TAMPER WITH THE EARTHING - CONSULT A QUALIFIED ELECTRICIAN SO THAT THE
EARTHING CAN BE CHECKED.
DO NOT USE ANY OTHER PIPE OTHER THAN THE HIGH PRESSURE PIPE SUPPLIED FOR OXYGEN
FILLING.
•NOTE: With some applications you may need to fill the Vessel to less than 2400KPA e.g.1500KPA (15 bar),
however this is only applicable when you have a sample which is highly combustible, for example with wood
related samples. THE FILLING PRESSURE IS ADJUSTABLE on the regulator, the filling speed is adjustable on
the filling station.
REMEMBER: You may fill the Vessel LESS than 3000KPA but NEVER more than 3000KPA.
FILLING STATION (CAL2K-3)
•Secure the Filling Station to the table.
•Install the flexible high pressure pipe supplied without any sharp bends.
•Check the nylon high pressure pipe supplied for any mechanical damage before putting it under pressure.
•Secure the pipe nuts to the pressure regulator side, then clamp the ferrule to the high pressure pipe on the
gauge block side.
•If the oxygen bottle is not situated close to the Filling Station or if it is in another room or perhaps outside,
then a solid, permanent installation of pressure piping should be installed, as well as a shut off valve and
pressure gauge within easy reach of the CAL2K-3 Filling Station.
•If bottled oxygen is used, a suitable High Pressure oxygen regulator must be supplied by your Agent, or
sourced locally. Ordering this item from the factory ensures that the necessary modifications have been
made to fit the CAL2K-3 Filling Station.
•The oxygen bottle should be secured according to regulations.
•DO NOT USE ANY OTHER PIPE OTHER THAN THE HIGH PRESSURE PIPE SUPPLIED.
DDS CALORIMETERS
www.ddscalorimeters.com
Manufacturers of CAL2K/CAL3K Oxygen Bomb Calorimeters
CAL3K-A INSTALLATION GUIDE V1.1 | www.ddscalorimeters.com | [email protected]
ALWAYS FILL THE VESSEL WITH OXYGEN TO A MAXIMUM PRESSURE OF 3000KPA (30 BAR).
NOTE: With some applications you may need to fill the Vessel to less than 3000KPA e.g. 1500KPA (15
bar), however this is only applicable when you have a sample which is highly combustible, for
example with wood related samples.
REMEMBER: You may fill the Vessel LESS than 3000KPA but NEVER more than 3000KPA.
HIGH PRESSURE OXYGEN
•The type of Oxygen to be used is the standard Industrial Oxygen used for welding. A purity of 99.5% will be
suitable.
•Conform to the industry standard of handling procedures for oxygen bottles.
•Secure the bottle against a wall.
•The unit has an exhaust outlet (6mm pipe). Route this pipe to the outside or any suitable scrubber to
prevent the burned gas to enter the room.
COOLER (3K-2)
•Electrical shock: There are no user serviceable parts inside.
VESSEL (3K-5)
•The Vessel has been pressure tested (certificate will be provided if required), at 30 MPA according to
international standards.
NEVER OPERATE ANY UNSAFE VESSEL.
NEVER IMMERSE THE VESSEL INTO COLD WATER WHEN COOLING. USE THE 3K-2 AIR COOLER OR
ALLOW THE VESSEL TO COOL DOWN NATURALLY.
•A SUITABLE INSPECTION WARNING PERIOD OF 2000 FIRINGS, AND A STOP OPERATING LIMIT OF 2500
FIRINGS ARE PRE-PROGRAMMED FROM THE FACTORY
THE VESSEL MUST BE INSPECTED AT REGULAR INTERVALS DEPENDING ON THE USE. A SUITABLE INSPECTION PERIOD
CAN BE SET (By your agent!) AND THE UNIT WILL ISSUE AN INSPECTION WARNING AND SOON AFTER THIS IT WILL
SHUT-DOWN THE OPERATION.
NOTE: THE MANUFACTURER (DDS) AND ITS AGENTS CANNOT BE HELD RESPONSIBLE FOR ANY LOSS
OR DAMAGE RESULTING FROM NEGLIGENCE OR INCORRECT USE OF THEIR EQUIPMENT. IT IS YOUR
DUTY AND RESPONSIBILITY TO CHECK ALL SAFETY ASPECTS OF THE CAL3K-A SYSTEM REGULARLY.
DDS CALORIMETERS
www.ddscalorimeters.com
Manufacturers of CAL2K/CAL3K Oxygen Bomb Calorimeters
CAL3K-A INSTALLATION GUIDE V1.1 | www.ddscalorimeters.com | [email protected]
CAL3K-A REAR PANEL CONNECTIONS

DDS CALORIMETERS
www.ddscalorimeters.com
Manufacturers of CAL2K/CAL3K Oxygen Bomb Calorimeters
CAL3K-A INSTALLATION GUIDE V1.1 | www.ddscalorimeters.com | [email protected]
SYSTEM TESTING
HOW TO TEST CAL3K-A HARDWARE
The CAL3K-A has a hardware test built in, which is referred to as the USER or FIELD TEST. It is activated by entering
the following on the calorimeter keyboard:
Once you have entered the Field/User Test Mode the CAL3K-A will cycle through all the installed tests. When all
CAL3K-A hardware tests are done it will proceed with the vessel test and ask you to insert a vessel and close the lid.
All the above tests are displayed with the appropriate comments. If a test fails then the test sequence will stop at the
failed test. The failed test is logged into Event Logging. Once the hardware test is completed the test is logged into
the Event Logging and the User Test Log.
It is recommended to repeat the hardware once a day or once per shift. The hardware test takes
approximately 1 minute to complete.
NOTE: While the test runs or when it stops at a particular step then the F10 HELP key can be used to provide more
information.
The test can be terminated at any given time with ESC.
HOW TO TEST THE VESSEL
The vessel test is done in two stages:
1. Automatic, Internal self-diagnostics every time the vessel is inserted into the calorimeter well
2. Operator initiated test in the calorimeter environment
3K-5 SELF DIAGNOSTIC TEST
The vessel has a built in diagnostic program, which is activated every time the vessel is inserted in the calorimeter
well. The outcome of the internal check is transmitted to the calorimeter and is available (visible) on the PC Software
as BOMB_STATUS. This status includes the following items:
Fire Warning limit exceeded
Fire Inspection Fault
Supply Fault
Reference Fault
Memory Fault
Temperature Sensor #1 Fault

DDS CALORIMETERS
www.ddscalorimeters.com
Manufacturers of CAL2K/CAL3K Oxygen Bomb Calorimeters
CAL3K-A INSTALLATION GUIDE V1.1 | www.ddscalorimeters.com | [email protected]
Temperature Sensor #2 Fault
Temperature Sensor #3 Fault
Temperature Sensor #4 Fault
Temperature #0 Fault
Temperature #1 Fault
If a fault is detected, then the vessel is prevented from further use and the operator is informed
accordingly. Note that with the self-diagnostic test only the vessels electronics are tested. To test
how the vessel operates within the calorimeter the following test must be used.
3K-5 VESSEL TEST
This test checks the vessel performance inside the calorimeter environment. For this test the vessel must have a
firing wire. This test is the last portion of the CAL3K-A hardware test.
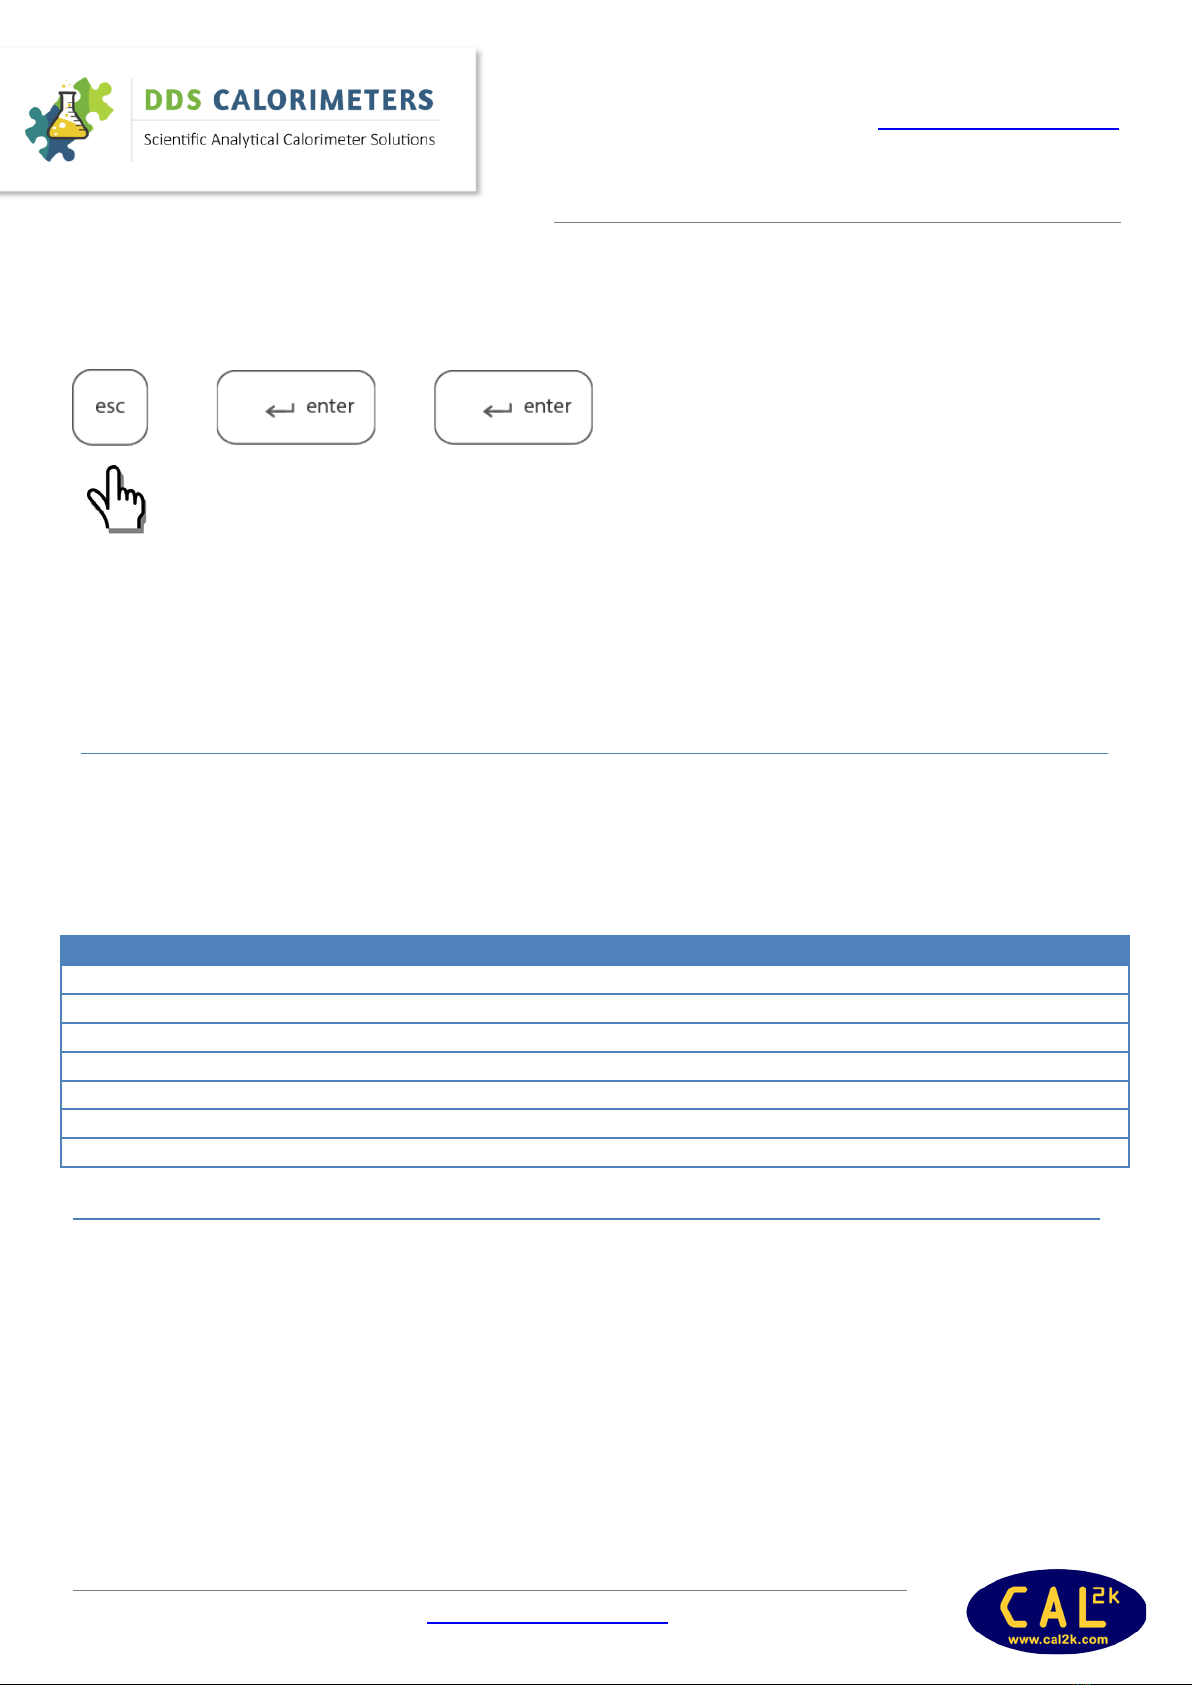
The unit cycles through the following steps and stops for operator action or when a fault is encountered.
Will stop the test.
The results of the test are logged together with the ‘Vessel Name’ and time into Event Logging, if a fault is found it
will be logged.
NOTE: This test MUST be repeated for each vessel.
OPERATING
This is a brief operating explanation. A more detailed version is available on-line from www.ddscalorimeters.com.
The unit has various communication options which are not explained here, and the unit requires a PC to change the
setup. At present the unit operates on the DEFAULT parameter setting. The default operating mode is:
DYNAMIC
KEYBOARD COMMANDS
The Unit is delivered with a password activated. In this mode NOT all commands are accessible. The default
password is: DDS3K. We recommend that the default password is changed via the PC application software. Check the
installed (password active=restricted) commands by:
DDS CALORIMETERS
www.ddscalorimeters.com
Manufacturers of CAL2K/CAL3K Oxygen Bomb Calorimeters
CAL3K-A INSTALLATION GUIDE V1.1 | www.ddscalorimeters.com | [email protected]
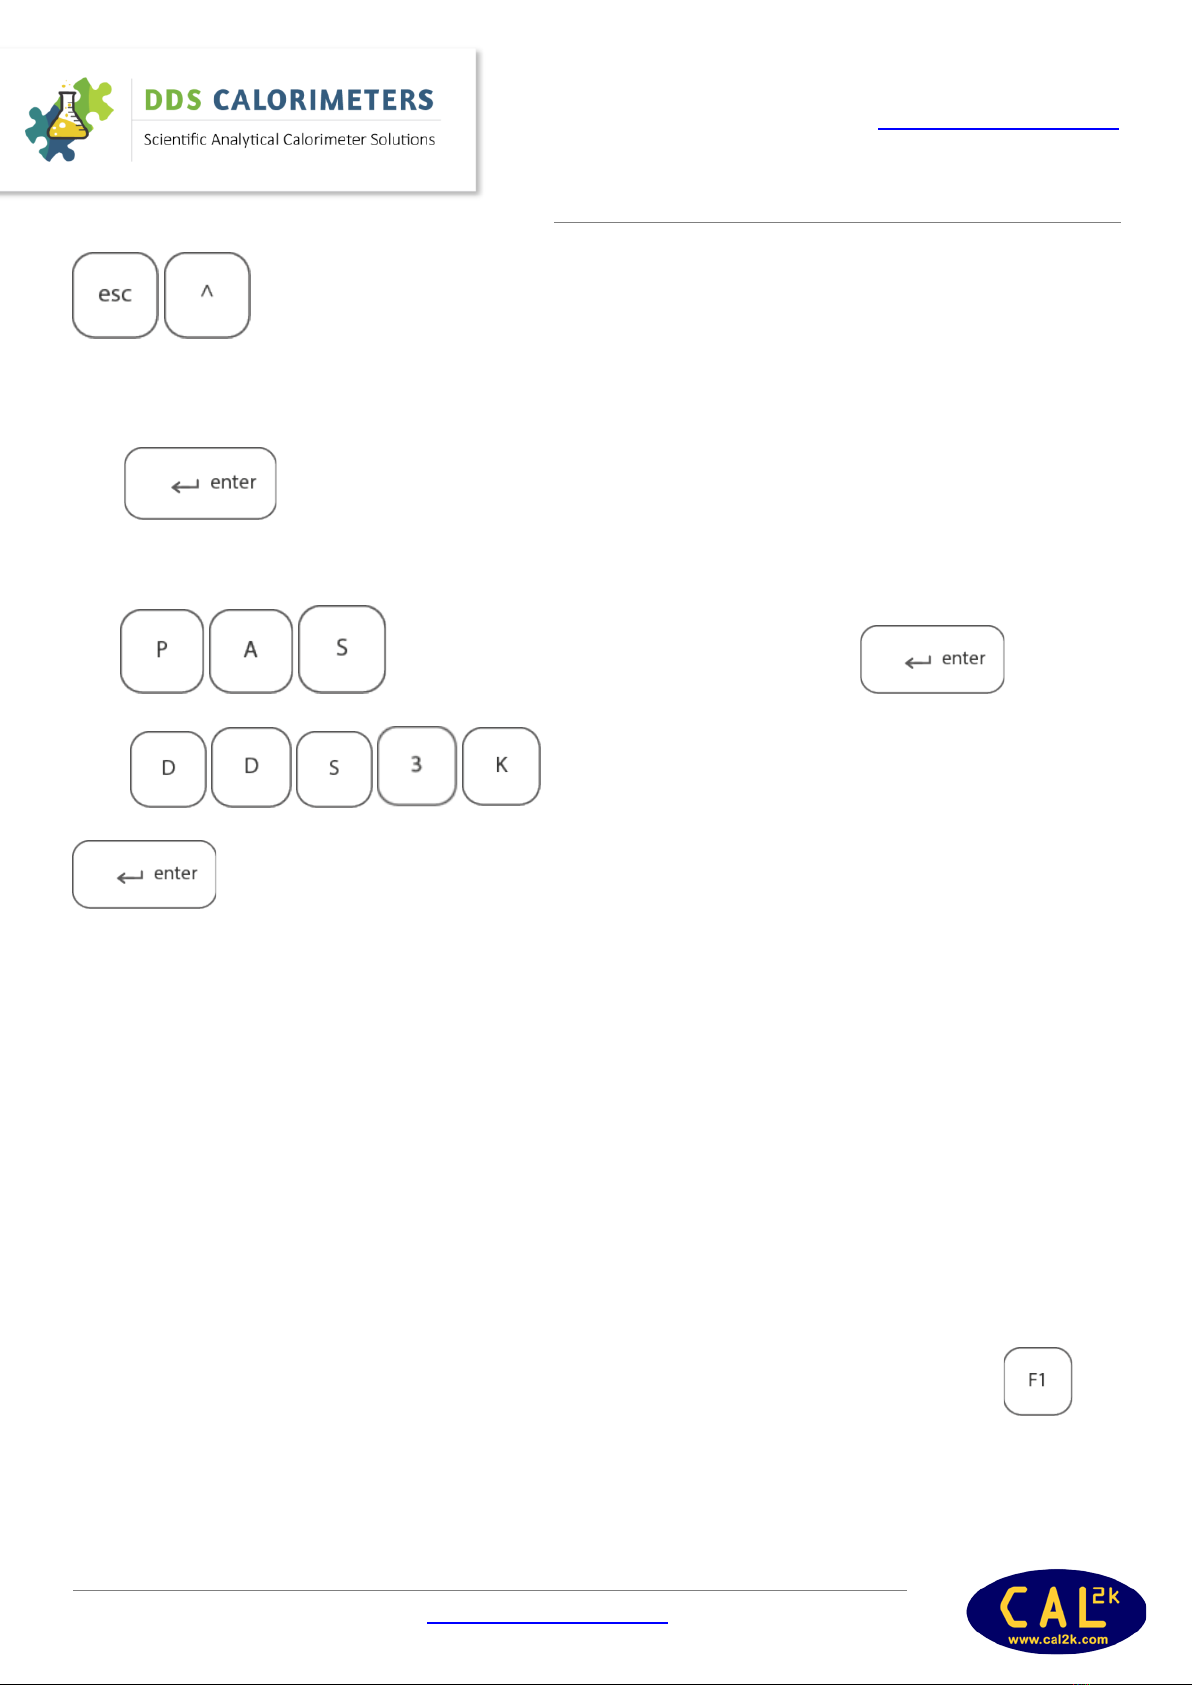
(Press repeatedly)
You will see the command (Line#3) and a short explanation (Line#4). If you wish to operate the indicated command,
press
To see the FULL list of commands:
Type (PASSWORD will be displayed on screen), now press
Type (DDS3K or your current password) and press
If you hear a loud beep after pressing enter, you’ve entered the wrong password.
Function keys: They serve as a shortcut to the keyboard commands. The following function keys are used:
F1 Mass entry (F1,Enter,0.xxxx,Enter)
F2 Sample Identification (F2,Enter,mysampleId,Enter)
F3 Group Identification (F3,Enter,MyGroupId, Enter)
F4 Spike Mass (F4,Enter,0.xxxx,Enter)
F5 Balance Mass (F5,Enter)
F6 Open Lid (F6,Enter,Y,Enter)
F7 Vessel User Test (F7,Enter)
F8 Terminate User Test (F8)
F9 CAL3K-A_AP User Test (F9,Enter)
F10 Help (F10) Read display!
MASS ENTRY
The mass is a weight in the range 0.2 to 1.5 Gramm. The limits can be set via a PC to suit your
operation. Once it is entered it is ‘LOCKED’ in to the present operation until it is ignited. The only way
to ‘ERASE’ the mass or ‘UNLOCK’ it is as follows:

DDS CALORIMETERS
www.ddscalorimeters.com
Manufacturers of CAL2K/CAL3K Oxygen Bomb Calorimeters
CAL3K-A INSTALLATION GUIDE V1.1 | www.ddscalorimeters.com | [email protected]
SAMPLE IDENTIFICATION
The sample ID is a 16 character (or shorter) string of characters. The last character will be automatically
incremented at each firing. That is to say that a 5 is incremented to 6, and ‘C’ increments to ‘D’. If a short
SID is used, followed by spaces, then the last non-space character is incremented.
GROUP IDENTIFICATION
The Group ID is a 16 character (or shorter) string.
SPIKE MASS
Enter the weight of the spike mass here. A spike mass of zero disables spiking. For details of spiking see
www.ddscalorimeters.com.
BALANCE MASS
The supplied balance cable (Part No: 3K-BC, D9 to D25) can be connected to a suitable balance and
then the weight is transferred automatically to the CAL3K-A display. Then ‘ENTER’ must be pressed to
LOCK the mass in to the calorimeter.
OPEN LID
The lid can be open at any given time. The present operation is terminated and the lid is opened. If
one does this during the main period then the sample is aborted and the premature termination is
logged.
VESSEL USER TEST
This requires that the vessel is in the well and that the vessel has a firing wire.

DDS CALORIMETERS
www.ddscalorimeters.com
Manufacturers of CAL2K/CAL3K Oxygen Bomb Calorimeters
CAL3K-A INSTALLATION GUIDE V1.1 | www.ddscalorimeters.com | [email protected]
TERMINATE USER TEST
If a user test ‘hangs’ on a problem, then pressing this key terminates it. It is a little more powerful then
Esc.
CAL3K-A USER TEST
This tests the CAL3K-A hardware.
The test cycles through all tests and checks the hardware connections and functionality. A Vessel is not required.
Some interaction is required.
SUBJECT HELP
Every time that the unit waits for an action, a more detailed subject help is available to explain what is
needed.
Press whenever something does not progress and read the comments.
OTHER KEYBOARD COMMANDS
Here are some handy commands, which have to be typed. The Unit checks the typing, and if no ambiguity exists it
will complete the command for you.
ABORT
This is a reset. The unit terminates ALL operations and starts fresh.
FIRE MANUAL
This can be used to shorten the initial period. The firing conditions are circumvented and the Vessel charge is ignited.
Useful to test the firing/ignition procedure
CALIBRATION
This directs the unit to perform a calibration procedure with the next sample. During this procedure the Sulphur
correction (if set) is disabled.

DDS CALORIMETERS
www.ddscalorimeters.com
Manufacturers of CAL2K/CAL3K Oxygen Bomb Calorimeters
CAL3K-A INSTALLATION GUIDE V1.1 | www.ddscalorimeters.com | [email protected]
READ RESULT
This command is required to read the previous stored results. The ‘last one first’ result can be retrieved by:
READ
The unit displays the Last result number and the result details in line #4.
Press (Enter) The unit displays the previous result
Press (Enter) repeat until you have all results!
Note: The results can only be cleared from a PC or mobile device if allowed to do so!
CONNECTING TO A BALANCE
This step is not absolutely necessary. The weight (mass) of the sample can be transferred manually from the balance
to the CAL3K-A and entered on the keyboard. The balance connection cable is included in the kit. If the unit is
installed near the balance then connect up. The default balance speed is 2400baud. Set your balance to this speed!
The balance speed can be changed from the PC only. Test the connection by pressing (F5). Then the stable balance
weight should show on the display. If you press (Enter) then the mass is locked. See MASS ENTRY to unlock it.
PERFORM THE FIRST SAMPLE
The object of this exercise is to check that everything functions. We assume that the CAL3K-A and the Vessel
hardware has been tested and found to be OK.
The sample test requires the following:
The default setup (set by the factory)
One Benzoic Acid (CAL2K-4-BA) tablet, supplied in 3K-1 Installation kit
Firing cotton (3K-5-FC), supplied in 3K-5 Installation Kit
Firing wire (3K-5-FW), (already fitted to vessel lid assembly, also supplied in 3K-5 Installation kit), check that
this is present
Minimum fuss, Minimum explanations, Minimum keyboard enter
Herewith the operating sequence:
1. Weigh a Benzoic Acid (supplied) on a scale to 4 decimal places with the tarred crucible. Do not touch the
tablet but use the supplied tweezers.
2. Prepare a vessel: Attach Firing cotton thread to the Firing wire. Insert the crucible with the BA tablet in to
the holder, and position the tabled on top of the cotton thread. Handle the lid gently because if the tabled
moves and does not touch the cotton thread it is unlikely that the tabled fires. Then gently close the vessel.
Do not over tighten.

DDS CALORIMETERS
www.ddscalorimeters.com
Manufacturers of CAL2K/CAL3K Oxygen Bomb Calorimeters
CAL3K-A INSTALLATION GUIDE V1.1 | www.ddscalorimeters.com | [email protected]
3. Enter the sample MASS (weight of sample) by selecting F1, ENTER, Type mass (e.g.: 0.5432) and ENTER.
4. Place the vessel in to the filling station and fill it with oxygen. Then place it in the CAL3K-A well.
5. Close the lid until you hear a click. You may have to press the lid down.
6. The CAL3K-A checks everything out and issue a warning if something is missing.
7. The CAL3K-A will then go into an INITIAL waiting period. The time is indicated in the top line on the LCD
screen.
8. After 2 to 3 minutes the sample is fired. This is displayed and announced with a short beep. You will notice
on the top line of the display the FIN period
9. After 2-3 minutes the result is displayed in the bottom line of the display and the lid opens.
10. Put the (warm) vessel in to the cooler. You will hear the fan coming on, and after a while (time is indicated)
the cooler fan will stop and the message “VESSEL READY” is displayed. The cooling time depends on the
Room temperature and vessel temperature and is indicated.
The above is just a short step-by-step procedure to run your first CV sample to make sure your calorimeter is in
working order.
There are many additional steps and procedures that you can do whilst running an actual CV sample. You will find
these How to Steps via the On-line Help Guide available on the website: www.ddscalorimeters.com
Please note the CAL3K-A Windows Software can be downloaded from the following link:
www.ddscalorimeters.com/software/cal3k
CALIBRATION
All vessels are calibrated in the factory with the calorimeter before shipment. Note that the calibration is saved for a
particular CAL3K-A chassis and for a particular vessel number. If this pre-calibration is not possible then the full
calibration procedure must be performed in the field. Here follows a SHORT description of the various calibration
procedures:
CALIBRATION
As above, but it affects the bomb factor with the average of old and new bomb factors. This is also entered in the
calibration history. Perform this once a day/week.
INTELCAL CALIBRATION
This requires a PC. The PC reads all the saved history calibrations and performs a SYSTEM calibration with the data. It
requires 7 to 10 history entries and when done it will download the IntelCal calibration data to the vessel. Perform
this once every 1 to 6 month. The unit is shipped with a universal default IntelCal calibration set.
VESSEL CALIBRATION WITH MORE THAN ONE CALORIMETER
If you have more than one calorimeter and you like to operate every vessel in every calorimeter then you must
calibrate each vessel in every calorimeter. A maximum of seven calorimeters are allowed per vessel.
DDS CALORIMETERS
www.ddscalorimeters.com
Manufacturers of CAL2K/CAL3K Oxygen Bomb Calorimeters
CAL3K-A INSTALLATION GUIDE V1.1 | www.ddscalorimeters.com | [email protected]
ROUTINE CALIBRATION
Each vessel must be calibrated. The calibration is best performed at the normal operating conditions. Prepare the
vessel as outlined previously and set the unit to the calibration mode by:
CALI ON
Note: that the state is displayed during the initial period as: ICA
Then close the LID and wait. You will notice that the calibration operation is indicated in the top left corner. Once
done, remove the vessel and repeat the procedure with the second vessel.
The calibration data set is stored in the vessel calibration history for the chassis number.
ROUTINE SAMPLE DETERMINATION
The procedure is the same. If you perform multiple determinations in a row then the operating cycles with two
vessels overlap:
Place prepared vessel in well
Place warm vessel in cooler
Tare a crucible and weigh a sample, but leave crucible in balance
Vessel fires (short beep)
Warm vessel is still cooling
Enter mass from balance F5 Enter
Wait until cooler is ready
Cooler fan switches off
Remove cooled vessel and prepare it
Wait until lid opens
PRODUCT IDENTIFICATION AND STATISTICS
All electronic parts have product identification such as:
Factory test date and time
Firmware version
Manufacturer information
Branding
Customer information
Serial Number
More…

DDS CALORIMETERS
www.ddscalorimeters.com
Manufacturers of CAL2K/CAL3K Oxygen Bomb Calorimeters
CAL3K-A INSTALLATION GUIDE V1.1 | www.ddscalorimeters.com | [email protected]
In addition each unit retains statistical and max data. Most of this information is visible via the PC interface. Some of
this information is ‘attached’ to the CAL3K-A chassis, some of it is contained on the control card, and a different data
set is in the vessel.
If a vessel, chassis, or control card is replaced in the field then some of the product identification may be different
from what our records reflect and we need your assistance to inform us accordingly.
WARRANTY – FOR NEW PRODUCTS
PURPOSE OF PRODUCT WARRANTY
Any part of a product is subject to ageing and eventual failure. These failures occur during normal use. The purpose
of a warranty is to protect the Owner against a part failure caused by manufacturing defects in workmanship,
material or design for a specific time.
OWNER’S WARRANTY
In the event of the Owner contracting directly with Digital Data Systems (Pty) Ltd “dds”, or in the event of the
installation of a unit arising out of a contract between the Owner’s Dealer or any other party on his/her behalf and
the said “dds”, the Owner records that not withstanding same, this warranty is the only warranty applicable to “dds”
units and is expressly in lieu of all other warranties, expressed or implied, including any implied warranty of
merchantability or fitness for a particular purpose. No amendments or additions to this warranty shall be binding on
“dds”, unless recorded in writing and signed by a duly authorised officer of the company. “dds” agrees to repair and
replace with a new or remanufactured part, any part, other than those excluded below, which after inspection,
upon its return to the factory in Randburg, Johannesburg by the Owner or the authorised Dealer to which he/she
returns the unit, is proven to be defective.
Replacement of a defective part will be made only within the applicable warranty period of 12 (twelve) months from
date of shipment. Not withstanding anything to the contrary herein, any labour involved in repairing or replacing a
defective part will be charged at “dds” rates applicable at the time.
If upon inspection it is found that the pressure vessel was submerged in water the warranty will automatically be
null and void and the owner will be responsible for the labour and parts charges.
EXCLUDED (NON-WARRANTY) PARTS
“dds” shall be entitled to treat this warranty as void unless the relevant warranty form (attached) is sent by
registered post to “dds” by the Owner within 10 (ten) days from date of original installation.
Regardless of warranty-status, the Owner shall be responsible for labour charges connected with periodic
maintenance requirements involving visual and functional inspection of the systems.
This warranty expressly covers the unit(s) “dds” supplied only and does not cover any other part, which may, as a
consequence of the installation and operation of the unit, become damaged in any way whatsoever.
Special attention should be given to the safe operation of the high-pressure Vessels. The published rules are
guidelines only and enclosed in this leaflet for the convenience of the User. The manufacturer is not responsible
Table of contents
Other DDS Calorimeters Laboratory Equipment manuals

DDS Calorimeters
DDS Calorimeters CAL3K 3K-F User manual

DDS Calorimeters
DDS Calorimeters CAL3K Series User manual

DDS Calorimeters
DDS Calorimeters CAL3K-F User manual

DDS Calorimeters
DDS Calorimeters CAL3K-AP User manual

DDS Calorimeters
DDS Calorimeters CALOK 3K-S User manual

DDS Calorimeters
DDS Calorimeters 3K-ST User manual


