Dell Alienware AW520H User manual

Alienware
Wired Gaming Headset
AW520H
User’s Guide
Regulatory Model: AW520H

1
Notes,Cautions and Warnings
NOTE: A NOTE indicates important information that helps you make better
use of your product.
CAUTION: A CAUTION indicates potential damage to hardware or loss of
data if instructions are not followed.
WARNING: A WARNING indicates a potential for property damage,
personal injury, or death.
Copyright © 2023 Dell Inc. or its subsidiaries. All rights reserved. Dell Technologies,
Dell, and other trademarks are trademarks of Dell Inc. or its subsidiaries. Other trademarks
may be trademarks of their respective owners.
2023 – 03
Rev. A00

2
Contents
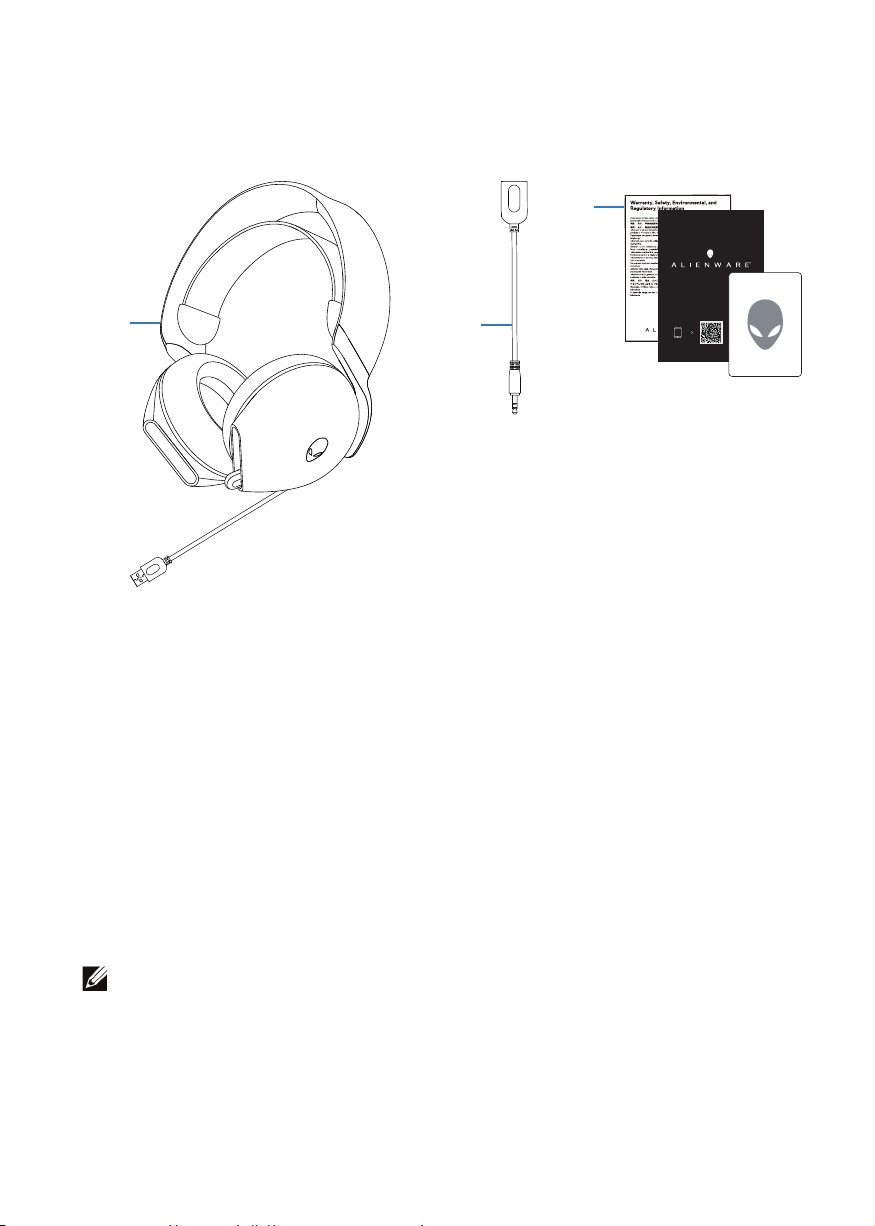
What‘s in the box............................................................. 4
Features ........................................................................... 5
Headset 5
........................................................................................
...................................................................................
Accessories 6
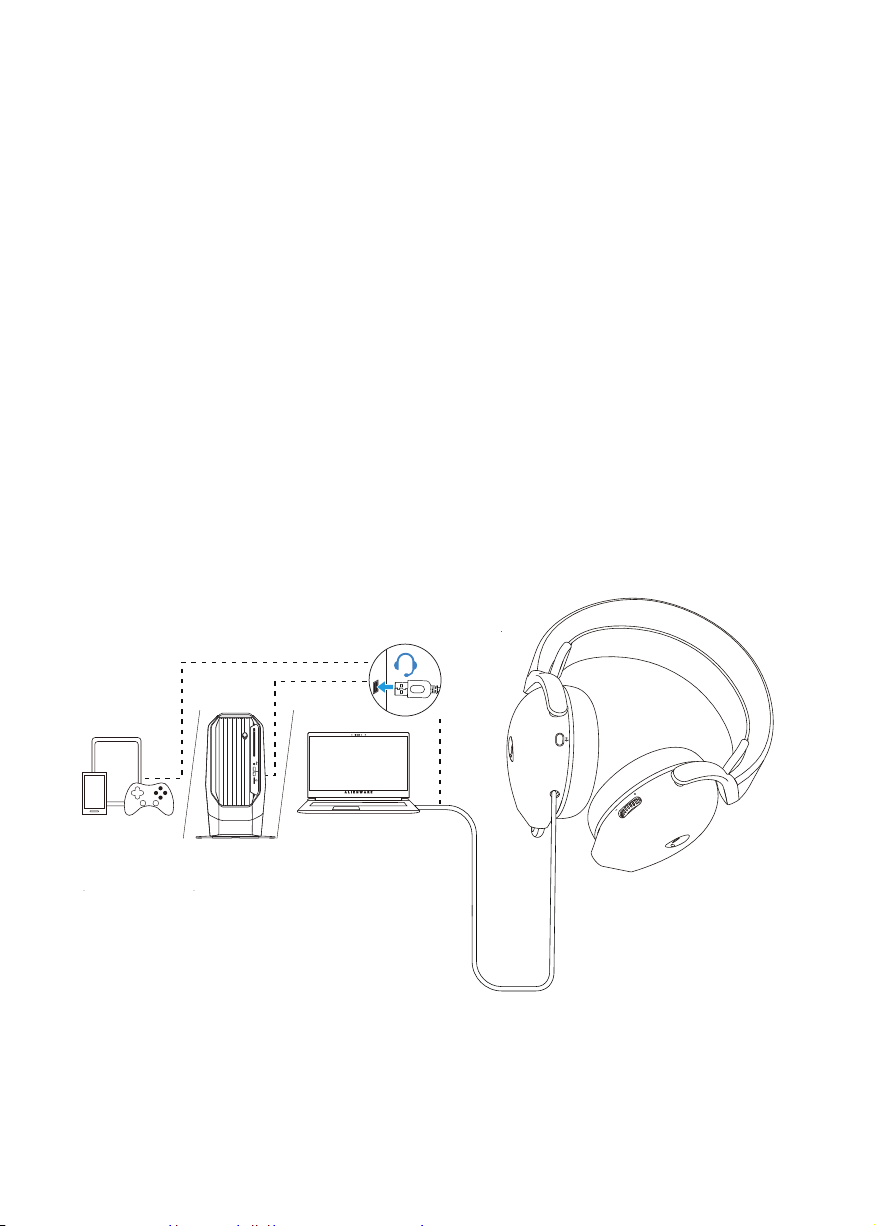
Connecting the headset to your device ..........................7
System requirements 7
...................................................................
Connecting the headset to your device with the USB-A
connector 7
Connecting the headset to your device using the 3.5 mm audio
adapter
..............................................................................................
8
...........................................................................................
Alienware Command Center (AWCC) ........................ 11
Installing AWCC through Windows Update............................. 12
Installing AWCC from the Dell Support website ..................... 12
Installing AWCC ......................................................................... 12
Activate Dolby Atmos for Headphone ......................... 12
Updating the firmware.................................................. 13
Using the headset.......................................................... 14
Configuring the headset on your computer ................. 9

3
Muting/unmuting the microphone
Volume Controls .............................................................. 15
..................................... 16
Replacing the ear pads ............................................................... 17
Regulatory logo position ............................................................ 18
Troubleshooting............................................................. 19
Specifications................................................................. 21
Warranty information.................................................... 22
Safety information......................................................... 23
Using features on the headset ..................................... 15

4
What‘s in the box
1 Alienware Wired Gaming Headset AW520H
3 Documents
2 3.5 mm audio adapter
NOTE: The documents shipped with your headset may vary depending on
the region.
AW520H
Dell.com/support/alienware/AW520H
12
3

5
Features
Headset
1 Microphone mute button 2 Volume control
5 Retractable microphone and microphone mute indicator
4
3 USB-A connector
3
2
4
1
5
LED indicator

6
Accessories
1 3.5 mm audio adapter

7
Connecting the headset to your device
System requirements
▪
▪
▪
Connecting the headset to your device with the USB-A connector
1. Connect USB cable on headset to your computer.
PlayStation®/Xbox/Switch/Mobile devices with 3.5 mm audio port
Microsoft Windows 10 or Microsoft Windows 11 64-bit
One USB port for headset

8
NOTE: The Alienhead LED is disabled when the headset is connected to
the device using the 3.5 mm audio adapter.
Connecting the headset to your device using the 3.5 mm audio
adapter
1. Connect one end of the 3.5 mm audio adapter to the USB-A connector of the
headset.
2. Connect the other end of the 3.5 mm audio adapter to the audio port on on the
device.

9
Configuring the headset on your computer
To use your headset for gaming or to listen to music from your computer, it has to
be selected as the default playback device and the default recording device in
Windows Audio Settings.
1. On the taskbar, right-click the speaker icon and click Sounds. The Sounds
dialog box appears.
2. Click on the Playbacktaband set the following:
▪Set AW520Has the default playback and communication device.

10
3. Click on the Recordingtab, set Alienware AW520H as the default
device.
4. Click on the Communications tab, select Do nothing. Click OK.
Adjust headset microphone volume and PC sound volume accordingly.

11
Alienware Command Center (AWCC)
Alienware Command Center (AWCC) provides a single interface to transform
your Windows computer into an enhanced gaming environment. This application
enables you to perform the following functions:
1. In theFX menu, you can access the following features:
▪Change lightingcolor and animation in the Lightingtab.
2. In the Settingstab, you can access the following settings:
▪View firmware version and upgrade the device firmware to the latest
version under the Updatetile.
▪Reset the device settings to factory default.
NOTE: For more information, please see the AWCC application Online Help.
Installing AWCC
To use the AWCC features, uninstall Alienware Headset Center (AWHC) if you
have already installed AWHC on your computer. You need to install AWCC to
configure the features available in Alienware Wired Gaming Headset AW520H.
Before installing AWCC on your computer, ensure that your computer is
connected to internet. If your computer is preinstalled with AWCC 5.0 or later,
you can configure your Alienware gaming headset throughFXavailable in AWCC.
If your computer is not preinstalled with AWCC 5.0 or later, install AWCC through
Windows Updateor from the Dell Support website at
https://www.dell.com/support. AWCC requires Windows 10 version 16299 or
later and Windows 11.
NOTE: The Alienhead LED is disabled when the headset is connected to the
device using the 3.5 mm audio adapter.

12
Installing AWCC through Windows Update
Connect your Alienware Wired Gaming Headset AW520H to your computer
through the USB port. The AWCC application is downloadedand installed
automatically.
2. AWCC installation may take up to 10 minutes to complete.
Go to the program folder to ensure that the AWCC installation is complete.
Then launch AWCC. Perform the following steps to downloadadditional
software:
▪In the Settingswindow, click Windows Update.
▪Click Check for updatesto check the Alienware driver update progress. If
the driver update is not responding on your computer, install AWCC from the
Dell support website.
Installing AWCC from the Dell Support website
1. Download the latest version of the following applications at
https://www.dell.com/support/drivers
▪Alienware Command Center
▪Alienware Gaming Headset driver
2. Go to the folder where you saved the setup files.
3. Double-click the setup file and follow the on-screen instructions to install the
application.
NOTE: You can customize headset features and lighting eects by
using the AWCC application.
Activate Dolby Atmos for Headphones
Dolby Atmos is automatically activated when connected to Microsoft Windows 10
and Microsoft Windows 11. Follow below instructions if you do not have Dolby
Access app installed:
1. Go to Microsoft Store.
2. Download the free Dolby Access app.
3. Connect the headset to the computer.
4. Once connected, Dolby Access will detect your device and activate Dolby
Atmos for Headphones.

CAUTION:
13
Updating the firmware
For best performance, update your headset firmware to the latest version.
Updating the headset firmware manually
1. Go to https://www.dell.com/support and search forAW520H.
2. From the Drivers & Downloadstab, download AW520H Headset FW
update tool.
3. Connect your headset to your computer through the USB cable.
4. Open the downloaded AW520H Headset FWupdate toolfile.
5. Click on the Update button. Once the firmware update iscomplete, the
“Success” message isdisplayed.
6. Close the window.
Disconnecting the USB cable from the computer, closing the
AWCC software, or shut down of computer during firmware update may
damage the headset.

14
Using the headset
Adjusting the headset
Shift the headband and ear pads to find the optimal fit for your head. Shift the elastic
band up and down for the best fit. When using the microphone, position it
approximately two centimeters away from your mouth.

15
Using features on the headset
Scroll the volume control wheel to increase or decrease the volume. Scroll up for
volume up, scroll down for volume down.
Adjusting the volume

16
Muting/unmuting the microphone
When the microphone is pulled out, the user can mute and unmute the microphone
by pressing the microphone-mute button.
The microphone-mute LED lights up in red when the microphone is muted.

17
Replacing the ear pads
To remove the ear pad:
1. Hold the ear pad firmly and twist towards the back of the headset.
2. Gently pull the ear pad out.
Note that left and right ear pads are dierent.
To replace the ear pad.
1. Fit the arrow marks on the ear pad to the headset.
Step 2
Step 1
Step 2
Step 1
Step 1
Step 2
Step 1
Step 2

18
Regulatory information
Regulatory information is located beneath ear pad on the right ear cup. Remove
the right ear pad to see this information.
CN-06305K-6HS00
-33J-0001-A00
Mfg Date: Mar 2023

19
Troubleshooting
Problems Possible solutions
Headset has no sound Ensure that the audio player is playing music, and that
the computer volume and media player volume are not
muted.
Check playback device menu on the computer, and
ensure that the default device is set to AW520H.
Check playback setting on the computer, and ensure
that the default device is set to AW520H.
Test the headset on another computer.
The person on
the other end
cannot hear me
Ensure that the microphone is positioned approximately
2 cm from your mouth.
Ensure that the microphone is not muted.
Abnormal sound
is coming out of
the headset
Check if something is obstructing the headset.
Adjust the volume level up and down, and check if
the abnormal soundchanges.
Check recording device menu on the computer, and
ensure that the default device is set to AW520H.
Ensure that the 3.5 mm audio adapter is connected to
the USB-A connector on your headset.
Ensure that the 3.5 mm adapter end is connected to
the playback device.
Table of contents
Other Dell Headset manuals