Deltec PF 501 Guide

PF 501 –PF 1370
Bedienungsanleitung
und Ersatzteilliste
Operating instruction
and Spare parts list
Istruzioni d’uso
e parti di ricambio
Instructions d'emploi et
Accessoires et pièces
détaches
Руководство по
обслуживанию и список
запасных частей

DE
Wichtige Sicherheitshinweise
Warnung: Zum Schutz vor Verletzungen sollten grundlegende Vorsichtsmaßnahmen und folgende Sicherheitshinweise
beachtet werden.
1) Sicherheitshinweise Lesen und befolgen
2) Gefahr: Zur Vermeidung eines elektrischen Schlages sollten alle Aquarium Geräte mit Vorsicht gehandhabt
werden. In keinem der unten aufgeführten Fälle sollte die Reparatur vom Kunden versucht werden. Das Gerät
muss zu einen autorisierten Kundendienst gebracht werden.
a) Wenn das Gerät in das Wasser fällt, NICHT danach greifen. Zuerst den Stecker aus der Netzsteckerdose ziehen
und dann das Gerät aus dem Wasser Holen. Wenn Elektroteile des Gerätes nass werden muss das Gerät sofort
ausgesteckt werden.
b) Wenn am Gerät ein abnormaler Wasseraustritt beobachtet wird, muss es sofort ausgesteckt werden.
c) Nach der Installation sollte das Gerät sorgfältig überprüft werden. Es darf nicht eingesteckt werden, wenn sich auf
Teilen, die trocken bleiben müssen, Wasser befindet.
d) Ein Gerät mit beschädigtem Kabel oder Stecker darf nicht in Betrieb genommen werden. Das gleiche gilt, wenn
das Gerät nicht richtig funktioniert, fallen gelassen oder anderweitig beschädigt wurde.
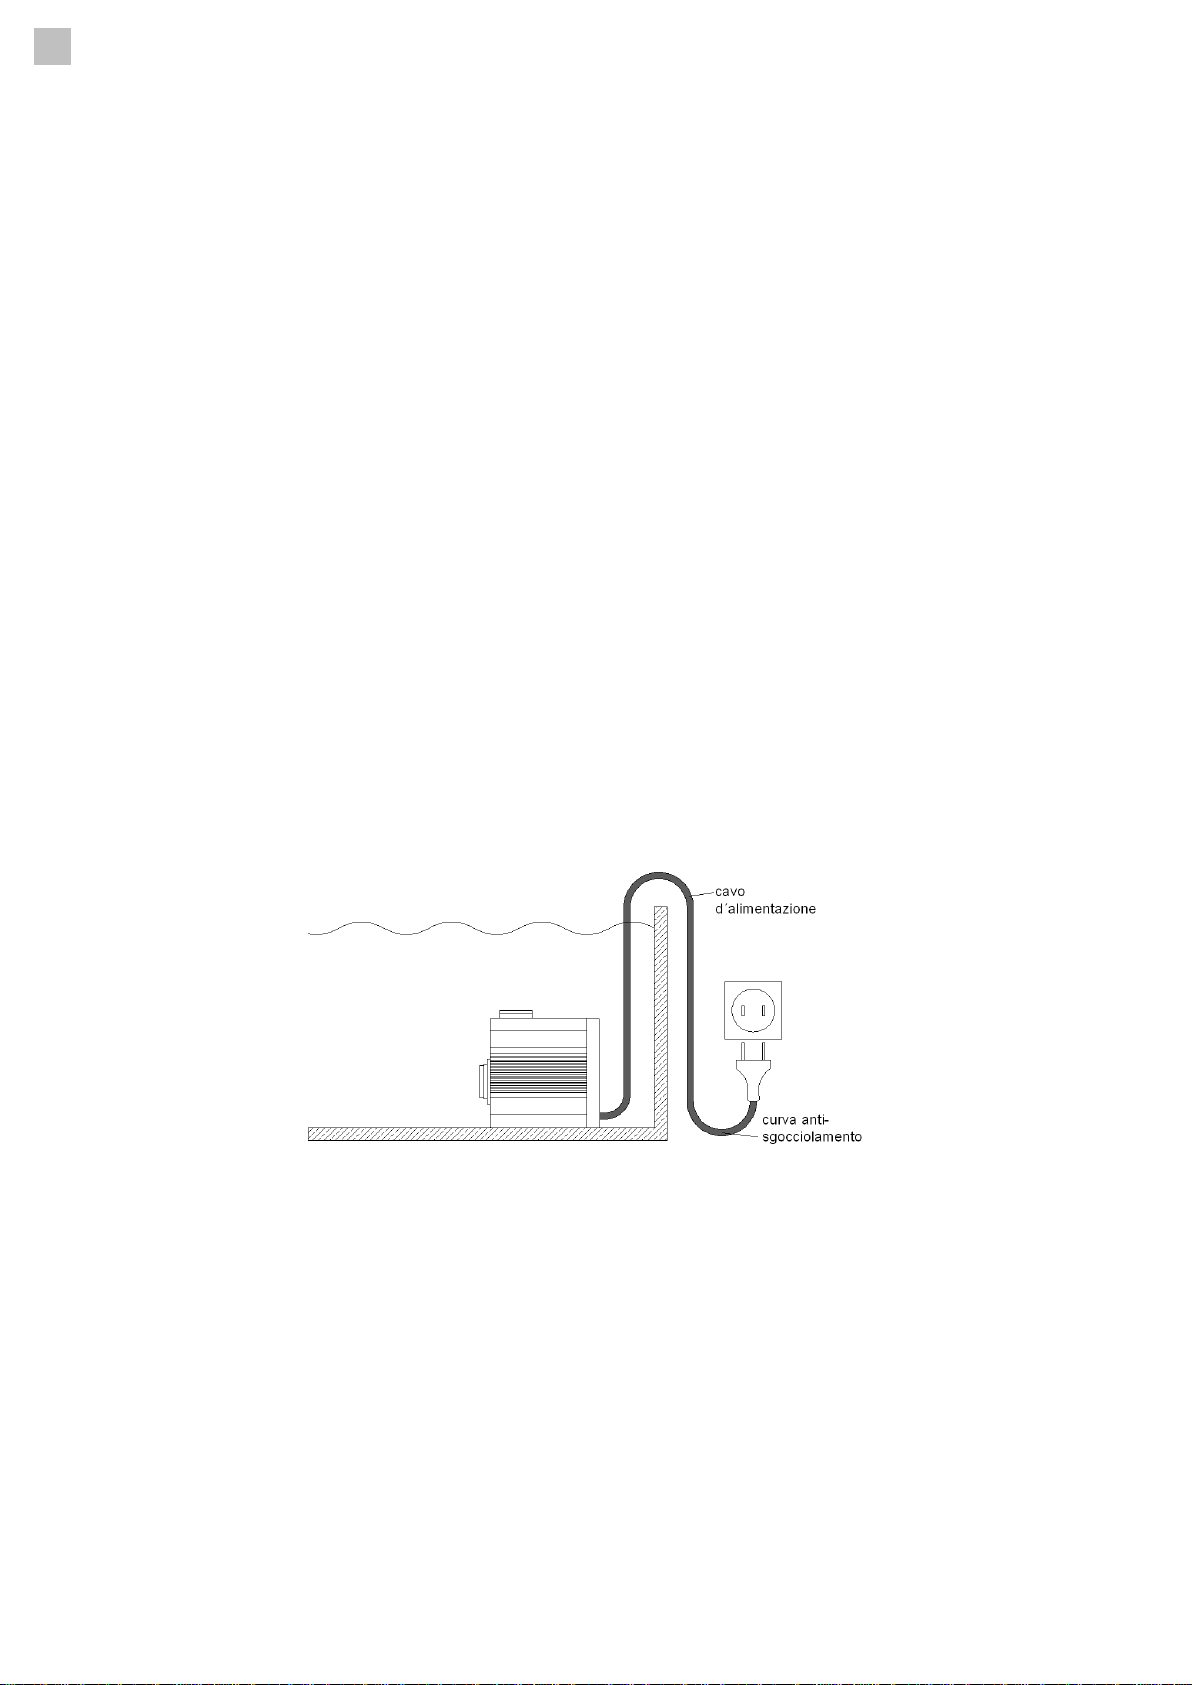
e) Um ein Nasswerden des Gerätesteckers oder der Steckdose zu vermeiden, sollten der Aquarium Unterschrank
und das Becken seitlich von der Wandsteckdose aufgestellt werden. Somit können keine Tropfen auf den Stecker
oder die Steckdose fallen. Eine „Tropfenschleife“ sollte in jedem Kabel zwischen Aquarium und Wandsteckdose
vorgesehen werden.
Die „Tropfenschleife“ ist der Teil des Kabels, der bei Verwendung eines Verlängerungskabels unter der Steckdose
durchhängt (Bild). Auf diese Weise tropft das Wasser unter der Steckdose vom Kabel ab und kann nicht mit
dieser in Berührung kommen. Wenn der Stecker oder die Steckdose nass wird, NICHT das Kabel herausziehen,
sondern die Stromversorgung an der Sicherung bzw. am Leistungsschalter trennen. Dann erst den Stecker
herausziehen und prüfen, ob sich Wasser in der Steckdose befindet.
3) Kinder müssen beaufsichtigt werden, wenn Sie sich am Aquarium oder in dessen nähe Aufhalten.
4) Zur Vermeidung von Verletzungen keine beweglichen oder heißen Teile, wie z.B. Heizungen, Reflektoren ,
Glühbirnen usw. berühren.
5) Bei Nichtverwendung, vor dem Montieren/Demontieren von Teilen oder vor dem Reinigen müssen die betroffenen
Geräte stets ausgesteckt werden. Nicht am Kabel ziehen. Zum Herausziehen des Kabels immer den Stecker
greifen.
6) Die Geräte dürfen nur für den vorgesehenen Zweck verwendet werden. Die Verwendung von Zubehör, das vom
Hersteller nicht empfohlen oder verkauft wird, kann gefährliche Bedingungen verursachen.
7) Das Gerät nicht an einer Stelle installieren oder lagern, wo es der Witterung oder Temperaturen unter null Grad
ausgesetzt ist.
8) Vor der Inbetriebnahme eines an der Beckenwand montierten Gerätes muss sichergestellt werden, dass dieses
richtig installiert und befestigt ist.
9) Alle Sicherheitshinweise auf dem Gerät müssen gelesen werden.
10) Wenn ein Verlängerungskabel notwendig ist, muss dieses die erforderliche Leistung haben. Ein Kabel, das für
weniger Ampere oder Watt zugelassen ist, kann sich überhitzen. Das Kabel ist so zu verlegen, dass niemand
darüber stolpern oder daran hängen bleiben kann.
11) Das Gerät ist mit einem Schukostecker ausgestattet. Dieser Stecker darf auf keine Weise verändert oder
umgangen werden.
Wird der Stecker entfernt erlischt jeder Garantieanspruch!
Diese Anleitung aufbewahren

DE
Deltec Fließbett Kalkreaktor PF 501 - PF1370
Die Deltec PF Kalkreaktoren arbeiten nach dem Fließbettverfahren, wodurch die Verwendung eines
feinkörnigen Granulates ermöglicht wird.
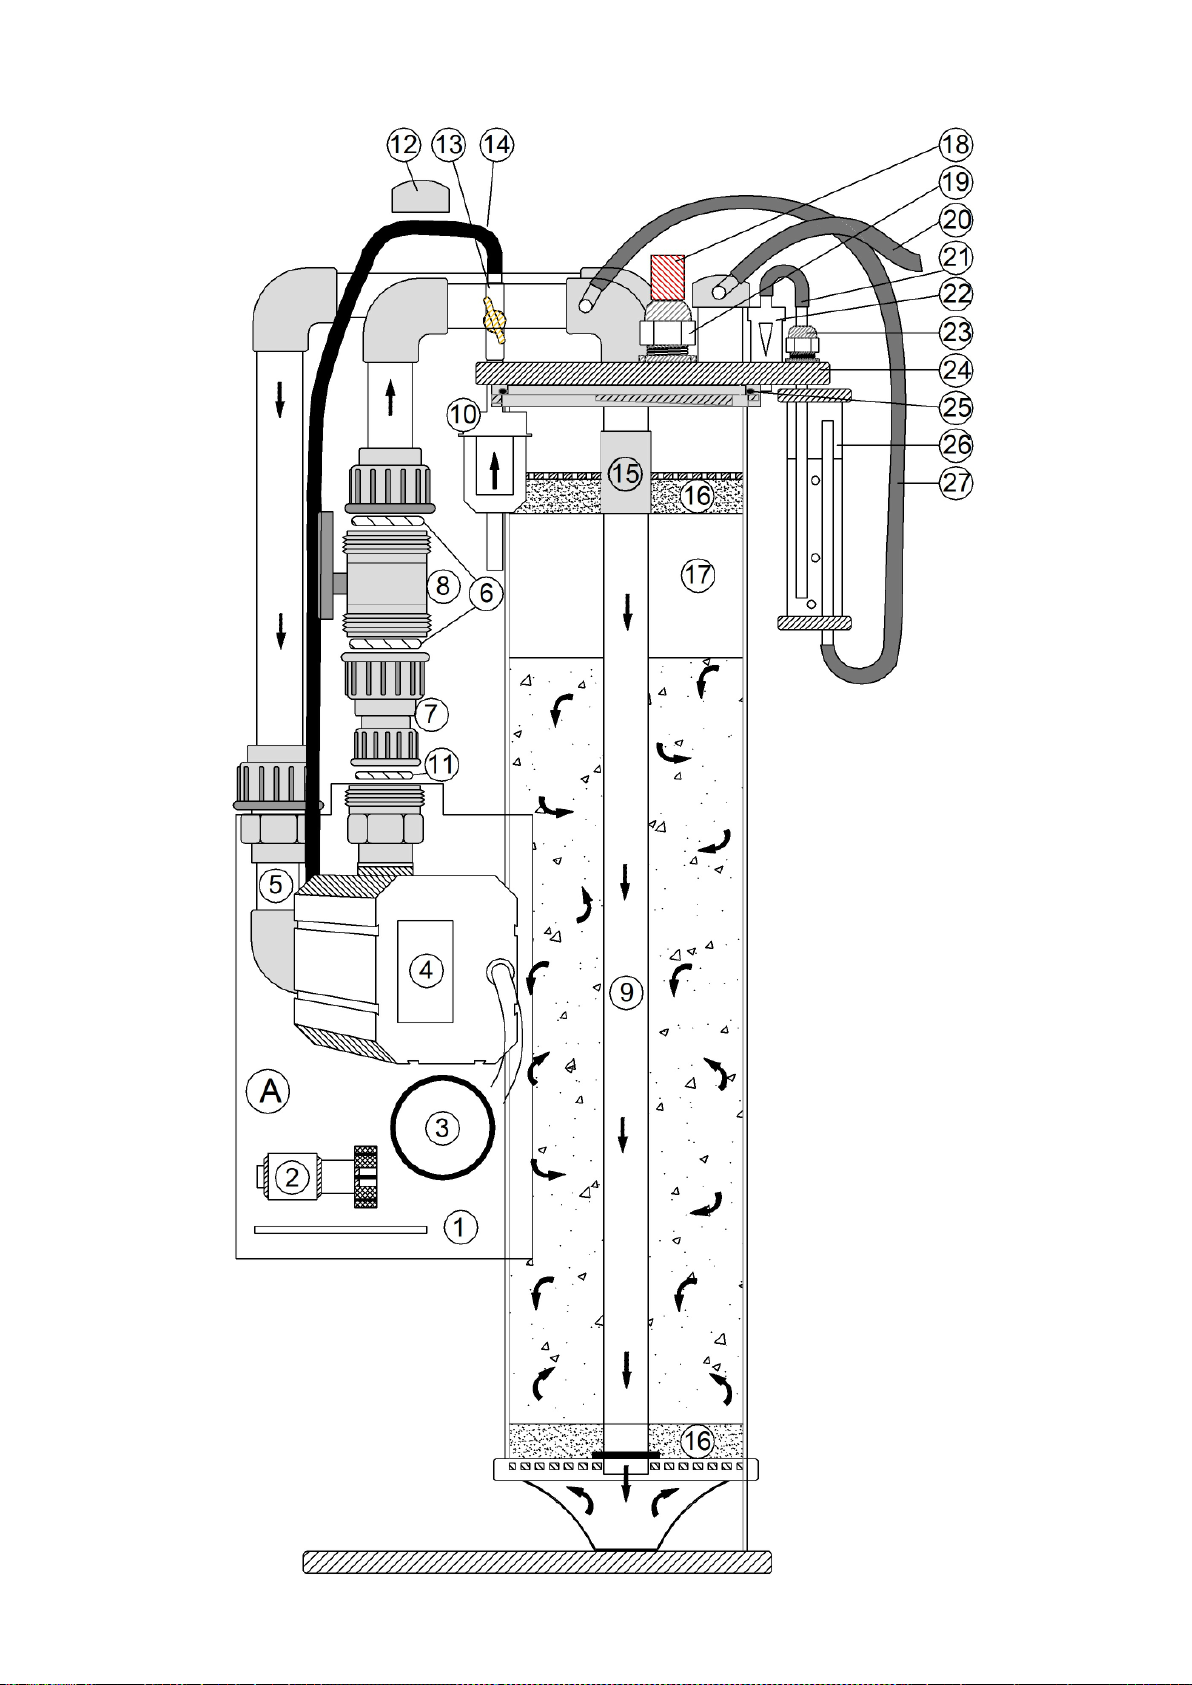
Die Deltec PF Kalkreaktoren bestehen aus:
- transparentem Behälter - Zirkulationspumpe
- Blasenzähler - Magnetventil ( Optional)
- Rückschlagventil - Verschraubung für pH Elektrode
- Microfilter
Granulat / Befüllung
-Das Granulat muss vor dem Befüllen des Kalkreaktors gründlich gewaschen werden.
-Der Kalkreaktor sollte plan, in unmittelbarer Nähe des Aquariums oder des Außenfilters aufgestellt
werden.
-Der Reaktorkopf ist mit dem Reaktor durch einen Bajonettverschluss verbunden. Durch drehen des
Reaktorkopfes entgegen dem Uhrzeigersinn kann der Kopf abgenommen, und die Siebplatte mit
Schwamm entnommen werden.
-Der Kalkreaktor darf nur bis zur markierten Höhe befüllt werden.
-Um ein Eindringen von Granulat in das zentrale Druckrohr Pos. 15 zu verhindern, die Kappe Pos. 12 auf
das Druckrohr stecken.
-Nach dem befüllen die Siebplatte mit dem Schwamm nach unten in das Reaktorrohr einsetzen.
-Vor dem Aufsetzen des Reaktorkopfes ist sicherzustellen, dass der O-Ring und alle Dichtflächen sauber
sind.
-Es ist empfehlenswert den O-Ring und die Dichtflächen mit Silikonspray oder Fett zu behandeln.
-Danach den Reaktorkopf im Uhrzeigersinn nur handfest anziehen.
Blasenzähler
Der Blasenzähler sollte unter einem Wasserhahn mit Wasser gefüllt werden. Dazu löst man die
Verschraubung und entfernt die CO2Schläuche.
Anschließen des Reaktors
-Nach dem der Blasenzähler wieder montiert ist, schließt man (falls vorhanden) das Magnetventil an die
CO2 Anlage an.
-Der Eingang des Microfilters wird mit einem Aquariumwasser führenden Schlauch verbunden. Das kann
über eine kleine separate Pumpe oder über eine Abzweigung von der Hauptpumpe erfolgen.
-Den Rücklaufschlauch niemals verschließen, da sonst im Reaktor ein unzulässig hoher Druck entstehen
kann.
-Nachdem dar Reaktor mit Wasser gefüllt ist und das Wasser aus dem Ablaufschlauch läuft, die Pumpe
starten.
-Die CO2 Zufuhr öffnen und auf 1-2 Blasen/sec. Einstellen
-Den Wasserdurchfluss auf ca. 2-4 Tropfen/sec. Einstellen.
Über die CO2 und Wasserzufuhr kann die Leistung des Reaktors geregelt werden.
Mit einem pH-Regelgerät kann der pH-Wert im Reaktor automatisch geregelt werden. Der Reaktor sollte mit
einem pH-Wert zwischen 6,2 und 6,5 betrieben werden. Um optimale Ergebnisse zu erzielen sollte nur
Aqua Crown Hy Carb oder Hy Carb Special verwendet werden.
Technische Daten
Maße (l/b/h) ca.
Füllmenge ca.
für Aquarien bis ca.
Rohr ø
PF 501
200 x 170 x 500 mm
2,9 kg
1000 Ltr.
110 mm
PF 601
260 x 210 x 550 mm
8,7 kg
2000 Ltr.
160 mm
PF 601S
305 x 255 x 550 mm
14,0 kg
3000 Ltr.
200 mm
PF 1001
375 x 305 x 1080 mm
34,0 kg
5000 Ltr.
200 mm
PF 1370
480 x 350 x 1300 mm
97,0 kg
20000 Ltr.
300 mm

EN
IMPORTNT SAFETY INSTRUCTIONS
WARNING To guard against injury, basic safety precautions should be observed, including the following.
1) READ AND FOLLOW ALL SAFETY INSTRUCTIONS.
2) DANGER –To avoid possible electric shock, special care should be taken since water is employed in the use of
aquarium equipment. For each of the following situations, do not attempt repairs by yourself; return the
appliance to an authorized service facility for service or discard the appliance.
a) If the appliance falls into the water DON´T reach for it! First unplug it and then retrieve it. If electrical
components of the appliance get wet, unplug the appliance immediately. (Non-immersible equipment only)
b) If the appliance shows any sign of abnormal water leakage, immediately unplug it from the power source.
(Immersible equipment only)
c) Carefully examine the appliance after installation. It should not be plugged in if there is water on parts not
interned to be wet.
d) Do not operate any appliance if it has a damaged cord or plug, or if it is malfunctioning or has been dropped or
damaged in any manner.
e) To avoid the possibility of the appliance plug or receptacle getting wet, position aquarium stand and tank to one
side of a wall-mounted receptacle to prevent water from dripping onto the receptacle or plug.
A “drip-loop”, shown in the figure below, should be arranged by the user for each cord connecting an aquarium
appliance to a receptacle. The “drip-loop” is that part of the cord below the level of the receptacle, or the
connector if an extension cord is used, to prevent water travelling along the cord and coming in contact with
the receptacle.
If the plug or socket does get wet, DON´T unplug the cord. Disconnect the fuse or circuit breaker that supplies
power to the appliance. Then unplug and examine for presence of water in the receptacle.
3) Close supervision is necessary when any appliance is used by or near children.
4) Always unplug an appliance from an outlet when not in use, before putting an or taking off parts, and before
cleaning. Never yank cord to pull plug from outlet. Grasp the plug and pull to disconnect.
5) Do not use an appliance for other than intended use. The use of attachments not recommended or sold by the
appliance manufacturer may cause an unsafe condition.
6) Make sure an appliance mounted on a tank is securely installed before operating it.
7) Read and observe all the important notices on the appliance.
8) If an extension cord is necessary, a cord with a proper rating should be used. A cord rated for less amperes or
watts than the appliance rating may overheat. Care should bee taken to arrange the cord so that it will not be
tripped over or pulled.
9) This appliance has a polarized plug (one blade is wider than the other). As safety feature, this plug will fit in a
polarized outlet only one way. If the plug does not fit, contact a qualified electrician. Never use with an extension
cord unless plug can be fully inserted. Do not attempt to defeat this safety feature.
Exception: This instruction may be omitted for an appliance that is not provided with a polarized attachment plug.
Removing of the plug invalidates the warranty!
SAVE THESE INSTRUCTIONS

EN
Deltec Fluidised Bed Calcium Reactor PF501 - PF1370
The correct calcium level is a vital requirement in keeping and growing corals successfully in marine aquaria.
The calcium level should be kept above 400 and preferably at 470/500 mg/litre.
With the Deltec calcium reactor it is possible to adjust and control the calcium level in a simple manner.
The Deltec calcium reactor consists of
-a cylindrical transparent container
-bubble counter
-solenoid valve (optional)
-non return valve
-provision for pH electrode
-micro filter
Installation and operating instruction
Wash the granulate to be used thoroughly before filling it into the Deltec calcium reactor. The granulate
must be free of all floating matters and other foreign particles.
The Deltec PF Calcium reactors operate on the fluidized bed principle; it is therefore important to use only
Deltec Hy Carb Media to achieve best results.
-Remove the reactor head by turning it anticlockwise.
-Remove the strainer plate and sponge.
-Fit the cap No. 12 over the central feed pipe No. 15 to prevent media to enter the pipe.
-Fill the Vessel up to the fill line.
-Refit the strainer plate with the sponge pointing downwards.
-Clean the O-Ring and all sealing surfaces and grease the O-Ring with silicon spray or silicon grease.
-Refit the reactor head and turn it clockwise
Place the Deltec calcium reactor on an even surface, close to the filter sump or the aquarium.
Please note
The bubble counter should be filled with tap water. To do this, loosen the cap nut of the pressure fitting,
remove the hoses, withdraw the bubble counter and fill it under a tap.
Connecting the reactor
-Connect a flexible CO2 supply hose to the bubble counter (or the solenoid valve if supplied).
-The micro filter should be connected to a water supply either from a separate
pump or else to a bypass of the main aquarium pump.
-Open the tap at the micro filter and allow the Deltec calcium reactor to be filled.
-Start the circulation pump
-To ease bleeding, raise the outlet hose higher than the reactor body for a short period.
Open and set the CO2 supply to app. one bubble per second. Adjust the tap at the micro filter to a drip (app.
2-4 drops/second, coming out at the outlet hose).
Please note
To adjust the DKH (calcium level) either increase the CO2or decrease the water flow. Avoid excessive supply
of CO2. Please ensure that sufficient time is allowed for any adjustments to take effect before testing the
water. The Deltec calcium reactor can also be operated automatically by fitting a pH electrode instead of
the red plug at the top of the Deltec calcium reactor. A suitable pH controller would control the pH value by
opening/closing the solenoid valve. For normal operation the pH level should be between 6,2-6,5.
To get best results, it is important to check the correct water flow and CO2supply on a regular basis and the
resulting DKH level at the outlet.
Important
Never restrict or block the water flow from the outlet hose, since this could lead to on increase of pressure
inside the reactor.
technical data
dimensions (l/w/h) app.
quantity app.
for aquaria up to
tube ø
PF 501
200 x 170 x 500 mm
2,9 kilos
1000 ltr.
110 mm
PF 601
260 x 210 x 550 mm
8,7 kilos
2000 ltr.
160 mm
PF 601S
305 x 255 x 550 mm
14,0 kilos
3000 ltr.
200 mm
PF 1001
375 x 305 x 1080 mm
34,0 kilos
5000 ltr.
200 mm
PF 1370
480 x 350 x 1300 mm
97,0 kilos
20000 ltr.
300 mm
IT
NORME DI SICUREZZA
AVVERTENZA: Per evitare incidenti si raccomanda di osservare le norme generali di sicurezza, tra cui le seguenti:
1) LEGGERE E SEGUIRE SCRUPOLOSAMENTE TUTTE LE NORME DI SICUREZZA.
2) PERICOLO –Considerato che l’uso di attrezzature per acquario avviene in presenza di acqua, agire sempre con
particolare cautela per evitare scosse elettriche. Per ognuna delle seguenti situazioni possibili, si raccomanda di
non tentare di eseguire da sé eventuali riparazioni, ma di portare l’apparecchio presso un centro assistenza
autorizzato o provvedere alla sua rottamazione.
a. (Solo per apparecchiature che non prevedono l’uso in immersione). Se l’apparecchio cade nell’acqua, NON
tentare di recuperarlo! Per prima cosa scollegare l’alimentazione elettrica, quindi procedere al recupero. Se i
componenti elettrici dell’apparecchio si bagnano, scollegare immediatamente l’alimentazione.
b. (Solo per apparecchi ad immersione). Se l’apparecchio mostra perdite d’acqua anormali, scollegarlo
immediatamente dall’alimentazione.
c. Dopo avere installato l’apparecchio, eseguire un controllo accurato. Non collegare l’apparecchio
all’alimentazione nel caso si osservi la presenza di acqua in parti non destinate ad essere bagnate.
d. Non mettere in funzione l’apparecchio se il cavo d’alimentazione o la spina appaiono danneggiati, se
l’apparecchio è malfunzionante, se è caduto o ha subito un qualsiasi danno.
e. Per evitare il gocciolamento dell’acqua sulla presa o sulla spina, posizionare l’acquario e il mobile di fianco alla
presa montata a parete in modo che questa resti visibile.
Si raccomanda di fare eseguire al cavo una curva “anti-gocciolamento” come mostrato nella figura sottostante.
Eseguire l’operazione per tutti i componenti elettrici dell’acquario. In questo modo una parte di cavo si trova
sotto il livello della presa, o della spina di collegamento nel caso si usi una prolunga, impedendo così che l’acqua
gocciolando lungo il cavo venga a contatto con la presa.
Se la presa o la spina si bagna, NON disinserire il cavo, ma scollegare l’interruttore generale che porta corrente
all’apparecchio. Quindi scollegare la spina e verificare la presenza di acqua all’interno della presa.
3) Se l’apparecchio viene utilizzato da o in presenza di bambini, è necessaria un’attenta supervisione da parte degli
adulti.
4) Scollegare sempre il cavo d’alimentazione quando l’apparecchio è inutilizzato, prima di aggiungere o prelevare
delle parti e prima di effettuare la pulizia. Per scollegare il cavo d’alimentazione, afferrare bene la spina ed
estrarla dalla presa senza tirare mai direttamente il cavo.
5) Non utilizzare l’apparecchio per usi diversi da quelli a cui è destinato. L’uso di accessori non raccomandati o non
venduti dal produttore dell’apparecchio possono essere causa di condizioni di funzionamento non sicure.
6) Assicurarsi che gli apparecchi montati sull’acquario siano correttamente installati prima di avviarli.
7) Leggere ed osservare tutte le informazioni importanti sull’apparecchio.
8) Se è necessario l’uso di una prolunga, assicurarsi che il cavo sia adatto al voltaggio utilizzato. Se il cavo è messo
a punto per meno ampere or watt rispetto all’apparecchio, potrebbe surriscaldarsi. Fare attenzione che il cavo non
sia troppo teso o schiacciato.
9) (Solo per UK) Questo apparecchio è dotato di spina polarizzata (uno spinotto è più largo dell’altro). Come misura
di sicurezza, tale spina potrà essere inserita in un solo modo in una presa polarizzata. Se la spina non è adatta,
rivolgersi ad un elettricista qualificato. Non utilizzare una prolunga se la spina non si inserisce completamente.
Non tentare di eludere questa condizione di sicurezza.
Eccezione: Questa avvertenza può essere omessa se l’apparecchio non è dotato di spina polarizzata.
In caso di manomissione della spina decade ogni garanzia!
“CONSERVATE LE PRESENTI ISTRUZIONI”

IT
Deltec Reattore di calcio a letto fluido PF 501 - PF1370
I Reattori di calcio PF Deltec funzionano secondo il procedimento delle resine a letto misto che permette
l’uso di un granulato fine.
I Reattori di calcio PF Deltec sono costituiti da:
- contenitore trasparente - pompa di circolazione
- contabolle - elettrovalvola (opzionale)
- valvola di non ritorno - collegamento a vite per elettrodo pH
- microfiltro
Granulato / Carica
-Lavare accuratamente il granulato prima di riempire il reattore di calcio.
-Installare il reattore di calcio su una superficie piana, nelle immediate vicinanze dell’acquario o del filtro
esterno.
-Collegare la testa del reattore al reattore mediante un innesto a baionetta. Ruotando la testa del reattore
in senso antiorario è possibile smontare la testa ed estrarre la lastra perforata con la spugna.
-Riempire il reattore di calcio solo fino all’altezza indicata.
-Per evitare l’introduzione di granulato nel tubo a pressione centrale (15) posizionare sopra lo stesso il
tappo (12).
-Dopo il caricamento inserire la lastra perforata e la spugna spingendole verso il basso nel tubo del
reattore.
-Prima di posizionare la testa del reattore, assicurarsi che l’O-Ring e tutte le superfici di tenuta siano
pulite.
-Si consiglia di trattare l’O-Ring e le superfici di tenuta con spray al silicone o lubrificante.
-Fissare la testa del reattore semplicemente avvitandola a mano girando in senso orario .
Contabolle
Riempire il contabolle con acqua sotto un rubinetto. Per smontarlo allentare il raccordo a vite e rimuovere i
tubi CO2.
Collegamento del reattore
-Dopo avere rimontato il contabolle, collegare l’elettrovalvola (se presente) all’impianto CO2.
-Collegare l’entrata del microfiltro con un tubo che porta acqua dall’acquario, utilizzando una piccola
pompa separata o una diramazione della pompa principale.
-Non chiudere mai il tubo di ritorno, altrimenti nel reattore può formarsi una pressione eccessiva.
-Quando il reattore è pieno d’acqua e l’acqua fuoriesce dal tubo di scarico, azionare la pompa.
-Aprire l’immissione di CO2 ed impostare su 1-2 bolle/sec.
-Regolare il flusso dell’acqua a ca. 2-4 gocce/sec.
La resa del reattore può essere regolata attraverso l’immissione di CO2 e acqua.
Il valore pH nel reattore può essere regolato automaticamente tramite un apparecchio di regolazione del
valore pH. Il reattore deve funzionare ad un valore pH tra 6,2e 6,5. Per un risultato ottimale si raccomanda di
utilizzare solo il granulato Aqua Crown Hy Carb o Hy Carb Special.
Dati tecnici
Dimensioni (l/l/h) ca.
Q.tà a pieno ca.
Per acquari fino a
tubo ø
PF 501
200 x 170 x 500 mm
2,9 kg
1000 l
110 mm
PF 601
260 x 210 x 550 mm
8,7 kg
2000 l
160 mm
PF 601S
305 x 255 x 550 mm
14,0 kg
3000 l
200 mm
PF 1001
375 x 305 x 1080 mm
34,0 kg
5000 l
200 mm
PF 1370
480 x 350 x 1300 mm
97,0 kg
20000 l
300 mm

FR
Instructions de sécurité importantes
Avertissement : Pour protéger contre quelconques blessures, il faut respecter les mesures de prudence et les instructions
de sécurité suivantes :
1) Lire et respecter les instructions de sécurité.
2) Danger : Pour éviter une électrocution, il faut manipuler tous les appareils de l'aquarium avec prudence. Dans
aucun des cas indiqué plus bas, le client ne devrait pas essayer de procéder à une réparation. L’appareil doit être
délivré au service après-vente autorisé.
f) Si l'appareil tombe dans l'eau, NE PAS essayer de le saisir. Retirer d’abord la fiche de la prise de courant secteur
puis sortir l'appareil de l'eau. Si les pièces électriques de l’appareil sont mouillées, il faut retirer immédiatement la
prise de l’appareil.
g) Si vous observez une fuite d'eau anormale sur l'appareil, il faut retirer immédiatement la prise de l’appareil.
h) Après l'installation, il faut vérifier soigneusement l'appareil. Il ne faut pas enficher sa prise quand de l'eau se
trouve sur des pièces qui doivent rester sèches.
i) Un appareil muni d’un câble ou d’une fiche détériorés ne doit pas être mis en service. Ceci est aussi valable quand
l’appareil ne fonctionne pas correctement, est tombé par terre ou a été détérioré d’une autre manière.
j) Pour éviter que la fiche de l'appareil ou la prise de courant se mouille, il faut placer le meuble de l’aquarium et le
bassin à côté de la prise de courant murale. Ainsi aucune goutte d'eau ne tombera sur la fiche ou la prise de
courant. Une « boucle d’égouttage » devrait être prévue entre l'aquarium et la prise de courant murale. La
« boucle d’égouttage » est la partie du câble qui fléchit sous la prise de courant en cas d’emploi d’une rallonge.
De cette manière, l'eau s'égouttera sous la prise de courant du câble et ne pourra pas entrer en contact avec
celui-ci. Si la fiche ou la prise de courant se mouille, NE PAS retirer le câble mais couper l’alimentation en courant
au fusible ou au sectionneur de puissance. Ne retirer la fiche qu’après avoir ceci et vérifier si de l'eau se trouve
dans la prise de courant.
3) Les enfants doivent être surveillés quand vous vous occupez de l'aquarium ou vous vous trouvez à proximité.
4) Pour éviter quelconques blessures, ne pas toucher les pièces mobiles ou chaudes, telles que les chauffages, les
réflecteurs, les ampoules etc.
5) Les fiche des appareils qui ne sont pas utilisés, avant le montage/démontage de pièces de ces appareils ou avant
leur nettoyage, doivent être retirées. Ne pas tirer au câble. Pour sortir le câble, toujours saisir la fiche.
6) Les appareils ne doivent être utilisés qu'aux fins prévues. L’emploi d’accessoires que le fabricant n'a pas
recommandés ou vendus, peut causer des conditions dangereuses.
7) Ne pas installer ou entreposer l’appareil à un endroit où il est exposé aux intempéries ou à des températures en
dessous de zéro.
8) Avant la mise en service d’un appareil monté à la paroi du bassin, il faut garantir que cet appareil est
correctement installé et fixé.
9) Toutes les indications de sécurité sur l'appareil doivent être lues.
10) S'il faut utiliser une rallonge, elle doit avoir la puissance nécessaire. Un câble qui est homologué pour peu
d’ampères ou de watts, peut se surchauffer. Le câble doit être posé de sorte que personne ne trébuche dessus ou
y reste accroché.
11) L’appareil est équipé d’une fiche à contact de protection. Cette fiche ne doit en aucun cas être modifiée ou
contournée.
Si la fiche est retirée, tout droit à garantie sera annulé !
Conserver ces instructions

FR
Deltec Réacteur à calcaire à lit fluidisé PF 501 - PF1001
Les Deltec PF Réacteurs à calcaire travaillent selon le principe du lit fluidisé, ce qui permet l'emploi d’un
granulat à grains fins.
Les Deltec PF Réacteurs à calcaire se compose de :
- Conteneur transparent - Pompe à circulation
- Compte-bulles - Électrovanne (en option)
- Clapet antiretour - Raccord à vis pour électrode pH
- Microfiltre
Granulat / Remplissage
-Le granulat doit être lavé soigneusement avant le remplissage dans le réacteur à calcaire.
-Le réacteur à calcaire doit être placé à plat, à proximité immédiate de l'aquarium ou du filtre extérieur.
-La tête du réacteur est reliée au réacteur par une fermeture à baïonnette. En tournant la tête du réacteur
dans le sens inverse aux aiguilles d'une montre, retirer la tête et prélever la plaque filtrante avec
l’éponge.
-Le réacteur à calcaire ne peut être rempli que jusqu'à hauteur du repère.
-Pour éviter que des granulats ne pénètrent dans le tuyau de refoulement central Pos. 15, enficher le
capuchon Pos. 12 sur le tuyau de refoulement.
-Après le remplissage, insérer la plaque filtrante avec l'éponge vers le bas dans le tuyau du réacteur.
-Avant d'enficher la tête du réacteur, il faut s'assurer que l'anneau torique et toutes les surfaces de joint
sont propres.
-Il est conseillé de traire l'anneau torique et les surfaces de joint avec un spray à la silicone ou de la
graisse.
-Ensuite ne resserrer la tête du réacteur dans le sens des aiguilles d'une montre qu’à la main.
Compte-bulles
Le compte-bulles devrait être rempli d’eau sous un robinet à eau. Pour ce faire, dévisser le raccord et retirer
les tuyaux à Co2.
Raccorder le réacteur
-Après le remontage du compte-gouttes, raccorder l'électrovanne (s'il en existe une) à l'installation à CO2
-L'entrée du microfiltre sera reliée à un tuyau conduisant de l’eau d’aquarium. Ceci peut se faire via une
petite pompe à part ou une dérivation de la pompe principale.
-Ne jamais fermer le tuyau de retour, car sinon une pression d’un niveau inadmissible peut se produire
dans le réacteur.
-Après avoir rempli le réacteur d'eau et après que l'eau s'écoule hors du tuyau d'évacuation, faire
démarrer la pompe.
-Ouvrir l'alimentation en CO2 et régler sur 1-2 bulles/s.
-Régler le débit d'eau sur 2-4 gouttes/s. env.
La puissance du réacteur peut être réglée via l'alimentation en CO2 et en eau.
La valeur du pH peut être réglée automatiquement dans le réacteur avec un régulateur de pH. Le réacteur
devrait être exploité avec une valeur du pH entre 6,2 et 6,5. Pour obtenir des résultats optimaux, il ne faut
utiliser que Aqua Crown Hy Carb ou Hy Carb Special Granulat.
Caractéristiques
techniques
Dimensions (Lxlxh) env.
Quantité de
remplissage env.
Pour aquariums
jusqu’à env.
Tuyau ø
PF 501
200 x 170 x 500 mm
2,9 kg
1000 l
110 mm
PF 601
260 x 210 x 550 mm
8,7 kg
2000 l.
160 mm
PF 601S
305 x 255 x 550 mm
14,0 kg
3000 l
200 mm
PF 1001
375 x 305 x 1 080 mm
34,0 kg
5000 l
200 mm
PF 1370
480 x 350 x 1300 mm
97,0 kg
20000 l
300 mm

RU
Правила техники безопасности
Внимание! Во избежание травм следует соблюдать основные меры предосторожности и следующие правила техники
безопасности.
1) Внимательно прочитайте и соблюдайте правила техники безопасности.
2) Опасно! Во избежание поражения электрическим током следует проявлять осторожность при обращении со
всеми устройствами аквариума. В ниже приведенных случаях самостоятельное проведение ремонта
запрещено. Устройство следует доставить в авторизованный сервисный центр.
a) При попадании устройства в воду ЗАПРЕЩАЕТСЯ браться за него руками. Сначала следует вынуть штекер
из розетки и только после этого достать устройство из воды. При образовании влаги на электрических
частях устройства его следует немедленно выключить.
b) При обнаружении выхода большого количества воды из устройства необходимо сразу немедленно
выключить его из розетки.
c) После установки устройство подлежит тщательной проверке. Запрещается подключать его к электросети,
если на деталях, которые должны всегда быть сухими, обнаружена влага.
d) Запрещается включать устройство с поврежденным кабелем или штекером, а также при его
неисправности, при наличии каких-либо повреждений и после падения.
e) Чтобы не допустить попадания влаги на розетку или штекер, аквариум следует разместить подальше от
розетки. Таким образом, капли воды не попадут на штекер или розетку. Для той части кабеля, которая
находится между аквариумом и розеткой, должен быть предусмотрен водозащитный изгиб. Водозащитный
изгиб — это та часть кабеля, которая при использовании удлинителя провисает под розеткой (см.
рисунок). В этом случае вода стекает с кабеля и не попадает в розетку. При наличии влаги на розетке или
штекере ЗАПРЕЩАЕТСЯ отключать кабель, следует отключить подачу тока с помощью предохранителя или
силового выключателя. Только после этого можно вынуть штекер и проверить розетку на наличие влаги.
3) Запрещается оставлять без присмотра детей, находящихся рядом с аквариумом.
4) Во избежание травм запрещается касаться подвижных или горячих деталей, таких как элементы нагрева,
отражатели, лампы и т.п.
5) При простое, перед монтажом или демонтажем деталей, а также перед очисткой следует отключить
соответствующие приборы от электросети. При этом следует браться за штекер и запрещается тянуть за
кабель.
6) Устройство следует использовать только по назначению. Использование запасных частей и аксессуаров,
которые не рекомендованы или не поставляются производителем, может быть опасным, и несет за собой
утерю заводской гарантии.
7) Запрещается устанавливать или хранить устройство в местах, подверженных воздействию атмосферных
явлений или температуры ниже нуля.
8) Перед вводом в эксплуатацию убедитесь, что все детали правильно собраны и закреплены.
9) Следует ознакомиться со всеми указаниями по технике безопасности, расположенными на самом
устройстве.
10) При необходимости следует использовать удлинитель соответствующей мощности. Кабель меньшей
мощности или силы тока может перегреться. Укладывать кабель следует так, чтобы никто не споткнулся и
не зацепился.
11) Прибор оснащен штекером под евророзетку. Запрещается вносить в него изменения или использовать
вместо него иной штекер.
Если по каким либо причинам,штекер будет удалён или повреждён,то пумпа Лишается
всякой гарантии.
Сохраните настоящее Руководство по эксплуатации

RU
Deltec известковый реактор со взвешенным слоем PF 501 -1001
Deltec PF известковые реакторы работают по принципу псевдоожижения, что позволяет использовать
мелкозернистый гранулят.
Deltec PF известковые реакторы состоят из следующих частей:
- прозрачный резервуар
- счетчик пузырьков
- обратный клапан
- циркуляционный насос
- магнитный клапан (опция)
- разводка для pH-электрода
- микрофильтр
Гранулят / загрузка
- перед загрузкой известкового реактора гранулят следует основательно промыть.
- известковый реактор необходимо установить ровно, в непосредственной близости
от аквариума или внешнего фильтра.
- головка реактора соединена с реактором байонетным соединением. Поворотом
головки реактора против часовой стрелки можно снять головку и вынуть
ситовидную пластину с помощью губки.
- известковый реактор можно заполнять только до указанной высоты.
- чтобы исключить попадание гранулята в центральную напорную трубу поз.15,
установить крышку поз.12 на напорную трубу.
- после загрузки ситовидную пластину с губкой установить вниз в трубе реактора.
- перед установкой головки реактора следует убедиться в том, что кольцо круглого
сечения и все уплотнительные поверхности чистые.
- рекомендуется обрабатывать кольцо круглого сечения и уплотнительные
поверхности силиконовым спреем или смазкой.
- затем плотно затянуть головку реактора по часовой стрелке.
Счетчик пузырьков
Счетчик пузырьков должен быть заполнен водой под водопроводным краном. Для этого развинтить
резьбовое соединение и убрать шланги CO2.
Подключение реактора
- после повторной установки счетчика пузырьков магнитный клапан (в случае
наличия) подключают к установке CO2.
- вход микрофильтра соединяется со шлангом подвода аквариумной воды. Это может
осуществляться с помощью небольшого отдельного насоса или с помощью
ответвления основного насоса.
- никогда не закрывать шланг обратного хода, иначе в реакторе может возникнуть
недопустимо высокое давление.
- после того, как реактор заполнен водой и из отводного шланга течет вода, запустить
насос.
- открыть подвод CO2и установить на 1-2 пузырька/сек.
- проток воды установить на прибл. 2-4 капли/сек.
Подводом CO2и воды можно регулировать мощность реактора.
С помощью pH-регулирующего прибора автоматически регулируется pH-значение в реакторе. Реактор
необходимо эксплуатировать с pH-значением 6,2 – 6,5. Для достижения оптимальных результатов
следует использовать только гранулят Aqua Crown Hy Carb или Hy Carb Special.
Технические
данные
Размеры
(длина/ширина
/высота) прим.
Ёмкость, прибл.
Для аквариумов,
до
Ø трубы
PF 501
200 х 170 х 500 мм
2,9 кг
1000 л
110 мм
PF 601
260 х 210 х 550 мм
8,7 кг
2000 л
160 мм
PF 601S
305 х 255 х 550 мм
14,0 кг
3000 л
200 мм
PF 1001
375 х 305 х 1080 мм
34,0 кг
5000 л
200 мм
PF 1370
480 x 350 x 1300
97,0 кг
20000 л
300 мм

PF 501 / PF 601 / PF 601S

Ersatzteilliste / Spare parts list
Art. Nr.
PF 501
Art. Nr.
PF 601
Art. Nr.
PF 601S
Bezeichnung
Description
87300000
87320000
87340000
PF 501 / PF 601
PF 501 / PF 601
PF 601S
PF 601S
A
28055000
28060000
28065000
Pumpe + Verrohrung
Pump + piping
B
xxxxxxxx
25020000
25030000
Pumpe
Pump
1
87308000
87328000
87348000
Innenrohr
Pipe inside
2
27015000
27020000
27030000
Laufeinheit-07
Impellor-07
3
69511000
69513000
69513000
O-Ring Pumpe
O-Ring pump
4
xxxxxxxx
69530000
69530000
Frontplatte Pumpe
Front cover
5
69517000
69527000
69527000
Bajonett Pumpe
Bayonet ring
6
xxxxxxxx
25094000
25094000
Front Lagerplatte-07
Bearing plate-07
7
26015000
26020000
26030000
Stator-07
Stator-07
8
28056000
28061000
28066000
Saugleitung-07
Suction line
9
xxxxxxxx
87327000
87327000
Druckleitung
Adapter
10
64056000
64056000
64056000
Micro Filter
Micro filter
11
93041400
93041400
93041400
O-Ring Verschraubung
O-Ring coupling
12
93141000
93141000
93141000
Klebkappe
Cap
13
93010010
93010010
93010010
Mini Regulierventil
Tap
14
61751019
61751020
61751022
Silikonschlauch 5/8
Silicon hose 5/8
15
87303000
87323000
87343000
Siebplatte
Strainer
16
65426000
65425000
65428000
Schwamm Satz 2 Stück
Sponge Set 2 pcs.
17
87301000
87321000
87341000
Grundgerät
Body
18
65900000
65900000
65900000
Stopfen rot
Plug red
19
65904000
65904000
65904000
Verschraubung PG 13,5
Fitting PG 13,5
20
61751050
61751060
61751060
Silikonschlauch 5/8
Silicon hose 5/8
21
61750014
61750020
61750021
Silikonschlauch 4/6
Silicon hose 4/6
22
87140000
87140000
87140000
Rückschlagventil
Non return valve
23
65901000
65901000
65901000
Verschraubung PG 7
Fitting PG 7
24
87302000
87322000
87342000
Deckel
Cover
25
80500110
80500160
80500200
O-Ring Bajonett
O-Ring Bayonet
26
87252000
87252000
87252000
Blasenzähler
Bubble counter
27
61751035
61751046
61751046
Silikonschlauch 5/8
Silicon hose 5/8

parti di ricambio / Список запасных деталей
Арт. №
PF 501
Арт. №
PF 601
Арт. №
PF 601S
Descrizione
Описание
87300000
87320000
87340000
PF 501 / PF 601
PF 501 / PF 601
PF 601S
PF 601S / PF 1001
А
28055000
28060000
28065000
Pompa + raccordi
насос (п. 2-9)
В
xxxxxxxx
25020000
25030000
Pompa
насос (п. 2-7)
1
87308000
87328000
87348000
Tubo interno
внутренняя труба
2
27015000
27020000
27030000
Girante 07
блок запуска-07
3
69511000
69513000
69513000
O-Ring pompa
кольцо круглого
сечения насоса
4
xxxxxxxx
69530000
69530000
Piastra frontale pompa
передняя панель
насоса
5
69517000
69527000
69527000
Baionetta pompa
байонет насос
6
xxxxxxxx
25094000
25094000
Piastra d’appoggio frontale 07
передняя опорная
плита-07
7
26015000
26020000
26030000
Statore 07
Статор-07
8
28056000
28061000
28066000
Tubo aspirante 07
всасывающая линия-07
9
xxxxxxxx
87327000
87327000
Tubo di mandata
напорная линия
10
64056000
64056000
64056000
Microfiltro
микро фильтр
11
93041400
93041400
93041400
O-Ring raccordo a vite
кольцо круглого
сечения разводка
12
93141000
93141000
93141000
Coperchio adesivo
клеевая крышка
13
93010010
93010010
93010010
Mini-valvola di regolazione
мини регулирующий
клапан
14
61751019
61751020
61751022
Tubo di silicone 5/8
силиконовый шланг 5/8
15
87303000
87323000
87343000
Lastra perforata
ситовидная пластинка
16
65426000
65425000
65428000
Spugna 2 pezzi
комплект губок, 2 шт.
17
87301000
87321000
87341000
Apparecchio base
основной прибор
18
65900000
65900000
65900000
Tappo rosso
заглушка красная
19
65904000
65904000
65904000
Raccordo a vite PG 13,5
разводка PG 13,5
20
61751050
61751060
61751060
Tubo di silicone 5/8
силиконовый шланг 5/8
21
61750014
61750020
61750021
Tubo di silicone 4/6
силиконовый шланг 4/6
22
87140000
87140000
87140000
Valvola di non ritorno
клапан обратного хода
23
65901000
65901000
65901000
Raccordo a vite PG 7
разводка PG 7
24
87302000
87322000
87342000
Coperchio
крышка
25
80500110
80500160
80500200
O-Ring Baionetta
кольцо круглого
сечения байонет
26
87252000
87252000
87252000
Contabolle
счётчик пузырьков
27
61751035
61751046
61751046
Tubo di silicone 5/8
силиконовый шланг 5/8
PF 1001

Ersatzteilliste / Spare parts list
Art. Nr.
PF 1001
Bezeichnung
Description
87360000
PF 1001
PF 1001
A
87158000
Pumpe (Punkt 1-5)
Pump (point 1-5)
1
89130000
Welle
Shaft
2
89036000
Laufeinheit
Impellor
3
10501700
O-Ring Pumpe
O-Ring pump
4
69704200
Stator
Stator
5
87366000
Saugleitung
Suction line
6
93402300
O-Ring Kugelhahn
O-Ring shut off val.
7
87365000
Verbindungsstück
Connector
8
93402100
Kugelhahn o. Überwurfmutter
Shut off valve
9
87328000
Innenrohr
Pipe inside
10
64056000
Micro Filter
Micro filter
11
93042400
O-Ring Verschraubung
O-Ring coupling
12
93142000
Klebkappe
Cap
13
93010010
Mini Regulierventil
Tap
14
61751022
Silikonschlauch 5/8
Silicon hose 5/8
15
87363000
Siebplatte
Strainer
16
65428000
Schwamm Satz 2 Stück
Sponge Set 2 pcs.
17
87361000
Grundgerät
Body
18
65900000
Stopfen rot
Plug red
19
65904000
Verschraubung PG 13,5
Fitting PG 13,5
20
61751100
Silikonschlauch 5/8
Silicon hose 5/8
21
61750021
Silikonschlauch 4/6
Silicon hose 4/6
22
87140000
Rückschlagventil
Non return valve
23
65901000
Verschraubung PG 7
Fitting PG 7
24
87362000
Deckel
Cover
25
80500200
O-Ring Bajonett
O-Ring Bayonet
26
87252000
Blasenzähler
Bubble counter
27
61751046
Silikonschlauch 5/8
Silicon hose 5/8

Parti di ricambio / Список запасных деталей
Deltec GmbH
Steller Straße 75
D-27755 Delmenhorst
Deutschland / Germany
www.deltec-aquaristic.com
Art. Nr.
PF 1001
Descrizione
Описание
87360000
PF 1001
PF 1001
A
87158000
Pompa (pos. 1-5)
насос (п. 1-5)
1
89130000
Albero
2
89036000
Girante
блок запуска
3
10501700
O-Ring pompa
кольцо круглого сечения насоса
4
69704200
Statore
Статор
5
87366000
Tubo aspirante
всасывающая линия
6
93402300
O-Ring rubinetto
кольцо круглого сечения шаровой
кран
7
87365000
Raccordo
соединитель
8
93402100
Rubinetto
шаровой кран или накидная гайка
9
87328000
Tubo interno
внутренняя труба
10
64056000
Microfiltro
микро фильтр
11
93042400
O-Ring raccordo a vite
кольцо круглого сечения
разводка
12
93142000
Coperchio adesivo
клеевая крышка
13
93010010
Mini-valvola di regolazione
мини регулирующий клапан
14
61751022
Tubo di silicone 5/8
силиконовый шланг 5/8
15
87363000
Lastra perforata
ситовидная пластинка
16
65428000
Spugna 2 pezzi
комплект губок, 2 шт.
17
87361000
Apparecchio base
основной прибор
18
65900000
Tappo rosso
заглушка красная
19
65904000
Raccordo a vite PG 13,5
разводка PG 13,5
20
61751100
Tubo di silicone 5/8
силиконовый шланг 5/8
21
61750021
Tubo di silicone 4/6
силиконовый шланг 4/6
22
87140000
Valvola di non ritorno
клапан обратного хода
23
65901000
Raccordo a vite PG 7
разводка PG 7
24
87362000
Coperchio
крышка
25
80500200
O-Ring Baionetta
кольцо круглого сечения байонет
26
87252000
Contabolle
счётчик пузырьков
27
61751046
Tubo di silicone 5/8
силиконовый шланг 5/8
Other manuals for PF 501
1
This manual suits for next models
4
Table of contents
Languages:
Other Deltec Laboratory Equipment manuals


Popular Laboratory Equipment manuals by other brands


RR Mechatronics
RR Mechatronics Lorrca MaxSis user manual

Thermo Scientific
Thermo Scientific Cryo 740 Series Installation

Julabo
Julabo CF31 operating manual

Biobase
Biobase BK-DH2000 user manual

Agilent Technologies
Agilent Technologies 2200 TapeStation user manual

Daihan Scientific
Daihan Scientific WiseSpin CF-10 Operation manual