Denon AVR-3808CI Use and care manual

Page 1 of 6
Questions or problems, please call Denon USA Customer Support @ 800-497-8921
AVR-3808CI FIRMWARE UPDATE AVAILABLE
There are now firmware updates available through our DPMS (Denon Product Management Server) for AVR-
3808CIs – USA and Canada models only (please verify serial numbers and firmware version numbers below).
These updates allow Denon to address certain operating issues, as well as adding new features and functionality. A
previous update was available only for limited number of units with operational issues, however for many AVR-
3808CIs to complete any current or future updates, the original update is included for those units that did not it from
the DPMS server directly or was applied at production, again please verify serial numbers and firmware version
numbers below.
We ask you thoroughly read and understand this entire document before starting any update procedure with your
AVR-3808CI. Thank you.
Firmware Update #1 Improvements:
1. In the GUI, under ‘Network Info’, the information was displayed incorrectly as the columns did not match up.
2. Auto Setup did not have the ability to handle a 6.1 speaker configuration, so it would lock up.
3. The Display screen would go blank shortly after showing the GUI.
4. RS-232/IP Protocol Fixes
a. Could not perform direct access to XM stations with the TFXMnnn command.
b. No response for commands, PSBAS, PSTRE OR PSxxx from the Ethernet port.
Serial Number Start of Factory Updated AVR3808CIs: xxxxx09001 (only need the last 5 digits)
Firmware Version Numbers of Factory Updated AVR-3808CIs:
To read back the firmware version numbers, do the following:
1. Turn Master Power ‘Off’
2. While holding down the ‘Status’ and ‘Return’ buttons on the front panel, press Master Power ‘On’.
3. Release the ‘Status’ and ‘Return’ buttons. With each press of the ‘Status’ button, the following names and
version numbers are indicated on the front panel display of the receiver.
NAME
VERSION
1
Main
01.28
2
Sub
00.32
3
DSP1
36.49
4
DSP2
39.39
5
FPGA (Audio)
00.50
6
PLD (Video)
-
7
GUI Config
A070629B
8
GUI Serial
P0007621
D37750004
9
DM850 FBL
-
10
DM850 BL
B200707020733
11
DM850 IMG
I200709050353
12
DM850 WEB
W200709050354
13
DM850 CNE
C20070905
Power cycle the AVR to return to normal operation.

Page 2 of 6
Questions or problems, please call Denon USA Customer Support @ 800-497-8921
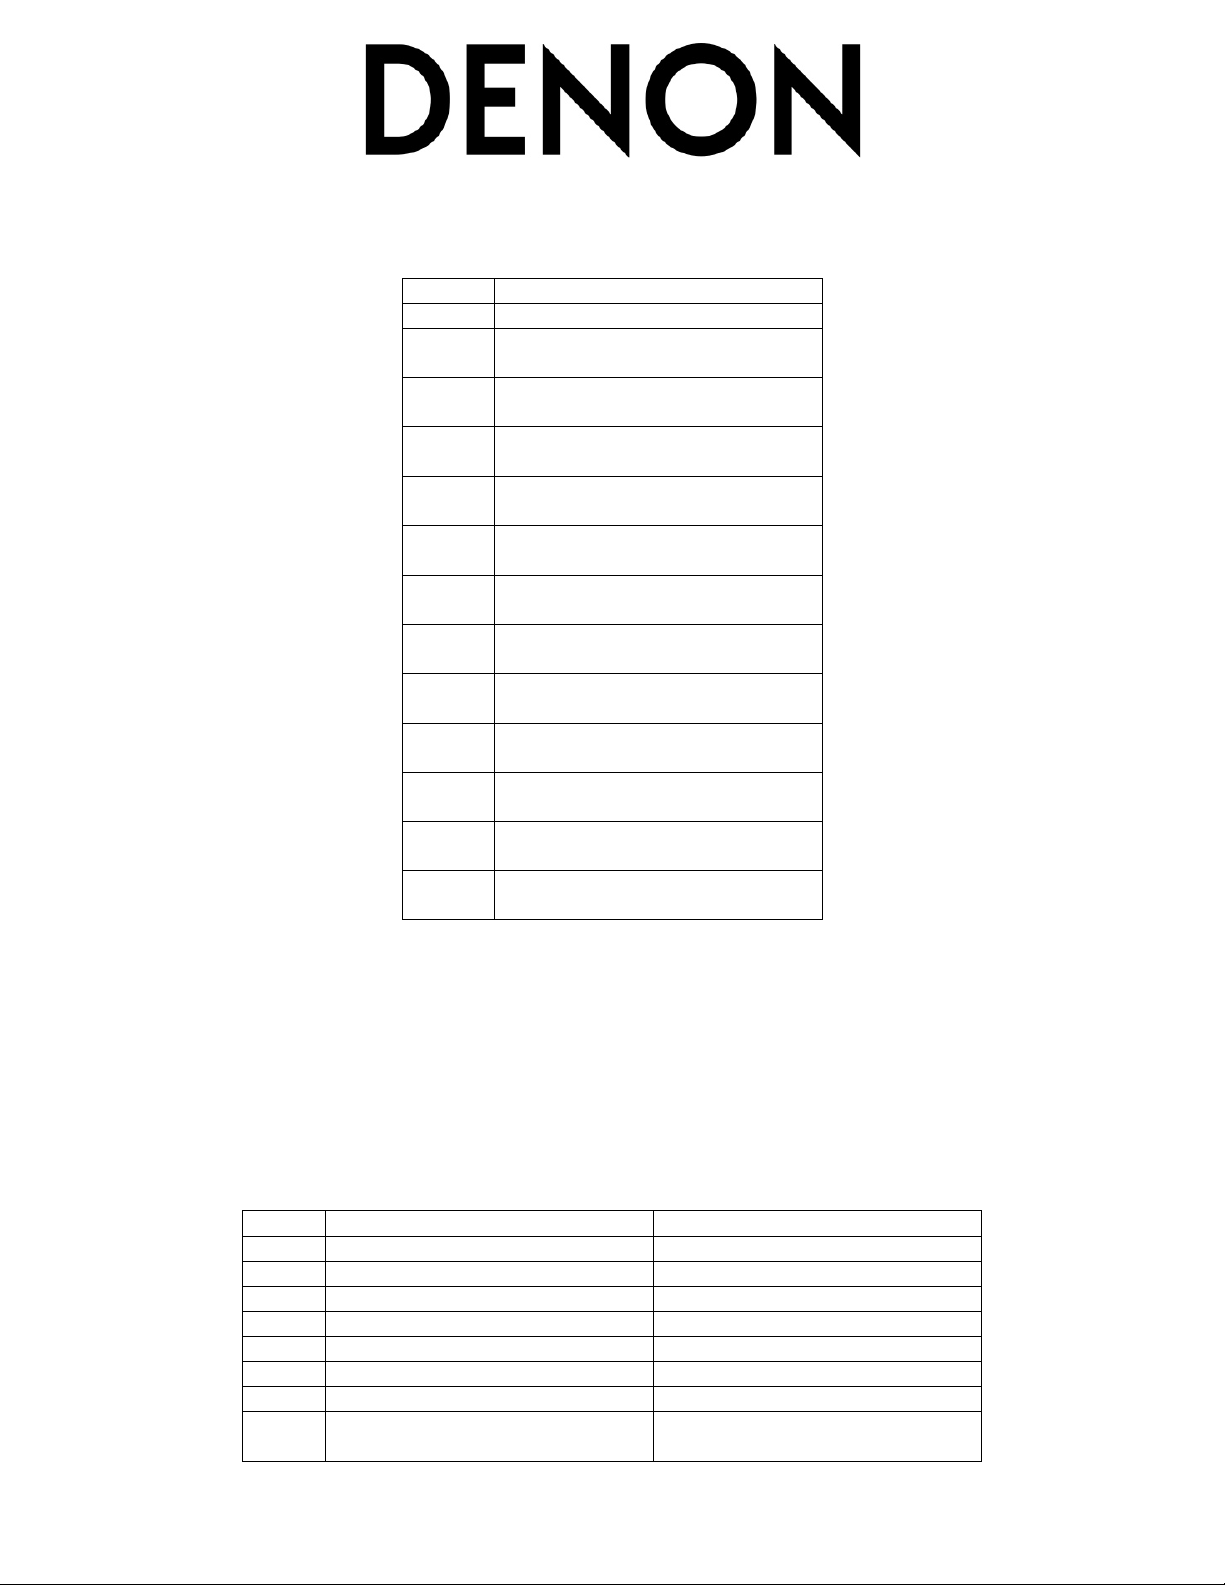
If your unit has a serial number lower than xxxxx09001 and its firmware version numbers do not match the
above chart, then it will be updated with both updates automatically. Please proceed to Update Procedure
#1, once update is complete, verify firmware version numbers with the chart under Firmware update #2. If
the serial number is between numbers xxxxx09001 and xxxxx17330 and the firmware version numbers
match those above, please proceed to Update Procedure #2. There are no updates available for units with
serial numbers of xxxxx17331 and higher. You will be able to check via the units GUI at any time if a new
update is available form the Denon Product Management Server with the completion of these updates.
UPDATE PROCEDURE #1
This update requires the unit to be reinitialized to start. This means all settings already done to the receiver will be
deleted and must be reset upon completion of this update process. To reinitialize the unit, perform the following:
1. Turn Master Power ‘Off’
2. While pressing the ‘Standard’ and ‘DSP Simulation’ buttons behind the trap door, turn Master Power ‘On’.
Let the front panel display flash 2-3 times, then release the buttons.
We strongly recommend that this, and all, firmware update(s) be done via a connected Ethernet cable to your
network, instead of using Wi-Fi. This is due to possible signal degradation/interference, and/or dropouts that may
occur with the Wi-Fi signal. Connect an Ethernet cable to the AVR with the unit powered off. Power unit back on,
wait a couple of minutes for the router to recognize and give the unit an IP address. Verify Internet connectivity by
selecting Internet Radio and check its operation.
To start the firmware update procedure, perform the following:
1. Turn Master Power ‘Off’
2. While pressing the ‘’ and ‘’ cursor buttons behind the trap door, turn Master Power ‘On’. Let the front
panel display flash 2-3 times, then release the buttons.
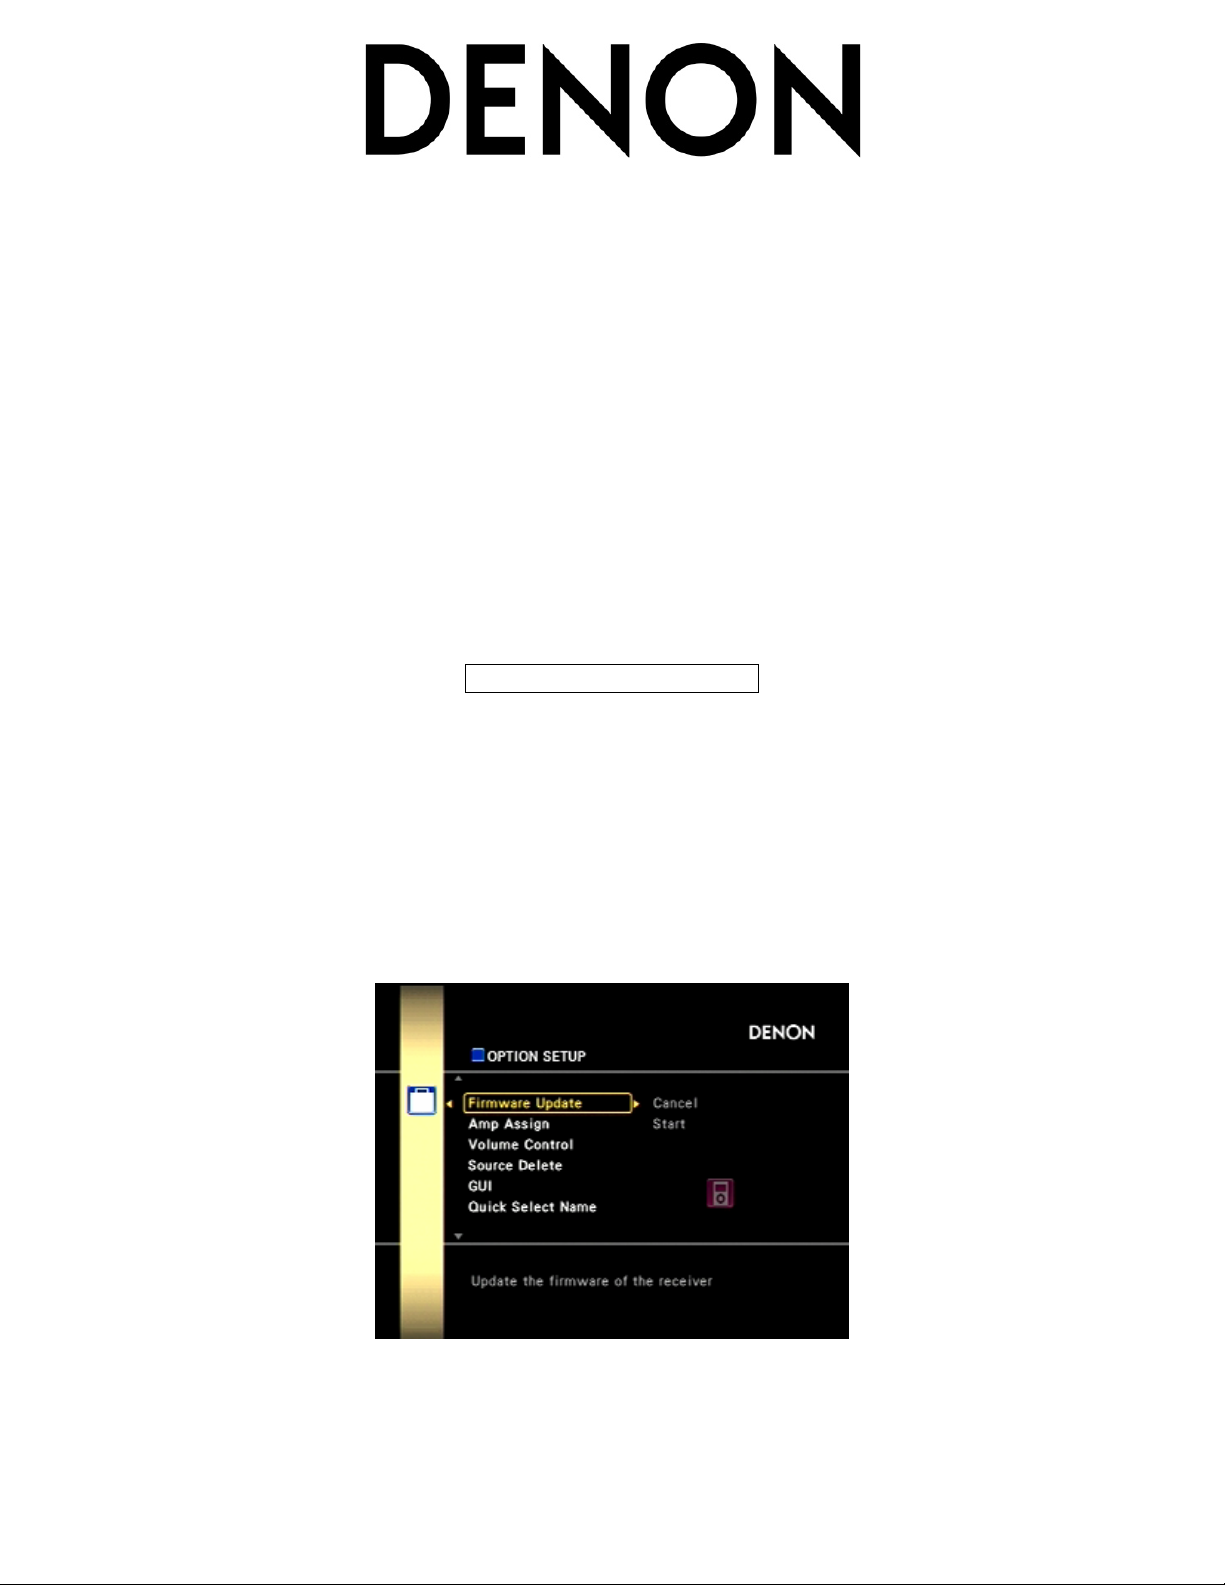
3. Enter the GUI by pressing the ‘Menu’ button on the front panel behind the trap door.
4. Press the ‘Up’ or ‘Down’ cursor buttons to locate ‘Manual Setup’
5. Press ‘Right’ cursor button to access ‘Option Setup’
6. Press the ‘Up’ or ‘Down’ cursor buttons to locate ‘Firmware Update’
7. Press ‘Right’ cursor button to highlight ‘Start’, then press the ‘Enter’ button.

Page 3 of 6
Questions or problems, please call Denon USA Customer Support @ 800-497-8921
8. When the update starts correctly, the GUI will shut off but the front panel display remains active to show
progress of the update. Do not turn off power during the update.
9. Total update time is approximately 35 to 50 minutes depending on the DPMS server and the Internet
environment of the unit’s location.
10. Progress Indications from the front panel display are as follows:
STEP
FL DISPLAY INDICATION
1
Please Wait…
2
Main Firm 1/14
Updating **%
3
Sub Firm 2/14
Updating **%
4
SFPGA Firm 3/14
Updating **%
5
VFPGA Firm 4/14
Updating **%
6
VPLD Firm 5/14
Updating **%
7
DSP1 Firm 6/14
Updating **%
8
DSP2 Firm 7/14
Updating **%
9
Sflash Firm 8/14
Updating
10
Ether BL 12/14
Updating
11
Ether WP 13/14
Updating ***
12
Ether IM 14/14
Updating ***
13
Firm Update
Updating Complete
11. Master Power ‘Off’ then ‘On’ of the AVR. Again, the unit is now returned to ‘Factory’ default and therefore
must be re-configured to your original settings.
Firmware Update #2 Feature Additions/Improvements:
Serial Number Start of Factory Updated AVR3808CIs: xxxxx17331 (only need the last 5 digits)
If your unit’s serial number is between xxxxx09001 and xxxxx17330, please continue, if lower than
xxxxx09001, please go back to Update Procedure #1. There are no updates available for units with serial
numbers of xxxxx17331 and higher. You will be able to check via the units GUI if a new update is available
with the completion of these updates.
1. The Web Remote Browser is now fully functional.
i. ‘Save and Load’ function added
2. Denon/Audyssey Pro Installer Program
a. Function has been added

Page 4 of 6
Questions or problems, please call Denon USA Customer Support @ 800-497-8921
i. Dynamic EQ activation after Audyssey Pro calibration has been added
3. Improvement of GUI Menu
a. ‘Firmware Update’ Function
i. ‘Cancel’ option replaced with ‘Check for Update’
ii. GUI will now display Firmware Availability and time required for download
iii. The Front Panel Display when updating will now show remainder time of update, instead of
version (**/14).
iv. When Updating is completed, unit returns to ordinary operation automatically.
b. Under ‘Manual Setup’>’Option Setup’
i. ‘Add New Feature’ option has been added – this is for downloadable upgrades in the future
4. Future Firmware Update procedure will not require any further re-initialization of the unit prior to updating.
5. Firmware Corrections:
a. When using headphones, sound was still output from the loudspeakers
b. Audyssey Calibration does not work correctly when the AVR is placed in Bi-Amp Mode.
c. When using Zone 2 Component Video, and then adjusting volume for Zone 2, the image would loose
sync
UPDATE PROCEDURE #2
To start the firmware update procedure, perform the following:
1. Turn Master Power ‘Off’
2. While pressing the ‘’ and ‘’ cursor buttons behind the trap door, turn Master Power ‘On’. Let the front
panel display flash 2-3 times, then release the buttons.
3. Enter the GUI by pressing the ‘Menu’ button on the front panel behind the trap door, or via the remote
control.
4. Press the ‘Up’ or ‘Down’ cursor buttons to locate ‘Manual Setup’
5. Press ‘Right’ cursor button to access ‘Option Setup’
6. Press the ‘Up’ or ‘Down’ cursor buttons to locate ‘Firmware Update’
7. Press ‘Right’ cursor button to highlight ‘Start’, then press the ‘Enter’ button.
8. When the update starts correctly, the GUI will shut off but the front panel display remains active to show
progress of the update. Do not turn off power during the update.

Page 5 of 6
Questions or problems, please call Denon USA Customer Support @ 800-497-8921
9. Total update time is approximately 35 to 50 minutes depending on the DPMS server and the Internet
environment of the unit’s location. Progress Indications from the front panel display are as follows:
STEP
FL DISPLAY INDICATION
1
Please Wait…
2
Main Firm **min.
Updating **%
3
Sub Firm **min.
Updating **%
4
SFPGA Firm **min.
Updating **%
5
VFPGA Firm **min.
Updating **%
6
VPLD Firm **min.
Updating **%
7
DSP1 Firm **min.
Updating **%
8
DSP2 Firm **min.
Updating **%
9
Sflash Firm **min.
Updating
10
Ether BL **min.
Updating
11
Ether WP **min.
Updating ***
12
Ether IM **min.
Updating ***
13
Firm Update
Updating Complete
10. Master Power ‘Off’ then ‘On’ of the AVR. Resume normal operation, unless Firmware Update #1 was done
at the same time, then the unit has been reset back to Factory Default and must be re-setup fully.
To verify completed firmware (#1+#2, or just #2) updating by the unit, check the firmware versions shown below. To
check the firmware version numbers, do the following:
4. Turn Master Power ‘Off’
5. While holding down the ‘Status’ and ‘Return’ buttons on the front panel, press Master Power ‘On’.
6. Release the ‘Status’ and ‘Return’ buttons. With each press of the ‘Status’ button, the following names and
version numbers are indicated on the front panel display of the receiver.
NAME
VERSION
1
Main
01.57
2
Sub
00.38
3
DSP1
36.49
4
DSP2
39.41
5
FPGA (Audio)
00.50
6
PLD (Video)
-
7
GUI Config
A070629B
8
GUI Serial
P0007621
D37750008

Page 6 of 6
Questions or problems, please call Denon USA Customer Support @ 800-497-8921
9
DM850 FBL
-
10
DM850 BL
B200707020733
11
DM850 IMG
I200710301122
12
DM850 WEB
W200710301101
13
DM850 CNE
C20071030
Power cycle the AVR to return to normal operation.
Following are possible Error Messages that may be shown on the Front Panel Display when performing a firmware
update on a Denon AVR, and the Countermeasures to correct them.
Indication of FL Display
Reason for Failure
Countermeasure
‘Download failed’
‘Updating failed’
Update is imperfect or fails
Please turn Main power off, then
on again, confirm procedure,
and perform update again
‘Login failed’
‘Connection failed’
Internet Connection failure
Confirm the unit is correctly
connected to the Internet.
‘Server is busy’
Server is busy
Try to update at a later time
‘Regist failed’
Failure to Register with the
Server
Please turn Main power off, then
on again, confirm procedure,
and perform update again
Any questions or problems, please contact the Denon USA Factory Service Department at
1-800-497-8921
Other manuals for AVR-3808CI
10
Table of contents
Other Denon Receiver manuals

Denon
Denon AVR-X1000 User manual

Denon
Denon AVC-A1D User manual

Denon
Denon AVR-2312 User manual

Denon
Denon AVR-988 Administrator guide

Denon
Denon AVR-E400 User manual

Denon
Denon MULTEQXT AVR-4306 User manual

Denon
Denon AVR-985 User manual

Denon
Denon S-5BD User manual

Denon
Denon AVR-887BKE3 User manual

Denon
Denon AVR-3313CI User manual

Denon
Denon AVR-X500 User manual

Denon
Denon AVR-1519 User manual

Denon
Denon AVR 2808CI - AV Receiver User manual

Denon
Denon In-Command AVR-2313CI User manual

Denon
Denon AVC-A11XV User manual

Denon
Denon AVR-5800 User manual

Denon
Denon AVR-785 User manual

Denon
Denon AVR-1610 Administrator guide

Denon
Denon AVR-1403 Dimensions

Denon
Denon AVR-1706 User manual