dentalfarm PF PRO User manual

Porcelain Furnace
PF PRO
INSTRUCTION MANUAL

INDEX
1
GENERAL INFORMATION Page 3
1.1 Purpose of the manual 3
1.2 Identification of the manifacturer 3
1.3 Technical informations 3
1.4 Safety precautions 3
1.5 Technical data 4
1.6 Elimination and waste disposal 4
2
HANDLING AND INSTALLING 4
2.1 Packaging and unpacking 4
2.2 Handling and moving the machine 4
2.3 Installation instructions 4
3
INSTRUCTIONS FOR USE 5
3.1 Panel - Operating controls description 5
3.2 Muffle opening and closing 5
3.3 First steps 6
3.4 Working Cycle 6
3.5 Programs 7
3.5A Create a new program 7
3.5B Change a program 8
3.5C Create from program 8
3.5D Eliminate program 8
3.5E Macro 8
3.5F See last cycle 8
3.6 Carrying out a firing cycle 8
3.7 Interruption of a program in progress - STOP 10
4
CRYSTALLIZATION OF CAD/CAM LITHIUM DISILICATE 10
5
FOLDER “SET” 10
5.1 Day and time 10
5.2 Calibration 10
5.3 Preferences 11
6
FOLDER “I” 11
6.1 “Impostazioni macchina” menu 12
6.2 Menu “test” 13
7
RECOMMENDATIONS FOR USE 14
8
MAINTENANCE INFORMATION 14
8.1 Ordinary maintenance 14
8.2 Extraordinary maintenance 14
8.3 Error messages 15
9 EXPLODED DRAWING AND SPARE-PART LIST 16
10 WIRING DIAGRAM 21
11 VACUUM CIRCUIT 22

1 - GENERAL INFORMATION
1.1 - Purpose of the manual
This manual has been written by the manufacturer and is an integral part
of the machine.
All herein contained information are addressed to the user and include
relevant Safety Recommendations.
Before using this furnace, it is recommended to read this manual
carefully, to ensure the operator knows all control devices, their function
and position. It is also advisable to make tests before real use.
This manual must be stored in an accessible place for future reference.
1.2 - Identification of the machine manufacturer
The machine is identified by a label as shown in Pic. 1.
1.3 - Technical information
The PF Pro furnace has been designed and manufactured to fire ceramic products and to carry out thermal
treatments on metals for dental use and laboratories. Both the firing and heating furnace cycles are
managed by a microprocessor electronic control. The vacuum function can be activated to allow a vacuum
firing phase. Therefore, the furnace is pre-fitted to be connected to a vacuum pump, whose functioning is
handled by the electronic control.
This furnace is delivered in one version only and is compliant with applicable safety requirements.
A Control Panel E Vacuum pump connection fitting
B Plate F Pump Power Supply
C Muffle G Computer and Printer connection
D Case H Power Supply220 V & General Switch
1.4 - Safety precautions
Carefully read this manual before carrying out any operations on the machine. Safety of the operator
depends on the ability, common sense and caution during use. It is therefore necessary to know all controls
as well as their function and position. The machine is designed to be used by a well-trained professional, not
by occasional users. Periodically check the parts subject to wear. Do not tamper or alter the electric
installation of the unit. No safety devices installed on the machine should be removed or altered for any
reason. Do not allow unauthorized users to maintain or repair the unit.
Pic. 1
Pic. 2

1.5 - Technical Data
Dimensions W x D x H mm 390 x 440 x 490
Weight Kg 30
Muffle dimensions mm ∅90 x 55 H
Power Supply 220 - 230 V AC
Resistances Power 1050 W
Pump Power (Max) 500 W
Fuses 10A
Max Temperature 1200°C
Raising Speed 2 - 200 °C/Min
Available Free Programs for traditional ceramics 79
Available Free Programs for CAD/CAM lithuim disilcate 20
Autocalibration Program 1
1.6 - Elimination and waste disposal
According to International regulations, this unit has been classified as AEE (electric and
electronic device, whose correct operation depends on electric currents and electromagnetic
fields) and as a consequence, at the end of its lifetime, it can not be treated as normal waste
material but it must be disposed separately, complying with Directive 2002/96/EEC.
2 – HANDLING AND INSTALLING
2.1 - Packaging and unpacking operations
The packaging consists of:
Protective polyurethan foam performs. Hard cardboard cover. Strap.
Packaging waste disposal must be carried out respecting the environment and in compliance with the
regulations in force.
2.2 - Handling and moving the machine
This machine must be moved by means of trolleys or manually by at least 2 people. While moving the
machine avoid absolutely any kind of bumping, dropping or tilting: they could seriously damage it. Obviously,
the manufacturer is not responsible for damages caused by droppings, improper use and maintenance which
are not in strict accordance with the manufacturer’s instructions contained in this manual.
2.3 - Installation instructions
The machine must be located on a safe place and in a horizontal position. It is up to the user to ensure that
the electric network is in accordance with the safety regulations in force. It is particular important to make
sure that the earthing works properly. Furthermore, it is important to verify the network voltage: in case the
voltage is too low (lower than 210V), this could lead to inconveniences and it might be necessary to install a
voltage stabilizer.
After having placed the furnace and gone through the above checklist, follow these instructions:
• The general switch must be in the OFF (0) position.
• Connect the power supply plug to a 220-230 V AC outlet, by using the given cable.
• Plug the vacuum pump cable into the corresponding socket.

3 – INSTRUCTIONS FOR USE
3.1 - Panel - Operating controls description (Pic. 3)
1 - Blue light LED display
2 - Encoder used for the input of operating data and selection of the functions. By rotating it to the right or to
left you can choose the functions or modify the values of the ones already selected. By pushing it you will
confirm the displayed information (ENTER). From now on we will call this knob “EN”.
3 - START/STOP button: used to start a firing cycle or stop a cycle in progress.
4 - ESC button: used to exit from a folder or from a function during the programming or displaying phase.
5 - ARROW DOWN button: used to lower the plate when no program is in progress. During the
programming stage, it is used to move the cursor leftwards when entering the name of a new program.
During search of programs, this key allows to rapidly switch from one group of programs to another
(downwards: for instance from position 80 to 70 or from 70 to 1). From now on we will call this key “FB”.
6 - ARROW UP button: used to lift the plate when no program is in progress. During the programming
stage, it is used to move the selecting cursor rightwards when entering the name of a new program. During
search of programs, this key allows to rapidly switch to upper positions, similarly as stated above. From now
on we will call this key “FA”.
3.2 - Muffle opening and closing (Pic. 4)
In the PF Pro, the opening and closing of the muffle are performed through upwards and downwards
movement of the plate (Pic. 4 B). From the above pictures you can see the following positions: A (closed
furnace), C (furnace completely open). When the furnace is not working on a firing program, to start the
opening of the muffle push 5 FB. The plate will go down and stop at its lowest position. To lift the plate push
the button 6 FA. To stop the plate during a movement push again either FA or FB.
Pic. 4
Pic. 3

3.3 - First Steps
After having turned the furnace on by means of the general switch located on the back of the device, the
plate will go down till position C (Pic. 4) while the heading DENTALFARM will appear on the display. Push
EN and the following screen will appear (Pic. 5). From now on, this screen will be called MAIN MENU.
As you can see 4 icons are shown on the display, representing 4 folders containing all the elements
necessary to work with the furnace.
By rotating the EN cursor you can choose one of the 4 folders. By positioning the EN cursor on one of the
icons and by pushing it you have access to the chosen folder. The folders contain the following information:
- FOLDER “P”: all firing programs are contained in this folder. Choose this folder any time you want to create
a new program, modify an existing one, copy a program or simply display the settings of a specific program.
- FOLDER “START”: use this folder when you want to start a program.
- FOLDER “SET”: it contains all the information to set the parameters of the furnace, which are common to
all programs (calibration, preferences, etc...)
- FOLDER “i”: it contains all the information related to the manufacturer, information system and a few
hidden service menus for repair and maintenance.
3.4 - Working Cycle
The working cycle of PF Pro has been developed to work with the following 15 variables:
• F1 - (TA): Drying Temperature (or starting temperature) from 20° to 1200° Celsius. This temperature is
obtained with a fixed temperature increase speed of 70°C/min.
• F2 - (t1): Drying Time or muffle closing time (minutes and seconds). Once the Drying Temperature TA is
reached, the plate will lift and the muffle will close according to the set value of this variable.
• F3 - (t2): Drying Time with closed muffle before the firing begins (in minutes and seconds). This waiting
time can be important to balance the inner muffle temperature after the chamber has closed. If you set 0,
after having closed the muffle the furnace will start immediately the heating as per the following phase F4.
• F4 - (TC): Firing Temperature from 20° up to 1200°C.
• F5 - (VC): Temperature increase speed (in °C/min.) It varies from 2 to 200°C/min.
• F6 - (tc): Firing time (in minutes and seconds).
• F7 - Vacuum (1=YES, 0=NO)
• F8 - (TV-ON): Switch-on temperature of the vacuum pump. The vacuum can be set during the firing
phase: therefore TV-ON must be higher or equal to TA.
• F9 - (TV-OFF): Switch-off temperature of the vacuum pump. It can be lower or equal to TC.
• F10 - (tv-OFF): Vacuum duration time at chosen TC. This value is set only if TV-OFF=TC.
• F11 –(%V): Vacuum grade expressed in % of the absolute vacuum. If 100% is set, the pump keeps
working continuously; if lower values are set, the pump restarts whenever the vacuum grade decreases
below the set value.
• F12 – (TR): Guided cooling stage until the pre-set temperature. The furnace will cool slowly with
according to the cooling speed set in F13 , before starting to open the muffle.
• F13 – (VR): Cooling speed in C°/min during slow cooling.
• F14 - (t3): Muffle opening time (in minutes and seconds). If you set the value 0 the muffle will instantly
open.
• F15 - (TF): Final Temperature: it is the stand-by temperature the furnace will reach at the end of the
cycle. This value will be set depending on the drying temperature of the next cycle.
Pic. 5

3.5 - Programs
The furnace PF Pro can store up to 100 programs (or cycles): 79 are programs for complete firing cycles for
tradictional ceramics and 20 are suited for CAD/CAM lithium disilicate. The program 0 is a test cycle which
should not be used for firing.
3.5 A – Create a new program
From the display of Pic. 5, rotate the Encoder EN to the left and access folder P (Programs by pushing EN:
the following screen will appear:
Rotate the Encoder EN to choose “create new” and enter by pushing EN. The following screen will appear:
Rotate EN and choose the number you want to assign to the program.
Confirm by pushing EN: you can select the name and all available characters.
Push FA and the letter D is selected.
Rotate EN: the cursor will move on the characters until the selected character or letter is backlit.
Push FA to move the cursor on the second character or letter, then rotate EN to chose the character or letter
and proceed like this until you have written the entire name of the program (NB: note that the empty space is
the first available character).
Push EN and you move onto the following display for the 15 functions of the program.
The first selected function is: F1.
Push EN: the value will be selected (example 500 C°)
Rotate EN to modify this value until the desired value.
Push EN to move the cursor again on F1.
Rotate EN to select the next function F2.
Push EN to select the value (example 3).
Pic. 6
Pic. 7
Pic. /

Rotate EN to modify it.
Push EN twice to switch again to F2.
Rotate EN to move to F3 and proceed like this until the last function F15.
You can go back or skip the functions which don’t need to be modified.
After having set the complete program, push ESC and the following screen will appear:
To save the program, push EN: the recently set program will be kept in memory until a further modification
will take place. By pushing ESC, the last program you have been working on will be kept in memory.
3.5 B – Change a program
To modify a program, please switch to “change” of the display PROGRAM MANAGEMENT Pic. 6. On the
following display Pic. 7, choose the number of the program and then, if you want you can modify the name
as per the above described instructions; otherwise, by pushing EN, you can modify the values of the
functions. Follow the same procedure as described in the previous point.
3.5 C – Create from program
This allow to create a program using an already pre-set program. The procedure and results are similar to
the ones included in “change a program” point.
3.5 D – Eliminate program
If a program is no longer necessary, it can be eliminated by using this option: you will be asked to confirm or
discard the elimination of the program.
3.5 E – Macro
The “Macro” function is not enabled in this model.
3.5 F – See last cycle
You can see the last performed cycle.
3.6 – Carrying out a firing cycle
To execute a program (that is to perform a firing cycle or a thermal treatment) proceed as follows:
Open the furnace and place the object on the ceramic support of the plate.
In the main menu, select the folder START by rotating EN – push ENTER and the following screen will
appear:
Rotate EN to select the program you want to perform.
Pic. 9
Pic. 10
From this position you can view the program and, if you want, you can also change it.
Once the program has been chosen, push ENTER: in this way you will access the display shown in Pic. 8.
As described in 3.5A, you can see the program and even change it. At the end, by pushing ESC, you move
to the save function display shown in Pic. 9, then by pushing ENTER or ESC, you go back to the previous
display shown in Pic. 10.
Push START/STOP: the furnace will start to carry out the chosen program and by moving to position B of
Pic. 4 and the muffle temperature will go up to the TA Drying Temperature. Once the TA has been reached,
the plate will be lifted and the muffle will close. Muffle closing will be done according to the time value set in
function F2 (Drying Time). The furnace will then perform all the necessary procedures included in the
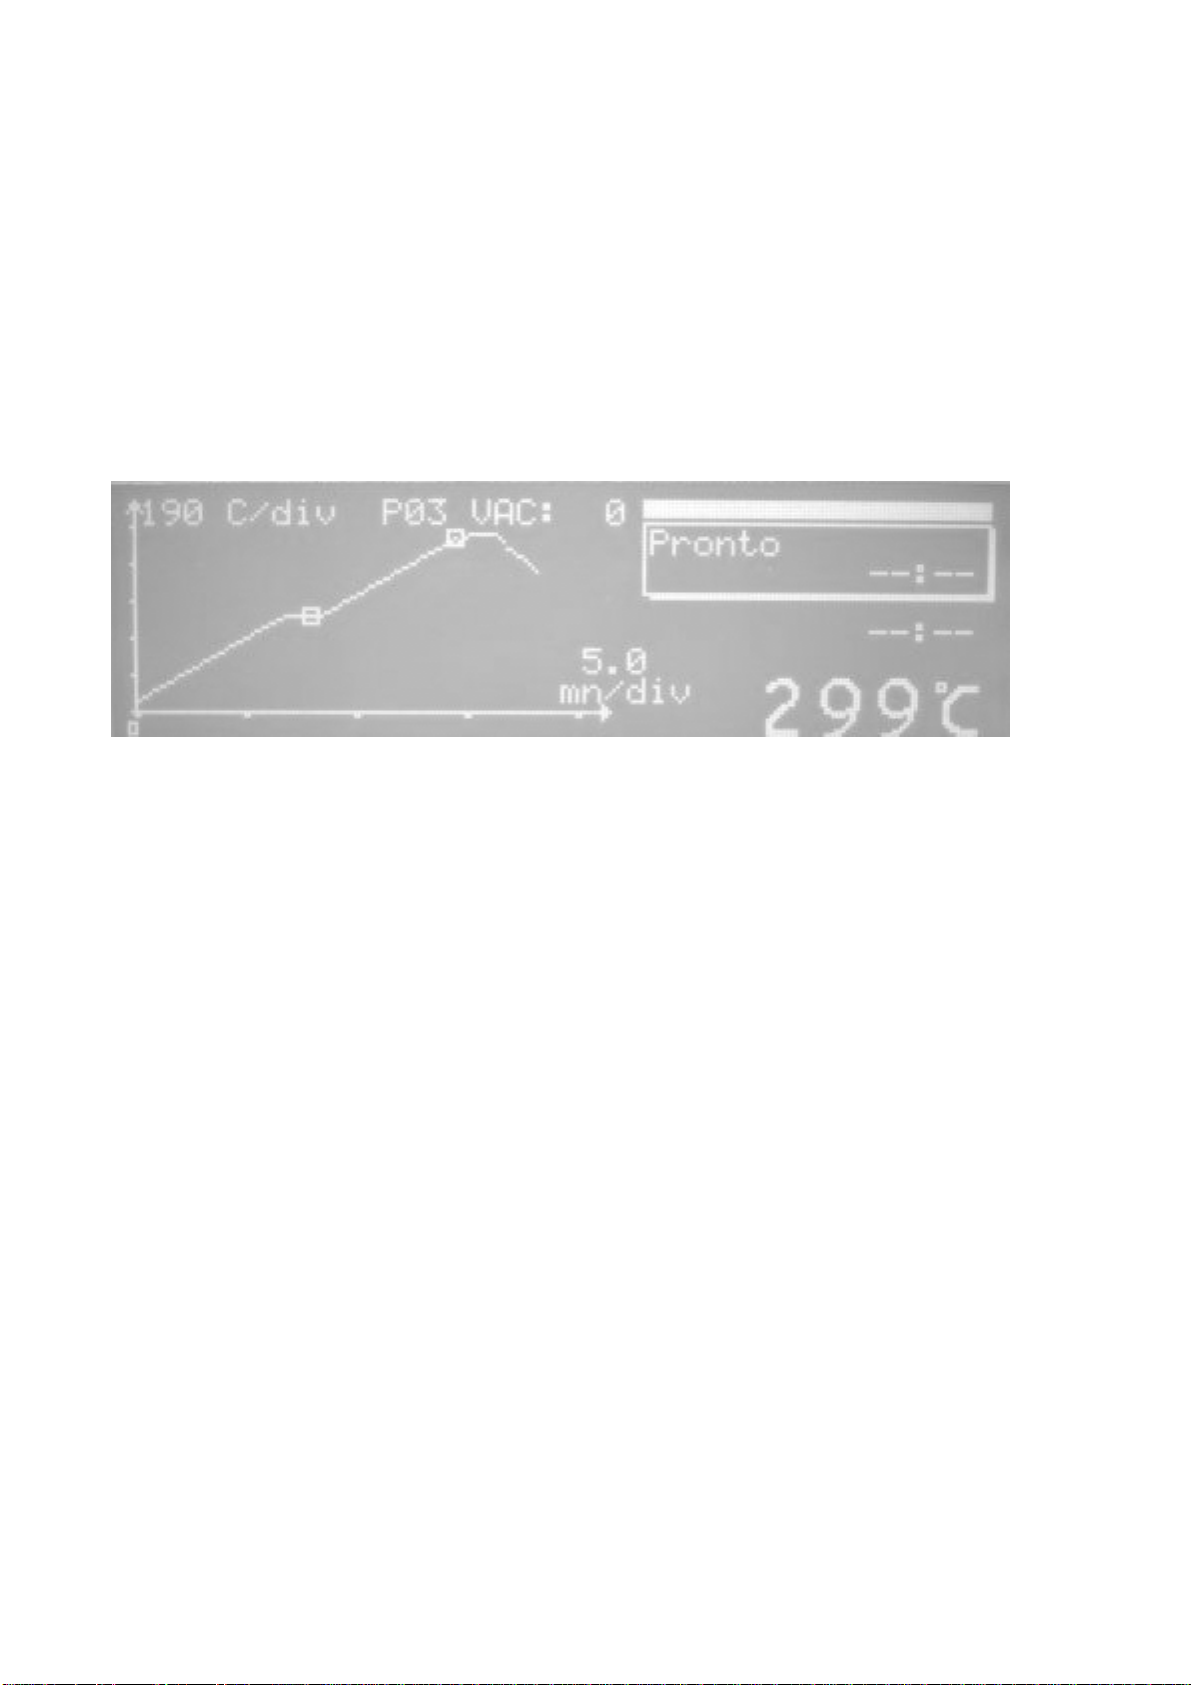
program up to its end. During the program, the display will shown with a chart the following parameters: T-t
(Temperature – time: Temperature in C° vertically, and time expressed in minutes, horizontally) as shown in
Pic. 11.
Chart Explanation:
- Vertically : temperature. In this case each step indicates a variation of 200 °C and this value
changes for each cycle.
- Horizontally : time expressed in minutes. In this case each step indicates 8 minutes and also this
value changes for each cycle.
- The vacuum function is indicated by the title VAC: the number represents the vacuum grade
expressed in mmHg. (The maximum vacuum grade is 760mmHg). The vacuum function is also
shown by the scroll bar. Maximum vacuum grade is reached when the light bar has reached its left
limit. The two little squares on the chart indicate the start and end point of the vacuum function.
- Below the vacuum bar, the current function in progress is shown. In this case the function F1 is
shown, which is the “Drying Preparation”. On the lower part of the bordered space the unit displays
the temperature that must be reached during the current function (T: 500C), on the right the
estimated time to process this function (in minutes and seconds).
- Below the panel you see the estimated remaining time to finish the program (ESTIMATED).
- In big lettering, the inner temperature inside the muffle is shown (299°C).
- Here, alarm or error messages that might intervene during the processing program, will be shown.
The list and meanings of such messages are contained in paragraph 8.3
At the end of the cycle the plate will go back to position B: at this stage the program ends. The operator will
manually open the furnace up to its maximum opening position.
It is also possible to see and change a program already in progress.
Push ENTER: you go to the display shown in Pic. 8. At this point you can see the program and change the
functions which have not yes been performed, according to what described in 3.5A. At the end, by pushing
ESC, you move onto the saving display shown in Pic. 9, then by pushing ENTER or ESC you go back to the
previous display shown in Pic. 10.
Pic. 11

3.7 – Interruption of a program in progress – STOP
To interrupt a program which is already in progress, do as follows:
• Push START/STOP: the furnace will ask you to confirm this order. If you do not confirm it within 5
seconds, by START/STOP, the furnace will ignore the order and will continue to perform the cycle.
Instead, if you confirm the order by START/STOP within 5 seconds, the furnace will immediately
interrupt the program. If vacuum is on, the furnace will let air in to restore normal conditions. During this
stage, all controls are disabled.
• Once the vacuum has been released, push FA and the furnace will open and be ready for another
operation. Press ESC to exit.
• If the furnace is hot, please let it cool down before opening it: let the temperature drop below 700° C.
4 - CRYSTALLIZATION OF CAD/CAM LITHIUM DISILICATE
PF Pro can treat CAD/CAM milled lithium disilicate. The corresponding cycles are included between position
80 and 99. These cycles are characterized by a high number of editable parameters (instead of only 15
parameters, here 23 parameters are present). This allows programming of double threshold cycles.
Consequently, all parameters from F4 to F11 (referring to the first firing stage) are repeated – marked with
suffix B – when referring to the second firing stage.
5 - FOLDER “SET”.
By placing the cursor on “SET” folder as in Pic. 5, the follow screen will appear:
5.1 – Day and Time
In this folder you can update day and time: this is necessary if the furnace remains non-operative for a long
time.
5.2 – Auto-Calibration
The following two Auto-calibration modes are possible:
A - Automatic Calibration: it is carried out using 100% pure Silver thread - this calibration is possible with a
Kit provided by our company on request. First assemble the Calibration Kit, verify that the calibration
temperature is the same as that of Silver (namely 960 °C) and then press START. As for all calibration
systems including this one, it is necessary to pay extreme attention and accuracy in its execution and it is
strongly suggested not to be done by not trained personnel. In any case 2 calibrations are done during the
test phase at our premises: one electronic calibration and one with the silver thread. Therefore since the
furnace doesn’t lose its calibration settings, it is not necessary to repeat it.
Such calibration must be done only in case the thermocouple or the electronic card are replaced.
Pic. 12

B – Manual Calibration: it is useful when the dental technician has to perform small changes depending on
the verification of the ceramic after firing it. It is clear that each furnace must be customised according to the
user and therefore it is possible to introduce small manual changes as for the furnace calibration: To modify
manually the calibration please follow the hereafter instructions:
- enter the Calibration menu
- select the function OFFSET by rotating EN and then press ENTER
- modify the related value by rotating EN: if the furnace fires unsufficiently, then increase the value,
otherwise if it overfires, lower it. For instance, if the ceramic was underfired and 8 degrees more are
necessary to obtain a perfect firing: the OFFSET value must be changed from 0 to 8. From now on
all the applied temperatures will be increased of 8 degrees.
- Push ESC twice to exit.
WARNING: if the automatic calibration cycle is turned On before having assembled the calibration Kit, the
furnace will show ERROR 11. To skip this error you must press STOP twice, then press ESC, turn Off the
furnace and turn it On again after 5 seconds.
5.3 – Preferences
Inside the Preferences folder you can set some general parameters, good for the performance of the furnace
and all the programs. By selecting “Preferences” and pushing EN the following screen will appear:
- contrast: this parameter controls the brightness of the display. Please do not change it.
- plate speed: it indicates the maximum speed of the plate. Please do not change it.
- temperature: you can choose between Celsius & Fahrenheit.
- menu language : you can choose Italian, English, French, German or Spanish.
- T in off : it indicates the temperature the furnace will reach when it is turned On. Default value is 200°C. In
a word, this is considered a stand-by temperature. This value can be modified according to the type of
ceramics to handle: for instance, if you use a ceramic with a drying temperature of 480°C, T in off can be set
at 470°C (so a slightly lower value than TA).
- buzzer mode: it indicates how long the Beep at the end of the cycle will sound. The following options can
be chosen: Off (no Beep), 10s, 20s, 30s, 40s.
6 - FOLDER " I "
This folder contains all the protected menus that are used for the set-up of the furnace and repairs. Herein
we describe the procedure to enter the first menu of this folder. By placing the cursor on the folder “i” in PIC
5 the following display will appear (Pic. 19):
Pic. 13
Pic. 14

In order to enter the first menu press simultaneously and keep pressed buttons 5 and 6 for at least 2
seconds shown in Pic. 3 (ARROW UP and ARROW DOWN): the following screen will appear:
code: 0 (another number than 0 could appear). Enter the code 1234 as follows:
-rotate the Encoder EN and change the number visualised until number 1 is shown.
-Press ENTER and a second number will appear. Rotate EN until number 2 is shown.
-Press ENTER and a third number will appear. Rotate EN until number 3 is shown.
-Press ENTER and a fourth number will appear. Rotate EN until number 4 is shown.
-Press ENTER and you will have access to the following menu:
From this protected menu you will have access to the first 2 sub-menus: Machine set-up and in/out Test.
6.1 - Machine Settings Menu
By selecting MACHINE SETTINGS from the display in Pic. 20 and pressing ENTER you will have access to
the following sub-menu:
In this menu, on the left column you will see some parameters which are the ones regulating the furnace
whose meaning is explained hereafter. To change the value of the parameters follows the same procedure
as before: select the parameter you want to change by rotating EN, press ENTER to select its numeric value
and modify it by rotating EN, press ESC then select another parameter or exit with ESC.
Start Pos : this parameter regulates the position of the plate from where the drying process starts (pos B in
Pic. 4). To lower this position (meaning you want the plate to start from a lower position) you must select a
lower value than the viewed number. To increase the drying position you must select a higher value. The
Default set value is 1800.
Limit Pos : this parameter indicates the highest position reached by the plate at the end of the run. Normally
this parameter shouldn’t be changed. It can happen that you need to change if the position of the micro-
switch has been moved (for example if the micro-switch itself has been replaced) or if, for any other reason,
the furnace doesn’t close the muffle well. In order for the muffle to be well closed, it is necessary that the
plate pushes on the muffle plate to ensure a firm tightness with the green OR. If this is correct the 4 lower
screws must come out of about 2.5 mm from the contact position with the flask. In the following Pic. 16 you
will see the correct position of the screws, after the plate has been lifted, in pos. A. If the screws are as in
pos. B, you must lift a little the plate position and therefore increase the value of the parameter “limit pos”.
An increase of 15 represents a lift of about 1 mm of the plate. Avoid selecting too high values, which will
cause error signals.
Pic. 15
Pic. 16

CUR Li UP : this parameter is proportional to the max torque the engine can use for the lifting of the plate. Its
default value is 850 and it is recommended not to change it.
CUR Li DO : this parameter is proportional to the max torque the engine can use for the lowering of the
plate. Its default value is 650 and it is recommended not to change it.
Type Thermo: to set the type of thermocouple in use. Two types of thermocouples can be used: type K and
type N. NEVER change the pre-set type.
Pump ist: Pump hysteresis. It defines the interval between the vacuum pump turning On and turning Off
points. If the pump turns On too often, the value of this parameter must be increased.
6.2 - Menu Test
By selecting ”In/Out Test” from the display in Pic. 20 and by pressing ENTER you will have access to the
following sub-menu:
Vacuum = OFF/ON : by choosing the ON position the vacuum pump turns On.
Inject = OFF/ON : by choosing the ON position you lift the press-injection piston in the furnace PF Press.
Muffle = OPEN/CLOSE : open and close the muffle. It is the same as using arrows UP and DOWN.
Air Out = OFF/ON : by choosing the ON position you close the electro-valve NA for the emission of air inside
the furnace. You can test the vacuum-tight
Pic. 18
Pic. 17
B
A

This menu is used for the following tests on the furnace:
- Pump performance and vacuum-tightness. By choosing Air Out=ON and Vacuum=ON (after of
course having closed the muffle) you turn On the pump and you check what level of vacuum is able
to produce. Check the value from the third line of the right column: the pressure indicated is the
absolute pressure, therefore the atmospheric pressure (1013 mbar) represents lack of vacuum (no
vacuum), absolute vacuum is indicated with zero pressure. The pump is unable to produce absolute
vacuum but it can reach a vacuum of about 98-99% of the absolute vacuum, therefore the pressure
indicated will be about 10 – 20 mbar. If the pressure is higher it means that the pump has lost some
efficiency or there is a small loss in the vacuum circuit. To verify if there is a loss, turn Off the pump
(Vacuum = OFF) and check that the value of the pressure doesn’t go up for about 15 seconds.
Normally when you turn Off the pump the pressure goes up of some values immediately (this is due
to the delay of the closing of the EV of the pump) but then it should stay stable (or decrease of 1
point maximum) for about 15 seconds. At the end of the test turn Off the pump (Vacuum = OFF) and
release the vacuum (Air Out = OFF). If a consistent loss in the vacuum circuit has been found (a
pressure increase higher than 10 in 15 seconds) the loss must be checked and located in the
various elements of the vacuum circuit: Or of the plate, Electro-valve, cables, inner distribution pillar).
Instead if no losses are found but the pressure remains too high, it means that the problem is due to
the pump.
- Efficiency of the opening and closing muffle system. This function is not active since the
performance can easily be checked using the arrows UP and DOWN (pos. 5 and 6 in Pic. 3).
- Efficiency of the injection system. This test must be done only for the furnace PF Press. After
having connected the furnace to the compressed air and regulated the entrance pressure (about 3
bar), open the furnace and select Inject = ON: the ceramic support located on the plate goes slowly
up until the end of its run (about 25mm). To lower the plate select Inject = OFF.
To exit the TEST MENU press ESC: you will find yourself in RESERVED MENU in Pic. 14, press again ESC
to go back to the MAIN MENU.
7 - RECOMMENDATIONS FOR USE
An oil less vacuum pump is delivered with the unit. It is recommended to use only this pump; moreover,
periodically check the efficiency and the wear conditions of the connecting pipe.
8 - MAINTENANCE INFORMATION
8.1 - Ordinary maintenance
This machine doesn’t need any maintenance.
Keep it clean from any firing residues and dust.
8.2 - Extraordinary maintenance
To repair the machine or replace some of its parts, the user should consult directly the manufacturer or only
specialized technicians.
Absolutely avoid opening any of the fixed guards without proper precautions.
Disconnect the power supply plug from the outlet before any extraordinary maintenance operations.

8.3 - Error messages
When an error intervenes, the furnace emits an intermittent sound signal and on the main display the
heading “Problem” followed by a number will appear.
The numbers correspond to the following inconveniences:
Problem Description
1 Reading / writing problem of the EEPROM. The electronic card doesn’t work!
Contact the manufacturer.
2 There is no In tension signal used to pilot the static relays. The problem is signalled for a
moment when there is a tension failure and the card is working on a cycle performance.
If alternating power tension is Ok it means that the electronic card is broken.
3 The checksum of the memorized electronic card parameters is not the same as the one
memorized and therefore the electronic card has loaded the default parameters.
4 The vacuum pump is unable to make the vacuum.
5 Encoder engine problem: the engine is on but the encoder doesn’t move (the problems is
signalled if the engine doesn’t start within 2 seconds).
Verify all connections, the position of the encoder and the correct engine movement.
6 In the starting phase of the plate the micro of engine end-run has not been heard.
Verify the connections and position of the end-run micro.
7 Problem on starting of the firing cycle. A parameter is not in accordance to the given
instructions.
8 Problem related to calling back the previous status parameters. When performing a firing cycle
and there is a power tension failure the electronic card saves the status to be able to go on with
the cycle as soon as the tension is resumed. If this problem intervenes, it means that the
electronic card has not been able, for some reasons, to save all the information. The cycle
cannot be resumed. Forward the problem to the software manufacturer.
9 Error in the definition of the calibration temperature.
10 Problem in resuming the previous position. The procedure of the starting of the plate must be
done again.
11 The Auto-calibration procedure has been started but the thread is missing or the contact
unstable.
12 Loss in the control furnace stability. The control will be restarted and the status tried to be
resumed.
13 Calibration procedure end without the thread breaking.
14 The tension read by the thermocouple is over the allowed limit.
Verify the thermocouple connection.
15 Engine overload current (the signalling of the problem is not qualified but only the control is).
16 Error in the loading of the calibration parameters: the default setting is done.
17 Error in the loading of the protected parameters: default values set.
18 Error in the loading of preferences parameters.
19 Error in the problem saved list: zero-setting procedure.
20 During the RAM reset procedure (inside the protected menu) a reading/writing error has been
detected.
21 Error in the analogue converter for the reading of the furnace temperature: blocked.
22 Error in the serial test (procedure from the protected menu).
23 Incorrect reading in the serial channel.
24 Clock problem: it seems blocked. Turn it off and on again to verify the correct functioning.
25 Furnace temperature maximum limit reached (T-limit value set in the protected menu).
26 Error in the setting of the factory data: terminator block data not found.
27 Wrong Cheksum in the setting of the machine data set for this device, setting procedure from
general data set up.
28 Problem in the pressure reading system: value < 500 mbar or higher than 1100 mbar with open
muffle.
29 Problem in maintaining vacuum during the cycle. This happens during the cycle, namely after
having created the vacuum at the first start, if the set vacuum value cannot be maintained.

9 - EXPLODED DRAWING AND SPARE PART LIST
9
No. CODE DESCRIPTION
1 4051004 Muffle compartment cover
2 4051144 Grid on fan
3 4051143 Fan
4 4051100 Muffle compartment shell
5 4051013 Side panel
6 4051003 Assembly compartment cover
A 4050101 Complete muffle unit
B --- Sliding plate unit
C --- Plate movement unit
D --- Assembly compartment unit

No. CODE DESCRIPTION
7 --- Resistance connection point
8 4051030 Insulating washer
9 4051031 Brass joint
10 4051112 Vacuum pipe-fitting
11 4051032 Resistance connection
12 4051033 Insulating base
13 4051113 OR joint on muffle
14 4051006 Aluminum plate
15 4051034 Furnace refractory frame
16a 4051035 FKC spacer
16b 4051036 FKC spacer
16c 4051037 FKC spacer
17 4051038 Resistance unit
18 4051039 Ceramic support
19 4051040 Insulating washer
20 4051005 Muffle metallic cover
21 4051114 Silicone pipe for vacuum
22 4051041 Thermocouple adapter
23 4050102 Thermocouple
24 4051115 Thermocouple fitting

No. CODE DESCRIPTION
25 4050045 Ceramic base for works
27 4051047 Plate insulating ring
28 4050048 FCK internal ring
29 4050049 FCK disk
30 4051116 OR joint on plate
31 4050009 Aluminum plate
32 4051008 Sliding plate support
38 4051119 Spring
39 4051007 Mobile plate
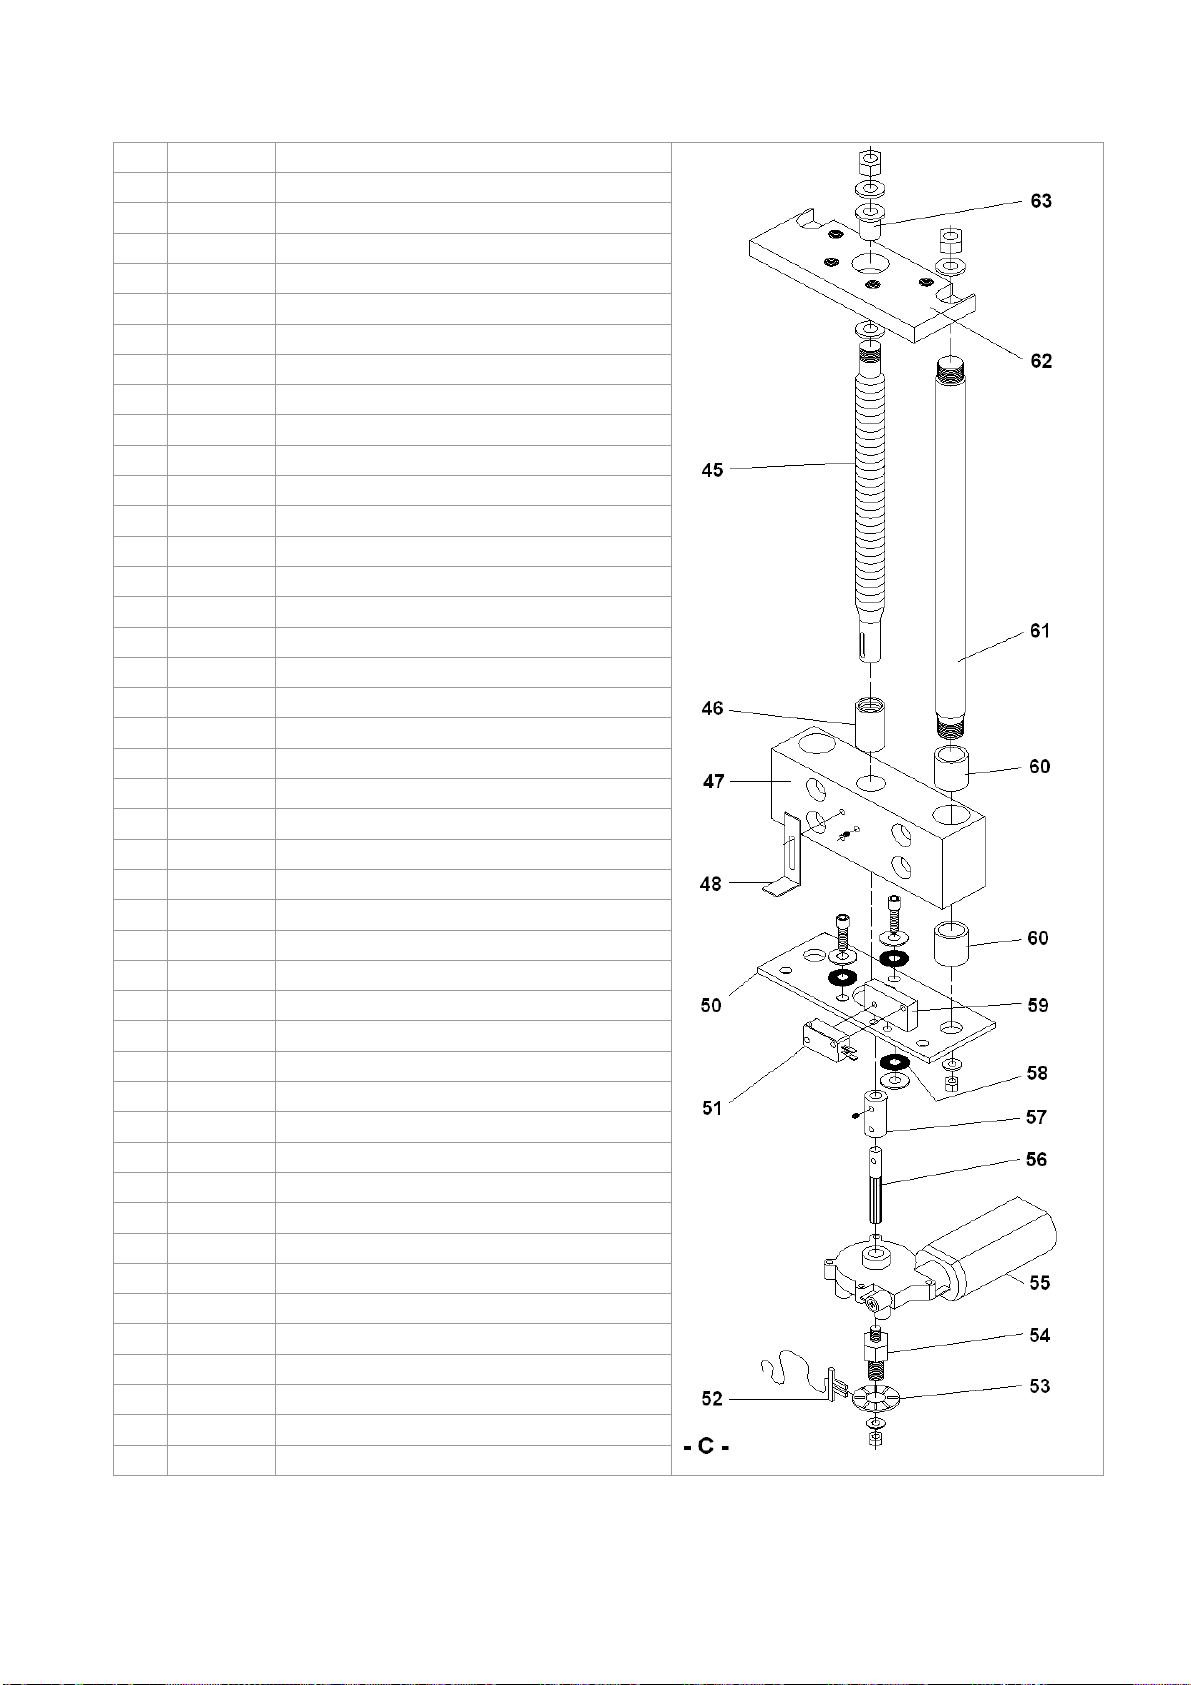
No. CODE DESCRIPTION
45 4051017 M12 screwed shaft
46 4051020 M12 threaded bush
47 4051011 Transverse slide
48 4051010 Microswitch operating clamp
50 4051014 Lower plate
51 4051125 Microswitch
52 4051126 Encoder reader
53 4051127 Encoder disk
54 4051026 Encoder disk support
55 4051128 Gearmotor
56 4051025 Grooved shaft
57 4051024 Engine coupling
58 4051023 Anti-vibration washer
59 4051022 Microswitch support
60 4051021 Self-lubricating bush
61 4051018 D12 stainless steel rod
62 4051015 Upper plate
63 4051019 Copper bush

No. CODE DESCRIPTION
64 4051129 Power supply and switch unit
65 4051130 Pump connection socket
66 4051131 Vacuum insertion solenoid valve (EV3)
69 4051012 Upright support
70 4051002 Metallic body
73 4051138 Vacuum distribution column complete
74 --- 4P OUT 220V terminal
75 --- 2P IN 220V terminal
76 --- Spacer for board
77 4050001 Brand label + AL panel
78 4050108 CPU board with display
79 4051139 Potentiometer knob
80 4050500 Complete control panel (panel + CPU board)
81 4050109 Power board
82 --- PWR-CPU flat cable
83 --- PWR terminal block
84 4051140 Toroidal transformer
85 4051141 EMI filter
86 --- INPUT-S1 flat cable
87 4051107 INPUT card
88 4051016 INPUT card bracket
90 4051133 Vacuum release solenoid valve (EV2)
Table of contents
Other dentalfarm Dental Equipment manuals


Popular Dental Equipment manuals by other brands

Renfert
Renfert Silent compactCAM Translation of the original instructions for use

DentalEZ
DentalEZ RAMVAC Utility user manual

Carestream DENTAL
Carestream DENTAL CS 8100 Access user guide

BOREA
BOREA RAYPLICKER quick start

Reborn Endo
Reborn Endo R-SMART PLUS user manual

Tecno-gaz
Tecno-gaz B-MAX Instructions for use


W&H
W&H S-NW Instructions for use

Vaniman
Vaniman VANGUARD MOBILE 2.0 manual

W&H
W&H proxeo ULTRA PB-5 L Instructions for use

DENTSPLY
DENTSPLY MIDWEST Stylus 181S Series Installation, maintenance and operation instructions

Chirana Medical
Chirana Medical Smile Mini 04 Instructions for use

Integra LifeSciences
Integra LifeSciences CUSA Excel 23 kHz manual