devinci E-TROY User manual

TECHNICAL MANUAL
E-TROY & E-SPARTAN

PLEASE READ BEFORE USING YOUR BIKE
Even if you have already piloted a bike for years, it is important to be aware of the information contained in the User's Manual
and the Specic Manual PAB (Power-Assisted Bike). Read them carefully before riding your E-Spartan, E-Troy or EP :
• These documents contain important information.
• Understand the use, layout and maintenance of each electrical components of your new PAB.
Your safety and those of other is paramount :
• Never ride the bike without its battery; the battery must be on the bike when you head out, otherwise there
will be no lights on the bike.
• Never ride the bike without a saddle ; failure to comply with this rule could lead to accidents.
• Inspect your bike to make sure there are no loose screws or components or damages. In the event of a defect,
visit your authorized Devinci retailer for a repair.
• A PAB is faster than a normal bike, risks of accident with other users on the road may occur.
• Ride under the conditions mentioned in the Owner's Manual.
• For PAB's that have a rear rack : the limit is 20 kg.
The electrical system requires careful handling :
• Do not clean the bike with a high-pressure jet. The system is sensitive to moisture. High-pressure water may
seep into the connectors or other parts of the electrical system.
• Handle the battery carefully and pay attention to electric shocks. Failure to comply with this instruction could
lead to abnormal heating or severe damage. In very rare cases, the consequences of an electrical shock could
Perform maintenance of the battery as mentioned in the Technical Manual.
* NOTE: Failure to followthe instructions below may damage the battery and require you to purchase a new battery kit.
• Charge the bike with the Shimano charger only;
• When the battery is not used for a long time, recharge to 100% (from 4 to 5 LEDs ont the charge indicator);
• Check the battery charge status regularly when not in use, recharge it to 100% if the load is less than 20%
(1 indicatior light on the charge gauge). Check the load every month and have it fully charged every 6 months ;
• It is not recommended to keep the battery connected to the charger for a long period;
•
• Store the battery in a well-ventilated and dry place. Pay attention to moisture ;
• In case of poor conditions, remove the battery from the bike and store it in a dry place until next use;
•
• Monitor the storage temperature and try to avoid discrepancies. For example, do not leave the battery in your
car during summer or leave the battery outdoors during a storm in winter;
• It is recommended to store a battery which is not connected to the bike.
Follow the transport instructions for your PAB :
• Comply with local laws regarding transportation on the PAB ;
• A PAB is heavier than a normal bike, so you must be careful when transporting it. Check that the maximum
load of the rack, roof or bike rack used is respected. Refer to the support manual used;
• The Li-Ion battery of your PAB, due to its size, is considered a "Class 9 dangerous good" during transport.
Applicable regulations could limit transport of a separate Li-Ion battery (when the battery is not on the bike)
in some places. This regulation applies to several airlines and a number of road transport companies. On the
other hand, if you are planning to move around with a full PAB (when the battery is on the bike), regulations
are less strict. In case you use these transport methods, check the regulations that apply to your PAB with
your transport company before booking.
Visit your authorized Devinci retailer for regular maintenance of your new PAB :
• Only your retailer has the know-how and the proper equipment to maintain your PAB.
• If you have any question about your PAB, please ask for assistance from your retailer.

612
13 14
4
TABLE OF CONTENT
Cable
Routing
Service
Kit
Warranty Warranty
Conditions
Frame -
Technical
Specications
YOUR AUTHORIZED DEVINCI RETAILER
Your authorized Devinci retailer is at your service to guide your choices of bike and accessories which are best suited to
the style of biking you wish to perform. This will help you maintain your equipment in good condition so that you can take
carry out the repairs and provide you with reliable advice.
However, your authorized Devinci retailer cannot make decisions for you, and cannot be held responsible for your lack of
For further information, please see the User Manual that you are currently reading and the Shimano STEPS EP800 &
E7000 series user manual available on http://si.shimano.com/, or you can ask your authorized Devinci retailer. He will take
the time to answer any questions you may have and will advise you with great pleasure.
ABOUT OUR MANUALS
Our user manuals meet ISO 4210-10TS, EN 15194 et EN 14766 standards.
Like many sports, cycling involves risk of injury and accidents, so you must be fully aware of these risks. Neither the
manufacturer, the retailer, nor the person who sold you the bike, nor the people who maintain the trails are responsible
for these risks. As you are solely responsible, it is, therefore, essential that you read and fully understand all the parts
contained in this manual.
To enjoy maximum safety and enjoyment right from the get go, it is important that you are familiar with your new bike, its
handling and its possibilities. It is your duty to maintain your bike well and reduce the risk of injury. Biking can be a dan-
gerous activity, even under the best conditions. These are risks associated with using a bicycle that cannot be predicted
or avoided. These are the sole responsibility of the cyclist.
54
1
14
15
11
18
10
7
2
3
24
21
12
8
16
13
9
20
4 & 5
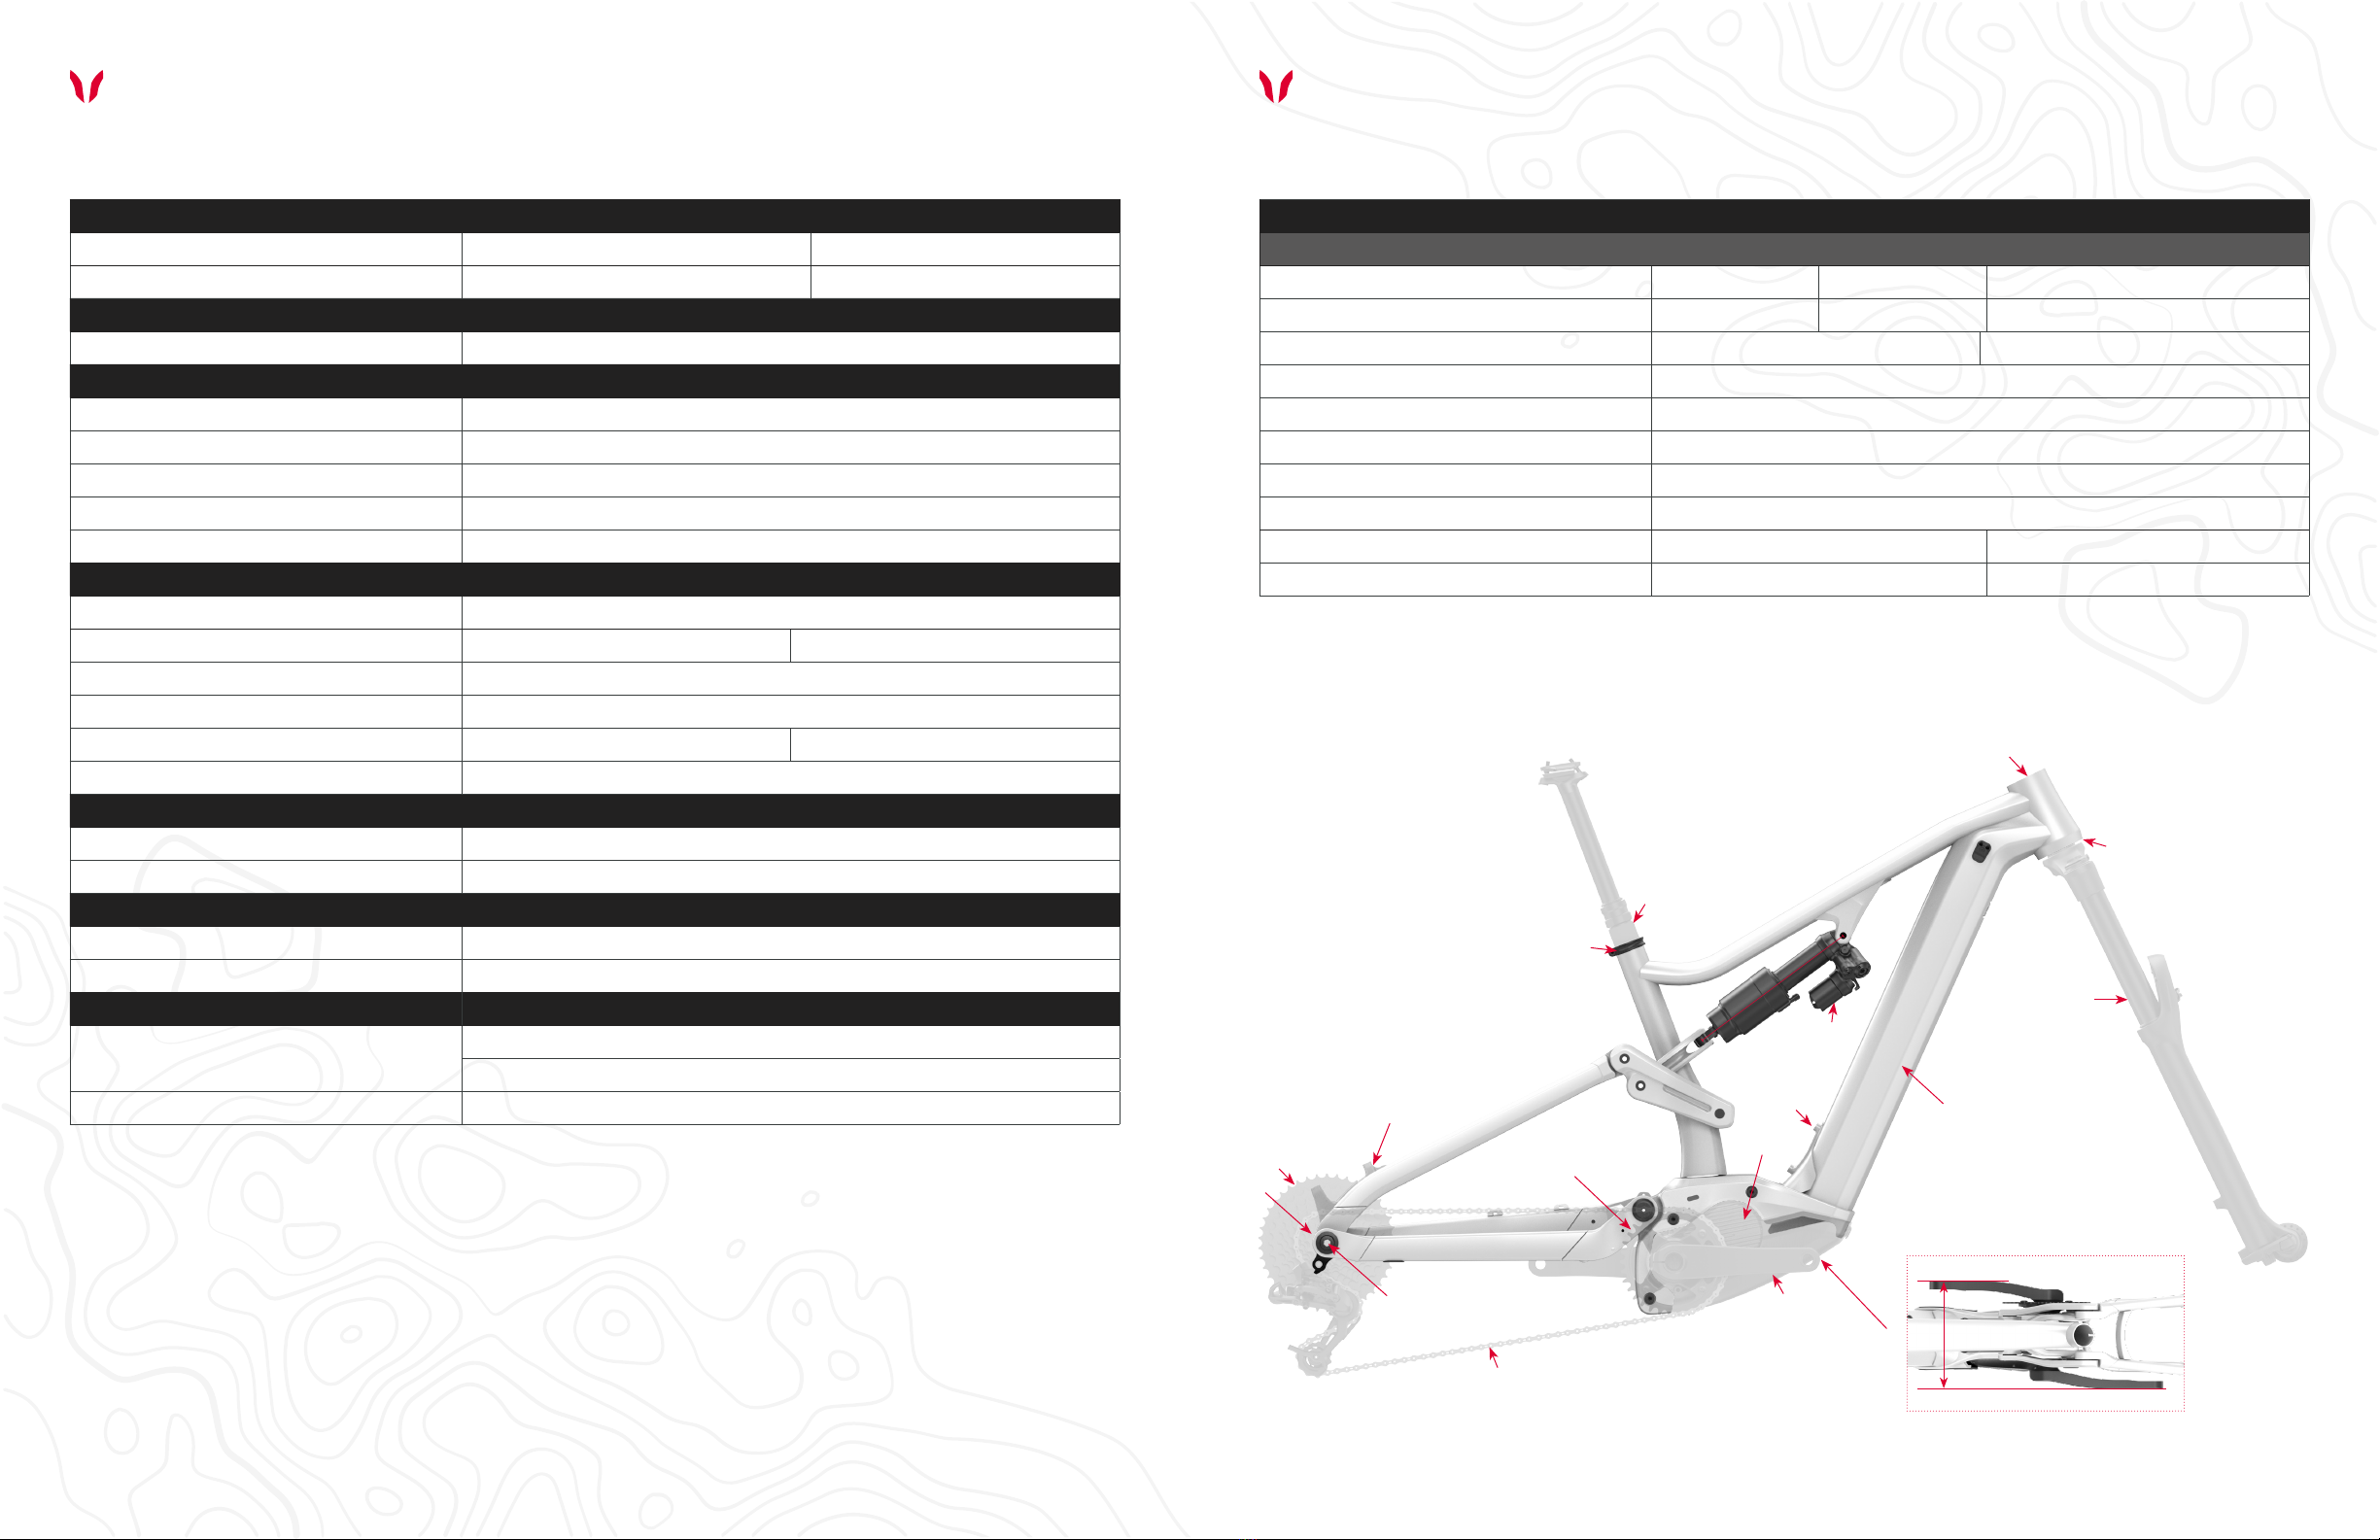
FRAME
appropriate frame clearance. However, it is impossible for us to test all tires and rim combination available on the market,
so be mindful that some combinations may result in slight rubbing if higher than 66mm in actual width.
Technical Specications
Available sizes
S | M | L | XL
HEADTUBE DIMENSIONS
1. UPPER (S.H.I.S) ISIS52 1.5'' IS
2. LOWER (S.H.I.S) ZS56 1.5"Zerostack
BOTTOM BRACKET
3. STANDARD Mid-Drive Motor
ELECTRIC ASSIST SHIMANO (Conguration 1)
3. DRIVE UNIT DU-EP800
4. BATTERY MOUNT BMZ V10
5. BATTERY BMZ V10
6. SPEED SENSOR TYPE SM-DUE11
7. DRIVE UNIT COVER Custom
MECHANICAL DRIVETRAIN (1X)
8. REAR HUB SPACING O.L.D. (Over Locknut Dimension) TA 12 x 148 BOOST
9. MAXIMUM & MINIMUM CHAINRING 38T 34T
10. SMALLEST COG COMPATIBLE 12s |9T
11. BIGGEST COG COMPATIBLE 12s |52T
12. MAXIMUM & MINIMUM RECOMMENDED CHAINLINE 53mm 53mm
13. MINIMUM Q-FACTOR 175mm
TUBE ET COLLET DE SELLE
14. SEATPOST OUTSIDE DIAMETER (OD) 34.9mm
15. SEAT TUBE OUTSIDE DIAMETER (OD) 38.6mm
FREINS
16. BRAKE MOUNT (FRAME) Post Mount 200mm Direct
17. MAX ROTOR SIZE COMPATIBLE (FRAME) 220mm
18. WATER BOTTLE (FRAME) YES
NOTE: A bottle of 16 oz t every size
19. PROTECTORS YES
FRAME
Technical Specications
Q-FACTOR
INFOS DE COMPATIBILITÉ (BASÉ SUR LA TAILLE MÉDIUM)
29er | 170MM | E-MTB
20. FRONT SUSPENSION TRAVEL & SAG 180mm 160mm 20-25%
21. REAR SUSPENSION TRAVEL & SAG 170mm 150mm 30%
22. SHOCK EYE-TO-EYE & STROKE 230 x 65mm 230 x 52.5mm
23. SPRING TYPE COMPATIBILITY AIR & COIL
24. SHOCK PIGGYBACK COMPATIBILITY 40 X 10mm
25. SHOCK ORIENTATION Forward / Up
26. UPPER (OR FRONT) SHOCK HARDWARE DIMENSION 35 x 10mm
27. LOWER (OR REAR) SHOCK HARDWARE DIMENSION NA
28. FRONT & REAR WHEEL GEOMETRY 29x2.6 29x2.6
29. FRONT & REAR WHEEL MAX ETRTO 29x2.6 (66-622) 29x2.6 (66-622)
appropriate frame clearance. However, it is impossible for us to test all tires and rim combination available on the market,
so be mindful that some combinations may result in slight rubbing if higher than 66mm in actual width.
8 9
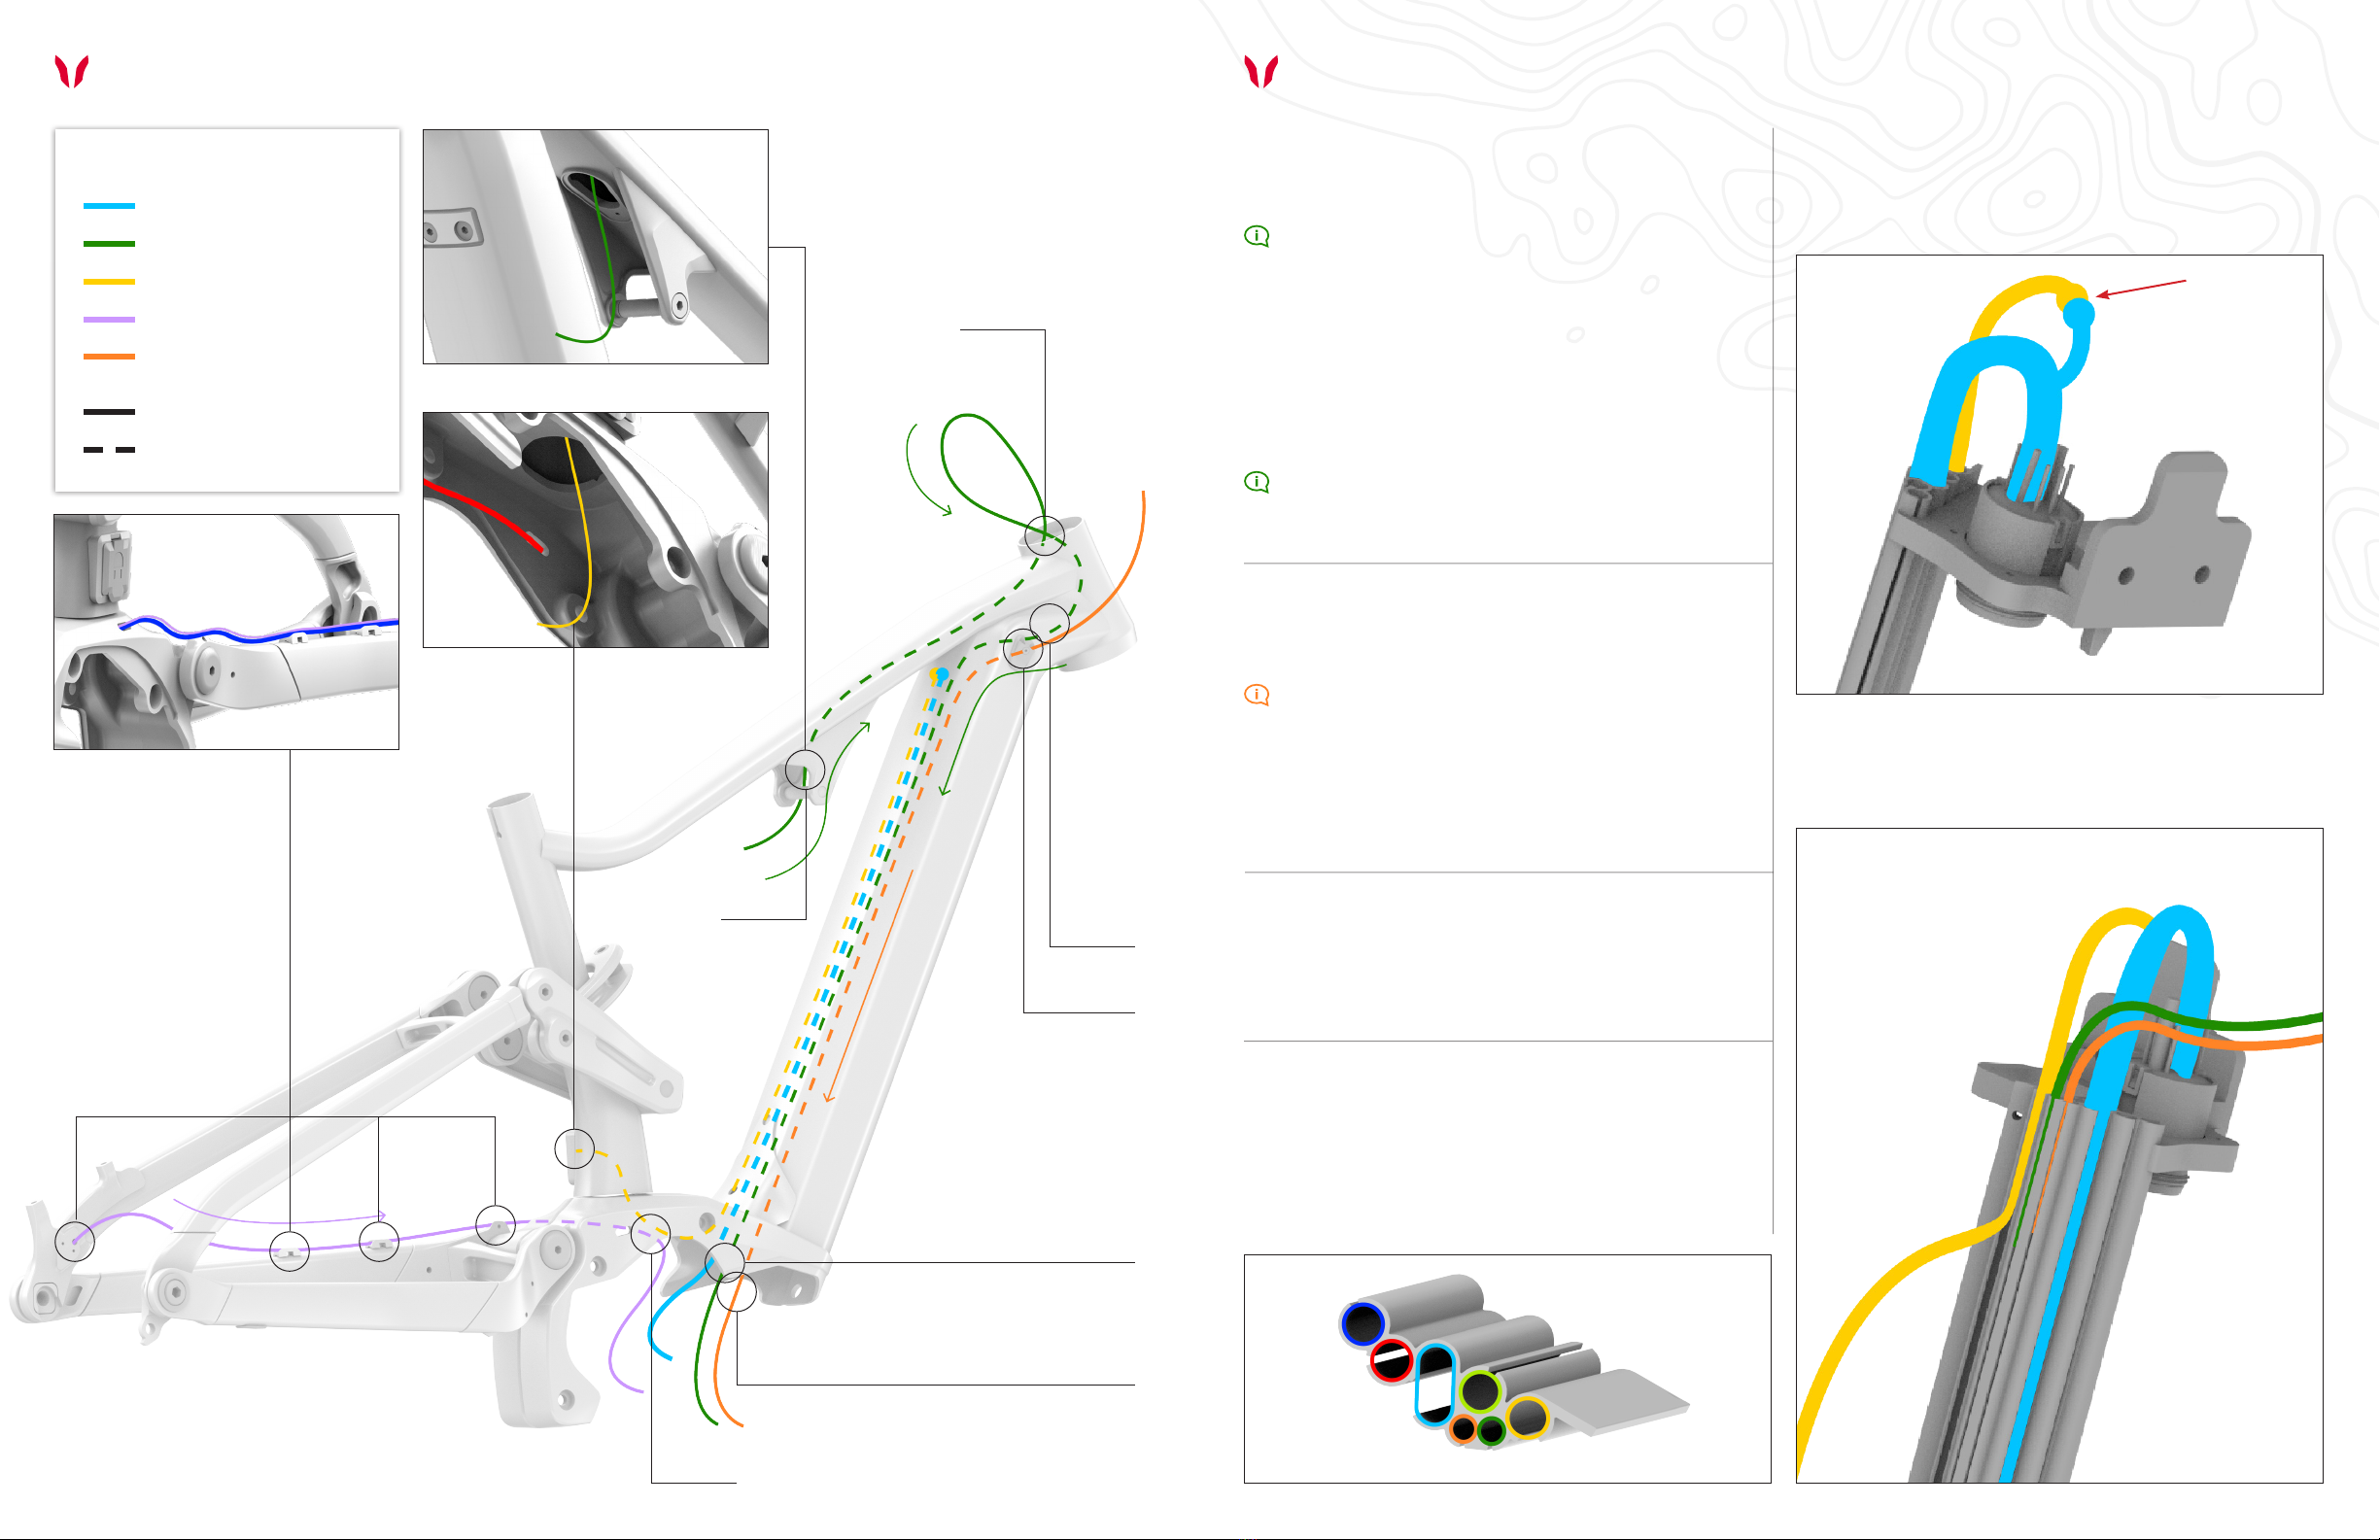
Cable routing // E-Troy & E-Spartan Cable routing // E-Troy & E-Spartan
Di2 cable
CABLES
Interruptor cable
Charging port cable
Speed sensor cable
Consol control cable
Cable outside the frame
Cable inside the frame
Step 1 | Insert the cable through the cavity located under
the top tube, hidden by the rear shock mount.
Step 2 | Exit the cable from the top of the steering column.
Create a loop with the cable in order to facilitate its
reinsertion in the diagonal.
Step 3 | Re-insert the cable in the diagonal until it exits
through the motor shell. Secure the switch with tape to
prevent it from moving.
To ease the insertion, rotate the frame upright with the
head tube down.
To ease the insertion in the diagonal, rotate the
frame vertically with the head tube up.
INTERRUPTOR
Step 1 | Route the charging port cable through the
connector cavity located on the seat tube, then attach
the connector.
CHARGING PORT CABLE
Step 1 | Remove the stopper, then insert the cable in
the diagonal.
Step 2 | Pull the cable out through the motor shell.
To ease the insertion in the diagonal, rotate the
frame vertically with the head tube up. Fix the end of
the cable to the diagonal using tape to prevent it from
inserting itself into the diagonal during the process.
CONSOL CONTROL CABLE
Step 1 | Attach the cable, then position it on the three
stoppers located on the base.
Step 2 | Insert the cable through the cavity on the left side
of the motor shell.
SPEED SENSOR CABLE
CABLE GUIDE
PERFORM THE FOLLOWING STEPS SIMULTANEOUSLY:
Step 2.1 | Step 1 | Connect the motor mount cable to the
charging port cable using the connector provided.
Step 4.2 | Step 2.2 | Step 3.2 | Introduce the cables into
the cable guide while making sure to nest the wires in their
respective base. (See annex 1.1)
Step 1
Step 1
Step 3
Step 2
Step 1
Step 4
Step 2
Step 2
Step 1
Annex 1.1 - Cable guide
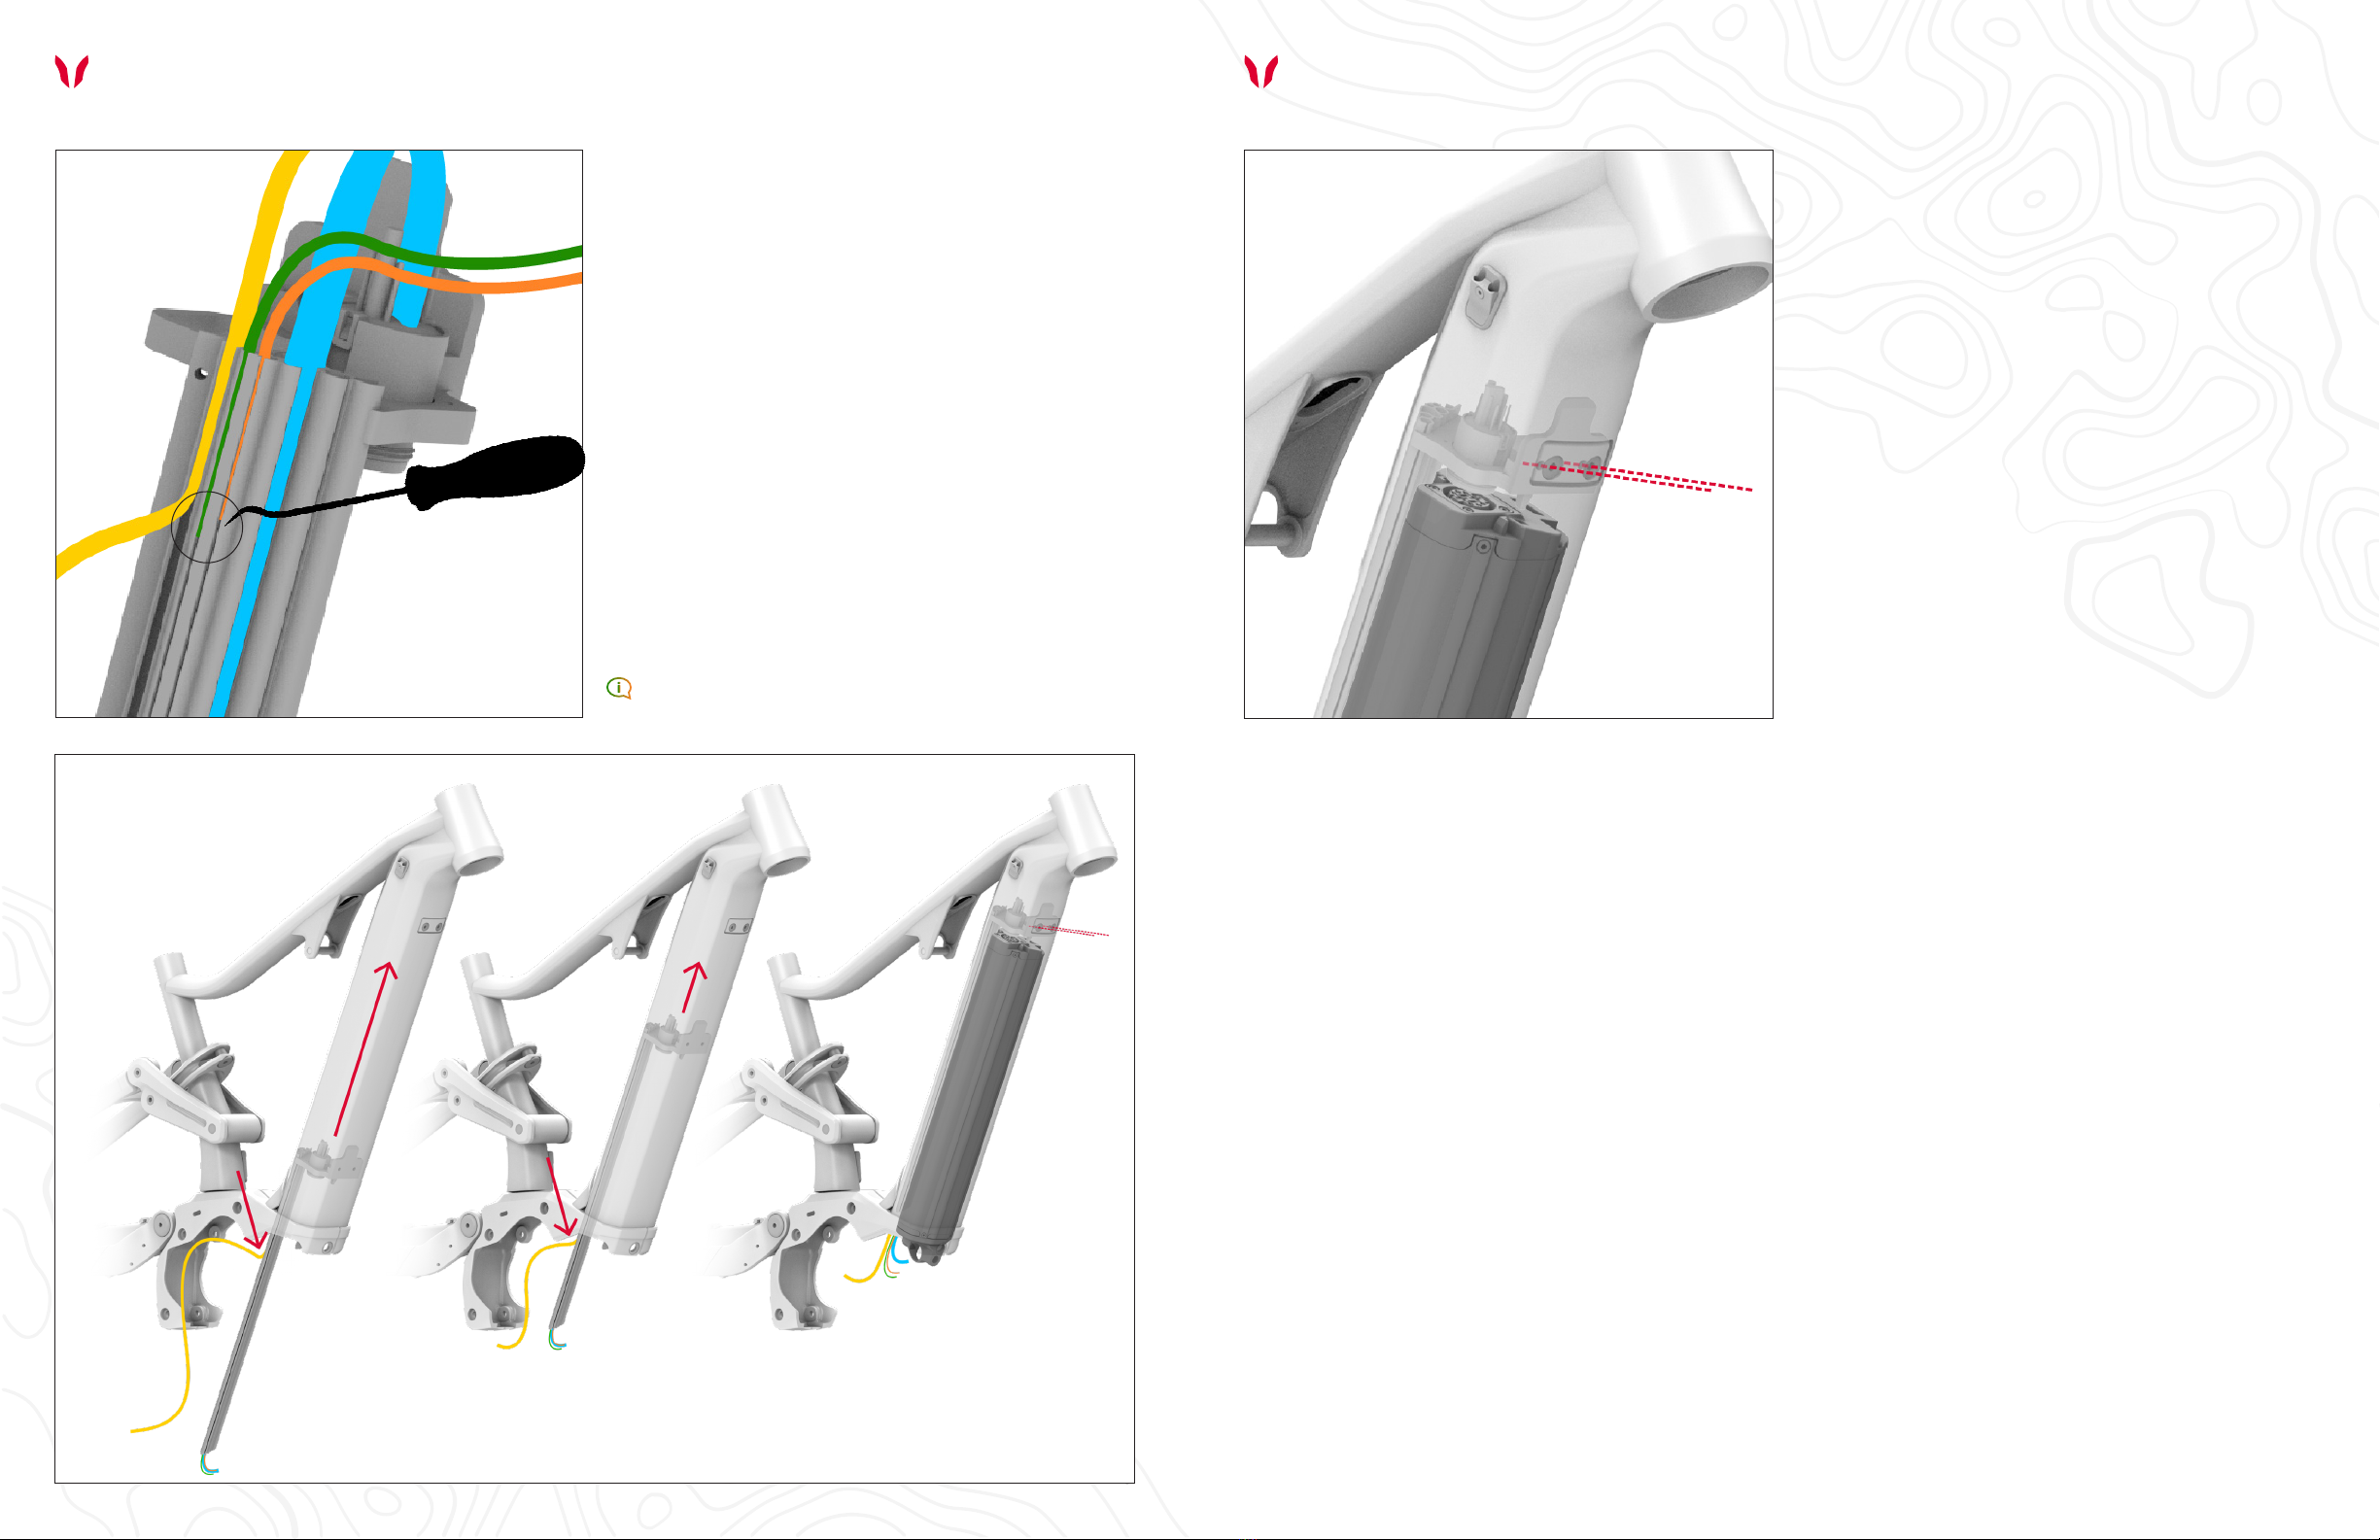
10 11
To facilitate insertion, use a hook to slide the cables into
the cable guide.
Step 4.3 | Step 2.3 | Step 3.3 | Introduce slowly
the cable guide inside the diagonal while nesting the motor
support cable in its base. while sliding the cable guide in the
diagonal, simultaneously help yourself with a hook to slide
the wires to the bottom of the cable guide.
Cable routing // E-Troy & E-Spartan
Step 4.4 | Step 2.4 | Step 3.4 | Once the cable guide is fully
inserted in the diagonal, ensure that it is correctly positioned by
guiding you using the battery.
Cable routing // E-Troy & E-Spartan

12 13
Step 2 | Step 2.2 | Step 3
Étape 2.3 | Step 4
Step 2.1Step 1.1Step 1.2
Step 1
Step 3
Seatpost housing
Rear brake housing
Housing outside the frame
Rear derailleur housing
Housing inside the frame
Annex 1.1 - Cable guide
Step 1 | Attach the rear brake housing to the three stops
welded to the base using a zip tie.
Step 2 | Insert the housing through the cavity located on
the left side of the motor shell. Make sure the speed sensor
cable has been inserted there rst.
Step 3 | Insert the rear brake housing into the cable guide.
Step 4 | Slide the rear brake housing in the diagonal and
pull the housing out of the left cavity located at the top
of the diagonal.
Remember to secure the speed sensor cable to the
stops with the rear brake housing.
REAR BRAKE HOUSING
See annex 1.1 and 1.2 to visualize the location of
the housing in the cable guide.
Step 1 | Insert the seatpost housing into the seat tube
from the motor shell.
Step 2.1 | Insert the seatpost housing into the cable guide.
See annex 1.1 and 1.2 to visualize the location of the
housing in the cable guide.
SEATPOST HOUSING
Step 2.2 | Pull the housing out through the cavity located
on the right side of the diagonal. Put the stopper back in
place, pass the seatpost housing through the lower cavity
and the consol control cable through the upper cavity.
Step 2.1 | Insert the rear derailleur housing into the cavity
on the right side of the motor shell.
Step 1.1 | Insert the rear speed housing through the cavity
located under the front of the base.
Step 1.2 | Remove the stopper located at the other end of
the base and pull out the housing using a hook.
Step 2.2 | Insert the rear derailleur housing into the cable
guide.
Step 2.3 | Pull the housing out through the cavity located on
the left side of the diagonal using a hook. Put the stopper back
in place, pass the speed housing through the lower cavity and
the brake housing through the upper cavity.
See annex 1.1 and 1.2 to visualize the location of the
housing in the cable guide.
Make sure the housing is long enough to reach
the rear derailleur.
Remember to x the housing to the stopper provided for
this purpose located inside the motor shell.
REARD SPEED HOUSING
Annex 1.2 - Cable guide (housing)
Cable routing // E-Troy & E-Spartan Cable routing // E-Troy & E-Spartan
HousingS
Step 1 & 2

13
REAR AXLE
(20 N∙m)
6.7 N∙m
2
8
11
ALWAYS REFER TO SHIMANO DOCUMENT
LATEST VERSION FOR TIGHTENING TORQUE
VALIDATION (10 - 12.5 N·m)
12
8
9
12
12
APPLY ZIP TIE
DO PIVOT
(22 N∙m)
DERAILLEUR
HANGER
(25 N∙m)
WL PIVOT
(22 N∙m)
BL AND
EXTENSION PIVOT
(14 N∙m)
CL PIVOT
(14 N∙m)
UPPER SHOCK BOLT
(22 N∙m)
COLLAR
6 N∙m
REAR SHOCK
SCREW
(22 N∙m)
ADD LOCTITE
#242 ON THREADS
16
1
1
13 13
13
1
1
2
13
13
2
1
1
1
7
13
1
4 1
10
3
3
3
13
13 13
6
10
10
14 N∙m
7.0 N∙m
6
6
6
6
6
6
6
5
3.0 Nm
7.0 Nm
17
17
17
17
17
WARNING:
MAKE SURE TO
CAREFULLY READ THE
ASSEMBLY
INSTRUCTIONS AND
CLEANING
INSTRUCTIONS NOTES
ON NEXT PAGE.
DO PIVOT
WL PIVOT
CL PIVOT
BL PIVOT
B
Revision
PCB-062 & PCB-065
E-TROY / E-SPARTAN
SERVICE KIT DEVINCI’S RIDE IN PEACE
WARRANTY
WARRANTY PERIOD FROM DEVINCI CYCLES INC
The frames of cycles devinci inc. are guaranteed against all manufacturing defects, for the periods specied below, as
of the date of the initial purchase. During these specic periods, devinci will replace or repair without charge, and at its
discretion, the devinci frames that display a manufacturing defect. The parts replaced or repaired in accordance with this
warranty, will be covered for a period equal to the remaining portion of the warranty of the original equipment. Replace-
ment parts are subject to availability. In certain cases, color and/or model may dier from the original parts.
BICYCLE FRAMES & WARRANTY PERIOD
Since 2006, all the frames bike model, including all mountain, freeride, downhill frames and dirt jump are guaranteed
for life. Paint and decals for all models of frame: 1 year the pivots* for double suspension frames: 1 year the components
assembled on devinci frames are guaranteed by their respective manufacturers. Please contact your authorized devinci
retailer. For more information regarding the applicable warranties.
* the pivots include the bearings, bolts and axles holding together the elements of the suspension of the rear triangle.
WARRANTY EXCLUSIONS
Each devinci bicycle was conceived for a specic use. The operational life of a bicycle varies according to its construction,
maintenance and the care provided. Intensive use or use with a heavy load, use during competitions or for activities other
than those for which the bicycle was conceived, greatly diminish its operational life. Any of these conditions may lead to
random failure. Abusive use will therefore cancel the warranty.
EXCHANGE POLICY IN CASE OF ACCIDENT
Devinci is aware that the purchase of a high performance bicycle is done with the heart. This is why our customer service
applies an exchange policy at a low price to accommodate claims that would have been refused for one of the reasons
mentioned in the section “warranty exclusions”. This policy applies only to the initial buyer. Please contact your devinci
retailer for more information.
Limitation of liability: this is an integral warranty, complete and nal, for devinci frames. Devinci does not give authoriza-
tion to any other person, including the authorized devinci retailers, to assume or grant, expressly or implicitly, any or all
addition(s) or extension(s) to the warranty specied herein. Any other obligation or responsibility expressed by any other
person(s) and any demonstration or illustration of devinci frames is in no way linked to devinci and is furthermore excluded
from this warranty.
Devinci assumes no liability in case of any property damage, moral or bodily injury to the user, the buyer or any other per-
son(s), resulting from the use of a devinci frame or one of its components.
Except as limited or expressly forbidden by law, regarding any other condition or guarantee, express or implied, based in
law, established commercial customs and usage, including, but not limited to, guarantee of merchantability or adaptation
to a specic end, devinci declines any responsibility for any amount exceeding the actual purchase price of the bicycle nor
for any particular, accessory or consecutive damages that may occur in connection with said bicycle.
With regard to the exercising of rights resulting from the present warranty, the buyer of a devinci frame agrees to elect
domicile in the judicial district of chicoutimi, in the province of quebec, canada, as an appropriate place for the hearing
of all claims or legal proceedings.
ALL OUR FRAMES ARE GUARANTEED FOR LIFE.

14 ©Cycles Devinci 2021
www.devinci.com
DEVINCI’S RIDE IN PEACE
WARRANTY | CONDITIONS
THIS WARRANTY DOES NOT COVER
Regular maintenance (cleaning, lubrication or inspection);
TranOptimum S or shipping charges incurred as a result of the execution of the warranty;
Cost of labour related to the assembly, disassembly, repair or replacement parts;
Damages caused by normal wear and tear including damages caused by material fatigue.
THE WARRANTY DOES NOT APPLY IF:
The damages were caused by a fortuitous event;
The bicycle was purchased from a retailer other than those authorized by devinci;
The bicycle was not entirely assembled by an authorized devinci retailer;
The bicycle was repaired by a person other than an authorized devinci retailer;
You are not the original owner of the bicycle;
The instructions contained in the user’s manual for all frames and the technical manual for frames with double sus-
pension were not respected;
The periodic inspection recommended in the user’s manual for all frames and in the technical manual for the frames
with double suspension was not carried out;
Parts not supplied by devinci with the bicycle or not indicated in the user’s manual for all frames or the technical
manual for the frames with double suspension were used;
The bike paint is damaged as a result of an adhesive frame protector installation;
The bicycle was used for an activity other than those for which it was conceived;
The bicycle and/or its components were subject to abusive use, negligence, abnormal and/or excessive use or was
implicated in an accident;
The frame is too small for you;
The frame and/or its components were modied (ex: polishing, structural or mechanical modication or addition,
stripping, sanding, strain hardening, shot peening);
You continued to use your bicycle while it was damaged.
Head Oce
1555 Manic
Chicoutimi (Quebec) Canada
G7K 1G8

Other manuals for E-TROY
1
This manual suits for next models
1
Other devinci Bicycle manuals


