devinci TROY 8402 User manual


04: Red
07: Charcoal
XX = Parts Color Code
01: Black
02: Titanium
03: Gold
.YTQ.oNTRAPNOITPIRCSEDMETI
1 FRONT TRIANGLE 8414-0300 1
2 SEAT STAYS 8613-9900 1
3 CHAIN STAYS 8414-9800 1
4 RIGHT LINKAGE MFL14004 1
5 LEFT LINKAGE MFL14003 1
822011PFMKCAPLLUFSR23096GNIRAEBLLAB6
113011PFMTFAHSTOVIPTUOPORDTHGIR7
123011PFMTFAHSTOVIPTUOPORDTFEL8
9 ADJUSTER SHAFT MFP12022 2
10 PIVOT SPACER MFP11080 2
11 PIVOT NUT MFP11011-XX 2
12 SHOCK BOLT 66mm MFV00073 1
13 SHOCK BOLT 24.5mm MFV00120 1
15 PIVOT SHAFT SCREW MFP12020-XX 4
16 PIVOT SHAFT 72.5mm MFP12021-XX 2
17 ADJUSTER SPACER MFP12023 2
18 REAR HUB AXLE 1-
2015 TROY ALU-CARBON
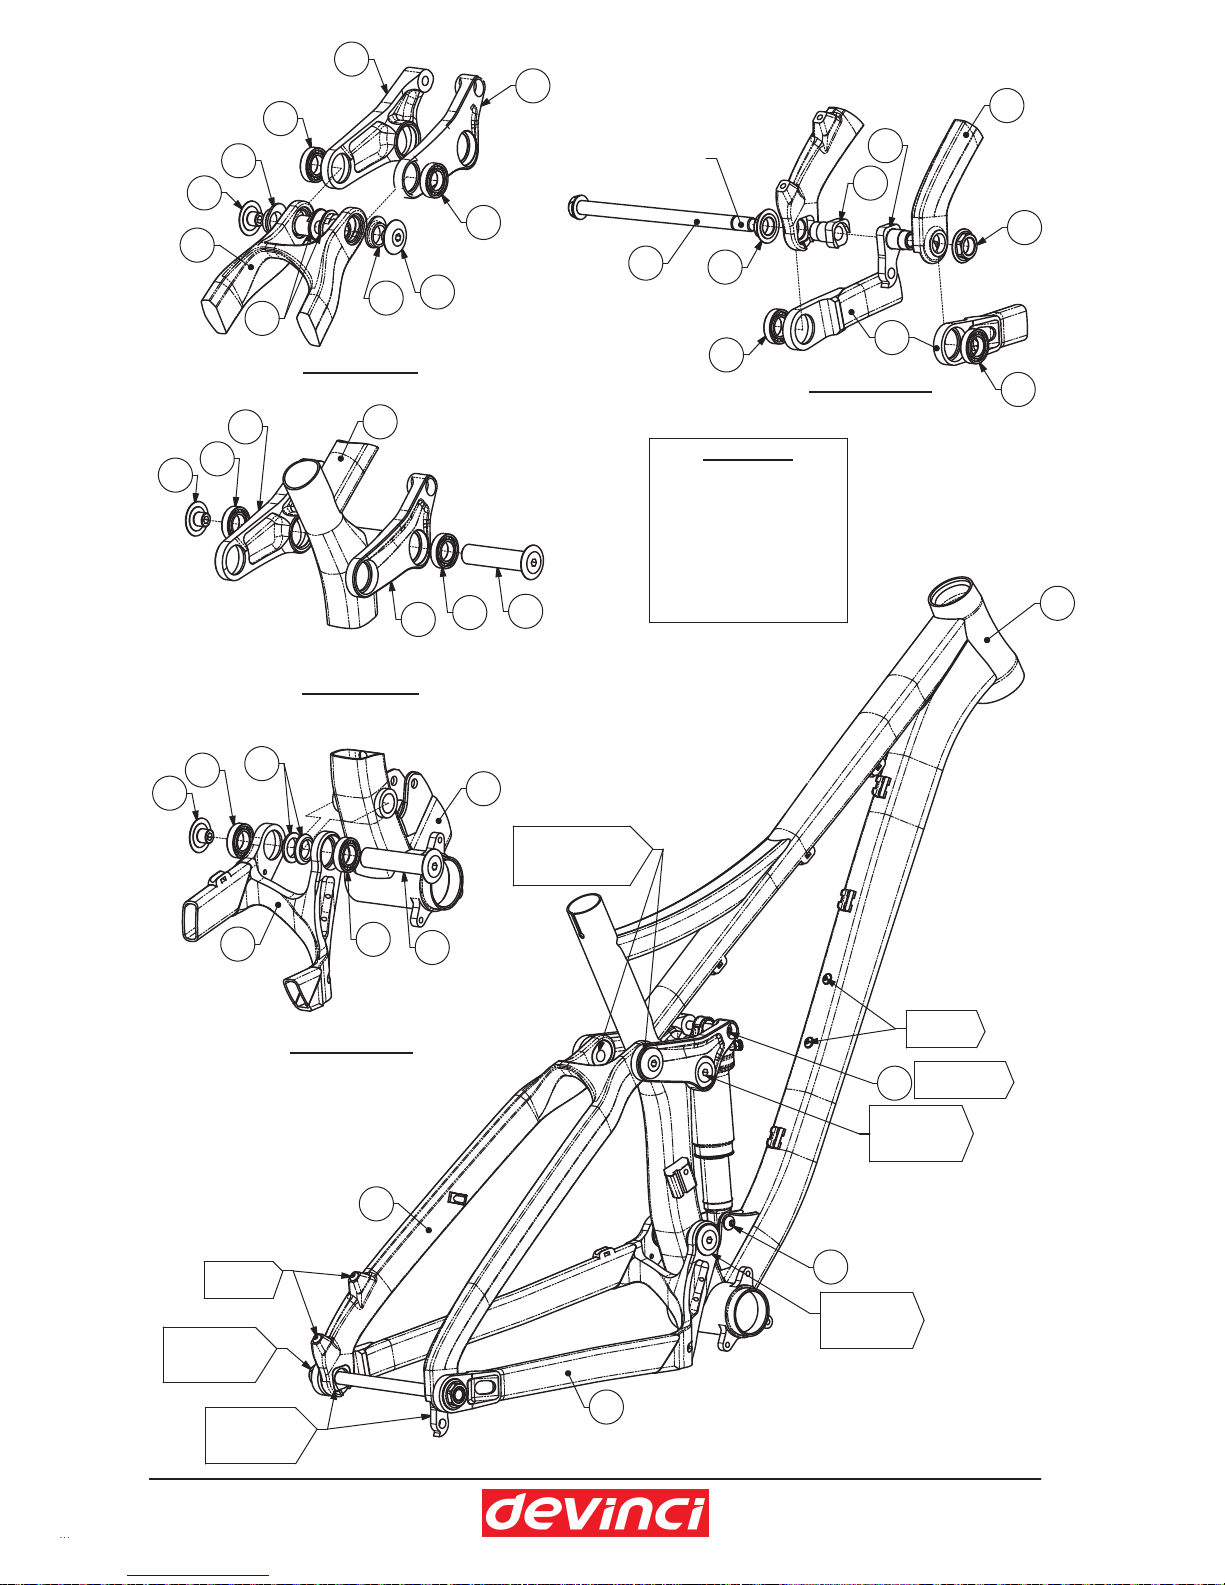
(120-125 lb.in)
CL PIVOT
(13.6 - 14.1 N.m)
25 - 30 lb.in
2.8 - 3.4 N.m
(120-125 lb.in)
WL PIVOT
(190 - 210 lb.in)
DO PIVOT
12
13
2
3
(160 - 180 lb.in)
(18.1 - 20.3 N.m)
BL PIVOT
(120-125 lb.in)
REAR AXLE
45 - 55 lb.in
5.1 - 6.2 N.m
WL PIVOT
1
WARNING:
MAKE SURE TO
CAREFULLY READ THE
ASSEMBLY
INSTRUCTIONS AND
CLEANING
INSTRUCTIONS NOTES
ON NEXT PAGE.
DO PIVOT
3
6
16
1
6
15
10
CL PIVOT
6
6
6
4616
15
1
5
BL PIVOT
2
11
18
8
7
11
3
NO LOCTITE
ON THIS PART,
GREASE ONLY
6
15
2
17
17 15
6
5
4
9
55 - 65 lb.in
6.2 - 7.3 N.m
(13.6 - 14.1 N.m)
(21.5 - 23.7 N.m)
(13.6 - 14.1 N.m)
2015 TROY ALU-CARBON

CLEANING INSTRUCTIONS:
IT IS A WELL KNOWN FACT THAT A CLEAN BIKE PERFOMS BETTER. DEVINCI RECOMMENDS WASHING YOUR
BIKE REGULARLY USING A BRUSH AND SOAPY WATER. HOWEVER, DEVINCI DO NOT RECOMMEND THE USE OF
A PRESSURE WASHER, SINCE THIS MAY SIGNIFICANTLY REDUCE THE SERVICE LIFE OF BALL BEARINGS. EVEN
THOUGH OUR BALL BEARINGS ARE EQUIPPED WITH HIGH QUALITY DOUBLE-LIP SEALS, HIGH PRESSURE WATER
CAN STILL PASS THESE SEALS AND REMOVE THE GREASE INSIDE THE BEARING. THIS MAY CAUSE PREMATURE
CORROSION AND WEAR OF THE BALL BEARINGS.
ASSEMBLY INSTRUCTIONS:
1- THOROUGHLY CLEAN THE INTERIOR OF EACH BEARING HOUSING TO REMOVE ANY DIRT OR OLD GREASE;
2- APPLY HIGH QUALITY WATERPROOF GREASE ON THE INSIDE FACE AND INSIDE DIAMETER OF ALL BEARING HOUSINGS
BEFORE PRESS-FIT;
3- APPLY HIGH QUALITY WATERPROOF GREASE TO ALL PIVOT PARTS THAT CONTACT WITH THE INNER DIAMETER OF THE
BEARINGS (EX.: MFP12021);
4- APPLY HIGH QUALITY WATERPROOF GREASE TO ALL NON-THREADED METAL-TO-METAL INTERFACES (EX.: PLANAR FACE
OF THE PIVOT SPACER (MFP11080) THAT CONTACTS THE LATERAL FACES OF THE FRONT TRIANGLE WL PIVOT). THESE
INSTRUCTIONS ALSO APPLY TO THE SHOCK ASSEMBLY;
5- UNLESS OTHERWISE SPECIFIED, APPLY BLUE LOCTITE 242 ON ALL THREADS BEFORE ASSEMBLY TO THE SPECIFIED
TORQUE VALUE;
6- HUB OPTIONS: YOU CAN SWITCH FROM A 142mm TO A 135mm HUB SIMPLY BY REPLACING THE PARTS MFP11031 AND
MFP11032 BY THE PARTS MFP11061 AND MFP11062;
7- TO PREVENT DAMAGE TO THE FRAME, THE SEATPOST MUST HAVE A MINIMUM INSERTION IN THE SEAT TUBE.
CARBON FRAME:
SMALL / MEDIUM - 70mm INSERTION
LARGE / X-LARGE - 100mm INSERTION
ALUMINIUM FRAME:
SMALL / MEDIUM / LARGE / X-LARGE - 100mm INSERTION
8- FRG ADJUSTABLE: THIS DESIGN ALLOWS RIDERS TO CHOOSE BETWEEN A LOW OR HIGH POSITION. WITH FRG
ADJUSTABLE TECHNOLOGY, YOU CAN FINE-TUNE YOUR RIDE TO PERSONAL TASTES OR SPECIFIC TRAIL TYPES USING A
FLIP-FLOP PIVOT MECHANISM THAT SLIGHTLY CHANGES THE BIKE'S GEOMETRY FOR THE TROY, THIS ADJUSTMENT IS
PROVIDED BY THE BL PIVOT ADJUSTER SHAFTS AND SPACERS (MFP12023 AND MFP12022), AS SHOWN BELOW.
HIGH POSITION
LOW POSITION
2015 TROY ALU-CARBON

tech | squeaks ‘n’ creaks
A bicycle is intended to ride in different environments regardless of the
weather, to be ridden occasionally or year-round by professionals and
beginners, a bicycle is an integrity of mechanisms that needs some
maintenance. After using your bicycle for some time, it may begin to
generate some creaking noises, squeaks and all sort of different weird,
annoying noises. Don’t be worried, you are riding your bicycle in the
purpose of its creation if you’re hearing these noises. It is normal and it
only means that you need to give your bicycle some loving. However, if
after periodic maintenance these noises are still heard, these are symp-
toms that shows you need to take some more investigation to uncover
and fix these problems.
The following simple steps will guide you through the most common
areas of squeaking/creaking noises, they will provide you the procedure
in order to make them cease and ride your bicycle smoothly again.
Never forget that these annoying noises also mean that there might be
possibility of serious safety issues if not dealt with. If after following all
these simple steps, you are still experiencing some problems with your
bicycle, we highly recommend you bring it to your local Devinci Autho-
rized Dealer for further investigation.
Enjoy the ride

SQUEAKS ‘N’ CREAKS | D E V I N C I T E C H
DEVINCI TECH | SQUEAKS ’N’ CREAKS
DRIVETRAIN ASSEMBLY
1
2
3
4
5
6
7
CHAINRING BOLTS
BOT TOM BRACKET
REAR DERAILLEUR &
HANGER BOLT
PEDALS
CHAIN WEAR
CASSETTE ASSEMBLY
BRAKE BOLTS - ROTOR
BOLTS
DUE TO THE CONSTANT TENSION AND FORCES TO WHICH CHAINRINGS ARE EXPOSED, THEY REQUIRE REGULAR TORQUE INSPECTIONS TO
ENSURE THEY DO NOT TURN FREELY. PLEASE REFER TO THE CRANK’S OWNER MANUAL FOR PROPER SPECIFICATIONS AND TIGHTENING
ORDER.
LOOSE BOTTOM BRACKET CUPS CAN ALTER THE FRAME BB THREADS AND CREATE LOUD CREAKING NOISES IF NOT DIAGNOSED/FIXED
QUICKLY. THEY CAN BE HARD TO DIAGNOSE AND ISOLATE DEPENDING ON A LOT OF DIFFERENT FACTORS. TAKING YOUR BICYCLE TO YOUR
DEVINCI AUTHORIZED DEALER IS ALWAYS PREFERED TO TRYING TO OVERHAUL THE WHOLE UNIT BY YOURSELF AS SPECIAL TOOLS/PRO-
CEDURES ARE NEEDED. REMEMBER THAT IF YOU DECIDE TO PERFORM THESE CORRECTIONS BY YOURSELF, PLE ASE ALWAYS REFER TO THE
RESPECTIVE PART OWNER’S MANUAL AND FOLLOW THE OVERHAUL PROCEDURE OR YOU MAY RISK VOIDING THE WARRANT Y.
DUE TO THE CONSTANT TENSION AND FORCES TO WHICH THE REAR DERAILLEUR /HANGER BOLT ARE EXPOSED, THEY REQUIRE REGUL AR
INSPECTION AND TIGHTENING. MOST BICYCLE DER AILLEUR HANGERS USE A 5MM HEX, HOWEVER THRU-AXLE DROP-OUTS AND OTHER
DERAILLEUR SYSTEMS MIGHT NEED SPECIAL TOOLS/TIGHETNING PROCEDURES. PLEASE ALWAYS REFER TO THE MANUFACTURER’S OWNER
MANUAL BEFORE PROCEEDING.
MAKE SURE YOUR PEDALS ARE ALWAYS PROPERLY TIGHTENED WITH THE HELP OF AN 15MM PEDAL WRENCH OR HEX KEYS. IT IS IMPOR-
TANT TO ALWAYS REMEMBER THAT THE NON-DRIVE SIDE IS ALWAYS REVERSE THREADED. MAKE SURE YOU ALWAYS LUBRICATE/GREASE
THE THREADS PRIOR TO INSTALLATION, AND REFER TO THE MANUFACTURER’S OWNER MANUAL TO DETERMINE IF AWASHER BETWEEN
THE PEDAL AND CRANK-ARM INTERFACE IS REQUIRED BEFORE TIGHTENING TO THE PROPER TORQUE.
DUE TO THE CONSTANT TENSION AND FORCES THE CHAIN IS ALWAYS UNDER, HAVING A WORN-OUT CHAIN MIGHT GENERATE NOISES FROM
THE ENTIRE DRIVE-TRAIN. ON TOP OF BEING NOISY, AN USED CHAIN WILL DETERIORATE THE CHAINRING AND CASSETTE LIFE. WE RECOM-
MEND YOU MEASURE YOUR CHAIN-WEAR WITH PROPER TOOLS OFTEN TO MAXIMIZE YOUR OVERALL DRIVE-TRAIN LIFE.
DUE TO THE CONSTANT TENSION AND FORCES THE CHAIN IS ALWAYS UNDER, HAVING A LOOSE CASSETTE ASSEMBLY CAN GENERATE LOUD
CREAKING NOISES WHEN PEDALING. PLEASE REFER TO THE MANUFACTURER’S OWNER MANUAL FOR PROPER INSTALLATION/MAINTE-
NANCE PROCEDURES.
DUE TO THE CONSTANT BRAKING FORCES V-BRAKES/DISC-BRAKES ARE ALWAYS UNDER, LOOSE BOLTS WILL GENERATE A LOT OF VIBRA-
TIONS THROUGHOUT THE FRAME WHICH CAN EVEN BE TRANSFERED TO LOUD NOISES WHEN APPLYING THE BRAKES. MAKE SURE TO APPLY
BLUE LOCTITE TO THE MOUNTING HARDWARE THREADS BEFORE TENSIONING TO THE MANUFACTURER’S SPECIFICATIONS.
3
2
1
4
5
6
7

SQUEAKS ‘N’ CREAKS | D E V I N C I T E C H
DEVINCI TECH | SQUEAKS ’N’ CREAKS
COCKPIT ASSEMBLY
SUSPENSION ASSEMBLY
1
2
3
4
5
6
SADDLE RAILS / SEAT
POST CLAMP
SEAT CLAMP
STEM BOLTS
HE ADSET
REAR SHOCK MOUN-
TING HARDWARE
SUSPENSION PIVOT
BOLTS
EVERY SINGLE-BOLT SEATCLAMP ONADEVINCI BICYCLE REQUIRES A HIGH TORQUE. THAT’S WHY A TORQUE WRENCH MUST BE USED TO
OBTAIN PROPER TORQUE SPECIFICATIONS, OTHERWISE A LOUD CREAKING NOISE CAN BE HEARD WHILE PEDALING SEATED ON THE SADDLE.
MAKE SURE YOU SLIGHTLY GREASE ALL METAL-TO-METAL CONTACT POINTS, ESPECIALLY THE MECHANISM CLAMP BOLTS.
WHEN QUICK-RELEASE SEATCLAMPS ARE USED, MAKE SURE THE BOLT IS ADJUSTED SO THAT PROPER TIGHTENING FORCE IS APPLIED
WHEN THE LEVER IS IN THE CLOSED POSITION. WHEN BOLT-ON SEATCLAMPS ARE USED, MAKE SURE THE BOLT IS PROPERLY TIGHTENED.
KEEP IN MIND NOT TO USE GREASE ON CARBON SEATPOSTS AND/OR FR AMES; USE SPECIAL CARBON ASSEMBLY PASTE INSTE AD. PLEASE
ALWAYS REFER TO THE MANUFACTURER’S OWNER MANUAL FOR PROPER TORQUE SPECIFICATIONS.
AS PART OF THE COCKPIT ASSEMBLY, STEM CAP BOLTS SHOULD BE INSPECTED OFTEN TO MAKE SURE PROPER TORQUE IS APPLIED AS
REFERENCED IN THE STEM OWNER’S MANUAL. DO NOT USE GREASE ON CARBON STEER TUBES AND CARBON HANDLEBARS, ALWAYS
REFER TO THE PART’S OWNER MANUAL FOR PROPER INSTALL ATION.
IN ORDER TO WORK PROPERLY, THE HEADSET ASSEMBLY REQUIRES THE STEM BOLTS TO BE TIGHTENED TO SPEC TO KEEP EVERYTHING
TIGHT AND SECURE. FOR CARBON STEER TUBES, A PROPER CARBON SPECIFIC EXPANDER PLUG NEEDS TO BE USED INSTEAD OF A REGU-
LAR STAR NUT. PLEASE ALWAYS REFER TO THE MANUFACTURER’S OWNER MANUAL FOR PROPER ASSEMBLY.
DRY SHOCK BOLTS AND/OR LOOSE SHOCK BOLTS CAN GENERATE SOME NOISE IF NOT TAKEN CARE OF. WE RECOMMEND LUBRICATING THE
SHOCK BOLTS BEFORE ASSEMBLY, AND MAKE SURE TO APPLY SOME BLUE LOCTITE ON DRY AND CLEAN THREADS BEFORE TORQUING TO
SPEC.
EACH AND EVERY PIVOT BOLT SHOULD BE TORQUED TO ITS PROPER SPECIFICIATION WITHIN THE DEVINCI SPLIT-PIVOT MANUAL. IN MOST
ENVIRONMENTS, LUBRICATINGS THOSE PIVOT POINTS AND BOLTS SHOULD ELIMINATE ANY CREAKING ISSUES WITHOUT THE NEED FOR
BEARING EXTR ACTION. IF NOISES PERSIST AFTER LUBRICATION, PLEASE VISIT YOUR LOCAL DEVINCI AUTHORIZED DEALER FOR BEARING
REMOVAL/INSTALLATION AND OVERHAUL PROCEDURES (SPECIAL BEARING EXTRACTOR NEEDED).
3
2
1
4
5
6
6
6
SQUEAKS ‘N’ CREAKS | D E V I N C I T E C H
DEVINCI TECH | SQUEAKS ’N’ CREAKS
WHEEL ASSEMBLY
MISC ASSEMBLY
1
2
3
QUICK-RELEASE
SKEWERS
REAR WHEEL
THRE ADED AXLES
WATER BOT TLE CAGES
WHEEL QUICK RELEASES SHOULD ALWAYS BE UNDER PROPER TENSION AND PROPERLY FASTENED. THERE SHOULD BE AMPLE RESISTANCE
WHEN TRYING TO OPEN THE QUICK RELEASE, IF NOT, TURN THE BOLT UNTIL A SIGNIFICANT AMOUNT OF FORCE IS REQUIRED TO CLOSE THE
QUICK RELEASE. MAKE SURE TO CHECK THE TENSION ON EACH QUICK RELEASE BEFORE AND AFTER EVERY BIKE RIDE.
MAKE SURE TO LUBRICATE/GREASE THE REAR AXLE AND ITS THREADS BEFORE TENSIONNING IT TO ITS PROPER TORQUE. FAILURE TO
PERFORM THESE ACTIONS WILL RESULT IN EITHER A LOOSE A XLE, SEIZED A XLE AND/OR CREAKING NOISES WHEN PEDALLING FORCES ARE
APPLIED.
AS SIMPLE AS THEY ARE, WATER BOT TLE CAGES WHEN NOT TIGHTENED PROPERLY CAN GENERATE RATTLING NOISES. REFER TO THE
MANUFACTURER’S OWNER MANUAL FOR PROPER INSTALL ATION AND TORQUES.
3
2 1

Pour obtenir une version française de ce document, communiquez avec nous via Internet à l’adresse : [email protected]
NOTE: This manual is not intended as a comprehensive use, service, repair or maintenance manual. If you have any questions about your bicycle
which are not answered in this manual, of if you are not certain that you understand any of the answers in this manual, please consult with your
authorized Devinci dealer.
OWNER’S
MANUAL
FOR
MULTI-SPEED
BICYCLES
This manual containsimportant safety, performance and maintenance infor-
mation. Please read this manual before you take your first ride on your new
bicycle. Keep the manual handy for future reference.
01
Most sports carry the risk of injury, damage or both, and bicycling is no exception. By choosing to ride a bike, you are aware of these inherent dangers and risks. You also agree totake full
responsibility for those risks. Neither the manufacturer, nor the distributor, nor the person who sold your bike, nor the people that do the maintenance of the trails where you ride can be held
responsible. Since you take full responsibility, it is imperative that you read and fully understand the content of this manual.
It is your duty to do the proper maintenance on your bicycle and, therefore, substantially reduce the risk of injury.
Riding a bicycle can be a very dangerous activity, even under the best circumstances. Also, since it is impossible to predict all the situations you may face, this manual is not meant to describe
every aspect of safe use. Many risks inherent to riding a bike cannot be predicted or avoided and they are, therefore, your sole responsibility.
This manual uses WARNING and CAUTION tabs that warn you about consequences that might occur because of bad inspection or inadequate maintenance of your bicycle. Also, not
respecting traffic laws can lead to serious injury or damage. The symbol and the word WARNING always indicate risk of serious injury that could even lead to death. The symbol
and the word CAUTION imply the possibility of serious damage to your bicycle and the risk of voiding your warranty.
Warning intended for parents and guardians
It is tragic to realize that minors are the most likely to be involved in bicycling accidents. As parent or guardian, you are entirely responsible for your children’s activities and therefore of their
security. Those responsibilities consist, among other things, of making sure that the following criteria are met:
As the parent or the guardian, you should read this manual in its entirety before letting your children use the bike. Moreover, make sure your child always wears a regulation standard helmet
when bicycling.
IMPORTANT WARNING
•The size of the bicycle is adequate for your children;
•The bicycle is in good working order and requires no maintenance whatsoever;
•Your children know how to use the bicycle safely;
•You both know and apply your local traffic laws;
•You apply common sense and a responsible attitude when bicycling.
02
Your authorized Devinci dealer is committed to guiding you in the process of choosing a bike with accessories that really are adapted tothe type of cycling you wish to practice. It also provides
help concerning maintenance, soyou can fully benefit from your investment. Authorized Devinci staff possess the knowledge, the experience and the necessary tools to adequately repair and
provide reliable advice.
However, your dealer cannot make decisions on your behalf and be held responsible for your lack of knowledge, experience, qualifications or common sense. Onthe other hand, your
authorized Devinci dealer can take the time to explain how your bike and its components work or what accessories will meet your specific needs.
If you have a problem or need information, consult your authorized Devinci dealer immediately, who will be glad to answer and guide you.
YOUR AUTHORIZED
DEVINCI DEALER
03
37
1
2
3
4
5
6
7
8
910
11
12
13
14
15
16
17
18
19
20
21
22
23
24
25
26
31
28
29
30
27
32
33
34
35
36
38
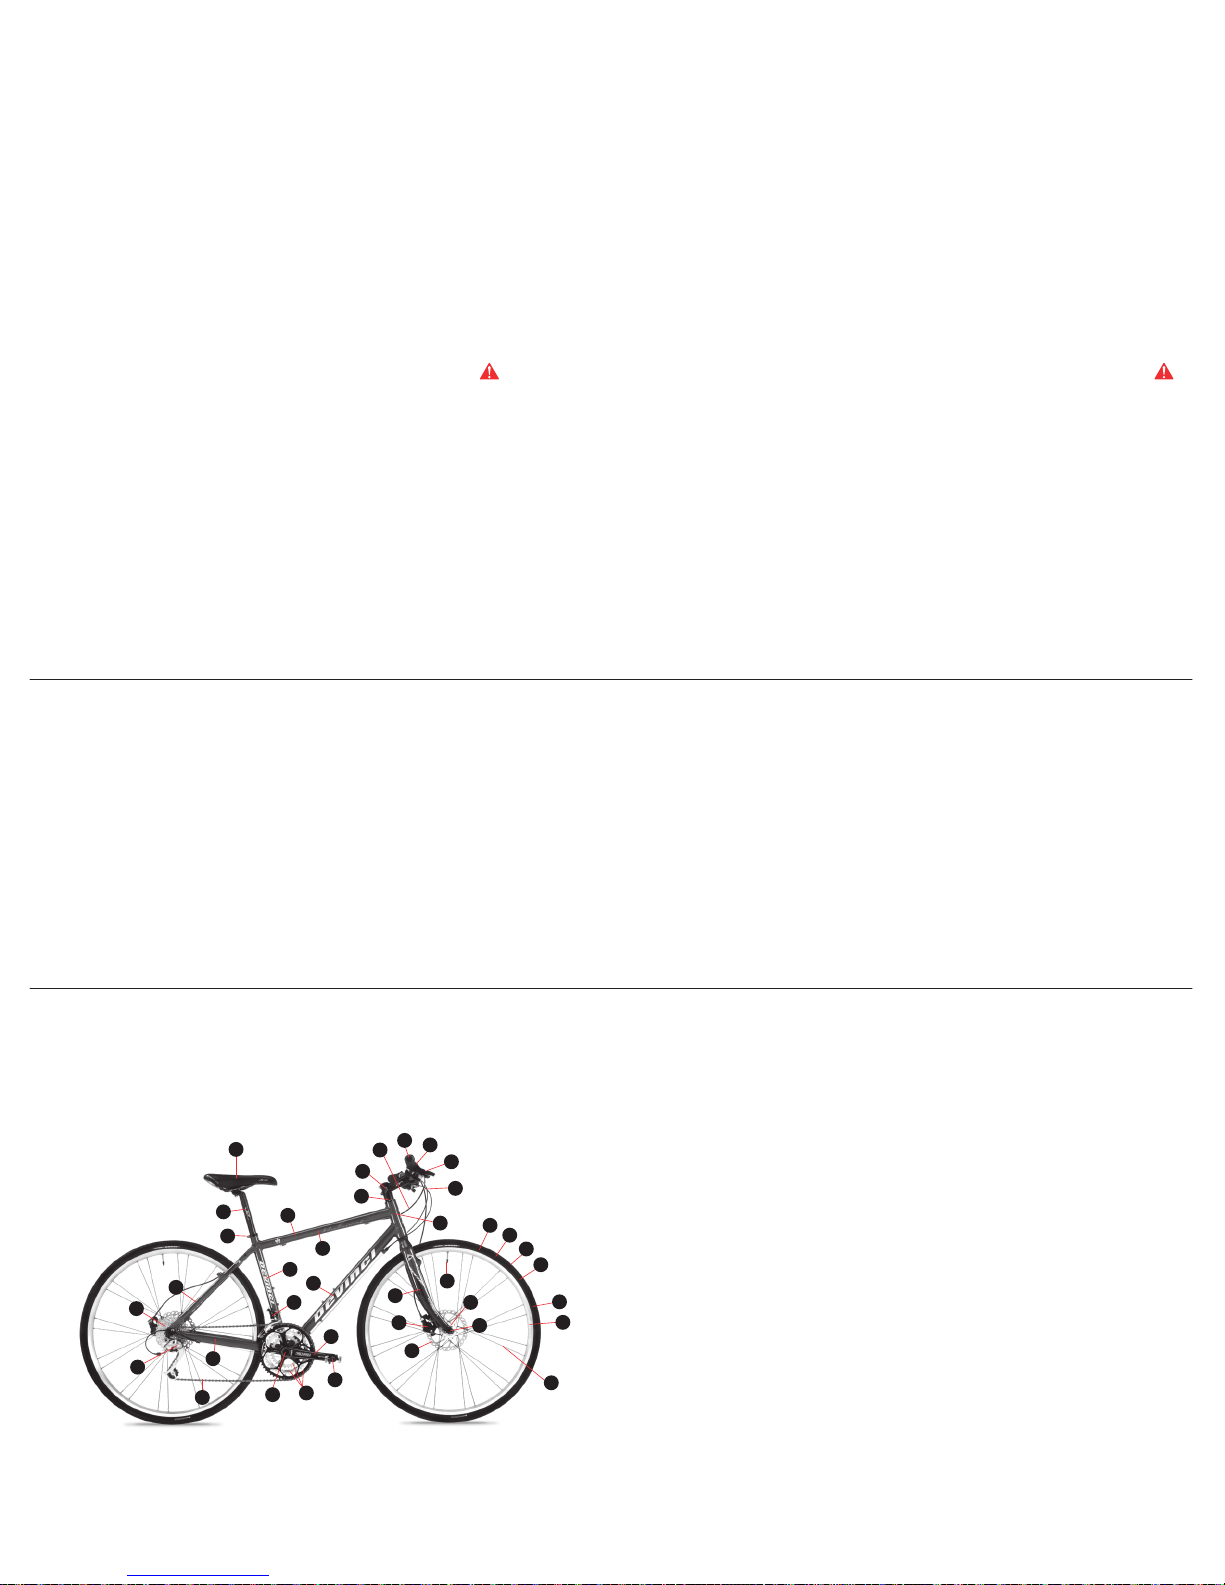
NOMENCLATURE
FOR YOUT BIKE 1. Frame
2. Top tube
3. Down tube
4. Seat tube
5. Chain stay
6. Seat stay
7. Head tube
8. Fork
9. Wheel
10. Tire
11. Tread
12. Sidewall
13. Valve
14. Inner tube
15. Rim
16. Spokes
17. Hub
18. Quick release
19. Bottom bracket
20. Crank
21. Chain rings
22. Chain
23. Pedal
24. Cassette
25. Rear derailleur
26. Front derailleur
27. Shifter
28. Shifter cables
29. Headset
30. Stem
31. Handlebar
32. Seat post
33. Saddle
34. Seat collar
35. Brake lever
36. Caliper
37. Brake disc
38. Brake cable

4.1 Road
The term “road bike” refers to any bicycle designed for paved roads or paths. Like most products that grow in popularity, so does their
design to meet the specific demands of the consumer. The road bike can be further divided into four types: Road, Time-trial/Triathlon,
Touring and Cyclo-cross.
4.2 All-terrain
The term “all-terrain” refers to any bicycle designed for off-road riding. Since the beginning, off-road riders have pushed the limits of their
bikes and begun to ride a wider variety of terrain, forcing the market to split into four categories of mountain bikes: XC racing, XC Trail,
Freeride and Downhill.
4.3 Hybrid
The desire to ride freely on a comfortable bike, both on cycle paths and in the city, has led to both on cycle paths and in the city, has led
to bike and the mountain bike, the hybrid is well-adapted to touring trips or your daily transportation to work. The hybrid offers a wide
range of gear ratios and large wheels for a smoother ride than the road bike and a faster one than the all-terrain.
4.4 Comfort
The comfort bike is meant for those who enjoy life on the paved paths. With larger tires than the hybrid bike and a more comfortable
saddle, it allows a straighter position for riders looking for a pleasant and safe ride. The comfort bike is an excellent choice for cyclists
that prefer comfort over speed.
04THE BIBYCLE FAMILIES
5.1 Getting started
It is strongly recommended that you read this manual thoroughly before your very first ride. Make sure you understand the following points and be sure to refer to the detailed sections if you
have any doubts. Remember that your authorized Devinci dealer is also available to answer your questions.
5.1.1 Bike Dimensions
First, you should know the answers to the following questions:
a. Is the size of your bike adequate for you? To check, refer to section 5.2.1. A bike that’s too large or too small results in loss of stability and could make you fall.
b. Is your saddle properly adjusted? To check, refer to section 5.2.2. Before adjusting the saddle by yourself, make sure you respect the minimal insertion height by referring to section 7.2.
c. Have you correctly tightened the saddle and the seat post? If so, you shouldn’t get any movement whatsoever.
d. Are the handlebars and the stem in the right positioned for you? Before adjusting, make sure you refer to section 5.2.3 to learn how to do it the right way.
e. Are the reach and angle of your brakes convenient for you? It is possible to adjust your brakes to make them more comfortable to use. Please refer to section 5.2.4.
f. Do you know precisely how everything works on your bike? If you to have any doubts, do not hesitate to contact your authorized Devinci dealer who will be pleased to describe and teach
the functioning of every mechanism to you.
5.1.2 Security and Bicycling
a. A regulation standard helmet by CSA (Canada), CPSC, Snell, ASTM (America) or CEN (Europe) is an essential piece of equipment. Do you have one? It is imperative that you ALWAYS
wear a regulation standard helmet when riding your bike. Also, make sure it fits your head, that it is well-adjusted and that the chin strap is securely buckled. The use of a poorly
adjusted, wrongly positioned and/or incorrectly attached helmet may cause serious injury and could even lead to death.
05FUNDAMENTALS OF CYCLING

b. Do you own other specific safety equipment? In certain provinces or states, you may be obliged to use other safety equipment. It is your responsibility to know and respect the safety
rules in effect wherever you ride your bike.
c. Are you familiar with the use of your wheel quick releases? If not, make sure you refer to section 7.1 to understand their functioning. The use of a bike with incorrectly adjusted wheel
quick releases is very dangerous since the wheel could become loose or even unlock and fall, causing damage and/or serious injury that could lead to death.
d. Do you know how to operate toe clips or clipless pedals? If your bike is equipped with one or the other device and you don’t fully understand their functioning please refer to section 7.6
or 7.7. It is very important that you acquire the skills to safely engage and disengage these pedal models. In order to do so, you need to take time in a safe place to practice and learn
how they work, one foot at a time. The technique is tricky at first and there is a risk of falling, which could cause injuries.
e. Is your bike equipped with a front suspension? If so, refer to section 7.8. When braking, a weight transfer tends to compress the front suspension, resulting in a lifting force applied to the
rear of your bike that could throw you over the handlebars. It is important that you learn how to use a bike equipped with suspensions in a safe place before doing a real ride. Consult your
suspension user manual for more information on how to adjust your suspension. Safety mechanical inspection.
It is crucial that you make a rigorous mechanical inspection before using your bike. Refer to section 5.4 to find out precisely what has to be checked.
Congratulations, you are now up for your first ride!
Wearing your helmet, go get acquainted with your new bike. We recommend you do a short ride to familiarize yourself with the operations of all the different components.
Make sure you learn to brake, to shift gears, engage and disengage your toe clips or clipless pedals as well as understanding how your suspension responds and operates. This learning
curve is inevitable and will make you appreciate much more the rides that follow by making them safer at the same time.
Don’t forget to read the manual in its entirety!
5.2 Tuning your bike according to your morphology
It is very important that your bike be the right size for you. A bike that is either too large or too small is likely to be harder to control and less comfortable.
WARNING: If the size of your bike is incorrect, you risk losing control and falling. If the size happens to be incorrect, ask your authorized Devinci dealer to exchange it
before you start using it.
5.2.1 Dimensions
Your authorized Devinci dealer will help you choose the right size of bike according to the information provided. If the bike was purchased by someone else, it is imperative that the main
user confirms that the size is right before using it. If you selected your bike yourself at your dealer, your dealer will indicate what model is best suited for you.
First of all, the simplest way to check your frame size is to check the standover height. This is defined as the distance between your crotch and the top tube of the frame when standing over
the bike with one foot on each side of it. Before you measure it, make sure you wear your bike shoes. Between the saddle and the handlebars as shown on figure 1, place your feet on the
ground and jump on your heels. Has your crotch touched the top tube? If yes, your bike is too big for you.
If you intend to use your bike only on paved surfaces, then aim for a standover height of at least 2.5cm. If you intend to use it on bike paths and on unpaved roads, then aim for at least
7.5cm. Finally, if you expect to do some off-road or mountain biking, then you should aim for a standover height of more than 10cm.
Figure 1 Figure 2
5.2.2 Saddle positioning
In order to achieve greater comfort and optimal performance, the saddle should be positioned and adjusted properly. Your authorized Devinci dealer has already placed the saddle in a
general position that is likely to satisfy most people. However, if you feel like it could be better, then do not hesitate to go back to your authorized Devinci dealer to have it positioned perfectly.
You could also complete the following operations yourself if you have the right tools and necessary skills.
Refer to figures 3, 4 and 5 to determine in which category your saddle falls.
Figure 3 Figure 4 Figure 5
Figure 6 Figure 7
There are three different settings for a saddle:
A. The Height
The height of your saddle depends on the length of your legs. Generally, we assume your saddle is well adjusted when you can barely touch the pedal at its lowest position with your heel,
when seated on the saddle. The procedure goes as follows: sit on your saddle, place your heel on the pedal and extend your leg to position the crank arm parallel to the seat tube. Your
saddle is too low if your leg is bent at the knee while your heel touches the pedal. On the other hand, it is too high if your hip does not remain straight (see figure 2). Your saddle needs to
be adjusted until the ideal position is obtained.

In order to adjust the height of your saddle, you will need to loosen the quick release of the seat collar bolt, referring to figure 6 to determine which one you have. Then, move the seat post
up or down according referring to figure 6 to determine which one you have. Then, move the seat post up or down according to your needs. Check the straightness of the saddle with
respect to the length of the bike and tighten the seat collar carefully to firmly immobilize the seat post.
WARNING: Your seat post has a minimum insertion line which limits the maximum height you can safely reach. Under no circumstances should this line be visible after
positioning the saddle (see figure 7). Placing the saddle otherwise could result in a rupture of the seat tube inducing a loss of control that could lead to serious
injury or even death.
B. The Fore-and-aft positioning
Loosen the clamp by referring to figures 3, 4 and 5 and slide the saddle toward the front or the back as desired. First, place the saddle in the middle and make it slide in the desired
direction until the most comfortable position is reached.
C. The Tilt
Even though many cyclists opt for a horizontal saddle, a few prefer to have it tilted. If this interests you and your saddle allows it (see figure 5), just loosen the saddle clamping mechanism
and tilt the saddle as desired. Be sure to tighten back the mechanism firmly.
WARNING: After moving your saddle, tighten the clamping mechanism vigorously and do it before attempting to ride your bike. In order to make sure it is properly
clamped, grab the two ends of your saddle and try to move it up, down, sideways, try to tilt it and even twist it every possible wayIf it moves, contact your
authorized Devinci dealer.
Small changes in your saddle positioning are enough to increase both your comfort and performance levels. It is strongly recommended that you adjust the saddle in one direction at a time.
Do it many times, little by little, until you find the best position for you.
If you have not found a comfortable configuration after adjusting your saddle in every direction, maybe another type of saddle would suit you better. Everyone is different and that could
explain the abundance of different saddle models on the market, offering a myriad of sizes, shapes and stiffness. Your dealer can guide you in the process of choosing an appropriate
saddle that will suit your needs and expectations.
CAUTION: Riding a bike equipped with a saddle that does not correctly support your pelvic area can induce pain or numbness. Also, injuries to your nerves and to your
blood vessels could result from an inappropriate saddle. If you happen to feel pain or numbness, adjust your saddle differently. If it persists, contact your
authorized Devinci dealer to find out about ergonomic models that might suit you better.
5.2.3 Handlebar positioning
If your bike has a stem clamped directly on the outside of the steer tube, your authorized Devinci dealer should adjust your handlebars height by using cylindrical spacers above or under it.
Do not attempt this modification by yourself, ask your authorized Devinci dealer instead.
Figure 8 Figure 9
On many bikes, it is possible to adjust the height of the handlebars slightly yourself by changing the stem height. To do so, loosen the stem clamping bolt by a few turns as shown on figure
9. Use a rubber hammer to move the stem if it appears to be jammed. You can now adjust the height of the stem and tighten back the bolt properly once you have reached the desired
setting. You should never be able to move the alignment of the handlebars and the stem with your hands. Moreover, there is a minimum insertion line on your stem; make sure it is never
visible. It is not recommended to make this modification by yourself, this one requires a certain amount of experience. Ask your authorized Devinci dealer if you’re in doubt.
Now check if your handlebars turn normally and that your brakes are working properly.
CAUTION: On a few bike models, the handlebars height adjustment could modify the tension in the front brake cable, resulting in the malfunctioning of your front brakes.
If the brake pads are closer or further apart from the rim, contact your authorized Devinci dealer before using your bike to have your brakes adjusted.
WARNING: The minimum insertion line of your stem shall not be higher than the head set as shown on figure 9. If visible, there is a risk of damaging your steer tube which
could result in a loss of control and a fall, leading to serious injury or even death.
If you wish to modify the angle of your handlebars, you can loosen the bolt of its clamping system, rotate the handlebars as desired, center them and tighten the bolt vigorously. You
shouldn’t be able to change the alignment of the handlebars with the stem with your hands.
WARNING: A weak tightening of the retaining bolt of your stem or of the handlebars is likely to decrease the handling of your bike and risk causing a loss of control and a
fall. Place yourself facing the bike, squeeze the front wheel between your legs and try turning the handlebars. If you can change the alignment between your
stem and your front wheel, the bolts are definitely not tightened enough. The alignment of the handlebars with respect to the stem should also be identical.
5.2.4 Brake levers and shifters position
Upon delivery of your bike, your authorized Devinci dealer has assembled the brake levers and shifters in the standard position. It is possible to modify their angle and their position with
respect to the handlebars. Ask your authorized Devinci dealer to adjust them or to show you the procedure.
5.2.5 Brake tuning
Many models offer the possibility of adjusting the reach of your brake levers and shifters. If you feel it is difficult to brake or to shift gears properly, then ask your authorized Devinci dealer
to adjust them according to your needs.
WARNING: It is essential that all your stopping power is available within the reach that the brakes are adjusted in. As a matter of fact, a shorter brake reach implies a
thinner functioning range. Indeed, an insufficient reach could prevent the use of your maximum braking power, which can lead, of course, to loss of control,
falls, serious injury or even death.
5.3 Safety equipment
WARNING: Many countries have laws that require the use of certain safety devices. It is your duty to know the legislation of the countries you use your bike in and to
comply with those requirements by using these safety devices.
5.3.1 Helmet
Even though the use of the helmet is not required in every country, it is strongly recommended to use one that is regulation standard (see section 5.1.2). The worst accidents involve head
injuries that could be avoided by wearing a helmet. Your authorized Devinci dealer has many good-looking models that will certainly meet your expectations.

Figure 10
Make sure the helmet you choose is well-adapted to your head, not to your look. Always place it correctly as shown on figure 10 and secure it completely. Ask your authorized Devinci
dealer to guide you in the process of selecting your helmet.
WARNING: You should always wear a regulation standard helmet when riding your bike. It is important to secure the chin strap. Consult your helmet user manual for more
information. The use of a regulation standard helmet can prevent serious or even deadly injury
5.3.2 Reflectors
The reflectors are an essential component of your bike that greatly improve your safety. They are designed to reflect car lights and street lights and therefore, make you easier to spot.
WARNING: Run a regular check to verify that your reflectors and their mounting brackets are functional, clean, straight and solidly mounted. Consult your authorized
Devinci dealer if they are broken or damaged, to get them replaced.
WARNING: Never remove your front or rear reflectors or their mounting brackets, because they are designed to push away from the brake cables and prevent interference
with the wheels in the event they break. Such interference could result in sudden wheel stop, leading to loss of control that could cause serious or even deadly
injuries.
WARNING: Never remove your bike reflectors. They are very important safety devices that help increase significantly your visibility. Indeed, if you remove them, there is a
risk of collision between you and the other road users who will not see you properly. Being hit by a car can result in very serious injuries or even death.
However, do not forget that reflectors are not intended to replace lights. Be sure to equip your bike with lights according to the local legislation.
5.3.3 Lights
If you use your bike at night, it has to be equipped with lights to make your surroundings visible and make you visible to your surroundings. From a legal point of view, a bicycle is as much
a road vehicle as a car. Therefore, you are required to have a white front light and a red one on the back, when riding at night. Your authorized Devinci dealer can guide you in choosing the
proper lighting devices.
WARNING: The reflectors are not intended to replace lights. You are required to equip your bike with lighting devices according to the legislation in effect in the areas
where you use it. It is dangerous to ride without reflectors and lights at night or when the visibility is poor.
5.3.4 Pedals
Performance bikes are often equipped with pedals with sharp edges and dangerous parts. These are designed to increased security and performance by improving their adherence with
the cycling shoes. If you have this pedal type, be careful and practice their use on an unpaved surface. Depending on your level, you might want to choose a less aggressive pedal model.
Consult your authorized Devinci dealer to choose a convenient pedal model.
5.3.5 Eyewear
When riding a bike, there is a high risk of getting dust, mud, bugs and other projectiles in the eyes. Therefore, it is strongly recommended that you wear eye protection adapted to riding.
Consult your authorized Devinci dealer to receive assistance choosing your eyewear.
5.4 Mechanical safety inspection
5.4.1 Nuts, bolts and clamps
Lift the front wheel five to ten centimetres and let it bounce heavily on the ground. Nothing should be loosened. Do a quick visual and physical inspection of every part of your bike to make
sure of that. In case you find any loosened parts or accessories, tighten then immediately with the proper tools. If you have any doubts, ask your authorized Devinci dealer.
5.4.2 Tire and wheels
Your tires must be properly inflated. To check the pressure, place one hand on the saddle and the other on the handlebar and stem junction, then push vigorously towards the ground using
your weight. Examine the resulting effect on each tire. Do they appear properly inflated? If not, inflate or deflate them accordingly. Refer to section 7.5 for more detailed instruction and
information.
Make sure the tires are still in good condition. Turn the wheels slowly and check for damage, cuts or excessive wear on the tires. Replace the damaged tires before using your bike. Redo
the same exercise, checking the wheels this time. Verify their straightness and trueness, the absence of lateral loosening and the constancy of the distance between the brake pad and the
rim. Consult your authorized Devinci dealer if anything looks suspicious or to get your wheels true.
WARNING: The brake functioning largely depends on your wheel state. Truing a wheel requires very specific skills and tools. Never attempt this operation if you lack the
skills or the tools. Instead, consult your authorized Devinci dealer.
5.4.3 Brakes
To check that your brakes are functioning properly, press firmly on the brake levers. Make sure the brake pads close in correctly on the rim. Also, check that the brake cable stays in place.
Do the brake pads touch the rim when pressing the brake levers at 2.5cm? Is the brake disc centered in the callipers? Is the disc in contact with the brake pads when not braking? Can you
obtain maximum braking power without having the brake levers touching the handlebars? If you found any problems while answering these questions or if you have any doubts concerning
your brakes after this inspection, you should have your brakes checked immediately. Do not use your bike until the brakes are fully functioning. Refer to section 7.3 for more detailed
instructions or contact your authorized Devinci dealer.
WARNING: Using a bike with worn brake pads or simply maladjusted brakes is very dangerous and can cause serious injury or even death.
5.4.4 Wheel and seat post quick releases
Check that your wheel seat post and quick releases are properly clamped. Refer to section 7.1 for more information.
WARNING: The use of a bike with loosened quick releases is extremely dangerous. A wheel quick release that is improperly tightened may cause wheel wobbling. This
could cause damage to your bike and result in injury and could even lead to death.
5.4.5 Handlebar and saddle alignment
Is your saddle parallel to the top tube of your frame? Is your wheel aligned with your stem and perpendicular to your handlebars? Are these parts tightened properly? You should never be
able to move any of them with your hands.
5.4.6 Handlebar extremities
Are your handling grips properly attached to the handlebars? Are they in good shape? If not, consult your authorized Devinci dealer to get new grips. If they are missing the end plugs,
install new ones before riding your bike.
WARNING: If your handlebar grips are loosened of damaged, you risk loosing control of your bike and falling. If the end plugs of your handlebar are not protected, you
could cut yourself or get seriously hurt.

6.1 Fundamentals of cycling
1. Proceed to the mechanical safety inspection (refer to section 5.4) before every use;
2. Always wear a standard approved helmet (see section 5.1.2);
3. Keep moving parts of your bicycle away from your bodyKeep moving parts of your bicycle away from your body carry;
4. Wear shoes that hold your feet tightly and offer a good adherence with the pedals. Never use your bike wearing sandals or just barefoot;
5. Make sure you know and master every part of your bicycle;
6. Never do jumps with a bike not designed for this purpose. When landing, huge forces are distributed through the bike, generating massive stress levels. The most critical part is certainly
the fork that could, if not designed for excessive loads, break and lead to serious or even deadly injury;
7. Adapt your speed to your environment, to the riding conditions and to your level of skills. Make sure you always fully control your bike and that you are at ease with the speed you are
going. Never forget the direct correlation between speed and the risk of loosing control;
8. Wear clothes with bright and visible colors that are not likely to get stuck in the moving parts of your bike. Always avoid loose clothing.
WARNING: Jumping, riding half-pipe, attempting aerial maneuvers or carrying heavy loads are very dangerous and are not recommended uses of your bike, since they
imply high risk of damag ing your bike or causing serious injury that could even lead to death.
6.2 Road bike Safety Code
1. Know traffic laws and other specific regulations of the region where you ride. Many cities have adopted rules concerning bicycling, sidewalk use, bike licensing, etc. Many countries also
have laws concerning helmets and child carriers. Some even have specific traffic laws for bikers;
2. Ride carefully, anticipating and ready to avoid:
a. surrounding cars that turn, engage, disengage, brake or follow you;
b. motorist opening their doors on your path;
c. pedestrians crossing the street;
d. kids playing on the side of the road;
e. gully holes, railroad tracks, pot holes, bridge expansion joints, debris or any other objects obstructing your path that might cause damage to your bike and loss of control;
f. Any other distraction you may encounter on your path.
3. The roads are busy, be careful and respect the other cars, trucks, motorcycles and bicycles. Respect the traffic laws, be patient and tolerant even if others aren’t;
4. Learn how to properly hand signal your actions, like right or left turns and stops;
5. Respect the Highway Code: Obey traffic lights and stop signs, look both ways before crossing at an intersection;
6. Observe priority rules and try not to do unexpected maneuvers;
7. Make sure you stay focused at all times and anticipate the possibility of a motorist neglecting, forgetting or even not noticing your presence;
8. Never transport another person, unless it is a young child wearing a regulation standard helmet in a safe and securely mounted standard child carrier;
9. Always use the bike path if possible. On the road, stay on the right side as far as possible from the traffic;
10. Avoid as much as possible riding in bad weather with poor visibility, in dark areas or when you are tired. These conditions are dangerous and tend to substantially increase the risk of injury;
11. Never use headphones while riding since they impair your ability to hear the traffic sounds or the sirens of emergency vehicles;
12. Do not transport luggage that could impair your visibility, disturb the stability and maneuverability of your bike or get jammed in moving parts;
13. Never try to pull or get pulled by any other vehicle;
14. Do not ride under the influence of drugs or alcohol;
15. Do not attempt tricks, wheelies, jumps or any other stunts with your bike.
6.3 Off-road bike Safety Code
1. When riding off-road, help is often far away. Be cautious and prepared; bring all the necessary equipment presented in section 8.2;
2. Never ride by yourself in remote areas. Even when accompanied, inform at least one person of your destination and an estimated return hour;
3. Ride only in mountain biking trails. Do not enter private land and areas with forbidden access;
4. Since it is more dangerous and technically more difficult to do mountain biking than road biking, start by practicing in an easy and safe place;
5. You are not alone on the trails, make sure you respect the other users and be tolerant;
6. Always give priority to pedestrians and be careful not to disturb the fauna. Keep a good distance so as not to frighten them and to avoid their unpredictable moves that could cause losses
of control and make you fall;
7. Always stay on trails to prevent damage to the environment. In mud, be careful not to contribute to the soil erosion. You are likely to disturb the fauna and the flora by not following the
marked trails;
8. It is your duty to minimize your impact on the environment. Ride responsibly by leaving nature as you found it and by disposing of your garbages in the proper receptacles.
06FOR A SAFE AND SMART EXPERIENCE
6.4 Riding at night
It is dangerous to ride your bike at night. It is not recommended to let children ride near roads at dusk or at night. Adults also should avoid it as much as possible.
WARNING: It is dangerous to use a bike without reflectors or a lighting system at night, at dusk or when visibility is reduced. You could risk serious injury or even death.
If you ride your bike at dusk or at night, make sure you are completely visible by taking the following pecautions:
1. Wear clothes with bright colors and accessories that make you easier to see, such as reflective vests, reflective arm, wrist, ankle and helmet bands and flashing lights. This will help the
motorists and pedestrians detect your presence;
2. Run a regular check to verify that your reflectors and their mounting brackets are functional, clean, straight and solidly mounted;
3. Install a lighting system for the front and the rear of your bike that runs on batteries or by a dynamo. Ask your authorized Devinci dealer for more information;
4. Be careful not to hide your reflectors and/or lights with your clothes or any objects you are carrying.
Adapt your behaviour:
1. Ride slowly;
2. Do not ride in areas with lots of traffic, on roads with a speed limit higher than 50km/h;
3. Avoid very obscure or dangerous areas;
4. Use only paths that are familiar to you.

6.5 Riding on wet surfaces
WARNING: Rain tends to make roads, paths and trails slippery and increases the braking distance for you as well as for other users you may encounter. Visibility is
generally negatively affected. The risk of accident is substantially increased on wet surfaces.
As mentioned earlier, wet surfaces tend to be very slippery, resulting in a substantial loss of maneuverability and braking power. To be sure to safely stop on a wet surface, you must
diminish your speed and you must brake earlier and more progressively than normal. In fact, you would not want your wheels to lock up and start skidding. Refer to section 7.3.1 for more
details.
6.6 Extreme and competitive use
If you intend to participate in competitions or if you practice downhill, you accept that you are taking greater risks that could cause serious injury or even death. In downhill, you risk reaching
speeds as high as those attained by off-road motorcycles and you are then exposed to a similar level of danger. Always wear complete safety equipment including full-face helmet, full finger
gloves and a body armor that fully protects your back. Make sure your bike and equipment are in order by having them inspected by your authorized Devinci dealer. Ask the expert riders
and the trail managers for information regarding the conditions and the required materials. It is your responsibility to check that you have the correct equipment, including your bike and that
it is in working perfect order
WARNING: Downhill biking can result in serious accidents. Always wear the proper safety equipment and make sure your bike is in perfect working order. In downhill, even
the best protection cannot prevent serious injury or even death. Learn how your suspension and braking systems work and respond before attempting downhill
or extreme off-road.
07
In order to increase your performance, your safety as well as your fun, it is essential that you understand thoroughly how your bike and its components work. Even if you are an expert rider, the
new generation bikes have so many innovations and new technology that you could end up surprised. It is, therefore, strongly recommended you go through this section no matter how much
experience you have. For more information, always refer to your authorized Devinci dealer.
7.1 Wheels
7.1.1 Assembly and disassembly
WARNING: Using a bike with quick releases that are not tightened enough means you risk losing the wheels, resulting in damage to bike and leading potentially to serious
injury or even death. It is, therefore, essential that you:
1. Ask your authorized Devinci dealer to explain how the wheels quick releases work so that you can assemble and disassemble them safely;
2. Learn how to safely use a quick release so that you can apply this knowledge;
3. Make sure your wheels are properly clamped before every ride.
A. Adjusting the quick release system
The quick release uses a cam mechanism to exert a significant force on the wheel hub when placed in the closed position and a small force in the open position. Since it is adjustable, you need
to learn how to operate it to ensure optimal use and a safe binding.
Figure 11
WARNING: You need to use the cam mechanism when clamping your wheel with a quick release to achieve proper binding force, by switching the lever from the opened to the
closed position. If you hold the level with one hand and you screw the nut to clamp the wheel, it will never be safely tightened. Instead, you need to switch the lever
from the opened to the closed position with a very significant restriction force. The nut helps you adjust the amplitude of that force by screwing or unscrewing it.
It is the power of the cam that maintains the wheel in place. It squeezes the wheel hub in between the fork arm ends or dropouts when switching the lever from the opened to the closed
position. The tightening force depends on the torque applied on the adjusting nut. To increase the tightening force, you need to turn the adjusting nut clockwise while holding the lever with the
other hand. To reduce it, turn the adjusting nut counterclockwise again holding the lever. Less than half a turn can make the difference between a safe and an unsafe tightening. Refer to
figure 11.
Notice: The quick release mechanism is installed on the wheel hub by its manufacturer. Never remove the mechanism from the wheel hub unless you need to repair it. Consult your authorized
Devinci dealer for the repair of a wheel hub.
B. Front wheel alternative devices
On many models, the front fork is equipped with an alternative retention device that prevents the wheel from disengaging in case of poor quick release installation. This device, integrated
directly to the fork by the processes of machining or casting, shall not replace, under any circumstances, the prescribed adjustment of the quick release.
WARNING: It is very dangerous to use a bike with a modified or removed auxiliary retention device. The modification or the removal of this device could result in serious injury
or even death. This could also lead to the annulment of your warranty.
C. Disassembly and assembly of a wheel equipped with a quick release
a. Front wheel disassembly
i. If your bike has v-brakes, spread the brake calipers as elaborated in section 7.3;
ii. Switch the quick release from the closed to the opened position;
iii.Loosen the adjusting nut of the quick release until the wheel can be adequately removed;
iv.Lift the front of the bike a few centimeters and hit the wheel downward with your hand to disengage it from the fork.
TECHNICAL INFORMATION

Figure 12 Figure 13
b. Front wheel assembly
Notice: If your bike has disc brakes, make sure you do not damage the disc, the calipers or the pads in the process of removing the front wheel. Be particularly careful when inserting the disc
between the brake pads and the calipers.
i. Turn the quick release lever into the opened position as shown on figure 12;
ii. Place the fork straight with respect to the bike and insert the wheel between the fork dropouts. The axel must firmly rest in the dropouts;
iii.Maintain the quick release lever at the opened position with one of your hands. Manually tighten the quick release adjusting nut until you feel an adequate resistant torque;
iv.Press the wheel firmly into the dropouts, align the wheel with respect to the fork, align the quickrelease lever with the fork arm and then switch it to the closed position. Make sure the quick
release lever ends up being parallel to the fork arm as shown on figure 13;
WARNING: In order to place the quick release lever into the closed position, you must use leverage with the fork arm. Also, the lever should leave a clear imprint in the palm of
your hand for a few seconds. If this is not the case, place the lever back to the opened position and turn the adjusting nut a quarter of a turn clockwise and try again.
v. If you cannot tighten the quick release lever to the closed position, you need to loosen the adjusting nut a quarter of a turn. Then try again;
vi.Reconfigure the brakes back in place and make sure the wheel is properly centered, so that it turns freely without touching the brake pads.
Figure 14
WARNING: The auxiliary retention system is not intended to replace adequate tightening of the quick release. If you use your bike and the quick releases are not tightened
enough, you risk losing the wheels, damaging your bike and suffering serious injury or even death.
c. Rear wheel disassembly
i. Shift the rear derailleur onto the highest gear corresponding to the smallest sprocket;
ii. If your bike has v-brakes, spread the brake calipers as shown in section 7.3;
iii.Turn the quick release lever to the opened position as illustrated in figure 12;
iv. Lift the rear of the bike a few centimeters and push the wheel Lift the rear of the bike a few centimeters and push the wheel disengage it.
d. Rear wheel assembly
Notice: If your bike has disc brakes, make sure you do not damage the disc, the calipers or the pads in the process of replacing the front wheel. Be particularly careful when inserting the disc
between the brake pads and the calipers.
i. Shift the rear derailleur on to the highest gear which corresponds to the smallest sprocket;
ii. Shift the rear derailleur on to the highest gear which corresponds to the smallest sprocket;
Turn the quick release lever to the opened position, referring to figure 12. Place the wheel with the quick release positioned on the rear derailleur’s opposite side;
iii.Bring the derailleur body towards the back with one of your hands;
iv.Place the chain on the smallest sprocket of the cassette. Position the wheel axel in the dropouts and push vigorously as shown on figure 14;
v. Turn the adjusting nut clockwise until it touches the dropout. Turn the quick release lever towards the closed position, making sure the lever is parallel to the seat stay;
WARNING: The auxiliary retention system is not intended to replace adequate tightening of the quick release. If you use your bike, and the quick releases are not tightened
enough, your wheels risk to disengaging, damaging your bike and leading to serious injury or even death.
vi.If you cannot tighten the quick release lever to the closed position, you need to loosen the adjusting nut a quarter of a turn. Then try again;
vii. Place the rear derailleur back in place;
viii. Reconfigure the brake back in place and make sure the wheel is properly centered so that it turns freely without rubbing the brake pads.
D. Assembly and disassembly of wheels without quick release
a. Front wheel disassembly
i. If your bike has v-brakes, spread the brake calipers as elaborated in section 7.3;
iii.Lift the front of the bike a few centimeters and hit the wheel downward with your hand to disengage it from the fork.
b. Front wheel assembly
i. Place the fork straight with respect to the bike and insert the wheel between the fork dropouts. The axel must firmly rest in the dropouts. The washers should be on the outside of the
dropouts, before the nuts;
ii. Press the wheel firmly in the dropouts and align the wheel with respect to the fork. Tighten the nuts firmly on the axel with a 15mm wrench;
iii.Reconfigure the brake back in place and make sure the wheel is properly centered, so that it turns freely without touching the brake pads.
c. Rear wheel disassembly
i. Shift the rear derailleur to the highest gear which corresponds to the smallest sprocket;
ii. If your bike has v-brakes, spread the brake calipers as shown in section 7.3;
iii.With a 15mm wrench, loosen the axel nuts;
iv.Lift the rear of bike a few centimeters and push the wheel forward then downward to disengage it.
d. Rear wheel assembly
i. Shift the rear derailleur to the highest gear which correspond to the smallest sprocket;
ii. Bring the derailleur body towards the back with one of your hands;
iii.Place the chain on the smallest sprocket of the cassette. Position the wheel axel in the dropouts and push vigorously as shown on figure 14;
iv.Tighten the axel nuts firmly with a 15mm wrench;
v. Place the rear derailleur back in place;
vi.Reconfigure the brake back in place and make sure the wheel is properly centered, so that it turns freely without rubbing the brake pads.
7.2 Seatpost
Most bikes have a quick release to clamp the seatpost. These work exactly like the wheel quick releases as explained before. Even though it looks like a bolt with a nut and a lever, it is
actually a cam mechanism that clamps your seatpost tightly and that facilitates adjusting its height.
WARNING: If you use your bike and its seatpost quick release is not tightened enough, your seat could move and turn. This could result in a loss of control, leading to
serious injury or even death. It is, therefore, essential that you:
1. Ask your authorized Devinci dealer to explain how your quick release works so that you can safely adjust your seat;
2. Learn how to safely use a quick release so that you can apply this knowledge;
3. Make sure your seat is properly clamped before every ride.
A. Quick release adjustments
It is the power of the cam that maintains the seatpost in place. It squeezes it inside the seat tube when switching the lever from the opened to the closed position. The tightening force
depends on the torque applied on the adjusting nut. To increase the tightening force, you need to turn the adjusting nut clockwise while holding the lever with the other hand. To reduce it, turn
the adjusting nut counterclockwise while hold ing the lever. Less than half a turn can make the difference between a safe and an unsafe clamping.
WARNING: You need to use the cam mechanism when clamping your seatpost with a quick release to achieve proper clamping force, by switching the lever from the opened
to the closed position. If you hold the nut in one hand and you turn the lever to tighten the wheel, the seatpost is never going to be safely clamped. Instead, you
need to switch the lever from the opened to the closed position with significant restriction force. The nut helps you adjust the amplitude of that force by screwing
or unscrewing it.
WARNING: To place the quick release lever into the closed position, you must use leverage with the seat tube. Also, the lever should leave a clear imprint in the palm of your
hand for a few seconds. If this not the case, place the lever back to the opened position and turn the adjusting nut a quarter of a turn clockwise and try again.
7.3 Brakes
Notice: In order to achieve the optimal braking power, use both front and rear brakes simultaneously.
WARNING: If you brake suddenly and excessively, you risk falling over your bike and that could cause serious injury or even death.
7.3.1 Brake functioning
First of all, for safety purposes, it is essential you instinctively associate each brake lever with the brake it controls. In North America, the right lever controls the rear brake while the left one
controls the front one. On a bicycle, it is the friction between the brake pads and the rims that allows braking, by transforming kinetic energy into heat. There are also disc brakes that uses the
same principle but with a disc instead of the wheel rim. In both cases, for the best braking, clean the brake pads and the rim or the disc and make sure there are no traces of lubricant or wax.
Furthermore, you should check that the brakes are easy to reach with your hands. If you feel your hands are too small, that the position is uncomfortable or if you are unable to brake with full
power, ask your authorized Devinci dealer. Most of the time, they will be able to tune the reach of the brake levers or install specific grips to solve the problem.
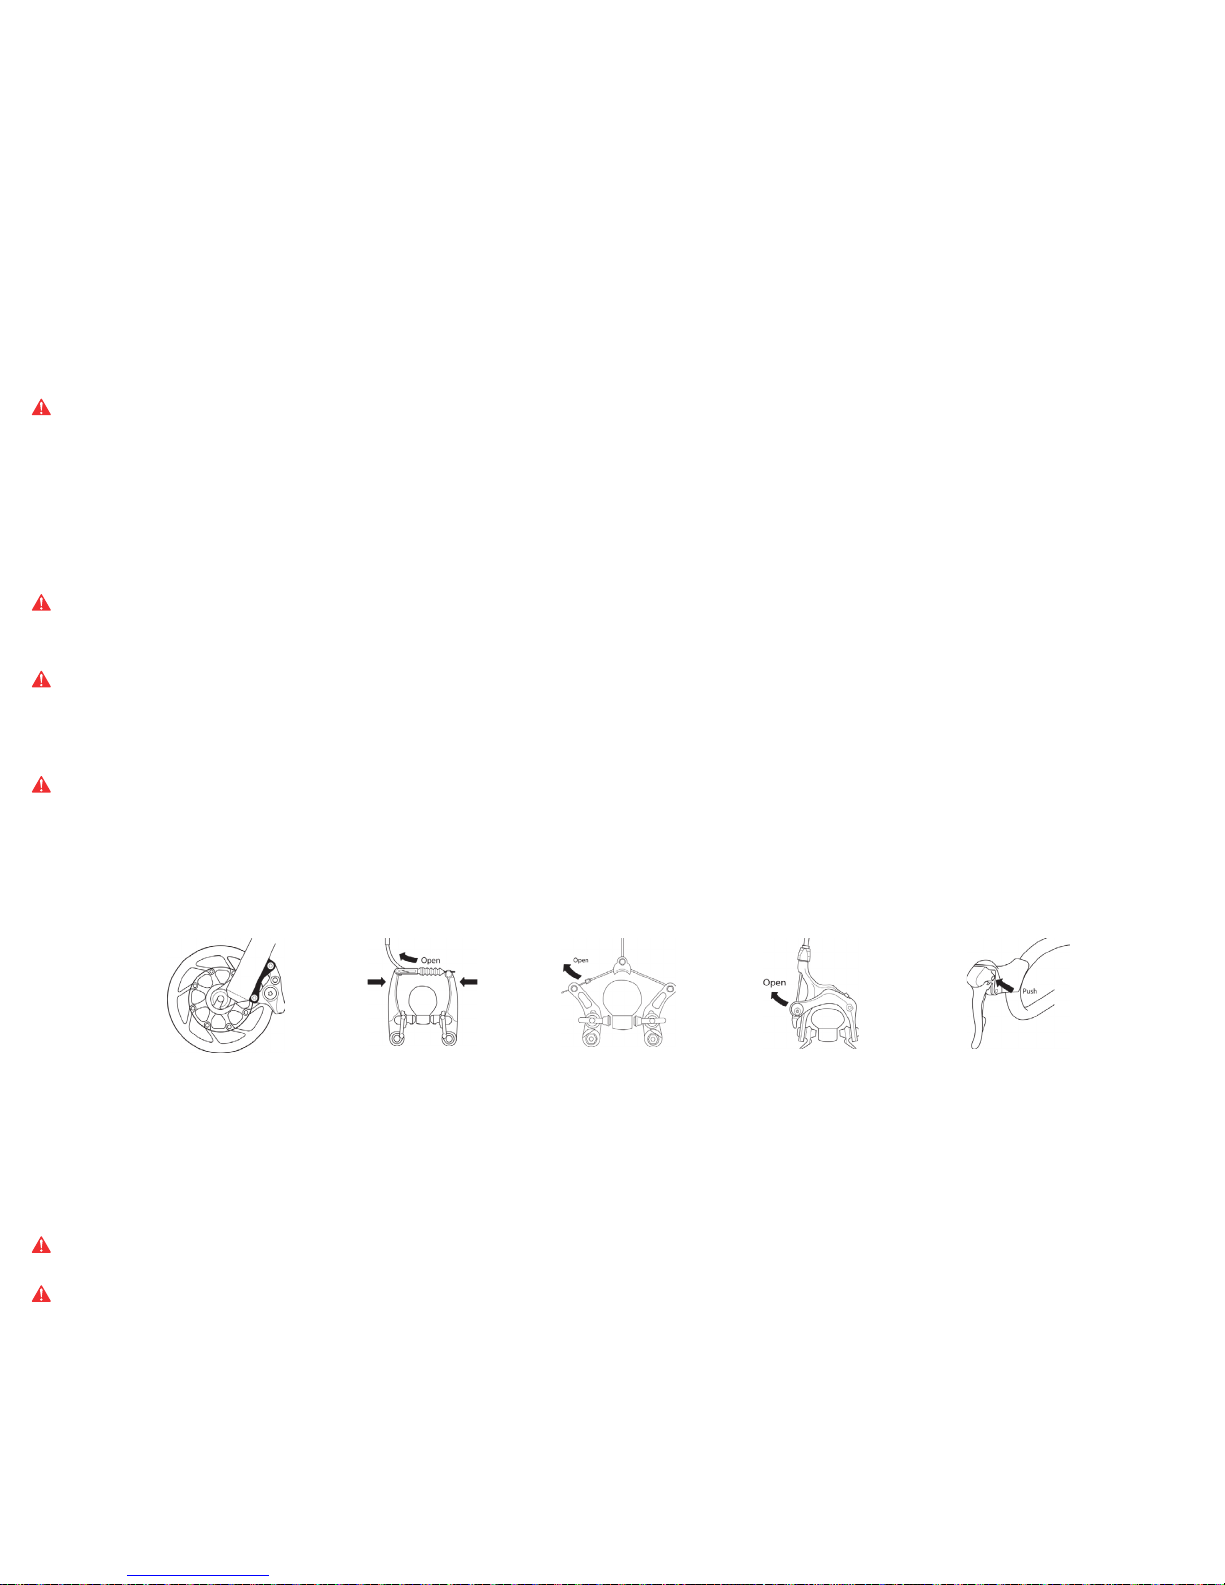
Figure 15 Figure 16 Figure 17 Figure 18 Figure 19
Most brakes possess a mechanism that allows disengaging the brake from the rim when you want to assemble or remove the wheel. Once disengaged, it is impossible to brake. Ask your
authorized Devinci dealer to explain clearly how to disengage the brakes on your bike according to the mechanism you have (refer to figures 15 to 19). Always check that your brakes are
operational before using your bike. Brakes are not intended for the sole purpose of stopping your bike, they are also intended to help you slow down. The maximal stopping power can be
achieved just before the wheel starts skidding. When the wheels are locked up, a large amount of the breaking power is lost and you tend to loose control. You must learn to slow down and
brake efficiently without locking up your wheels. This technique is known as progressive braking modulation. Pull the brake lever by progressively increasing the braking power instead of
pulling suddenly and excessively. If you feel your wheels starting to lock, smoothly release the lever until you get a normal wheel rotation back. It is very important to adjust the braking force
on the wheels according to the surface on which you’re riding. To thoroughly understand this technique, we recommend you try walking beside your bike to visualize the effect of pulling the
brake levers. You are likely to perceive more easily the moment your wheels lock up and stop rotating.
WARNING: The disc and linear pull brakes on certain models are extremely powerful. If you have this kind of brakes, familiarize yourself carefully by trying to brake
progressively at first. Pull the lever too suddenly could result in loss of control and a fall.
CAUTION: Disc brakes become very hot after intensive or prolonged use. Be careful not to burn yourself by touching the disc or the caliper.
When braking, the bike starts slowing down, but your body inertia tends to continue forward at the same pace, causing a weight transfer towards the front wheel. If you brake by suddenly
locking up the wheels, this weight transfer could throw you over the handlebars. This phenomenon will even be accentuated if you have a front suspension. Indeed, the suspension will
compress downward, increasing the weight transfer.
Caliper brake adjusting barrel Brake lever adjusting barrel
Figure 20 Figure 21
Another factor that affects the braking force is the load on your wheel. Indeed, normal force is directly proportional to the friction force you can reach. As a matter of fact, a wheel with a
heavy load on it will allow a higher braking force, while a wheel with a lighter load on it will lock up much sooner. Therefore, you should back up to the rear of your bike when braking with
more intensity. This will increase the weight on the rear wheel while decreasing the weight on the front one, it will also shift your center of gravity. This will help reduce the risk on being
thrown over your bike. Simultaneously , you should use the front brake with more strength than the rear one. This technique is even more important when riding down steep terrain.
In order to master braking techniques, it is important to practice in a safe place away from traffic, obstacles or any other danger. Make sure you master the lock up limits of your wheels and
the weight transfer linked to emergency braking.
When riding your bike on wet surfaces, in rainy weather or on light and running soil, your bike response changes. The tire adherence decreases quickly and your maneuverability is
negatively affected. Often, a smaller braking pressure is all it takes to lock up the wheels completely. Furthermore, water and humidity make the brake pads less efficient. In wet weather,
make sure you reduce your speed in order to better control your bike.
7.3.2 Brake tuning
If your bike is equipped with hydraulic disc brakes and you suspect something abnormal at your safety mechanical inspection, have it immediately checked by your authorized Devinci dealer.
On the other hand, if your bike is equipped with cable brakes and it fails the safety mechanical inspection, you can try adjusting their strokes by turning their tuning barrel counter-clockwise.
Make sure you screw back the lock nut after the adjustment. If the problem persists, ask your authorized Devinci dealer for assistance. Refer to figures 20 and 21 for visual support.
7.4 Drive train
Your bike is equipped with a mechanism of chain and sprockets, also known as a drive train that allows changing the pedaling ratios and optimizes your pedalling power.
Shifting gears will allow you to increase your physical benefits. Using your gears, you can pedal with a higher cadency and a lower resistance, which will help improve your endurance and
power. On the other hand, exerting huge forces on your pedals with a low cadency will obtain poor results for your health and your fitness. The numerous gears your bike possesses help
you target the optimal cadency in a variety of situations and geographical conditions. The optimal cadency is generally ranged between 60 and 90 turns per minute, depending on your age
and your fitness.
7.4.1 Drive train functioning
The drive train mechanism of your bike is divided into:
•A rear derailleur;
•A front derailleur (most of the time);
•A freewheel cassette;
•One to three chainrings;
•A chain;
•One or two shifters.
To calculate the number of speeds available on a bike, just multiply the number of chainrings with the number of rear sprockets on your freewheel cassette. For example, a bike with three
chainrings and nine sprockets on your freewheel cassette has twenty-seven speeds.
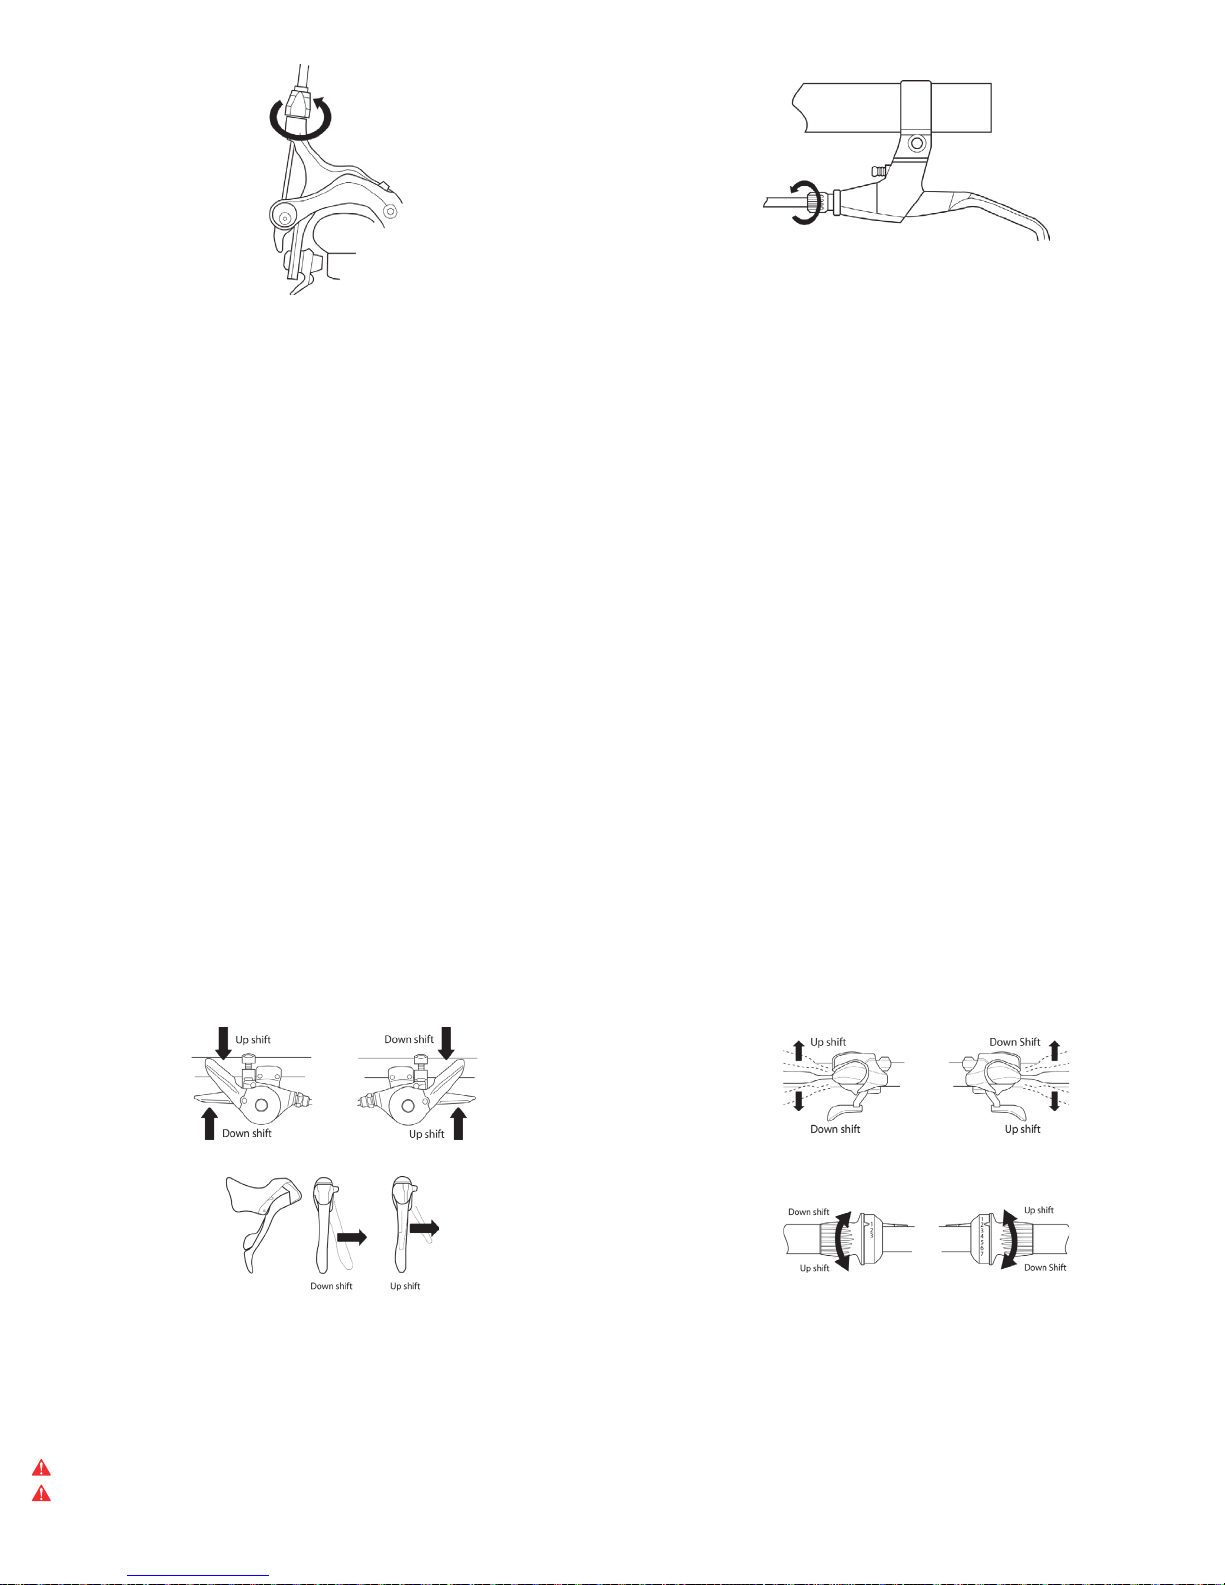
A. Shifting gears
Many shifter models are available on the market. Devinci has selected shifters to better meet your criteria in terms of ergonomics, performance and price. The figures 22 to 25 illustrate the
way the different models work. Check the type of shifters your bike is equipped with before continuing.
Figure 22
Figure 23
Figure 24 Figure 25
The vocabulary for gear shifting might seem a bit confusing at first. To go to a shorter gear ratio or to a slower gear is designated as a downshift while upshifting refers to the action of going
at a longer gear ratio or a faster gear. A slower gear requires less strength than a faster gear. To make that even more complex, the actions on your rear derailleur are opposite to those on
your front derailleur. Indeed, the action of down shifting can be achieved in two different ways; lowering the chain on a smaller chainring or raising the chain on a larger sprocket on the
freewheel cassette. Refer to sections B and C for more details.
A little trick to help you memorize this is to note that the chain must be closer to the frame in order to down shift and climb a hill or further away to upshift and go faster.
To shift gears, the chain must be tight and rotate in the normal direction. The derailleur works only when pedaling forward.
CAUTION: Never activate your shifters when pedaling backwards and never pedal backwards after having shifted gears. The gears could jam and damage your bike.
WARNING: Never send the chain on the larger or the smaller sprocket of the freewheel cassette if your derailleur is not properly adjusted. The chain could jam and result in
a fall and serious injury. This also applies to the front derailleur.
B. Front derailleur shifting
It is the left shifter that activates the front derailleur. The chain move from the smaller chainring for easier pedaling (slower gears) to larger ones for harder pedaling (faster gears).
C. Rear derailleur shifting
It is the right shifter that controls the rear derailleur, making the chain moves on the different sprockets of the freewheel cassette. The larger sprockets produce smaller ratios, which
necessitate less effort, but require more pedaling cycles to achieve a given distance. The smaller sprockets produce greater ratios, which require more effort but necessitate fewer cycles
to achieve the same given distance. When downshifting, you displace the chain from a smaller sprocket to a larger one and upshifting is the other way around.
D. Choosing the proper gears
When climbing a hill, choose slower gears that are a combination of the smallest chainring with larger rear sprockets. On the other hand, to increase your speed, combine the largest
chainring with the smallest rear sprockets. Refer to figure 26 for visual support.
At first, choose a combination of gears that is convenient for you. You should target a gear ratio that allows a decent acceleration without requiring destabilizing effort. Practice gear shifting
in a safe place. You should familiarize ytourself with the different possible combinations. Once you will have understood these basic principles, you should be ready to shift gears smoothly
while riding.
Figure 26
7.5 Tires and inner tubes
7.5.1 Tires
Many tire models are available on the market. There are generic tires for versatility and specific ones that are adapted to particular weather or soil. Devinci has carefully selected tires
offering a great quality-to-price ratio to satisfy your specific needs, depending on the biking you do. After a bit of experience, you might want to change your tire types. You could then ask
your authorized Devinci dealer for advice.
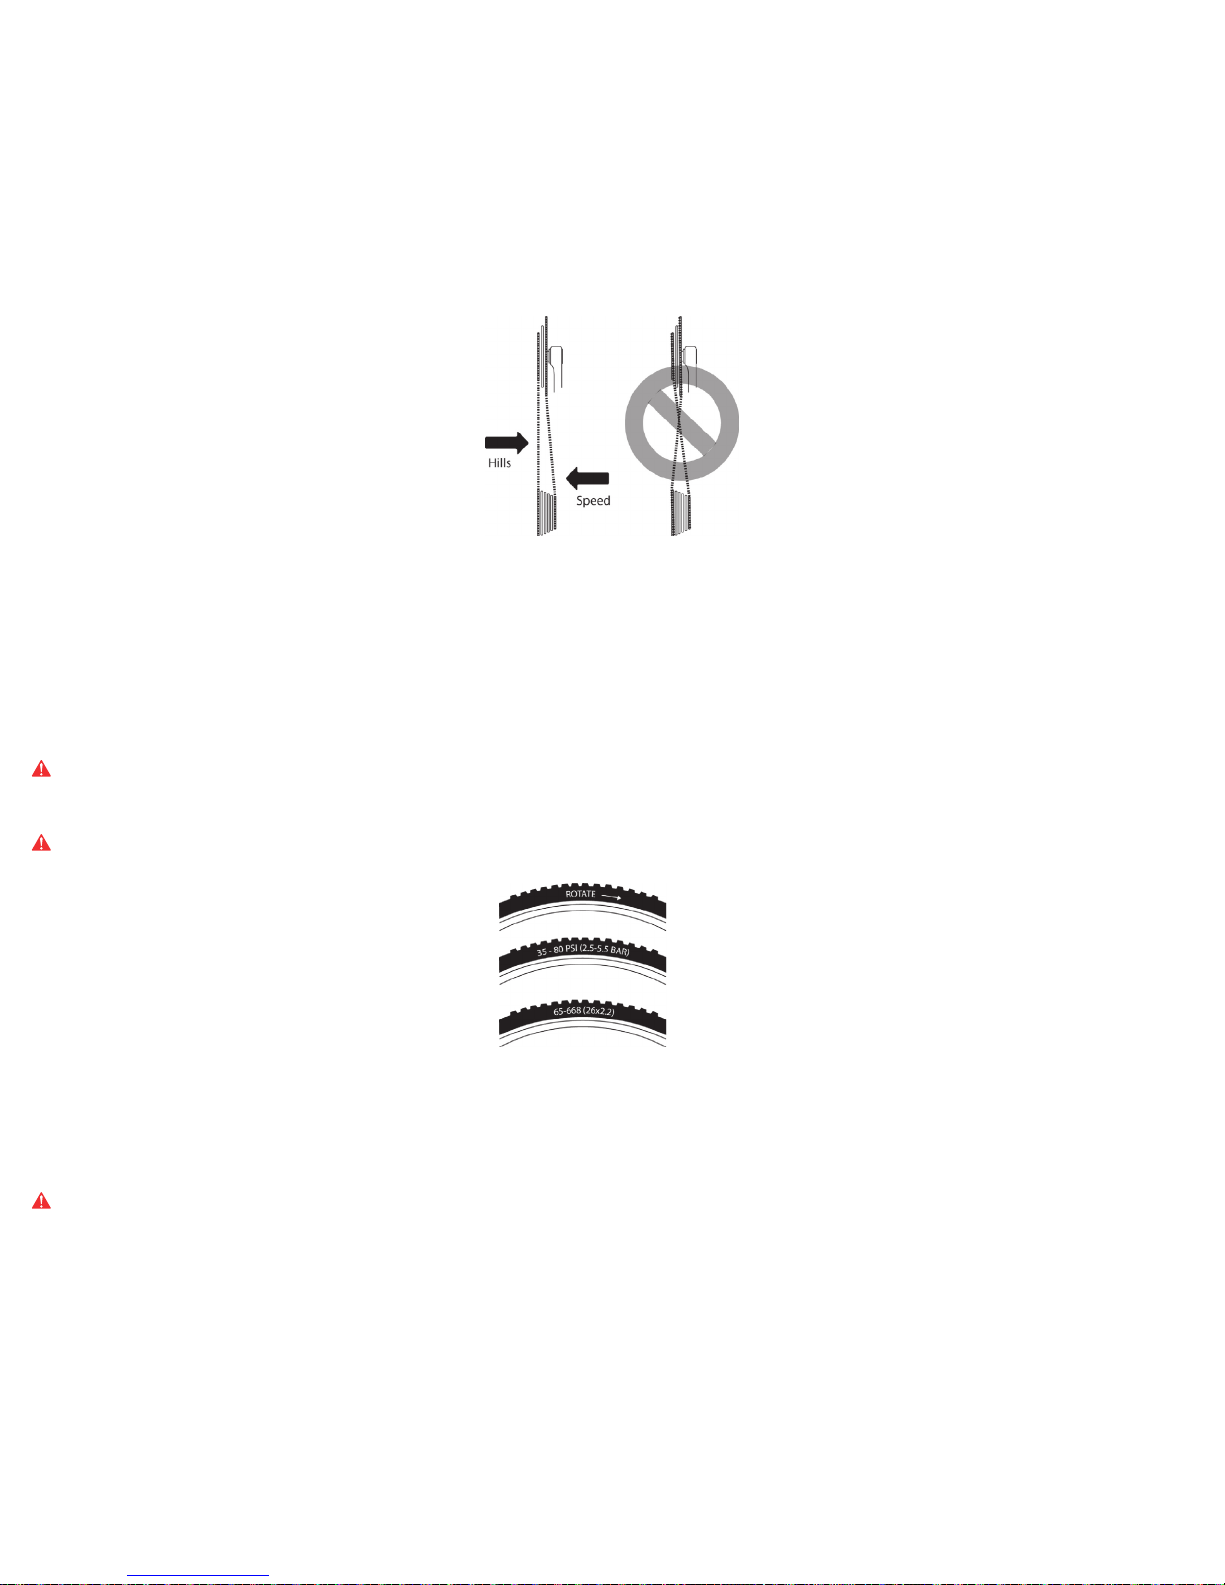
Your tire size, the recommended pressure and sometimes details concerning the targeted applications are written on the tire sidewall. The most important information concerns the
pressure (refer to figure 27).
WARNING: Never exceed your tire’s recommended pressure, indicated on its side. Exceeding it can result in your tire bursting or going off the rim. This could cause
damage to your bike, injury or even death.
The optimal way to inflate a tire is to use a manual pump specially designed for bicycles. Ask your authorized Devinci dealer to assist you in the process of choosing a good pump.
CAUTION: Inflating compressor units in gas stations have very high airflows that quickly increase the pressure in your tires. When using these kinds of units, inflate your
tire carefully with quick bursts to prevent it from being damaged.
Figure 27
As mentioned earlier, your tire sidewall indicates an interval of recommended tire pressure. The maneuverability of your bike on different soils largely depends on your tire pressure.
When inflated to the maximal pressure, your tire offers less resistance and friction. However, this damps impacts. Maximum pressure is recommended on a dry and smooth surface. At the
minimum pressure, tires offer better results on smooth or slippery surfaces like compact argyle or light and running soil.
If your tire pressure is insufficient for your weight or riding style, the tire could deform and pinch the inner tube which could result in a tire puncture.
WARNING: The pressure readings from gas station compressor units are often inaccurate and so are many automotive tire gages. Do not rely on these devices, unless
you are confident of their precision. Make sure you always use a quality manometer that provides good and accurate results.
Refer to your authorized Devinci dealer to learn about the tire pressure you should have, according to your riding habits, and inflate your tires accordingly. To check, refer to section 5.4.2.
You will then have a visual benchmark to refer to when inspecting your tire pressure. Make sure you check it frequently since it can change quickly.
Some high-end tires have specific direction of rotation. Indeed, their tread is designed to provide a better adherence in a specific direction. In that case, an arrow on the sidewall indicates
the proper direction. Make sure the wheels are properly mounted to respect the rotating direction as you go forward.
7.5.2 Valves
Valves allow inflating your tires’ inner tubes and keeping their pressure at the same time. Two valve models are available on the market; the Presta and the Schraeder shown on figures 28
and 29. You need a pump that is compatible with the valve model that your tires are equipped with. Adaptors exist to make the Presta valves fit the Schraeder standard.
The Schraeder valve is the same used by the automotive industry. To inflate a Schraeder valve tube, all you need to do is to unscrew its cap and use a bicycle pump or a compressor. To
deflate it partially or completely, just press on the tiny pin in the middle of the valve end with a sharp-pointed object. Always have the valve caps properly hand-tightened before using your
bike.
Table of contents
Other devinci Bicycle manuals


