Devine USB 50 User manual

USB 50
USB condenser studio microphone
User manual
All information and illustrations shown in this user manual are subject to change without further notice.
User manual version: 1.0 Creation date + author initials: 10-12-2015 RV Revision date + author initials: -

Introduction
Thank you for purchasing the Devine USB 50 studio microphone. This studio microphone can be connected
directly to a computer thanks to the built-in USB audio interface and the supplied USB cable.
The Devine USB 50 is a versatile USB studio microphone ideal for vocal and instrument recording.
For optimal performance connect the USB 50 to a computer. After the correct drivers are automatically
installed the USB 50 will be ready for use. It can be used as a microphone for Skype for example as well
as for podcasting broadcasting and vocal recording. If you wish to use the USB 50 for recording
applications audio editing software is required. Devine recommends installing the free software Audacity.
The USB 50 performs best when placed on a microphone stand. A small desktop stand is included with the
USB 50 for immediate use. If you prefer to place the USB 50 on a normal microphone stand or a
broadcasting arm you can attach the shock mount onto a stand with a 5/8” thread. If a 3/8” connection is
required remove the 3/8” inner thread to 5/8” outer thread adapter from the desktop stand (tools may be
required to loosen the adapter).
The included shock mount ensures that vibrations and unwanted handling noises are kept to a minimum. It is
always recommended to use the USB 50 with the included shock mount. This microphone is not designed to
be used as a hand held microphone. The super-cardioid polar pattern of the USB 50 picks up most of the
sound directly from the front of the microphone. For optimal sound quality position the vocalist or musician
as closely to the microphone as possible (approx. 2-3 centimetres) and ensure they sing/speak/play directly
into the front of the microphone.
Please note that the USB 50 microphone is a sensitive microphone and should be handled with care when
transported or installed. Impacts and/or severe vibrations may have a negative impact on the lifespan and
performance of the microphone. This microphone is not designed for on-the-road use.
Before unpacking all the received items carefully read this manual to familiarise yourself with the functions of
the microphone. Also check the contents of the box to make sure all the necessary parts are included (see
the section Box contents in this manual). If the microphone fails to operate properly or if you encounter any
problems while using it disconnect it immediately and contact your local dealer for more information and
help.
WEEE: Dispose of this product properly. This product is part of the WEEE directive – the
Waste Electrical and Electronic Equipment directive. The requirements stated in this directive
apply to all manufacturers and producers of electronic equipment in the EU.
Do not dispose of this product together with regular household rubbish. Contact your local
government representative for more information about proper disposal and recycling of
electronic products in your region. By recycling this product properly after use we can work
together to enjoy these products and protect our environment from pollution.
CE: The CE mark indicates that the product complies with applicable European directives and
regulations.
Indoor use only: This device is designed to only be used indoors. The maximum ambient
temperature should not exceed 40 degrees Celsius (104 degrees Fahrenheit)
All information and illustrations shown in this user manual are subject to change without further notice.
User manual version: 1.0 Creation date + author initials: 10-12-2015 RV Revision date + author initials: -

Box contents
Box contents:
1x Devine USB 50 studio microphone
1x shock mount with 5/8” thread
1x desktop stand with thread adapter from 5/8” outer to 3/8” inner thread
1x USB A – USB B cable +/- 1.6 metres long
Please note: the USB cable is included in this box!
Beneath the microphone you will find a piece of protective
foam. When removed you will find the USB cable underneath.
Unit and accessory inspection:
- If you do not plan to use the unit for an extended period of time disconnect it and store it in a dust-free
environment.
- Always check the unit for possible damage before use. If you suspect that something is wrong with the unit
do not connect it! If you suspect that your unit is broken or damaged contact your local dealer or a certified
technician to inspect the unit.
Contact:
Devine pro audio and studio products
Verrijn Stuartweg 18
4462 GE Goes
The Netherlands
Please do not send any products directly to this address. If you wish to return a product for a refund or
repair, please contact your local dealer for an RMA (Return Material Authorisation)
All information and illustrations shown in this user manual are subject to change without further notice.
User manual version: 1.0 Creation date + author initials: 10-12-2015 RV Revision date + author initials: -

Using the microphone
The Devine USB 50 studio microphone is suitable for various studio recording applications. It is designed for
vocal recording but can be used for instrument recording as well. It has a super-cardioid polar pattern which
means it captures most sound directly from the front of the microphone and a little from the rear.
Setting up the microphone
Please make sure that the USB 50 is placed on a suitable stand. This can be a small desktop stand (like the
one included) as well as a large vertical or boom arm microphone stand. A thread adapter is included to
ensure that the Devine USB 50 can be attached to nearly any microphone stand with ease.
Make sure that the microphone is positioned as closely to the sound source as possible. To ensure optimal
sound quality make sure the vocalist or musician speaks/sings/plays directly into the front of the
microphone. This ensures that the recording or live streaming of any sound takes place at an optimal volume
level without the addition of extra boost or gain (which can cause unwanted noise).
To use the included desktop stand attach the shock mount by tightening it onto the collapsed desktop stand.
Once the shock mount is attached unfold the desktop stand legs. For optimal stability turn the shock mount
so it lines up with one of the desktop feet.
To insert the USB 50 microphone use your middle
finger and thumb to press the metal brackets towards
each other (1) making the inner section of the shock
mount slightly larger (2). Hold the shock mount with
one hand and slide the microphone into the metal
brackets that are attached to the inner section.
The inner section is lined with foam padding to prevent
scratches and damage to your microphone.
The microphone should be inserted with the logo
facing towards you and the shock mount angle
adjustment knob facing away from you. For the most
optimal position insert the microphone so that the
brand and type number is still visible.
Connecting to your computer
The USB 50 can be connected to any Windows or
Apple computer desktop model or laptop. A software
CD is not required to install the software on your
computer.
Always use the included cable to connect the microphone to your computer. The square connector on one
end fits perfectly into the base of the microphone and the other end fits into a free USB port on your
computer.
Once your computer is turned on and has finished its start-up procedure connect the USB 50. When
connected a bright blue LED will turn on indicating that there is USB power.
The computer should now recognize the USB 50 as a USB microphone and can use it for various
applications. If your computer does not recognize the microphone the required drivers may not be installed.
If this is the case:
- ensure that your computer is connected to the internet to automatically download the required drivers.
- (for Windows) try a different driver for example ASIO4ALL www.asio4all.com (free download).
- (for Mac) Mac computers are usually equipped with Core Audio API handling for audio which will take care
of the installation process.
All information and illustrations shown in this user manual are subject to change without further notice.
User manual version: 1.0 Creation date + author initials: 10-12-2015 RV Revision date + author initials: -

Using the microphone for live broadcasting or recording
As stated earlier in this user manual the sound source needs to be placed as close to the microphone as
possible to ensure optimal audio quality. Placing the microphone further away from the source causes low-
volume recording or sound which would need to be artificially boosted but this will also boost the self-noise
of the microphone itself (which is present on all microphones). If you ensure that the source volume is good
unwanted noise as a result of artificial boost will not be necessary.
Most live broadcasting and/or podcasting software can only influence volume. Ensure that peaks in sound
are not present in order to prevent distortion. When using recording software start recording a track and test
it to make sure the signal is not too low or too high. Reduce the microphone volume and/or gain if needed.
Protecting the microphone:
This Devine microphone is equipped with very sensitive electronics which provide optimal audio
performance. Make sure the microphone is not exposed to situations that may cause permanent damage as
a result of severe shocks collisions or falls from high altitudes. Improper use of the microphone is not
covered by warranty. Always transport the microphone in the original packaging or in a flight case with
proper fitted foam inlay. This microphone is not intended for on-the-road use.
All information and illustrations shown in this user manual are subject to change without further notice.
User manual version: 1.0 Creation date + author initials: 10-12-2015 RV Revision date + author initials: -
Troubleshooting
Problem Possible Cause Solution
No sound or very low sound
signal
USB cable not connected
(properly)
Connect the USB cable to your
computer / make sure the cable is
connected properly
Volume set too low Increase input volume and gain on
your mixer interface or other
sound processing device
Microphone positioned too far
away
Place the microphone closer to the
sound source
Rattling and cracking sounds Moisture inside the microphone Allow the microphone to dry in
room temperature. Avoid use of
the microphone in humid or moist
environments. Do not let the
microphone come in contact with
water or liquids.
Loud high frequencies coming
from the speakers
Microphone is positioned too close
to the speakers causing feedback
Move the microphone further away
from the speakers or change the
position so the microphone is not
aimed directly at the speakers.
Microphone signal is interrupted Loose or broken USB cable Check if the USB cable is plugged
into the microphone correctly. If
that does not solve the problem
try replacing the cable.
Distortion and/or noise in the
captured sound
Too much airflow caused by vocals Use a pop filter or windshield (sold
separately)
All information and illustrations shown in this user manual are subject to change without further notice.
User manual version: 1.0 Creation date + author initials: 10-12-2015 RV Revision date + author initials: -
Technical specifications
- works with all types of recording software or DAW (e.g. Audacity)
- compatible with Windows2000/XP/Vista or later and Mac OS X
- studio USB microphone
- ideal for recording individual instruments vocals and speech
- works on Windows and Mac computers
- installs drivers automatically
- utilises a high-quality condenser capsule
- 14 mm back electret condenser capsule
- polar pattern: super-cardioid (uni-directional)
- connection: USB Plug-and-Play (USB A - USB B)
- sampling and bitrate: 16 bits / 48 kHz
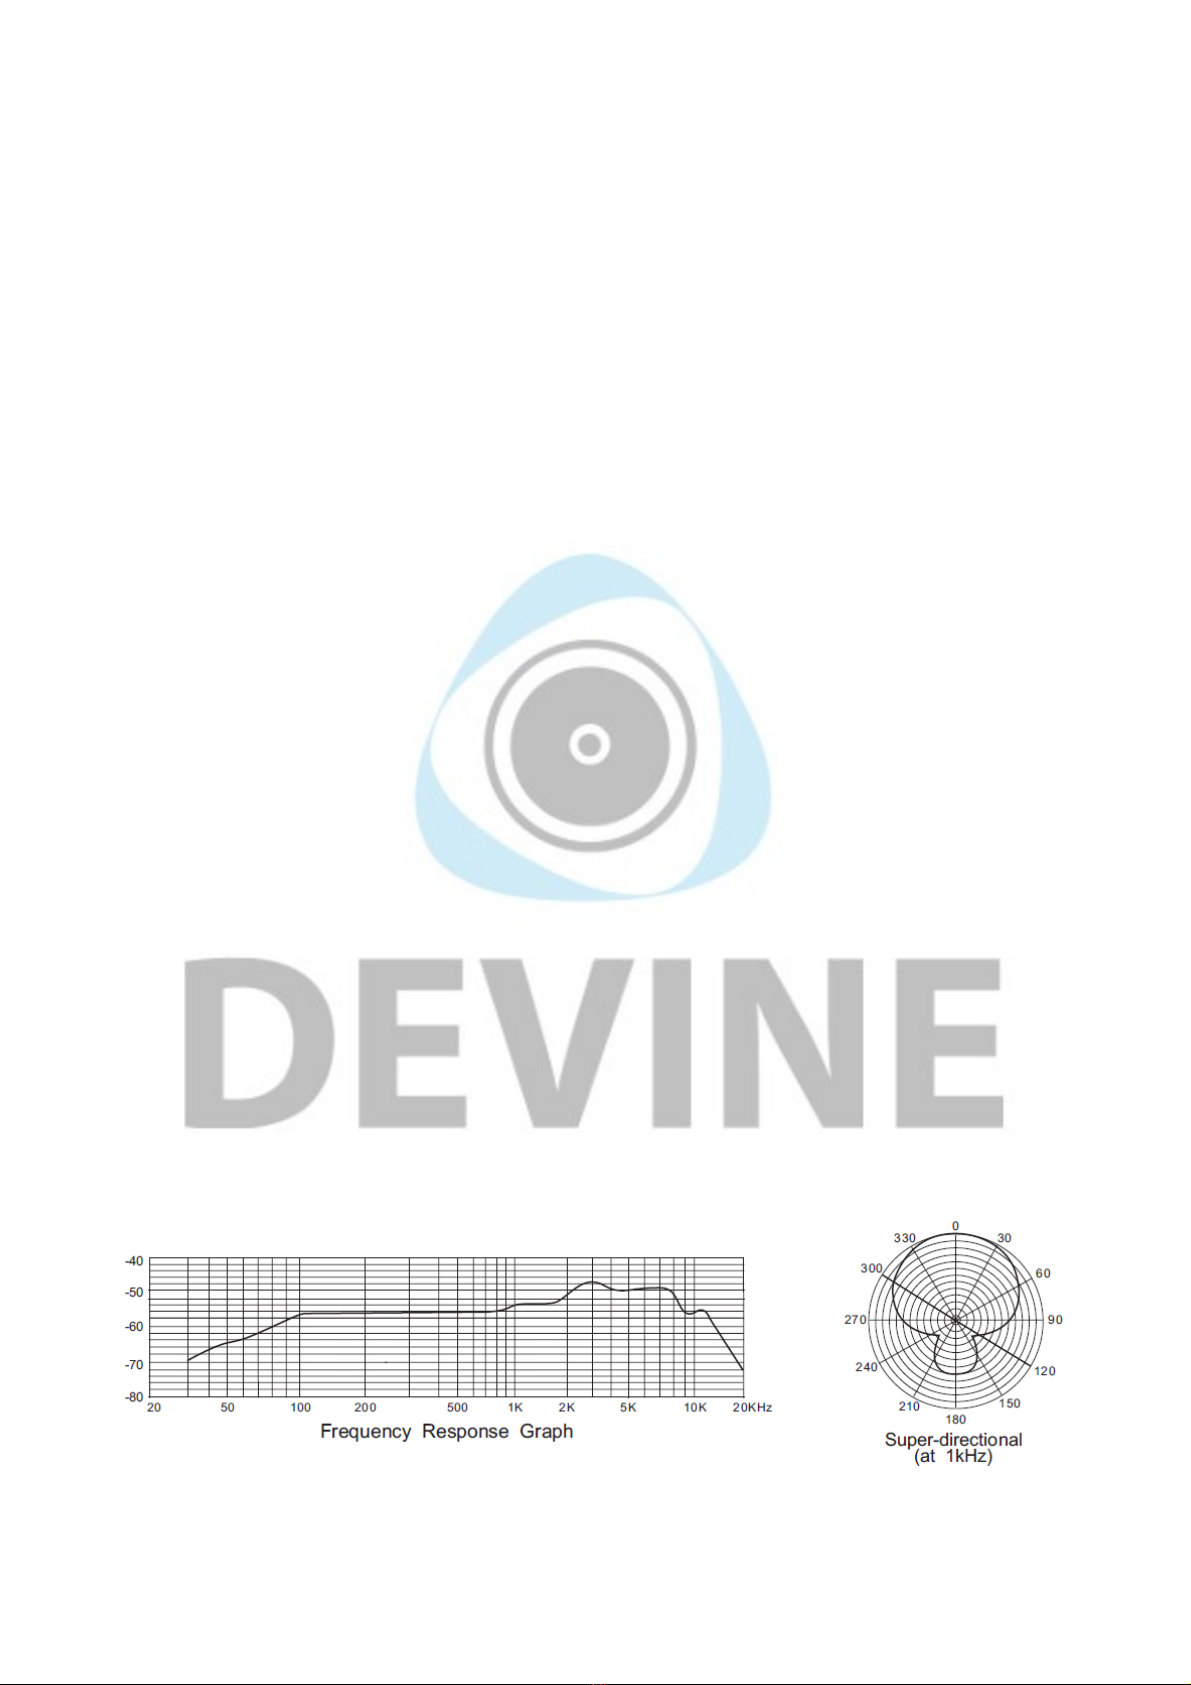
- frequency response: 20 Hz - 17 kHz
- sensitivity: -34 dB (+/- 3 dB) (0 dB = 1 V/Pa @ 1kHz)
- output impedance: 1000 ohms +/- 30% (@ 1 kHz)
- noise level: 16 dBA
- max. SPL: 132 dB (@ 1 kHz max. 1% T.H.D.)
- S/N ratio: 78 dB
Included accessories:
1x desktop stand with thread adapter from 5/8” outer to 3/8” inner thread
1x USB A – USB B cable +/- 1.6 metres long
1x shock mount with 5/8” thread
Frequency response and polar pattern graph:
All information and illustrations shown in this user manual are subject to change without further notice.
User manual version: 1.0 Creation date + author initials: 10-12-2015 RV Revision date + author initials: -
Table of contents
Other Devine Microphone manuals

Devine
Devine BM-100 User manual

Devine
Devine USB-1 User manual

Devine
Devine SM-100 User manual

Devine
Devine DM 70 User manual

Devine
Devine RM 10 User manual

Devine
Devine BM-500 User manual

Devine
Devine M-Mic XLR W User manual

Devine
Devine USB-100 User manual

Devine
Devine M-Mic PRO USB W User manual

Devine
Devine DM 20 User manual


