Devine M-Mic XLR W User manual

M-Mic XLR (W / BK)
Studio Microphone
User Manual
The information in this user manual is subject to change at any time without notice.
Version:
1.0
Date of creation and author's initials:
25 07 2017 RV
Revision date and author's initials:

Introduction
Thank you for purchasing this Devine M-Mic XLR microphone. The Devine M-Mic XLR
microphone is a practical studio mic designed to record vocals and/or speech, or an
instrument such as acoustic guitar.
s the M-Mic XLR microphone is not equipped with an integrated analogue to digital
converter, its applications are numerous. It can be used in combination with a normal USB
audio interface with mic preamps as well as with field recorders or other similar recording
devices. It is up to you to determine which equipment you use for an optimal audio signal.
The only thing the M-Mic XLR does require is a phantom power supply of anywhere
between 5 and 48 volts in order to power the internal components and provide optimal
performance.
The M-Mic XLR microphone comes complete with a tripod so you can position it optimally
on your desktop or other flat, stable surface.
Due to this mic's high sensitivity, it is not recommended to hold it during use as you would a
live handheld microphone. This will result in audible handling noise.
Box contents:
The Devine M-Mic XLR comes with various accessories for optimal use.
In the box, you will find:
1x Devine M-Mic XLR microphone (W or BK version, white or black)
1x 3-pin male to female XLR cable (+/- 2.5 metres in length)
1x mini tripod with thread adapter
1x shock mount
The information in this user manual is subject to change at any time without notice.
Version:
1.0
Date of creation and author's initials:
25 07 2017 RV
Revision date and author's initials:

Sa ety instructions
Everyone involved with the installation, operation and maintenance of this device must:
- Have read the instructions in this user manual
- Be sure that neither the device nor the included accessories are damaged. Should the
device or the included accessories be damaged, please contact your dealer for more
information.
- Ensure that the device is in good working condition and is safe to operate. Please follow
the advice and instructions as they are described in this user manual.
Damage caused by misuse and/or modifications made to the device are not covered by the
warranty.
This device does not contain any parts that need to be repaired or replaced by the user.
Should maintenance or repairs be necessary, they must be handled by a qualified
technician.
Important in ormation regarding health and sa ety:
- Do not remove any labels or stickers from this device.
- Do not leave any cables lying around.
- The device should not be opened up, and any hardware or software that may be present
should not be modified.
- Do not expose the device to audio sources that produce extreme volume levels that are
louder than necessary in order to achieve optimal performance.
- The device should only be used indoors; contact with water, rain and moisture should
always be avoided.
- Remove the device from any nearby flames or heat sources; do not place it near
flammable fluids, gasses or objects.
- Disconnect this device from the power supply if it will not be used for a longer period of
time, if maintenance is necessary, or if the device needs to be cleaned.
- Do not pull on the cable to remove a connector, as it can cause damage.
- Do not use any cables other than the ones described in this manual. Do not use defective
cables. Please contact your dealer if the included or necessary cables do not function
properly with this device.
- In the event that the device is exposed to extreme temperature changes (e.g. transported
through a cold outdoor environment into a warm indoor environment), it should not be turned
on until it has reached room temperature. This is necessary to prevent moisture from
forming in the device, which can cause electric shocks and possibly permanent damage.
Guidelines and operation o this device:
- This device is intended for indoor use by adults only.
- This device is not suitable for use by children, and should always be operated by an adult.
- This device may only be used in a suitable environment where no damage to the device
can occur. Do not use the device in moist or dusty environments such as:
- indoor swimming pools where chlorine is used
- beaches where there is sand and salt
The information in this user manual is subject to change at any time without notice.
Version:
1.0
Date of creation and author's initials:
25 07 2017 RV
Revision date and author's initials:

- outdoors
- indoors in spaces where intense heat sources are present, or where it reaches
temperature levels that would be considered uncomfortable for a person
- void impact and collisions during use and transport. Do not transport the device while it is
in use. void using excessive force when installing and operating the device.
- The user should become familiar with the functions of this device before using it.
- Should the device not be used in the manner described in this user manual, damages or
even injuries could occur. Devine cannot be held responsible for any injuries or damages
that occur as a result of improper use of this product.
Storage and transport:
- This device is designed for fixed use. During transport, it should be well-protected,
preferably in the original packaging or otherwise in a suitable case with foam interior.
- This device is not designed for permanent (24/7) use. The expected lifespan of the device
will not be affected by occasionally turning the device off. Disconnect the device or turn off
the power when it is not actively in use.
- If the device will not be used for a longer period of time, it should be disconnected and
stored in a dust-free environment.
- Do not expose the device to extreme temperature differences.
Housing
- Inspect the device's housing frequently, and always just before use. void operating the
device if there are large dents or cracks, or if screws are missing. Do not use the device if
the housing is not in good condition.
Contact your dealer or a qualified technician if you are unsure about the state of the device.
- Check the device and the screws for corrosion. Corrosion must not be present on this
device. Contact your dealer or a qualified technician if you find any corrosion on the screws.
Every power and signal connector should be securely mounted. Do not use the device if the
connectors are not secure.
void dust and dirt build-up. Clean the device once a month by disconnecting it from the
power supply and wiping it down with a dry or slightly moist cloth. If the device is used
frequently, the cleaning intervals should increase.
Symbol explanation:
WEEE: Ensure that this device is disposed of properly. This product falls under
the WEEE (Waste Electrical and Electronic Equipment) directive. The
requirements of this directive apply to all manufacturers and producers of
electronic devices in the EU. Do not throw this product away with regular
rubbish. Please contact your local authority for more information about how to
recycle and dispose of these products in your region. By recycling this product
in the proper manner, we can work together to ensure that we can continue to
The information in this user manual is subject to change at any time without notice.
Version:
1.0
Date of creation and author's initials:
25 07 2017 RV
Revision date and author's initials:

enjoy these kinds of products and still protect the environment as much as
possible from pollution.
CE: The CE logo indicates that this product meets the European norms and
requirements to which it must legally conform.
Only suitable or indoor use: this product was designed to be used inside.
The maximum environmental temperature must not exceed 40 degrees Celsius
(104 degrees Fahrenheit).
Contact:
Devine pro audio and studio products
Verrijn Stuartweg 18
4462 GE Goes
The Netherlands
Please do not send any products to this correspondence address.
Should you wish to send in a product for repairs or for a refund, please contact your dealer
for an RMA request (Return Merchandise Authorisation).
The information in this user manual is subject to change at any time without notice.
Version:
1.0
Date of creation and author's initials:
25 07 2017 RV
Revision date and author's initials:

Construction and usage
Once you remove the Devine M-Mic XLR microphone and all the accessories from the box,
it's important to mount it on the included tripod right away using the included shock mount.
The tripod unfolds easily in order to free the three central legs. Together they form a stable
base and have tips which absorb vibrations and provide extra grip as well.
The included shock mount can be screwed on
top.
The microphone can then be installed in the
shock mount with the help of the illustration on
this page. Position the mic as shown in (2) while
squeezing the two brackets (1) together. This will
widen the round opening for easy mic
positioning.
Release your grip on the brackets (1) to secure
the microphone in place.
Once you've completed the steps above, you
can connect the included XLR cable by plugging
one end to the microphone and the other to a
recording device, P mixer or audio interface, depending
on your setup.
If assembled correctly, your microphone setup should
look like this:
Some important factors to bear in mind:
- lways ensure the brand and type number of the
microphone are facing towards you to capture the audio
as optimally as possible.
- Ensure one of the tripod legs is pointed towards you.
Because the microphone is mounted on the tripod at a
slight angle, this will enhance stability to prevent it from
accidentally getting knocked over.
- Ensure the microphone is positioned at an angle and
make sure the brand and type number are still visible
from where you are seated for optimal results.
- lways place the microphone tripod on a stable flat surface such as a desk or table.
Optional:
The information in this user manual is subject to change at any time without notice.
Version:
1.0
Date of creation and author's initials:
25 07 2017 RV
Revision date and author's initials:

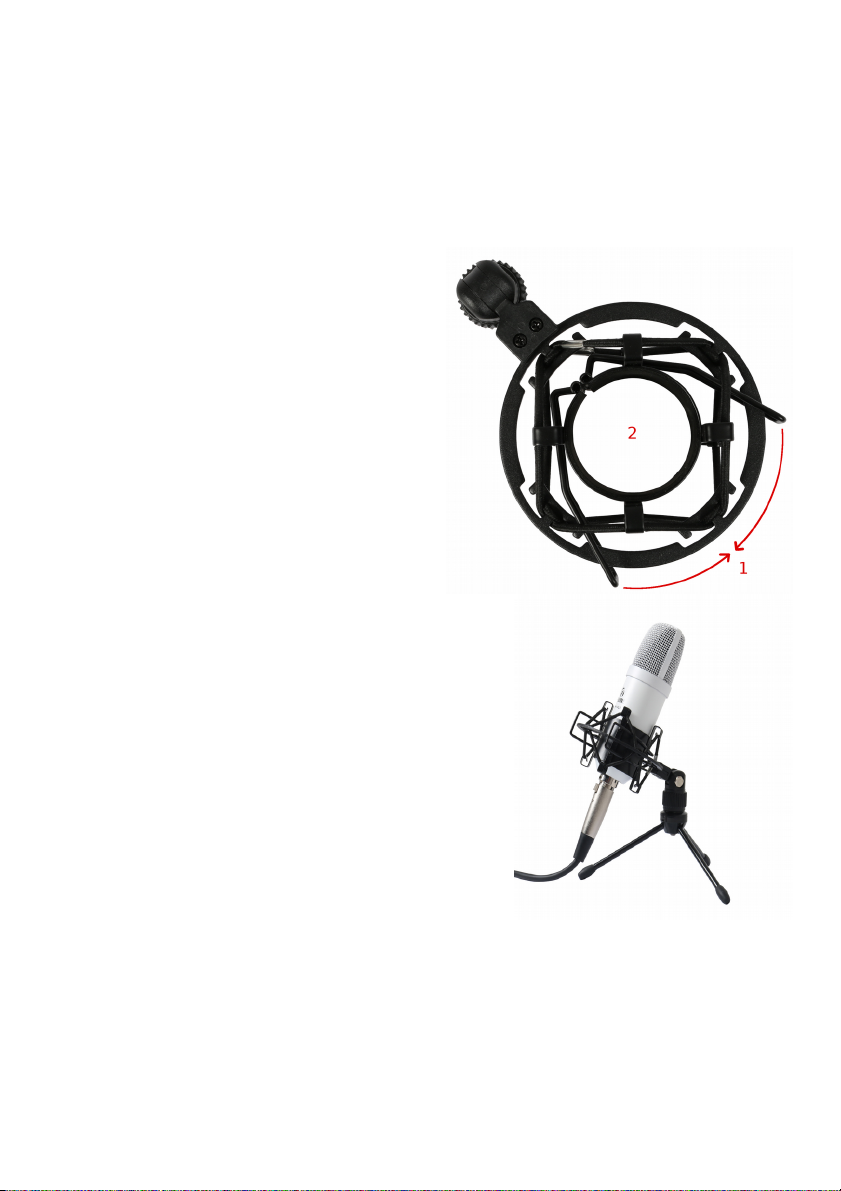
If mounted in the included shock mount, the M-Mic microphone can also be mounted on a
professional mic stand or broadcasting arm as long as they are equipped with a 3/8-inch or
5/8-inch (industry standard) screw thread. If necessary, you can use the thread adapter that
can be found on the tripod.
If you use a different stand than the included tripod, it is highly recommended to position the
audio source as close to the mic as possible for optimal results. s always, make sure the
brand and type number are facing towards the audio source. If your setup requires it, the
microphone can also be used upside-down.
Optimal sound quality
To maintain optimal audio quality, it is necessary to position the microphone as close to the
audio source as possible, unless it produces extremely high volume levels (such as a drum
kit).
For vocals or instruments, position the mic as close as possible to the audio source. When
using the included tripod, make sure it is placed on a desk or other flat, stable surface.
Position the microphone at an angle (while ensuring the brand and type number are still
visible and facing the audio source), to capture the best possible audio.
The further away an audio source is from the microphone, the less volume it produces. This
will need to be compensated either during recording or afterwards, which can have an
impact on the sound or cause clipping.
Every audio device (regardless of brand) generates some sound or self-noise. With normal
use, this is barely audible, and the more you need to amplify an audio fragment, the more
audible this noise can become.
If an audio source is very quiet or positioned too far away, the self-noise level of the
microphone itself can become too high when the captured audio is amplified.
If you are having problems with noise or unwanted sounds, always try to adjust the position
of the microphone first. separately-available microphone stand or broadcasting arm may
be necessary for optimal results.
In situations where an optimal setup is not possible, for example if you want to record vocals
and an instrument at the same time, it is recommended to place the microphone as
optimally as possible between the two audio sources. Experiment by making short test
recordings in various setups and compare them to finds the best possible solution.
Compatibility
Devine M-Mic XLR microphones can be used with virtually all audio equipment that can
supply phantom power. This type of power supply is necessary in order to power the internal
components of the microphone.
In the M-Mic XLR microphone, the phantom power is used to supply power to the integrated
The information in this user manual is subject to change at any time without notice.
Version:
1.0
Date of creation and author's initials:
25 07 2017 RV
Revision date and author's initials:

microphone preamp, when with many other microphones, it is used to provide power to the
diaphragm. For this reason, the M-Mic XLR works with phantom power that ranges form 5 to
48 volts.
Consult the user manual or specifications of your device to make sure it can supply phantom
power to the microphone. Without it, the M-Mic XLR will not perform properly.
The M-Mic XLR microphone can not be plugged into a dynamic mic input on devices such
as consumer battery-powered speakers, active P -speakers, DJ mixers, etc.
You can however use an external phantom power supply.
Upgrades (Pop ilter, windshield)
The mic capsules and electronics of the Devine M-Mic XLR microphone have already been
optimised. It comes complete with a tripod and a shock mount, and positioning and use with
other microphone stands and arms has been explained earlier in this manual.
nother way to optimise vocals and speech is to use a pop filter. This is a circular frame
made of metal or plastic with a nylon or metal mesh that is placed directly in front of the
microphone. They also feature a flexible arm for optimal positioning. pop filter prevents
unwanted plosives that are created when the sounds P, K, S, T and F are pronounced. The
best results are achieved when the vocalist or speaker is positioned as closely to the
microphone as possible.
If you're making recordings outdoors where there is a lot of wind, then it is recommended to
use a windscreen. This prevents any wind sounds from being captured that can disrupt the
recording.
windscreen is usually a black cap made of porous foam that filters out wind and unwanted
noise without sacrificing audio quality. Please ask your dealer for advice about suitable
windscreens.
The information in this user manual is subject to change at any time without notice.
Version:
1.0
Date of creation and author's initials:
25 07 2017 RV
Revision date and author's initials:

Troubleshooting
Problem Possible cause Solution
Microphone is not
working
Wrong cable If you're connecting the microphone
to the computer, you'll need to use a
mini jack to XLR cable with the
correct number of pins. (Pin 1 + 3
ground) Contact your dealer for
more information.
Phantom power is not
activated
This microphone requires phantom
power of anywhere between + 5 and
48 volts to function. Most recording
devices, P mixers and audio
interfaces are equipped with
phantom power. If not, you can use
an external phantom power supply.
Phantom power on
defective channel
Check if the microphone does work
on a different channel or input that
provides phantom power.
Mute button is turned on Make sure the mute button on your
P mixer, interface or recorder is
turned off.
Volume control is turned
down
Make sure the volume control of the
channel in question is turned up.
Lots of (self)noise The microphone is
positioned too far from the
audio source, or the volume
of the source is too low.
Place the microphone as close to
the audio source as possible to it
can capture the sound as clearly and
loudly as possible so you won't have
to amplify the audio during or after
recording. This will keep unwanted
(self)noise to a minimum.
Lots of unwanted
plosives/sound
Sounds are too loud or
unfiltered
Hard sounds like the P, T, K, S and F
can produce plosives. Use a pop
filter (not included) to reduce this
effect.
Wind or ambient noise Use a windscreen (not included) to
prevent the sounds of wind or
background noise from being
captured.
Microphone keeps Unstable positioning Make sure the microphone is
The information in this user manual is subject to change at any time without notice.
Version:
1.0
Date of creation and author's initials:
25 07 2017 RV
Revision date and author's initials:

falling over, is not
stable
installed securely in the shock mount
on the tripod and that one of the
tripod legs is pointing towards the
audio source.
Loose screw on shock
mount hinge
If used often, the screw designed to
angle the shock mount may come
loose. Use a standard screwdriver to
tighten it.
Microphone sound is
too quiet
Microphone is too far away
from audio source
Position the microphone closer to
the audio source. If this doesn't
work, try increasing the recording
volume level.
Microphone sound too
loud or clipped
Microphone is too close to
audio source
When recording extremely loud
audio sources (such as a drum kit), it
is recommended to position the
microphone further away and/or
lower the volume/gain on your mixer.
The information in this user manual is subject to change at any time without notice.
Version:
1.0
Date of creation and author's initials:
25 07 2017 RV
Revision date and author's initials:

Technical speci ications
Features:
- suitable for various applications (podcasting, live streaming, gaming, music recording,
etcetera)
- robust metal housing with black or white finish
- comes complete with shock mount, cable and mini desktop tripod
- cable length: 2.5 metres
- tripod comes with screw thread adapter from 3/8 to 5/8 inches
- can be connected to mic inputs of audio interfaces, P mixers and recording equipment
- +5 - 48V phantom power required
- also suitable for use with universal mic stands by third parties
Speci ications:
- back electret capsule
- directional characteristic: uni-directional
- connector: 3-pin XLR
- frequency range: 20 Hz - 18 kHz
- sensitivity: -34 dB, +/-3 dB (0 dB = 1V/Pa @ 1 kHz)
- output impedance: 150 ohms, +/- 30% (@ 1 kHz)
- self-noise: 16 dB
- max. sound pressure level: 134 dB (@ 1 kHz, with ≤1% total harmonic distortion)
- S/N ratio: 78 dB
- net weight: 210 grams
- dimensions: 44 x 47 x 155 mm
Frequency range:
The information in this user manual is subject to change at any time without notice.
Version:
1.0
Date of creation and author's initials:
25 07 2017 RV
Revision date and author's initials:
This manual suits for next models
1
Table of contents
Other Devine Microphone manuals

Devine
Devine BM-500 User manual

Devine
Devine SM-100 User manual

Devine
Devine BM-600 User manual

Devine
Devine DM 10 User manual

Devine
Devine DM 20 User manual

Devine
Devine USB 50 User manual

Devine
Devine PRO-USB1 User manual

Devine
Devine RM 10 User manual

Devine
Devine USB-100 User manual

Devine
Devine M-Mic USB W User manual