Devon & Devon Nobel Console User manual

Nobel Console
ASSEMBLY INSTRUCTIONS
ISTRUZIONI DI MONTAGGIO
MONTAGEANLEITUNGEN
INSTRUCTIONS DE MONTAGE
INSTRUCCIONES DE MONTAJE
ИНСТРУКЦИИ К МОНТАЖУ

ISTRUZIONI
DI MONTAGGIO
Vi ringraziamo per aver scelto un prodotto Devon&Devon.
Vi preghiamo cortesemente di leggere questo manuale prima di installarlo.
INDICE
Pag.2 - Avvertenze
Pag.2 - Prima di iniziare / Attrezzi necessari
Pag.3 - Packing list struttura Consolle Nobel
Pag.4 - Packing list lavabo Consolle Nobel
Pag.5 - Istruzioni di montaggio
Devon&Devon si riserva il diritto di modicare il prodotto per ragioni tecnico-
produttive e non si ritiene in ogni caso responsabile per inconvenienti causati dalle
suddette modiche.
Ultimo aggiornamento: Settembre 2021

A
B
D
F
C
E
I
T
A
2 - ITA
AVVERTENZE
Prima del montaggio vericare l’integrità dei pezzi. In caso di difetti o dubbi rivolgersi
al rivenditore.
Il montaggio deve avvenire seguendo attentamente le istrusioni di seguito indicate.
L’azienda declina ogni responsabilità su installazioni non conformi alle norme vigenti
e su montaggio e manutenzioni che non rispettano le presenti avvertenze e istruzioni
d’uso.
- Vericare le predisposizioni degli impianti.
- Vericare la presenza di tutti gli articoli all’interno dell’imballo tramite il Packing List
riportato nelle pagine seguenti. Vericare inoltre che tutti i componenti non presentino
difetti visibili.
- Qualora rileviate dei difetti contattate immediatamente Devon&Devon.
- Per il montaggio di questo prodotto è richiesta la presenza di almeno due operatori.
- Le istruzioni di montaggio sono fornite presumendo che le pareti siano in bolla e
abbiano una struttura idonea a sostenere il prodotto.
Devon&Devon si riserva il diritto di modicare il prodotto per ragioni tecnico-produttive
e non si ritiene in ogni caso responsabile per inconvenienti causati dalle suddette
modiche.
Gli elementi dell’imballaggio (scatole, sacchetti di plastica, polistirolo,
etc…) non devono essere lasciati a portata di mano dei bambini
perché possono essere fonti di pericolo (rischio di soocamento,
abrasioni, etc…).
PRIMA DI INIZIARE
ATTREZZI NECESSARI (NON FORNITI DA DEVON&DEVON)
A. Livella
B. Trapano/Avvitatore
C. Chiave/Brugola/Pinza
D. Silicone
E. Matita
F. Metro
A
B
D
F
C
G
E
H
I
T
A
3 - ITA
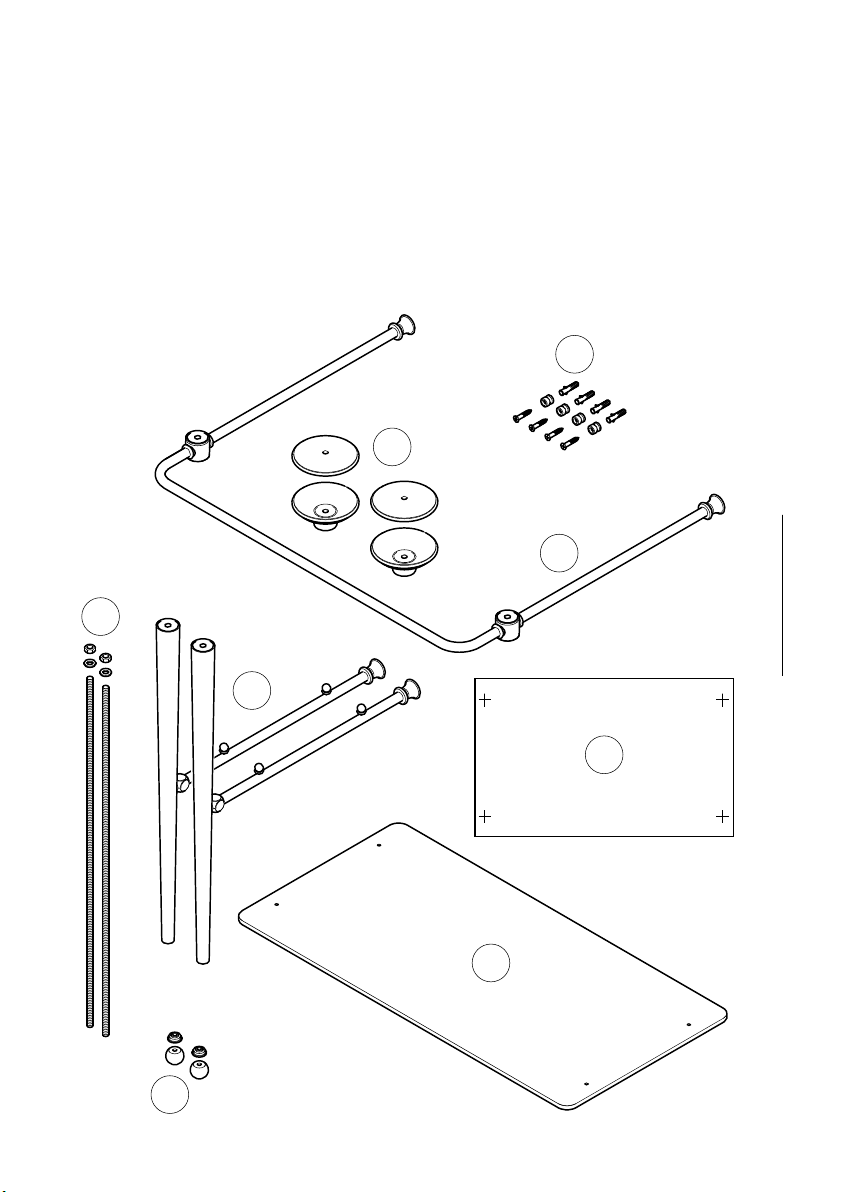
PACKING LIST STRUTTURA CONSOLLE NOBEL
A. Ripiano portaoggetti in vetro trasparente extrachiaro (x1)
B. Struttura metallica di sostegno (x1)
C. Gambe e struttura metallica per ripiano (x2)
D. Appoggio per lavabo (x2)
E. Piedini (x2)
F. Viti, tasselli di ssaggio e supporti a muro per struttura metallica (x8)
G. Barre lettate (x2)
H. Dima per fori di ssaggio.
J
I
K
I
T
A
4 - ITA
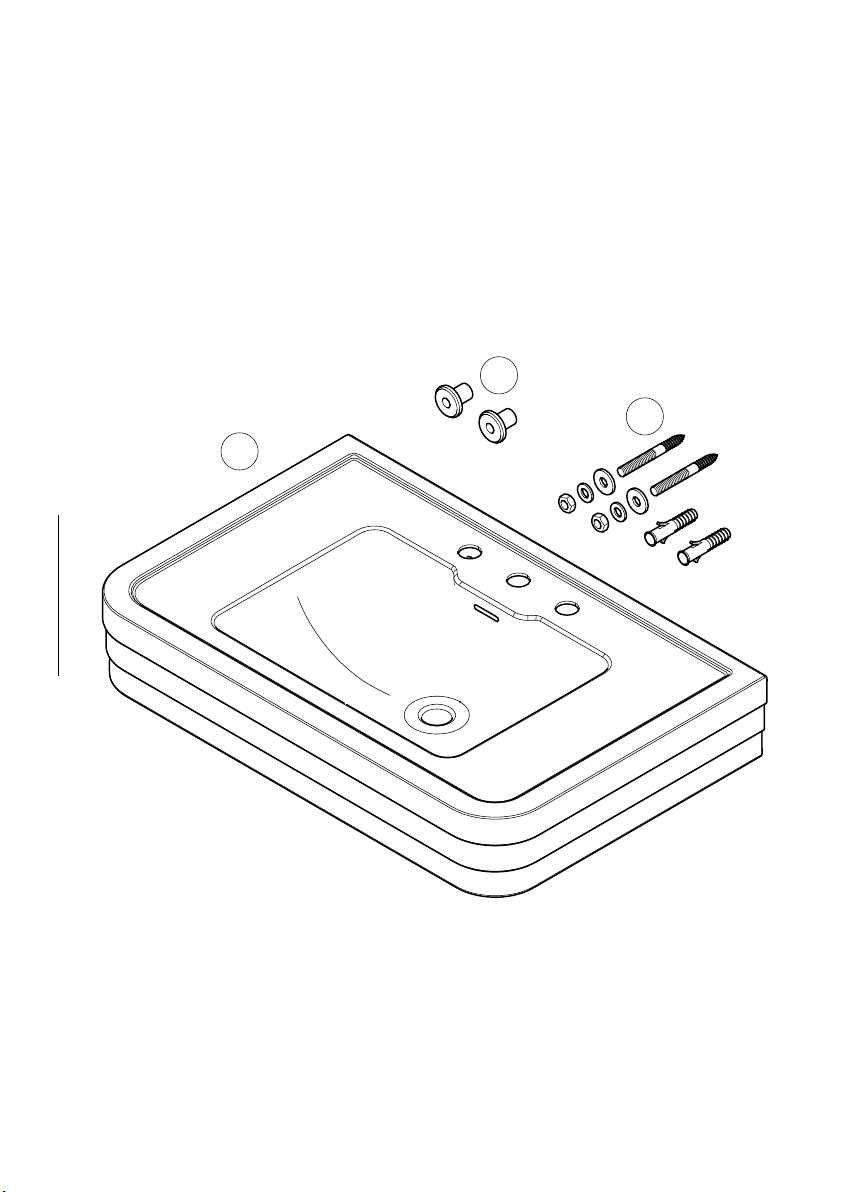
PACKING LIST LAVABO CONSOLLE NOBEL
I. Lavabo in ceramica (x1)
J. Viti e tasselli per ssaggio a muro per lavabo (x2)
K. Rondelle di plastica (x2)
G
C
EG
I
T
A
5 - ITA
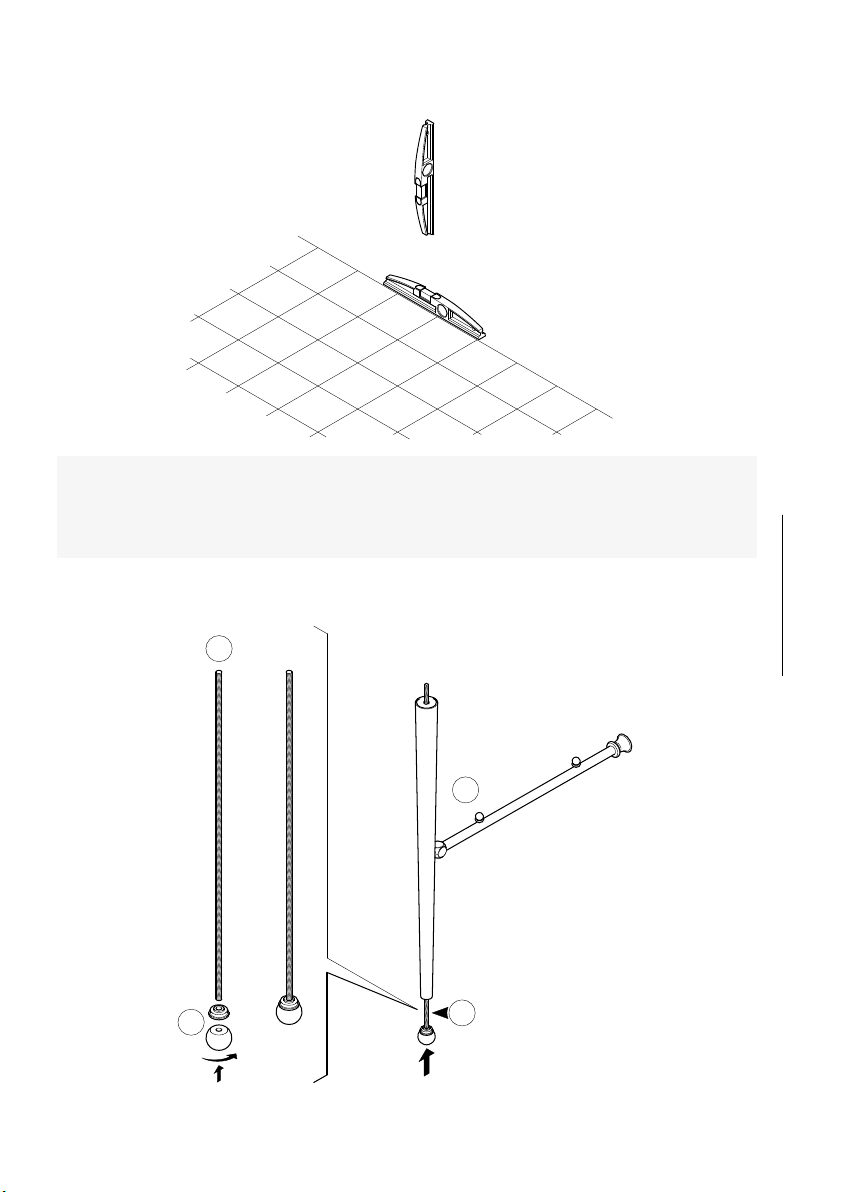
ISTRUZIONI DI MONTAGGIO
1) Controllare la perpendicolarità di parete e pavimento.
2) Fissare i piedini (E), avvitandoli alla barra lettata (G). Togliere il dado dalla parte
superiore della barra lettata.
ATTENZIONE:
DOPO AVER RIMOSSO I COMPONENTI DALLA STRUTTURA DELL’IMBALLO, APPOGGIARE LA STRUTTURA
A TERRA SOPRA UN CARTONE O SU UN ALTRO MATERIALE CHE PERMETTA DI MANTENERE IL PRODOTTO
INTEGRO
3) Inserire la barra lettata (G) nella gamba (C).
B
G
E
D
G
D
I
T
A
6 - ITA
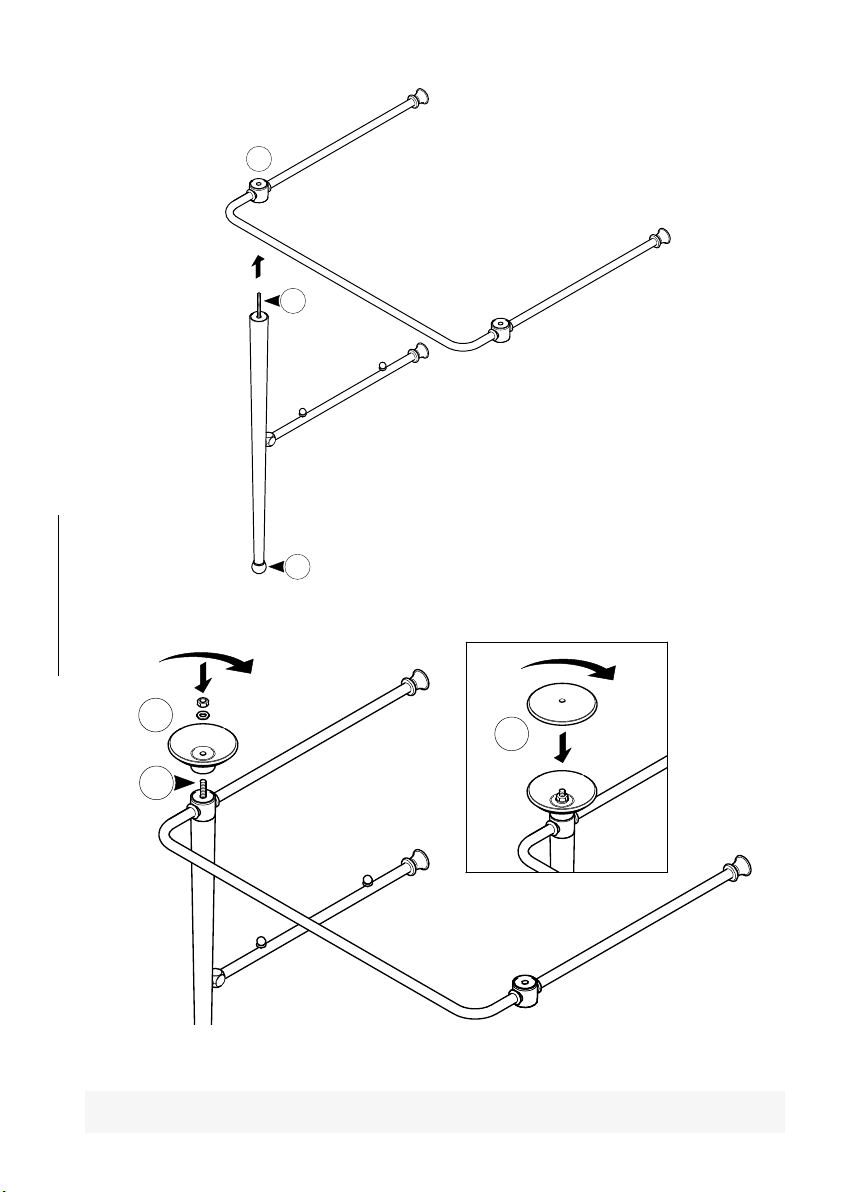
5) Inserire la borchia (D) nella barra lettata (G). Inserire il dado e serrarlo.
4) Inserire la barra lettata (G) nella struttura (B).
6) Avvitare il coperchio della borchia (D) alla barra lettata (G). Se la barra lettata
risulta troppo corta, aiutarsi tenendo bloccato il piedino (E) e svitare la barra.
RIPETERE LE OPERAZIONI DAL PUNTO 3 AL PUNTO 5 PER IL MONTAGGIO DELLA SECONDA GAMBA (C)
325
[12 3/4”]
I
T
A
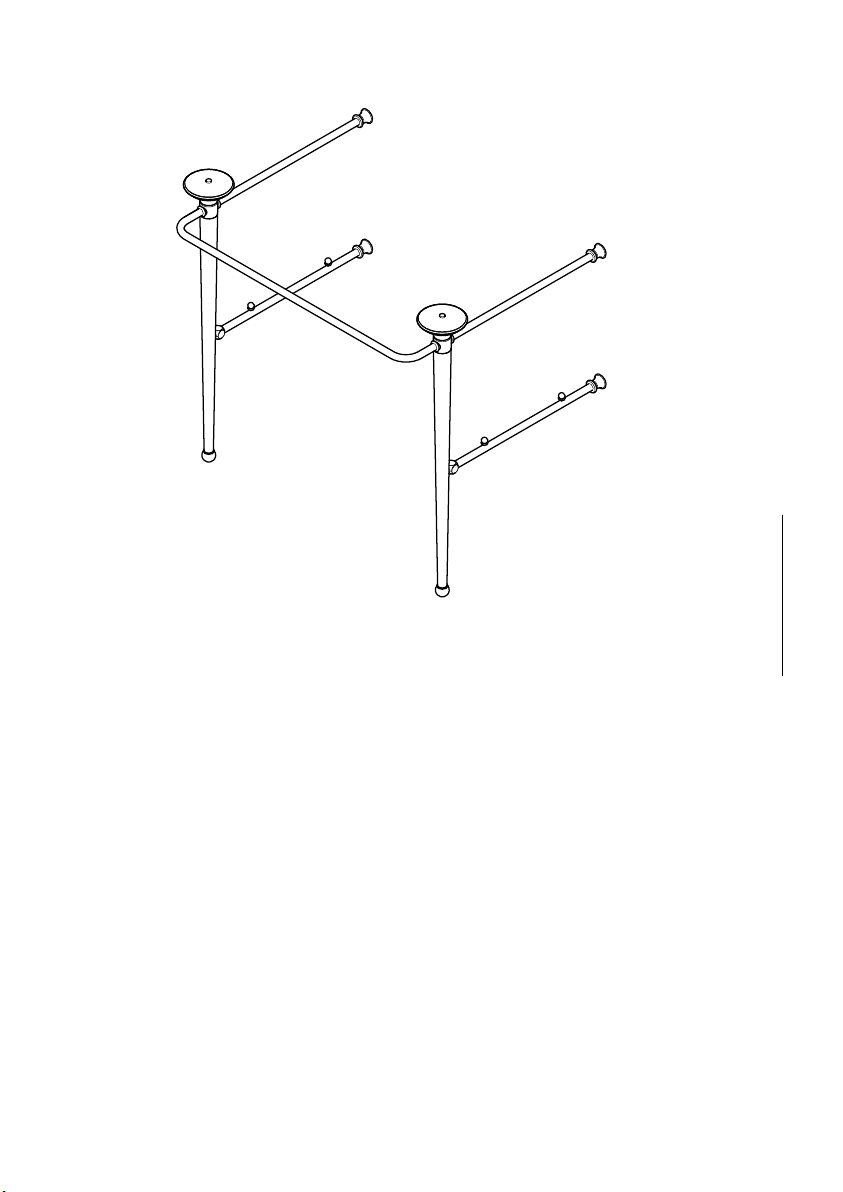
7 - ITA
7) A questo punto, la struttura metallica assemblata, dovrebbe apparire come
mostrato in gura.
8) Attaccare al muro la dima di cartone (H) in dotazione tenendo conto delle altezze
prestabilite
H da terra - 667 mm
H da terra - 325 mm

325
[12 3/4"]
H da terra - 325 mm
H da terra - 667 mm
667
[2 4/16"]
F
325
[12 3/4”]
667
[26 4/16”]
I
T
A
8 - ITA
H da terra - 667 mm
H da terra - 325 mm
10) Una volta assicurati che le misure sono corrette e la struttura è interamente a
livello, forare il muro (4 fori totali) e inserire viti, tasselli e supporti di ssaggio (F).
9) Con l’aiuto della dima attaccata al muro e di una livella, assicurarsi che le altezze
siano corrette

B
C
F
E
I
T
A
9 - ITA
11) Far combaciare e inserire i supporti (F) nella struttura (B e C). Avvitare i grani.
12) Controllare nuovamente con una livella il corretto posizionamento orizzontale
della struttura, agendo sui piedini regolabili (E).
Table of contents
Languages:
Other Devon & Devon Bathroom Fixture manuals

Devon & Devon
Devon & Devon Boston User manual

Devon & Devon
Devon & Devon Savoy V User manual

Devon & Devon
Devon & Devon HUF94 Installation guide

Devon & Devon
Devon & Devon Savoy Y User manual

Devon & Devon
Devon & Devon Savoy K User manual

Devon & Devon
Devon & Devon Savoy T User manual

Devon & Devon
Devon & Devon Lady User manual

Devon & Devon
Devon & Devon Kalos User manual

Devon & Devon
Devon & Devon Marlene User manual

Devon & Devon
Devon & Devon Savoy W User manual


