DeWalt DXV06P User manual

DXV06P
6 GALLON (23 L) PORTABLE WET/DRY VACUUM
PORTÁTIL ASPIRACIÓN HÚMEDA / SECA 23 L
ASPIRATEUR POUR DÉCHETS SECS / HUMIDES DE 23 L
1-888-899-0146
If you have questions or comments, contact us.
Si tiene dudas o comentarios, contáctenos.
Pour toute question ou tout commentaire, nous contacter.
Instruction Manual
Manual de instrucciones
Guide d'tilisation

(original instructions) 1
Español (traducido de las instrucciones originales) 10
Français (Description originale) 20
English
ENGLISH

ENGLISH
DEFINITIONS: SAFETY ALERT SYMBOLS AND WORDS
This instruction manual uses the following safety alert symbols and words to alert people to hazardous
situations and the risk of personal injury or property damage.
DANGER: Indicates an imminently hazardous situation which, if not avoided, will result in
death or serious injury.
WARNING:
Indicates a potentially hazardous situation which, if not avoided, could result in
death or serious injury.
CAUTION: Indicates a potentially hazardous situation which, if not avoided, may result in
minor or moderate injury.
NOTICE: Indicates a practice not related to personal injury which, if not avoided, may
result in property damage.
1Handle
2Power switch
3
4
5
Lid latch
6
Vacuum port
Dust tank
Caster
7
9
10
11
Extension wand (DXVA19-1202)
Crevice nozzle(DXVA19-1400)
Hose strap
Accessory mesh bag(DXVA19-5158)
11
Disposable lter bag(DXVA19-4101)
1-7/8” Hose (DXVA19-2558)
Round brush(DXVA19-2400)
12
13
14
15
Utility nozzle(DXVA19-1300)
Clean connect lter(DXVC6910)
TM
16 Instruction manual
WARNING: Read all safety warnings and all
instructions. Failure tofollow the warnings and
instructions may result in electric shock, fire and/or
WARNING:To reduce the risk of injury, read the
If you have any questions or comments about this or
any DEWALT tool, call us toll free at: 1-888-899-0146.
1
2
3
4
5
6
7
8
9
10
1
11
8
9
13
1
2
3
4
6
5
7
10
14
12
15 16 DXV10PL
10 GALLON (38 L) PORTABLE WET/DRY VACUUM
PORTÁTIL ASPIRACIÓN HÚMEDA / SECA 38 L
ASPIRATEUR POUR DÉCHETS SECS / HUMIDES DE 38 L
1-888-899-0146
Ifyou have questions or comments, contact us.
Sitiene dudas o comentarios, contáctenos.
Pourtoute question ou tout commentaire, nous contacter.
InstructionManual
Manualde instrucciones
Guided'tilisation

ENGLISH
WARNING:
WARNING: To reduce the risk of electric
shock. Do not expose to rain. Store indoors.
• Do not leave the appliance when it is connected
to a power source. Unplug it from outlet when
not in use and before servicing.
• Do not allow the appliance to be used as a toy.
Pay close attention when the appliance is used
by or near children.
• Use this appliance ONLY as described in the
manual. Use only DEWALT recommended
attachments.
• Do not use this appliance with a damaged cord or
plug. If the appliance is not working correctly, or if
it has been dropped, damaged, left outdoors, or
dropped in water, return it to a service center.
• Do not pull or carry this appliance by the cord, use
the cord as a handle, close a door on the cord, or
pull the cord around sharp edges or corners. Do
not run the appliance over the cord. Keep cord
away from heated surfaces.
• Do not unplug this appliance by pulling on the
cord. To unplug, grasp the plug, not the cord.
• Do not handle the plug or appliance with wet hands.
• Do not put any objects into the openings of the
appliance. Do not use the appliance with any
opening blocked; keep free of dust, lint, hair and
anything else that may reduce air flow.
• Keep hair, loose clothing, fingers, and all body
parts away from the openings and moving parts.
• Turn off all controls before unplugging appliance.
• Take extra care when cleaning on stairs.
• Do not use the appliance to pick up flammable or
combustible liquids, such as gasoline, or use in
areas where flammable or combustible liquids
are present.
• Static shocks are possible in dry areas or when
the relative humidity of the air is low. This is only
temporary and does not affect the use of the
vacuum. To reduce the frequency of static shocks,
add moisture to the air with a console, installed
humidifier or use anti-static hose
(standard on some models).
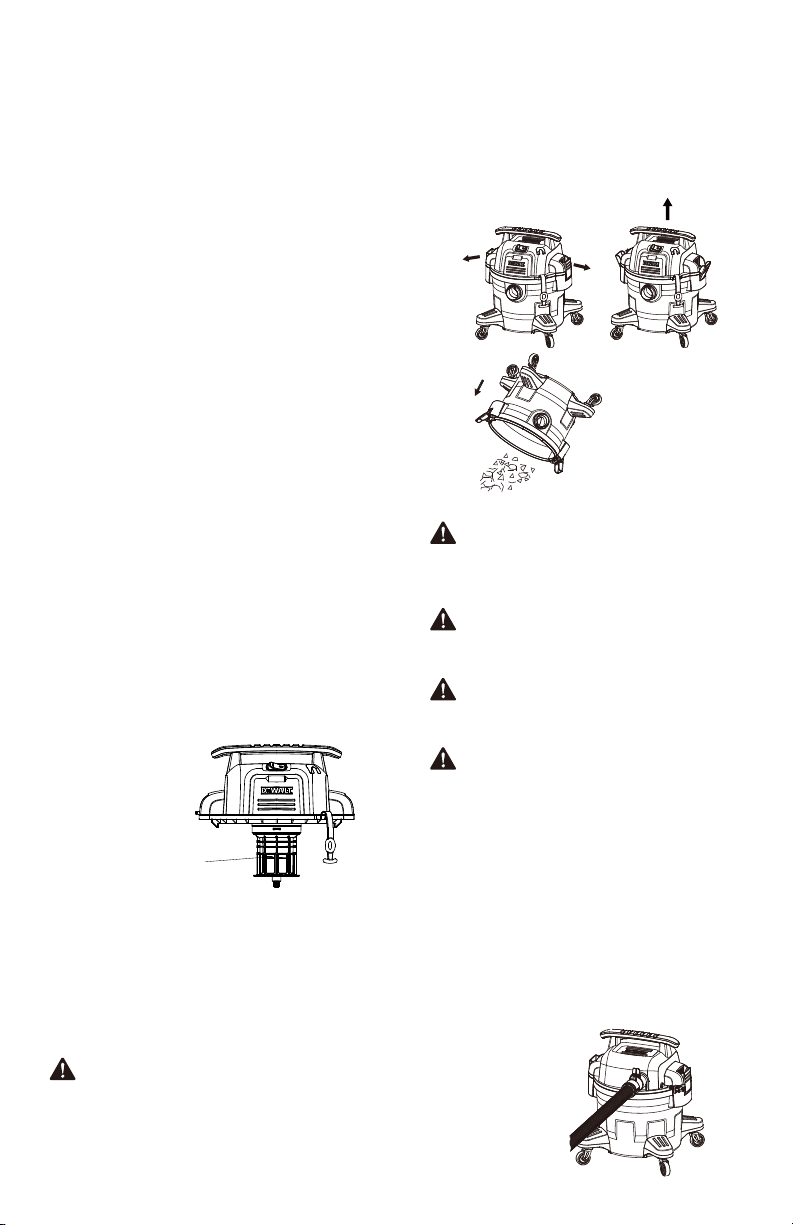
• To avoid spontaneous combustion, empty the dust
tank after each use.
• Do not pick up anything that is burning or
smoking, such as cigarettes, matches, or
hot ashes.
• Do not use to vacuum combustible explosive
materials, such as coal, grain, or other finely
divided combustible materials.
• Do not use to vacuum hazardous, toxic or
carcinogenic materials, such as asbestos or
pesticide.
• Never pick up explosive liquids (e.g. gasoline,
diesel fuel, heating oil, paint thinner, etc.),
acids or solvents.
• Do not use vacuum without filters in place.
• Some wood contains preservatives which
can be toxic. Take extra care to prevent
inhalation and skin contact when working
with these materials. Request and follow
any safety information available from the
material supplier.
• Do not use vacuum as a step ladder.
• Do not place heavy objects on vacuum.
• An extension cord must have adequate
wire size (AWG or American Wire Gauge)
for safety. The smaller the gauge number of
the wire, the greater the capacity of the cable,
that is 16 gauge has more capacity than
18 gauge. An undersized cord will cause a
drop in line voltage resulting in loss of power
and overheating. When using more than one
extension to make up the total length, be sure
each individual extension cord contains at least
the minimum wire size. The following table
shows the correct size to use. If in doubt, use
the next heavier gauge. The smaller the gauge
number, the heavier the cord.
• If an extension cord is to be used outdoors it
must be marked with the suffix W-A or W
following the cord type designation.
For example – SJTW-A indicates it is
acceptable for outdoor use.
When using electric appliances,
always follow basic safety precautions to reduce
the risk of fire, electric shock and personal injury,
including the following:
IMPORTANT SAFETY INSTRUCTIONS SAVE THESE INSTRUCTIONS
BEFORE USING THIS APPLIANCE, READ AND
FOLLOW ALL INSTRUCTIONS.
ADDITIONAL SAFETY RULES
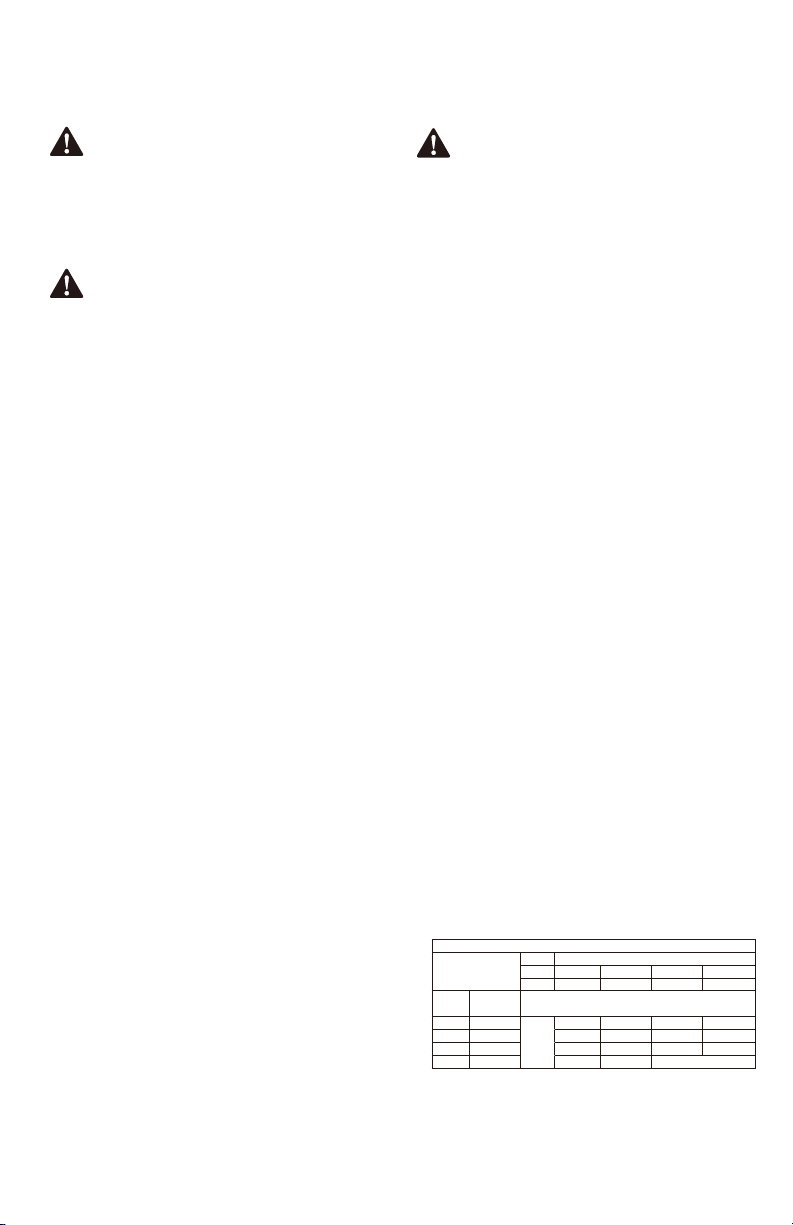
Minimum Gauge for Cord Sets
Ampere Rating
Volts Total Length of Cord in Feet (meters)
120V 25 (7.6) 50 (15.2) 100 (30.5) 150 (45.7)
240V 50 (15.2) 100 (30.5) 200 (61.0) 300 (91.4)
More
Than
Not More
Than AWG
0 6 18 16 16 14
6 10 18 16 14 12
10 12 16 16 14 12
12 16 14 12 Not Recommended
WARNING:
2

PRODUCT SPECIFICATIONS
Tank Capacity
Power
Motor
6 Gallon
1-7/8 in. x 7 ft.
Single Stage
120 V / 60 Hz / 8 A
Hose
SJTW18AWG / 10 ft. Length
Power cord
Model DXV06P
3
ENGLISH
WARNING: Always wear proper
personal hearing protection that
conforms to ANSI S12.6 (S3.19) during
use. Under some conditions and duration
of use, noise from this product may
contribute to hearing loss.
To reduce the exposure to these chemicals,
wear approved safety equipment such as
dust masks that are specially designed to
filter out microscopic particles.
WARNING: Always use safety
goggles. Everyday eyeglasses are NOT
safety goggles. Also use face or dust mask
if area of operation is dusty. ALWAYS
WEAR CERTIFIED SAFETY EQUIPMENT:
• ANSI Z87.1 eye protection (CAN/ CSA
Z94.3),
• ANSI S12.6 (S3.19) hearing protection,
• NIOSH/ OSHA/ MSHA respiratory
protection.
WARNING:
SERVICING OF DOUBLE-
INSULATED WET/DRY VAC
In a double-insulated Wet/Dry Vac, two
systems of insulation are provided instead
of grounding. No grounding means is
provided on a double-insulated appliance,
nor should a means for grounding be added.
Servicing a double-insulated Wet/Dry Vac
requires extreme care and knowledge of the
system and should be done only by qualied
service personnel. Replacement parts for a
double-insulated Wet/Dry Vac must be
identical to the parts they replace. Your
double- insulated Wet/Dry Vac is marked
with the words "DOUBLE INSULATED" and
the symbol (square within a square) may
also be marked on the appliance.
To reduce the risk of injury from electrical
shock, unplug power cord before servicing
the electrical parts of the Wet/Dry Vac.
IMPORTANT:
If the supply cord is damaged, it must be
replaced by the manufacturer or its service
agent or a similarly qualied person in order
to avoid a hazard.
IMPORTANT:
Remove the plug from the socket before
performing maintenance. Before using the
machine make sure that the frequency and
voltage shown on the rating plate correspond
with the mains voltage. Specications and
details are subject to change without prior
notice. The accessories shown in the pictures
may vary from model to model.
WARNING:
• TO REDUCE THE RISK OF INJURY, USERS MUST
READ INSTRUCTION MANUAL. DO NOT RUN
UNATTENDED. DO NOT PICK UP FLAMMABLE,
COMBUSTIBLE OR HOT MATERIALS. DO NOT
USE AROUND EXPLOSIVE DUST, LIQUIDS OR
VAPORS. ELECTRICAL DEVICES PRODUCE
ARCS OR SPARKS WHICH CAN CAUSE FIRE
OR EXPLOSION. DO NOT USE AT FILLING
STATIONS OR ANYWHERE GASOLINE IS
STORED OR DISPENSED. DO NOT VACUUM
TOXIC OR CARCINOGENIC MATERIALS OR
OTHER HEALTH ENDANGERING MATERIALS
SUCH AS ASBESTOS OR PESTICIDES.
ALWAYS USE PROPER EYE AND RESPIRATORY
PROTECTION. TO REDUCE THE RISK OF
ELECTRICAL SHOCK, DO NOT EXPOSE TO
RAIN. STORE INDOORS. WHEN SERVICING,
USE ONLY IDENTICAL REPLACEMENT PARTS.
DO NOT TO BE USED AS A STEP STOOL.
IMPORTANT SAFEGUARDS
The symbol on the product or packaging indicates
that the product must not be treated as domestic
refuse. Instead, it should be handed in to a
collection point for the recycling of electrical and
electronic components. By ensuring the product
is treated in the correct manner, you will help
prevent any negative impact on the environment
and health that might arise were the product to
be discarded as ordinary refuse. For further
information about recycling, you should contact
your local authorities, refuse collection service or
the sales outlet where you bought the goods.

WARNING:
To reduce the risk of re or explosion, do not
operate this vac in areas with ammable gases,
vapors or explosive dust in the air. Flammable
gases or vapors include but are not limited to:
lighter uid, solvent-type cleaners, oil-based
paints, gasoline, alcohol or aerosol sprays.
Explosive dusts include but are not
limited to: coal, magnesium, aluminum, and
grain or gun powder. Do not vacuum
explosive dust, ammable or combustible
liquids or hot ashes. Do not use this vac as
a sprayer for any ammable or combustible
liquid. To reduce the risk of health hazards
from vapors or dusts, do not vacuum
toxic materials.
WARNING:
The operation of any utility vac can result in
foreign objects being blown into the eyes,
which can result in severe eye injury. Always
wear safety goggles complying with ANSI
Z87.1(or in Canada, CSA Z94.3) before
starting operation.
1. Pull lid latches in an outward motion, remove
power head and some accessories that may
have been shipped in the tank.
2. Attach accessories following the instructions
in this manual.
3. Before replacing power head, refer to this
manual to ensure you have the proper lter
installed for the cleaning operation.
4. Replace power head, and apply pressure
with thumb to each latch until it snaps
tightly in place. Make sure all lid latches are
clamped securely.
5. Insert the hose end into inlet of tank.
6. Attach the extension wands to the end of the
hose. Apply slight pressure until tting is tight.
7. Attach one of the cleaning accessories
(depending on the cleaning requirements) to
the extension wands. Twist slightly to tighten
the connection.
8. Plug the cord into the wall outlet. The vacuum
is ready for use.
9. To reduce the risk of injury from accidental
starting, always shut off vacuum and
disconnect the power plug from the wall
outlet before installing any part or
cleaning accessory.
OPERATING INSTRUCTIONS
UNPACKING & SETUP SUMMARY
SAVE THESE INSTRUCTIONS
WARNING:
To reduce the risk of re or explosion, do not
operate this vac in areas with ammable gases,
vapors or explosive dust in the air. Flammable
gases or vapors include but are not limited to:
lighter uid, solvent-type cleaners, oil-based
paints, gasoline, alcohol or aerosol sprays.
Explosive dusts include but are not
limited to: coal, magnesium, aluminum, and
grain or gun powder. Do not vacuum
explosive dust, ammable or combustible
liquids or hot ashes. Do not use this vac as
a sprayer for any ammable or combustible
liquid. To reduce the risk of health hazards
from vapors or dusts, do not vacuum
toxic materials.
WARNING:
The operation of any utility vac can result in
foreign objects being blown into the eyes,
which can result in severe eye injury. Always
wear safety goggles complying with ANSI
Z87.1 (or in Canada, CSA Z94.3) before
starting operation.
ENGLISH
1. Invert dust tank, take the casters to align
the tank bottom sinking place. Secure with
screws provided.
2. Return dust tank assembly upright.
CASTER ASSEMBLY
4

5
CAUTION:
To reduce the risk of hearing loss, wear ear
protectors when using the vac for extended
hours or when using it in a noisy area. The unit
is ready for dry vacuuming.
After plug the power cord into the wall
receptacle, turn the unit “ON” by pushing the
switch position with 1 embossing straps is
the “ON” position.
ON OFF
1. The lter must always be in correct position to
reduce the risk of leaks and possible damage
to vac. Make sure that the lter is completely
covering the lter cage. Make sure there are
no gaps between the lter and the lid. It is
very important to assemble the lter to the
cage without any possible leaks or tears.
Any leaks will allow the picked up debris
to be blown out of the blowing port and back
into the surrounding environment.
DRY PICK-UP
4. To clean the cartridge lter, shake or brush off
excess dirt or rinse (from the inside of the lter)
with water, dry completely (approximately 24
hours) and re-install.
2. When using the vac to pick up ne dust,
it will be necessary to empty the dust tank and
clean or replace the lter at more frequent
intervals to maintain peak vac performance.
1. With the power head in an upside down position,
slide the cartridge lter down over the lid cage,
push the lter seals against the power head.
2. Turn the knob on lter retainer clockwise to
tighten, the lter into place.
3. To remove the lter for cleaning, turn the lter
knob counter clockwise till feel the tactile and
auditory cue, and make sure the knob arrow
align with the "Unlock" icon on the lter cap,
then slide the cartridge lter off the lid cage.
then grasp the step of knob tightly with ngers
to pull the cartridge lter out off the cage.
The cartridge lter can be used for wet or dry
pick-up, installation is the same for both.
INSTALLING THE CARTRIDGE FILTER
NOTICE:
A dry lter is necessary to pick up dry material. If
use the vac to pick up dust when the lter is
wet, the lter will clog quickly and be very difcult
to clean. If the lter gets wet, replace it before
continuing to do dry pickups.
NOTICE:
If the lter has been used for wet pick-up, it must
be cleaned and dried before dry pick-up.
Lock
1. Slide the cardboard collar opening rmly onto
the vacuum port deector until it stops against
the deector wall.
2. Position the bag so that it is distributed around
the inside of the tank.
3. Replace and secure the power head onto the
tank.
WET PICK-UP
INSTALLING THE DISPOSABLE FILTER
BAG
Remove all dirt and debris found in the tank.
The vacuum requires only a minimum of
conversion when going from dry to wet pick up.
Remove the dry use lter from the vacuum. A
clean cartridge lter may used for vacuuming
small amounts of liquids. For best results when
vacuuming large quantities of liquid, remove the
cartridge lter. When vacuuming liquids
containing debris, it is recommended purchas-
ing a foam lter and install over the lter cage.
The foam lter may be purchased by visiting our
website at www.dewalt.com, contacting our
customer service department, or purchasing at
the local DEWALT distributor. When picking up
large amounts of liquid, it is recommend to
remove the cartridge lter. If the lter is not
removed, it will become saturated and misting
may appear in the exhaust.
ENGLISH
Disposable
dust bag

6
1. Always disconnect the plug from the wall outlet
before removing the power head. Place power
head in an upside down position. Remove the
cartridge lter by sliding it up and off the
lter cage.
2. Shake excess dust off the cartridge lter with
a rapid up and down movement.
NOTE: WET PICK-UP ACCESSORIES
SHOULD BE WASHED PERIODICALLY,
ESPECIALLY AFTER PICKING UP WET,
STICKY FLUIDS OR SPILLS. THIS CAN BE
ACCOMPLISHED WITH A WARM SOLUTION
OF SOAP AND WATER.
1. Remove the power head assembly of the
wet/ dry vac by pulling outward on the lid
clips located on each side of the vac.
Lift off the power head assembly.
2. Dump the tank contents into the proper
waste disposal container.
WARNING:
To reduce the risk of injury from accidental
starting, unplug power cord before emptying
the dust tank.
EMPTY THE TANK
NOTE: IF ACCIDENTALLY TIPPED OVER,
THE VACUUM COULD CLOSED SUCTION.
IF THIS OCCURS, PLACE VAC IN UPRIGHT
POSITION AND TURN SWITCH OFF. THIS
WILL ALLOW THE FLOAT TO RETURN TO
ITS NORMAL POSITION, AND YOU WILL BE
ABLE TO CONTINUE OPERATION.
ENGLISH
At this time, you should dry or replace the
cartridge lter to eliminate the misting and
possible dripping of liquid around the lid. After
completing a wet pick-up job, raise the hose to
drain any excess liquid into the tank before
shutting off. The interior of tank should be
periodically cleaned.
3. This wet/ dry vac is equipped with a oat
mechanism which will rise automatically to
cut off the airow when the liquid in the tank
reaches a predetermined level. When this
happens, turn off vac, unplug the power cord,
and empty the dust tank. You will know that
the oat has shut the airow off because the
suction ceases and the motor noise becomes
higher in pitch due to increased motor speed.
The liquid capacity may vary with the
rate of pickup.
IMPORTANT: To reduce the risk of damage
to the vac, do not run motor with oat in
raised position.
Float in raised position
WARNING:
BLOWING OPERATION
Always wear safety goggles complying with
ANSI Z87.1 (or in Canada CSA Z94.3) when
using as a blower.
WARNING:
To avoid injury to bystanders, keep them
clear of blowing debris.
CAUTION:
Wear a dust mask if impeller dust which
might be inhaled.
CAUTION:
To reduce the risk of hearing loss, wear
ear protectors when using the vac/blower
for extended hours or when using it in a
noisy area.
1. Locate blowing port on the vac.
2. Insert one end of the 1-7/8 in. x 7 ft.
hose into the blowing port.
3. Turn vac “ON”.
The vac contains a blowing feature. It has
the capability to blow sawdust and other
debris. It can be used to blow dust and
debris out of garages or off patios and
driveways. Follow the steps below to use
the vac as a blower.

7
1. Dump out debris.
2. Wash tank thoroughly with warm water
and mild soap.
3. Wipe out with dry cloth.
WARNING:
To reduce the risk of injury from accidental
starting, unplug power cord before changing
or cleaning the lter. The lter should be
cleaned often to maintain peak vac performance.
WARNING:
Do not remove lter cage and oat. The
oat prevents water from entering the impeller
and damaging the motor. The cage prevents
ngers from touching the moving impeller.
CLEANING:
To keep the wet/ dry vac looking its best,
clean the outside with a cloth dampened
with warm water and mild soap.
To clean the tank:
STORAGE:
Before storing the vac,the dust tank should
be emptied and cleaned. The cord should
be wrapped and hung on the unit and the
accessories should be kept in mesh bag
so they can be readily available. The vac
should be stored indoors.
IMPORTANT:
To avoid damage to the blower wheel and
motor, always reinstall the Clean Connect™
lter before using the vac for dry pickups
and wet pickups.
IMPORTANT:
After cleaning, check the lter for tears or
small holes. Do not use a lter with holes
or tears in it. Even a small hole can cause
a lot of dust to come out of the vac.
Replace it immediately.
NOTICE:
Before installing the lter on the vac, clean
the area of the lid so that the lter will seal
against the lid and stop small particles from
bypassing the lter bag. If the lter is clean
and not damaged, replace it on the lter
cage. If it cannot be reused, place a new
lter over the lter cage.
NOTICE:
Clean the lter in an open area. Cleaning
should be done outdoors and not in
living quarters.
CARE AND MAINTENANCE
FILTER REPLACEMENT
Minor problems often can be xed without calling
customer service.
TROUBLESHOOTING
PROBLEM SOLUTION
Motor does not run
Check power cord, plugs and outlet.
Ensure the on/ off switch is in the
ON position ( I )
Remove blockages in the suction
nozzle, suction tube, suction hose
or lters.
Replace the paper or eece dust bag.
Clean or replace the lters.
Empty the dust tank, refer to Empty
the tank under Operating
instructions.
Check for proper installation of the
lters.
Suction capacity
decreases
Vacuum stops
running
Thermal overload has been tripped:
1. Turn the vacuum off and
disconnect vacuum cleaner from
power source.
2. Empty the canister, if needed.
3. Allow the unit to cool.
4. Plug the power cord into an
appropriate outlet and turn on/off
switch to the ON position ( I ) to
test. If vacuum will not restart
call 1-888-899-0146
Ensure lters are not damaged;
replace if necessary.
Ensure lter seals are in place and
are secure.
Check for proper installation of the
lters.
Dust comes out
while vacuuming
ENGLISH

8
ENGLISH
EXPLODED VIEW / PARTS LIST
Handle
1
2
3
4
5
6
7
11
12
13
14
15
16
17
11
1
2
1
1
1
1
1
1
1
1
1
PART DESCRIPTION QTY PART DESCRIPTION QTY
Power Switch
Top Cover
Thermal Baffle
Motor
Hose Strap
Filter Cage Assy
Lid Latche
Motor Sealing Ring
Power Cord
8
9
10
1
1
1
Motor Support Sealing Ring
Motor Sealing Ring
Lid
Drain Port
Dust Tank
Vacuum Port
Heavy-duty Rubberized Caster 4
18
19 2
1
Bag Holder Bracket
Accessory Bag Holder

9
ENGLISH
WARRANTY
Alton Industry Ltd. Group
3 years Limited Warranty
This warranty covers any defects in materials or workmanship of the enclosed
product. Alton Industry Ltd. Group will repair or replace any defective materials due to
craftsmanship of the product. This warranty does not cover any problem caused by
misuse, abuse, accidents or acts of God, such as floods or hurricanes. Consequential
and incidental damages are not covered under this warranty. Coverage terminates if
you sell or otherwise transfer the ownership. If you feel you have a defective product,
please submit a copy of your receipt to the address below and call1-888-899-0146
for instructions prior returning this item to the store or sending back to:
Alton Industry Ltd. Group
1031North Raddant Rd
Batavia, Illinois 60510
We will inspect the product and contact you within 72 hours to give you the results of
our inspection. We reserve the right to repair or replace the product at our discretion.
However, we may replace the product with one of similar but not exact features.
Parts and Service Information available callAlton Industry at 1-888-899-0146.
This warranty gives you specific legal rights. You may have other rights
which vary from state to state.

10
Manuel de instrucciones
ESPAÑOL
DEFINICIONES: SÍMBOLOS Y PALABRAS DE ALERTA DE SEGURIDAD
Este manual de instrucciones utiliza los siguientes símbolos y palabras de alerta de seguridad para
alertarle de situaciones peligrosas y del riesgo de lesiones corporales o daños materiales.
PELIGRO: Indica una situación de peligro inminente que, si no se evita, provocará la muerte
o lesiones graves.
ADVERTENCIA: Indica una situación de peligro potencial que, si no se evita, podría
provocar la muerte o lesiones graves.
ATENCIÓN:
Indica una situación de peligro potencial que, si no se evita, posiblemente
provocaría lesiones leves o moderadas.
AVISO:
Se reere a una práctica no relacionada a lesiones corporales que de no evitarse
puede resultar en daños a la propiedad.
ADVERTENCIA: Lea todas las advertencias de
seguridad e instrucciones.El incumplimiento de
las advertencias e instrucciones puede provocar
descargas eléctricas, incendios o lesionesgraves.
ADVERTENCIA:Para reducir el riesgo de lesiones,
lea el manual deinstrucciones.
Si tiene alguna duda o algún comentario sobre ésta
u otra herramienta DEWALT, llámenos al número
gratuito: 1-888-899-0146.
1Manejar
2Interruptor
3
4
5
Dos tapa pestillo
6
De vacío de puerto
Depósito de polvo
Ruedas de goma
7
9
10
11
Tubo extensón(DXVA19-1202)
Boquilla para rincones(DXVA19-1400)
Correa de manguera
Bolsa de malla para accesorios(DXVA19-5158)
11
Desechables bolsa de polvo(DXVA19-4101)
48mm Manguera(DXVA19-2558)
Cepillo redondo(DXVA19-2400)
12
13
14 Boquilla de utilidad(DXVA19-1300)
Filtre de Clean-Lock (DXVC6910)
TM
15
16
1
2
3
4
5
6
7
8
9
10
11
8
9
13
1
2
3
4
6
5
7
10
14
12
15 16 DXV10PL
10 GALLON (38 L) PORTABLE WET/DRY VACUUM
PORTÁTIL ASPIRACIÓN HÚMEDA / SECA 38 L
ASPIRATEUR POUR DÉCHETS SECS / HUMIDES DE 38 L
1-888-899-0146
Ifyou have questions or comments, contact us.
Sitiene dudas o comentarios, contáctenos.
Pourtoute question ou tout commentaire, nous contacter.
InstructionManual
Manualde instrucciones
Guided'tilisation

11
ADVERTENCIA:
ADVERTENCIA: Para reducir el riesgo
de descarga eléctrica, no exponer a la lluvia.
Almacenar bajo techo.
• No exponga el aparato a la lluvia. Almacénelo
en el interior. Esto reducirá el riesgo de
descargas eléctricas.
• No permita que se juegue con él. Preste
especial atención si el aparato es utilizado por
o cerca de niños.
• SÓLO use este aparato como lo describe el
manual.
Use sólo los accesorios DEWALT recomendados.
• No use este aparato si su cable o enchufe están
dañados. Si el aparato no funciona debidamente,
o si se ha caído, dañado, dejado a la intemperie,
o si se ha caído en agua, devuélvalo a un centro
de servicio.
• No tire del cable, levante el aparato por el cable,
use el cable como un mango, cierre la puerta si
el cable está en el umbral, o tire del cable entorno
a bordes o esquinas a lados. No atropelle el cable
con el aparato. Mantenga el cable alejado de
super cies calientes.
• Notiredelcableparadesenchufarelaparato.
Paradesenchufarlos, tome el enchufe con meza,
no el cable.
• No toque el enchufe o el aparato si tiene las
manos mojadas.
• No inserte ningún objeto por las aperturas del
aparato. No utilice este aparato si tiene alguna
apertura bloqueada; manténgalo sin polvo,
pelusa, pelo o cualquier otra cosa que podría
reducir el ujo de aire.
• Mantenga su cabello, vestimenta suelta, dedos y
toda parte de su cuerpo alejados de las aperturas
y piezas móviles del aparato.
• Apague todos los controles antes de desenchufar
el aparato.
• Tenga especial cuidado cuando lo use para limpiar
en escaleras.
• No use el aparato para recoger líquidos o
combustibles, como gasolina, ni lo use en lugares
donde exista la presencia de líquidos in amables
o combustibles.
• Es posible que se produzcan descargas
estáticas en áreas secas o cuando la
humedad relativa del aire sea baja. Esto es
solo pasajero y no afecta la utilización de la
aspiradora. Para reducir la frecuencia de las
descargas estáticas, agregue humedad al aire
con un ador instalado de consola o use la
manguera antiestática (estándar en algunos
modelos).
• Para evitar una combustión espontánea,
vacíe el recipiente después de cada uso.
• No recoja nada que se esté quemando o
que esté humeando, como cigarrillos, fósforos
o cenizas calientes.
• No use para aspirar materiales combustibles
explosivos, como carbón, grano u otro
material combustible amente dividido.
• No utilice para aspirar materiales peligrosos,
tóxicos o cancerígenos, tales como asbesto
o pesticida.
• Nunca recoja líquidos explosivos (como
gasolina, combustible diesel, gasóleo,
diluyente de pintura, etc.), ácidos o solventes.
•
No utilice la aspiradora sin los ltros bien puestos.
• Alguna madera contiene preservantes que
pueden ser tóxicos. Tenga especial cuidado
para prevenir la inhalación y el contacto con
la piel cuando trabaje con estos materiales.
Solicite y siga cualquier información de
seguridad que el proveedor de materiales
ponga a el disposición.
• No use la aspiradora como escalera de mano.
• No coloque objetos pesados sobre la aspiradora.
• Los hilos del alargador deben ser de un
calibre apropiado (AWG o American Wire
Gauge) para su seguridad. Mientras menor
sea el calibre del hilo, mayor la capacidad del
cable. Es decir, un hilo calibre 16 tiene mayor
capacidad que uno de 18. Un cable de un
calibre insu ciente causará una caída en la
tensión de la línea dando por resultado una
pérdida de energía y sobrecalentamiento.
Cuando se utilice más de un alargador para
completar el largo total, asegúrese que los
hilos de cada alargador tengan el calibre
mínimo. La tabla siguiente muestra el tamaño
correcto a utilizar. Si tiene dudas sobre cuál
calibre usar, use un calibre mayor. Cuanto
más pequeño sea el número del calibre, más
resistente será el cable.
• Si utilizará un alargador en el exterior, deberá
tener marcado el sujo W-A ó W luego de la
designación del tipo de cable. Por ejemplo –
SJTW-A para indicar que es aceptable para
usar afuera.
Cuando utilice aparatos
eléctricos, siempre siga instrucciones básicas de
seguridad para reducir el riesgo de incendio,
descarga eléctrica y lesiones corporales, incluyendo
las siguientes:
INSTRUCCIONES DE SEGURIDAD
IMPORTANTES
GUARDE ESTAS INSTRUCCIONES
ANTES DE UTILIZAR ESTE APARATO, LEA Y
SIGA TODAS LAS INSTRUCCIONES.
ESPAÑOL
REGLAS DE SEGURIDAD ADICIONALES
ADVERTENCIA:

12
ADVERTENCIA: Siempre use protección
auditiva personal en conformidad con
ANSI S12.6 (S3.19) durante el uso de este
aparato. Bajo algunas condiciones y duraciones de
uso, el ruido producido por este producto puede
contribuirala pérdida auditiva.
ADVERTENCIA:
• PARA REDUCIR EL RIES GO DE FUEGO,
CHOQUE ELÉCTRICO O LESINOES: LEA
TODAS LAS INSTRUCCIONES ANTED DE
USAR EL APARATO. NO DEJE EL
APARATO CONECTADO. DESCONÉCTELO
DE LA TOMA DE CORRIENTE CUANDO NO
LO ESTÉ USANDO Y ANTES DE HACERLE
ALGÚN SERVICIO. NO EXPONGA A LA
LLUVIA, ALMACÉNELO EN EL INTERIOR.
NO UTILICE CON EL CABLE O EL ENCHUFE
DAÑADO. MANTENGA EL CABLE ALEJADO
DE SUPERFICIES CALIENTES. NO LO
UTILICE PARA ASPIRAR LÍQUIDOS
COMBUSTIBLES O FLAMABLES; COMO
GASOLINA, NI LO USE EN ÁREAS DONDE
PUEDAN ESTAR PRESENTED. NO ASPIRE
NADA QUE ESTÉ ENCENDIDO O
FUMÁNDOSE, COMO CIGARROS,CERILLOS
O CENIZAS CALIENTES. NO ASPIRE
TÓXICOS, CANCERÍGENOS, COMBUSTIBLE
U OTROS MATERIALES PELIGROSOS COME
ASBESTO, PLOMO, PESTICIDAS U OTROS
MATERIALES QUE ATENTEN CONTRA LA
SALUD. DOBLE INSULATION- AL DAR
SERVICIO, SÓLO UTILICE PIEZAS DE
REPUESTO IDÉNTICAS. SÓLO PARA USO
DOMÉSTICO. PARA USO DOMÉSTICO.
ADVERTENCIA: SIEMPRE utilice gafas de
seguridad. Los anteojos de diario NO SON gafas de
seguridad. Utilice también caretao mascarilla si se
produce polvo al operar en el área. PORTE SIEMPRE
EQUIPO DE SEGURIDAD CERTIFICADO:
• Protección ocular ANSI Z87.1(CAN/CSA Z94.3),
• Protección auditiva ANSI S12.6(S3.19),
• Protección respiratoria NIOSH/OSHA/MSHA.
Calibre mínimo para cables de alimentación
Amperaje
Voltios Largo total del cordón en metros (pies)
120V 7,6 (25) 15,2 (50)
30,5 (100)
30,5 (100) 45,7 (150)
91,4 (300)61,0 (200)15,2 (50)240V
Más
de
No más
de AWG
0 6 18 16 16 14
6 10 18 16 14 12
10 12 16 16 14 12
12 16 14 12 No recomendado
ADVERTENCIA:
El funcionamiento de cualquier vac de la utilidad
puede resultar en objetos extraños siendo soplado
en los ojos, lo que puede resultar en lesiones
oculares graves. Siempre use gafas de seguridad
que cumplan con ANSI Z87.1 (o en Canadá,
CSA Z94.3) antes de comenzar la operación.
ADVERTENCIA:
MANTENIMIENTO DE UNA ASPIRADORA
PARA SECO Y MOJADO CON DOBLE
AISLAMIENTO
En una aspiradora para seco y mojado con doble
aislamiento cuentan con dos sistemas de aislamiento
en lugar de una conexión a tierra. Los electrodomés
-ticos con doble aislamiento no cuentan con un
medio de puesta a tierra ni se le debe agregar uno. El
mantenimiento de una aspiradora para seco y mojado
con doble aislamiento requiere extremo cuidado y
amplios conocimientos del sistema, por lo que solo
debe estar a cargo de personal de mantenimiento
calicado. Las piezas de repuesto para una aspiradora
para seco y mojado con doble aislamiento deben ser
idénticas a las piezas que reemplazan. Su aspiradora
para seco y mojado con doble aislamiento está
marcada con las palabras “DOBLE AISLAMIENTO” y
el símbolo (cuadrado dentro de otro cuadrado)
puede estar marcado sobre el electrodoméstico.
Para reducir el riesgo de lesiones provocadas por
descargas eléctricas, desenchufe el electrodoméstico
antes de realizar el mantenimiento a las piezas
eléctricas de la con aspiradora para seco y mojado.
IMPORTANTE!
Si el cable de alimentación está dañado, este
debe ser reemplazado por el fabricante, su
empresa de servicio o una persona con
calicación similar para evitar peligros.
IMPORTANTE!
Desconecte el enchufe del tomacorriente
antes de realizar mantenimiento. Antes de
usar la máquina, asegúrese de que la
frecuencia y el voltaje indicado en la placa de
calicaciones corresponda con el voltaje. Las
especicaciones y los detalles están sujetos a
cambio sin previo aviso. Los accesorios que
se muestran en las imágenes pueden variar
de un modelo a otro.
MEDIDAS DE SEGURIDAD
IMPORTANTES
El símbolo en el producto o el paquete indica
que el producto usado no se debe considerar
parte de los desechos domésticos. En cambio,
este debe llevarse a un punto de recolección
para el reciclaje de componentes eléctricos y
electrónicos. Al garantizar que el producto se
trató de la manera correcta, ayudará a evitar
cualquier impacto negativo sobre el medio
ambiente y la salud que podría originarse si el
producto se eliminara como desecho ordinario.
Para obtener más información sobre el
reciclaje, póngase en contacto con sus
autoridades locales, su servicio de recolección
de desechos o el punto de venta donde
lo compró.
ESPAÑOL

13
1. Tire de los pestillos de la tapa hacia afuera,
retire el cabezal de potencia y algunos
accesorios que pueden haberse enviado en
el tanque.
2. Conecte los accesorios siguiendo las
instrucciones de este manual.
3. Antes de reemplazar el cabezal de potencia,
consulte este manual para asegurarse de
tener instalado el ltro adecuado para la
operación de limpieza.
4. Vuelva a colocar el cabezal de alimentación
y aplique presión con el pulgar en cada
pestillo hasta que encaje rmemente en su
lugar. Asegúrese de que todos los pestillos
de la tapa estén bien sujetos.
5. Inserte el extremo de la manguera en la
entrada del tanque.
6. Conecte las varillas de extensión al extremo
de la manguera. Aplique una ligera presión
hasta que el ajuste esté apretado.
7. Conecte uno de los accesorios de limpieza
(según los requisitos de limpieza) a las
varillas de extensión. Gire ligeramente para
apretar la conexión.
8. Enchufe el cable a la toma de corriente.
La aspiradora está lista para usar.
9. Para reducir el riesgo de lesiones por
arranque accidental, siempre apague la
aspiradora y desconecte el enchufe de la
toma de corriente de la pared antes de
instalar cualquier pieza o accesorio
de limpieza.
ESPECIFICACIONES DEL PRODUCTO
Capacidad del
tanque
Potencia
Motor
23 Litros
4,8 cm x 2,1 m
de una sola fase
120V / 60Hz / 8A
Manguera
SJTW18AWG / 3m largo
Cable de
alimentación
Modelo DXV06P
INSTRUCCIONES DE FUNCIONAMIENTO
DESEMBALAJE Y CONFIGURACIÓN
GUARDE ESTAS INSTRUCCIONES
Carbón, magnesio, aluminio y pólvora o pólvora
cilíndrica. No aspire polvos explosivos, líquidos
inamables o combustibles ni cenizas calientes.
No use esta aspiradora como rociador de líquidos
inamables o combustibles. Para reducir el riesgo
de peligros para la salud debido a vapores o polvo,
no aspire materiales tóxicos.
ADVERTENCIA:
Inamables o polvo explosivo en el aire. Los
gases o vapores inamables incluyen,
entre otros: Líquidos de encendedores,
limpiadores tipo solvente, pinturas a base de
aceite, gasolina, alcohol y rociadores en aerosol.
Los polvos explosivos incluyen, entre otros:
1. Voltear al revés el tanque y tome la rueda a
modo que se centre a lo que está undido.
Aseguré con los tornillos.
2. Vuelva a colocar el conjunto del tanque de
polvo en posición vertical.
MONTAJE DE LA RUEDA
ESPAÑOL
ADVERTENCIA:
El funcionamiento de cualquier vac de la utilidad
puede resultar en objetos extraños siendo soplado
en los ojos, lo que puede resultar en lesiones
oculares graves. Siempre use gafas de seguridad
que cumplan con ANSI Z87.1 (o en Canadá,
CSA Z94.3) antes de comenzar la operación.
PRECAUCIÓN:
Para reducir el riesgo de pérdida auditiva, use
protectores auriculares cuando Usar el vac por
horas extendidas o al usarlo en un área ruidosa.
La unidad está lista para aspirar o soplar en seco.
Después de conectar el El cable de alimentación
en el receptáculo de la pared, encienda la unidad.
La posición del interruptor con 1 cintas de gofrado
es la posición "APAGADO".
APAGADO ENCENDIDO
ASPIRADO EN SECO
El ltro debe estar siempre en la posición
correcta para reducir el riesgo de fugas y
posibles daños a la aspiradora. Asegúrese de
que el ltro esté cubriendo completamente la
caja del ltro y que el aro de la abrazadera
esté lo más cerca posible de la tapa.
Asegúrese de que no haya espacios entre el
ltro y la tapa. Es muy importante ensamblar
1.

14
INSTALACIÓN DEL FILTRO DE CARTUCHO
AVISO:
el ltro a la caja sin dejar ninguna fuga o
gotera. Cualquier fuga permitirá que la
suciedad aspirada sea soplada hacia fuera
del puerto de soplado y de vuelta en el aire.
Se necesita el ltro seco para recoger el material
seco. Si usa la aspiradora para aspirar polvo
cuando el ltro está mojado, este se obstruirá
rápidamente y la limpieza será muy difícil. Si el
ltro se moja, reemplácelo antes de continuar
aspirando.
El ltro de cartucho puede utilizase para la
aspiración de materiales líquidos o sólidos; las
instalación es la misma para ambos.
Cuando use el aspiradora para aspirar polvo
no, será necesario vaciar el tanque para
polvo y limpiar o reemplazar el ltro en
intervalos más frecuentes para mantener el
máximo rendimiento de la aspiradora.
2.
AVISO:
Si el ltro ha sido utilizado para aspiración de
líquidos, se deberá limpiary dejar secar antes de
utilizarlo para la aspiración de sólidos.
Deslice la abertura del collar de cartón
rmemente sobre el deector del puerto de
aspiración, hasta que se detenga contra la
pared del deector.
1.
Coloque la bolsa de modo que se distribuya
en todo el interior del tanque.
2.
Vuelva a colocar y asegurar el cabezal en
el tanque.
3.
INSTALACIÓN DE LA BOLSA DE
FILTRO DESECHABLE
ESPAÑOL
Con la cubierta del depóposito en posición
invertida, deslice el ltro de cartucho hacia
abajo sobre el alojamiento de la tapa,
empujando hasta que el ltro se selle contra
la cubierta.
Gire la perilla del retenedor del ltro en
sentido horario para apretar, bloqueando el
ltro en su lugar.
2.
Para quitar el ltro para la limpieza, gire la
perilla del ltro en sentido contrario a las
agujas del reloj hasta sentir la señal táctil y
auditiva y asegúrese de que la echa del
botón se alinee con el icono "Desbloquear"
de la tapa del ltro y deslice el cartucho de
la jaula . then grasp the step of knob tightly
with ngers to pull the cartridge lter out off
the cage.
3.
1.
Bloquear
Para limpiar el ltro de cartucho, retire la
suciedad sacudiendo, cepillando o
enjuagandolo(desde el interior hacia fuera
del ltro) con agua, deje que se seque por
completo(approximadamente 24 horas)
antes de volver a insta arlo.
4.
Elimine toda la suciedad y la suciedad que se
encuentre en el tanque. El vacío requiere solo
un mínimo de conversión cuando se pasa de
una aspiración seca a húmeda. Retire todo el
ltro de uso seco de la aspiradora. Se puede
usar un ltro de cartucho limpio para aspirar
pequeñas cantidades de líquidos. Para obtener
los mejores resultados al aspirar grandes
cantidades de líquido, retire el ltro del
cartucho.
FUNCIONAMIENTO DE ASPIRACIÓN
DE LÍQUIDOS
Al aspirar líquidos que contengan desechos,
se recomienda comprar un ltro de espuma e
instalarlo sobre la caja del ltro. El ltro de
espuma se puede comprar visitando nuestro
sitio web en www.dewalt.com, comunicán-
dose con nuestro departamento de servicio al
cliente o comprando en distribuidor local
DEWALT. Cuando recoja grandes cantidades
de líquido, recomendamos retirar el ltro. Si el
ltro no se retira, se saturará y podría aparecer
niebla en el escape. Para entonces, usted
deberáó secar el manguito de cartucho o
cambiarlo el manguito de líquido alrededor de
la cubierta. Después de terminar de aspirar
líquidos, levante la manguera para drenar
cualquier exceso de líquido en el tanque antes
de apagarla. Manguito debe limpiarse
periódicamente como se describe en los
siguientes pasos:
Bolsa de polvo
desechable

15
Siempre desconecte el enchufe del
receptáculo de pared antes de quitar la
cubierta del tanque. Coloque la cubierta
del tanque. Coloque la cubierta del
tanque al revés.Quite el manguito
deslizándolo hacia arriba y fuera del
ajustador interno de la bolsa.
1.
Sacuda el polvo sobrante del manguito
con un rápido movimiento de arriba a
abajo.
2.
AVISO:SI SE ACCIDENTALMENTE SE TIRA, EL
VACÍO PODRÍA CERRAR LA SUCCIÓN. SI ESTO
OCURRE, COLOQUE VAC EN POSICIÓN ACTUAL
Y DESLIGUE EL INTERRUPTOR. ESTA VOLUNTAD
PERMITIR AL FLOTADOR VOLVER A SU POSICION
NORMAL, Y USTED PODRÁ CONTINUAR LA
OPERACIÓN.
ESPAÑOL
AVISO: LOS ACCESORIOS PARA LA
ASPIRACIÓN DE SÓLIDOS DEBEN
LAVARSE PERIÓDICAMENTE, ESPECIAL-
MENTE DESPUÉS DE RECOGER
LIQUIDOS HÚMEDOS, PEGAJOSOS O
DERRAMES. ESTO PUEDE IR ACOM-
PAÑADO DE UNA SOLUCIÓN TIBIA DE
AGUA Y JABÓN. DESPUÉS DE COMPLE-
TAR LA ASPIRACIÓN DE LÍQUIDOS,
LEVANTE LA MANGUERA SOBRE LA
ASPIRADORA PARA PERMITIR QUE
CUALQUIER LÍQUIDO EN LA MANGUERA
DRENE HACIA EL TANQUE ANTES DE
APAGARLA. EL INTERIOR DEL TANQUE
DEBE LIM PIARSE PERIÓDICAMENTE.
Esta aspiradora para seco/ mojado está
quipada con un mecanismo de otador
que se eleva automáticamente para cortar
el ujo de aire cuando el líquido en el
tanque alcanza un nivel predeterminado.
Cuando ocurra esto, apague la aspirado-
ra, desenchufe el cable de alimentación y
vacíe el tanque para polvo. Sabrá que el
otador ha cerrado el ujo de aire y que la
succión se detieneyel ruido del motor se
vuelve más agudo debido a la disminución
de la velocidad del motor. La capacidad
de líquido puede variar según la cantidad
que se aspire.
3.
IMPORTANTE: Para reducir el riesgo de
daños a la aspiradora, no haga funcionar el
motor con el otador en la posición elevada.
Flotador en la
posición elevada
ADVERTENCIA:
Para reducir el riesgo de lesiones
debidoaarranques accidentales, desenchufe el
cable de alimentación antes vaciar Itanque
para polvo.
Retire el ensamble del cabezal de alimentación
de la aspiradora para seco/ mojado jalando
hacia fuera los sujetadores de la tapa ubicados
a cada lado de la aspiradora. Retire el
ensamble del cabezal de alimentación.
1.
Vacíe el contenido del tanque en el contenedor
de residuos adecuado.
2.
VACIADO DEL TANQUE
ADVERTENCIA:
FUNCIONAMIENTO DE SOPLADO
Siempre use gafas de seguridad que
cumplan con ANSI Z87.1(o en Canadá
CSA Z94.3) cuando utilice como
soplador.
ADVERTENCIA:
Para evitar lesiones a los transeúntes,
manténgalos alejados de la suciedad
soplada.
Use una mascarilla antipolvo si el soplado
provoca polvo que pueda ser inhalado.
PRECAUCIÓN:

16
Ubique el puerto de soplado en el aspiradora.
1.
Inserte un extremo de la manguera de
1-7/8in.x7 ft.(4,8cm x 2,1 m) en el puerto
de soplado.
2.
Encienda la aspiradora.
3.
PRECAUCIÓN:
Para reducir el riesgo de pérdida auditiva,
use protectores para los oídos cuando
use la aspiradora/soplador por varias
horasoen un entorno bullicioso.
El aspiradora cuenta con una
característica de soplado. Tiene la capacidad
de soplar aserrínyotros residuos. Puede
usarse para soplar polvo y suciedad de
garajes o de patios y entradas de garaje. Siga
los siguientes pasos para usar el aspiradora
como soplador.
Para reducir el riesgo de lesiones debido a
arranques accidentales, desenchufe el cable de
alimentación antes de cambiarolimpiar el ltro.
Debe limpiar el ltroamenudo para mantener el
máximo rendimiento de la aspiradora.
ADVERTENCIA:
No retire la caja del ltro ni el otador. El otador
evita que el agua ingrese al propulsor y que
dañe el motor. La caja evita que los dedos
toquen el propulsor en movimiento.
ADVERTENCIA:
Para evitar daños en la rueda del ventilador y
en el motor, vuelva a instalar siempre el ltro de
Clean Connect™ antes de usar la aspiradora
para pastillas secas y pastillas mojadas.
IMPORTANTE:
CUIDADO Y MANTENIMIENTO
REEMPLAZO DEL FILTRO
ESPAÑOL
Después de limpiar, revise si el ltro tiene
desgarraduras u oricios pequeños. No
use la aspiradora si un ltro tiene oricios
o desgarraduras. Incluso un pequeño
oricio puede causar que salga mucho
polvo de aspiradora. Reemplácelo
inmediatamente.
IMPORTANTE:
Retire los desechos.
1.
Lave el tanque completamente con agua
tibia y jabón suave.
2.
Limpie con un paño seco.
3.
Para mantener el aspiradora para seco/
mojado con una apariencia perfecta,
limpie la supercie exterior con un paño
humedecido con agua tibia y jabón suave.
Para limpiar el tanque:
LIMPIEZA:
Antes de almacenar el aspiradora, el
tanque para polvo debe vaciarse y
limpiarse. El cable debe enrollarse y
colgarse en la unidad y los accesorios
deben guardarse en bolsa de malla para
que estén a la mano. La aspiradora se
debe almacenar en interiores.
ALMACENAJE
Antes de instalar el ltro en la aspirado-
ra, limpie el área de la tapa para que el
ltro se cierre contra la tapa y evite que
las partículas pequeñas salgan de la
bolsa del ltro. Si el ltro está limpio y no
está dañado, reemplácelo en la jaula del
ltro. Si no puede reutilizarse, coloque
un nuevo ltro sobre la jaula del ltro.
AVISO:
Limpie el ltro en un área abierta. La
limpieza se debe efectuar en exteriores y
no en áreas habitadas.
AVISO:

17
ADVERTENCIA:
Los problemas menores se pueden arreglar
generalmente sin llamar al Servicio al Cliente.
SOLUCIÓN DE PROBLEMAS
PROBLEMA SOLUCIÓN
El motor no funciona
Compruebe el cable de alimentación,
los enchufes y la toma de corriente.
Asegúrese de que el interruptor de
encendido/ apagado esté en la
posición ON posición(I)
Quitar los bloqueos en la boquilla
de succión, Tubo de aspiración,
manguera de succión o ltros.
Reemplace la bolsa de papel o de lana.
Limpie o reemplace los ltros.
Vacíe el recipiente, consulte Vaciar
el tanque en las instrucciones
de uso.
Compruebe la correcta instalación
de los ltros.
La capacidad de
succión disminuye
El vacío deja de
funcionar
Se ha disparado la sobrecarga
térmica:
1. Apague la aspiradora y
desconéctela Aspirador de la
fuente de energía.
2. Vacíe el recipiente, si es necesario.
3. Deje que la unidad se enfríe.
4. Enchufe el cable de alimentación
en un Salida y encienda el
interruptor de encendido /
apagado posición( I) Probar.
Si el vacío no
Reiniciar llamada 1-888-899-0146
Asegúrese de que los ltros no estén
dañados; Reemplazar si es necesario.
Asegúrese de que los sellos del ltro
estén en su lugar y estén seguros.
Compruebe la correcta instalación
de los ltros.
El polvo sale
mientras se aspira
ESPAÑOL

18
EXPLODED VIEW / PARTS LIST
Mango de tranporte
Interruptor de alimentación
Cubierta superior
Deflector térmico
Anillo de sellado del motor
ESPAÑOL
1
2
3
4
5
6
7
11
12
13
14
15
16
17
11
1
2
1
1
1
1
1
1
1
1
1
Motora
Gancho para cable eléctrico
Conjunto de jaula de filtro
Pestillo de la tapa
Cable de alimentación
8
9
10
1
1
1
Anillo de sellado del soporte
del motor
Esponja
Miembro
Conexión de purga
Tanque de polvo
Puerto de vacío
Rueda de goma resistente 4
18
19 2
1
Soporte para portabolas
Soporte para bolsa de accesorios
Artículo CantidadDescripción Artículo CantidadDescripción
Other manuals for DXV06P
1
Table of contents
Languages:
Other DeWalt Vacuum Cleaner manuals

DeWalt
DeWalt DCV581H User manual

DeWalt
DeWalt DCV580 User manual

DeWalt
DeWalt XR Li-ion DWH161 User manual

DeWalt
DeWalt DWV010 User manual

DeWalt
DeWalt DCV582 User manual

DeWalt
DeWalt DC500 User manual

DeWalt
DeWalt DCV580H User manual

DeWalt
DeWalt H-8902 Operating instructions

DeWalt
DeWalt DCV580 User manual

DeWalt
DeWalt D25301D User manual

DeWalt
DeWalt DXV05P User manual

DeWalt
DeWalt DWV901 User manual

DeWalt
DeWalt DWH205DH User manual

DeWalt
DeWalt Flexvolt DCV585 User manual

DeWalt
DeWalt DXV06G User manual

DeWalt
DeWalt DCV582 User manual

DeWalt
DeWalt DWH205DH User manual

DeWalt
DeWalt DCV517 User manual

DeWalt
DeWalt DXV06P User manual

DeWalt
DeWalt DWV010-BR User manual