INSTRUCCIONES DE COLOCACIÓN GEBRAUCHSANWEISUNG
INSTRUCTIONS D'UTILISATION
Antes de colocar el soporte, le rogamos que lea completa y detenidamente estas instrucciones.
La colocación correcta del soporte es esencial para su buen funcionamiento.
INDICACIONES: Ayuda a reducir y minimizar aún más una lesión ya existente en un hombro.
EMPLEO Y CUIDADO
Bitte lesen Sie diese Anweisungen vollständig und gründlich durch, bevor Sie die Stütze anlegen.
Richtiges Anlegen ist entscheidend für die einwandfreie Funktion der Stütze.
INDIKATIONEN: Reduzierung und Minimierung weiterer Verletzungen bei bereits vorhandener Schulterverletzung.
GEBRAUCHS- UND PFLEGEHINWEISE
Avant d’appliquer l’orthèse, veuillez lire attentivement et intégralement les instructions ci-après.
Une mise en place correcte est essentielle au fonctionnement adéquat de l’orthèse.
INDICATIONS: Aide à la réduction et à la prévention des blessures additionnelles sur une épaule déjà blessée.
UTILISATION ET ENTRETIEN
• Puede lavarse en lavadora con agua fría. SECADO AL AIRE. • In der Waschmaschine waschen, kaltes Wasser verwenden. LUFTTROCKNEN.
• Laver à la machine et à l’eau froide. LAISSER SÉCHER À L’AIR LIBRE.
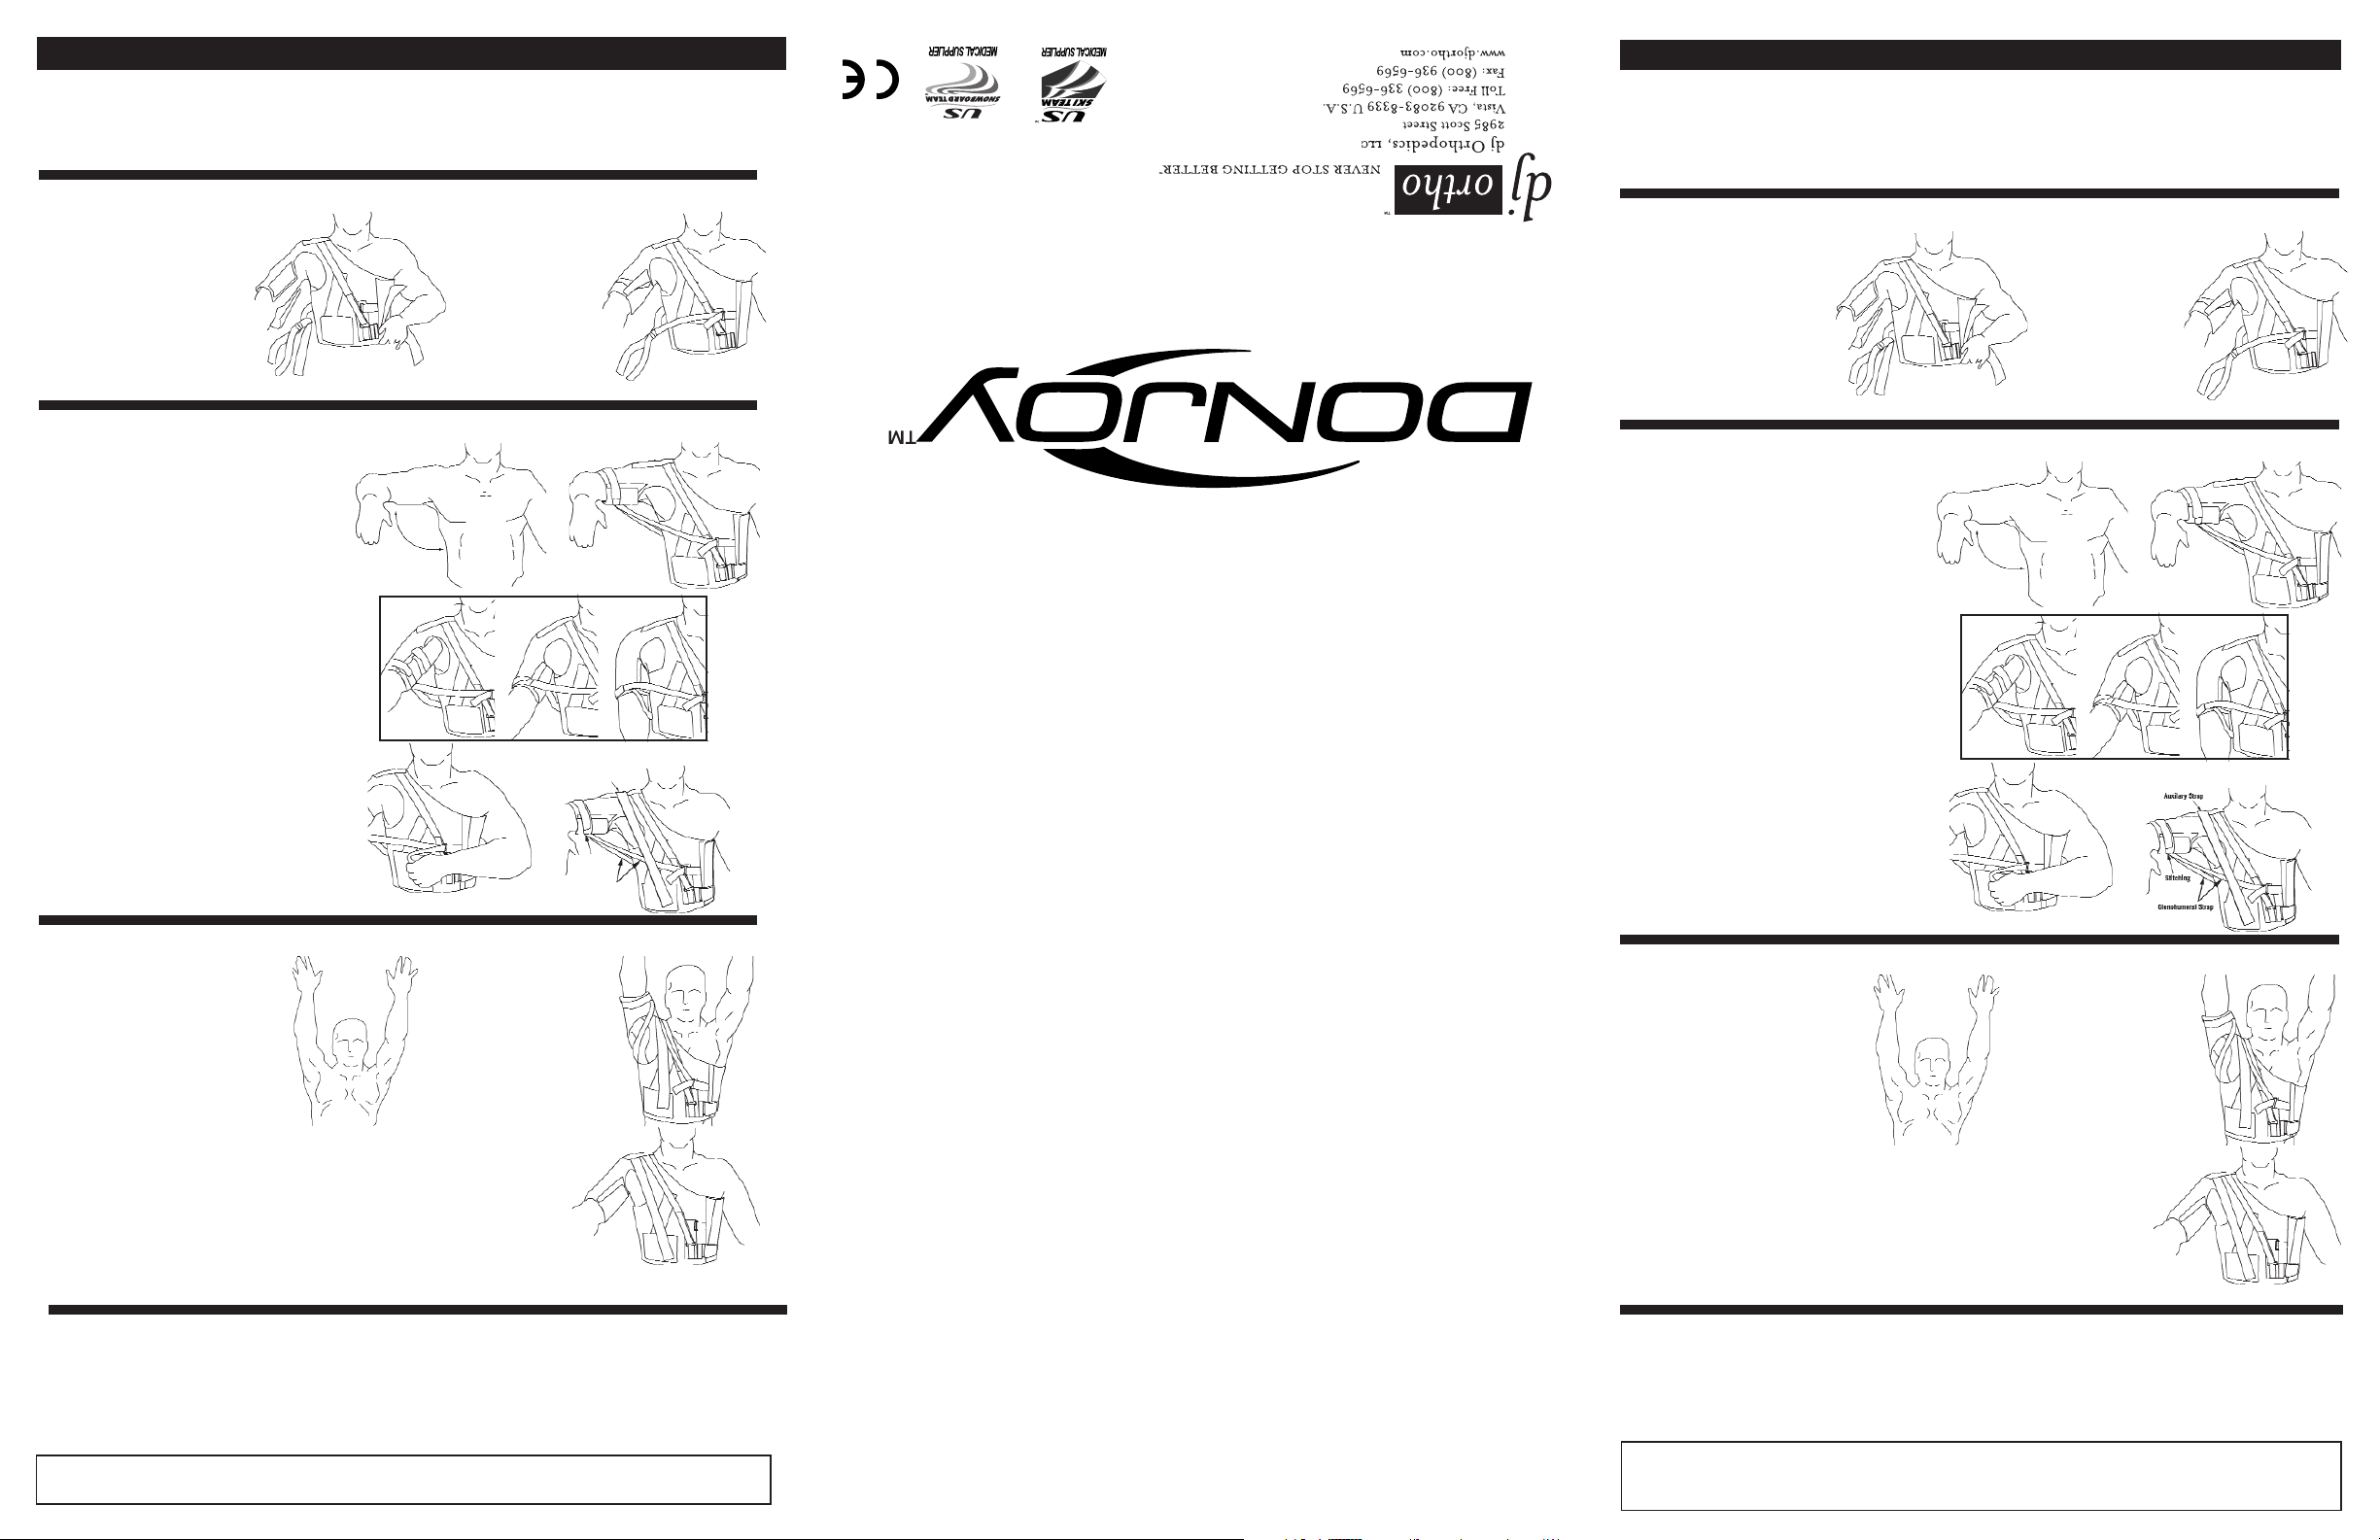
Aplique la hombrera sobre el
hombro lesionado. Sostenga un
extremo de la hombrera en la
parte inferior y tire del cierre
tipo Velcro®, asegurándose de
que al cerrar la hombrera la
parte inferior quede más
apretada que la parte superior.
(Figura 1) La hombrera debe
quedar bien ajustada, pero no
debe restringir la respiración.
A
Figura 1 Figura 2
B
B. Fije el cierre tipo Velcro® a
través del anillo en “D” para
bloquear el cierre lateral.
Sujete los cierres tipo Velcro®
en el bíceps tratando de
ajustarlos tanto como sea
posible; de este modo reducirá
al mínimo cualquier rotación
dentro de la carcasa del bíceps.
(Figura 2)
APLICACIÓN DE LA HOMBRERA
CONTROL DE ABDUCCIÓN
Para lograr un sencillo control de abducción
como se observa en la figura 3, después de
aplicar la hombrera, sujete las correas
glenohumerales a la carcasa del bíceps, de modo
que la banda de cierre (vea la figura 6) retenga
la correa delantera y la correa posterior en la
posición indicada en la figura 4a. Lograr esta
posición es muy importante.
C
Figura 3
IMPORTANTE
La posición correcta de la banda de cierre tiene una
importancia fundamental para aumentar al máximo
el grado admisible de flexión hacia delante mientras
que, al mismo tiempo, se reduce al mínimo la
rotación externa. Según se observa en la figura 4, a
medida que usted mueve la posición de A a C y va
acortando la correa delantera se va reduciendo al
mínimo la rotación externa.
Figura 4
ABC
Simplemente apriete o afloje las correas a través
de los anillos en “D” y el cierre tipo Velcro® para
lograr la amplitud deseada de movimientos y el
control de abducción. (Figura 5)
D
Figura 5
AJUSTES AVANZADOS
La hombrera es muy eficaz
para aumentar al máximo la
abducción en la flexión hacia
delante. (Figura 7) Es ideal
para las personas que tienen
que alzar los brazos por
encima de la cabeza, pero
necesitan prevenir la
rotación externa y la
extensión hacia atrás en la
abducción.
E
Figura 7 Figura 8
F
Afloje la correa posterior. Para
ello, de ser necesario, saque
completamente la correa
posterior del anillo en “D”.
Coloque la banda de cierre
frente al bíceps como se
muestra en la figura 4. En ese
momento es importante
apretar la correa delantera
para controlar la extensión
hacia atrás. (Figura 8)
Separaciones de la articulación acromioclavicular
La hombrera también es eficaz para apoyar las separaciones de la articulación
acromioclavicular. Si la articulación todavía está sensible, se puede colocar un aro o
almohadilla protectora debajo de la hombrera. Apriete la correa A/C ajustando la
correa a través de los anillos en “D” de la parte delantera y posterior. Las correas aux-
iliares largas o medianas también pueden pasarse a través de los bucles sobre la correa
A/C y fijarse al cierre tipo Velcro® en la parte delantera y posterior de la hombrera.
(Figura 9)
G
Figura 9
Figura 6
Legen Sie die Stütze über die
verletzte Schulter. Greifen Sie
nach dem unteren Ende der
Stütze, und ziehen Sie die
Fixationsstreifen nach vorne.
Stellen Sie sicher, dass die
Stütze unten straffer anliegt als
oben. (Abbildung 1) Die
Stütze sollte eng anliegen, aber
nicht die Atmung
beeinträchtigen.
A
Abbildung
1
Abbildung
2
B
Führen Sie die
Fixationsstreifen durch die
Öse, um die Stütze seitlich zu
fixieren. Befestigen Sie die
Fixationsstreifen über dem
Bizeps, und versuchen Sie, die
Stütze so straff wie möglich
anzulegen. Auf diese Weise
wird eine Rotation innerhalb
der Bizepsmanschette
vermieden. (Abbildung 2)
ANLEGEN DER STÜTZE
ABDUKTIONSEINSCHRÄNKUNG
Für eine einfache Abduktionseinschränkung
(siehe Abbildung 3) befestigen Sie die
glenohumeralen Bänder nach Anlegen der
Stütze an der Bizepsmanschette. Achten Sie
dabei darauf, dass die Naht, die das vordere
und hintere Band verbindet (siehe
Abbildung 6), so positioniert wird, wie in
Abbildung 4a dargestellt. Diese
Positionierung ist äußerst wichtig.
C
Abbildung
3
WICHTIG
Die Positionierung der Verbindungsnaht ist
entscheidend, um den Spielraum für die
Vorwärtsflexion zu bestimmen und gleichzeitig die
externe Rotation zu minimieren. Aus Abbildung 4
geht hervor, dass das vordere Band durch die
Positionierung der Verbindungsnaht von A nach C
immer stärker verkürzt und dadurch gleichzeitig die
externe Rotation minimiert wird.
Abbildung
4
ABC
Sie können die Bewegungs- und
Abduktionseinschränkung variieren, indem Sie die
durch die Öse laufenden Bänder festziehen oder
lockern und anschließend die Fixationsstreifen
erneut befestigen. (Abbildung 5)
D
WEITERE ANPASSUNGSMÖGLICHKEITEN
Die Schulterstütze ist
nützlich für die Ermöglichung
einer maximalen Abduktion in
Vorwärtsrichtung. (Abbildung
7) Dies ist sehr hilfreich für
Patienten, die nach oben über
den Kopf greifen, gleichzeitig
aber darauf achten müssen,
dass eine externe Rotation und
eine rückwärtige Extension
vermieden werden.
E
Abbildung
7
Abbildung
8
F
Lösen Sie das hintere Band,
und nehmen Sie es
gegebenenfalls vollständig aus
der Öse heraus. Positionieren
Sie die Verbindungsnaht
vorne auf dem Bizeps wie in
Abbildung 4 dargestellt. Es ist
nun wichtig, das vordere Band
so anzuziehen, dass die
rückwärtige Extension
eingeschränkt wird. Abbildung
8)
Verletzungen des Akromioklavikulargelenks
Die Schulterstütze ist ebenfalls sehr nützlich bei Verletzungen des
Akromioklavikulargelenks. Ist das Gelenk noch empfindlich, kann eine Abstützung
oder ein Schutzpolster unter die Stütze gelegt werden. Ziehen Sie das
Akromioklavikular-Band fest, indem Sie es durch die vordere und hintere Öse
ziehen. Die langen oder mittellangen Zusatzbänder können auch durch die Ösen
über dem Akromioklavikulargelenk geführt und mit den Fixationsstreifen vorne und
hinten an der Stütze befestigt werden. (Abbildung 9)
G
Abbildung
9
Abbildung
6
Appliquer l'orthèse sur l'épaule
blessée. Saisir une extrémité de
l'orthèse en bas et tirer
au-dessus de la fermeture par
contact, en s'assurant de
refermer le bas plus fermement
que le haut. (Figure 1) Le
serrage doit être suffisant, sans
pour cela gêner la respiration.
A
Figure 1 Figure 2
B
Passer la sangle de la
fermeture par contact à travers
la boucle en "D" pour bloquer
la fermeture latérale. Attacher
les fermetures par contact au
niveau du biceps aussi
fermement que possible; ceci
limitera la rotation du
manchon du biceps. (Figure 2)
MISE EN PLACE DE L'ORTHÈSE
CONTRÔLE D'ABDUCTION
Pour obtenir un contrôle d'abduction simple
tel qu'illustré sur la figure 3, après avoir
appliqué l'orthèse, attacher les sangles
gléno-humérales au manchon de biceps à
l'aide du maillage (voir la figure 6) attachant
les sangles avant et arrière positionnées
comme sur la figure 4a. Ce positionnement
est essentiel.
C
Figure 3
IMPORTANT
Le positionnement du maillage est critique afin de
maximiser la limite de mouvement en flexion
avant tout en minimisant la rotation externe.
Dans la figure 4, à mesure que vous déplacez le
positionnement de A vers C et réduisez la
longueur de la sangle avant, vous minimisez la
rotation externe.
Figure 4
ABC
Resserrer ou desserrer simplement les sangles au
moyen de la boucle "D" et de la fermeture par
contact pour obtenir la limite de mouvement et le
contrôle d'abduction souhaités. (Figure 5)
D
Figure 5
AJUSTEMENT PLUS PRÉCIS
L'orthèse d'épaule est très
efficace quand il s'agit de
maximiser l'abduction lors
d'une flexion avant. (Figure
7) Cela est idéal pour les
personnes qui doivent
soulever les bras au-dessus de
la tête mais qui ont besoin
d'empêcher toute rotation
externe et extension arrière
lors de l'abduction.
E
Figure 7 Figure 8
F
F.si nécessaire, la sortir
complètement de la boucle en
"D". Positionner le maillage
devant le biceps comme
illustré à la figure 4. Il est
essentiel de serrer maintenant
la sangle avant afin de
contrôler l'extension arrière.
(Figure 8)
Séparations acromio-claviculaires
L'orthèse d'épaule est également très efficace dans le support des séparations
acromio-claviculaires. Si l'articulation est encore tendre, un guide ou une protection
rembourrée peut se placer sous l'orthèse. Resserrer la sangle acromio-claviculaire en
l'ajustant au niveau des boucles "D" avant et arrière. Les sangles auxiliaires (longue
ou moyenne) peuvent aussi être passées à travers les boucles de la sangle
acromio-claviculaire et attachées aux fermetures à contact avant et arrière de
l'orthèse. (Figure 9)
G
Figure 9
Figure 6
AVISO: SI BIEN SE HAN HECHO TODOS LOS ESFUERZOS POSIBLES CON LAS TÉCNICAS MÁS MODERNAS PARA OBTENER LA COMPATIBILIDAD MÁXIMA DE
LA FUNCIÓN, RESISTENCIA, DURABILIDAD Y COMODIDAD, NO EXISTE GARANTÍA ALGUNA DE QUE SE EVITARÁN LESIONES DURANTE EL EMPLEO DE ESTE
PRODUCTO.
ADVERTENCIA: SI EXPERIMENTA DOLORES, HINCHAZÓN, CAMBIOS DE SENSIBILIDAD O CUALQUIER REACCIÓN FUERA DE LO COMÚN MIENTRAS UTILIZA ESTE
PRODUCTO, CONSULTE DE INMEDIATO CON UN PROFESIONAL MÉDICO.
HINWEIS: OBWOHL ALLE ANSTRENGUNGEN UNTERNOMMEN WURDEN, UNTER EINSATZ MODERNSTER VERFAHREN MAXIMALE KOMPATIBILITÄT VON
FUNKTION, FESTIGKEIT, HALTBARKEIT UND OPTIMALEM SITZ ZUERZIELEN, KANN KEINE GARANTIE GEGEBEN WERDEN, DAß DURCH DIE ANWENDUNG
DIESES PRODUKTS VERLETZUNGEN VERMIEDEN WERDEN KÖNNEN.
WARNHINWEIS: SOLLTEN BEIM GEBRAUCH SCHMERZEN, SCHWELLUNGEN, EMPFINDUNGSÄNDERUNGEN ODER UNGEWÖHNLICHE REAKTIONEN AUFTRETEN,
IST UNVERZÜGLICH DER BEHANDELNDE ARZT AUFZUSUCHEN.
AVIS: BIEN QUE TOUTES LES TECHNIQUES DE POINTE AIENT ÉTÉ UTILISÉES AFIN D'OBTENIR LE NIVEAU MAXIMAL DE COMPATIBILITÉ DE FONCTION, DE
RÉSISTANCE, DE DURABILITÉ ET DE CONFORT, IL N'EST PAS GARANTI QUE L'UTILISATION DE CE PRODUIT PRÉVIENDRA TOUT PRÉJUDICE CORPOREL.
AVERTISSEMENT: EN CAS DE DOULEUR, D'ENFLURE, D'ALTÉRATION DE LA SENSATION OU DE TOUTE AUTRE RÉACTION ANORMALE LORS DE L'UTILISATION DE
CE PRODUIT, SE METTRE EN RAPPORT IMMÉDIATEMENT AVEC LE PROFESSIONNEL DE LA SANTÉ CONCERNÉ.
Correa auxiliar
Correa
glenohumeral
Banda de
cierre
Sangle auxiliaire
Sangle
glénohumérale
Maillage
Zusatzband
Glenohumerales
Band
Verbin-
dungsnaht
Abbildung
5