manuals.online logo
Brands
  1. Home
  2. •
  3. Brands
  4. •
  5. dj ortho
  6. •
  7. Personal Care Product
  8. •
  9. dj ortho Surround Ankle Stirrup w/Floam User guide

dj ortho Surround Ankle Stirrup w/Floam User guide

S
URROUND
™ A
NKLE
S
TIRRUP W
/F
LOAM
™
S
UPPORTO A STAFFA PER CAVIGLIA
SURROUND™
CON MATERIALE DI RIVESTIMENTO
FLOAM™
A
BRAZADERA PARA TOBILLO
SURROUND™
CON ACOLCHADO DE
FLOAM™
É
TRIER DE CONTENTION POUR CHEVILLE
SURROUND™
AVEC
M
ATELASSURE
FLOAM™
SURROUND™ S
PRUNGGELENKORTHESE MIT
FLOAM™ E
INLAGE
B
A
APPLICATION INSTRUCTIONS
C
Before applying the brace, please read these instructions completely and carefully.
Correct application is vital to the proper functioning of the brace.
INDICATIONS: Acute or chronic injuries of the ankle.
ADJUSTMENT HEEL PAD:
Center Volara Foam heel pad evenly under heel.
(Fig. 1)
If necessary, adjust the heel pad with the vertical
side straps while the brace is on. Using both hands,
pinch bottom of shells, and pull straps upward until
desired fit is obtained. (Fig. 4) Straps may be
trimmed if necessary.
Positioning shells on either side of ankle, align
with midline of leg and secure lower strap first for
alignment. (Fig. 2)
D
Wrap the upper strap around calf and secure.
Adjust both straps for patient comfort. Be certain
the side shells are centered along the ankle and leg.
(Fig. 3) Straps may be trimmed if necessary.
WARNING: THIS PRODUCT IS TO BE USED UNDER THE SUPERVISION OF A MEDICAL PROFESSIONAL. THIS DEVICE IS NOT INTEND-
ED FOR UNSUPERVISED PUBLIC USE. IF YOU EXPERIENCE ANY PAIN, SWELLING, SENSATION CHANGES, OR ANY UNUSUAL REACTIONS
WHILE USING THIS PRODUCT, CONSULT YOUR MEDICAL PROFESSIONAL IMMEDIATELY.
AVVERTENZA: QUESTO PRODOTTO VA USATO ESCLUSIVAMENTE SOTTO IL CONTROLLO MEDICO; NON È PREVISTO PER L’USO AUTONOMO. NEL CASO IN CUI SI
AVVERTANO SINTOMI QUALI DOLORE, GONFIORE, MUTAMENTI A LIVELLO DELLE PERCEZIONI SENSORIALI O QUALSIASI ALTRA REAZIONE ANOMALA DURANTE
L'UTILIZZAZIONE DEL PRESENTE PRODOTTO, RIVOLGERSI IMMEDIATAMENTE AL PROPRIO MEDICO.
AVVISO: SEBBENE LE ATTUALI TECNOLOGIE MIRINO AD ASSICURARE LA MASSIMA COMPATIBILITÀ FUNZIONALE, RESISTENZA, DUREVOLEZZA E COMODITÀ, È NEC-
ESSARIO TENERE PRESENTE CHE QUESTO PRODOTTO È SOLO UN SINGOLO ELEMENTO ALL'INTERNO DI UN PIÙ AMPIO QUADRO TERAPICO GESTITO DA PERSON-
ALE MEDICO QUALIFICATO. NON ESISTE ALCUNA GARANZIA CHE L'USO DI TALE PRODOTTO SIA IN GRADO DI PREVENIRE EVENTUALI LESIONI.
SOLO DIETRO PRESCRIZIONE MEDICA.
13-1692-0-00000 REV 120500
NOTICE: WHILE EVERY EFFORT HAS BEEN MADE IN STATE-OF-THE-ART TECHNIQUES TO OBTAIN THE MAXIMUM COMPATIBILITY OF FUNCTION, STRENGTH,
DURABILITY AND COMFORT, THIS DEVICE IS ONLY ONE ELEMENT IN THE OVERALL TREATMENT PROGRAM ADMINISTERED BY A MEDICAL PROFESSIONAL.
THERE IS NO GUARANTEE THAT INJURY WILL BE PREVENTED THROUGH THE USE OF THIS PRODUCT.
USE AND CARE
• DO NOT HEAT therapeutic bag. DO NOT MICROWAVE therapeutic bag.
• Liner may be hand washed in cold water with mild soap. Air dry. Outer shell may be wiped down with a damp cloth.
RX ONLY.
E
Apply pressure to the sides of the Therapeutic Gel
Bag to allow even flow of pressure within the plastic
shell.
F
REMOVAL OF BRACE:
Remove upper and lower hook and loop straps. Slide
heel portion to rear of ankle and release side shells.
(Fig. 5)
Figure 5
ISTRUZIONI PER L'APPLICAZIONE
Prima di applicare il tutore, leggere interamente e attentamente le presenti istruzioni.
La corretta applicazione è di fondamentale importanza per l'adeguato funzionamento del tutore.
INDICAZIONI: • Lesioni acute della caviglia.
B
A
C
REGOLAZIONE DELL’IMBOTTITURA
PER IL CALCAGNO: centrare
l’imbottitura in gomma Volara
uniformemente sotto al calcagno (Fig. 1).
Avvolgere lo strap superiore attorno al polpaccio e
fissarlo. Regolare entrambi gli strap per garantire un
comfort ottimale. Assicurarsi che le conchiglie
laterali siano centrate lungo caviglia e gamba
(fig. 3). Se necessario, è possibile tagliare gli strap.
Posizionare le conchiglie su entrambi i lati della
caviglia, allineare con l'asse centrale della gamba e
fissare per primo lo strap inferiore per garantire
l'allineamento (fig. 2).
D
Spingere contro i lati della borsa terapeutica al gel
per consentire un flusso omogeneo della pressione
all'interno della conchiglia di plastica.
USO E MANUTENZIONE
•
NON RISCALDARE il sacco curativo. NON METTERE il sacco curativo in un FORNO A MICROONDE.
• Lavare l'imbottitura a mano in acqua fredda con sapone neutro. Asciugare all'aria. Pulire la conchiglia esterna con un panno umido.
E
Se occorre, regolare l'imbottitura del tallone rispetto agli
strap verticali sui lati mentre il tutore è indossato. Con
entrambe le mani, afferrare le conchiglie per la parte
inferiore e tirare gli strap verso l'alto fino ad ottenere
l'aderenza desiderata (fig. 4). Se necessario, è possibile
tagliare gli strap.
F
RIMOZIONE DEL TUTORE: rimuovere gli
strap a gancio e occhiello superiore e inferiore. Far
scivolare la parte del calcagno sul retro della caviglia
e rilasciare le conchiglie laterali. (Fig. 5)
© dj Orthopedics, LLC
Surround, dj Ortho and DonJoy are trademarks of dj Orthopedics, LLC
Surround, dj Ortho y DonJoy es una marca registrada de dj Orthopedics, LLC
Surround, dj Ortho et DonJoy est une marque déposée de dj Orthopedics, LLC
Surround, dj Ortho und DonJoy ist ein eingetragenes waren eichen von dj Orthopedics, LLC
Surround ,dj Ortho e DonJoy sono marchi depositati dalla dj Orthopedics, LLC
FLOAM is a trademark of Mattel, Inc.
FLOAM es una marca registrada de Mattel, Inc.
FLOAM est une marque déposée de Mattel, Inc.
FLOAM ist ein eingetragenes waren eichen von Mattel, Inc.
FLOAM sono marchi depositati dalla Mattel, Inc.
For maximum support, wear an absorbent sock and a laced athletic shoe when wearing the brace.
Figure 4
Figure 3
Figure 2
Figure 1
Figura 5
Per il massimo sostegno, quando si porta il tutore va indossato un calzino ad
azione assorbente (tubolare) e una scarpa sportiva con lacci.
Figura 4
Figura 3
Figura 2
Figura 1
WARNUNG: DIESES PRODUKT DARF NUR UNTER MEDIZINISCHER ANLEITUNG VERWENDET WERDEN UND IST NICHT ZUM UNBEAUF-
SICHTIGTEN ÖFFENTLICHEN GEBRAUCH BESTIMMT. FALLS SIE BEIM TRAGEN DIESES PRODUKTS SCHMERZEN VERSPÜREN, SCHWELLUN-
GEN, EMPFINDUNGSÄNDERUNGEN ODER UNGEWÖHNLICHE REAKTIONEN FESTSTELLEN, BITTE SOFORT IHREN ARZT ZU RATE ZIEHEN.
HINWEIS: OBWOHL DURCH ANWENDUNG NEUESTER TECHNIK ALLE ANSTRENGUNGEN UNTERNOMMEN WURDEN, FUNKTION, STABILITÄT, HALTBARKEIT
UND TRAGEKOMFORT OPTIMAL AUFEINANDER ABZUSTIMMEN, IST DIESE VORRICHTUNG NUR EIN ELEMENT IM GESAMTEN, VON IHREM ARZT
AUFGESTELLTEN BEHANDLUNGSPLAN. ES KANN NICHT GARANTIERT WERDEN, DASS DAS TRAGEN DIESES PRODUKTS VERLETZUNGEN VERHINDERT.
NUR RX
ADVERTENCIA: ESTE PRODUCTO DEBE UTILIZARSE BAJO LA VIGILANCIA DE UN PROFESIONAL MÉDICO. ESTE APARATO NO ESTÁ
DISEÑADO PARA USO PÚBLICO NO SUPERVISADO. SI EXPERIMENTA DOLORES, HINCHAZÓN, CAMBIOS DE SENSACIÓN O CUALQUIER
REACCIÓN FUERA DE LO COMÚN MIENTRAS UTILIZA ESTE PRODUCTO, CONSULTE DE INMEDIATO CON SU PROFESIONAL MÉDICO.
AVISO: SI BIEN SE HAN HECHO TODOS LOS ESFUERZOS POSIBLES CON LAS TÉCNICAS MÁS MODERNAS PARA OBTENER LA COMPATIBILIDAD MÁXIMA DE LA
FUNCIÓN, RESISTENCIA, DURABILIDAD Y COMODIDAD, ESTE APARATO ES ÚNICAMENTE UN ELEMENTO DEL PROGRAMA DE TRATAMIENTO GLOBAL ADMINISTRADO
POR UN PROFESIONAL MÉDICO. NO EXISTE GARANTÍA ALGUNA DE QUE SE EVITARÁN LESIONES DURANTE EL EMPLEO DE ESTE PRODUCTO.
SÓLO CON PRESCRIPCIÓN MÉDICA
AVIS : BIEN QUE TOUTES LES PRECAUTIONS AIENT ETE PRISES POUR FABRIQUER DES ORTHESES DE QUALITE, EFFICACES ET CONFORTA-
BLES, CES PRODUITS NE CONSTITUENT QU’UN ELEMENT DANS L’ENSEMBLE DU TRAITEMENT PRESCRIT PAR LE MEDECIN. L’UTILISATION DE
CETTE ORTHESE NE GARANTIT PAS UNE PREVENTION TOTALE DES LESIONS.
SUR ORDONNANCE UNIQUEMENT.
AVERTISSEMENT : CE PRODUIT DOIT ETRE UTILISE SOUS SURVEILLANCE MEDICALE. CE DISPOSITIF N'EST PAS DESTINE A UN USAGE
GRAND PUBLIC SANS SURVEILLANCE MEDICALE. EN CAS DE DOULEUR, D’OEDEME, DE MODIFICATIONS DE SENSATIONS OU DE REAC-
TIONS INHABITUELLES PENDANT L'UTILISATION DE CE PRODUIT, CONSULTEZ IMMEDIATEMENT VOTRE MEDECIN.
INSTRUCCIONES DE COLOCACIÓN
Antes de utilizar este producto, lea estas instrucciones completa y detenidamente.
Una correcta colocación es fundamental para el funcionamiento correcto de este producto.
INDICACIONES: •Lesiones agudas del tobillo.
GEBRAUCHSANWEISUNG
Vor dem Einsatz der Schiene die Gebrauchsanweisung bitte vollständig und sorgfältig durchlesen.
Ein korrektes Anlegen ist Voraussetzung für eine einwandfreie Funktion der Schiene.
INDIKATIONEN: •Akute Knöchelverletzungen.
INSTRUCTIONS D'UTILISATION
Avant d'utiliser le produit, lire les instructions suivantes complètement et attentivement.
Une utilisation correcte est indispensable au bon fonctionnement du produit.
INDICATIONS : •Blessures graves de la cheville.
B
A
C
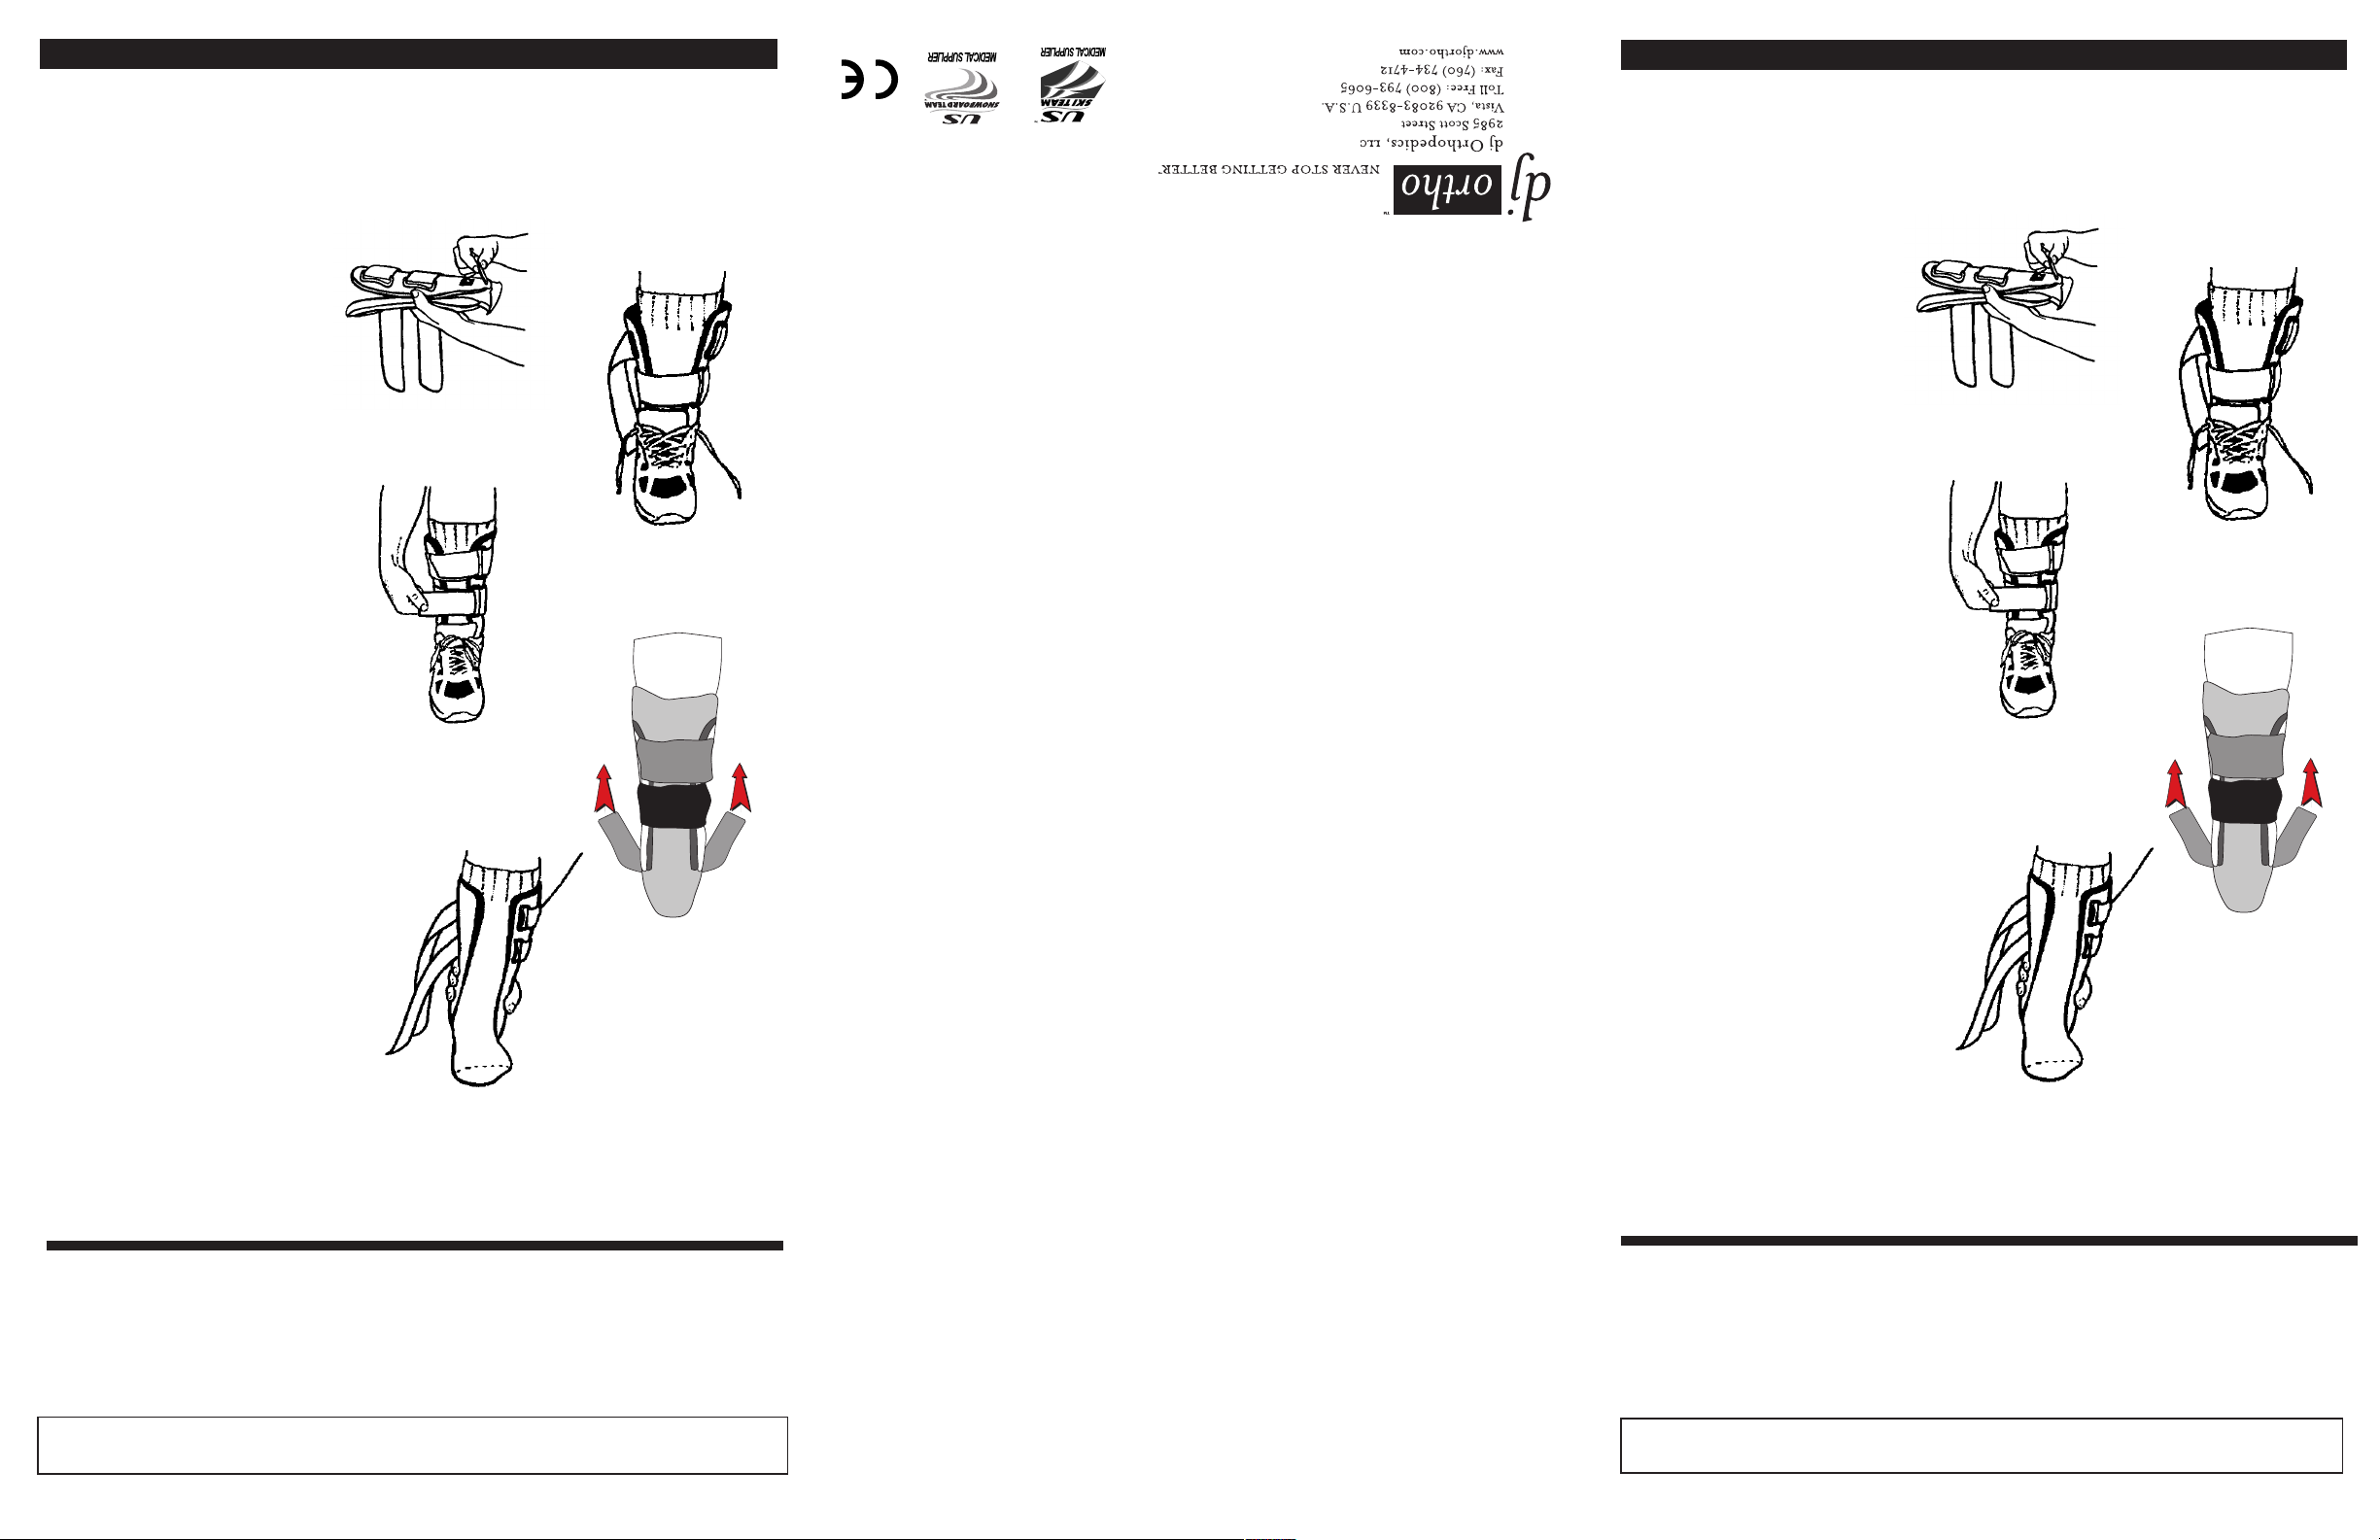
ALMOHADILLA DE AJUSTE PARA EL
TALÓN: Centre la almohadilla de
gomaespuma Volara para el talón
uniformemente bajo el mismo. (Fig. 1)
Ajuste la correa superior alrededor de la pantorrilla
y fíjela. Ajuste las dos correas de manera que el
paciente esté cómodo. Compruebe que las carcasas
laterales estén centradas a lo largo del tobillo y la
pierna (Fig. 3). Si es necesario, se pueden cortar las
correas.
Coloque las carcasas a ambos lados del tobillo, alineadas
con la línea media de la pierna, y ajuste primero la correa
inferior para mantener la alineación. (Fig. 2)
D
Aplique presión a los lados de la bolsa de gel terapéutico
de forma que exista un flujo de presión uniforme en la
carcasa plástica
USO Y CUIDADO
•
NO CALIENTE la bolsa terapéutica. NO CALIENTE EN EL MICROONDAS la bolsa terapéutica
• El forro puede lavarse a mano en agua fría y con jabón suave. Secado al aire. La carcasa exterior pueden limpiarse frotando con un paño
húmedo
E
Si es necesario, ajuste la almohadilla del talón con las
correas laterales verticales mientras está colocada la
tobillera. Con las dos manos, sujete la parte inferior de
las carcasas y tire de las correas hacia arriba hasta que
se logre el ajuste deseado (Fig. 4). Si es necesario, se
pueden cortar las correas.
F
RETIRADA DE LA TOBILLERA: Retire las
correas de cierre de contacto inferior y
superior. Deslice la parte del talón hacia atrás del
tobillo y suelte las carcasas laterales.
(Fig. 6)
B
A
C
A. PLACEMENT DE LA TALONNETTE:
Centrer la talonnette en mousse Volara sous le
talon (figure 1).
Positionner les coquilles sur chaque côté de la
cheville, et les aligner avec la ligne médiane de la
jambe, puis fermer tout d’abord la sangle du bas
pour assurer l’alignement. (Fig. 2)
D
Appuyer sur les côtés de la poche de gel thérapeutique
pour que la pression à l’intérieur de la coquille en
plastique soit régulière.
UTILISATION ET ENTRETIEN
•
NE PAS CHAUFFER la poche thérapeutique. NE PAS METTRE la poche thérapeutique DANS LE FOUR À
MICRO-ONDES.
• Laver l’enveloppe à la main à l'eau froide, avec un détergent doux. Sécher à l'air. Essuyer la coquille extérieure avec un chiffon humide.
E
Au besoin, ajuster le rembourrage du talon à l’aide
des sangles latérales verticales une fois la chevillère
mise en place. Pincer le bas des coquilles avec les
deux mains, puis tirer les sangles vers le haut jusqu’à
ce que la chevillère soit bien en place. (Fig. 4) Il
est possible de couper les sangles, si nécessaire.
F
RETRAIT DE LA CHEVILLÈRE: Défaire
les sangles auto-agrippantes supérieures et
inférieures. Faire glisser la talonnette derrière la
cheville et enlever les coquilles latérales (figure 6).
B
A
C
EINSTELLBARES VERSENPOLSTER:
Volara-Versenschaumpolster unter der
Versenmitte anbringen. (Abb. 1)
Das obere Band um die Wade legen und fixieren.
Beide Bänder so befestigen, daß sie bequem sitzen.
Sicherstellen, daß die Seitenschalen zum Gelenk
und Bein zentriert sind. (Abb. 3). Die Bänder
können bei Bedarf zugeschnitten werden.
Die Schalen auf beiden Seiten des Sprunggelenks
positionieren, an der Beinmittellinie ausrichten
und unteres Band für einen optimalen Sitz zuerst
fixieren (Abb. 2).
D
Auf beide Seiten des therapeutischen Gelbeutels
drücken, damit der Druck innerhalb der
Plastikschale gleichmäßig ist.
PFLEGEHINWEISE
•
Therapeutischen Beutel NICHT ERHITZEN. Therapeutischen Beutel NICHT IN DER MIKROWELLE aufwärmen.
• Die Einlage in milder, kalter Seifenlauge von Hand waschen. Lufttrocknen. Die Hülse mit einem feuchten Tuch abwischen.
E
Gegebenenfalls den Sitz des Fersenpolsters mit Hilfe
der vertikalen Seitenbänder korrigieren, während die
Stütze angelegt ist. Die Schalen mit beiden Händen
unten zusammendrücken und Bänder hochziehen,
bis die Stütze bequem anliegt (Abb. 4). Die Bänder
können bei Bedarf zugeschnitten werden.
F
ENTFERNUNG DER SCHIENE: Obere und
untere Schnürbänder lösen. Versenteil zur
Rückseite des Knöchels schieben und Seitenschalen
lockern. (Abb. 6)
Placer puis attacher la sangle supérieure autour du
mollet. Ajuster les deux sangles pour améliorer le
confort du patient. S’assurer que les coquilles
latérales sont centrées le long de la cheville et de
la jambe. (Fig. 3) Il est possible de couper les
sangles, si nécessaire.
Figura 5
Para una sujeción máxima, utilizar un calcetín absorbente y una zapatilla de
deportes con cordones cuando se utilice la tobillera.
Figura 4
Figura 3
Figura 2
Figura 1
Figure 5
Pour un support maximum, porter une chaussette absorbante et une chaussure de
sport à lacet en même temps que l’orthèse.
Figure 4
Figure 3
Figure 2
Figure 1
Abbildung 5
Optimalerweise sollten Sie unter der Gelenkstütze
saugfähige Socken und Sportschuhe tragen.
Abbildung 4
Abbildung 3
Abbildung 2
Abbildung 1

Other dj ortho Personal Care Product manuals

dj ortho Surround Ankle w/Gel Brace User guide

dj ortho

dj ortho Surround Ankle w/Gel Brace User guide

dj ortho DONJOY ULTRASLING II User manual

dj ortho

dj ortho DONJOY ULTRASLING II User manual

dj ortho Donjoy 11-110 06000 Series User guide

dj ortho

dj ortho Donjoy 11-110 06000 Series User guide

dj ortho DONJOY Installation instructions

dj ortho

dj ortho DONJOY Installation instructions

dj ortho DONJOY HIGH TIDE User manual

dj ortho

dj ortho DONJOY HIGH TIDE User manual

dj ortho BOA User manual

dj ortho

dj ortho BOA User manual

Popular Personal Care Product manuals by other brands

Advanced Wireless Communications AW-NCB4100 user manual

Advanced Wireless Communications

Advanced Wireless Communications AW-NCB4100 user manual

Balance KH111 Operating and safety instructions

Balance

Balance KH111 Operating and safety instructions

EMP NEW TherapyZone Multi-Positioning Tower Assembly instructions

EMP

EMP NEW TherapyZone Multi-Positioning Tower Assembly instructions

DURAVIT LM7837000000000 Mounting instructions

DURAVIT

DURAVIT LM7837000000000 Mounting instructions

mychway SR-CM02 user manual

mychway

mychway SR-CM02 user manual

DJO Global Procare XcelTrax Patient guide

DJO Global

DJO Global Procare XcelTrax Patient guide

Lanaform Perfect Nail manual

Lanaform

Lanaform Perfect Nail manual

DURAVIT N1 7950 Mounting instructions

DURAVIT

DURAVIT N1 7950 Mounting instructions

Love My Skin DERMA BEAUTY PRO+ manual

Love My Skin

Love My Skin DERMA BEAUTY PRO+ manual

Joycare JC-239 instruction manual

Joycare

Joycare JC-239 instruction manual

Philips MS1011 manual

Philips

Philips MS1011 manual

Omnilux CONTOUR user guide

Omnilux

Omnilux CONTOUR user guide

Candela Vbeam Perfecta Treatment Guidelines

Candela

Candela Vbeam Perfecta Treatment Guidelines

Velocitek S5 instructions

Velocitek

Velocitek S5 instructions

ConvaTec Esteem quick start guide

ConvaTec

ConvaTec Esteem quick start guide

Rolyan Hemi Arm Sling manual

Rolyan

Rolyan Hemi Arm Sling manual

Thuasne Ligaflex pro manual

Thuasne

Thuasne Ligaflex pro manual

Philips SC1996 user manual

Philips

Philips SC1996 user manual

manuals.online logo
manuals.online logoBrands
  • About & Mission
  • Contact us
  • Privacy Policy
  • Terms and Conditions

Copyright 2025 Manuals.Online. All Rights Reserved.