dji PHANTOM 4 User manual

Aircraft
© 2016 DJI. All Rights Reserved.
21
Phantom 4 User Manual
01
Point the aircraft toward the screen
02
Align the boxes
03
Pan and tilt the aircraft
Calibrating Front Sensors
Obstacles Sensing cameras that installed on landing gear are calibrated on delivery. However these
camera are vulnerable to excessive impact, hence it will require calibration via DJI Assistant 2 from time
to time. Follow the steps below to calibrate the camera when the DJI GO app prompt you to do so.
Detection Range
The detection range of the Obstacle Sensing and Vision Positioning System is depicted as follow. Note
that the aircraft cannot sense and avoid the obstacles that are not within the detection range.
Using Vision Positioning
Vision Positioning is activated automatically when the aircraft is turned on. No further action is
required. Vision Positioning is typically used in indoor environments, where GPS is unavailable.
Using the sensors that are built into the Vision Positioning system, the aircraft can hover precisely
even without GPS.

Aircraft
22
© 2016 DJI. All Rights Reserved.
Phantom 4 User Manual
Follow the steps below to use Vision Positioning:
1. Toggle the ight mode switch to P-mode.
2. Place the aircraft on a at surface. Note that the Vision Positioning system cannot
work properly on surfaces without clear pattern variations.
3. Turn on the aircraft. The aircraft status indicator will ash green two times, which
indicates the Vision Positioning system is ready. Gently push the throttle up to lift
off and the aircraft will hover in place.
ON OFF
Auto Hold
The performance of your Vision Positioning System is affected by the surface over which it is
ying. The ultrasonic sensors may not be able to accurately measure distances when operating
above sound-absorbing materials. In addition, the camera may not function correctly in
suboptimal environments. The aircraft will switch from P-mode to A-mode automatically if neither
GPS nor Vision Positioning System are available. Operate the aircraft with great caution in the
following situations:
Flying over monochrome surfaces (e.g. pure black, pure white, pure red, pure green).
Flying over a highly reective surfaces.
Flying at high speeds(over 10 m/s at 2 meters or over 5 m/s at 1 meter).
Flying over water or transparent surfaces.
Flying over moving surfaces or objects.
Flying in an area where the lighting changes frequently or drastically.
Flying over extremely dark (lux < 10) or bright (lux > 100,000) surfaces.
Flying over surfaces that can absorb sound waves (e.g. thick carpet).
Flying over surfaces without clear patterns or texture.
Flying over surfaces with identical repeating patterns or textures (e.g. tiles with the same design).
Flying over inclined surfaces that will deect sound waves away from the aircraft.
Assisted Breaking from Obstacle Sensing System
Powered by the Obstacle Sensing System, the aircraft will now be able to actively initiate breaks when
obstacles are detected direct ahead of the aircraft. Note that Obstacle System works best when light
condition is ideal and the obstacle does not have feature-less pattern. In addition, the aircraft speed
cannot exceed over 8 meter/second so that the aircraft can break and stop at the safe distance.

Aircraft
© 2016 DJI. All Rights Reserved.
23
Phantom 4 User Manual
Flight Recorder
Flight data is automatically recorded to the internal storage of the aircraft. This includes flight
telemetry, aircraft status information, and other parameters. To access these data, connect the
aircraft to the PC through the Micro USB port and launch the DJI GO app.
Attaching and Detaching the Propellers
Use only DJI approved propellers with your Phantom 4. The grey and black ring on the propeller
indicate where they should be attached and in which direction whey should spin.
Propellers Silver Ring Black Ring
Figure
Attach On Motors without three dots Motors with three dots
Legends Lock : Turn the propellers in the indicated direction to mount and tighten.
Unlock : Turn the propellers in the indicated direction to loosen and remove.
Keep the sensors clean at all times. Dirt or other debris may adversely affect the effectiveness
of the sensors.
Vision Positioning is only effective when the aircraft is at altitudes of 0.3 to 10 meters.
The Vision Positioning System may not function properly when the aircraft is ying over water.
The Vision Positioning System may not be able to recognize pattern on the ground in low light
conditions (less than 100 lux).
Do not use other ultrasonic devices with frequency of 40 KHz when Vision Positioning system is
in operation.
Keep the animals away from the aircraft when Vision Positioning system is activated. The sonar
sensor emits high frequency sounds that are only audible to some animals.
Attaching the Propellers
1. Be sure to remove the warning stickers from the motors before attaching the propellers.
2. Mount the propellers with black propeller rings to the motors with black dots. Mount the propellers with
sliver propeller rings to the motors without black dots. Press t he propeller down onto the mounting
plate and rotate in the lock direction until it is secured in its position.

Aircraft
24
© 2016 DJI. All Rights Reserved.
Phantom 4 User Manual
DJI Intelligent Flight Battery Functions
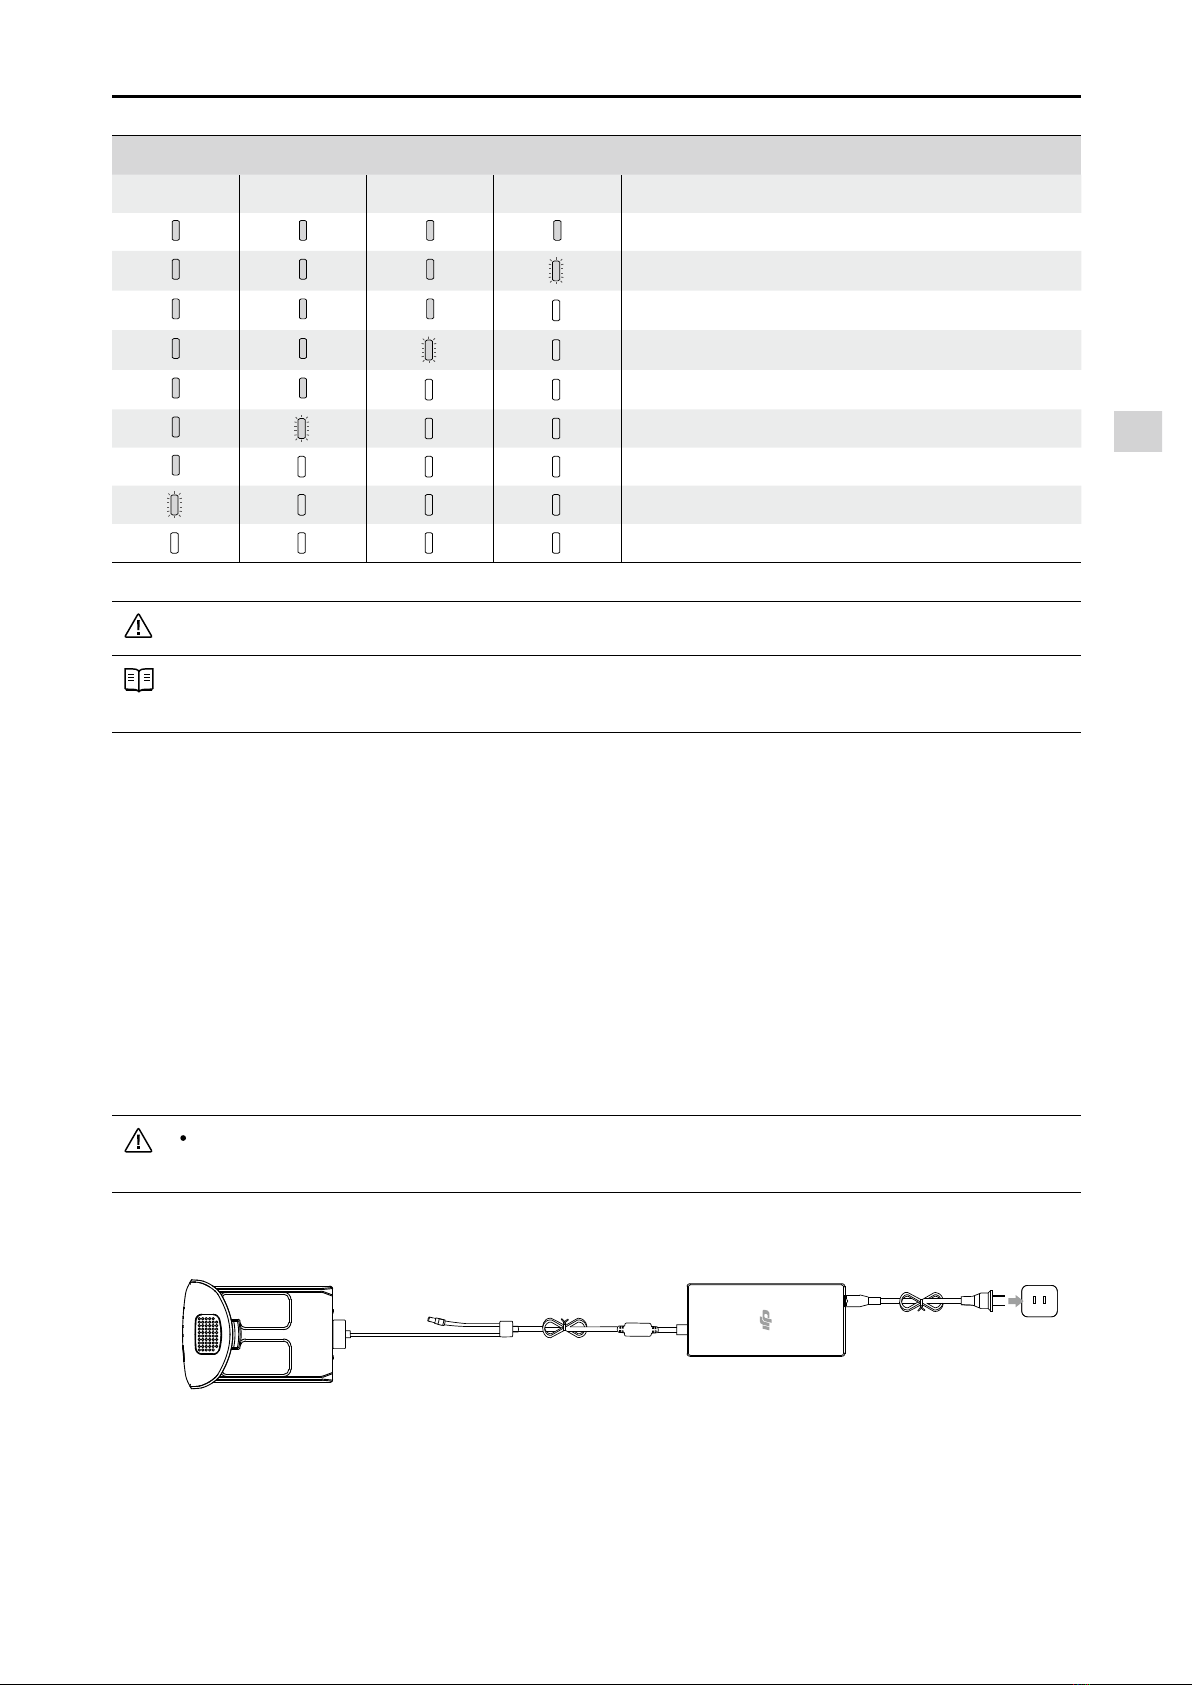
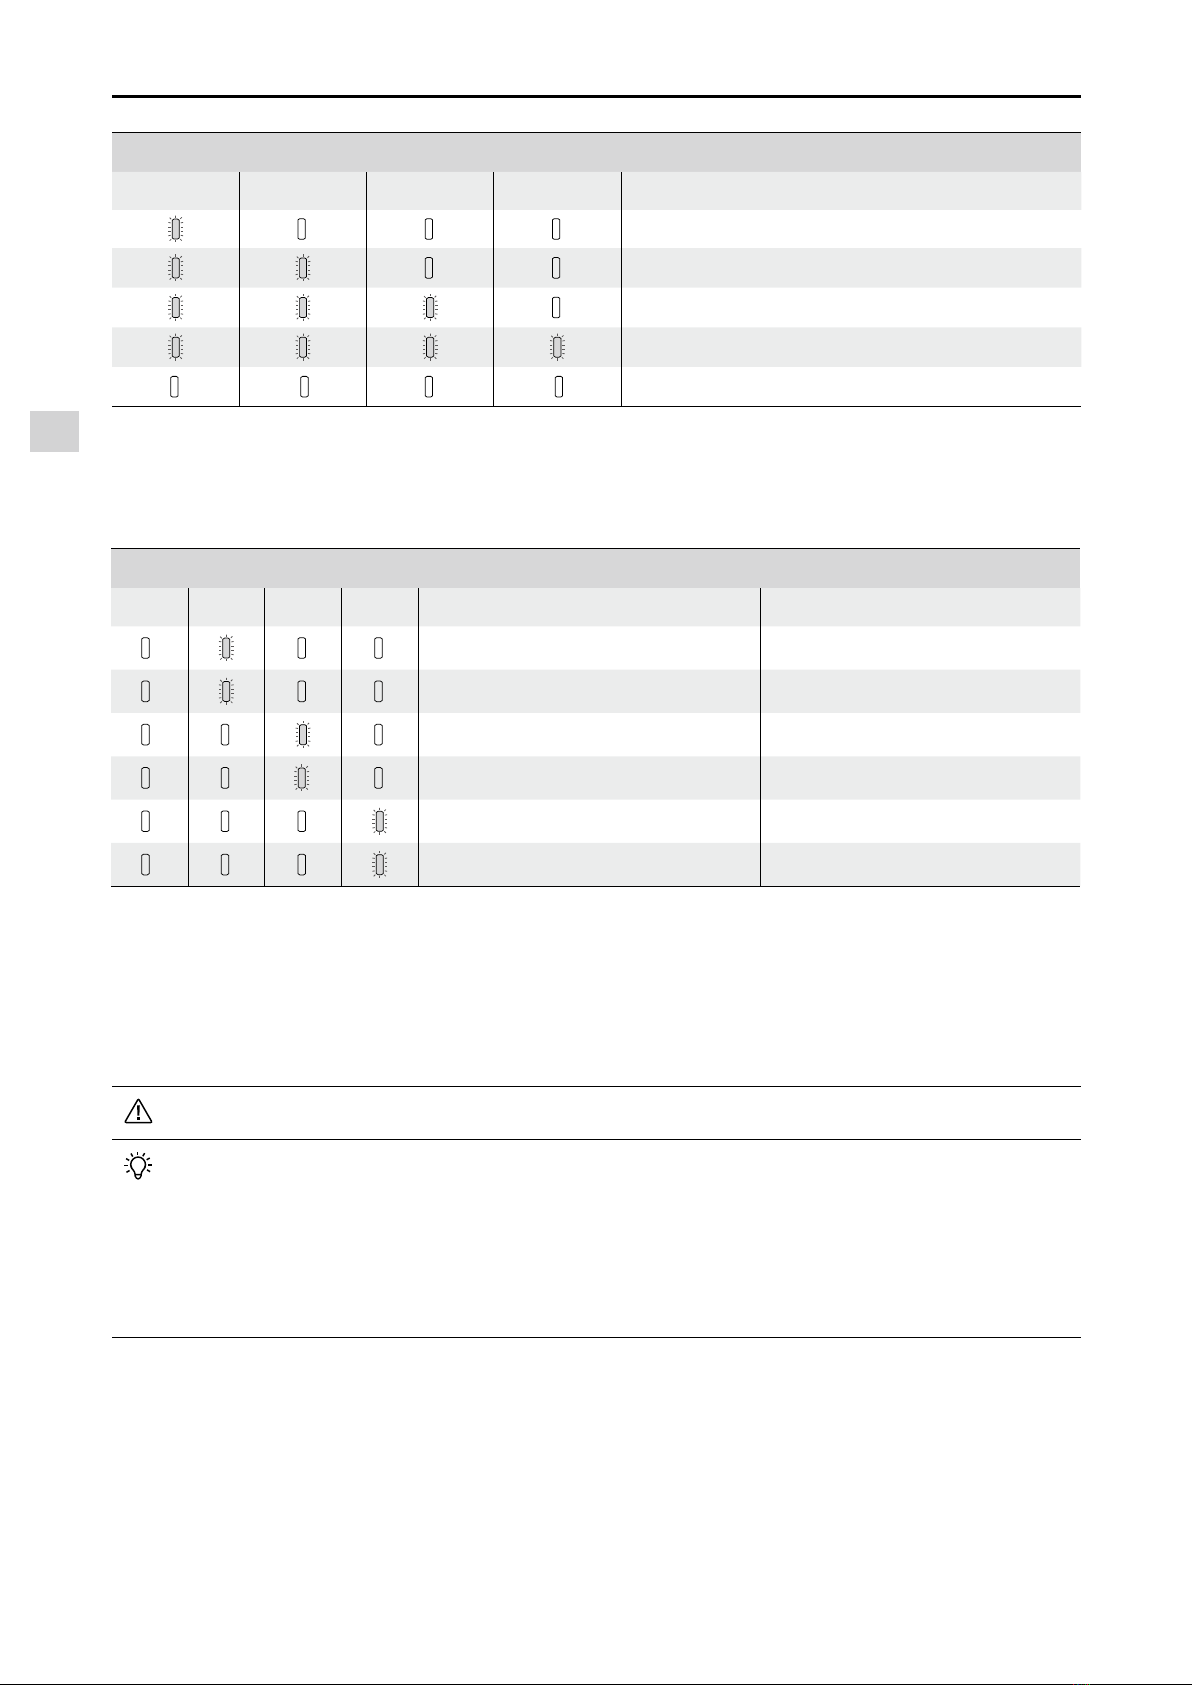
1. Battery Level Display: The LED indicators display the current battery level.
2. Battery Life Display: The LEDs display the current battery power cycle.
3. Auto-Discharging Function: To prevent swelling, the battery automatically discharges to below 65% of
total power when it is idle for more than ten days. It takes around two days to discharge the battery to
65%. It is normal to feel moderate heat being emitted from the battery during the discharge process.
Discharge thresholds can be set in the DJI GO app.
4. Balanced Charging: Automatically balances the voltage of each battery cell when charging.
5. Overcharge Protection: Charging automatically stops when the battery is fully charged.
6. Temperature Detection: The battery will only charge when the temperature is between 5°C (41°F) and
40°C (104°F).
The Intelligent Flight Battery must be fully charged before using it for the first time. Refer to
“Charging the Intelligent Flight Battery” for more information.
Be aware that the output power of the supplied Phantom 4 charger is 100W.
DJI Intelligent Flight Battery
The DJI Intelligent Flight Battery has a capacity of 5350 mAh, a voltage of 15.2 V, and a smart charge/
discharge functionality. It should only be charged using an appropriate charger that has been approved
by DJI.
Intelligent Flight Battery Charger
Be aware of the sharp edges of the propellers. Handle with care.
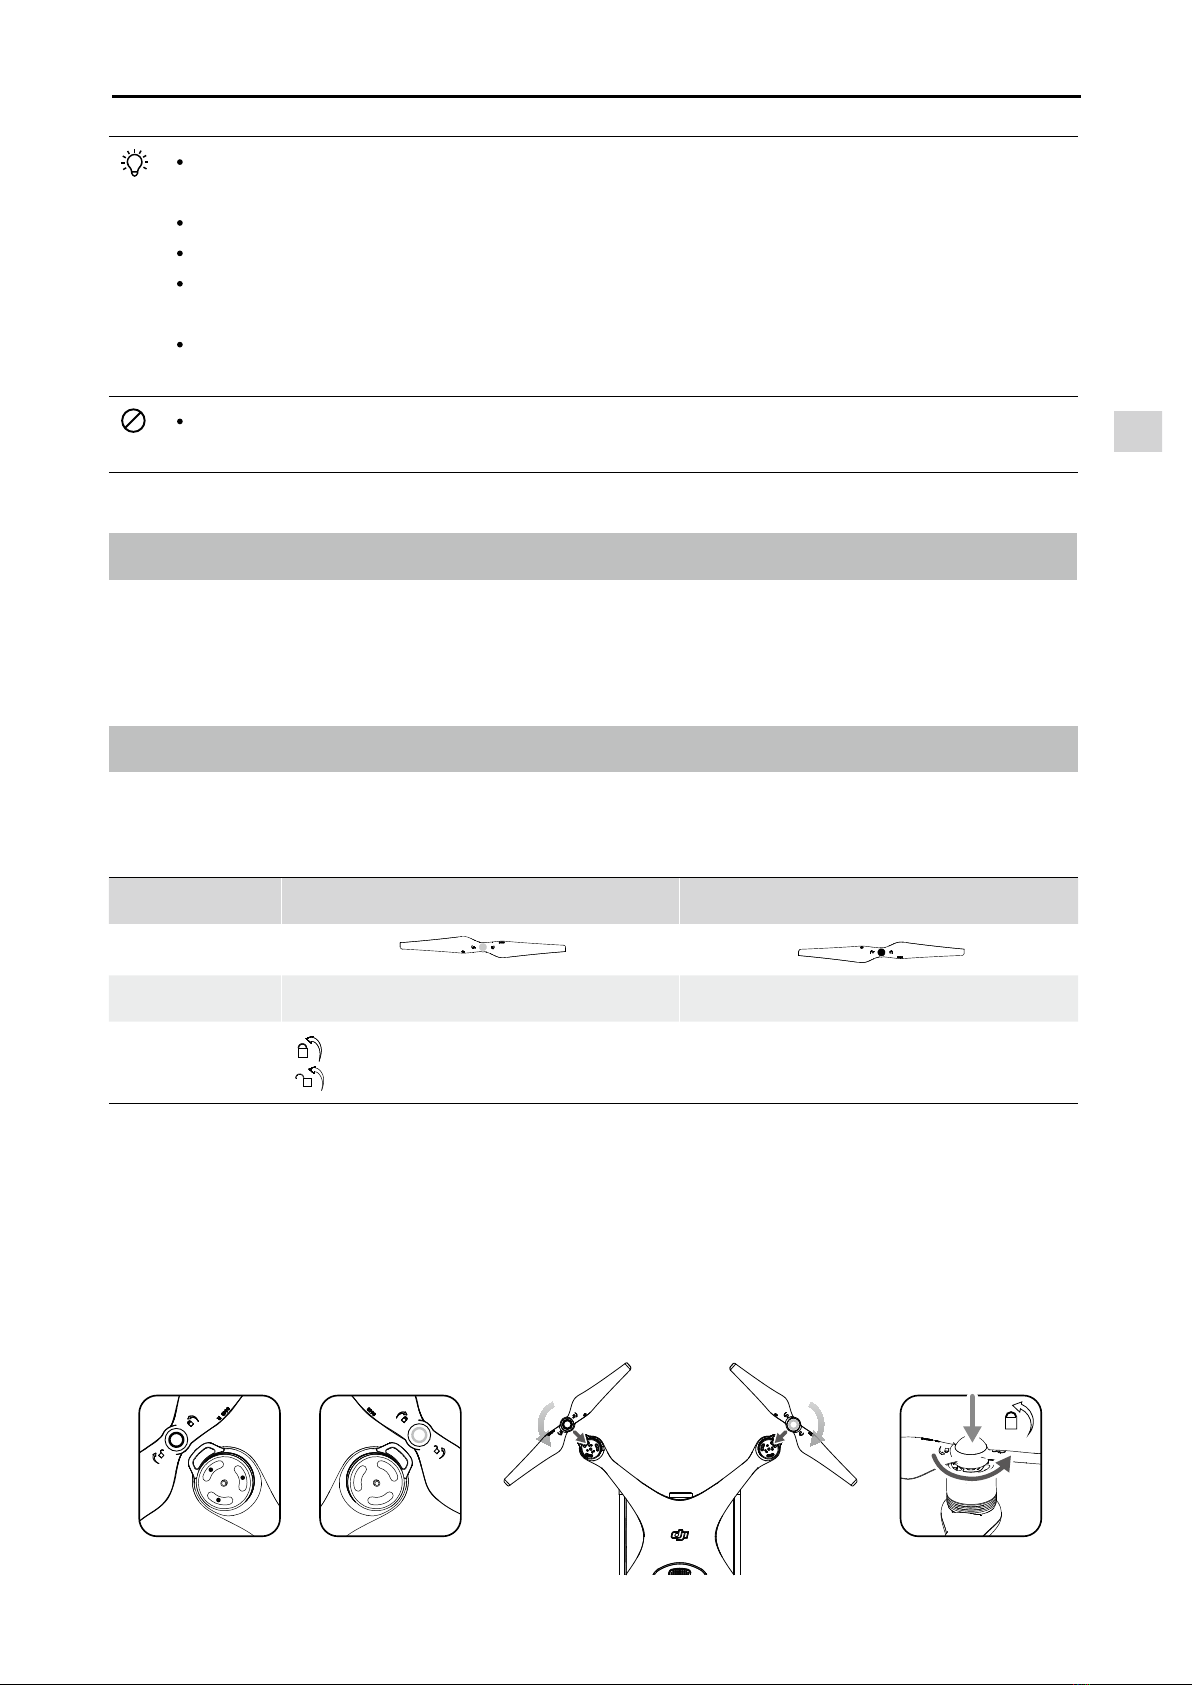
Use only the DJI approved propellers. Do not intermix the propellers types.
Stand clear of the motors and DO NOT touch the propellers when they are spinning.
Detaching the Propellers
Press down the propellers onto the motor mount, rotate the propeller according to the marked direction to
unlock the propeller.
Check that the propellers and motors are installed correctly and rmly before every ight.
Ensure that all propellers are in good condition before each ight. DO NOT use aged, chipped,
or broken propellers.
To avoid injury, STAND CLEAR of and DO NOT touch propellers or motors when they are spinning.
ONLY use original DJI propellers for a better and safer ight experience.

Aircraft
© 2016 DJI. All Rights Reserved.
25
Phantom 4 User Manual
Using the Battery
LED1
LED2
Battery Level Indicators
LED3
LED4
Power Button (Bulit-in LED)
Turning ON/OFF
Turning On: Press the Power Button once, then press again and hold for 2 seconds to turn on. The
Power LED will turn red and the Battery Level Indicators will display the current battery level.
Turning Off: Press the Power Button once, then press again and hold for 2 seconds to turn off. The
battery power LED will ash when powering off the Phantom to allow automatically stopping
of a recording during the event recording wasn’t stopped.
The Battery Level Indicators will also show the current battery level during charging and
discharging. The indicators are dened below.
: LED is on. : LED is ashing.
: LED is off.
7. Over Current Protection: The battery stops charging when high amperage (more than 8 A) is detected.
8. Over Discharge Protection: To prevent over-discharge damage, discharging automatically stops when
the battery voltage reaches 12 V.
9. Short Circuit Protection: Automatically cuts the power supply when a short circuit is detected.
10. Battery Cell Damage Protection: The DJI GO app displays a warning message when a damaged
battery cell is detected.
11. Battery Error History: Browse the battery error history in the DJI GO app.
12. Sleep Mode: To save power, the battery enters sleep mode after 20 minutes of inactivity.
13. Communication: Information pertaining to the battery’s voltage, capacity, current, etc. is transmitted to
the aircraft’s main controller.
Refer to
Phantom 4 Intelligent Flight Battery Safety Guidelines
before use. Users take full
responsibility for all operations and usage.

Aircraft
26
© 2016 DJI. All Rights Reserved.
Phantom 4 User Manual
Low Temperature Notice:
1. Battery capacity is signicantly reduced when ying in low temperature (< 0°C) environments.
2. It is not recommended that the battery be used in extremely low temperature (< -10°C) environments.
Battery voltage should reach the appropriate level when operating environment with temperatures
between -10°C and 5°C.
3. End the ight as soon as the DJI GO app displays the “Low Battery Level Warning” in low temperature
environments.
4. Keep the battery indoors to warm it before ying in low temperature environments.
5. To ensure optimal performance of the battery, keep the battery temperature above 20°C.
6. The charger will stop charging the battery if the battery cell’s temperature is not within the operating
range (0°C ~ 40°C ).
In cold environments, insert the battery into the battery compartment and allow the aircraft for
approximately 1-2 minutes to warm up before taking off.
Checking the Battery Level
The Battery Level Indicators display how much power remains. When the battery is turned off, press
the Power Button once. The Battery Level Indicators will light up to display the current battery level. See
below for details.
Battery Level
LED1 LED2 LED3 LED4 Battery Level
87.5%~100%
75%~87.5%
62.5%~75%
50%~62.5%
37.5%~50%
25%~37.5%
12.5%~25%
0%~12.5%
=0%
Battery life
Battery life refers to how many more times the battery can be discharged and recharged before it must
be replaced. When the battery is turned off, press and hold the Power Button for 5 seconds to check the
battery life. The Battery Level Indicators will light up and/or blink for two seconds, as shown below:

Aircraft
© 2016 DJI. All Rights Reserved.
27
Phantom 4 User Manual
Charger
Intelligent Flight Battery
Power Outlet
Charging the Intelligent Flight Battery
1. Connect the Battery Charger to a power source (100-240 V 50/60 Hz).
2. Connect one end of the charger to the Intelligent Flight Battery to the Battery Charger. If the battery
level is above 95%, turn on the battery before charging.
3. The Battery Level Indicator will display the current battery level as it is charging.
4. The Intelligent Flight Battery is fully charged when the Battery Level Indicators are all off.
5. Air-cool the Intelligent Flight Battery after each ight. Allow its temperature to drop to room temperature
before storing it for an extended period.
Always turn off the battery before inserting it or removing it from the Phantom 4. Never insert or
remove a battery when it is turned on.
Battery Life
LED1 LED2 LED3 LED4 Battery Life
90%~100%
80%~90%
70%~80%
60%~70%
50%~60%
40%~50%
30%~40%
20%~30%
below 20%
When battery life reaches 0%, it can no longer be used.
For more information about the battery, launch the DJI GO app and check the information that is listed
under the battery tab.

Aircraft
28
© 2016 DJI. All Rights Reserved.
Phantom 4 User Manual
Battery Level Indicators While Charging
LED1 LED2 LED3 LED4 Battery Level
0%~25%
25%~50%
50%~75%
75%~100%
Fully Charged
Battery Protection LED Display
The table below shows battery protection mechanisms and corresponding LED patterns.
Battery Level Indicators while Charging
LED1 LED2 LED3 LED4 Blinking Pattern Battery Protection Item
LED2 blinks twice per second Over current detected
LED2 blinks three times per second Short circuit detected
LED3 blinks twice per second Over charge detected
LED3 blinks three times per second Over-voltage charger detected
LED4 blinks twice per second Charging temperature is too low
LED4 blinks three times per second Charging temperature is too high
After these issues are resolved, press the Power Button to turn off the Battery Level Indicator. Unplug the
Intelligent Flight Battery from the charger and plug it back in to resume charging. Note that you do not
need to unplug and plug in the charger in the event of a room temperature error; the charger will resume
charging when the temperature is within the allowable range.
DJI does not take any responsibility for damage caused by third-party chargers.
How to discharge your Intelligent Flight Battery:
Slow : Place the Intelligent Flight Battery into the Phantom 4’s Battery Compartment and turn
it on. Leave it on until there is less than 8% of power left, or until the battery can no longer be
turned on. Launch the DJI GO app to check battery levels.
Rapid : Fly the Phantom 4 outdoors until there is less than 8% of power left, or until the battery
can no longer be turned on.

© 2016 DJI. All Rights Reserved.
29
Remote Controller
This section describes the features
of the remote controller and includes
instructions for controlling the aircraft
and the camera.

Remote Controller
30
© 2016 DJI. All Rights Reserved.
Remote Controller
Remote Controller Prole
The Phantom 4 remote controller is a multi-function wireless communication device that integrates the
video downlink system and aircraft remote control system. The video downlink and aircraft remote control
system operate at 2.4 GHz. The remote controller features a number of camera control functions, such
as taking and previewing photos and videos, as well as controlling gimbal motion. The battery level is
displayed via LED indicators on the front panel of the remote controller.
Compliance Version: The remote controller is compliant with local compliance and regulations.
Operating Mode: Control can be set to Mode 1 or Mode 2, or to a custom mode.
Mode 1: The right stick serves as the throttle.
Mode 2: The left stick serves as the throttle.
To prevent transmission interference, do not operate more than three aircrafts in the same area.
Using the Remote Controller
Turning the Remote Controller On and Off
The Phantom 4 remote controller is powered by a 2S rechargeable battery that has a capacity of
6000 mAh. The battery level is indicated via the Battery Level LEDs on the front panel. Follow the
steps below to turn on your remote controller:
1. When the remote controller is turned off, press the Power Button once. The Battery Level LEDs will
display the current battery level.
2. Press and hold the Power Button to turn on the remote controller.
3. The remote controller will beep when it is turned on. The Status LED will rapidly blink green, indicating
that the remote controller is linking to the aircraft. The Status LEDs will glow solid green when linking is
complete.
4. Repeat Step 2 to turn off the remote controller.
Charging the Remote Controller
Charge the remote controller using the included charger. Refer to the gure on next page below for more
details.
Other manuals for PHANTOM 4
9
Table of contents
Other dji Quadcopter manuals

dji
dji Phantom 2 Vision + User manual

dji
dji Phantom 3 SE User manual

dji
dji GeoSnap PPK Quick setup guide

dji
dji mavic User manual

dji
dji Inspire 1 User manual

dji
dji Inspire 1 User manual

dji
dji Spreading Wings S1000+ User manual

dji
dji S?1000 User manual

dji
dji Phantom 3 Advanced User manual

dji
dji Phantom 2 Vision + User manual

dji
dji Matrice 100 User manual

dji
dji MAVIC 2 ZOOM Installation guide

dji
dji mavic Installation guide

dji
dji PHANTOM 3 4K User manual

dji
dji S?1000 User manual

dji
dji MAVIC 2 PRO User manual

dji
dji P4 MULTISPECTRAL User manual

dji
dji Phantom 3 Advanced User manual

dji
dji MAVIC 2 PRO User manual

dji
dji Tello User manual


