Doro Wel Being Sara User manual

How to install your
personal alarm service
www.welbeing.org.uk

Welcome to Welbeing
This step by step guide tells you everything you need to know to
self-install your personal alarm service. It has been written by our
expert technicians and has easy to follow instructions and pictures.
Before installation
Before installing your equipment please ensure you have
completed the service user details online form (available at
www.welbeing.org.uk/service-user-details) and returned all
enclosed forms to Welbeing.
If you have any questions or issues please see our comprehensive
FAQs online at www.welbeing.org.uk/help/ or call our technical
helpline on 01323 408972.

5. Phone lead & adaptor (green) 6. Wall mounting kit
4. Power supply (yellow)3. Wristband & neckcord
1. Base unit 2. Pendant
Included in your box
Your personal alarm pack contains the following items:

Installation of your alarm
1. Unplug the existing telephone
connection from the master wall
socket and plug the telephone
connector into the telephone
lead/adapter (item 5, green tape).
Connect the telephone lead/adaptor
to the TEL socket on the personal
alarm unit. Plug the adaptor into the
telephone socket on the wall.
2. Connect the power supply (item 4,
yellow tape) to the wall socket and
connect the power supply lead to the
POWER socket on the personal
alarm unit.
3. Turn the power switch to the ON
position. Check that the indicator
lamp has a steady green light.
4. Lift the telephone receiver and
check that you can hear the tone.
5. Carry out a test alarm from the
personal alarm unit. See ‘Making
a Test Call’.

Note: All illustrations are for illustrative purposes only and may not accurately
depict the actual device. The items supplied with your unit might vary depending
on the software and accessories available in your region.
Installation with broadband
Follow the instructions as explained in ‘Installation of your alarm’ without an
ADSL filter, but instead of plugging into the telephone wall socket, connect
into the ADSL filter socket as shown above, then plug the ADSL filter into the
telephone socket on the wall.
ADSL filter
Broadband router

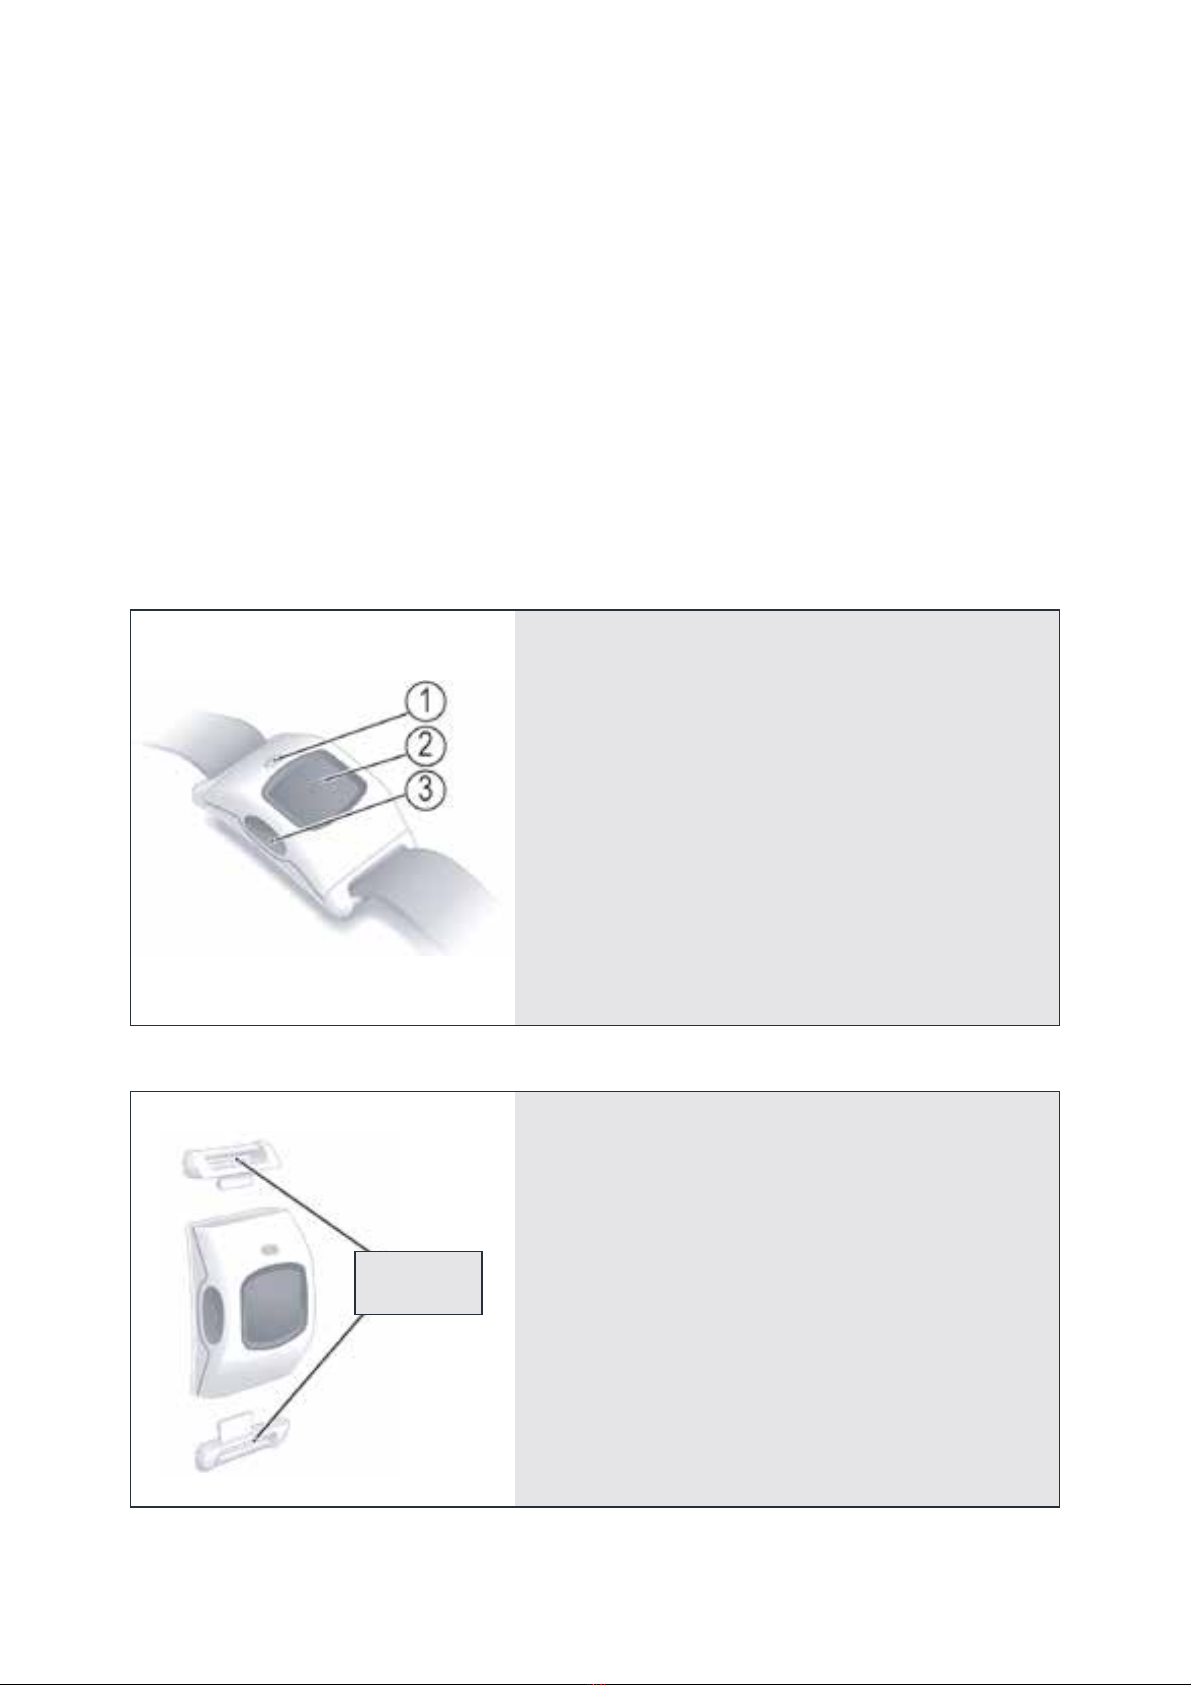
Simply press the pendant button once.
• The button will flash red for several seconds to confirm a call is being made.
• Then the front light will go steady red and the unit will announce….
• “[Alarm type], please wait, dialling for assistance”
• This message will be repeated for a few seconds before the unit starts to dial.
• The call will be answered by a contact centre operator who will say “You’re
through to Welbeing Lifeline, how can I help?”
• Advise the operator you have just self-installed the alarm, are new to the
service and are placing a test call.
• A conversation can now be held between you and the contact centre
operator, who will:
- Confirm your customer name and the address where the unit is fitted.
- Welcome you to the service and confirm how clear they can hear you.
- Confirm telephone number the alarm is connected to (in case dierent to
that held on customer’s record).
- Ask where in the property the unit has been installed.
- Ask you to press the button on the alarm base unit to provide a further test.
- Ask the location of the smoke detector (if relevant) and for it to be tested.
- Finally request, if we have not received full customer information, for you
to follow the link in the email sent upon placing the order and submit the
information without further delay.
• Once the call is complete the operator will close it down and the light on the
front of the unit will return to steady green.
• If you have a smoke detector, once installed, it will automatically raise an
alarm to our contact centre if it senses smoke.
• No matter how the call is raised (from pendant, smoke detector or the
button on the alarm unit) the unit will start to make an emergency call.
• If the operator cannot hear you, they will attempt to call you on the landline.
Please test your pendant once a month
• Press the button on your pendant
• When the operator answers your call, tell them you are
testing and they’ll close your call
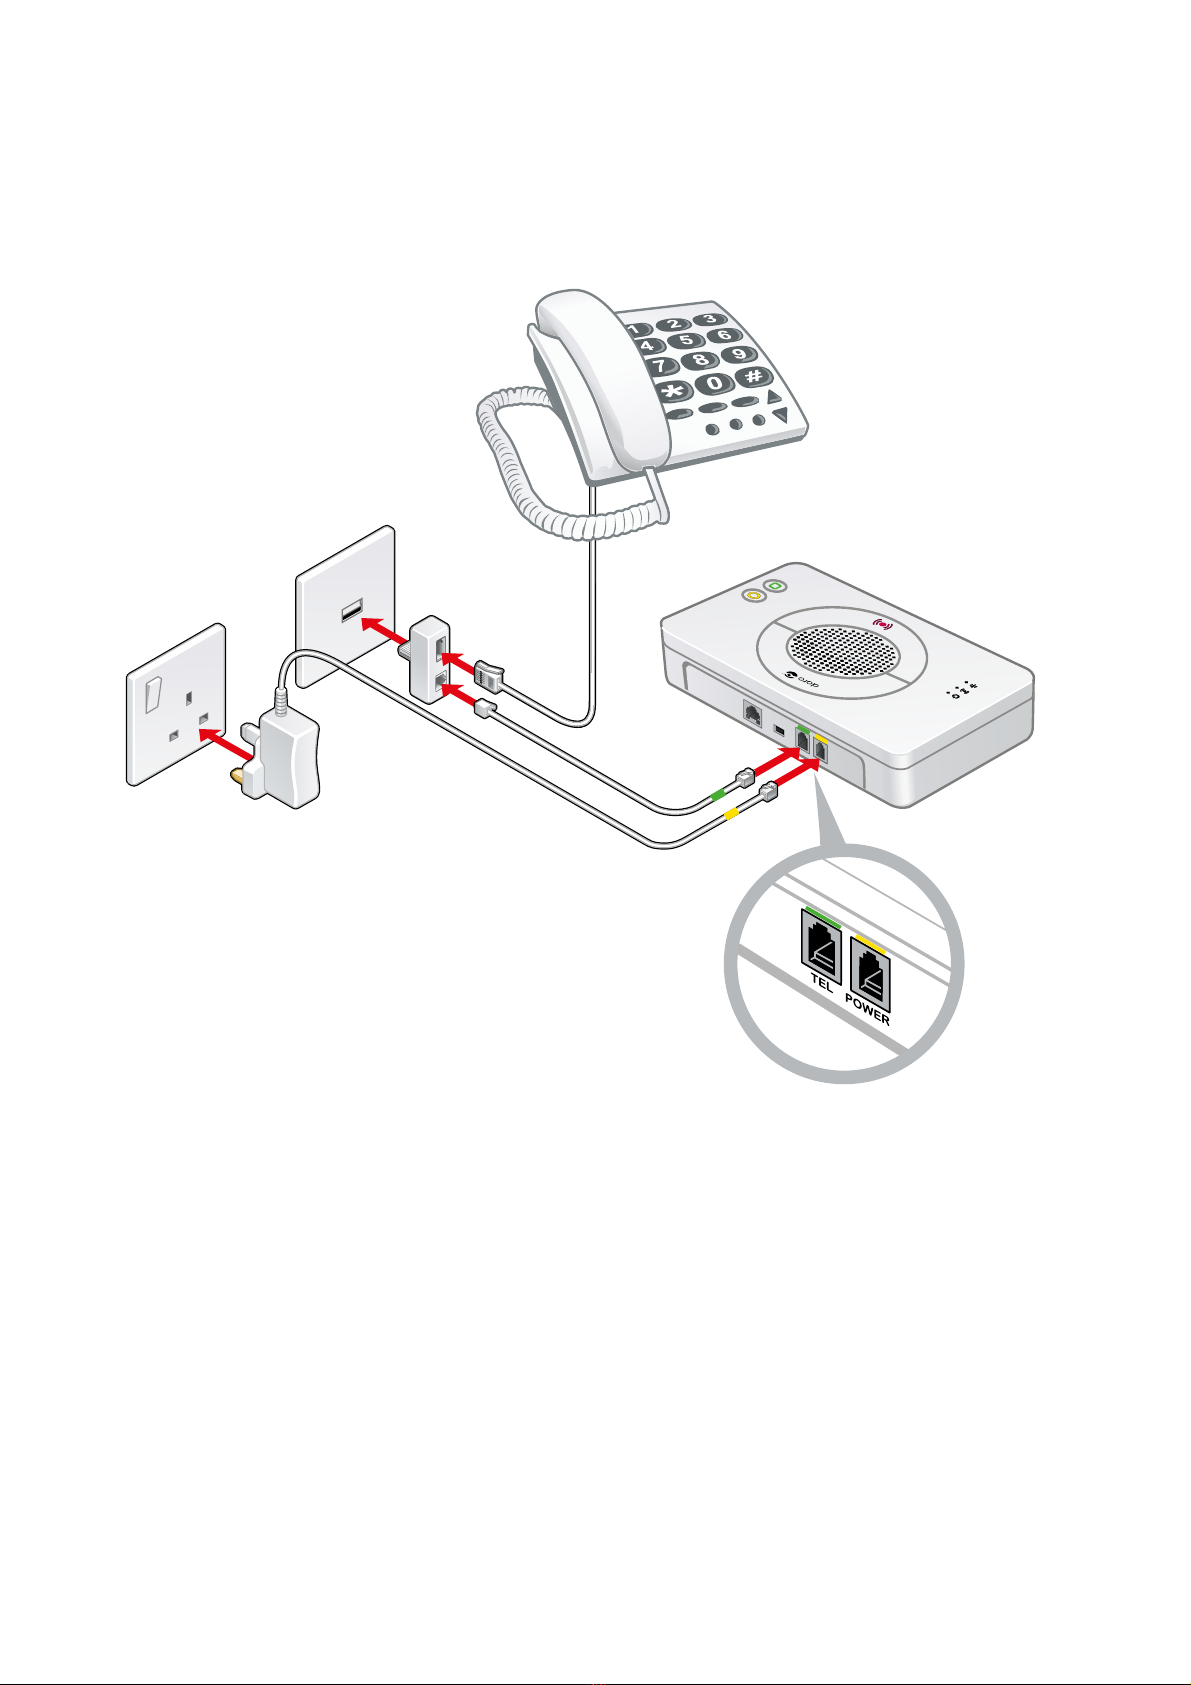
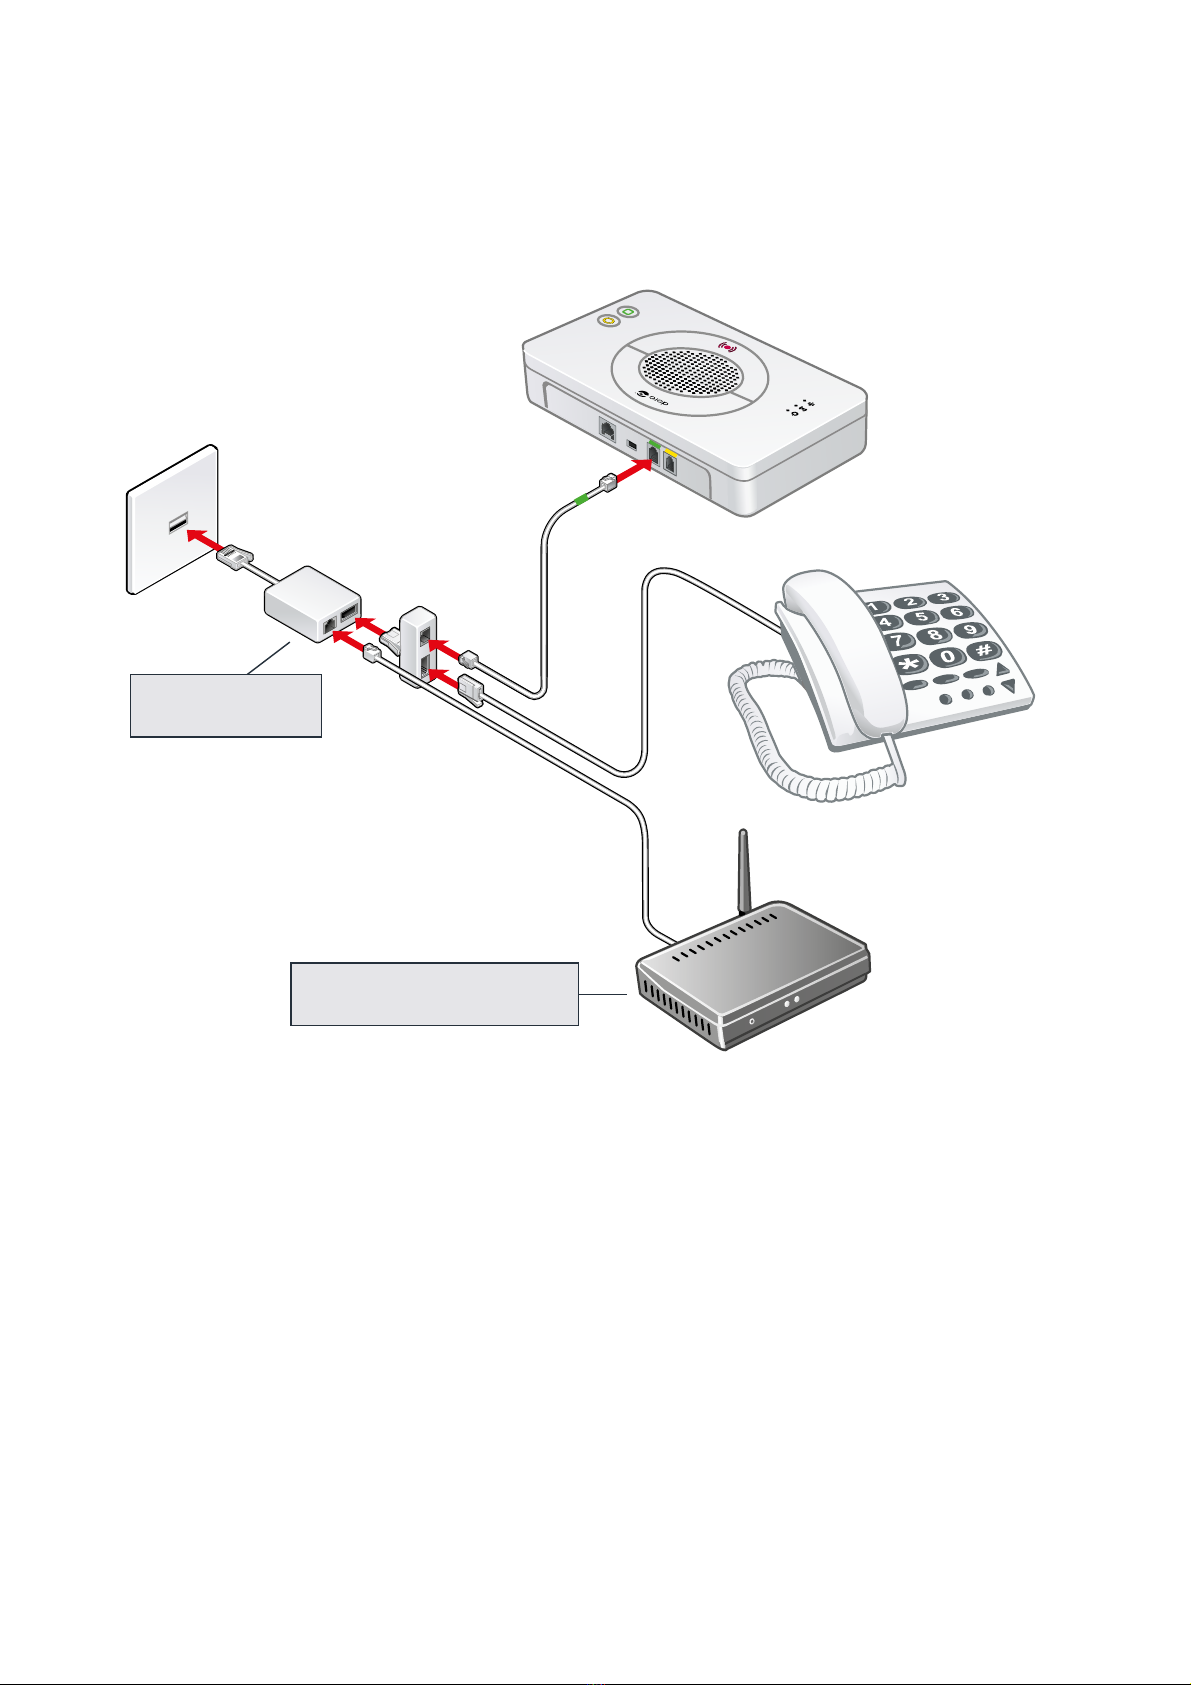
Making a test call

How to install the smoke
detector (optional)
If you have ordered a smoke detector it arrives programmed and ready
to be installed.
Prior to fitting the smoke detector, test the detector by pushing the “test”
button on the front and ensure the contact centre respond, this confirms the
smoke detector has been activated.
On the base of the smoke detector you will find a sticky backed Velcro pad.
This should be detached from the base and fixed to the ceiling following the
guidelines set out below:
• If your home has 2 floors ideally you should have one smoke detector per
floor, but if you only have one detector you should install the smoke detector
on the ceiling of the first floor landing to give the best coverage for the
entire property.
• If your property has one floor (flat or bungalow) the smoke detector should
be installed in the most central point, ideally in the corridor to pick up smoke
from any room in the house.
• Smoke detectors should not be installed in the kitchen. Steam from cooking
or the kettle will activate the device.
• Smoke detectors should not be installed on the wall. The operation time is
such that a fire will have taken hold before the alarm will activate.
• The smoke detector should be installed at least 300mm from
any wall or partition.
• It should also be mounted at least 300mm from anything dropping down
from the ceiling including light fittings, beams, etc.
Once the Velcro pad is axed to the ceiling, push the smoke detector onto the
pad so the two parts of the Velcro stick together. Your smoke detector will
now be ready to operate, if it detects any smoke an alert will be raised to the
contact centre.

Your personal alarm explained
1On steady green mains power on
flashing programming mode
green o mains failure
2Alarm slow flashing red in alarm state
fast flashing red connection to contact centre
on alarm
3Error slow flashing red no connection to telephone line
fast flashing red power failure, battery fault
o normal operation
4Loudspeaker
5Red button alarm button activates the alarm
6Yellow button function button
7Green button cancel button stops the alarm
8Microphone
Note: The yellow button has no function upon delivery but is programmable for
special functions.

8Microphone
9Holes for wall mounting
10 AUX input / output
11 O / ON switch
12 TEL connection to telephone network
13 POWER power supply / programming cable
Note: The personal alarm unit should be placed on a hard surface to avoid
blocking the microphone (item number 8)
The following can be found on the back of the unit.
8

Wristband attachments. Slide
the wristband into the clips making sure
the dark grey side is facing the pendant.
1. Indicator light
2. Alarm button
3. Function button (not supported)
Your pendant explained
The pendant is provided with a number of accessories giving dierent options
for wearing: wristband, wristband attachment, neckband, pocket clip and
“easy-press” cover.
The accessories are attached to the alarm button with a simple click-in action.
If you wish to switch from wristband to neck cord, the top and bottom clips can
be removed by sliding left or right and lifting out.
Clips

Neckcord attachments. Slide the
illustrated clips into the top and bottom
of pendant. Snap the neckcord (1) into
the top clips.
For those with reduced physical strength
to press the alarm, you can insert the
Easy Press Cover over the pendant.
Simply remove clip (2) and slide the
cover into the bottom slot.
1. Pocket clip
2. Cover plate
Easy press
cover
Pocket clip
Cover plate

General information
• If the telephone line is not working,
no alarm can be sent.
• The personal alarm unit should
be connected to the main phone
socket in the home.
• The personal alarm unit must not
come into contact with water or
any other liquid.
• Used batteries should be disposed
of in an environmentally-
responsible manner.
• Calls made from your alarm unit are
charged at the standard local rate
of your provider.
Maintenance
Cleaning
The personal alarm unit and pendant
should be cleaned using a slightly damp
cloth. Solvents should not be used.
Problems with the equipment
If you have a problem with your
equipment or need to ask any questions
you can either place a call via the
Welbeing alarm unit or call our technical
helpline on 01323 408972. If your
equipment is found to be faulty we will
send you a replacement, along with a
jiy bag to return the faulty equipment
to us for test, inspection and repair.
Please ensure you return the faulty
equipment in its entirety within 28 days
of receiving replacement, otherwise
you may be charged.
Power cuts
Your alarm unit has an internal battery
that keeps it working for up to 30 hours
(depending on use). In the event of a
power failure the unit will automatically
connect to the contact centre to let us
know the power has failed.
Test calls (once a month)
Once a month test the equipment
by pressing the pendant, let us
know it is a test call. We will confirm
that the equipment is working and
that we have received your call. This
makes sure we know all is well with
your equipment. It also helps the
user feel familiar with the process.
If there are other devices fitted it
will be beneficial for you to activate
each device in turn to ensure that the
whole system is operational.
Periods away from the home
If you are going away for a while,
perhaps on holiday, let us know the
dates so we will be aware that your
property is empty. When you return
home press your pendant to let the
sta in the contact centre know you
are back.

• Protect the unit from moisture. Rain/snowfall, moisture and all types of liquid
can contain substances that corrode the electronic circuits.
• The personal alarm unit should be placed on a hard surface to avoid blocking
the microphone (positioned underside of the unit).
• Battery replacement may be performed only by authorised persons. Only use
recommended battery type.
• Only use recommended power supply.
• The power supply can be used as a disconnecting device. The wall socket shall
be installed near the equipment and shall be easily accessible.
• AUX-port: Wired installation must be performed only by authorised persons
in accordance with the instructions in the service manual.
Important information
All systems using radio and network communication are subject to interference
beyond the user’s control.
These products are designed to minimise the impact of such interference.
Nevertheless, the user must be aware that system components can be
subjected to interference or other influences that may cause malfunction.
It is therefore important to regularly check that every part of the system works
in all areas, especially radio communications. Contact Welbeing immediately in
case of any suspected malfunction.
Users should pay particular attention to the risk of disruption from products
which communicate using the same or adjacent frequencies.
Read safety information
Always read and follow the safety information accompanied
by this symbol.
Caution: Risk of explosion if battery is replaced by an incorrect type.
Dispose of used batteries according to the instructions.

Notes

Notes

Welbeing
Units 3-4,
Technology Business Park
Moy Avenue
Eastbourne
BN22 8LD
01323 644422
01323 408972 (Technical support)
www.welbeing.org.uk
info@welbeing.org.uk
This manual suits for next models
1
Table of contents
Other Doro Security System manuals
Popular Security System manuals by other brands

Nortek Security & Control
Nortek Security & Control Numera 2GIG-WMT1-345 installation instructions

LifeLink
LifeLink Prodigy LP2500 Operation manual

First Alert
First Alert One Link SA520B Specifications

Lorex
Lorex L19LD1600 Series Specifications

Satel
Satel Micra MPB-300 manual

Ansul
Ansul INERGEN 150-BAR manual