Dors 750 User manual

750
BANKNOTE COUNTER
USER MANUAL

3
CONTENTS
DORS 750 BANKNOTE COUNTER
Introduction .......................................................................................................... 4
Specifications ....................................................................................................... 4
Safety Precautions................................................................................................ 5
Delivery Set.......................................................................................................... 6
Appearance.......................................................................................................... 6
Operating Keys..................................................................................................... 7
Operation.............................................................................................................. 10
Menu Setup .......................................................................................................... 12
Error Messages..................................................................................................... 16
Troubleshooting .................................................................................................... 18
Counter Maintenance ............................................................................................ 18
Transportation And Storage................................................................................... 18
Support And Warranty ........................................................................................... 18

CONTENTS
SPECIFICATIONS
45
READ THIS MANUAL CAREFULLY BEFORE OPERATION!
INTRODUCTION
Hopper capacity............................................. 5 00 banknotes;
Stacker capacity............................................. 200 banknotes;
Banknote counting speed (+/–15%)............... 600/1000/1500 banknotes per minute;
Banknote size................................................ 117—180 mm (width),
58—90 mm (length),
0,05—0,2 mm (thickness);
Batch size...................................................... 1—999;
Banknotes feed system................................. Friction type roller system;
Counting sensor............................................ line of sensitive optical components in
IR and red light, a built-in system of the
banknote pattern recognition.
Verification in UV-T light: two-track
checking of paper fluorescence level;
Display ......................................................... STN, graphical, 256x64 pixels;
Power supply ................................................ 100-240VAC, 50/60 Hz;
Current consumption .................................... 0.25…0.5A;
Operating temperature range........................ +10°C…+35°C;
Relative humidity at + 25°C............................ 40% to 80%;
Atmospheric pressure .................................. 84…107 KPa (630…800 mm Hg);
Overall dimensions:
Height........................................................... 270 mm
Width............................................................ 290 mm
Depth............................................................ 240 mm
Net weight..................................................... 4.2 kg
Gross weight................................................. 5.4 kg
Service life*................................................... 7 years
* – DORS establishes 7 years service life period for the counter provided all
the service regulations are observed. Taking into account the high quality of the
counter, its reliability and safety degree, the real service life of the counter may
significantly exceed an official one.
SAFETY PRECAUTIONS
To ensure long life and reliable operation of the counter, please follow these
operation requirements and safety precautions:
1. The counter rotating parts are potentially hazardous for the user. Therefore, we
highly recommend that the users should avoid any jewelry and loose clothes,
and pin their long hair when operating the counter;
2. Avoid getting of any metal object or liquid into the counter;
3. To connect the counter to the power network, use a mains socket with a
protective earth contact (PE). The socket should be within the direct access
from the teller's working place;
4. Turn off and unplug the counter from the mains after the work has been
completed.
5. If the counter is out of use for a long time, its power switch should be in the «О»
position;
6. Install the device on an even horizontal surface;
7. Do not use the counter at an extremely low or high temperature, and avoid high
humidity; do not use the counter under the direct sun light;
8. Do not touch the inside parts of the counter if it is connected to the AC mains;
9. Avoid using the counter in dusty area;
10. To avoid fire or short circuit, do not install the counter in the places where it may
be at risk of a soot or steam impact.
DORS 750 BANKNOTE COUNTERDORS 750 BANKNOTE COUNTER
Dear customer,
Thank you for choosing DORS 750, the banknote counting machine that verifies
an authenticity of the banknotes and indicates an amount ofgenuine notes with
breakdown by denominations. The counter is intended for counting and batching of
US dollars, Euros and other world and local currencies.
Authenticity verification is based on examination of visible, infrared and
ultraviolet images of the counted banknotes.
DORS 750 (hereinafter «the counter») is designed by R&D DORS, Russia, and
manufactured by DORS Industries (China) Ltd.

CONTENTS
67
Delivery Set:
DORS 750 BANKNOTE COUNTER ............................................................. 1 pc.
Power cord..................................................................................................... 1 pc.
Quick Start guide............................................................................................ 1 pc.
Calibration card.............................................................................................. 1 pc.
Package ........................................................................................................ 1 set
COUNTER DESCRIPTION
Appearance
Figure 1
7
8
9
10
11
Appearance
Figure 2Control panel
1
2
3
4
6
5
CONTROL PANEL
1. The display;
2. MODE key for switching the counting modes;
3. MAN key for switching manual start mode ON/OFF;
4. ADD key for switching ADD mode ON/OFF;
5. BATCH key for switching on batch mode;
6. Navigation key UP ;
7. Navigation key DOWN ;
8. SET key to enter the menu and select menu items;
9. START/CLEAR key to start counting in manual start mode and clear the results.
1
3
4
5
7
2
9
8
6
OPERATING KEYS
1. MODE key to choose banknote counting mode.
The counter may count banknotes in three modes: COUNT, DEN and MIX. To
choose a required mode, press the MODE key. The selected mode is shown in the left
part of the display:
1. COUNT - The mode for piece counting. This mode allows counting of the
banknotes; the quantity of the counted banknotes is shown in the display.
COUNT mode indicator The quantity of counted banknotes
1 Screw to adjust the thickness of
the banknotes to be counted;
2 Banknote guides;
3 Hopper;
4 Control panel;
5 Stacker;
6 Stacker wheels;
2. DEN – The mode for counting banknotes of the same denomination and
their total amount. The mode is used for counting the banknotes of the same
denomination with the detection in IR and red light, detection of the total amount of
the counted banknotes and detection of the banknotes belonging to the given
denomination (the denomination is set by the first banknote in the batch to be
counted).
DEN mode indicator
The amount of the
counted banknotes
Currency
Banknotes denomination
The quantity of the counted
banknotes
7 Remote display connector;
8 USB connector;
9 Power switch;
10 Fuse;
11 Power connector.
Validation level
indicator
DORS 750 BANKNOTE COUNTERDORS 750 BANKNOTE COUNTER

CONTENTS
8 9
3. MIX – The mode for counting a mixture of the banknotes with different
denominations of the same currency with detection in IR and red light and with
displaying of
– the total amount and quantity of the counted banknotes;
– the quantity of the banknotes and their amount by each denomination.
Total quantity of the
counted banknote
Total amount of the
counted banknoteMIX mode indicator
Press ▼ for detailed view
Banknote
denomination
The quantity of the counted
banknotes by denomination
The sum of the counted banknote by
denomination
2 MAN key to choose manual/automatic counting start
1. The MAN key sets the counter in a manual or an automatic start mode.
2. Press the MAN key to activate the manual mode. The indicator MAN in the
top left corner of the display appears at the manual start mode. To start counting,
press the START/CLEAR key on the control panel.
Manual start indicator
3. Press MAN key to switch off the manual mode. The indicator AUTO
appears in the display. The AUTO function being activated, the counter starts
counting automatically as soon as a banknote gets into the hopper.
3 ADD key (summation mode)
ADD mode is used to sum the amount of the banknotes being counted by their
denominations and display their total amount. Moreover, the newly-counted number
will be added to the one counted before.
AUTO start indicator
Press ADD key to switch on/off ADD mode. To clean the results of summing,
press the START/CLEAR key and hold it while the stacker and the hopper are empty.
ADD mode indicator
The result of the accumulation the data on the banknote
counting by denominations Amount by denominations
Total amount
4 BATCH key for batch size setting
You may set the required batch size from 1 to 999 banknotes. When the batch
reaches its size, the device stops, shows the total number of the counted banknotes
and beeps (if the sound is switched on). If selected batch size exceeds stacker
capacity, the counter stops after reaching stacker limit and resumes counting after
the banknotes have been removed from the stacker. This function is available only for
the COUNT and DENOMINATION modes
To set the batch size, use two methods:
1. Select among the preset values - repeating pressing BATCH key will set
batch size to 5-10-25-50-100 banknotes.
Batch size, selected from preset values
DORS 750 BANKNOTE COUNTERDORS 750 BANKNOTE COUNTER

CONTENTS
10 11
2. Holding the BATCH key during 3 sec. results in a manual setting of the
required number. In this mode, use the navigation keys and to set the required
value for the edited digit (the underlined one). To move to the next digit, use the SET
key. To exit from the manual setting mode, press the BATCH key.
Number of banknotes in batch
at manual setting
1. Make sure about taking into account the precautions specified in the relevant
section of the manual;
2. Use a power cord to connect the counter to AC mains.
3. Use a power switch (9) to switch on the counter (see Fig.1). Self-testing will start
after switching on: the following image (see Fig. 3) will appear in the display (1) (see
Fig. 2). Firmware version
Loading indicator
Figure 3 Self-testing screen
Check the loading indicator is moving during self-test (the arrow in the bottom
part of the image) and the stacker wheels (6) (see Fig.1) and the hopper rollers (3)
(see Fig. 1) are rotating. After self-test is completed, a beep sound is given and the
display shows as in Fig. 4:
OPERATION
– ADD mode - OFF;
– Batch - OFF;
– Interface language - Russian;
– Counting speed -1000 banknotes per minute;
– UV detection - OFF;
– Validation level - Normal
– Currency - AUTO;
– Orientation – OFF;
– Sound - OFF
– Display backlight brightness - 2;
– Stacker capacity – 100
– Banknotes density – Normal
– External Indicator – DORS85
– UART baudrate – 9600
4. Adjust the gap (Fig. B) of the banknote feed system. The manufacturer presets
the gap according to the local currency to be counted. However, if the counter often
stops during counting, and the display shows the error messages «DOUBLE
ERROR» and «CHAIN ERROR», then turn the screw (1) (see Fig. 1) slightly
clockwise «–» to reduce the gap. If «NO BANKNOTE» or «LARGE ANGLE
ERROR» appears in the display after the counter stops, then turn the screw (1) (see
Fig. 1) slightly counterclockwise «+» to increase the gap.
The gap between separating rollers and feeding rollers should allow one note to
pass free between the rollers stop two notes put together from passing (see Fig. 14).
To check a gap, use a banknote of good quality, not worn out one. Rotate the
rollers to move the cogs away from the gap. Holding the banknote as in Fig.A, put the
short side of banknote between the separating rollers and feeding rollers. The
banknote must pass through with a little tension. If one banknote passes freely, then
decrease the gap a little. If one banknote can hardly pass between the rollers, then
increase the gap. Continue gap setting until one banknote passes between the
rollers with a little tension.
5. Adjust the banknote guides according to the width of the widest banknote in the
batch being counted, level the batch edges and place it carefully in the middle of
the hopper avoiding its skew.
Figure 4 Ready for work screen
After that, the counter device is ready for counting banknotes at the following
(factory) settings*.
– Operation mode - COUNT;
– Start mode - AUTO;
Banknote
Fig. BFig. A
Fig. C
The gap
The counter will start operation automatically.
The counting stops after stacker limit is reached.
The stacker limit may be set equal to 50, 100 or 200
banknotes. After the banknotes have been removed
from the stacker, the counter resumes operation
automatically.
* – The factory settings may be changed according to the customer's requirements.
DORS 750 BANKNOTE COUNTERDORS 750 BANKNOTE COUNTER

CONTENTS
12 13
6. In case of an error, follow the recommendations of the ERROR
MESSAGES Section to eliminate the error.
Note:
Prepare the banknotes to be
counted as in Fig. 5; remove
the damaged, wet, greasy or
dirty banknotes.
Figure 5
To enter the user settings menu, press and hold the SET key (see Fig.2) on the
control panel during 1s. After entering the menu, the left part of the display remains
unchanged, and the submenu appears in the right part.
To switch between the submenu settings, use the and keys.
To enter the submenu, press the SET key. Having selected the required setting
with the and keys, press the SET key to enter the settings menu. To exit the user
settings menu, hold the SET key during 1s. After you exit the menu, the display will
show the selected settings.
MENU SETUP
1. The interface language selection.
Select the language of display menu. Navigation keys
2. The banknote counting speed.
The display shows counting speed in banknotes per minute. Three values of the
counting speed are available: 600, 1000, and 1500 banknotes per minute.
Counting speed value
3. Ultraviolet fluorescence inspection mode «UV»
If UV is switched on, an error message will appear during the banknote counting
in case a banknote with an increased UV fluorescence has been detected (for
example, a banknote printed on a regular office paper), and the counting will stop.
There are 3 preset UV levels:
LEVEL 1 for the banknotes with high UV luminescence (EUR)
LEVEL 2 for the banknotes with average UV luminescence (RUB)
LEVEL 3 for the banknotes with low UV luminescence (USD)
Mode of UV marks inspection is switched on
UV LEVEL 1
mode is switched on
4. VALIDATION LEVEL setting.
You may choose the level of validation (for MIX and DEN modes). For NORMAL
level (indicated in the main screen as VL1) only the main authenticity features of the
banknote are detected. STRICT level (indicated in the main screen as VL2) adds the
detection of additional authenticity features of the banknote (if any).
NOTE: when STRICT level is selected, the control over the authenticity of
banknotes increases, but the number of rejected genuine banknotes may increase.
VALIDATION LEVEL
5. CURRENCY setting.
You may choose the currency to be counted. Before the counting starts, set the
currency to be counted. For AUTO (factory setting) the currency is set by the first
banknote detected in the batch.
Selected currency -
EURO
DORS 750 BANKNOTE COUNTERDORS 750 BANKNOTE COUNTER

CONTENTS
14 15
7. SOUND setting.
The mode being switched on, the executed operations are followed by beep
signal.
SOUND on
indicator
8. BRIGHTNESS setting.
Choose one of three levels of brightness for display backlight to adapt to
environmental lighting.
6. ORIENTATION setting.
When counting in this mode, orientation of the banknotes of the batch to be
counted is checked to match the first detected banknote. In case of mismatch, the
counting stops and an error message appears (this setting is available only in the
DEN mode).
ORIENTATION
mode indicator
9. STACKER CAPACITY setting.
Choose desired stacker capacity in correspondence with the counted
banknotes. If the capacity changes, «Please, reboot» message appears in the
screen. The counter will resume its operation after restart.
13. INFORMATION.
The technical information for the service centre staff.
10. Banknotes Density setting.
Choose counted banknotes' optical density:
«Low» for more transparent banknotes
«Normal» for regular density banknotes
«High» for opaque banknotes
11. External Indicator setting.
Choose the required external device for connection.
«None» for no device connected
«DORS85/90» for DORS external display
«POS Printer» or «CCTV» for corresponding equipment
12. UART baudrate setting.
Choose the required baud rate for external printer or CCTV connection to match
their specifications.
DORS 750 BANKNOTE COUNTERDORS 750 BANKNOTE COUNTER

CONTENTS
16 17
In case of an error, the counter automatically stops, gives a beep signal (at the
sound switched on) and an error message appears in the display. Refer to tables 1
and 1a «Error messages» to determine the error reason and its elimination method.
Sometimes, in case of a problem, the error code is not displayed or it differs from the
codes in the tables 1 and 1a. Then refer to table 2 «Troubleshooting» to resolve the
problem.
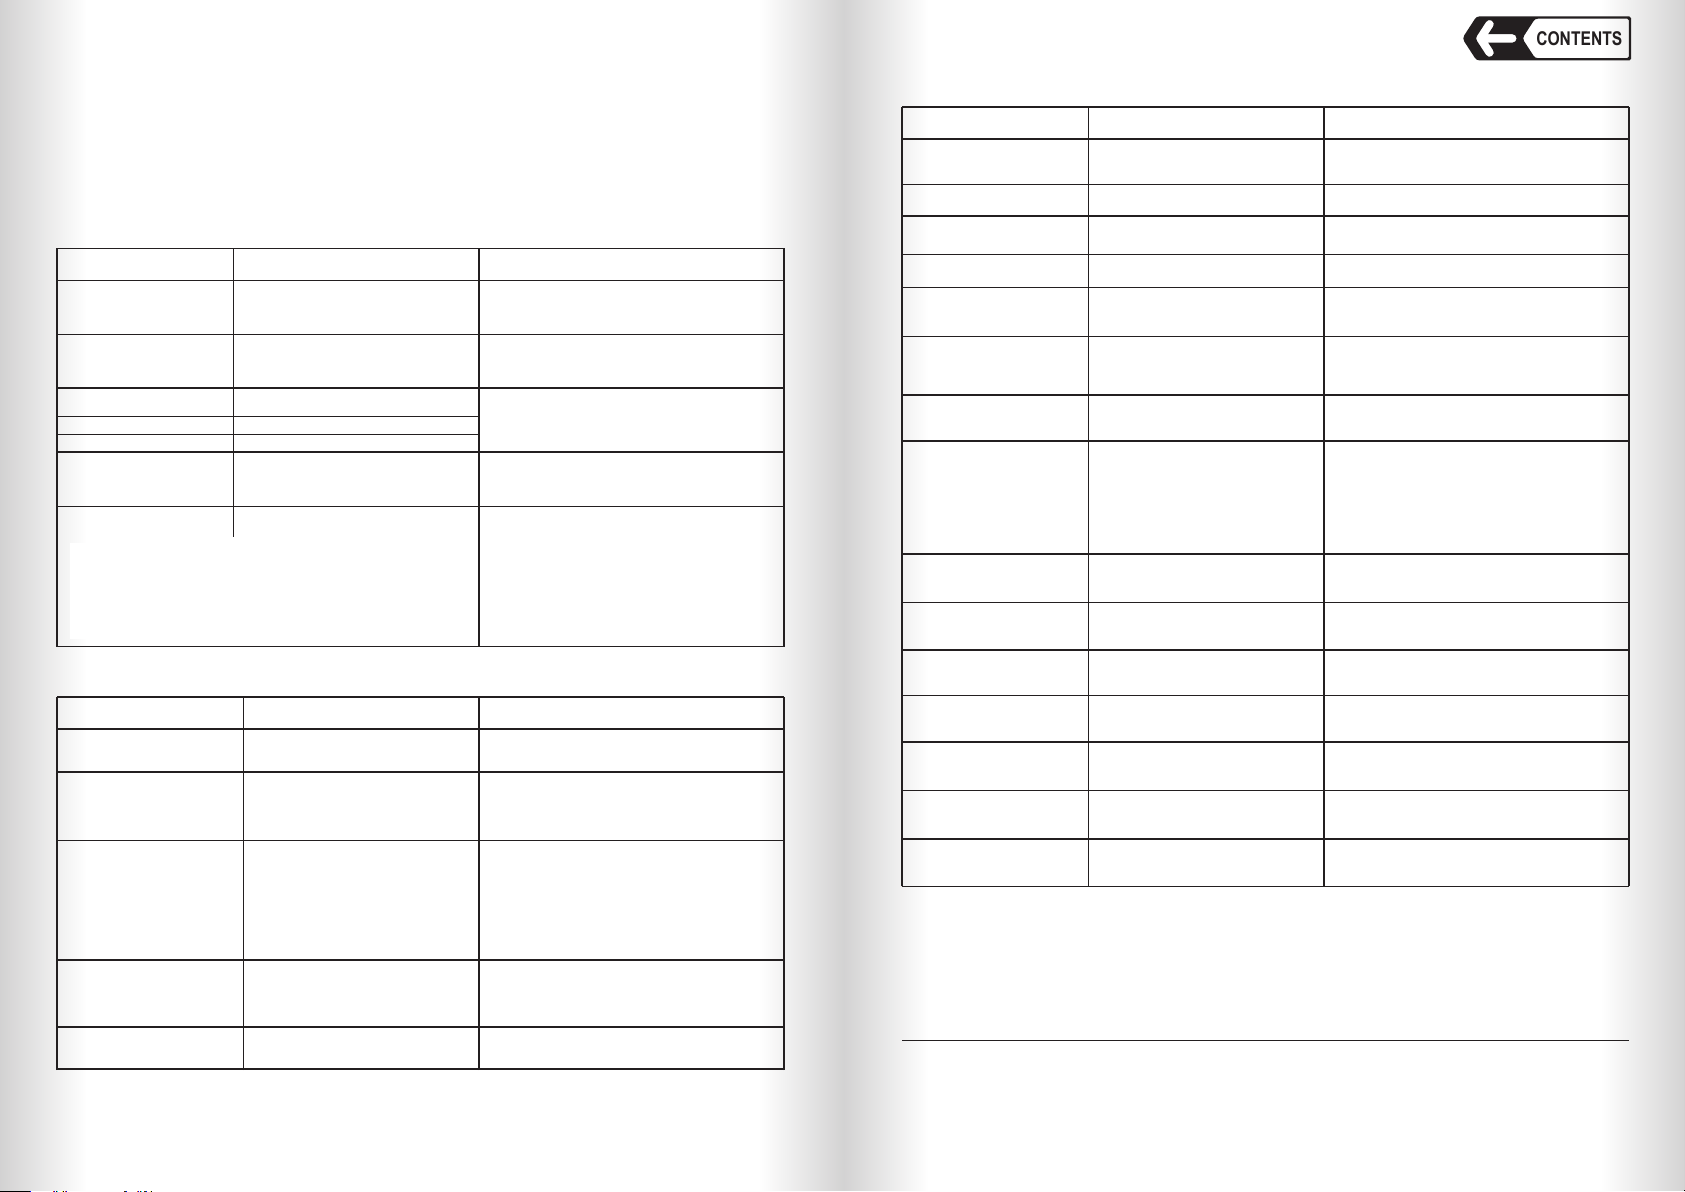
Table 1. Error messages that appear upon switching the counter on
ERROR MESSAGES REASON TELLER'S ACTIONS
REMOVE NOTES FROM
THE HOPPER
There were banknotes in the hopper
at the moment of switching on the
device or it is a hopper sensor
malfunction.
Remove the banknotes from the hopper and
clean hopper sensor. In case of a repeated
error, call the technician.
REMOVE NOTES FROM
THE STACKER
There were banknotes in the stacker
at the moment of switching on the
device or it is a stacker sensor
malfunction.
Remove the banknotes from the stacker or
clean stacker sensor. In case of a repeated
error, call the technician.
An error of the pulse sensor or of
the path motor.
SYNCHRO ERROR
CALIBRATION ERROR An error of the sensors calibration.
Communication error.
COMM ERROR
PLEASE REBOOT Appears after changing the stacker
limit and exit from the menu. Restart the counter*.
Table 1a. Error messages that appear during counting
REMOVE NOTES FROM
THE STACKER
There were banknotes in the stacker
when the new batch was placed in
the hopper.
Remove the banknotes from the stacker. The
counter will resume operation.
NO BANKNOTE It is impossible to load the
banknotes from the hopper. Adjust banknote guides to the banknote width
and duly prepare the batch for counting. If
necessary, adjust the banknote feeder gap for
operation with thicker banknotes: turn screw
(1) (Fig. 1; «+» to increase the gap)
A banknote or some foreign object
blocks the sensors. Remove the banknotes from the stacker. After
1-2 s the counter automatically rotates the path
to get rid of the banknote blocking the path. If
the banknote is not removed automatically,
switch off the counter, remove the banknote
manually and switch the counter on again. In
case of a repeated error, remove the banknotes
from the hopper, then remove the banknotes
from the stacker. Wait until self-cleaning is over.
PATH CLEARING
DOUBLE ERROR A doubled banknote or a very dark
banknote has been detected.
Remove the banknote from the stacker. Check
the banknote feeder gap for operation with
thinner banknotes, and if necessary, adjust it.
To adjust the gap, turn screw (1) (see Fig.1)
clockwise.
A banknote with an increased
fluorescence level detected at the
activated UV-mode.
Remove the banknote.
UV ERROR
LENGTH ERROR A banknote length differs by more
than 10% from the length of the
previous ones.
Remove the banknote different in size. Duly
prepare the batch for counting.
ERROR MESSAGES
Switch off the counter*, and then switch it on
again. In case of a repeated error, call the
technician.
ERROR MESSAGES REASON TELLER'S ACTIONS
SCANNER ERROR
CLEAN SCANNER
SENSORS
Scanner sensor elements are
overlapped or malfunctioning.
Scanner sensor elements are dirty.
Turn off the counter, carefully remove the
banknotes and foreign objects and turn the
counter on. In case of a repeated error, call the
technician.
The message is for information and will
disappear in 5sec. If the message appears after
each switching the device on and the dust level
increases, then periodical maintenance may be
required soon.
* – The counter may be switched on again not sooner than 10 seconds after its switching off.
** – The counter remains operable but periodical maintenance is recommended.
Table 1a. Error messages that appear during counting
ERROR MESSAGES REASON TELLER'S ACTIONS
HALF ERROR A folded or a damaged banknote
is detected. Remove the banknote.
LARGE ANGLE ERROR The banknote skew angle exceeds
±15°. Adjust banknote guides to the banknote width
and duly prepare the batch for counting.
The banknote does not match the
specified orientation. Remove the last banknote (s) from the stacker
and press START button to resume the
operation.
ORIENT ERROR
VALIDATION ERROR The banknote main authenticity
features do not match with the
preset ones for the specified
currency.
Remove the banknote.
A banknote width differs by more
than 10% from the width of the
previous one.
Remove the banknote.
WIDTH ERROR
CHAIN ERROR A continuous chain (too long
banknotes, an interval between the
banknotes is too short).
It may occur during a batch
formation if an excess banknote has
been caught. In this case, no gap
adjusment is required as it makes no
impact on the problem solution.
Adjust the banknote feeder gap for operation
with thinner banknotes. Remove the banknotes
that got stuck together. To decrease the gap,
turn screw (1) (Fig. 1) clockwise.
JAM ERROR A banknote jammed in the path
(blocking the path rotation).
Switch the counter off *. Carefully eliminate the
jam manually trying to avoid any banknote
damage. Switch the counter on.
An insufficient number of
banknotes for the batch specified
for counting. Place more banknotes into the hopper.
ADD NOTE
FULL The number of the counted
banknotes exceeds 9999. Press the START/CLEAR key to reset the
display indications. Remove the banknotes
from the stacker.
Maintenance is required. Remove the banknotes and restart the
counter*. If the error appears again after
rebooting, then call the technician**.
SERVICE
DIFFERENT
DENOMINATION
Detection of a banknote with a
different denomination in DEN
mode.
Remove the last banknote(s) from the stacker
and press START button to resume the
operation.
DIFFERENT CURRENCY Detection of a banknote of some
other currency in the MIX and DEN
modes.
INTERNAL ERROR Detection of an undocumented
error.
Remove all the banknotes and reboot the
counter; if the counter still does not operate
properly, call the technician.
Remove the last banknote(s) from the stacker
and press START button to resume the
operation.
Note:
To cancel an error message, remove the banknotes from the stacker. The
counter resumes operation automatically. To avoid a counting error in case of fault, a
repeated batch counting is recommended.
DORS 750 BANKNOTE COUNTERDORS 750 BANKNOTE COUNTER

18
TROUBLESHOOTING
FAILURE ELIMINATION METHOD
The counter fails to switch on. Make sure about the counter connection to the power supply
and the power cord plugging into the connector on the counter
rear cover.
Make sure that the power switch is in position «I».
If these terms are observed but the counter fails to switch on,
call the technician.
The display shows a message not
described in the «Error messages»
table.
Switch the counter off. Call the technician.
COUNTER MAINTENANCE
A preventive maintenance requiring partial disassembling of the counter by a
service technician is recommended every 90 days. In case of an intensive use (more
than one shift a day), the maintenance should be more frequent.
On a daily basis:
1. Switch off the banknote counter if you do not use it.
2. Wipe the counter external parts with a dry clean lint-free tissue.
TRANSPORTATION AND STORAGE
Transport the counter in the manufacturer's package by car, by railway (in a
boxcar), or by air - in the pressurized modules at a temperature of -20°C to +50°C, air
relative humidity up to 98% at +25°C and the air pressure 84 to 107 kPa (630 to
800mm Hg).
Store the counter (in the manufacturer's package) in a heated and ventilated
storage room, at the temperature of +5°C to +40°C and a relative humidity not
exceeding 80% at +25°C.
Table 2. Troubleshooting
SUPPORT AND WARRANTY
DORS products supplied to your country are manufactured taking into account
operation conditions in the country.
To make sure about it, please, check the official conformity marks on the product
and its package.
In case of counter malfunctioning please apply to your supplier.
To avoid any misunderstanding, we earnestly ask you to study properly the
terms and conditions of the counter operation, its transportation and storage and the
warranty terms and conditions provided by your supplier. DORS reserves the right
not to provide the product warranty maintenance if warranty terms are not observed.
CONTENTS
DORS 750 BANKNOTE COUNTER

www.dors.com
User Manual
Version 3.0
© DORS LLC 2019
Production date:
Other manuals for 750
3
Table of contents
Other Dors Banknote Counter manuals