Dors 800 User manual

800
EBKM.00D800.00.00.000-02UM_Int Pantone 300CPantone 7502C
USER MANUAL
2021
User Manual
Version 3.0
BANKNOTE COUNTER

1DORS 800 BANKNOTE COUNTER
Contents
Introduction....................................................................... 2
Specifications..................................................................... 2
Safety Precautions.............................................................. 3
Delivery Set....................................................................... 4
Appearance....................................................................... 4
Control panel..................................................................... 5
External Sensors, Path Sensors and Redirector....................... 6
Preparing for Operation....................................................... 7
Operation.......................................................................... 8
Setup menu....................................................................... 10
Submenu «Common».......................................................... 10
Count Rate..................................................................... 11
INFO............................................................................. 12
Pocket Limits.................................................................. 12
Print.............................................................................. 13
Submenu «MODE».............................................................. 13
Batch continue................................................................ 14
Batch clear..................................................................... 14
Submenu «ADVANCED»......................................................... 15
Visual mode select.......................................................... 15
Sound Volume................................................................ 16
LCD Brightness............................................................... 16
Factory reset.................................................................. 16
Submenu «THEMES».......................................................... 17
Submenu «LANGUAGE»...................................................... 17
OPERATING KEYS............................................................... 17
Messages in course of operation........................................... 35
Connection of external devices............................................. 38
Maintenance...................................................................... 38
Troubleshooting.................................................................. 39
Transportation and Storage.................................................. 39
Warranty and support......................................................... 39

Introduction
Dear Customer,
Thank you for purchase of DORS 800, two-pocket banknote counter that
recognizes value and authenticity of banknotes of different currencies, and
sorts them by orientation or by denomination.
DORS 800 (hereafter «counter») is designed by DORS LLC, Russia, and
manufactured by DORS Industries (China) Ltd.
The machine is intended for counting and sorting of US dollars, Euros and
other world and local currencies (depending on client's choice and availability
of certain currency's software). Authenticity verification is based on visible and
infrared images of both sides of banknotes, and their magnetic and ultraviolet
response as well.
3
Specifications
1
Hopper capacity ........................................................... Up to 800 banknotes
Stacker capacity, not more than............................................. 200 banknotes
Reject pocket capacity, not more than.................................... 100 banknotes
Value counting speed (±10%).......................... 600/900/1200/1500 note/min
Banknote size.................................................... 100—190 mm (width),
58—90 mm (length),
0,05—0,2 mm (thickness)
Batch size select..................................................................... 1—999
Sensors...................................... a line of photosensitive elements with an
infrare d and visible lighting, (CIS).
Ultraviolet sensors (2 pcs. for transmitted
light and 2 pcs. for reflected light).
Magnetic sensors (1 pc. at the centre,
2 pcs. at the sides).
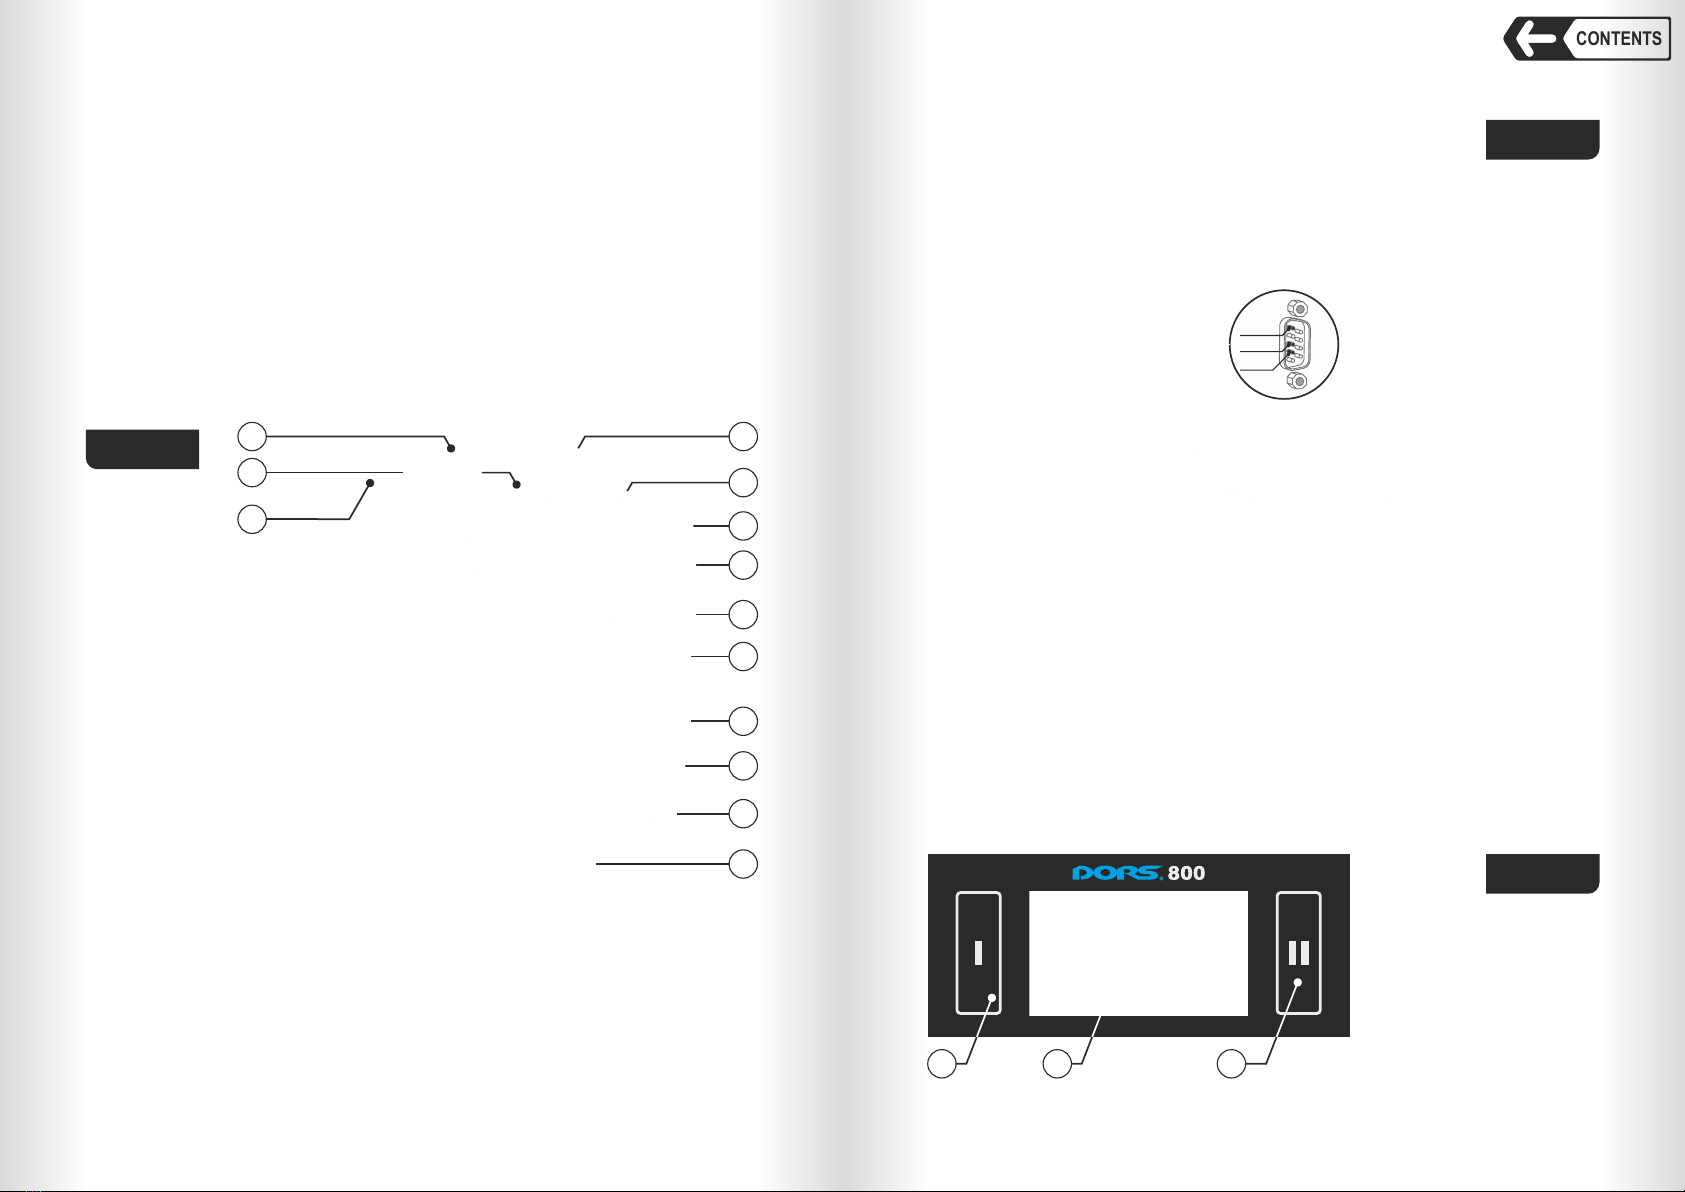
Display........................................Colour TFT LCD 4.3" (11cm) with resistive
touch sensor.
Power supply.......................................................... 100-240 VAC, ~50/60 Hz
Current consumption, not more than...................... 2A (100 V); 1A (240 V)
Operating temperature range................................. 10°C to 35°C
Relative air humidity at +25°C................................ 40% to 80%
Atmospheric pressure................................ 84 to 107 kPa (630 to 800 mm Hg)
Overall dimensions:
Height................................................................................................ 345 mm
Width................................................................................................ 305 mm
Length............................................................................................... 295 mm
Net weight......................................................................................... 10 kg
Gross weight..................................................................................... 13 kg
Average lifespan............................................................................... 7 years
2
CONTENTS
DORS 800 BANKNOTE COUNTER DORS 800 BANKNOTE COUNTER
Safety Precautions
To ensure long lifespan and a reliable operation of the counter the user
should follow the below-mentioned operation requirements and safety
precautions:
1 The counter's rotating parts are potentially hazardous for the user. Do not
touch the rollers as it may cause an injury. We highly recommend that the
user avoids wearing any jewelry and loose clothes, and covers long hair
while operating the machine.
2 Do not touch the counter, the power supply plug and the power cord by wet
hands as it may cause an electric shock.
3 When closing the top cover, mind your fingers as you may squeeze them. At
operation with an open top cover, make sure about its steady state. A
sudden closing of the cover may cause an injury.
4 Avoid getting of any metal object or liquid into the counter.
5 Use an electric outlet with a protective earth contact (PE) to connect the
counter to the power supply. The outlet should be located close to user's
workplace.
6 Avoid usage of the power cord other than included in the delivery set; do not pull
the power cord to disconnect it from the outlet, neither bend it nor twist.
7 If you do not use the counter for a long time, turn its power switch in the «О»
position. Upon work completion, disconnect the machine from AC mains.
8 Install the counter on an even horizontal surface.
9 Do not use the machine at extremely high or low temperatures; avoid
humidity and do not expose it to direct sunlight.
10 When the counter is working, do not switch it off, do not pull the power plug
out of outlet, and do not open machine's cover. It may cause a damage of
the counter.
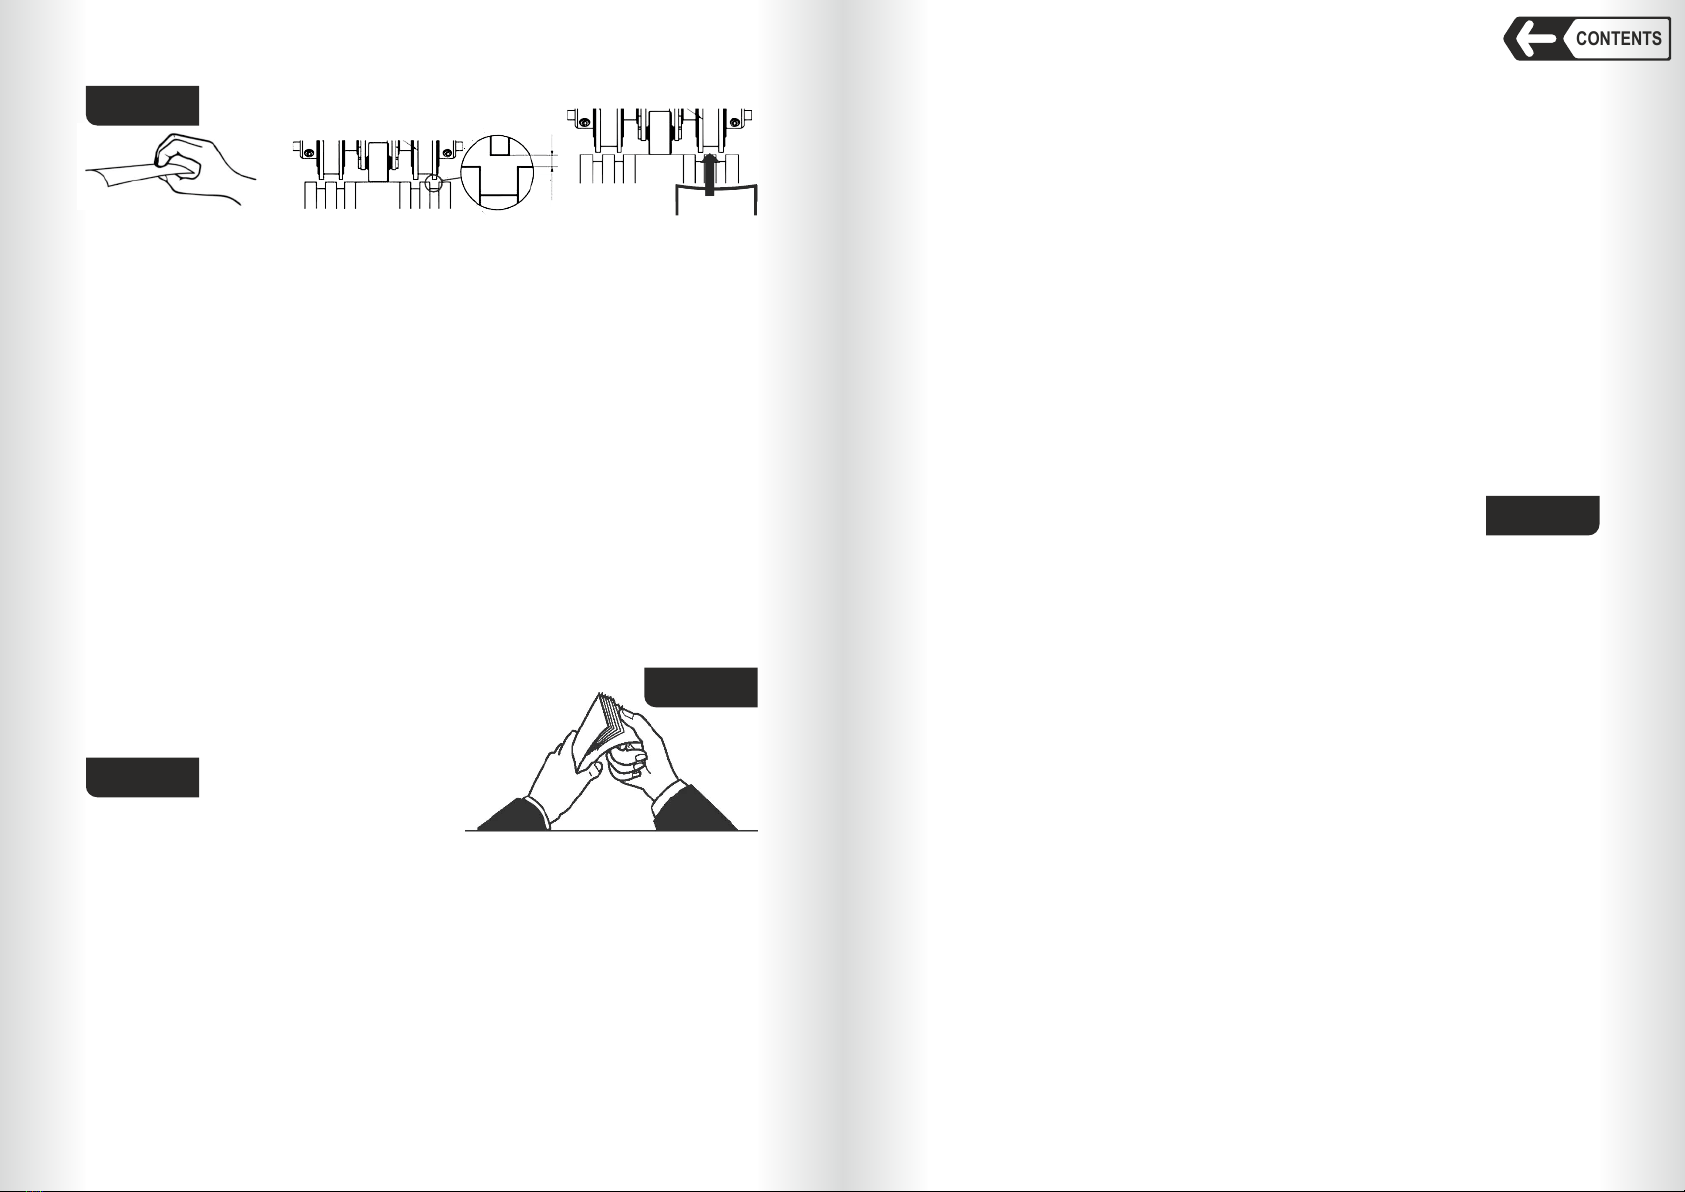
11 Before cleaning the sensors of the path, make sure the counter is switched
off.
12 When you are choosing the place of counter's installation, avoid the areas
with high level of dust content.
13 During installation and usage of the counter, keep some space sufficient for
opening its upper part and getting access to the path.
14 To avoid inflammation or short circuit do not install the device in the places
where it may be at risk of a soot or steam exposure.
Avoid mechanical stress on the counter during operation, don't tilt the
counter.
1 Here and below, the capacity (hopper, stacker, rejection) is given for the new banknotes. The
capacity depends on banknotes fitness, therefore it is not recommended to use the maximum
values of the pockets' capacities for worn out banknotes.

17
9
16
15
14
13
12
18
2 RxD
3 TxD
5 GND
5
Delivery Set:
Banknote counter DORS 800........................................................ 1 pc.
Power cord..................................................................................... 1 pc.
Stylus............................................................................................. 2 pcs.
USB cable (A-В type).................................................................... 1 pc.
User manual.................................................................................. 1 pc.
Calibration cards............................................................................ 1 set
Package......................................................................................... 1 set.
Banknote guide.............................................................................. 2 pcs.
Cleaning brush............................................................................... 1 pc.
Dry tissue....................................................................................... 1 pc.
4
Appearance
1 Screw to adjust
a gap between hopper's
rollers.
2 Banknote guides.
3 Hopper.
4 Locks providing access to
mechanism.
5 Control panel.
6 Reject pocket.
22
3
4
5
6
7
8
9
10
11
1
4
CONTENTS
DORS 800 BANKNOTE COUNTER DORS 800 BANKNOTE COUNTER
7 Stacker.
8 Stacker wheels.
9 Carrying handles.
10 Upper part.
11 Base.
18
Appearance
12 Power switch.
13 Fuse.
14 Power connector.
15 Connector for an
external printer or
a video surveillance device.
16 USB port for PC connection.
17 Socket for external display.
18 Ethernet connector (option).
Control panel
1 Start / user select
keys.
2 Touch screen display.
11 2
Fig. 3
Fig. 2
Fig. 1

External sensors, path sensors and redirector
To open the path, press simultaneously the locks fixing an upper part
(see Fig. 1, item 4), and then, holding the hollows of the case, pull the
upper part of the counter (see Fig. 2, item 10) up to the stop. To close the
path, push the upper part back to a click.
Fig. 5, Fig. 6, and Fig. 7 show the external sensors, the path sensors
and the pocket switch.
7
6
1 Hopper sensor
2 Reject pocket sensor
3 and 4 Stacker sensors
5 UV-T sensors
6 Contact image sensor (CIS)
7 Contact image sensor
8 UV reflection sensors
9 Magnetic sensors
6
55
2
1
4
7
8
5
9
3
CONTENTS
DORS 800 BANKNOTE COUNTER DORS 800 BANKNOTE COUNTER
11
10
PREPARING FOR OPERATION
1 Make sure that the safety precautions mentioned in the relevant section of
the manual are kept.
2 Install the banknote guides (Fig. 1, item 2) included in the delivery set:
2.1 Take one banknote guide (Fig. 1, item 2) and match the tabs of the
guide (see Fig. 8) with the slots of the banknote guide holder (see Fig. 9).
2.2 Push the guide into the holder (see Fig. 10).
2.3 To fasten the guide on the holder, move it down up to the stop (see Fig. 11).
2.4 Repeat points 2.1-2.3 for the second banknote guide.
2.5 To check that the banknote guides are installed properly, move the
guides manually sideways, to the maximum and minimum; the
movement shall be synchronous and without jerks.
To remove the guide (for example before transportation), take the upper
part of the guide, press it slightly and then pull it up.
10 Path sensors
11 Redirector
Clamps
Tabs
Fig. 9
BanknoteBanknote
guide holderguide holder
Banknote
guide holder
Fig. 8
Fig. 6
Fig. 5
Fig. 4
SlotsSlotsSlots
Fig. 7
Fig. 10 Fig. 11
3 Connect the counter to AC mains outlet by power cord.

Operation
1 Make sure that the safety precautions mentioned in the relevant section of
the manual are kept.
2 Use a power switch (Fig. 2, item 12) to switch the counter on. After you have
done it, a process of the firmware loading and self-testing is activated and
an image (see Fig. 12) appears on the graphical display (Fig. 3, item 2).
During self-test the loading indicator is moving, the stacker wheels (Fig. 1,
item 8) and the hopper rollers (Fig. 1, item 3) are rotating.
SW version
Currency database
version
Loading
indicator
Fig. 12
After self-testing is over the counter will beep and the display will show the
main menu (see Fig. 13):
CONTENTS
9
8DORS 800 BANKNOTE COUNTER DORS 800 BANKNOTE COUNTER
Fig. 13
1 Counting mode key; 10 Automatic / manual start key;
2 Counting speed key; 11 UV, MG, optical density, strict CF
3 Banknote orientation sorting key; detection ON/OFF key;
4 Key/indicator of batch mode 12 Settings menu key;
(inactive in MIX and MULTI modes); 13 Currency indicator/ currency
5 Currency selection key; selection hot key;
6 Key for printing of count results; 14 Number of counted banknotes;
7 Counting results clear key; 15 Number of rejected banknotes;
8 Report key; 16 Amount of counted banknotes.
9 Accumulation mode key;
2
Now the counter is ready to work with the factory settings as follows :
– Interface language is English.
– Currency is automatic currency detection by the first banknote in a
batch.
– Counting mode is MIX.
– Start mode is automatic.
– Accumulation mode is off.
– Batch mode is off (because in MIX mode it is always disabled).
– Counting speed is 900 banknotes per minute.
– Ultraviolet detection (UV) is off.
– Magnetic features detection (MG) is off.
– Banknote density detection (DENSITY) is on.
– Orientation sorting (ORT) is off.
– Data output method is a printer (in manual mode), connection rate is
9600.
– Extended visual mode is off.
– Sound volume is 50%.
– Screen brightness is 100%.
– Theme is default.
– Stacker capacity is 200 banknotes.
– Reject pocket capacity is 50 banknotes.
– User profile is «I».
2 The factory settings may be replaced by user settings if required.
1
6
4
3
7
9
8
10
11
12
13 14 15
16
5
2
3 Adjust the feeder gap. The manufacturer presets the gap in accordance with
the currencies to be counted. However, if the counter often rejects the
genuine banknotes and the report (see section «Operation Keys»,
REPORT Key, Fig. 51) returns «Small Notes Gap», «Double Note» or
«Dimensions» as the reason of the banknotes rejection, then turn screw 1
slightly clockwise (toward «–») to reduce the gap (see Fig. 1). If the
rejection report returns «Skew Error», «Length» or «Dimensions», then
turn screw 1 slightly counterclockwise (toward «+») to increase the gap
(see Fig. 1). The gap between separating rollers and feeding rollers should
make one note to pass free between the rollers but prevent two notes put
together from passing (see Fig. 14). To check a gap, use a banknote of good
quality, not worn out one. Rotate the feeding wheels to set the position of the
rollers so that there are no ripples in a place where the note passes. Put the
short side of the banknote between the separating rollers and feeding
rollers. The banknote should pass through with a little tension. If one
banknote passes very easily, then decrease the gap. If one banknote
passes between the rollers with difficulty, then increase the gap. Continue
gap setting until the banknote passes through rollers with a little tension.

Fig. 16
11
10
CONTENTS
DORS 800 BANKNOTE COUNTER DORS 800 BANKNOTE COUNTER
4 Adjust the banknote guides position according to the length of the longest
banknote in the batch being counted, align the batch edges (separate
banknotes shall not protrude from the batch) and place it in the middle of the
hopper avoiding its skew. The counter will start operation automatically.
Counting stops when stacker or reject pocket capacity limits have been
reached. After the banknotes have been removed out of the stacker, the
counter automatically resumes operation.
5 In case of an error follow the advices of the «Error Messages» section.
Note: Prepare the banknotes to be counted as in Fig. 15, remove the
banknotes that are torn, wet, greasy or dirty.
Advice: For customer's convenience we suggest using a stylus. The stylus
will facilitate your work with the counter.
Two styluses for the resistive touch screens are the part of delivery set
(see Fig. 16).
Setup Menu
To enter the user's settings menu touch the «MENU» key (see Fig. 13).
The user's settings menu appears on the screen. In its left part there are the
submenu keys, in the right part there are the corresponding parameters. To
save the changes and exit the menu, touch key.
After the exit the screen shows the
selected settings.
To exit the menu without saving the
changes, touch key.
А
Banknote
CB
The gap
Fig. 14 UV-T and UV-R are respectively translucent and reflective ultraviolet
detection modes. If activated ( , ), and a banknote with an
increased UV fluorescence has been found (for example, a counterfeit printed
on plain paper) then the banknote is rejected (reject reasons are available in
the «REPORT» submenu).
DENSITY is banknote optical density control. When is on the
banknotes with increased density (for instance, two notes stuck together) as
well as the banknotes with increased transparency will be redirected to reject
pocket (reject reason is available in REPORT menu).
MG is a magnetic ink detection. When is on, the banknotes without
magnetic ink will be redirected to reject pocket (reject reason is available in
REPORT menu).
STRICT is strict verification level. When is off the banknotes are
checked for the main authentication features only. When is on the
banknotes are checked for both main and additional authentication features (if
any additional features are available).
IMPORTANT: When STRICT is on, authenticity control degree of the
banknotes is more acute, but the number of rejected banknotes may increase,
(reject reason is «suspicious note»).
Note: Don’t turn off STRICT if counted banknotes authenticity is uncertain.
1 Submenu «Common» (see Fig.17) сontains the categories
«DETECTION», «COUNT RATE», «DENSITY LEVEL», and
the keys «Info», «Pocket limits», «Print», «Addit.»
Detection
Each counting mode has own range of available detection.
In COUNT mode the translucent UV control (UV-T) and the optical density
control of banknotes (DENSITY) are available.
In DEN, MULTI and MIX modes the available kinds of detection are: the
reflective UV control (UV-R), magnetic marks control (MG), strict level of
counterfeit detection (STRICT).
Fig. 17
Count Rate
User can choose any of four counting rates (600, 900, 1200, and 1500
banknotes per minute). The check-box opposite the selected speed is
highlighted in blue. For counting of worn notes we suggest low speed (600 or
900 notes/min).
Attention: If UV-R detection is activated ( ), only two counting
speeds (600 and 900 notes/min) are available.
Density level
The setting allows adjusting the scanner to detect the banknotes with
different optical density in COUNT mode.
Light and dark banknotes can be best detected when the right setting is selected:
1– For the new banknotes and the banknotes with the even optical density;
2– For moderate worn-out banknotes;
3– For the worn-out (dirty) banknotes and the banknotes with uneven
optical density (e.g. USD).
Fig. 15

13
12
CONTENTS
DORS 800 BANKNOTE COUNTER DORS 800 BANKNOTE COUNTER
Reduced sensitivity
Reduced sensitivity is switched off by default: .
Switching on improves banknote position detection
but the banknotes with transparent windows can't be counted.
INFO
This screen contains the information of the device identifier (UIN), the
firmware versions, the supported languages, the supported currencies, and
the currency database version (see Fig. 18, Fig. 19). Scroll the screen to see
the details.
Fig. 18 Fig. 19
Touch the key to open the submenu of the pocket capacities selection
(see Fig. 20).
POCKET LIMITS
Fig. 20
The stacker limit is the maximum number of banknotes that can be placed
into the stacker. The limit has two possible values: 100 and 200 banknotes; as
soon as the selected value is reached, the counter stops and resumes its
operation after the banknotes are removed from the stacker (and pressing the I
or II key, if the counter is in the manual start mode). The selected value of the
stacker limit is highlighted in blue (see Fig. 20). To change the setting, just
press the required value (it became highlighted in blue).
The reject pocket has an adjustable limit value. As soon as the specified
limit is reached, the counter stops and resumes its operation after the
banknotes have been removed from the reject pocket (and pressing the I or II
key, if the counter is in the manual start mode). The default (optimal) value of
the reject pocket limit is 50 banknotes. The user can change the limit within the
range of 25 to 100 banknotes. To change the limit, move a slider to the required
value.
The slider moves by steps of 5 notes each (25 - 30 - 35 - etc.).
Attention! For counting of worn notes we suggest the reject pocket limit
would be not more than 50 notes, otherwise it may cause unsmooth stacking
or jamming of notes.
Note: All the banknotes that do not match to the counting/sorting criteria get
into the reject pocket, including the notes with tears and other mechanical
damages. To prevent any banknote damage, please choose such capacity of
reject pocket that corresponds to physical condition of the counting notes.
PRINT
Touch to open INFO OUTPUT METHOD (see Fig. 21).
This submenu allows choosing an external device for data output. Connect
the printer or CCTV to socket 15 (PRN) and the display to socket 17 (IND) in
the Fig. 2 and select the required output mode:
– CCTV
– PRINTER (AUTO) means a receipt is printed automatically.
– PRINTER (MAN) means a receipt is printed after touching (item 6 in
the Fig. 13).
– DORS 85 means information output to external display DORS 85.
– DORS 90 means information output to external display DORS 90.
Connection speed option allows choosing the speed of counter's COM port.
If an external device for information output is connected, the speed of its
COM port should be equal to the speed of counter's COM port.
The button ( ) allows to output a test info to an external device. If an
external device and a connection speed are correct then a message on
successful setting will be output at relevant external device (a screen of CCTV
or a receipt).
Fig. 21
2 Submenu «MODE» (Fig.22)
ADD mode:
ADD lets the user select an optimal accumulation mode. A checkbox
against selected mode is highlighted with blue.
Warning: ADD mode selection is in the menu (see Fig.22). To turn ADD mode
on/off please use ADD key (Fig. 13 pos. 9).
1

1514
CONTENTS
DORS 800 BANKNOTE COUNTER DORS 800 BANKNOTE COUNTER
ADD 1
When is selected, the display shows the current batch amount.
Having the batch counted (the banknotes are in the stacker) the machine
displays the last batch amount for a while and then will show total amount.
When the notes are taken out from the pockets and the new notes are
added to the hopper, the device will add the new count to total amount.
ADD2
When is selected, the display shows the current batch amount.
Having the batch counted (the banknotes are in the stacker) the machine
displays the total amount.
When the notes are taken out from the pockets and the new notes are
added to the hopper, the machine adds the new count to total amount.
ADD3
When is selected, the display shows the current batch amount.
Having the batch counted (the banknotes are in the stacker) the machine
displays the last batch amount for a while and then will show total amount.
When the notes are taken out from the pockets and the new notes are ad-
ded to the hopper, the machine resets total amount and starts counting anew.
Warning:
If during the counting process (when the accumulation mode is on or the
stacker is not empty), the parameters affecting the count result (for example:
ADD mode, batch mode, currency, etc.) have been changed, a flashing
warning AMOUNT DATA WILL BE LOST will appear in the display. Touch
and take out the banknotes from all the pockets of the counter to confirm the
changes.
Or select the previous mode to disable the changes.
BATCH CONTINUE
Batch Continue is the counting mode which allows accumulating the
counting results while there are the banknotes in the hopper.
When the hopper is empty, the next count will start from zero, not from the
previous amount.
Touch Batch Continue icon to activate/deactivate the mode (see Fig. 22).
BATCH CLEAR
Batch Clear is the function that lets the user to choose whether to add the
new batch amount to the previously counted banknotes or to reset the last
batch if the following conditions are met:
– ADD1 or ADD2 mode is on.
– Some amount has been reached while counting, and then both the
hopper and the stacker were emptied.
– An error occurred during further counting, requiring the user's attention
(note jam or the pockets are empty etc).
Having the error fixed the user will receive a message offering to add the last
batch to previous amount or to reset the result to previous amount.
Touch Batch Clear icon to activate/deactivate the function (see Fig. 22).
Fig. 22
3 Submenu «ADVANCED»
This menu contains screen brightness and sound volume settings, visual
mode select and FACTORY RESET icons (see Fig. 23).
Visual mode select
The counter has three visual modes:
1– Regular (Fig. 23.1, it's the default mode, it looks like pictured in Fig. 13).
2– Wide (Fig. 23.2). Quick access keys are removed from the screen, the font
size is increased for COUNT and AMOUNT values (see Fig. 24). To get an
access to the menu touch key. To recall the hot keys on the sides of the
screen, touch the centre of the screen; touch it again to hide the keys.
3– Simple (see Fig. 23.3). The font size is increased for COUNT and AMOUNT
values (see Fig. 25). Only three keys are available on the screen:
– menu access.
– send data to printer.
– exit to Default visual mode.
1 2 3
Fig. 23

17
16
CONTENTS
DORS 800 BANKNOTE COUNTER DORS 800 BANKNOTE COUNTER
SOUND VOLUME
Set the volume by moving the slider between MIN and МАХ (Fig. 23). To
turn the sound off move the slider to MIN.
LCD BRIGHTNESS
Set display brightness by moving the slider between MIN and МАХ (Fig. 23).
FACTORY RESET
Touch the key to reset current user settings to factory defaults (refer to
«OPERATION» – Submenu «ADVANCED» see page 15). To exclude an
accidental reset of the settings, you will be asked to confirm it (see Fig. 44).
Warning: the settings are reset for the current user only, while the settings
of another user remain as they were.
4 Submenu «THEMES»
Select one of the preset themes of graphic user interface (GUI). Selected
theme is marked by blue check-box at the left (Fig. 26).
Fig. 26
Fig. 24
Fig. 25
5 Submenu «LANGUAGE»
Select one of the preset languages. Touch the language to select it.
Selected language is marked by blue check-box at the left (see Fig. 27).
Available languages depend on the counter firmware version.
Fig. 27
1 Keys and (START / USER PROFILE / USER)
1.1 The counter can save two various profiles with their unique settings.
You can switch between them by touching the keys «I» and «II»
(see Fig. 3). The profiles may be used by one user or by two users
(«Two tellers» operation mode). According to the tasks to be solved
and personal preferences, each user can choose any setting and any
counting / sorting mode.
Selected profile indication depends on visual mode. In regular visual
mode the operating keys next to the active user key are highlighted in
green. The figures given below show the control panel appearance for
various users: Fig. 28 is for 1st user (I); Fig. 29 is for 2nd user (II).
OPERATING KEYS

1918
CONTENTS
DORS 800 BANKNOTE COUNTER DORS 800 BANKNOTE COUNTER
Fig. 28
USER 1 keys are highlighted
Regular visual mode:
WIDE VISUAL MODE:
1.2 Keys «I» or «II» are used for the start of count in the manual start mode.
To start counting touch the button of the active user.
The active user indication in the wide visual mode is shown in Fig. 30
(1st user) and Fig.31 (2nd user).
Fig. 29
USER 2 keys are highlighted
Fig. 30
Fig. 31
USER 1 indicator
USER 2 indicator
2 Counting mode key
There are four counting modes: «COUNT», «MIX», «MULTI» and «DEN».
A mode is selected by a repetitive touching of the mode key. At the same
time this key displays the selected operation mode.
2.1 «COUNT» is a piece counting mode. The notes are counted without
detecting their denominations and counterfeit detection; the display
3
shows the quantity of the counted and rejected banknotes (Fig. 32).
Fig. 32
2.2 «MIX» is the counting mode for mixed denominations of certain
currency with their authentication, calculation of the total amount, the
quantity of the counted banknotes and amounts of each denomination.
The counter will display total amount of the counted banknotes, the
quantity of rejected and accepted banknotes (see Fig. 33).
The detailed report on each denomination's number and amount is
available by touching the key «REPORT» (submenu «Batch Report»,
Fig. 34) or by touching the area shown in Fig. 33).
3 Rejected banknotes displayed quantity is for reference and may differ from actual.

2120
CONTENTS
DORS 800 BANKNOTE COUNTER DORS 800 BANKNOTE COUNTER
Fig. 33
Touch here to
open the
detailed report
For more details on submenu «REPORT», see subsection Operation
Keys (Key «REPORT»).
2.3 «MULTI» is a MIX mode for several currencies simultaneously. The
currencies to be counted in the MULTI mode are ones selected as
AUTODETECT currencies (see Fig.38), i.e. up to 10 currencies. If the
«Full auto» mode is selected then the list of currencies on the main
screen is empty by default and will be filled once more currencies are
detected. After detecting more than 5 currencies the buttons will appear
to scroll the list. The display shows the quantity and amount of
counted banknotes for each currency and the quantity of rejected
banknotes (see Fig. 35).
To go to the batch report for a certain currency, touch the flag zone or the
name of the currency (see Fig. 35a). The denomination, quantity and
amount of all counted currencies are available by touching the
«REPORT» key (see Fig. 35b).
Fig. 35
Touch here to
open currency
report
Amount
Quantity
Fig. 34
2.4 «DEN» is the counting mode for the banknotes of certain denomination
with their authentication, calculation of the total amount and the quantity
of counted banknotes, as well as the recognition of denomination and
issue.
The denomination and issue are set by the first banknote in the batch.
It's also possible to select the denomination manually (see submenu
«CURRENCY», Fig. 39). The display shows the total amount of counted
banknotes, the quantity of rejected and accepted banknotes (see Fig. 36).
Fig. 35a
Fig. 35b

2322
CONTENTS
DORS 800 BANKNOTE COUNTER DORS 800 BANKNOTE COUNTER
Fig. 36
Touch here to
open the report
about counted
banknotes
Touch REPORT key or the area shown in Fig. 36 and open to
check the denomination, quantity and amount for each denomination
(see Fig. 37).
Fig. 37
3 «CURRENCY» key
3.1 Touch CURR-CY key, the CURRENCY submenu will appear
(see Fig. 38), and select the currency and denomination to be counted.
(The set of supported currencies depends on the firmware version.)
Currency selection is available only for «MIX», «MULTI» and «DEN»
modes; denomination selection is available only for «DEN» mode.
Automatic mode of currency recognition is on by default; the counted
currency is set by the first banknote in the batch (see Fig. 38). In the
bottom left corner of the screen there is a list of auto currencies
( ), i.e. those currencies that can be detected automatically
(if more than one currency is selected).
Fig.38 shows:
A – Actual number of currencies available for auto detection by the first
banknote in the batch (selected by user). Touch any currency to delete it
from auto detection list.
B – Maximum number of currencies available for auto detection (depends
on firmware version).
If the user tries to exceed this
amount then a message will
appear in the upper part of the display.
C – All available currencies’ quantity (depends on firmware version). In the
middle of the screen there is a list of currencies. If the quantity of
currencies in this list (C) is more than 8, you can scroll this list
with keys.
Touch the currency to add any currency to Auto Currencies list (A). A
colour of a corresponding checkbox is changed from grey to blue to
confirm your choice. Touch the currency again to delete it from
the Auto Currencies list.
Touch and hold the currency for one second to select it as a single one.
NOTE: if the only currency is chosen then its name appears at the top of
the screen (see Fig. 39); also in the main screen a sign is replaced
with a name of this currency (in the Fig. 40 it is USD ).
С
А
В
Fig. 38
Fig. 38a

2524
CONTENTS
DORS 800 BANKNOTE COUNTER DORS 800 BANKNOTE COUNTER
Fig. 39 Fig. 40
Fig. 41
3.2 In the «DEN» mode you may
count the banknotes of the selected
currency with a manually selected
denomination value.
Select a single currency, and the
list of Auto Currencies at bottom
left corner of the screen will be
replaced with a list of all
denominations of selected
currency (see Fig. 39).
By default the Auto Denomination mode is activated: the denomination
is detected by the first note in the batch; in this case the check-boxes to
4
the left of denominations are highlighted in blue . If it's required that only
the banknotes of the certain denomination get into the stacker then
touch the required denomination; the check-box to the left becomes
blue while the other check-boxes become grey (see Fig. 41). The
selected value of denomination in mode «DEN» is shown in the main
screen to the right of the selected currency (see Fig. 40).
To return to Auto Denomination mode, touch key (see Fig. 39).
3.3 The DEN mode has the option of banknote sorting by emission (a year
when they were put in circulation). When you activate this option, the
counter will accept only the banknotes of the same currency,
denomination, and emission as the first note of a batch. All the other
banknotes will be rejected.
Touch button to activate this option (the button will be highlighted
in blue).
The year of issue (emission) of the counted banknotes will be shown in
the main screen of DEN mode to the right of currency symbol (see Fig 42).
Fig. 42
4 The colour may vary depending on selected theme.
WARNING: sorting the banknotes by their issue (OLD, NEW and VERY
NEW) is available not for every currency.
3.4 Singular currency.
Depending on a currency set of your counter it can have so-called
singular currencies. A singular currency is one which optical properties
differ from other currencies so that detecting it automatically among the
other currencies is impossible.
If a singular currency is selected, then the other currencies can't be
added to the auto currency list. To cancel a choice of a singular currency
just choose any other currency.
In currencies list a singular currency is marked yellow (see Fig. 43).
A symbol of selected currency (or AUTO mode symbol) is at the bottom
left corner of the main screen (see Fig. 40). This symbol is
also a hot key to CURRENCY submenu (for instance when Wide visual
mode is active). In MIX mode to the right of a currency symbol there is a
list of denominations of this currency with quantity of counted notes; the
counted denominations are in black font (see Fig. 33).
Fig. 43

2726
CONTENTS
DORS 800 BANKNOTE COUNTER DORS 800 BANKNOTE COUNTER
3.5 Full AUTO
Full automatic currency detection mode allows you to work with all the
currencies stored in the counter's memory (except the singular ones).
To activate the mode touch the button «Full AUTO» (see Fig. 38).
When this mode is activated, the list of all available currencies is
replaced with the inscription «All currencies are allowed except
special ones» (see Fig. 38a). Available counting speed in Full AUTO
mode is 600/900/1200.
WARNING:
RESET acknowledgement
may be disabled in your
counter firmware version!
Fig. 45
4 PRINT key
key will send the results of counting to the printer connected to the
counter if manual printing mode is selected (see Fig. 21).
5 RESET key
key is to clear the counting results of the stacker after it has been
emptied (the reject pocket shall also be empty). To avoid an accidental data
reset, confirmation is required, (see Fig. 44).
Fig. 44
6 REPORT key
Touch key to open REPORT submenu (Fig. 46) showing the information
about the counted and rejected banknotes.
The report on the counted b anknotes is available in two versions:
– ;Batch report for last batch
– Total report displaying the result since the counter has been
switched on.
– T touch o clear the report touch.
– Touch to exit REPORT submenu.
A report on the rejected banknotes is available in two versions:
– Reject report;
– Extended reject report.
REJECT REPORT (see Fig. 47) contains possible reject reasons and
rejected banknotes’ quantity for each reason:
«Counting mode mismatch»: rejected banknotes do not match selected
counting mode (for instance the banknotes of various denomination are
counted in DEN mode; currency or denomination mismatch).
«Mechanical errors»: the banknotes were rejected due to skew in the path
causing detection error.
«Suspect»: rejected banknotes do not match main criteria of selected
currency.
EXTENDED REJECT REPORT (Fig. 48) contains the numbers of the
banknotes and their reject reasons.
NUM – banknote position in reject pocket (the position may not match the
actual one due to some errors: small notes gap, double note etc).
REJECT REASON – an error which caused banknote reject (see Table 1).
The number of the banknote (№) in the counted batch is displayed to the
right of reject reason for reference.
To clear the report touch (confirmation is required, see Fig. 44).
Touch to exit REPORT submenu.
Fig. 46
Fig. 47
Fig. 48

2928
CONTENTS
DORS 800 BANKNOTE COUNTER DORS 800 BANKNOTE COUNTER
Manual amount correction
Pressing key (see Fig. 46, in the top right corner) opens the menu for
manual correction of the amount of counted banknotes (see Fig. 49). This
menu allows you to manually adjust the amount of counted banknotes
including adding the required amount of coins, save to the report or print the
corrected results.
In the fig. 49:
1 – The currency selected for adjustment (highlighted in the list of
currencies).
2 – The total amount of all denominations obtained as a result of the
correction.
3 – Fields for entering: the number and amount of coins, the quantity for each
denomination of the selected currency (the list can be scrolled).
4 – A list of all available currencies (depends on your counter's firmware). At
the top of the list there are the currencies that have been counted before
entering the correction menu. All the other currencies are arranged after
in alphabetical order (the list can be scrolled).
5 – «Cancel» button to exit the menu without saving the entered changes.
6 – OK button, saves the changes and switches to the REPORT menu.
Correction order:
1 – Select the required currency in the list of currencies.
2 – Touch the input field of the required denomination, in the window that
opens (see Fig. 50), enter the required quantity (for coins the quantity
and amount) and touch the checkmark to confirm.
3 – Repeat steps 1, 2 for all denominations and currencies that are required.
4 – Touch OK button to save the entered changes and exit to the REPORT
menu.
When manually adjusting the amount, please note that:
• When ADD mode is on, all available banknote counts are saved, and
newly entered data will be added to them.
• When ADD mode is off and there are counted banknotes in the stacker,
then the newly entered data will be added to them.
• When ADD mode is off and there are no counted banknotes in the
stacker then only newly entered data is displayed.
121
3
4
5
6
Fig. 50 Fig. 49
SMALL GAP
IN THE PATH
Continuous chain in path (short
side of note is too long or the gap
between two notes is too short). Remove the banknotes that got
stuck together. Adjust the feeder
gap («–» means gap decrease) for
operation with the thinner
banknotes. To get the required gap,
turn screw 1 (Fig. 1) clockwise.
DOUBLE
NOTE:
DARK
A double banknote or a very dark
banknote has been detected.
Remove the rejected banknote(s).
Adjust the feeder gap («–» for gap
decrease) for operation with the
thin banknotes. To adjust the
required gap, turn screw 1 (Fig. 1)
slightly clockwise.
SMALL GAP
IN THE
FEEDER
Continuous chain between
separating and feeding rollers
(short side of note is too long or the
gap between two notes is too
short).
DOUBLE NOTE:
TRANSPARENT A very transparent banknote
has been detected.
Remove the banknote.
DIMENSIONS A banknote d iffer s from t he
average dimensions of the first five
notes in a batch (the difference
exceeds 20mm by the long side of
note or 10% by its short side.
Remove the banknote. Adjust the
feeder gap (if required) according
to article 3 of section «Operation».
SKEW ERROR Banknote skew angle exceeds 14°. Adjust the hopper's guides in
accordance with the length of the
longest note in the batch. If required,
adjust the banknote feeder gap («+»
means gap increase) for operation
with thicker banknotes. To get the
required gap, turn screw 1 (Fig. 1)
counterclockwise.
Table 1. The reasons of banknote rejection
REJECT
REASON
SUSPECT
NOTE
Currency and denomination are
detected, but authenticity is
suspected.
Remove the banknote and recount
it. In case of repeated rejection
verify the authenticity of the
banknote using currency reference
book and multifunctional detector
like DORS 1250 or DORS 1300.
Description Teller's actions
CURRENCY [X]
where X is for
currency
Banknote currency doesn't match
the selected one in DEN or MIX
mode
Remove the banknote.
DENOM [X Y]
where X is for
currency and Y is
for denomination
Banknote denomination doesn't
match the selected one in DEN
mode.
UNKNOWN
NOTE
Banknote currency and
denomination can't be detected
ORIENTATION Banknote orientation does not
match the selected one.
Place the banknote into the hopper
according to the selected
orientation.

3130
CONTENTS
DORS 800 BANKNOTE COUNTER DORS 800 BANKNOTE COUNTER
Table 1 continued
REJECT
REASON Description Teller's actions
UV A banknote with an increased level
of UV luminescence is found.
Remove the banknote and recount
it. If the high level of UV
luminescence is a feature of this
type of banknotes, switch off UV-T
or/and UV-R.
MG A banknote with wrong magnetic
properties is found.
Remove the banknote.
SCANNER
ERROR
Banknote scanning error Place the banknote in the hopper
and recount.
LENGTH Short side of the banknote is
exceeded 120mm (a probable
reason can be: a banknote has
passed with a large skew or the
banknotes got stuck together).
Remo v e t he ba n k n otes a n d
recount them. If required, adjust the
feeder gap.
FEED ERROR Banknote feed error.
Remo v e t he ba n k n otes a n d
recount them.
BATCH QUOTA
OVERFLOW
There are more banknotes fed
than required by the current
mode (batch size, stacker
capacity).
The banknote issue doesn't
match the issue of the 1st
note in the batch (for DEN and
MIX modes).
ISSUE
Remove the banknote.
7 ADD Key
Touch ADD key to turn on or turn off ADD mode (item 9 in Fig. 13). To
switch between ADD1, ADD2, ADD3 modes use MENU key.
ADD mode is for accumulation of counted banknotes by their denomination
and total amount, the banknotes added to the hopper will be summed with
the ones already counted. Touch RESET to reset counted total amount and
notes quantity.
Please mind that in DEN and MIX modes COUNT and AMOUNT values are
displayed according to selected ADD mode while counting and after the
counting has been finished.
8 AUTO / MAN Key
AUTO / MAN key (item 10 in Fig. 13) sets the counter to automatic or
manual start mode. The key has two states: for automatic start and for
manual start. In automatic start mode the counter will start counting as soon
as the notes are placed into the hopper. In manual start mode the counter
will start counting as soon as the key or is touched, depending on
selected user profile.
9 DETECTION Key
DETECTION key provides a quick access to detection options depending
on selected count mode. In MULTI, DEN and MIX modes touching this key
recalls pop-up menu where UV-R, MG or STRICT detection can be turned
on / off. Turned on detection will be highlighted in blue if Default theme is
used (Fig. 53). Turned off detection
will be highlighted in grey:
Fig. 53

33
32
CONTENTS
DORS 800 BANKNOTE COUNTER DORS 800 BANKNOTE COUNTER
Touching this key in COUNT mode recalls pop-up menu where UV-T or
DENS. detection can be turned on / off. Turned on detection will be
highlighted in blue if Default theme is used (Fig. 54). Turned off detection
will be highlighted in grey:
Fig. 54
Note:
a text on the
DETECTION key is
highlighted
depending on
selected detection
mode.
10 BATCH key
Touching key opens BATCH submenu (see Fig. 55), available in «DEN»
and «COUNT» (and unavailable in MIX and MULTI modes). BATCH
submenu lets you select batch size and stacker limit.
Turn on batch mode by touching key (batch size should be greater than 0).
Turn off batch mode by touching key.
Touch to cancel the changes and return to main menu.
Set batch size (1…999) by touching 0…9 keys. Touch to delete the last
digit.
Touch to reset batch size.
Fig. 55
The fast access key to BATCH mode is available from the main screen in the
top right corner (see Fig. 56). means that batch mode is on; means
that batch mode is off. The batch size is shown in the bottom right corner of
the main screen (see Fig. 56). Once the batch size is reached, the indicator
starts blinking, and in 10 seconds the message «BATCH IS READY»
appears in the screen. If the number of the banknotes in the stacker is less
than the batch size, the message is: «add X», where X is the number of
banknotes required to complete the batch of the selected size, in 10
seconds message «ADD BANKNOTES» will appear in the screen.
Note: The batch size indicator is also the hot key for a quick access to the
«BATCH» submenu.
11 «ORIENTATION» Key
Select the counting by banknotes' orientation by touching key. A menu
will appear to select the required orientation (see Fig. 57). You may also
select the orientation by repetitive touching of ORT key; the mode will
change as , , , showing selected orientation of the banknotes.
The menu will be closed in 7 seconds after the mode has been selected or
when the counting begins.
You can select the following setting for the orientation of the banknotes:
• «OFF» (disregard the orientation see Fig. 57)
• «FACE» - the banknotes will pass to the stacker if they were placed in the
hopper face side up (if you doubt which side is the face, refer to relevant
Central Bank's web site). The other banknotes will be sent to reject pocket
(see Fig. 58).
In the BATCH submenu a user can change stacker capacity. The current
value of the stacker capacity is highlighted in blue. Touch the required value
(new value will be highlighted in blue) to change stacker capacity.
Note: under the current batch size there is an information bar which
contains info about the rejected banknotes, the current batch size and the
stacker capacity (see Fig. 55).
Fig. 56

35
34
CONTENTS
DORS 800 BANKNOTE COUNTER DORS 800 BANKNOTE COUNTER
Fig. 57
• «ORIENT» - the banknotes will pass to the stacker if they were placed in the
hopper in main orientation (face side up).
Otherwise oriented banknotes will be sent to reject pocket see Fig. 59.
• «AUTO» (by the first note in the stack) – the banknotes will pass to the
stacker if they were oriented in the hopper same way as the first note in the
batch. Otherwise oriented banknotes will be redirected to the reject pocket
see Fig. 60.
Fig. 58
Fig. 59
Fig. 60
MESSAGES IN COURSE OF OPERATION
Table 2. Error messages
Error
message
P.O.S.T.
ERROR
An error occurred during self-
testing of the counter (at its
switching on), the sensors are
covered by foreign object.
Switch off the machine. Remove
banknotes and/or foreign objects
from the hopper, the stacker, the
reject pocket, and the path. Then
switch on again. If the error
happens again, call a technician.
Reason Teller's actions
Jammed banknotes or a foreign
object in the path block the gear
and cause the overcurrent.
Switch off the machine. Remove
the banknotes and/or foreign
objects from the path.
Overcurrent
The b anknotes g et j ammed.
Foreign object in the path blocks
the redirector between the hopper
and the reject pocket.
Switch off the machine. Remove
the banknotes and/or foreign
objects from the redirector
Switch
error
Sensors calibration error occurred
during self-test of the counter.
Switch off the machine. Open the
path and remove the banknotes,
the foreign objects blocking CIS
(see item 7, Fig. 6). Then switch on
again. If the error happens again,
call a technician.
Calibration
error
Periodical
maintenance
required.
Please call
your service
support.
The counter has counted the
number of banknotes specified for
the service interval.
Touch the screen to continue the
operation. Call the technician for
periodical maintenance.

37
36
CONTENTS
DORS 800 BANKNOTE COUNTER DORS 800 BANKNOTE COUNTER
A banknote is jammed in the path
during counting.
Remove banknotes from the
hopper, open the path and remove
the banknotes from there.
The red circles on the picture are
marked the places of possible
jams.
Message Reason Teller's actions
More banknotes than required
passed to the stacker in batch
mode.
Take the notes out of the stacker
and recount the batch.
Batch error
In a process of a count an uncertain
amount of banknotes passed to the
stacker.
Take the notes out of the stacker
and recount them.
Count error,
uncertain
amount
Incorrect feeding of the banknotes. Remove banknotes from the
hopper, open the path and remove
the banknotes from there.
Ad j u s t t h e h o p p e r ' s g u i d e s
according to the width of the widest
banknote in the batch, level the
batch edges (separate banknotes
shall not to protruded from the
batch), and place them in the
hopper avoiding their skew.
Feed error
Table 3. Messages in course of count
Banknote path
is closed.
Clearing
the path…
Path self cleaning is in progress
after the path has been closed.
Wait till path clearing is over.
Banknote
path is closed.
Remove
banknotes
from hopper
There are banknotes in hopper or
hopper's sensor is covered by a
foreign objects.
Remove the banknotes or foreign
objects from the hopper.
Banknote path
is closed.
Clean
the pockets
There are banknotes in the stacker
and/or in the reject pocket.
Remove the banknotes from the
stacker and/or from the reject
pocket.
Banknote
path is open The path is opened, the upper part
is opened.
Ensure there is no banknote or
foreign object inside the counter
and close the path.
Banknote path
is closed.
Note is jammed
in path
Open the path, remove banknotes
or foreign objects. If you are sure
that the jammed banknote will not
get damaged, then you can use
«force clean» button to force self-
cleaning the path.
There are banknotes or foreign
objects in the closed path.
Table 3 continued
Remove
banknotes
from stacker
The number of notes in the stacker
is equal to the stacker capacity.
Take the banknotes out of the
stacker. The counter will resume
operation at once (in AUTO mode)
or after key I(II) is touched (in MAN
mode).
Remove
notes from
reject
pocket
The number of notes in the reject
pocket is equal to its capacity.
Remove the banknotes from the
reject pocket.
Add
banknotes
The hopper is empty while the
number of notes in the stacker is
less than the required batch size (in
the AUTOMATIC START mode).
Add banknotes to the hopper, the
m a c h i n e r e s u m e s c o u n t i n g
automatically.
Add
banknotes
and press
start
The hopper is empty while the
number of notes in the stacker is
less than the required batch size (in
the MANUAL START mode).
Add banknotes to the hopper,
touch key I (II).
Clean the
pockets
Counting settings/modes were
changed after a count is finished.
Remove the banknotes from the
stacker and the reject pocket.
Batch is ready A batch of required size is counted. Remove the banknotes from the
stacker and resume counting, if you
want to count another batch.
UNAVAILABLE You tried to choose the function
unavailable for the current counting
mode (for example, tried to choose
a currency in the COUNT mode or a
batch size in the MIX mode).
Change counting mode to activate
required option.
SELF-
TESTING.
Please wait
until process
is completed
The self-test is in progress. Wait till the message box is closed.
BATCH XXX
IS READY
where YYY
in stacker
and ZZZ are
removed
The message is appeared when
you count a batch bigger than
stacker limit.
Take the banknotes out of the
stacker and continue counting.
Message Reason Teller's actions
Other manuals for 800
2
Table of contents
Other Dors Banknote Counter manuals