READ THIS INSTRUCTIONS CAREFULLY BEFORE MOUNTING AND USING THE LOCKING DEVICE. KEEP INSTRUCTIONS
FOR FUTURE REFERENCE. FAILURE TO DO SO MAY RESULT IN ACCIDENTAL WINDOW FALLS.
Please provide a copy of IMPORTANT SAFETY INFORMATION and INSTRUCTIONS to the owner and the occupant of the building
where the Breezz-Guard
®
is to be installed.
LEA ESTAS INSTRUCCIONES CUIDADOSAMENTE ANTES DE MONTAR Y UTILIZAR EL DISPOSITIVO DE BLOQUEO.
MANTENGA INSTRUCCIONES PARA REFERENCIA FUTURA. EL NO REALIZAR ESTO PUEDE RESULTAR EN CAÍDAS
ACCIDENTALES DE VENTANAS.
Proporcione una copia de INFORMACIÓN DE SEGURIDAD IMPORTANTE e INSTRUCCIONES al propietario y al ocupante del edificio
donde se instalará Breezz-Guard
®
.
L928
A. Guarda cable
B. Placa de cable
C. Cable
D. Cabezal de cable
E. Pestillo deslizable (a resorte)
F. Orificio de entrada del cabezal
de cable
G. 4 tornillos para madera
H. 4 tornillos para metal
14
Dreambaby® Breezz-Guard® Keyless Window Restrictor is suitable for most wood and aluminum hinged, sash and sliding
(horizontal or vertical) windows. Also suitable for many cabinets and doors.
El Breezz-Guard® de Dreambaby® es apropiado para la mayoría de las ventanas de madera y aluminio abatibles,
de guillotina y corredizas (horizontal y verticalmente). También es apropiado para muchos armarios y puertas.
SashHinged Sliding
Ventanas de
guillotina
Ventanas
abatibles
(con
bisagras)
Ventanas
corredizas
HG
C
A
D
B
F
E
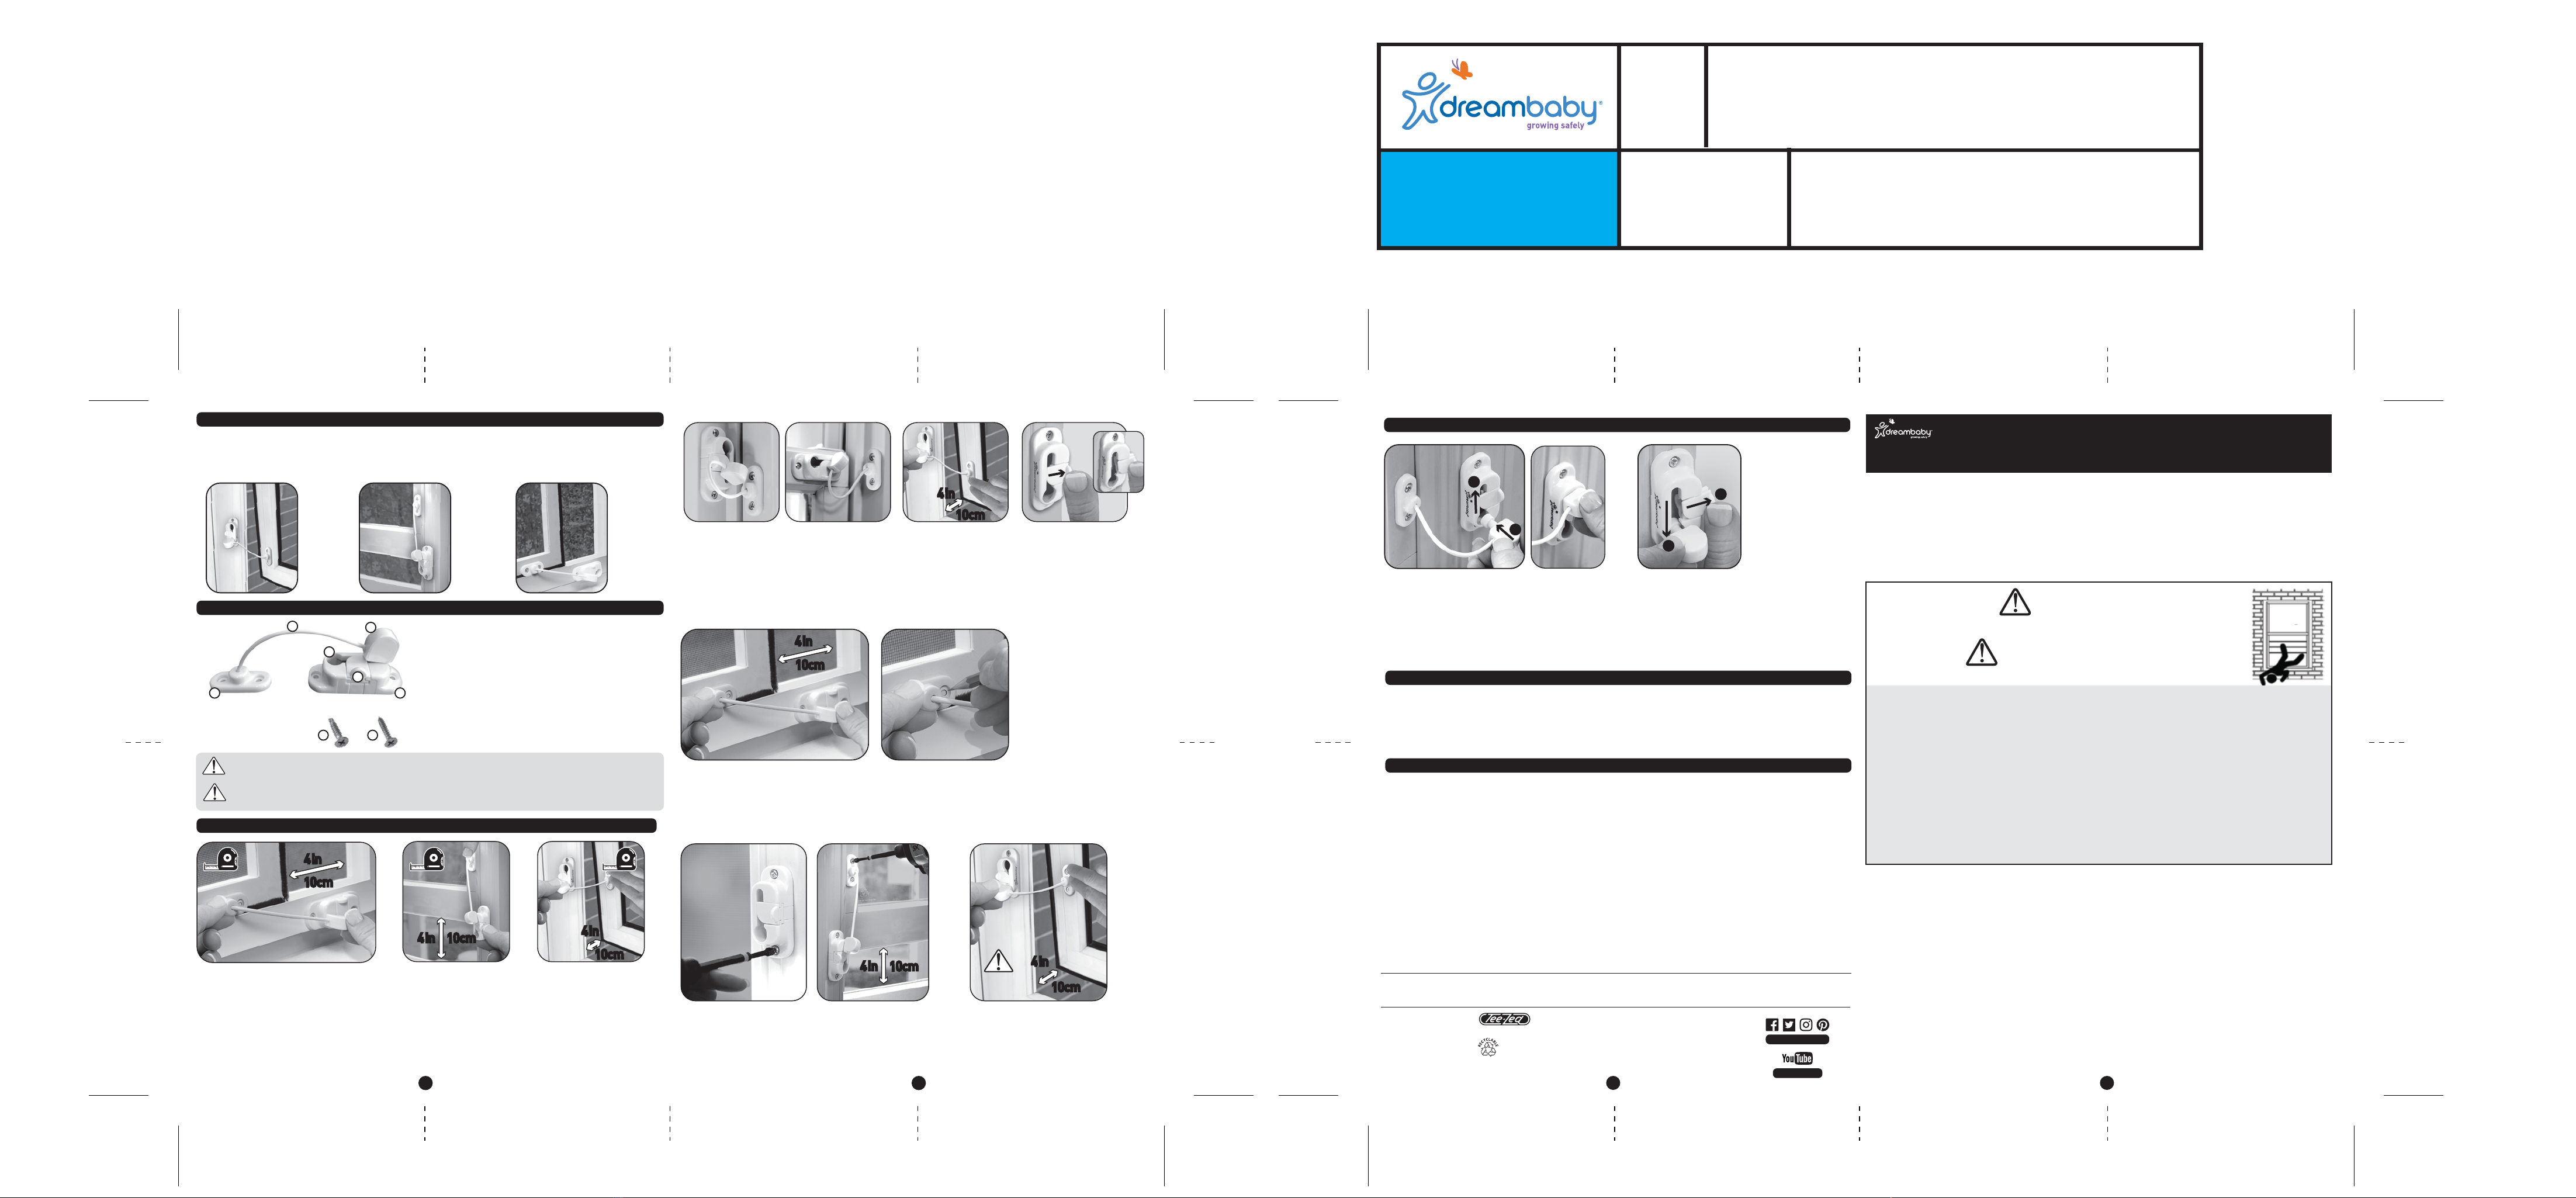
1. Using a tape measure to ensure the window will only open a maximum of 4in/10cm, work out the best position to install
the Breezz-Guard®.
Note: Depending on your window style and the Breezz-Guard® installation position, check for the window opening distance
in all directions. Confirm the window will not open more than a total of 4in/10cm at the widest point.
Usando una cinta de medir para asegurarse de que la ventana sólo se abra un máximo de 10 cm, determine cuál es la mejor
posición para instalar el Breezz-Guard®.
Nota: Dependiendo del estilo de la ventana y la posición de instalación del Breezz-Guard®, examine la distancia de apertura de
la ventana en todas direcciones. Cerciórese de que la ventana no se abra más de un total de 10 cm en el punto más ancho.
2.1 Before installing, work out which part should be
installed on the window frame and window edge,
the Cable Guard (A) or Cable Plate (B). These parts
may be fitted vertically or horizontally.
Antes de instalar, determine cuál parte, el guarda
cable (A) o la placa de cable (B), se debe instalar en
el borde de la ventana y cuál se debe instalar en el
marco de la ventana o pared. Estas partes se pueden
instalar en forma horizontal o vertical.
2.2 The Cable Guard (A)
and the Cable Plate (B)
do not need to be installed
on the same level.
No es necesario instalar el
guarda cable (A) y la placa
de cable (B) al mismo nivel.
3. Hold the fully assembled Breezz-Guard® in place and double check that the window will not open any more than a total of
4in/10cm and mark the position.
It is important that the opening distance of the window is not compromised and always remains at a maximum of 4in/10cm.
Sujete en posición correcta el Breezz-Guard® completamente ensamblado y verifique de nuevo que la ventana no se abra
más de un total de 10 cm y marque la posición.
Es importante que la distancia de apertura de la ventana no esté comprometida y permanezca siempre a un máximo de 10 cm.
4. Depending on the window edge or frame construction, secure
Cable Guard (A) and Cable Plate (B) in place using the appropriate
screws for Wood (G) or Metal (H).
Dependiendo del borde o marco de la ventana, asegure el
guarda cable (A) y la placa de cable (B) en posición correcta
usando los tornillos apropiados para madera (G) o metal (H).
5. With Breezz-Guard® installed and assembled,
confirm the window opening is restricted to
4in/10cm at the widest opening. If too wide,
reposition and reinstall.
Con el Breezz-Guard® instalado y ensamblado,
cerciórese de que la apertura de la ventana
esté limitada a un máximo de 10 cm. Si es
demasiado ancha, reposicione y vuelva a instalar.
23
4in
4in
10cm10cm
4in
4in
10cm10cm
10cm
10cm
10cm
10cm
2.3 When working out the position
for the Cable Guard (A),
ensure the Latch Slide (E) has
room to slide open.
Al determinar la posición del
guarda cable (A), asegúrese
de que haya suficiente espacio
para descorrer el pestillo
deslizable (E).
●
All screws should be checked regularly to ensure they have not loosened. Loose screws must be tightened.
●
Check the window and frame to ensure it remains in an appropriate condition for this product.
●
Remove Breezz-Guard® on windows that are no longer in sound condition.
●
The Cable Guard
(A)
, Cable Plate
(B)
and Cable
(C)
must be regularly checked for any signs of wear and corrosion.
Replace if this has occurred.
●
Todos los tornillos se deben revisar periódicamente para asegurarse de que no se hayan aflojado. Los tornillos aflojados
deben apretarse.
●
Chequee la ventana y el marco para asegurarse de que siguen en condiciones apropiadas para este producto.
●
Saque el Breezz-Guard® de las ventanas que ya no están en buenas condiciones.
●
El guarda cable
(A)
, la placa de cable
(B)
y el cable
(C)
se deben chequear periódicamente para detectar señales de
desgaste y corrosión. Reemplácelos si esto ha ocurrido.
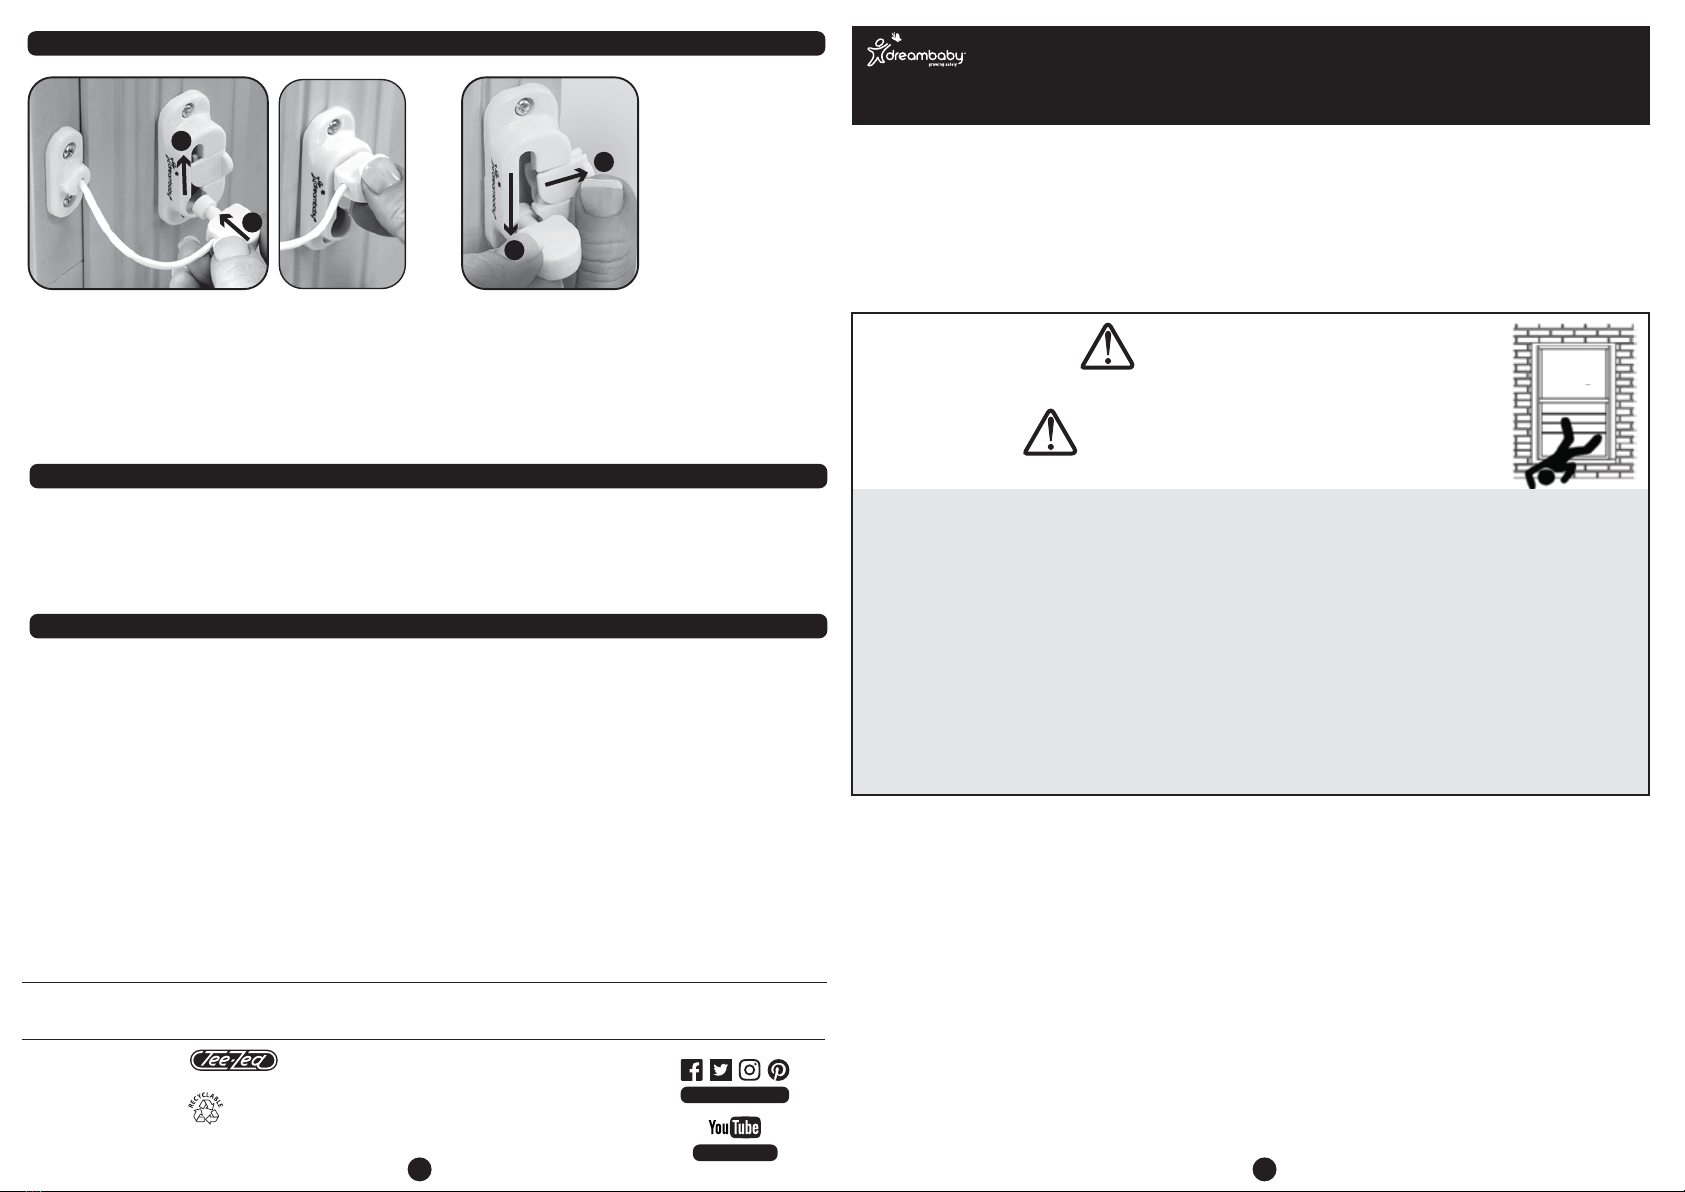
TO ENGAGE: TO DISENGAGE: PARA ENGANCHAR: PARA DESENGANCHAR:
1
1
2
2
PATENTED
PATENTADO
x4 x4
10cm10cm
4in
4in 4in
4in
4in
4in
10cm10cm
4in
4in
WARNING:
This package contains small parts and sharp points in an unassembled state.
Keep out of reach of children. Adult assembly required.
ADVERTENCIA:
Este paquete contiene piezas pequeñas y puntas filudas usada para ensamblar.
Mantenga fuera del alcance de los niños. Se requiere ensamblado por un adulto.
TO INSTALL: PARA INSTALAR:
Breezz-Guard
®
Keyless Window Restrictor
Restrictor sin llave para ventanas
DESIGN LIMITATIONS: LIMITACIONES DE DISENO:
PARTS LIST: LISTA DE PARTES
1.
Slide Latch (E).
2.
Move Cable Head (D) towards hole (F).
3.
Remove Cable (C).
1. Deslice la diapositiva del pestillo (E).
2.
Mueva la cabeza del cable (D) hacia el orificio (F).
3.
Retire el cable (C).
1.
Slide Latch (E).
2.
Insert Cable Head (D) into hole (F).
3.
Release Latch (E).
1.
Deslice la diapositiva del pestillo (E).
2.
Inserte el Cabezal del cable (D) en el orificio (F).
3.
Quite el Pestillo deslizable (E).
•
Ensure Breezz-Guard® is fitted in a position that does not hinder the ability for the window to lock and be unlocked.
•
Some children will be able to operate the child resistant mechanism, especially children around 4 years and above.
•
Replace the device if any part is broken, torn or missing.
•
To ensure proper installation of Breezz-Guard®, each installation site must be surveyed to determine the appropriate screw types and
condition of each window frame.
•
Once installed correctly according to instructions, window openings will be limited to 4in/10cm.
•
Do not install screws over an area that may hold glass.
•
Consult building and fire codes before installing Breezz-Guard
®
. Contact local building code department or fire department for specific applicable codes.
•
Breezz-Guard
®
shall be installed such that the release mechanism is in conformance with local building and fire code requirements.
CAUTION: THERE IS NO SUBSTITUTE FOR PROPER ADULT SUPERVISION.
•
Asegúrese de que Breezz-Guard® esté instalado en una posición que no obstaculice la capacidad de bloqueo y desbloqueo de la ventana.
•
Algunos niños podrán operar el mecanismo de resistencia infantil, especialmente niños de 4 años o más.
•
Reemplace el dispositivo si alguna parte está rota, rota o falta.
•
Para asegurar la instalación adecuada de Breezz-Guard®, cada sitio de instalación debe ser inspeccionado para determinar los tipos de
tornillos y las condiciones apropiadas de cada marco de ventana.
•
Una vez instalado correctamente de acuerdo con las instrucciones, las aperturas de las ventanas estarán limitadas a 10 cm.
•
No instale tornillos sobre un área que pueda tener vidrio.
•
Consulte los códigos de construcción y fuego antes de instalar Breezz-Guard®. Póngase en contacto con el departamento local de códigos de
construcción o el departamento de bomberos para conocer los códigos específicos aplicables.
•
Breezz-Guard
®
debe instalarse de manera que el mecanismo de liberación cumpla con los requisitos locales del código de construcción y de incendios.
PRECAUCIÓN: NO HAY SUSTITUTO PARA LA SUPERVISIÓN CORRECTA DE UN ADULTO.
•
Young children may fall out of the window if the Breezz-Guard® is not installed correctly.
•
Install the device so that a rigid 4in/10cm diameter sphere does not pass through any space in the window opening after the
Breezz-Guard® is in place.
•
Young children may fall out the window if all installation instructions are not followed:
•
Use recommended materials and techniques.
•
Make sure that the Breezz-Guard® is securely installed in accordance with instructions.
•
The Breezz-Guard® must not be fitted to decayed or corroded materials or to structures that have in any way deteriorated
and/or are in a poor condition.
•
Los niños pequeños pueden caerse por la ventana si Breezz-Guard
®
no está instalado correctamente.
•
Instale el dispositivo de modo que una esfera rígida de 10 cm de diámetro no atraviese ningún espacio en la abertura de la ventana
después de que Breezz-Guard
®
esté en su lugar.
•
Los niños pequeños pueden caerse por la ventana si todas las instrucciones de instalación no son seguidas:
•
Use materiales y técnicas recomendados.
•
Asegúrese de que Breezz-Guard
®
esté instalado de forma segura de acuerdo con instrucciones.
•
El Breezz-Guard
®
no debe instalarse en materiales cariados o corroídos o a estructuras que de alguna manera se han
deteriorado y / o están en malas condiciones.
WARNING
Possible Fall Hazard
ADVERTENCIA
Posible peligro de caída
A. Cable Guard
B. Cable Plate
C. Cable
D. Cable Head
E. Latch Slide (Spring Loaded)
F. Cable Head Feeder Hole
G. Screws for Wood x 4
H. Screws for Metal x 4
MAINTENANCE
MANTENIMIENTO
TEE-ZED PRODUCTS, LLC ACCEPTS NO RESPONSIBILITY FOR ANY LOSS OR DAMAGE
SUFFERED BY ANY PERSON AS A RESULT OF THE USE OR MISUSE OF THESE GOODS. IN THE
CASE OF ANY DEFECT IN THE GOODS, TEE-ZED’S LIABILITY SHALL BE LIMITED SOLELY TO
REPLACEMENT OF THE DEFECTIVE GOODS.
TEE-ZED PRODUCTS, LLC NO SE HACE RESPONSABLE DE NINGUNA PÉRDIDA O DAÑO
SUFRIDO POR ALGUNA PERSONA COMO RESULTADO DEL USO O DE LA MALA UTILIZACIÓN DE
ESTAS MERCANCÍAS. EN CASO DE CUALQUIER DEFECTO EN LAS MERCANCÍAS, LA
RESPONSABILIDAD DE TEE-ZED’S SERÁ LIMITADA ÚNICAMENTE AL REEMPLAZO DE LAS
MERCANCÍAS DEFECTUOSAS.
Tee-Zed Products, LLC
PO Box 1662,
Jamestown, NC 27282
USA
(336) 454-5716
Toll free: (888) 271-6959
�info@tee-zed.com
www.dream-baby.com
Tee-Zed Products Pty Ltd
PO Box 2022,
Bondi Junction NSW 1355
Australia
+61 (0)2 9386 4000
�info@tee-zed.com.au
www.dreambaby.com.au
Made in Dongguan, China.
Hecho en China.
©2018 Tee-Zed Products, LLC
Dreambaby
®
products by
Los productos Dreambaby
®
por
dreambabytv
dreambabysafety
Complies with
Cumple con
ASTM F2090-17
INSTRUCTIONS
INSTRUCCIONES
L928_IM_05072018_X.02
L928 IM_PAGE 1
w297 x h210mm
A4 LL
A4
L924 IM_PAGE 1
w297 x h210mm
A4
Printer:
KW
Design
JOB TITLE
L928_DB_Breezz-Guard®_IM_05.07.2018_X.02
COUNTRY
CODE
L
DATE:
05.07.2018