manuals.online logo
Brands
  1. Home
  2. •
  3. Brands
  4. •
  5. dreambaby
  6. •
  7. Safety Equipment
  8. •
  9. dreambaby Breezz-Safe F926 User manual

dreambaby Breezz-Safe F926 User manual

INSTRUCTIONS
Breezz-Safe
®
Window Restrictor
F926
Made in Hangzhou, China.
©2018 Tee-Zed Products Pty Ltd
41
F926_IM_2018.05_X.01
MAINTENANCE
●
All screws should be checked regularly to ensure they have not loosened.
Loose screws must be tightened.
●
Check the window and frame to ensure it remains in an appropriate condition for this product.
●
Remove Breezz-
Safe®
on windows that are no longer in sound condition.
●
The Lock Body
(A)
, Brackets
(D)
and Cable
(C)
must be regularly checked for any signs of wear
and corrosion. Replace if this has occurred.
TO ENGAGE: TO DISENGAGE:
1.
Use Key (G) to unlock.
2.
Remove Cable Head (F).
3.
Store Key (G) out of reach of children.
Keep the
Key out of reach of children in a position above
1.6m/63in, but in a place an adult could access
quickly should the need arise.
1.
Insert Cable Head (F) into hole
2.
Use Key (G) to lock in place.
3.
Pull to check Cable (C) is secure.
1.6m
63in
Complies with: Strata Schemes Management Amendment (Child Window Safety Devices)
Regulation 2013 (NSW, Australia).
BS EN 16281:2013
Dreambaby
®
Breezz-Safe
®
Window Restrictor
is suitable for most wood,
PVC and aluminum hinged, sash and sliding (horizontal or vertical)
windows. Also suitable for many cabinets and doors.
SashHinged Sliding
WARNING - Check the locking device prior to use.
WARNING - This locking device does not automaticaly locked again after it has been completely released.
WARNING - Some children will be able to operate the child resistant mechanism, especially children
around 4 years and above.
WARNING - Replace the device if any part is broken, torn or missing.
WARNING - When not in use, keep key out of reach of children as these could be a choking hazard.
Keep the Key out of reach of children in a position above 1.6m/63in, but in a place an adult
could access quickly should the need arise.
To ensure proper installation of Breezz-Safe®, each installation site must be surveyed to determine
the appropriate screw types and condition of each window frame.
The Breezz-Safe® must not be fitted to decayed or corroded materials or to structures that have in any
way deteriorated and/or are in a poor condition.
Once installed correctly according to instructions, window openings will be limited to 10cm/4in.
Do not install screws over an area that may hold glass.
CAUTION: THERE IS NO SUBSTITUTE FOR PROPER ADULT SUPERVISION.
WARNING
READ THIS INSTRUCTIONS CAREFULLY BEFORE MOUNTING AND USING THE LOCKING DEVICE.
THE CHILD PROTECTIVE FUNCTION OF THE LOCKING DEVICE MAY BE AFFECTED
IF YOU DO NOT FOLLOW THE INSTRUCTIONS.
Keep instructions for future reference.
Tee-Zed acknowledges that it’s customers may be entitled to statutory consumer guarantees and does not seek to exclude or limit them. These guarantees include that Tee-Zed’s products are of
acceptable quality. This Tee-Zed product is for the specific purpose detailed in the instructions and packaging and tee-zed considers use outside of that purpose to be abnormal use. To the
maximum extent permitted by law, Tee-Zed does not accept any liability for damage:
• arising from abnormal use of the products;
• caused by installation or removal of the products other than in accordance with the supplied installation and removal instructions; or
• arising under the law of tort or contract.
dreambabytv
dreambabysafety
Look for the Dreambaby® range of Child Safety and Care Products.
Tee-Zed Products Pty Ltd
PO Box 2022,
Bondi Junction NSW 1355
Australia
 +61 (0)2 9386 4000
 info@tee-zed.com.au
www.dreambaby.com.au
Dreambaby
®
products by
Tee-Zed Products (N.Z.) Ltd
PO Box 64013,
Botany Town Centre Auckland
New Zealand
 +64 (0)9 274 8788
 info@tee-zed.co.nz
www.dreambaby.co.nz
Tee-Zed Products Ltd
PO Box 29227,
Dunfermline, KY12 2DN
United Kingdom
 +44 (0)844 800 9445
 info@tee-zed.co.uk
www.dreambaby.co.uk
C
A
D
B
FE
A. Lock Body
B. Lock Cover
C. Cable
D. Cable Bracket
E. Cable Bracket Cover
F. Cable Head
G. Key
H. Screws x 4
H
G
1. Using a tape measure to ensure the window will only open a maximum of
10cm/4in
,
work out the best position to install the Breezz-Safe
®
.
Note: Depending on your window style and the Breezz-Safe
®
installation position, check for the
window opening distance in all directions. Confirm the window will not open more than a total
of
10cm/4in
at the
widest point.
2.
Having worked out the position you
require the Lock Body
(A)
to be
installed, secure it to the fixed
frame using the Screws
(H)
.
The Lock Body
(A)
may be fitted
either vertically or horizontally.
3.
Hold the Cable Bracket
(D)
on the
open window frame and position it
to ensure the window will not open
any further than
10cm/4in
at the
widest opening. The Lock Body
(A)
and the Cable Bracket
(D)
do not
need to be installed on the same
level, it is important the opening
distance of the window is not
compromised.
4.
Using the Screws
(H)
, secure the Lock Body
(A)
and
Cable Bracket
(D)
to the window.
7.
Slide the Covers
(B,E)
onto Lock Body
(A)
and Cable Bracket
(D)
and click into place.
6.
Test the function by locking
and unlocking using Key
(G)
.
23
4in
4in
10cm10cm
4in
4in
10cm10cm
10cm10cm
4in
4in
10cm10cm
4in
4in
10cm10cm
10cm10cm
4in
4in
4in
4in
10cm10cm
4in
4in
WARNING:
This package contains small parts and sharp points in an unassembled state.
Keep out of reach of children. Adult assembly required.
TO INSTALL:
PARTS LIST:
5.
Insert the Cable Head
(F)
into the
Lock Body
(A)
, then using Key
(G)
,
lock the Cable Head
(F)
into place.
Check measurement
of opening do not
exceed 10cm/4in.
(If too wide, reposition
and reinstall.)

Other dreambaby Safety Equipment manuals

dreambaby F860 User manual

dreambaby

dreambaby F860 User manual

dreambaby PCR854 User manual

dreambaby

dreambaby PCR854 User manual

dreambaby F820N User manual

dreambaby

dreambaby F820N User manual

dreambaby AVA G9334 User manual

dreambaby

dreambaby AVA G9334 User manual

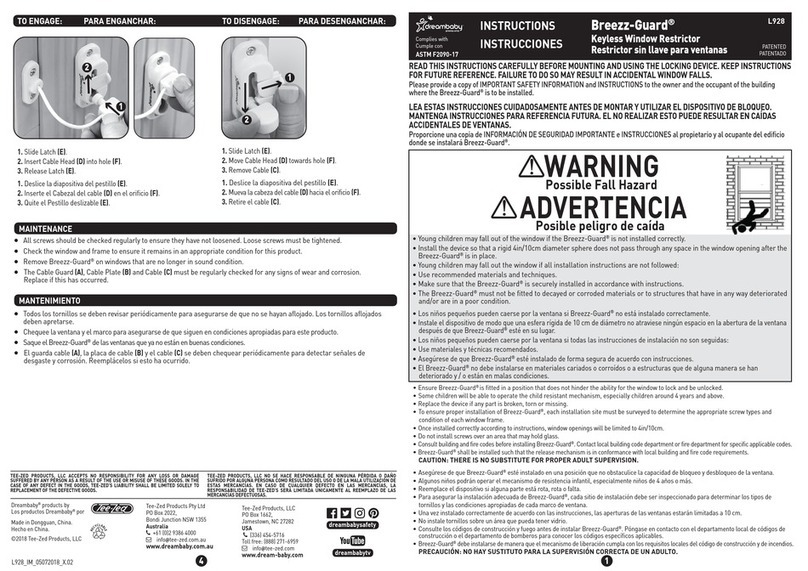
dreambaby Breezz-Guard L928 User manual

dreambaby

dreambaby Breezz-Guard L928 User manual

Popular Safety Equipment manuals by other brands

Sordin left/RIGHT Active FM Pro Product description

Sordin

Sordin left/RIGHT Active FM Pro Product description

Simy My-AIS manual

Simy

Simy My-AIS manual

IRUDEK 981 manual

IRUDEK

IRUDEK 981 manual

SICK C4000 Standard operating instructions

SICK

SICK C4000 Standard operating instructions

Tractel FABA-Klassik A11 Operating and maintenance instructions

Tractel

Tractel FABA-Klassik A11 Operating and maintenance instructions

EUCHNER CTS-C1-BP-FLX operating instructions

EUCHNER

EUCHNER CTS-C1-BP-FLX operating instructions

Potter RA-6075 Installation

Potter

Potter RA-6075 Installation

SICK DT35S operating instructions

SICK

SICK DT35S operating instructions

Safety Xpress BOLSM90X PRODUCT INFORMATION & INSTALLATION GUIDE

Safety Xpress

Safety Xpress BOLSM90X PRODUCT INFORMATION & INSTALLATION GUIDE

Daniamant Dan WL3-2 Installation and maintenance instructions

Daniamant

Daniamant Dan WL3-2 Installation and maintenance instructions

Bircher Reglomat CareMat A01T E868 quick start guide

Bircher Reglomat

Bircher Reglomat CareMat A01T E868 quick start guide

Plymovent PERSONALPRO User instructions

Plymovent

Plymovent PERSONALPRO User instructions

FALL SAFE FS2006 instruction manual

FALL SAFE

FALL SAFE FS2006 instruction manual

Silverline 254301 manual

Silverline

Silverline 254301 manual

SECUMAR 17 Instructions for use

SECUMAR

SECUMAR 17 Instructions for use

EUCHNER MGBS-P-L AP Series operating instructions

EUCHNER

EUCHNER MGBS-P-L AP Series operating instructions

Eaton Ex-TRA 100 manual

Eaton

Eaton Ex-TRA 100 manual

Harken Industrial IN627 product manual

Harken Industrial

Harken Industrial IN627 product manual

manuals.online logo
manuals.online logoBrands
  • About & Mission
  • Contact us
  • Privacy Policy
  • Terms and Conditions

Copyright 2025 Manuals.Online. All Rights Reserved.