Dynatone SDP-600 User manual

OWNER'S ANUAL
New feel, new look and new sound
High Performance USB Digital Piano

Precautions
I PORTANT SAFETY INSTRUCTIONS
WARNING: When using electric products, basic precautions should always be followed, including the
following:
1. Read all the instructions before using the product.
2. To reduce the risk of injury, close supervision in necessary when a product is used near children.
3. Do not use this product near water -for example, near a bathtub, washbowl, kitchen sink, in a wet
basement, or near a swimming pool.
4. This product should be used only with a cart or stand that is recommended by the manufacturer.
5. This product, either alone or in combination with an amplifier and headphones or speakers, may be
capable of producing hearing loss. Do not operate for a long period of time at a high volume level or
at a level that is uncomfortable. If you experience any hearing loss or ringing in the ears, you should
consult an audiologist.
6. The product should be positioned so that its location does not interfere with its proper ventilation.
7. The product should be positioned away from heat sources such as radiators, heat registers, or other
products that produce heat.
8. The product should only be connected to the type of power supply described in the operating
instructions or as marked on the product.
9. This product may be equipped with a polarized line plug (one blade wider than the other). This is a
safety feature. If you are unable to insert the plug into the outlet, contact an electrician to replace your
obsolete outlet. Do not defeat the safety purpose of the plug.
10. The power-supply cord of the product should be unplugged from the outlet when left unused for a
long period of time.
11. Care should be taken so that objects do not fall and liquids are not spilled into the openings of the
enclosure.
12. The product should be serviced by qualified service personnel when:
A. The power-supply cord or the plug has been damaged;
B. Objects have fallen, or liquid has been spilled into the product;
C. The product has been exposed to rain;
D. The product does not appear to operate normally or exhibits a marked change in performance;
E. The product has been dropped, or the enclosure damaged.
13. Do not attempt to service the product beyond what is described in the user maintenance instruction. All
other servicing should be done by qualified service personnel.
14. To clean the exterior surfaces, wipe lightly with a clean, dry cloth. Never use solvents such as benzine
or paint thinners.
15. The product should be positioned away from a television, radio, or any heavy equipment that can
generate electromagnetic fields.
16. The product should be located on a flat, stable surface that is free of vibration.
17. Be careful to protect the product from knocks, particularly when carrying it.
18. During thunderstorms, turn the product off and disconnect the plug from the power outlet.

Precautions
INFOR ATION TO THE USER
This equipment has been tested and is found to comply with the limits for a class B digital device,
pursuant to part 15 of the FCC Rules. These limits are designed to provide reasonable protection against
harmful interference in a residential installation. This equipment generates, uses and can radiate radio
frequency energy and, if not installed and used in accordance with the instructions, may cause harmful
interference. If this equipment does cause harmful interference to radio or television reception, which can
be determined by turning the equipment off and on, the user is encouraged to try to correct the
interference by one more of the following measures :
- Reorient or relocate the receiving antenna.
- Increase the separation between the equipment and receiver.
- Connect the equipment into an outlet on a circuit different from that to which the receiver is connected.
- Consult the dealer or an experienced radio/TV technician for help.
WARNING
Changes or modifications not expressly approved by the manufacturer could void the user's authority to
operate the equipment.
GROUNDING INSTRUCTIONS
This product must be grounded. If it should malfunction or breakdown, grounding provides a path of
least resistance for electric current to reduce the risk of electric shock. This product is equipped with a
power supply cord having an equipment-grounding conductor and a grounding plug. The plug must be
plugged into an appropriate outlet which is properly installed and grounded in accordance with all local
codes and ordinances.
DANGER - Improper connection of the equipment-grounding conductor can result in a risk of electric
shock. Do not modify the plug provided with the the product - if it will not fit the outlet, have a proper
outlet installed by a qualified electrician. Do not use an adapter which defeats the function of the
equipment-grounding conductor. If you are in doubt as to whether the product is properly grounded,
check with a qualified serviceman or electrician.

Not following this caution may result in injury and/or financial loss.
1
Safety Instructions
Before Reading: This section is intended to ensure the user's safety and
prevent financial damage.
Please read this section carefully and use the product
properly according to it.
Before Reading Safety Instructions
To avoid the risk of death or physical injury due to electric shock, short circuit, damage or fire,
please follow the fundamental safety instructions listed below. This warning includes the
following:
ㆍNever open up this product or attempt to break
down or modify its inner parts. This product
contains no user-serviceable components. If it
seems to be malfunctioning, please immediately
cease use of the product and contact customer
service for repair.
ㆍDo not expose the product to rain. Do not use this
product under watery or wet environment, and do
not leave any liquid container on its top as it may
spill into the product. If any liquid is spilled into the
product, immediately turn off the product, take the
plug off the AC outlet and contact a designated
service center for inspection.
ㆍIf the power cable or plug is either wore off or
damaged, or the product suddenly stops sounding,
or any unknown smell or smoke seem to emerge
from the product, immediately turn off the product,
take the adapter plug off the AC outlet and contact
a designated service center for inspection.
ㆍAlways use the correct voltage for this product. The
voltage specification can be found on the name
label located behind this product.
ㆍAlways take the plug off the outlet prior to cleaning
the product. Never insert or take off the plug with
wet hands.
ㆍRegularly check the condition of the power plug,
and remove any substances or dusts that may have
accumulated on it.
WARNING:
Not following this warning may result in death or serious injury
WARNING:
CAUTION:

To avoid the risk of physical injury, damage of this product or other financial loss, please follow
the fundamental safety instructions listed below. This caution includes the following:
CAUTION
ㆍDo not place the power cable nearby heat
generators like heaters or radiators. Bending the
cable too much could damage the cable. Do not put
heavy objects on the cable, or leave the cable on a
location where others may step on or trip over it.
ㆍWhen removing the plug from either the product or
the outlet, always seize the neck of the plug. Seizing
and pulling from the cable could damage it.
ㆍDo not use multi-connectors to power the product.
Doing so may result in lowered sound quality
and/or overheat the outlet.
ㆍWhen not using the product for an extended period
of time, or during an electric storm, take the plug off
the outlet.
ㆍWhen connecting this product to another electronic
product, turn off the powers of both products
before connecting. Set the volumes of all products
to minimum before turning on the products. After
making sure that all volumes are set to minimum,
begin using this product and gradually increase the
volume until the desired level is reached.
ㆍDo not expose this product to excessive dust,
vibration, or locations/sources of extreme heat
(under direct sunlight, nearby heaters, inside cars
during daytime). Exposure to such environments
may result in external and/or internal damage.
ㆍDo not use this product nearby devices like TVs,
radios, stereo sound devices, mobile phones or
other electronic devices. Doing so could result in
excessive noise from either this product or the
TV/radio.
ㆍDo not place the product on unstable locations
where it may fall off.
ㆍAlways remove all cables from the product before
moving it.
ㆍWhen cleaning the instrument, always use soft and
dry or lightly wet cloth. Do not use cloth imbued
with paint diluent, solvent, cleansing agent or
chemical substances. Do not place any objects
made of vinyl, plastic or rubber on the product.
Doing so may alter the color of the keys or the
panel.
ㆍDo not place your weight or heavy objects on the
product.
ㆍDo not use excessive force while manipulating the
buttons, switches or connectors.
ㆍBe careful not to leave fingers below the key cover
when closing it. Do not insert fingers below the key
cover or into any other gap between the parts of
this product.
ㆍDo not insert or drop objects like paper or metal
substances on the key cover, panel, or in the gap
between keys. When done so accidentally,
immediately turn off the power of the product, take
the plug off the outlet, and contact a designated
service center.
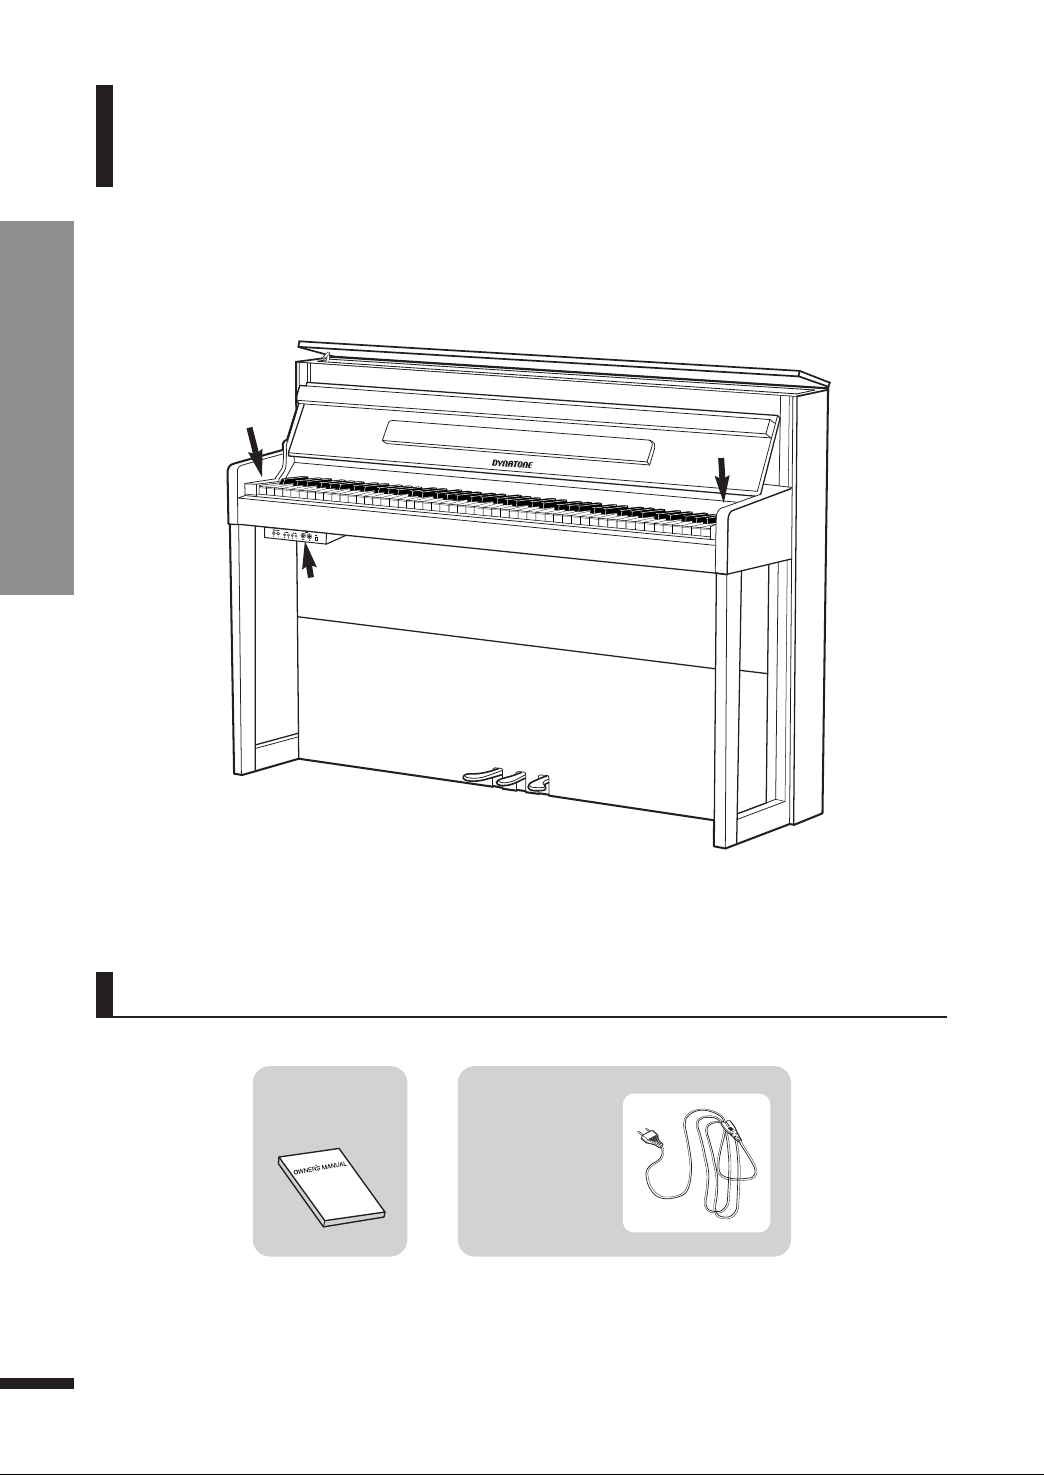
ㆍMaintain 3 inches of space between the piano and
the wall or other nearby objects. Insufficient space
may interfere with air circulation and result in
overheat.
ㆍCarefully read the guide on assembling procedure
and follow the instructions. Not doing so could
result in damage of the instrument and/or injury of
the user.
ㆍAvoid using the product on volume high enough to
be disturbing to ears for extended period of time, as
doing so could affect one's hearing permanently. If
you experience hearing difficulty, or excessive
ringing on the ears, contact a physician.
ㆍDuring thunderstorms, take the plug off the outlet.
2
Before Reading Caution

3
Preface
Before Reading Preface
Thank you for your purchase.
This product mixes up a maximum polyphony of 256 notes and a massive sound data weighing as
much as 8Gbit to offer its 5 distinguished concert grand piano sounds and other high quality voices
that recreate the authentic sound of 128 different instruments. Its R A-3W (Tri-sensor) wooden
keyboard, a vast improvement over its two-sensored predecessor, and half-pedal feature that detects
the precise movement of its keys add on its respectable quality.
The VP player of the piano features an extensive bank of demonstrational pieces including the
pedagogical etude series of Beyer, Czerny, Burgmüller and selected sonatines by many composers, as
well as 1,005 pieces in different genres for either entertainment or playing reference. The piano's
music player allows to play MP3 and MIDI files saved in USB flash drives.
Also there are the two-track recording system designed to aid the learning process, a USB 2.0 terminal
for connections with devices like computers or smartphones/tablets, and other versatile utilities such
as the auto-accompaniment system.
To take full advantage of the wide range of features and utilities offered by this instrument, please
read and examine this user's manual carefully.
Please keep this user's manual for future reference.
Thank you.


Table of Contents
Table of Contents
5
Before Reading
Table of Contents
External Appearance
Controls
Voice Key Map
Function Key Map
Terminals
Using the Pedals
Adjusting the Volume
Selecting Voice
Layer
Split
Twin Piano
Default All
Reverb
Tune
Transpose
Touch
Recording
MIDI C ART
GM Voice & Percussions List
Trouble shooting
Product Specifications
1
5
6
8
8
9
10
12
13
13
14
15
16
16
17
18
19
20
21
22
23
26
27

External Appearance
External Appearance Accessory
6
Accessory
AC Power Cable
Pedal
Plug the AC Power
Cable into the
corresponding
socket on the back
of the main unit.
Speaker Box
Control
Panel Fall
Board
Terminal
Box
Power Switch
Owner’s
anual

External Appearance Turning on the power/
Using the Headphone
7
①Connect the AC POWER CABLE. Insert AC plug at the
end of AC cord into the piano and AC plug at the other
end of AC cord into a standard AC outlet.
②Press POWER switch. The power is turned on.
The voice of Grand Piano is selected automatically as the
default value.
☞Adjust the volume by using ASTER VOLU E.
To turn off the power, press POWER switch again All
lamps will be turned off.
Turning on the Power
Using the Headphone
Auto Power Off (APO)
This product is designed to turn itself off automatically when left unused for more than 30 minutes,
in order to conserve energy.
Deactivating Auto Power Off(APO)
While holding down the first white key and first black key from the left, press the power switch to
deactivate APO.
Connect a set of stereo headphones(optional) to
HEADPHONE jack.
Insert plug of the headphone into the HEADPHONE jack
on the bottom panel of the piano.
When headphone is connected, the internal
speaker system is automatically shut off.
Since the piano has two HEADPHONE jacks, two sets of
headphones can be used simultaneously, allowing two
people to enjoy listening to the performance.

Controls
Controls / Voice Key ap
8
ⓐMASTER VOLUME
ⓑLAYER button
ⓒSPLIT button
ⓓTWIN PIANO button
ⓔREVERB button
ⓕRECORD button
ⓖSETUP button
ⓕ
Page 13
Page 14
Page 15
Page 16
Page 17
Page 21
Page 18,19,20
ⓖ
ⓓ ⓔ
ⓑ
ⓐ
ⓒ
Voice Key ap

Function Key ap
Function Key ap
9

CONNECTING AUDIO DEVICES
Terminals
Terminals CONNECTING AUDIO DEVICES
10
ⓐⓑⓓⓒ
ⓐAUX in jacks(RCA jacks of Land R)
The stereo outputs from another instrument can be connected to these jacks, allowing the sound of
an external instrument to be reproduced via the instrument's speakers.
Connect the output jacks (LINE OUT etc.) of an external synthesizer or the tone generator module and
the instrument's AUX In 'L' and 'R' jacks using appropriate audio cables.
☞CAUTION
When the sound of an external device is output to the instrument, first turn on the power to the external device, then to the
instrument. Reverse this order when you turn the power off.
ⓑAUX out jacks (RCA jacks of Land R)
When these are connected, you can use the instrument's ASTER VOLU E control to adjust the
volume of the sound output to the external device.
Connect the instrument's AUX Out 'L' and 'R' jacks and the input jacks of a pair of powered speakers
using appropriate audio cables.

CONNECTING OTHER DEVICES
Terminals CONNECTING OTHER DEVICES /
THE LOCAL CONTROL ON/OFF
11
Local control refers to the fact that, normally, the piano keyboard controls its internal tone generator,
allowing the internal voices to be played directly from the keyboard.
This situation is called Local Control ON. When the local control is set to off, the keyboard and sound
source are separated and no sound is heard through the piano when playing the keyboard.
owever, the data of the keyboard performance is output through MIDI. By setting local control to
off, you can play an external MIDI tone generator from the keyboard of the piano without sounding
the internal voices.
To enter the MIDI local control off mode, hold down the SETUP button and press C8 right end key
of the keyboard.
To release it, press again C8 key with the SETUP button.
ⓒConnecting the external IDI devices (MIDI Terminals)
Use the built-in IDI terminals and standard MIDI cables to connect external MIDI devices.
IDI IN Receives MIDI messages from an external MIDI device.
IDI OUT Transmits MIDI messages generated by the instrument.
☞What's IDI?
MIDI(Musical Instrument Digital Interface) is the international standard for digital communication of electronic musical
instrument data.
This means that any equipment that has a MIDI terminal (such as electronic musical instruments or personal computers ) can easily
exchange digital data with other MIDI equipment without complicated conversions or connections.
ⓓConnecting a computer (USB Terminal)
By connecting a computer to the USB, you can transfer data between the instrument and the
computer via MIDI, and take advantage of sophisticated computer music programs. Keep in mind
that you also need to install an appropriate USB MIDI driver.
The instructions below explain how to connect and use the terminals.
☞CAUTION - Precautions when using the USB terminal.
When connecting the computer to the USB terminal, make sure to observe the following points. Failing to do so risks freezing
the computer and corrupting or losing data. If the computer or the instrument freezes, turn the power to the instrument off
and restart the computer.
Before connecting the computer to the USB terminal, exit from any power-saving mode of the computer (such as suspended,
sleep, standby), quit any open application software, and turns off the power to the instrument.
Execute the following before turning the power to the instrument off or unplugging the USB cable to/from the
instrument/computer.
- Quit any open application software on the computer.
- Make sure that data is not being transmitted from the instrument. (Data is transmitted only by playing notes on the
keyboard or playing back a song.)
- While a USB device is connected to the instrument, you should wait for six seconds or more between these operations:
When turning the power of the instrument off then on again, or when alternately connecting/disconnecting the USB cable.
THE LOCAL CONTROL ON/OFF

Using the Pedals
Using the Pedals
12
The piano has three pedals.
①Damper Pedal (Right)
This pedal performs the same function as the damper pedal of an acoustic piano; playing notes while
keeping this pedal pressed will sustain the notes even if the keys have been released. It also provides
the alf Pedal feature, which detects and responds to the delicate control that pianists exercise on
acoustic pianos by pressing the pedal only halfway.
☞The duration of the sustained notes differs depending on the chosen voice.
☞The alf Pedal feature controls the sustain duration depending on how deep the pedal is pressed.
☞Do not press the damper pedal when turning on the piano. If the pedal had been pressed when the
piano was switched on, it may not function properly.
②Sostenuto Pedal (Center)
If you play a note or chord on the keyboard and press the sostenuto pedal while
the note(s) are held, those notes will be sustained as long as the pedal is held, but all
subsequently played notes will not be sustained. This makes it possible to sustain a
chord, for example, while other notes are played staccato.
③Soft Pedal (Left)
Pressing this pedal reduces the volume and slightly changes the timbre of the
notes you play.
☞Certain voices in the PERCUSSION group may not be affected by use of the sostenuto pedal.
☞Certain voices such as STRINGS or BRASS sustain continuously when the sostenuto pedal is pressed.
①
②
③

Adjusting the Volume
Adjusting the Volume/
Selecting Voice aster Volume / Selecting Voice
13
The piano has one volume on the panel for adjusting the volume.
ASTER VOLU E
This determines the entire volume of the piano.
☞This also determines the output level of the signal at the HEADPHONES.
☞Default voice is Grand piano 1.
☞Refer to the VOICE key map on page 8.
☞When a split voice or a layer voice is selected, layer or split function automatically will be on.
See the LAYER/SPLIT section on page 14~15.
The piano features a wealth of rich, authentic voices, including piano, strings and brass
instruments. It also features a keyboard percussion function that lets you play the
realistic drum and percussion sounds directly from keyboard.
There are 10 main voices, 2 split voices, 3 layered voices and 14 extra voices in this piano.
①Press and hold the SETUP button.
☞The lamp is on.
②Selectadesired voice.
☞Both theSETUPbuttonand a voice key should be pressed.
☞ain Voice
Grand Piano 1, 2, Pipe Organ, Elec. Organ 1, 2, Elec. Piano 1, 2, Strings, Slow Strings, Choir
☞Split Voice
Acoustic Bass, Elec. Bass
☞Layered Voice
Acoustic Bass, Fingered Bass, Elec. Bass
☞Extra Voice
Grand Piano 3, Detuned Piano, arpsichord, Vibraphone, Accordion, Elec. Organ 3,
Square Wave, Sawtooth Wave, Synth Piano, Flute, Saxophone, Guitar, Synth brass, Drum set
☞128 General IDI Voice
When connecting with PC, it's available to use 128 GM voices.
(See the G VOICE CHART/DRU TABLE section on page 23~25.)
Selecting Voice

Layer
Layer PLAYING WITH THE LAYER VOICE /
ADJUSTING THE LAYER VOLU E
14
The layer mode of the piano allows you to select and play two different voices simultaneously in a
layer. This makes it easy to create exceptionally rich and thick tonal textures. The volume balance can
be set for the two voices.
PLAYING WITH THE LAYER VOICE
①Select a main voice.
Select a voice in the normal way. (See the SELECTING VOICE section on page 13.)
②Call up the layer mode.
To call up the layer mode, press the LAYER button. Lamp lights and the
layer is set on.
③Select the layered voice.
Select a voice in the normal way. (See the SELECTING VOICES section on page 13.)
ADJUSTING THE LAYER VOLU E
This determines the volume of the layered voice.
②Adjust the layer volume by pressing secondary voice volume up(D#4) and down(C#4) keys.
☞Refer to the FUNCTION KEY AP on page 9.
☞If you press both UP and DOWN keys at the same time, it automatically returns to the default secondary voice volume
(11). The range of volume is 0 ~ 16.
☞old the key for continuous decrementing or incrementing.
☞Both split and layer volumes can be adjusted by using secondary volume keys.
①Press and hold the SETUP button.
☞The lamp is on.
☞If you select a layer voice, layer function automatically can be on without pressing the LAYER
button.
+

Split
Split PLAYING WITH THE SPLIT VOICE / ADJUSTING
THE SPLIT VOLU E / CHANGING TH SPLIT POINTV
15
The split mode of the piano allows you to select and play two different voices with your left and right
hands. For example, play bass with the left and piano with the right.
PLAYING WITH THE SPLIT VOICE
①Select a main voice.
Select a voice in the normal way. (See the SELECTING VOICE section on page 13.)
②Call up the split mode.
To call up the split mode, press the SPLIT button. Lamp lights and the split
is set on.
③Select the split voice.
Select a voice in the normal way. (See the SELECTING VOICE section on page 13.)
ADJUSTING THE SPLIT VOLU E
This determines the volume of the split voice.
☞If you select a split voice, layer function automatically can be on without pressing the
SPLIT button.
CHANGING THE SPLIT POINT
You can set the point dividing the split voice and main voice ranges at any desired key position.
☞Default value is F#3.
①Press and hold the SPLIT button.
②Press a desired key. The pressed key is assigned to new split point.
▼Split point (F#3)
②Adjust the split volume by pressing secondary volume up(D#4) and down(C#4) keys.
①Press and hold the SETUP button.
☞The lamp is on.
☞Refer to the FUNCTION KEY AP on page 9.
☞If you press both UP and DOWN keys at the same time, it automatically returns to the default secondary voice Volume
(11). The range of volume is 0 ~ 16.
☞old the key for continuous decrementing or incrementing.
☞Both split and layer volumes can be adjusted by using secondary volume keys.

Twin Piano
Twin Piano / Default ALL PLAYING WHIT THE TWIN PIANO
16
Splitting the piano Keyboard into two sections for twin piano performance.
The keyboard can be divided into two separate sections, allowing two people to perform in the same
octave.
Press ad hold the SETUP button and press left-end key (A#0).
Following settings go to default values.
1) Secondary Voice volume (Default, 11 Range 0 ~ 16)
2) Reverb level (Default 11, Range 0 ~ 16)
3) Transpose (Default C, Range G~C~F#)
4) Tune (Default A3 440 z, Range -50 ~ 0 ~ 50 cents)
5) Touch (Default Normal, Range Off, ard, Normal, Soft)
PLAYING WITH THE TWIN PIANO
①Press the TWIN PIANO button.
The keyboard splits two sections, which have same octave.
②To turn off the twin piano performance, press the TWIN PIANO button again.
The twin piano performance turns off and the lamp goes out.
☞This function can not be used with the layer and split functions.
Defaul ALL

Reverb
Reverb ADJUSTING THE REVERB LEVEL
17
Reverb is an effect that recreates the decaying reflections of a sound in a performance
space, and reproduces the special ambience of a concert hall.
①Press the REVERB button.
②To turn off the reverb, press the REVERB button again.
The reverb turns off and the lamp goes out.
☞The reverb turns on and lamp lights.
☞The reverb is engaged automatically when the power is turned on with the lamp
lighting.
ADJUSTING THE REVERB LEVEL
②Adjust the reverb level by pressing reverb level up(G#4) and down(F#4) keys.
☞Refer to the FUNCTION KEY AP on page 9.
☞The reverb level can be adjusted, when reverb is on.
☞If you press both UP and DOWN keys at the same time, it automatically returns to the default reverb level (11).
☞The range is 0 ~ 16.
☞old the key for continuous decrementing or incrementing.
①Press and hold the SETUP button.
☞The lamp is on.
+
Table of contents
Other Dynatone Musical Instrument manuals

Dynatone
Dynatone DPS-90H User manual

Dynatone
Dynatone UPRIGHT PIANO DPR2200 User manual

Dynatone
Dynatone SGP-500 User manual

Dynatone
Dynatone SLP-200H User manual

Dynatone
Dynatone SLP-210 User manual

Dynatone
Dynatone DPP610 User manual

Dynatone
Dynatone SLP-200H User manual

Dynatone
Dynatone SLP-50 User manual

Dynatone
Dynatone DPR-3100 User manual

Dynatone
Dynatone DPR-1650 User manual