Dynex DX-DA100501 User manual

USER GUIDE • GUIDE DE L’UTILISATEUR • GUÍA DEL USUARIO
Lithium-Ion Battery Charger
Chargeur de batterie ion-lithium
Cargador de baterías de Lition
DX-DA100501
DX-DA100501 English - combined.fm Page 1 Monday, August 7, 2006 12:25 PM

2Dynex DX-DA100501 lithium-ion battery charger
Dynex DX-DA100501 lithium-ion battery
charger
Introduction
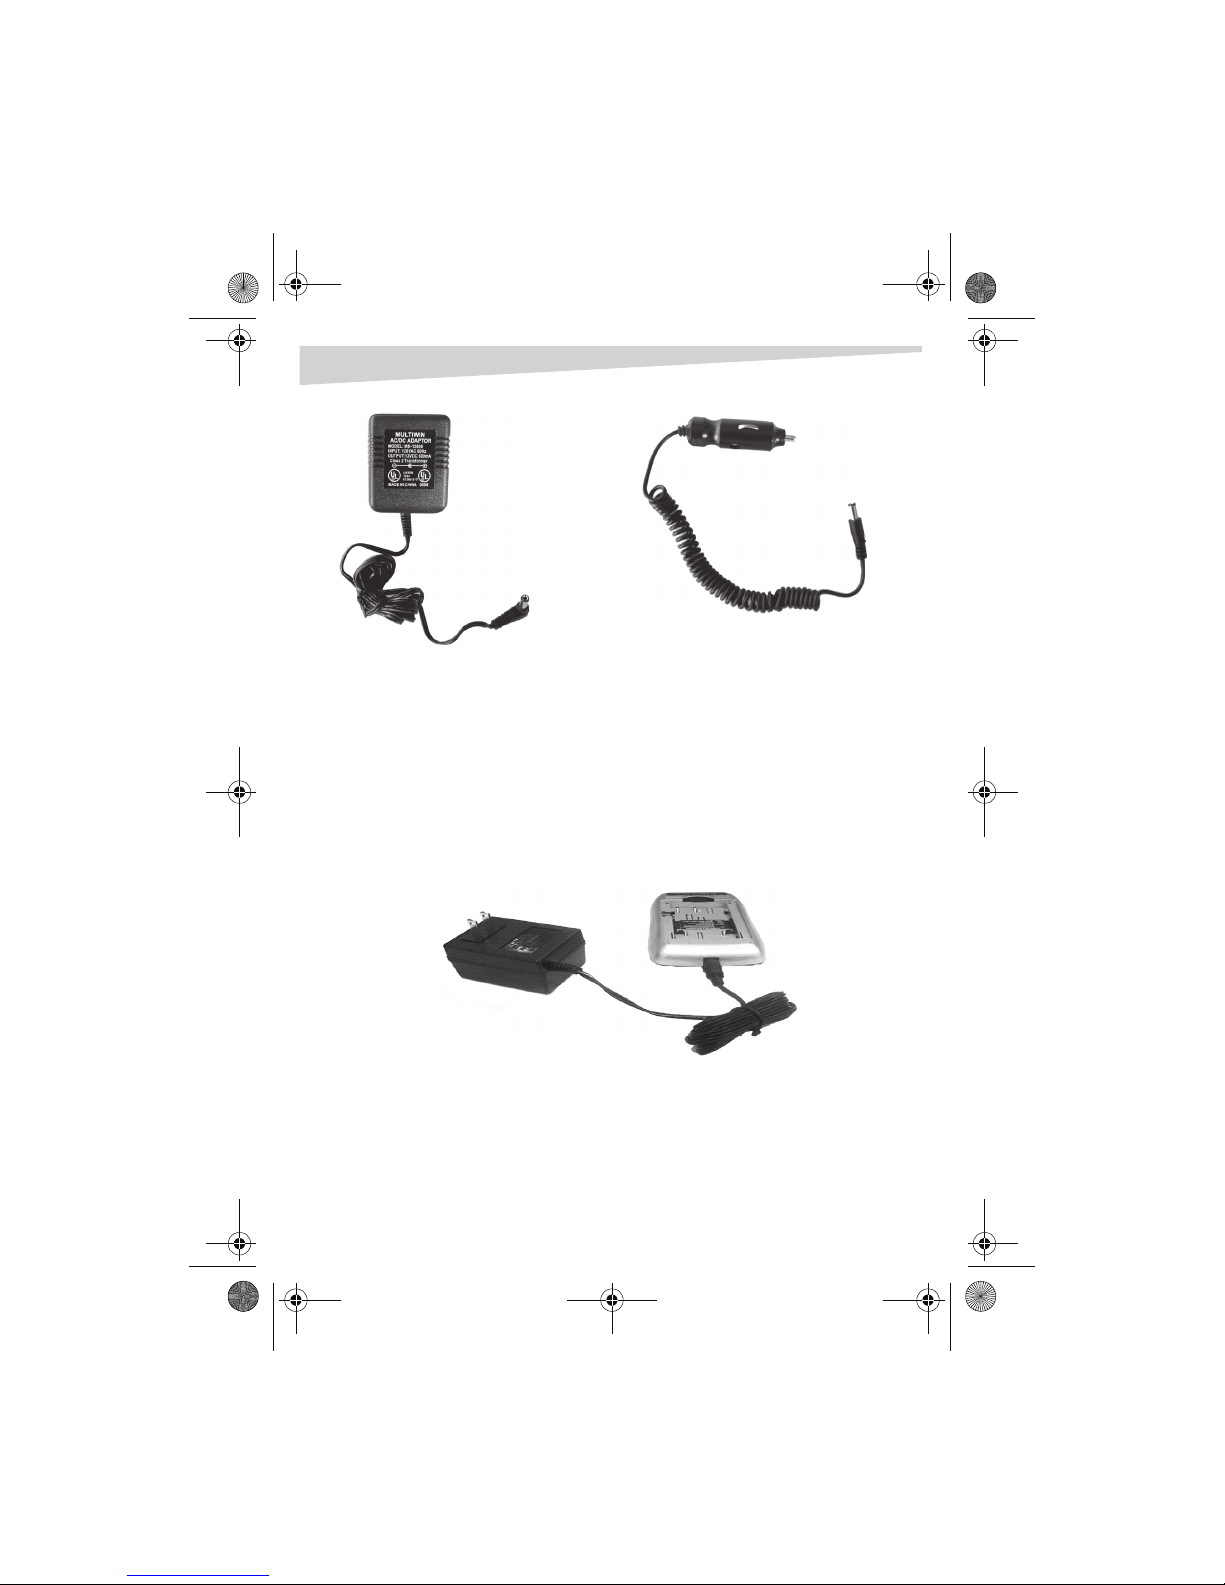
Congratulations on your purchase of the Dynex Model DX-DA100501 lithium-ion
camcorder and digital camera battery quick charger. With the included AC adapter
(for use with a standard power outlet) or the 12 V car cord, you can quickly charge
your digital camera and camcorder batteries at home or in the car.
Contents
Introduction..................................................................................................2
Important safety instructions .......................................................................2
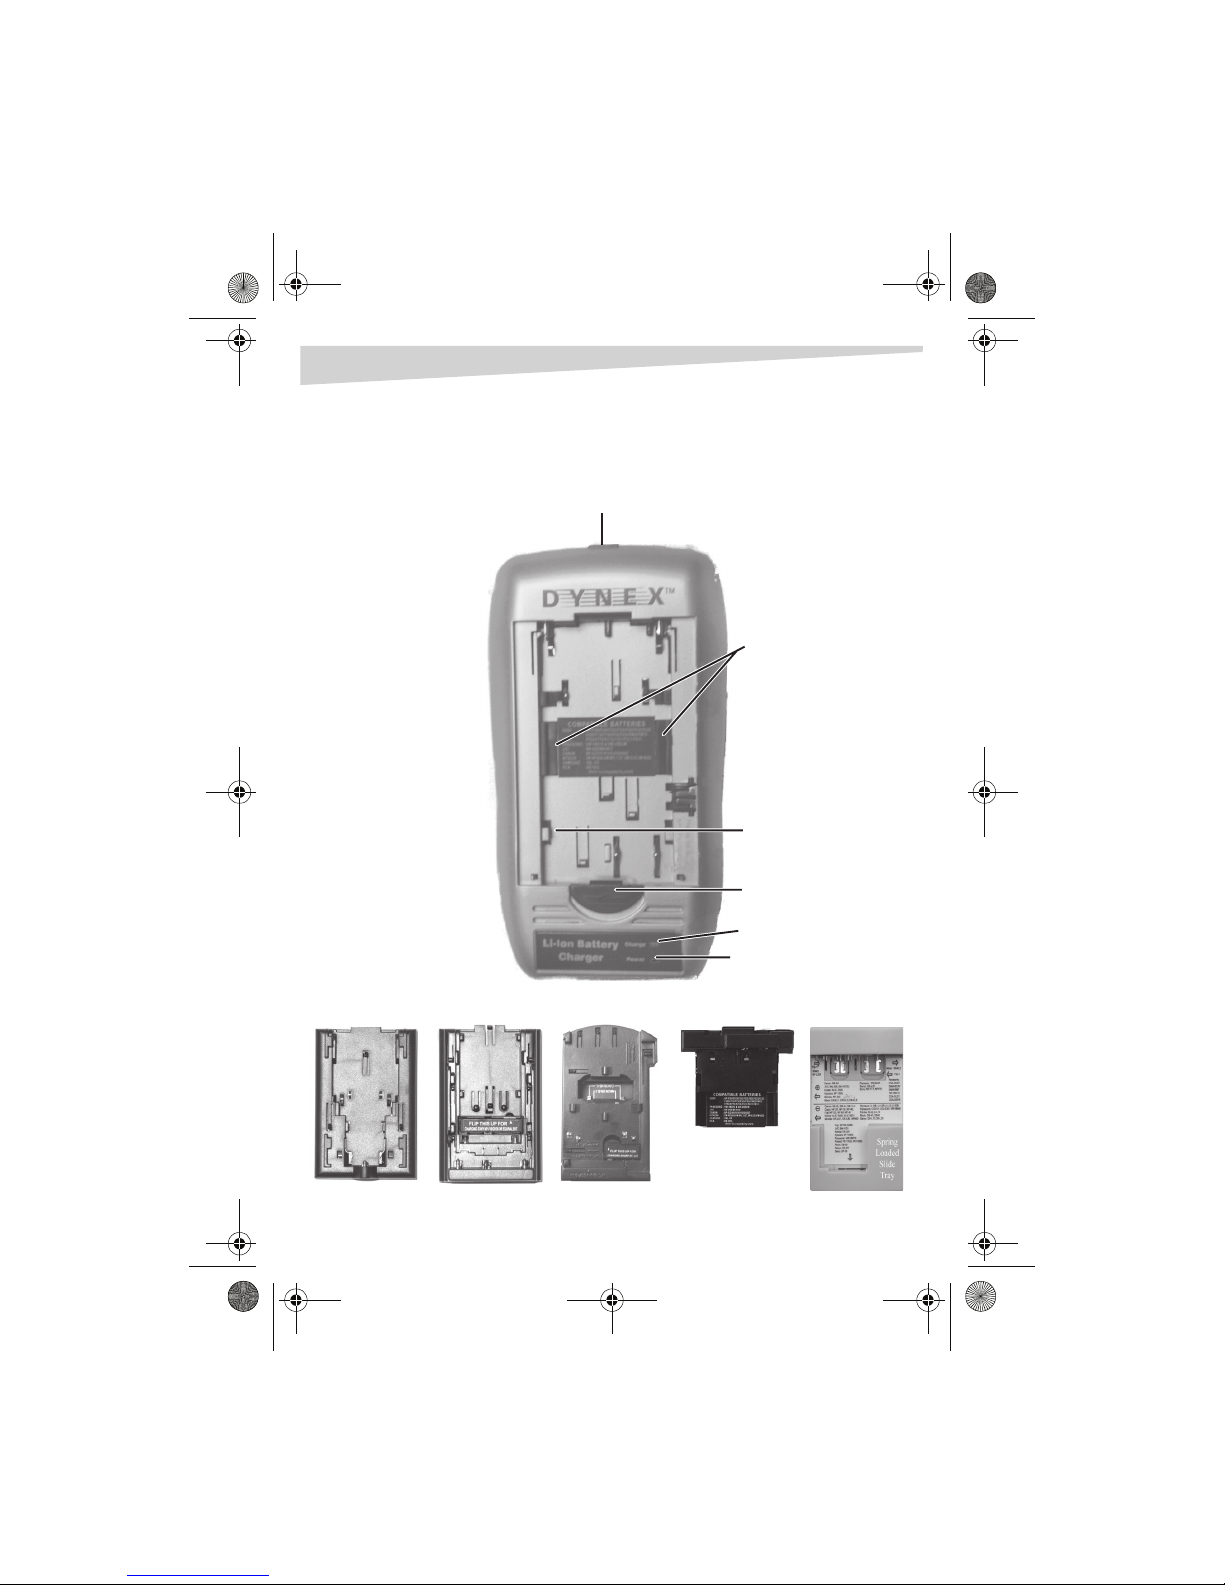
Features........................................................................................................3
Product components.....................................................................................4
Using the charger..........................................................................................6
Troubleshooting..........................................................................................14
Maintenance...............................................................................................15
Specifications..............................................................................................15
Warranty.....................................................................................................15
Legal notices...............................................................................................15
Français ............................................................. 16
Español .............................................................. 32
Important safety instructions
Safety precautions
Do not use this charger inside a drawer, closed cabinet, or covered with a cloth.
The heat from charging may damage the charger or the battery pack. This charger
becomes slightly warm during use.
Do not attempt to open the charger. Doing so voids your warranty.
Do not allow moisture of any kind to come in contact with the charger. Never
immerse in water for any reason.
DX-DA100501 English - combined.fm Page 2 Monday, August 7, 2006 12:25 PM

Features 3
Do not store in areas which may expose the charger to extreme temperatures.
Avoid placing in direct sunlight, such as on a car dashboard. High temperatures
will warp or melt plastics.
Do not drop the charger. A severe jolt may cause permanent damage and is not
covered by the warranty.
Follow this User Guide carefully. Follow the correct procedures when setting up the
battery charger.
Warning: For use with Lithium-Ion (Li-ion) batteries only. Do not attempt to
charge Nickel Cadmium (Ni-Cd) or Nickel Metal Hydride (Ni-MH) batteries with
this charger.
Features
• Compatible with most 3.6 V, 3.7 V, 7.2 V and 7.4 V Camcorder/Digital
Camera Lithium-Ion (Li-ion) batteries
• Precision end-of-charge voltage detection guarantees full charging of
battery packs
•Top-off function trickle charges to maintain a full charge
• Automatic battery voltage detection with LED indication
• LED status indicator displays charger mode
• Abnormal battery detection identifies faulty battery and stops charging
• Overcharge protection
• Timer protection
DX-DA100501 English - combined.fm Page 3 Monday, August 7, 2006 12:25 PM

4Product components
Product components
Battery charger
Adapter plate A Adapter plate B Adapter plate C Adapter plate D Adapter plate E
Main charging bay
(with Sony-type
battery contacts)
Power input jack
Charging status indicator
Power indicator
Battery adapter
plate latch
Adapter plate
latches
DX-DA100501 English - combined.fm Page 4 Monday, August 7, 2006 12:25 PM

5
Using the charger
Connecting your charger to a power source
To use with an standard AC power outlet:
1Connect the AC adapter to the power input jack on the back of your charger.
2Plug the AC adapter into any standard power outlet. The red power
indicator turns on.
12V DC adapter
AC adapter
DX-DA100501 English - combined.fm Page 5 Monday, August 7, 2006 12:25 PM

6Using the charger
To use with a 12 V DC (car) power connector:
1Connect the 12 V DC car cord barrel plug to the power input jack.
2Insert the 12 V DC car cord cigarette lighter plug into the cigarette lighter
socket of the vehicle. The red power indicator turns on.
Mounting the battery into the charger
Warning: For use with Lithium-Ion (Li-ion) batteries only. Do not attempt to
charge Nickel Cadmium (Ni-Cd) or Nickel Metal Hydride (Ni-MH) batteries.
To mount the battery into the charger:
1Note where the guides and contacts are located on the battery and align
them with the corresponding guides and contacts on the charger, then slide
the battery into place in the charging bay.
2Press the battery down, then slide it up (away from the indicator lights).
DX-DA100501 English - combined.fm Page 6 Monday, August 7, 2006 12:25 PM

Using the charger 7
- OR -
Slide the battery up, then press it down (depending on the battery to be
charged).
Do not force the battery onto the charger. If it does not slide easily into the
guides, re-align it and try again.
USING AN ADAPTER TRAY
Depending on your battery type, you may need to use an adapter tray. Refer to the
Battery Compatibility List to determine which adapter tray should be used with
your battery type.
To install the adapter tray onto the charger:
1For adapter trays A, B, or C:
Slide the central notch on the adapter tray’s upper edge into the slot on the
upper edge of the charger bay, then carefully press down on the loweredge
of the adapter tray.
The adapter tray snaps firmly inplace.Install the battery so that its contacts
meet the contacts on the adapter tray.
Installing Adapter A Installing Adapter B Installing Adapter C
DX-DA100501 English - combined.fm Page 7 Monday, August 7, 2006 12:25 PM

8Using the charger
- OR -
For adapter tray D:
Push the tray upward. The tray snaps firmly into place.
2To remove the adapter tray, pull back on the battery/adapter latch, then lift
the adapter tray up and out of the charger.
Installing Adapter D
Removing Adapter D
DX-DA100501 English - combined.fm Page 8 Monday, August 7, 2006 12:25 PM

Using the charger 9
Example - Adapter Plate A
Example - Adapter Plate B
Adapter plate A
locked into place.
Adapter plate A with guides
and contacts lined up. Battery in adapter plate A locked
into place and ready to charge.
Adapter plate B with guides
lined up. Note that the tray is
flipped up due to cell type.
Battery in adapter plate B
locked in place and ready to
charge.
DX-DA100501 English - combined.fm Page 9 Monday, August 7, 2006 12:25 PM

10 Using the charger
Example - Adapter Plate C
Example - Adapter Plate D
B
attery
i
n a
d
apter p
l
ate
C
l
oc
k
e
d
in place and ready to charge.
Adapter plate D
locked in charger. Battery locked in Adapter plate D
DX-DA100501 English - combined.fm Page 10 Monday, August 7, 2006 12:25 PM

Using the charger 11
USING THE UNIVERSAL ADAPTER PLATE
The universal adapter plate label provides only a partial list of batteries that are
compatible with this charger plate. Refer to the Battery Compatibility List for the
entire make and model list of compatible batteries.
Note: When inserting your battery for charging, you may need to apply pressure
and pull down to open the spring-loaded slide tray.
BATTERY POSITIONING GUIDE
Batteries Position
JVC: BN-V306, BN-V312U
KONICA-MINOLTA: NP-200, NP-400,
NP-800, NP-900
NIKON: EN-EL1, EN-EL3, EN-EL8
OLYMPUS: PS-BLM1
SANYO: DB-L20, UR-421
SONY: NP-FT1, NP-FR1, NP-FE1
DX-DA100501 English - combined.fm Page 11 Monday, August 7, 2006 12:25 PM

12 Using the charger
CANON: NB-1L, NB-1LH, NB-2L, NB-2LH,
NB-3L, NB2F12, BP-2L12, BP-3LCL
CASIO: NP-30, NP-40
FUJI: NP-40, NP-60, NP-120
JVC: BN-V37U
KODAK: KLIC 5000, KLIC 5001
KONICA-MINOLTA: DR-LB4, NP-1, NP-600
NIKON: EN-EL5
OLYMPUS: LI-10, LI-10B, LI-12B, LI-20B,
LI-40B
PANASONIC: CGR-S101A, CGA-S301,
CGA-S302A, CGA-S003A/1B,
DMV-BC7, DMV-BCB7,
VW-BVA05, VM-VBA10
PENTAX: D-L12, D-L17, D-L18
RICOH: DB-40, DB-43
SANYO: DB-L10
TOSHIBA: PDR-BT2, PDR-BT3
KONICA: DR-LB1
KYOCERA: BP-800S, BP-1000S
POLAROID: PR111DG, PR110DG
SHARP: AD-S30BT, AD-S31BT, AD-T50BT,
AD-T51BT
SONY: LIP-4WM
TOSHIBA: PDR-BT1, PDR-BT9
FUJI: NP80, NP100
JVC: BN-V101
KODAK: KLIC-3000
PANASONIC: VW-VBP10
POLAROID: PR105DG
RICOH: DB-30
SANYO: UR-211
SONY: LIP-10
Batteries Position
DX-DA100501 English - combined.fm Page 12 Monday, August 7, 2006 12:25 PM

Using the charger 13
For the batteries in the boxes below, you need to flip up the Flip 2 mating battery contact
terminals found on the right side of charger plate.
PANASONIC: CGA-DU07, CGA-DU14,
CGA-DU21,CGA-S001E,
CGA-S002,CGR-602A,
CGR-602E, CGR-D120,
CGR-D220, DMW-BCA7,
MW-BM7, MW-BL14,
VW-VBD07, VW-VBD14
CASIO: NP-20
FUJI: NP-30
JVC: BN-VF707, BN-VF714, BN-VF733
KONICA-MINOLTA: NP-700
NIKON: EN-EL2
CANON: NB-4L
PANASONIC: DMW-BCC12
RICOH: DB-60
Batteries Position
DX-DA100501 English - combined.fm Page 13 Monday, August 7, 2006 12:25 PM

14 Troubleshooting
Charging the battery
Charging begins as soon as the battery is properly connected. The green charging
status indicator blinks as the battery is being charged. When the battery is fully
charged, the green charging status indicator stops blinking and stays on. You can
remove the battery for use when this happens, but we recommended that you
leave the battery on the charger for another 30 minutes to ensure a full (topped
off) charge.
ABNORMAL BATTERY DETECTION
Your charger detects an abnormal battery pack by sensing the voltage. If it is too
high or too low, or if the battery pack does not reach full charge status within 8
hours of charging, the charger stops the operation immediately and indicate the
abnormal condition by flashing both the power and battery status indicator LEDs.
Normal operation resumes when the faulty battery is removed.
Troubleshooting
* To determine if the battery is overcharged or defective, place it on the camcorder or digital camera and turn it
on. If the camcorder or digital camera does not turn on, the battery is probably defective.If the camcorder or
digital camera does not operate, leave the power turned on for 30+ minutes, then remove the battery and put it
on the charger. The charger should go into charge mode, indicated by the green blinking charge status indicator.
Problem Possible causes and solutions
No indicator lights • Confirm that the AC Adapter is firmly connected at
both ends (wall and power input jack)
• Confirm that the power outlet is functioning normally
• Confirm that the car cord is firmly connected at both
ends (cigarette lighter socket and power input jack)
• Confirm that the cigarette lighter socket is
functioning normally
Power light only • The battery is fully charged *
• The battery is mounted incorrectly, remove and
remount the battery
• Clean the battery and charger contacts
• The battery may be defective*
Power and battery status LEDs both blinking Defective battery*
Hissing noise while charging Normal operation due to advance switching
circuitry
DX-DA100501 English - combined.fm Page 14 Monday, August 7, 2006 12:25 PM

Maintenance 15
Maintenance
If the charger must be cleaned, make sure it is unplugged, and then wipe the body
of the charger with a clean cloth lightly dampened with mild detergent. To clean
the metal contacts, use a clean cloth lightly dampened with rubbing alcohol.
Specifications
Input: 12 V DC
Stand-by current: 30 mA
Charging current: 800 mA max @ constant current mode
Charge termination: Fixed voltage
(4.2 V for 3.6 V battery, 8.4 V for 7.2 V battery)
Warranty
Limited 1 Year Warranty
Dynex warrants that for 1 year from date of purchase as stated on your receipt, it
will replace this product if found to be defective in materials or workmanship. If
defective, return the item to the store where it was purchased before the
expiration of the 1 year warranty period, with your original receipt, and we will
replace it with a then-current equivalent Dynex product (or a pro-rated refund at
Dynex's option). This warranty is available only for the original purchaser of this
product. Dynex will not be responsible for any incidental or consequential
damages or for any loss arising in connection with the use or inability to use this
product. Some states and provinces do not allow the exclusion or limitation of
incidental or consequential damages, so the above limitation or exclusion may not
apply to you. For defective products purchased online, please contact:
www.dynexproducts.com
Dynex support service at 1-800-305-2204. Dynex, Richfield, Minnesota
Legal notices
© 2006 Dynex. DYNEX and the DYNEX logo are trademarks of Best Buy Enterprise
Services, Inc. Other brands and product names are trademarks or registered
trademarks of their respective holders. Specifications and features are subject to
change without notice or obligation.
Support number: (800) 305-2204 URL: www.dynexproducts.com
DX-DA100501 English - combined.fm Page 15 Monday, August 7, 2006 12:25 PM

16 Chargeur de batterie ion-lithium DX-DA100501 de Dynex
Chargeur de batterie ion-lithium
DX-DA100501 de Dynex
Introduction
Félicitations d’avoir acheté ce chargeur rapide de batterie ion-lithium pour
appareil photo numérique et caméscope, modèle DX-DA100501 de Dynex. Avec
l’adaptateur CA inclus (pour utilisation sur une prise secteur standard) ou le câble
pour voiture de 12 V, il est possible de charger rapidement les batteries d’un
appareil photo ou d’un caméscope chez soi ou dans la voiture.
Table des matières
Introduction................................................................................................16
Instructions de sécuritéimportantes...........................................................16
Caractéristiques ..........................................................................................17
Description du produit ...............................................................................18
Fonctionnement du chargeur......................................................................19
Problèmes et solutions................................................................................29
Entretien.....................................................................................................30
Spécifications..............................................................................................30
Garantie......................................................................................................30
Avis juridiques.............................................................................................31
Instructions de sécurité importantes
Mesures de sécurité
Ne pas utiliser ce chargeur dans un tiroir, une armoire fermée ou recouvert d’un
tissu. La chaleur dissipée pendant la charge peut endommager le chargeur ou le
bloc-batterie. Ce chargeur chauffe légèrement pendant son utilisation.
Ne pas tenter d’ouvrir le chargeur. Cela annulerait la garantie.
Ne pas exposer le chargeur à une quelconque humidité. Ne jamais l’immerger
dans l’eau.
DX-DA100501 English - combined.fm Page 16 Monday, August 7, 2006 12:25 PM

Caractéristiques 17
Ne pas entreposer le chargeur dans des zones où il serait exposé à des
températures élevées. Éviter de l’exposer à la lumière directe du soleil, par
exemple ne pas le mettre sur le tableau de bord d’un véhicule. Des températures
élevées déformeront ou feront fondre le plastique.
Ne pas faire tomber le chargeur. Une secousse importante peut causer des
dommages permanents non couverts par la garantie.
Se référer à ce Guide de l’utilisateur avec attention. Observer les procédures
recommandées pour l’installation du chargeur de batterie.
Avertissement : Ne doit être utilisé que pour des batteries ion-lithium. Ne pas
essayer de charger des batteries au nickel-cadmium (Ni-Cd) ou à hydrure
métallique de nickel (NiMh) avec ce chargeur.
Caractéristiques
• Compatible avec la majorité des batteries ion-lithium de 3,6 V, 3,7 V, 7,2 V
et 7,4 V pour appareil photo numérique ou caméscope
• Un dispositif de détection de la tension détermine avec précision le niveau
de charge, garantissant la pleine charge des bloc-batteries
• La fonctionnalitécomplément de charge et charge d’entretien permet de
maintenir la charge totale en permanence
• Détection automatique de tension avec DEL témoin
• La DEL témoin indique le mode du chargeur
• Dispositif de détection d’anomalie de la batterie pour arrêter la charge
• Protection contre les surcharges
• Temporisation de protection
DX-DA100501 English - combined.fm Page 17 Monday, August 7, 2006 12:25 PM

18 Description du produit
Description du produit
Chargeur de batterie
Adaptateur A Adaptateur B Adaptateur C Adaptateur D Adaptateur E
Logement de charge
principal (avec bornes
pour batteries de type
Sony)
Prise d’entrée de l’alimentation
Témoin d’état de charge
Témoin de Marche/Arrêt
Patte de verrouillage de
l’adaptateur pour
batterie
Pattes de verrouillage
de l’adaptateur
DX-DA100501 English - combined.fm Page 18 Monday, August 7, 2006 12:25 PM

19
Fonctionnement du chargeur
Connexion du chargeur à une source d’alimentation
Pour l’utiliser avec une prise secteur CA standard:
1Connecter l’adaptateur CA à la prise d’entrée d’alimentation à l’arrière du
chargeur.
2Brancher l’adaptateur sur n’importe quelle prise secteur standard. Le
témoin d’alimentation rouge s’allume.
Adaptateur 12 V CC
Adaptateur CA
DX-DA100501 English - combined.fm Page 19 Monday, August 7, 2006 12:25 PM

20 Fonctionnement du chargeur
Pour l’utiliser avec un connecteur d’alimentation 12 V CC (de voiture) :
1Connecter la fiche banane du câble pour voiture de 12 V CC dans la prise
d’entrée d’alimentation.
2Insérer la prise allume-cigare du câble pour voiture de 12 V CC dans la
douille de l’allume-cigare du véhicule. Le témoin d’alimentation rouge
s’allume.
Installation de la batterie dans le chargeur
Avertissement : Ne doit être utilisé que pour des batteries ion-lithium. Ne pas
essayer de charger des batteries au nickel-cadmium (Ni-Cd) ou à hydrure
métallique de nickel (NiMh).
Pour installer la batterie dans le chargeur :
1Noter où les guides et les bornes sont situées sur la batterie et les aligner
avec les guides et bornes sur le chargeur, puis glisser la batterie dans le
logement de charge.
DX-DA100501 English - combined.fm Page 20 Monday, August 7, 2006 12:25 PM
Other manuals for DX-DA100501
2
Table of contents
Languages:
Other Dynex Batteries Charger manuals