EAL LAS 10112 User manual

1
Art.-Nr.: 10112
Positionsleuchte, eckig mit Halter
Bedienungsanleitung ...................................... 2
Article number 10112
Position light, square, with mounting bracket
Operating instructions ..................................... 4
Réf. 10112
Feu de position, rectangulaire avec support
Manuel de l‘opérateur ..................................... 6
© EAL GmbH, 10112, 04.2021
Art.nr. 10112
Positielicht, rechthoekig met houder
Gebruiksaanwijzing ......................................... 8

2
Für die Anschlüsse in der Positionsleuchte gehen Sie wie folgt vor:
Lösen Sie das Deckglas (Position 1 in der Übersicht) vom Gehäuse, indem Sie mit
einem Schraubendrehen oder mit einer Münze in den Önungsschlitz, Bild 3, an der
schmalen Seite des Gehäuses greifen und das Deckglas abheben.
5.2 MONTAGE UND ANSCHLUSS
Bild 2: Anschlussplan
Montage
Verlegen Sie die Anschlusskabel zur Montagestelle.
Montieren Sie die Positionsleuchte vorn oben an Ihrem Anhänger. Schrauben Sie
die Leuchte durch die Bohrungen (Position 6 in der Übersicht) des exiblen Halters
(Position 2 in der Übersicht) an Ihrem Anhänger fest. Die Leuchte muss in Fahrtrich-
tung nach vorn leuchten.
Die genauen Vorschriften für die Montage für die Positionsleuchte
(Begrenzungsleuchte) nden Sie in der Straßenverkehrszulassungsordnung,
StVZO § 51, Begrenzungsleuchten, vordere Rückstrahler, Spurhalteleuchten.
Anschluss
Schließen Sie die Positionsleuchten parallel mit dem entsprechenden Schlusslicht an,
Bild 2 Anschlussplan.
Die Kabel dürfen nicht geknickt oder gequetscht werden. Verlegen Sie die
Kabel nicht unter Zug. Die Kabel dürfen während der Fahrt nicht von sich
bewegendenTeilen beschädigt werden.
5. BEDIENUNGSANLEITUNG
5.1 ÜBERSICHT
1 Deckglas mit Reektor
2 exibler Halter
3 Kabeldurchführung
4 Kontaktblech mit Anschlusslasche
5 Leuchtmittel (Sotte)
6 Bohrungen für Befestigung, ø 6 mm
Bild 1: Übersicht
Positionsleuchte, eckig mit Halter
INHALT
1. BESTIMMUNGSGEMÄSSER GEBRAUCH _______________________ 1
2. LIEFERUMFANG _____________________________________ 1
3. SPEZIFIKATIONEN____________________________________ 1
4. SICHERHEITSHINWEISE ________________________________ 1
5. BEDIENUNGSANLEITUNG _______________________________ 2
5.1 ÜBERSICHT________________________________________ 2
5.2 MONTAGE UND ANSCHLUSS _____________________________ 2
6. WARTUNG UND PFLEGE ________________________________ 2
6.1 WARTUNG ________________________________________ 2
6.2 PFLEGE __________________________________________ 2
7. HINWEISE ZUM UMWELTSCHUTZ __________________________ 2
8. KONTAKTINFORMATIONEN ______________________________ 2
1. BESTIMMUNGSGEMÄSSER GEBRAUCH
Die Positionsleuchte dient dazu, die Fahrzeugbegrenzung bei Dunkelheit oder
schlechten Sichtverhältnissen für andere Verkehrsteilnehmer kenntlich zu machen.
Sie gibt einen Hinweis auf die Breite des Fahrzeugs.
Die Positionsleuchte muss auch bei Fernlicht und Abblendlicht ständig leuchten.
Dieses Gerät ist nicht dafür bestimmt, durch Kinder und Personen mit
eingeschränkten geistigen Fähigkeiten oder ohne erforderliches Fachwissen benutzt
zu werden. Kinder sind von dem Gerät fernzuhalten.
Zum bestimmungsgemäßem Gebrauch gehört auch die Beachtung aller Informa-
tionen in dieser Anleitung, insbesondere die Beachtung der Sicherheitshinweise.
Jede andere Verwendung gilt als nicht bestimmungsgemäß und kann zu Sach- oder
Personenschäden führen. Die EAL GmbH übernimmt keine Haftung für Schäden, die
durch nicht bestimmungsgemäßen Gebrauch entstehen.
WARNUNG
Lesen Sie die Bedienungsanleitung vor Inbetriebnahme
sorgfältig durch und beachten Sie alle Sicherheitshinweise!
Nichtbeachtung kann zu Personenschäden, Schäden am Ge-
rät oder Ihrem Eigentum führen!
Bewahren Sie die Originalverpackung, den Kaufbeleg
sowie diese Anleitung zum späteren Nachschlagen auf!
Bei der Weitergabe des Produkts geben Sie auch diese
Anleitung weiter.
Prüfen Sie vor Inbetriebnahme den Inhalt der Verpackung
auf Unversehrtheit und Vollständigkeit!
2. LIEFERUMFANG
Positionsleuchte Gebrauchsanleitung
3. SPEZIFIKATIONEN
Dimensionen (L x B x H): ca. 50 x 110 x 45 [mm]
Gewicht : ca. 60 g
Leuchtmittel: Sotte, 12V, 5W, SV8,5-8, D10, L36 mm
• Das Warndreieck kennzeichnet alle für die Sicherheit wichtigen
Anweisungen. Befolgen Sie diese immer, anderenfalls könnten Sie sich
verletzen oder das Gerät könnte beschädigt werden.
• Kinder dürfen nicht mit dem Produkt spielen.
• Reinigung und Benutzerwartung dürfen nicht von Kindern ohne
Beaufsichtigung durchgeführt werden.
• Lassen Sie das Verpackungsmaterial nicht achtlos liegen. Dieses kann
für Kinder zu einem gefährlichen Spielzeug werden!
• Benutzen Sie dieses Produkt nur für die dafür vorgesehene
Verwendung!
• Manipulieren Sie die Leuchte nicht! Bei Veränderung an der Leuchte
erlischt die Betriebsgenehmigung.
• Verwenden Sie zu Ihrer eigenen Sicherheit ausschließlich Zubehör
oder Ersatzteile, die in der Anleitung angegeben sind, oder deren
Verwendung durch den Hersteller empfohlen wird!
• Bei der Montage dürfen keine tragenden Teile, z. B. Längsträger des
Chassis oder Fahrwerksteile beschädigt oder verändert werden.
• Achten Sie bei der Montage darauf, dass keine Kabel oder Leitungen
beschädigt werden.
4. SICHERHEITSHINWEISE
Positionsleuchte
links, schwarz 58L
Masse, weiß 31
rechts, braun 58R
Schlusslicht
PositionsleuchteSchlusslicht

3
Stecken Sie die Anschlusskabel von außen durch die Kabeldurchführung (Position 3
in der Übersicht). Versehen Sie die Kabel mit einem Flachstecker/Quetschverbinder
(nicht im Lieferumfang enthalten).
Stecken Sie die Flachstecker auf die Anschlusslaschen der Kontaktbleche (Position 4
in der Übersicht), Bild 4.
Setzen Sie das Deckglas wieder auf das Gehäuse und drücken Sie es fest.
Führen Sie eine Funktionskontrolle durch.
Bild 4: Kabel anschließen
7.HINWEISE ZUM UMWELTSCHUTZ
Entsorgen Sie Elektrogeräte nicht mit dem Hausmüll! Elektro-
und Elektronik-Altgeräte müssen getrennt gesammelt und einer
umweltgerechten Wiederverwertung zugeführt werden. Über
Entsorgungsmöglichkeiten für Elektro- und Elektronik-Altgeräte
informieren Sie sich bei Ihrer Gemeinde- oder Stadtverwaltung.
8. KONTAKTINFORMATIONEN
EAL GmbH
Otto-Hausmann-Ring 107
42115Wuppertal, Deutschland
+49 (0)202 42 92 83 0
+49 (0) 202 42 92 83 – 160
info@eal-vertrieb.com
www.eal-vertrieb.com
6.WARTUNG UND PFLEGE
6.1 WARTUNG
Bei bestimmungsgemäßen Gebrauch ist die Positionsleuchte wartungsfrei.
6.2 PFLEGE
Reinigen Sie die Positionsleuchte nur mit Wasser oder handelsüblichen Fahrzeugrei-
nigern. Verwenden Sie keine scharfen oder lösungsmittelhaltigen Reinigungsmittel.
Lassen Sie keine Flüssigkeiten in das Innere der Positionsleuchte gelangen.
Bild 3: Deckglas abheben
Ersetzen des Leuchtmittels:
Das Leuchtmittel/Sotte darf nur mit einem gleichwertigen, baugleichen Leucht-
mittel ersetzt werden.
Sotte, 12V, 5W, SV8,5-8, D10, L36 mm

4
Position light, square, with mounting bracket
CONTENTS
1. PROPER USE OFTHE PRODUCT ____________________________ 4
2. SCOPE OF DELIVERY _________________________________ 4
3. SPECIFICATIONS_____________________________________ 4
4. SAFETY PRECAUTIONS_________________________________ 4
5. OPERATING INSTRUCTIONS______________________________ 4
5.1 OVERVIEW ________________________________________ 4
5.2 INSTALLATION AND CONNECTION __________________________ 4
6. MAINTENANCE AND CARE_______________________________ 5
6.1 MAINTENANCE _____________________________________ 5
6.2 CARE ___________________________________________ 5
7. INFORMATION ON ENVIRONMENTAL PROTECTION ________________ 5
8. CONTACT INFORMATION________________________________ 5
Please read the operating instructions carefully prior to use
and observe all safety instructions!
Not observing these may lead to personal injury, damage to
the device or to your property!
Store the original packaging, the receipt and these
instructions so that they may be consulted at a later
date! When passing on the product, please include these
operating instructions as well.
Please check the contents of package for integrity and
completeness prior to use.
1.PROPER USE OF THE PRODUCT
The position light makes the vehicle boundaries recognisable for other road users at
night or in poor visibility conditions. It provides an indication of the vehicle width.
The position light must also be on when driving with full-beam and dipped-beam
headlights.
This device is not designed to be used by children or persons with limited mental
abilities or without experience and/or lack of required specialist knowledge. Keep
children away from the device.
Utilisation according to the intended purpose also includes the observance of all
information in these operating instructions, particularly the observance of the
safety instructions. Any other utilisation is considered to be contrary to the intended
purposeandmayleadtomaterialdamage or personal injuries.EAL GmbH assumes no
liability for damage resulting from improper use.
2.SCOPE OF DELIVERY
Position light Operating instructions
3. SPECIFICATIONS
Dimensions (L xW x H): approx. 50 x 110 x 45 [mm]
Weight: approx. 60 g
Lamp: festoon bulb, 12V, 5W, SV8,5-8, D10, L36 mm
• The warning triangle sign indicates all instructions which are important
for safety. Always follow these, otherwise you could injure yourself or
damage the device.
• Children may not play with the product.
• Cleaning and user maintenance may not be carried out by children
without supervision.
• Do not leave packaging material lying around. It may become a
dangerous plaything for children!
• Only use this product for its designated purpose!
• Do not manipulate the light! If the light is modied, it is no longer
approved for operation.
• For your own safety, only use accessories and spare parts that are stated
in these instructions or that are recommended by the manufacturer!
• During installation, load bearing parts, e.g., main chassis beams or
chassis parts, must not be damaged.
• Make sure that cables or lines are not damaged during installation.
4. SAFETY PRECAUTIONS
WARNING
For the connections in the position light, proceed as follows:
Remove the cover glass (position 1 in the overview) from the housing by inserting a
screwdriver or a coin into the opening slit, Figure 3, on the narrow side of the housing
and lifting o the cover glass.
5.2 INSTALLATION AND CONNECTION
Figure 2: Connection diagram
Installation
Lay the connection cables to the installation location.
Install the position light at the front top of your trailer. Screw the light onto your
trailer via the holes (position 6 in the overview) of the exible bracket (position 2 in
the overview).The light must shine forward in the direction of travel.
Detailed rules on installing the position light (boundary light) can be found in the
Road Trac Act (StVZO), Section 51, boundary lights, front reectors, lane-keeping
lights.
Connection
Connect the position lights in parallel with the corresponding tail light, Figure 2
Connection diagram.
The cables should not be kinked or crimped. Do not lay cables under tensile
stress. Cables must not be damaged by moving parts during driving.
5. OPERATING INSTRUCTIONS
5.1 OVERVIEW
1 Cover glass with reector
2 Flexible bracket
3 Cable bushing
4 Contact plate with connection lug
5 Lamp (festoon bulb)
6 Holes for mounting, ø 6 mm
Figure 1: Overview
position light
left, black, 58L
ground, white, 31
right, brown, 58R
tail light
position lighttail light

5
Insert the connection cables through the cable bushing from the outside (position 3
in the overview). Add a at plug/crimp connector (not included) to the cables.
Insert the at plugs onto the connection lugs of the contact plates (position 4 in the
overview), Figure 4.
Put the cover glass back onto the housing and press it rmly into place.
Carry out a function check.
Figure 4: Connecting the cable
7.INFORMATION ON ENVIRONMENTAL PROTECTION
Do not dispose of electrical devices with the household waste!
Electrical and electronic scrap must be collected separately
and disposed of in an environmentally responsible manner for
recycling. Please contact your community or city administration
regarding disposal options for electrical and electronic scrap.
8. CONTACT INFORMATION
EAL GmbH
Otto-Hausmann-Ring 107
42115 Wuppertal, Germany
+49 (0)202 42 92 83 0
+49 (0) 202 42 92 83 – 160
info@eal-vertrieb.com
www.eal-vertrieb.com
6.MAINTENANCE AND CARE
6.1 MAINTENANCE
The position light does not need to be maintained with proper use of the product.
6.2 CARE
Clean the position lamp only with water or standard vehicle cleaners. Do not use
any aggressive cleaning agents or solvent-based cleaners. Never allow liquids to get
inside the position light.
Figure 3: Lifting o the cover glass
Replacing the lamp:
The lamp/festoon bulb may only be replaced by a lamp of identical quality and
design.
Festoon bulb, 12V, 5 W, SV8,5-8, D10, L36 mm

6
Feu de position, rectangulaire avec support
SOMMAIRE
1. UTILISATION CONFORME _______________________________ 1
2. CONTENU DE LA LIVRAISON _____________________________ 1
3. SPÉCIFICATIONS_____________________________________ 1
4. CONSIGNES DE SÉCURITÉ _______________________________ 1
5. NOTICE D’UTILISATION_________________________________ 2
5.1 VUE D’ENSEMBLE____________________________________ 2
5.2 MONTAGE ET CONNEXION_______________________________ 2
6. MAINTENANCE ET ENTRETIEN ____________________________ 2
6.1 MAINTENANCE _____________________________________ 2
6.2 NETTOYAGE _______________________________________ 2
7. REMARQUES RELATIVES À LA PROTECTION DE L’ENVIRONNEMENT ______ 2
8. DONNÉES DE CONTACT_________________________________ 2
1. UTILISATION CONFORME
Le feu de position est utilisé pour rendre les limites du véhicule visibles aux autres
usagers de la route dans l’obscurité ou dans des conditions de mauvaise visibilité. Il
donne une indication de la largeur du véhicule.
Le feu de position doit rester allumé en permanence en même temps que les feux de
route et les feux de croisement.
Cet appareil n’est pas destiné à être utilisé par des enfants ou des personnes aux
capacités mentales restreintes ou ne disposant pas de l’expérience ou des
connaissances nécessaires. Les enfants doivent rester à distance de cet appareil.
L’utilisation conforme aux prescriptions implique également le respect de toutes les
informations contenues dans cette notice d’utilisation, en particulier le respect des
consignes de sécurité.Toute autre utilisation est considérée comme non conforme et
peut entraîner des dommages matériels ou corporels. La société EAL GmbH décline
toute responsabilité en cas de dommages découlant d’une utilisation non conforme
à l’emploi prévu.
Avant la mise en service, lisez attentivement le mode
d’emploi et observez toutes les consignes de sécurité!
Tout non-respect de ces consignes peut entraîner des
dommages corporels, endommager l’appareil ou vos biens!
Conservez l’emballage d’origine, le justicatif d’achat et
la présente notice pour vous y référer ultérieurement! Si
vous revendez ou remettez l’appareil à des tiers, veuillez
également leur remettre cette notice d’utilisation.
Avant la mise en service, veuillez contrôler le contenu de
l’emballage quant à l’absence de dommages et vérier si
toutes les pièces sont présentes!
2. MATÉRIEL FOURNI
Feu de position Mode d’emploi
3. SPÉCIFICATIONS
Dimensions (L x l x H): env. 50 x 110 x 45 [mm]
Poids: env. 60 g
Ampoule: Sotte, 12V, 5 W, SV8,5-8, D10, L36 mm
• Le triangle d’avertissement indique toutes les instructions relatives à la
sécurité. Respectez-les à tout moment car vous risqueriez sinon de vous
blesser ou l’appareil risquerait d’être endommagé.
• Les enfants ne doivent pas jouer avec le produit.
• Les tâches de nettoyage et d’entretien à eectuer chez soi ne doivent
pas être exécutées par des enfants qui ne sont pas sous surveillance.
• Ne laissez pas traîner le matériel d’emballage. Il pourrait devenir un
jouet dangereux pour les enfants!
• N’utilisez cet appareil qu’aux ns pour lesquelles il a été prévu!
• Ne manipulez pas la lampe! Toute modication de la lampe entraîne
l’annulation du permis d’exploitation.
• Pour votre propre sécurité, utilisez exclusivement les accessoires ou
pièces de rechange qui sont indiqué(e)s dans la notice d’utilisation ou
dont l’utilisation est conseillée par le fabricant!
• Aucune pièce porteuse, comme les longerons du châssis ou les pièces
du châssis, ne doit être endommagée ou modiée pendant le montage.
• Pendant l’installation, veillez à ce qu’aucun câble ou ligne ne soit
endommagé.
4.CONSIGNES DE SÉCURITÉ
AVERTISSEMENT
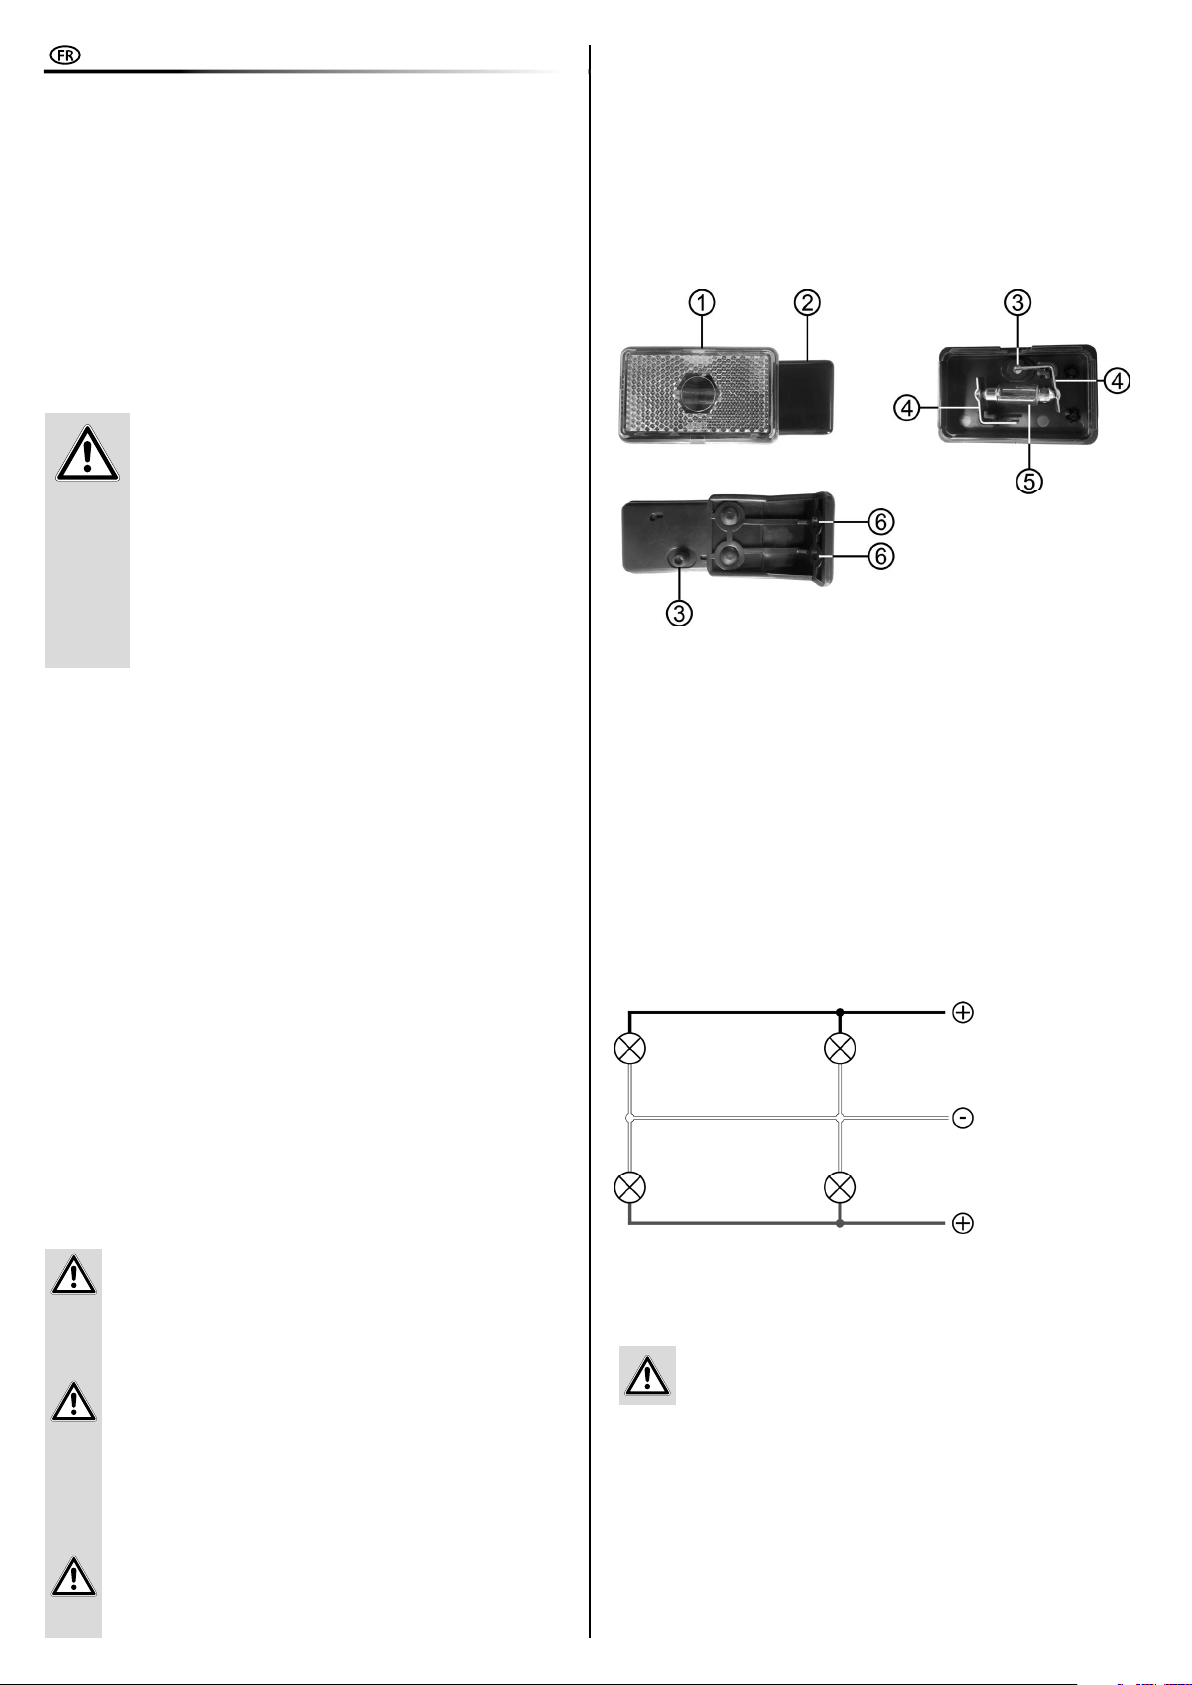
Pour les connexions du feu de position, procédez comme suit:
Retirez le verre de protection (position 1 dans la vue d’ensemble) du boîtier en
utilisant un tournevis ou une pièce de monnaie dans la fente d’ouverture, gure 3,
saisissez le boîtier par le côté étroit et soulevez le verre de protection.
5.2 MONTAGE ET CONNEXION
Figure 2: schéma de câblage
Montage
Posez les câbles de connexion jusqu’à l’emplacement d’installation.
Montez le feu de position à l’avant de votre remorque. Vissez la lampe à votre
remorque par les trous (position 6 dans la vue d’ensemble) du support exible
(position 2 dans la vue d’ensemble). La lampe doit éclairer vers l’avant.
Les dispositions exactes relatives à l’installation du feu de position (feu de
gabarit)se trouvent dansla réglementationallemandesur lacirculationdes véhicules
automobiles, StVZO § 51, Feux de position, réecteurs avant, feux de gabarit.
Raccordement
Connectez les feux de position en parallèle avec le feu arrière correspondant, gure 2
schéma de câblage.
Ne pas plier ou écraser le câble. Veillez à ce que les câbles ne soient
pas tendus. Les câbles ne doivent pas être endommagés par des pièces
mobiles pendant la conduite.
5. NOTICE D’UTILISATION
5.1 VUE D’ENSEMBLE
1 Verre de protection avec réecteur
2 Support exible
3 Passage de câbles
4 Plaque de contact avec patte de connexion
5 Ampoule (Sotte)
6 Trous de xation, ø 6 mm
Figure 1:Vue d’ensemble
feu de position
gauche, noir, 58L
masse, blanc, 31
droite, marron, 58R
feu arrière
feu de positionfeu arrière

7
Insérez les câbles de connexion de l’extérieur à travers le presse-étoupe (position
3 dans la vue d’ensemble). Munissez les câbles d’un connecteur plat/ à sertir (non
inclus dans la livraison).
Enchez les ches plates sur les cosses de connexion des plaques de contact (position
4 dans la vue d’ensemble), gure 4.
Replacez le verre de protection sur le boîtier et appuyez fermement dessus.
Eectuez un contrôle de fonctionnement.
Figure 4: brancher le câble
7.REMARQUES RELATIVES À LA PROTECTION DE L’ENVIRONNEMENT
Ne jetez pas les appareils électriques aux ordures ! Les
appareilsélectriquesetélectroniquesusagésdoiventêtrecollectés
séparément et remis aux services de recyclage. Renseignez-vous
quant aux possibilités d’élimination d’appareils électriques
et électroniques usagés auprès de votre administration
communale, municipale ou cantonale.
8.DONNÉES DE CONTACT
EAL GmbH
Otto-Hausmann-Ring 107
42115 Wuppertal, Allemagne
+49 (0)202 42 92 83 0
+49 (0) 202 42 92 83 – 160
info@eal-vertrieb.com
www.eal-vertrieb.com
6.ENTRETIEN ET NETTOYAGE
6.1 ENTRETIEN
Si le feu de position est utilisé de manière conforme, il n’exige pas d’entretien.
6.2 NETTOYAGE
Ne nettoyez le feu de position qu’avec de l’eau ou des produits de nettoyage pour
véhicules disponibles dans le commerce. N’utilisez pas de nettoyants agressifs ou
contenant des solvants. Ne laissez jamais de liquides entrer à l’intérieur du feu de
position.
Figure 3: retirer le verre de protection
Remplacement de l’ampoule:
l’ampoule / Sotte ne doit être remplacée que par une ampoule équivalente de
même type.
Sotte, 12V, 5 W, SV8,5-8, D10, L36 mm

8
Positielicht, rechthoekig met houder
INHOUD
1. REGLEMENTAIR GEBRUIK _______________________________ 8
2. LEVERINGSOMVANG __________________________________ 8
3. SPECIFICATIES______________________________________ 8
4. VEILIGHEIDSINSTRUCTIES_______________________________ 8
5. GEBRUIKSAANWIJZING ________________________________ 8
5.1 OVERZICHT________________________________________ 8
5.2 MONTAGE EN AANSLUITING _____________________________ 8
6. ONDERHOUD ENVERZORGING ____________________________ 9
6.1 ONDERHOUD_______________________________________ 9
6.2 VERZORGING_______________________________________ 9
7. INFORMATIE M.B.T. HET MILIEU ___________________________ 9
8. CONTACTGEGEVENS __________________________________ 9
1. REGLEMENTAIR GEBRUIK
Het positielicht wordt gebruikt om de voertuigbegrenzing in het donker of bij slecht
zicht duidelijk te maken voor andere weggebruikers. Het geeft een indicatie van de
breedte van het voertuig.
Het positielicht moet ook bij grootlicht en dimlicht continu branden.
Dit product mag niet worden gebruikt door kinderen, mensen met een verstandelijke
beperking of mensen die niet over de vereiste ervaring/kennis beschikken. Houd
kinderen uit de buurt van het apparaat.
Tot het beoogd gebruik behoort ook het in acht nemen van alle informatie in deze
gebruiksaanwijzing, in het bijzonder van de veiligheidsvoorschriften. Elk ander
gebruik geldt als niet-reglementair en kan materiële schade of persoonlijk letsel
veroorzaken. EAL GmbH is niet aansprakelijk voor schade als gevolg van niet-beoogd
gebruik.
Lees voorafgaand aan de ingebruikname de gebruiksaanwij-
zing aandachtig door en neem alle veiligheidsvoorschriften
in acht!
Het niet-naleven hiervan kan letsel, schade aan het product
of aan uw eigendom veroorzaken!
Bewaar de oorspronkelijke verpakking, het aankoopbe-
wijs en de gebruiksaanwijzing om deze later te kunnen
raadplegen! Geef bij het doorgeven van het product ook
deze gebruiksaanwijzing door.
Controleer de inhoud van de verpakking voor de ingebruik-
name eerst op beschadigingen en volledigheid!
2. LEVERINGSOMVANG
Positielicht Gebruiksaanwijzing
3. SPECIFICATIES
Afmetingen (L x B x H): ca. 50 x 110 x 45 [mm]
Gewicht : ca. 60 g
Lamp: Sotte, 12V, 5 W, SV8,5-8, D10, L36 mm
• De waarschuwingsdriehoek kenmerkt alle voor de veiligheid belang-
rijke aanwijzingen. Neem deze te allen tijde in acht, anders kunnen
lichamelijk letsel of schade aan het apparaat het gevolg zijn.
• Kinderen mogen niet met het product spelen.
• Kinderen mogen het apparaat niet zonder toezicht reinigen of het
gebruikersonderhoud uitvoeren.
• Laat het verpakkingsmateriaal niet achteloos rondslingeren. Dit kan
voor kinderen gevaarlijk speelgoed worden!
• Gebruik dit product uitsluitend voor het beoogde doel!
• Manipuleer het licht niet! De gebruiksvergunning vervalt als de
armatuur wordt gewijzigd.
• Gebruik voor uw eigen veiligheid uitsluitend toebehoren of reserveon-
derdelen die in de gebruiksaanwijzing staan vermeld of waarvan het
gebruik door de fabrikant wordt aanbevolen!
• Bij de montage mogen geen dragende onderdelen, zoals langsliggers
van het chassis of chassisdelen worden beschadigd of gewijzigd.
• Let er bij de montage op dat er geen kabels of leidingen beschadigd
raken.
4. VEILIGHEIDSINSTRUCTIES
WAARSCHUWING
Ga als volgt te werk om toegang te krijgen tot de aansluitingen in het positielicht:
Maak het dekglas (positie 1 in het overzicht) los van de behuizing door met een
schroevendraaier of een muntstuk in de openingssleuf, afb. 3, aan de smalle kant van
de behuizing te grijpen en til het dekglas eraf.
5.2 MONTAGE EN AANSLUITING
Afb. 2: Aansluitschema
Montage
Leg de aansluitkabels aan naar de montageplaats.
Monteer het positielicht vooraan boven op uw aanhanger. Schroef de lamp door de
gaten (positie 6 in het overzicht) van de exibele houder (positie 2 in het overzicht)
vast op uw aanhanger. Het licht moet in de rijrichting naar voren oplichten.
De exacte instructies voor het monteren van het positielicht (markeringslicht) is te
vinden in de Duitse regelgeving inzake vergunningverlening voor het wegverkeer,
StVZO § 51, markeringslichten, frontreectoren, breedtelichten.
Aansluiting
Sluit de positielichten parallel met het bijbehorende achterlicht aan, afb. 2
Aansluitschema.
De kabels mogen niet geknikt of geplet worden. Leg de kabels niet aan
onder trekspanning. De kabels mogen tijdens het rijden niet beschadigd
raken door bewegende onderdelen.
5. GEBRUIKSAANWIJZING
5.1 OVERZICHT
1 Dekglas met reector
2 Flexibele houder
3 Kabeldoorvoer
4 Contactplaat met aansluitlip
5 Lamp (Sotte)
6 Boorgaten voor bevestiging, ø 6 mm
Afb. 1: Overzicht
positielicht
links, zwart, 58L
massa, wit, 31
rechts, bruin, 58R
achterlicht
positielichtachterlicht

9
Steek de aansluitkabels van buitenaf door de kabeldoorvoer (positie 3 in het
overzicht). Voorzie de kabels van een platte stekker/knelconnector (niet bij de
levering inbegrepen).
Steek de platte stekker op de aansluitlippen van de contactplaten (positie 4 in het
overzicht), afb. 4.
Plaats het dekglas weer terug op de behuizing en druk het op zijn plaats.
Controleer of alles correct werkt.
Afb. 4: Bekabeling aansluiten
7. INFORMATIE M.B.T. HET MILIEU
Gooi elektrische apparaten niet weg bij het huisvuil! Elektrische
en elektronische apparaten moeten gescheiden worden ingeza-
meld en op milieuvriendelijke wijze worden gerecycled. Meer
informatie over het afvoeren van elektrische en elektronische
apparaten kunt u opvragen bij de gemeente of het stadsbestuur.
8. CONTACTGEGEVENS
EAL GmbH
Otto-Hausmann-Ring 107
42115 Wuppertal, Duitsland
+49 (0)202 42 92 83 0
+49 (0) 202 42 92 83 – 160
info@eal-vertrieb.com
www.eal-vertrieb.com
6. ONDERHOUD EN VERZORGING
6.1 ONDERHOUD
Bij correct gebruik is het positielicht onderhoudsvrij.
6.2 VERZORGING
Reinig het positielicht uitsluitend met water of in de handel verkrijgbare voertuigrei-
nigers. Gebruik geen agressieve reinigings- of oplosmiddelen. Laat nooit vloeistoen
in het positielicht binnendringen.
Afb. 3: Dekglas verwijderen
De lamp vervangen:
De lamp/Sotte mag alleen worden vervangen door een gelijkwaardige, structureel
identieke lamp.
Sotte, 12V, 5 W, SV8,5-8, D10, L36 mm

EAL GmbH
Otto-Hausmann-Ring 107
42115Wuppertal, Deutschland
+49 (0)202 42 92 83 0
+49 (0) 202 42 92 83 – 160
info@eal-vertrieb.com
www.eal-vertrieb.com
Table of contents
Languages:
Other EAL Automobile Accessories manuals
Popular Automobile Accessories manuals by other brands

ULTIMATE SPEED
ULTIMATE SPEED 279746 Assembly and Safety Advice

SSV Works
SSV Works DF-F65 manual

ULTIMATE SPEED
ULTIMATE SPEED CARBON Assembly and Safety Advice

Witter
Witter F174 Fitting instructions

WeatherTech
WeatherTech No-Drill installation instructions

TAUBENREUTHER
TAUBENREUTHER 1-336050 Installation instruction