EAST OAK TORCHSY User manual

TORCHSY Mini Tower
Patio Heater 11000 BTU
Owner’s Manual
MODEL:
EO-PH22007
EO-MPH22017
EO-MPH22018

1EASTOAK.COM MINI PATIO HEATER
Claim 3-year warranty
at eastoak.com/warranty
eastoak.com
Question? Comments?
Reach out to us to get expert support!
support@eastoak.com
eastoak.com
1-833-EAST-OAK (USA)
(1-833-327-8625)
Follow eastoakliving on

32 EASTOAK.COM[email protected]
1-833-327-8625 MINI PATIO HEATER
IMPORTANT CAUTION
Please verify all parts and components present and check for any damaged
pieces before assembly. If you have any damaged or missing parts, please
contact customer service at support@eastoak.com.
• Some parts may contain sharp edges and may cause injury or property
damage. We recommend you wear protective gloves during assembly.
• If you are using power tools, please set the speed to the lowest setting
possible to ensure there will be no damage to the parts.
DANGER
If there is any gas odor present:
• Shut off all gas valves immediately. Turn off the heater.
• Extinguish any open ames.
• If the odor continues, stay away from the appliance and immediately call your
gas supplier or dial 911 to call the re department.
CAREFUL
• DO NOT touch or move the heater for at least 45 minutes after use.
Allow the unit to cool down completely.
• The reector will be extremely hot to touch.
• Allow the reector to cool down before maintenance or storage.
CAUTION: CARBON MONOXIDE HAZARD
This appliance may produce an odorless carbon monoxide. Using this appliance
in an enclosed space may cause injury, damage, or death. NEVER use this
product in an enclosed space, such as a tent, car, or house.
WARNING
• Do not store or use any gasoline or other ammable vapors or liquids close
to this appliance. All propane tanks not connected to the heater should be
stored at a separate location.
• Improper installation, alteration, service, or maintenance may cause property
damage, injury, or death. Please read the manual for installation, use, and
maintenance instructions before assembly and operating this product. If
instructions are not followed thoroughly, a re or explosion may occur and
result in property damage, injury, or death.
CONSUMER
Retain this manual for future reference.
IMPORTANT INFORMATION SAFETY GUIDE
• The installation of this unit must adhere to local codes or Propane Storage
and Handling Code, CSA B149.2.
• THIS APPLIANCE IS INTENDED FOR OUTDOOR USE ONLY. Do not use
this product in an enclosed space.
• ONLY use this appliance with a propane gas tank (sold separately).
• Do not use this heater with any natural gases.
• Do not attach a remote gas supply to this unit.
• Converting this unit to natural gas is dangerous and not recommended. The
conversion of this unit will void the manufacturer warranty.
• Do not use any solid fuel or charcoal for this unit.
• If the propane gas tank is leaking gas, you may hear, see, or smell a hiss.
Do the following:
◦ Disconnect the propane gas tank.
◦ Do not attempt to x the problem yourself.
◦ Contact your gas supplier or re department for help.
• Applying too much propane may result in gas pooling and will not burn.
Allow fresh air into the unit so that the remaining gas may escape.
5020959

54 EASTOAK.COM[email protected]
1-833-327-8625 MINI PATIO HEATER
• Do not attempt to use re to check for gas leaks.
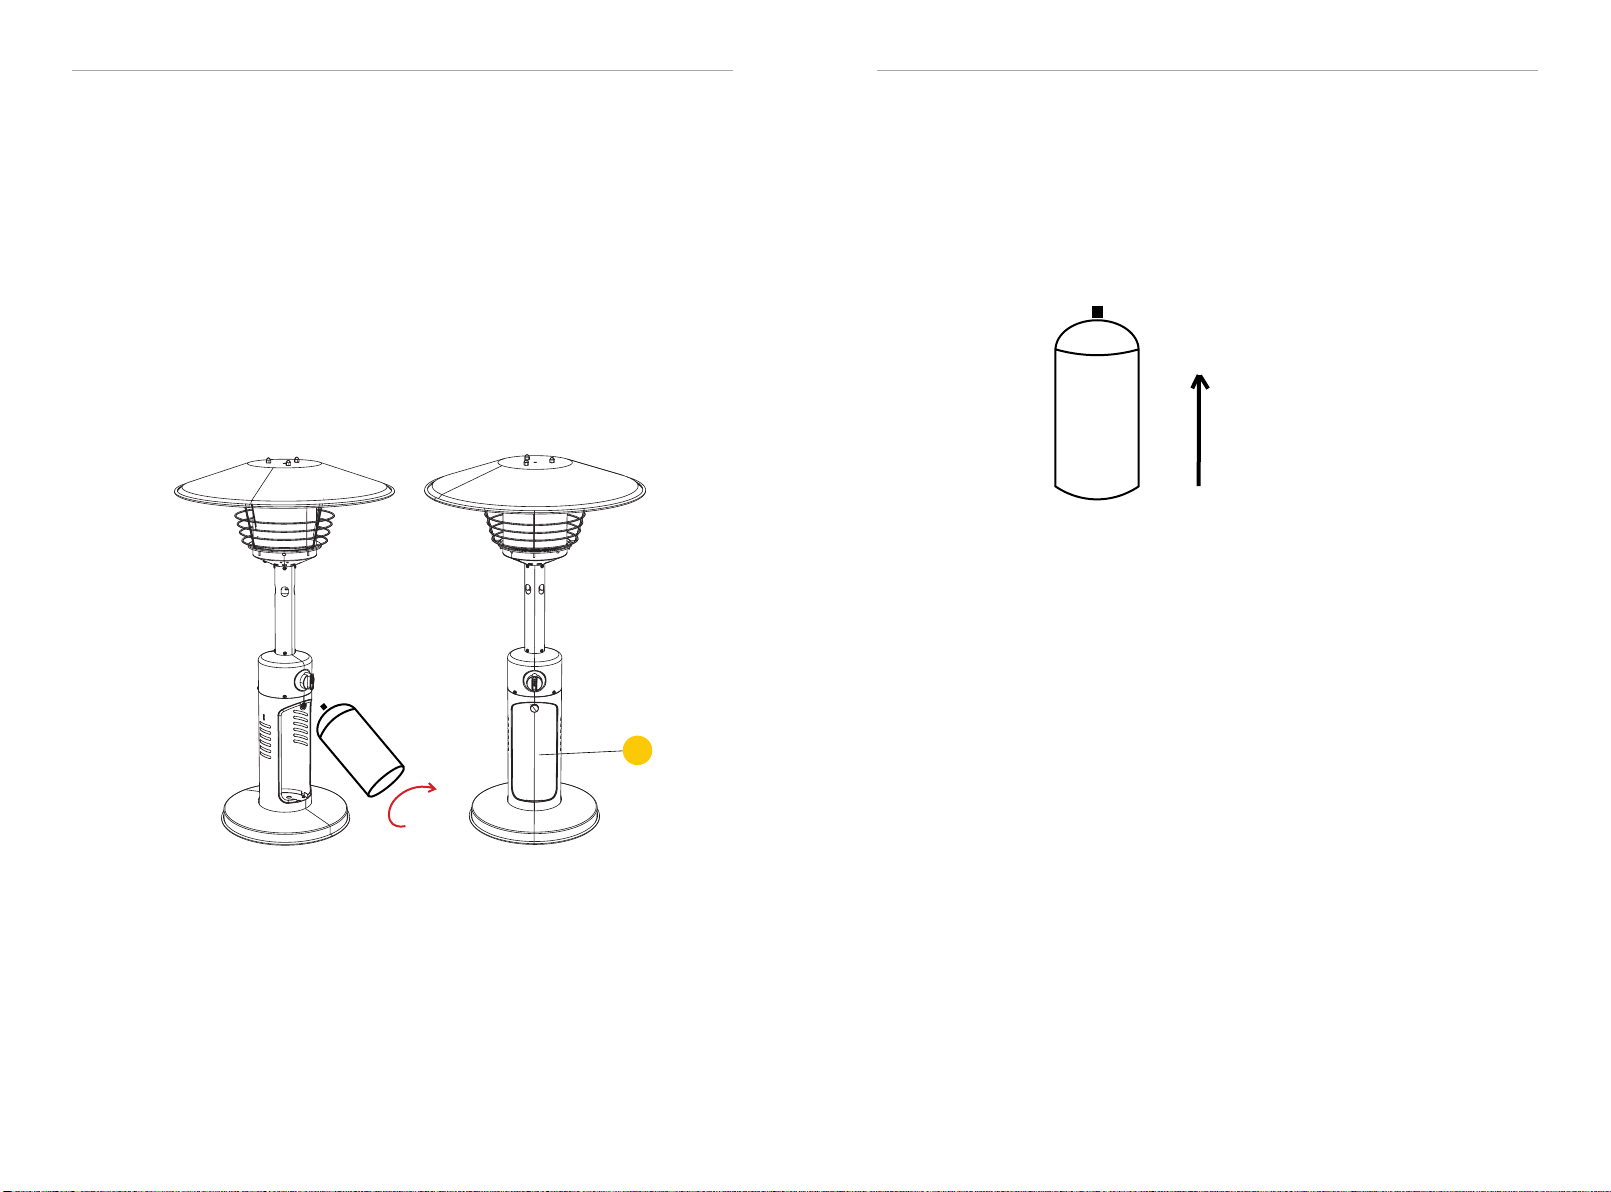
• You must use a propane tank that has a collar to protect the gas valve.
• DO not ll tank over 80 percent full.
• The tank system must be set up for vapor withdrawal.
• Discontinue use if any part of the propane tank is damaged. Rust and
dents may be hazardous and should be inspected by a gas supplier.
• Do not burn anything other than the provided materials for this patio heater.
• Do not operate unit until all parts are fully assembled.
• Do not paint or color any part of this heating unit.
• Do not attempt to move the appliance while in use. It is extremely hot.
• Never leave this heating unit unattended while in use.
• This unit is not intended for cooking.
• Keep any ammable items away.
• Keep a safe distance to avoid burning skin or clothing.
• Do not sit or rest hands or feet on this heating unit.
• Never place hands or ngers on upper portion of this unit while in use.
• Keep all electrical cords and fuel supply hose away from heated surfaces.
• Combustible material should not be within 24 inches of the top of the unit,
or within 36 inches around the entire unit.
• Keep the appliance area clear and free from combustible material, gasoline
and other ammable vapors and liquids.
• If the ame goes out while burning, turn the gas valve off. Wait 5 minutes
before repeating the initial lighting procedure. Once you have a ame started,
hold down the control knob for 1 minute.
• Never add water to the unit.
• If water gets into the appliance for any reason, please contact our customer
service at support@eastoak.com to replace any damaged parts.
• Do not disconnect any part while unit is in use.
• Do not store a spare propane tank on or near this unit.
• If the heating unit is indoors, detach the propane tank and leave outdoors.
• Do not operate on a boat or vehicle. This unit must be used on a at surface
and outdoors ONLY.
• Always remove protective cover before operating (if applicable).
• Check for leaks after not using the unit for long periods of time.
• Children should never operate this unit. Children must be supervised while
near this unit.
• Keep gas tank at least 5 feet away from unit when lit. (if external tank).
• Inspect all elements of this heating unit before each use. If there is damage,
the burner must be replaced.
• Use the pressure regulator supplied with the appliance.
• The installation must conform with local codes, or in the absence of local
codes,with National Fuel Gas Code, ANSI Z223.1/NFPA54,Natural Gas and
Propane Installation Code, CSA B149.1, or Propane Storage and Handling
Code, B149.2.
• Certain materials or items stored nearby or under the patio heater may be
subject to radiant heat and may cause serious damage, injury, or death. Do
not store any items underneath the patio heater.
• Use only a cylinder marked propane.
• Dented, rusted, or damaged propane tanks may be hazardous and should
be checked by your cylinder supplier. Do not use a propane cylinder with a
visible damage on the valve connection or cylinder itself.
• The propane cylinder must be constructed and marked in accordance
with the specications for LP gas cylinders of the U.S. Department of
Transportation (DOT). or the Standard for Cylinders, Spheres and Tubes for
Transportation of Dangerous Goods and Commission, CAN/CSA-B339.
• Ensure the cylinder includes a listed overlling prevention device.
• The propane tank should include a cylinder connection device compatible
with the patio heater.
• Each propane cylinder must include a collar to protect the valve.
• This heating appliance should not be used on plastic or articial wood decks.
• Children and adults should be alerted to the hazards of high surface
temperatures and should stay away to avoid burns or clothing ignition.
• Children and pets should stay away from the unit and carefully supervised
when ignited.
• Clothing or other ammable materials should not be hung from the appliance
or placed on or near the appliance.
• Any guard or other protective device removed for servicing the appliance
shall be replaced prior to operating the appliance.
SAFETY GUIDE

76 EASTOAK.COM[email protected]
1-833-327-8625 MINI PATIO HEATER
• Be mindful to not block the ow of combustion and ventilated air. Proper
ventilation allows for the appliance to burn effectively.
• Make sure the ventilation openings are free of debris.
• Visually checking burner ames, with pictorial representations.
• Clean all parts of the appliance with recommended cleaning agents,
if needed.
• Lubrication of moving parts and the type and amount of lubricant to be used.
• When applicable, visually checking portions of the hose assembly located
within the connes of the heater post.
NOTE: You must follow all steps to properly assemble this heating item. Make
sure the gas valve is turned “OFF” before assembling. Do NOT attempt to
assemble without proper tools.
SAFETY GUIDE
CARE AND MAINTENANCE
• Gas odor with extremely yellow ame tips.
• The heater does NOT reach the desired temperature.
• The heater glow may be excessively uneven.
• The heater makes popping noises.
• Spiders and insects can nest in burner or orices. This dangerous condition
can damage the heater and may be unsafe to use. Clean all burner holes
with a heavy-duty pipe cleaner. Compressed air is an alternative that may
clear away smaller particles.
• Any carbon deposits can be a re hazard. Clean the dome and burner screen
with warm mild soap and water if any carbon deposits develop.
Note: Salty air environments, such as near an ocean, cause corrosion to occur
more quickly. If you are using the heater in this type of atmosphere, frequently
check for corroded areas and repair them immediately.
TIP: Use high-quality automobile wax to help maintain the appearance of
your heater. Apply to exterior surfaces from the pole down. Do not apply to
emitter screen or domes.
To maximize the performance and longevity of your heater, here are some
recommended best practices to maintain and clean your appliance:
• Keep all exterior surfaces clean. Use a mild soap and water regularly and/or
after use.
• Do not use any ammable or corrosive cleaning agents.
• Never submerge the control valve assembly. If the gas control gets wet or
is submerged in water, DO NOT use it. This must be replaced immediately
before the next use.
• Keep the appliance clear and free of any combustible or ammable materials,
such as gasoline, vapors, or liquids.
• Do not block the ow of combustion and ventilated air.
• Keep the ventilation openings of the cylinder free of debris and any
obstructions.
Normal Abnormal
• Keep air ow ventilating appropriately. Ensure all controls, burner,
and air passageways are clean and free of any debris or ammable
materials. Signs of possible blockage include:

98 EASTOAK.COM[email protected]
1-833-327-8625 MINI PATIO HEATER
Between every use:
• Turn Control Knob to the “OFF” position. Disconnect LP source.
• Store the heater upright in an area protected from any environmental hazards,
such as rain or snow, and potential damaging materials, like debris and dust.
• For added protection, covert the heater to prevent any debris build up in the
air passages. Note: Wait until the heater is completely cooled down before
covering.
During periods of extended inactivity or when transporting:
• Turn Control Knob to the “OFF” position.
• Disconnect LP source and move the unit to a secure, well-ventilated location
outdoors.
• Store the heater upright in an area protected from any environmental hazards,
such as rain or snow, and potential damaging materials, like debris and dust.
• For added protection, covert the heater to prevent any debris build up in the
air passages. Note: Wait until the heater is completely cooled down before
covering.
When not in use, disconnect the propane cylinder:
• Only store the appliance indoors if the propane tank is disconnected from the
patio heater.
• You may only store the appliance in an area with shelter if it:
- Has four walls but has no overhead cover.
- Has no more than two walls and has an overhead cover.
- Has three side walls and an overhead cover OR at least 30 percent or
more of the horizontal periphery is open.
• Do not store a spare LP-gas cylinder under or near this appliance; Never ll
the cylinder beyond 80 percent full.
• Use a replacement pressure regulator specied by the appliance
manufacturer. Use the pressure regulator and hose assembly supplied with
the appliance.
STORAGE PORTABLE HEATER LOCATION
1. This portable heater is intended for outdoor use only. Always ensure
adequate fresh air ventilation.
2. Always maintain proper clearance to combustible materials: a minimum of 24
in. from the top and 36 in. from the sides Keep away from any children or pets.
3. Place the mini heater on top of a sturdy table.
4. Never use the heater in an area that may contain combustible materials, such
as gasoline, liquids, or vapors.
24”
36”
36”

1110 EASTOAK.COM[email protected]
1-833-327-8625 MINI PATIO HEATER
PARTS DIAGRAM
AA
A
BB
DD
C
D
E
F
EE
FF
CC
B
G
H
FF
II
HH
GG
Castle Nuts
Reector
Reector Spacers
Emitter
Washers
Wire Guard
Nuts
Access Panel
3
AA
A
BB
B
CC
C
DD
D
EE
E
FF
F
GG
G
HH
H
II
M6 X 25 Bolts
Base
3/16 in. Stainless Steel Bolts
Ring Weight
M5 X 8 Bolt
Post with Burner
Washer
Heater Housing
M5 Nut
1
3
1
6
1
3
1
4
1
8
1
1
1
1
1
1
1
PARTS LIST
M6 X 25 Bolts
Washers
EE (X4)
CC (X6)
FF (X8)
3/16 in. Stainless Steel Bolts
AA (X3)
Castle Nuts
BB (X3)
Reector Spacers
Nuts
DD (X3)

1312 EASTOAK.COM[email protected]
1-833-327-8625 MINI PATIO HEATER
PARTS LIST
M5 Nuts
II (X1) JJ (X1)
Wrench
Before assembly, check and conrm all parts are present. Compare parts present
with the content lists, including all hardware.
If any parts or hardware pieces are missing or damaged, please contact customer
service at support@eastoak.com. In your email, include your shipping address
and product purchased. We will send you replacement parts for free.
Estimated Assembly Time: 30 minutes
M5 X 8 Bolt
GG (X1)
Washer
HH (X1)
1
FF (X4) GG (X1)
Attach the ring weight (F) and base (E) to the heater
housing (H) using four M6x25 bolts (EE).
ASSEMBLY INSTRUCTIONS
II (X1)HH (X1)
2Attach the post with burner (G) to the heater housing
(H) using four 3/16in. stainless steel bolt (FF).
NOTE:keep the access panel (D) open.
EE (X4)
G
H
II
HH
GG
D
FF
Use M5x8 bolt (GG),
washer (HH) and
M5 nuts (II) screws
to x the valve
bracket.
E
F
EE
H

1514 EASTOAK.COMSUPPORT@EASTOAK.COM
1-833-327-8625 MINI PATIO HEATER
3
4
BB (X3)
DD (X3)
Insert three reector spacers (BB) into the holes
of the emitter (B). Use three nuts (DD) to hold the
spacers in place. Secure the emitter to the burner
assembly (G) with four bolts (FF).
Insert the four pins of wire guard (C) into the 4 holes
of post with burner (G).
FF (X4)
BB
B
DD
FF
G
G
C
CC (X6)AA (X3)
5Place 3 washers (CC) onto the top of the support bolts
to secure it in place. Attach the reector to the burner
assembly using 3 nuts (AA) and 3 washers (CC).
AA
A
CC
CC

1716 EASTOAK.COM[email protected]
1-833-327-8625 MINI PATIO HEATER
6Rotate the regulator towards the opening of the housing. Ensure
the threads on the gas cylinder are aligned with the threads on the
regulator. Insert and rotate the cylinder clockwise until secured tight.
Close the appliance (D).
Turn the burner control knob to the “OFF” position. Connect the
1.02 lb propane tank to the regular by rotating the tank clockwise
toward the regulator until secured tight.
Magnetic door panel, no need to screw.
D
7Propane gas tanks are sold separately. Please use a standard 1.02 lb
propane cylinder only.
If storing the appliance indoors, the cylinder must be disconnected
and removed from the appliance. Propane gas cylinders must be
stored outdoors in a well-ventilated area and away from children or
pets. Disconnected cylinders must have dust caps to ensure safety
and minimize damage or injury.
Orientation to provide
vapor withdrawal

1918 EASTOAK.COM[email protected]
1-833-327-8625 MINI PATIO HEATER
PROCEDURE FOR LEAKAGE TEST
1. Periodically check the whole gas system for leaks.
2. If you smell gas, immediately check for leaks.
3. Extinguish all open ames during testing or when an odor of gas is detected.
4. Do not smoke and avoid all ammable products when performing leak tests.
5. If a gas cannot be stopped, disconnect the gas cylinder from the heater.
6. Check the heater with a full propane cylinder.
7. DO NOT use the heater until you have performed a leak test on all
connections and veried that your appliance does not leak.
8. Use only manufacturer recommended replacement parts. Substitution may
void the warranty and may cause injury, property damage, or death.
OPERATION
TO TURN THE HEATER ON
• Turn on the valve on the gas supply cylinder completely.
• Firmly press down and turn the variable control knob approximately
90° (counterclockwise).
• Press down the variable control knob and hold for 30 seconds. Turn
the knob to Position “OFF” then push and turn the knob approximately
90° (counterclockwise) several times until the pilot ame comes on.
After lighting the pilot, wait 15 seconds to heat the thermocouple,
before releasing the control knob. Release the variable control knob
after the pilot ame lights.
• If the pilot does not light, repeat steps 2 to 3. Note: If a new tank has
just been connected, please allow at least one minute for the air in the
gas pipeline to purge out through the pilot hole.
• After the ame comes on, leave the variable control knob on the
LOWEST position for about 5 minutes, and then switch to the desired
temperature.
TO TURN THE HEATER AND PILOT LIGHT OFF
1. Turn control knob to “ON”.
2. Press down lightly and turn to “OFF”.
3. Turn the gas tank off completely.
4. Wait 5 minutes before relighting.
Variable
Control
Knob
TESTING FOR LEAKAGE
Each heater and its gas connections are leak-tested prior to shipment.
Mishandling of this product during shipment may occur and impair product
integrity. Before use, please perform a complete leak test again. To do, follow
these steps below.
1. Mix a mild soap solution of equal parts soap and water. The soap solution
can be used on the hoses with a spray bottle, brush, or towel.
2. Make sure that the safety control valve is in the “OFF” position.
3. Turn the cylinder valve to the “ON” position.Look for soap bubbles on or
around the valve connections and hoses. If bubbles appear, this means there
is a leak present.
4. If there is a leak, remove the propane gas tank immediately. Tighten all valve
closures and replace the gas cylinder.
5. Repeat the leak test with the new propane gas tank.

2120 EASTOAK.COM[email protected]
1-833-327-8625 MINI PATIO HEATER
TROUBLESHOOTING WARRANTY AND SERVICE
GUARANTEED 3-YEAR WARRANTY
Thank you for choosing East Oak. This product is covered by our company
warranty for up to 3 years from its original purchase date.
CLAIM WARRANTY
If you’d like to claim your product’s warranty, register your new product on our
website at www.eastoak.com/warranty.

support@eastoak.com
eastoak.com
1-833-EAST-OAK (USA)
This manual suits for next models
3
Table of contents
Other EAST OAK Patio Heater manuals

EAST OAK
EAST OAK MN11BN2 User manual

EAST OAK
EAST OAK PYROL EO-PH22006 User manual

EAST OAK
EAST OAK TPH22002 User manual

EAST OAK
EAST OAK TORCH EO-PH001 User manual

EAST OAK
EAST OAK SPH22001 User manual

EAST OAK
EAST OAK TORCH EO-PH001 User manual

EAST OAK
EAST OAK EO-PH22005 User manual

EAST OAK
EAST OAK WPH22002 User manual

EAST OAK
EAST OAK TPH22001 User manual

EAST OAK
EAST OAK CPH22001 User manual