Installation Instructions for:
Alfalux LED IP65
Testing Self-Contained Variants:
The unit should be connected to an unswitched live supply, which should be connected to the normal lighting sub-circuit in that
location. The LED indication should be checked to ensure that it is illuminated, this indicates that the batteries are charging.
Check that the lamp illuminates when the switched live is turned on.
A short discharge should be performed to check that the units are operating correctly. This is carried out by interrupting the
unswitched supply at the distribution board or by isolating the appropriate unswitched supply sub-circuit. The supply should
then be restored and the LED indication checked. After 24hrs carry out a full rated discharge test.The testing regime as defined
in EN 50172 should then be implemented.
If the unit no longer meets the emergency duration the battery must be replaced with a battery of the same type.
Nominal lamp lumen output: 1 Lumen (NOTE: This figure is obtained after safety cycling tests).
This value is provided to permit checking of correct operation, determination of the lighting level on an escape route can only
be made with full photometric data.
When used as intended this product complies with the EMC Directive 2014/30/EU and Low Voltage Directive 2014/35/EU.
Date of commissioning to be entered in the space provided on the battery label by either the installer or commissioning
engineer.
Safe Operation
1. Check the rating label for voltage and frequency before connecting this luminaire to the electrical supply.
2. Ensure that the mains supply is switched off when working on this luminaire, whether installing or carrying out any other
servicing.
3. Do not mount luminaire on or close to readily flammable materials.
4. To prevent damage to driver, do not mix with conventional magnetic ballasts on the same electrical circuit.
5. Where use in more onerous situations is required, e.g. In part-completed buildings before “drying-out” is completed, or areas
where ambient temperatures are outside the normal temperature range, then consult our Sales Office.
6. Ensure the fixing is adequate for the luminaire weight.
Servicing and Disposal
1. At commissioning and handing over of installation ensure that a copy of these instructions is presented to the authority
responsible for the operation and maintenance of the luminaries.
2. Servicing, e.g. cleaning, must only be carried out after the electricity supply has been switched off. It must not be assumed
that luminaries with lamps not lit are switched off-always check before servicing.
3. Cleaning should be carried out at regular intervals to ensure that dirt does not accumulate to an extent that will impair the
thermal safety or optical performance of the luminaire. Regular cleaning will also ensure that the optical performance of the
luminaries is maintained.
4. Avoid touching the LED strip. To clean - Blow surface with either dry air or nitrogen gas.
5. At the end of life the luminaire is classed as WEEE under directive 2012/19/EU and should be disposed of in accordance
with local legislation.
Battery Life
Performance of the luminaire is dependent on the use of the correct type of high temperature NiCad battery.
o
Battery life may be impaired if the luminaire is mounted in an ambient temperature greater than 25 C. Store the luminaire or
o o
battery between 0 C and 25 C. Replace with high temperature nickel-cadmium battery to the manufacturer's recommended
part number. Take care not to damage the sleeving. The battery should be replaced when the rated duration is no longer
achieved.
Warning: When disposing of the battery do not pierce, incinerate or short circuit. The battery contains cadmium and should
therefore be disposed of in accordance with recognised disposal methods.
Note: The LEDs are non-replaceable but the batteries can be replaced.
Luminaire Cleaning
End of Life and Components Disposal
WEEE
1
4
2
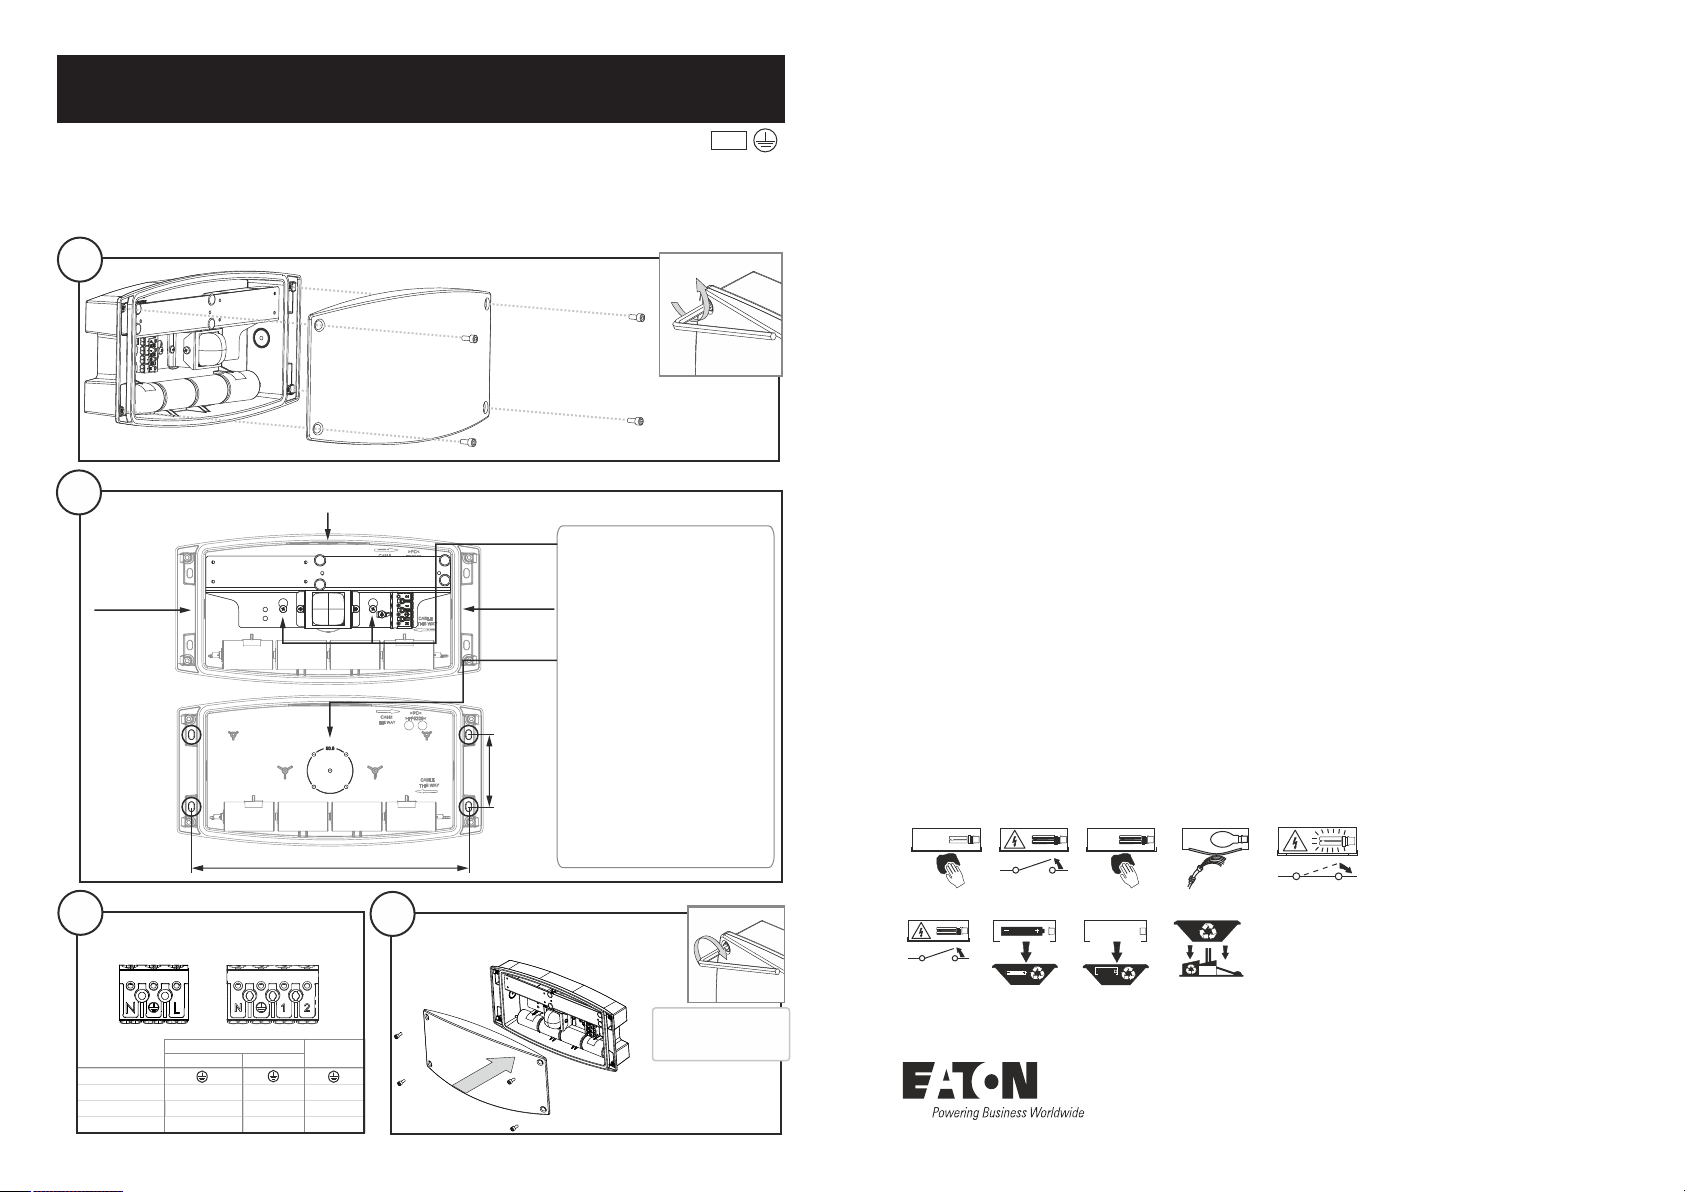
Loosen geartray screws and
remove geartray.
Fit luminaire to mounting surface
using 4 x fixing points, located
on outside (circled image b.).
BESA entry is also available on
the back. Feed mains cable
through preferred cable entry,
ensuring cable entry not used
is sealed.
b) Refit diffuser
and secure using
4 x captive allen
key screws
Note: Ensure a suitable IP65 rated
cable gland is used to seal cable
entry (M20). Apply PTFE (aluminium
base only) tape to all threaded
glands. For BESA entry, sealant or
suitable sealing washers should be
applied around fixing screw heads to
maintain the ingress protection of
the luminaire.
K950V3 Lighting and Safety
Cooper Lighting and Safety Ltd
Wheatley Hall Road, Doncaster, South Yorkshire, DN2 4NB
Sales
T: +44 (0)1302 303303
F: +44 (0)1302 367155
General
+44 (0)1302 321541
+44 (0)1302 303220
International Sales
+44 (0)1302 303250
+44 (0)1302 303251
Product luminaires comply with EN60598 and are suitable for use in normal interior and exterior conditions.
o o
For self contained variants - This luminaire has an ambient temperature range of -5 C to 25 C
o o
For slave variants - This luminaire has an ambient temperature range of -15 C to 40 C
K1086V3
Eaton
Wheatley Hall Road, Doncaster, South Yorkshire, DN2 4NB
Sales
T: +44 (0)1302 303303
F: +44 (0)1302 367155
E: sales@cooper-ls.com
General
+44 (0)1302 321541
+44 (0)1302 303220
technical@cooper-ls.com
International Sales
+44 (0)1302 303250
+44 (0)1302 303251
export@cooper-ls.com
IP65
Product luminaires comply with EN60598 and are suitable for use in normal interior and exterior conditions.
o o
For self contained variants - This luminaire has an ambient temperature range of 5 C to 40 C
o o
For slave variants - This luminaire has a ambient temperature range of -15 C to 40 C
Instruction Leaflet K1086V3
i-P65 Plus
October 2016
a.
b.
Ensure mains supply is
turned off a) Close gear tray
down and secure
screws
Instruction Manual - K1086V3
October 2016
i-P65 Plus
Cable Entry
Cable Entry
Cable Entry
307.5 mm
80 mm
Ensure fixing screws
are tightened to
1.8 - 2.0Nm torque
2
1
N
- (Unswitched) Live
- Brown (Switched) Live
- Green/Yellow (Earth)
- Blue (Neutral)
L
N
- Brown (Switched) Live
- Green/Yellow (Earth)
- Blue (Neutral)
3 - way 4 - way
1-
2L
NN
Maintained Slave
Non-Maintained
Self - Contained
-
Earth
N
Neutral
Unswitched Live
Switched Live
L
3


