ECG Forza 5500 Giorno User manual

Forza 5500 Giorno
English
Deutsch
Čeština
Slovenčina
Always read the safety&use instructions carefully before using your appliance for the rst time. The user´smanual must be always included.
Bitte lesen Sie vor der Inbetriebnahme des Produktes diese Anleitung und die darin enthaltenen Sicherheitshinweise aufmerksam durch. Die Bedienungsanleitung muss dem Gerät immer beigelegt sein.
Před uvedením výrobku do provozu si důkladně pročtěte tento návod abezpečnostní pokyny, které jsou vtomto návodu obsaženy. Návod musí být vždy přiložen kpřístroji.
Pred uvedením výrobku do prevádzky si dôkladne prečítajte tento návod abezpečnostné pokyny, ktoré sú vtomto návode obsiahnuté. Návod musí byť vždy priložený kprístroju.
STAND MIXER
INSTRUCTION MANUAL
KÜCHENMASCHINE
BEDIENUNGSANLEITUNG
KUCHYŇSKÝ ROBOT
NÁVOD KOBSLUZE
KUCHYNSKÝ ROBOT
NÁVOD NA OBSLUHU

DESCRIPTION / BESCHREIBUNG / POPIS / POPIS

English
1. Head shaft
2. Multifunction head release lever
3. Rotary control knob
4. Stainless steel bowl
5. Kneading hook
6. Mixing whisk
7. Beater
8. Removable bowl cover
9. Cover for mounting the machine
10. Mixer mounting cover
11. LED display
12. Multifunctional head
13. Base
Blender
B1 Mixer bowl
B2 Lid
B3 Filling cap
Machine with accessories for the
grinder, for making sausages,
kebbe, confectionery, pasta
M1 Tamper
M2 Meat bowl
M3 Machine with funnel
M4 Screw conveyor
M5 Lock nut
M6 Blade
M7 Meat grinder sieves - ne (3 mm),
medium (5 mm) and coarse (8
mm)
S1 Cutter sieve board
S2 Sausage attachment
S3 Kebbe attachment
S4 Insert for kebbe attachment
C1 Confectionery attachment
C2 Cookie cutter
P1 Pasta templates
Grater
V1 Tamper
V2 Grater machine with funnel
V3 Fine grater
V4 Coarse grater
V5 Slicer
Items not pictured: egg white
separator and spatula
Deutsch
1. Zubehörnabe
2. Hebel zum Lösen des
Multifunktionskopfes
3. Drehknopf
4. Schüssel aus rotsfreiem Stahl
5. Knethaken
6. Rührbesen
7. Quirl
8. Abnehmbare
Schüsselabdeckung
9. Abdeckung für die Montage des
Zusatzgeräts
10. Abdeckung für die Montage des
Mixers
11. LED-Display
12. Multifunktionskopf
13. Gerätebasis
Mixer
B1 Mixerbehälter
B2 Deckel
B3 Füllönung
Zusatzgerät mit Zubehör zum
Mahlwerk, für die Herstellung von
Würsten, Kibbeh, Süßigkeiten,
Pasta
M1 Stopfer
M2 Fleischschüssel
M3 Mahlwerk mit Hals
M4 Schnecke
M5 Sicherungsmutter
M6 Klinge
M7 Fleischwolfsiebe – fein (3 mm),
mittel (5 mm) und grob (8 mm)
S1 Separator
S2 Wurst-Aufsatz
S3 Kibbeh-Aufsatz
S4 Einsatz für Kibbeh-Aufsatz
C1 Aufsatz zur Herstellung von
Zuckerwaren
C2 Zuckerwaren-Form
P1 Pasta-Schablonen
Reibe
V1 Stopfer
V2 Mahlwerk der Reibe mit Hals
V3 Feine Reibe
V4 Grobe Reibe
V5 Reibe für Scheiben
Nicht abgebildet: Eiweißtrenner und
Spatel
Čeština
1. Hřídel hlavy
2. Páčka na uvolení multifunkční
hlavy
3. Otočný ovladač
4. Nerezová mísa
5. Hnětací hák
6. Mísící metla
7. Šlehací metla
8. Odnímatelný kryt na mísu
9. Kryt pro montáž strojku
10. Kryt pro montáž mixéru
11. LED displej
12. Multifunkční hlava
13. Základna
Mixér
B1 Nádoba mixéru
B2 Víko
B3 Plnicí uzávěr
Strojek s příslušenstvím k
mlýnku, na tvorbu klobás, kebbe,
cukrovinky, těstoviny
M1 Pěchovadlo
M2 Miska na maso
M3 Strojek s jícnem
M4 Šnek
M5 Pojistná matice
M6 Čepel
M7 Sítka k mlýnku na maso – jemné
(3 mm), středně hrubé (5 mm) a
hrubé (8 mm)
S1 Separátor
S2 Nástavec na klobásy
S3 Nástavec na kebbe
S4 Vložka k nástavci na kebbe
C1 Nástavec na výrobu cukroví
C2 Tvořítko na cukroví
P1 Šablony na těstoviny
Struhadlo
V1 Pěchovadlo
V2 Strojek struhadla s jícnem
V3 Jemné struhadlo
V4 Hrubé struhadlo
V5 Struhadlo na plátky
Položky bez vyobrazení: Separátor
na bílky a stěrka
Slovenčina
Slovenčina
1. Hriadeľ hlavy
2. Páčka na uvoľnenie
multifunkčnej hlavy
3. Otočný ovládač
4. Misa z nehrdzavejúcej ocele
5. Hnetací hák
6. Miesiaca metla
7. Šľahacia metla
8. Odnímateľný kryt misy
9. Kryt na montáž strojčeka
10. Kryt na montáž mixéra
11. LED displej
12. Multifunkčná hlava
13. Základňa
Mixér
B1 Nádoba mixéra
B2 Veko
B3 Plniaci uzáver
Strojček s príslušenstvom k
mlynčeku, na tvorbu klobás,
kebbe, cukroviniek, cestovín
M1 Zatláčadlo
M2 Miska na mäso
M3 Strojček smlecou komorou
M4 Závitovka
M5 Poistná matica
M6 Čepeľ
M7 Sitá na mletie mäsa - jemné (3
mm), stredné (5 mm) a hrubé (8
mm)
S1 Separátor
S2 Nadstavec na klobásy
S3 Nadstavec na kebbe
S4 Vložka k nadstavcu na kebbe
C1 Nadstavec na výrobu cukroviniek
C2 Formička na cukrovinky
P1 Šablóny na cestoviny
Strúhadlo
V1 Zatláčadlo
V2 Strojček strúhadla smlecou
komorou
V3 Jemné strúhadlo
V4 Hrubé strúhadlo
V5 Strúhadlo na plátky
Položky bez vyobrazenia:
Oddeľovač vaječných bielkov a
špachtľa

English
English
4
KITCHEN ROBOT
SAFETY INSTRUCTIONS
Read carefully and save for future use!
Warning: The safety measures and instructions, contained in this
manual, do not include all conditions and situations possible. The user
must understand that common sense, caution and care are factors
that cannot be integrated into any product. Therefore, these factors
shall be ensured by the user/s using and operating this appliance. We
are not liable for damages caused during shipping, by incorrect use,
voltage uctuation or the modication or adjustment of any part of
the appliance. To protect against a risk of re or electric shock, basic
precautions shall be taken while using electrical appliances, including
the following:
1. Make sure the voltage in your outlet corresponds to the voltage
provided on the appliance label and that the socket is properly
grounded. The outlet must be installed in accordance with
applicable electrical codes according to EN.
2. Never use the appliance if the power cable is damaged. All repairs,
including cord replacements, must be carried out at a professional
service centre! Do not remove the protective covers from the
appliance; there is a risk of electric shock!
3. Do not allow the power cord to touch hot surfaces or run the cord
over sharp edges.
4. Protect the appliance from direct contact with water and other
liquids to prevent electric shock.
5. Do not use the appliance outdoors and in wet environment and do
not touch the power cable or the appliance with wet hands. Risk of
electric shock.
6. The appliance is not intended for use with timers or other remote
control systems. There is a risk of re if the appliance is covered or
incorrectly positioned at the time of start-up.
7. Do not immerse the motor base and power cord in water or other
liquids. Do not rinse under running water. Prevent liquids getting
into the unit with the motor.
Kitchen robot
English

English
English
5
8. Pay closer attention when using the appliance near children.
9. The appliance should not be left unattended during operation.
10.We recommend that you do not leave the appliance with plugged
in power cable unattended.
11.Before carrying out maintenance, assembly / disassembly, changing
accessories or when the appliance is no longer in use, switch o the
appliance and unplug it. Do not remove the power cord from the
outlet by yanking the cord. Unplug the power cord from the outlet
by grasping the plug.
12.Always wait for all parts to come to a complete stop before
disassembling. The appliance needs approximately 20 minutes to
cool down for safe handling and cleaning.
13.Do not use the appliance close to a source of heat, e. g. oven. Protect
it against direct sunlight.
14.Do not put the appliance on the wall or on top of other appliances.
Leave at least 10 cm of free space on the back and on the side and
10 cm of free space above the appliance.
15.Always use the appliance on an even and stable surface. Do not
place any objects on the appliance. Make sure that the appliance
is placed at least 10 cm from the edge of the kitchen counter. Also,
that no openings are blocked.
16.Before the rst use, we recommend washing all parts that come into
contact with food, see the section "Cleaning and maintenance".
17.Never cover the appliance during operation and do not use it close
to ammable materials, e. g. curtains, etc.
18.Do not touch the moving parts.
19.Long hair, loose clothing or accessories and jewelry can be caught
by the rotating parts of the appliance. Make sure that your hair,
clothing and accessories do not come in dangerous proximity to
rotating parts!
20.Do not switch on the appliance without food inserted (empty)!
21.Clean the appliance immediately after each use. Wipe the body
of the appliance only with a damp cloth when cleaning. Do not
immerse it in water.
Kitchen robot
English

English
English
6
22.Use accessories only advised by the manufacturer, otherwise you
risk losing the warranty.
23.Do not exceed the maximum continuous running time of the
appliance. Allow the appliance to cool down suciently before
using it again. :Note for each accessory these times are determined
dierently, see the information in the manual below.
24.Use this appliance only in accordance with the instructions in this
manual.
25.This appliance is designed for domestic use only. It is also designed
for use in kitchen areas for employees, shops, oces and other
work environments. It also applies to hotels, motels, hostels and
residences. It is not intended for commercial use.
26.The manufacturer is not liable for any damage caused by the
improper use of this appliance.
27.Always use only one function of the appliance. Never start more
functions in the same time.
28.This appliance should not be used by children. Keep the appliance
and its power supply out of reach of children.The appliance may be
used by persons with reduced physical, sensory or mental capacities
or lack of experience and knowledge, if they are supervised or if they
were instructed how to use the appliance safely and understand
potential dangers. Children shall not play with the appliance.
29.Risk of property damage: The appliance may only be used if it is
properly and completely assembled.
30.Before replacing accessories that move during use, switch o the
appliance and disconnect it from the power supply.
31.Allow the appliance to cool down before cleaning and storing. Use
damp cloth for cleaning and maintenance. Do not use chemical
agents. Pay special attention to surfaces that come into direct
contact with food when cleaning.
32.Pay special attention when handling the cutting blades, especially
when removing the blades from the container and during cleaning.
Do not immerse in water!

English
English
7
DANGER TO CHILDREN: Children must not play with the packaging
material. Do not let the children play with
plastic bags. Risk of suocation.
SAFETY INSTRUCTIONS FOR ACCESSORIES
1. Assemble the accessory machines exactly according to the instructions in the manual; any other
combination of machine assembling is not permitted in terms of correct function!
2. Only fasten and remove the assembled accessory machine when the appliance is switched o and
unplugged.
3. Never use the accessory if it does not work properly, if it has fallen on the ground and been damaged. In
such cases, take the accessory machine to a service center to check that it is safe and working properly.
4. Never assemble accessory machines on the motor unit!
5. Take extra care when handling the cutting and mixing blades and graters (especially during cleaning); the
blades and graters are very sharp and can cause injuries.
Kneader and whisk
This accessory is intended for kneading leavened or poured dough and whipping foods.
• Due to the size of the work bowl, please note that the appliance cannot whip / knead very small amounts
of ingredients. For optimal results, choose ingredients with a total weight of at least 300 g. At the same
time, the maximum weight of all ingredients must not exceed 1.5 kg.
• Under no circumstances should any objects be inserted when the whisk / kneader is in operation. First
switch o the appliance and then you can remove the trapped food from the kneading hook or whisk with
a spatula. Always use the lid.
• Before replacing accessories that move during use, switch o the appliance and disconnect it from the
power supply.
• Allow the appliance to cool down before cleaning and storing. Use damp cloth for cleaning and
maintenance. Do not use chemical agents.
Blender
Use these accessories only for food processing (smoothies, drinks, ice cubes, sauces, soups, porridge for
children, etc.). It can also be used to crush ice cubes.
• The highest possible temperature of processed food is 80°C. Do not use boiling food. Always put the liquid
component in the mixer.
• The maximum amount of all raw materials must not exceed 1.5 l
• Never use the mixer if the mixer bowl is damaged or the blade unit is damaged or loose.
• Use the blender only with the lid attached. If the container turns when the motor is running, immediately
turn o the blender and tighten the container to the blender’s body.
• Before replacing accessories that move during use, switch o the appliance and disconnect it from the
power supply.
• Do not try to push the contact located in the multifunction head with your hand.
• Pay special attention when handling the cutting blades, especially when removing the blades from the
container and during cleaning.
• Do not put the container lled with food or liquids in the freezer. Freezing the contents could damage the
container and the blade unit.
• Allow the appliance to cool down before cleaning and storing. Use damp cloth for cleaning and
maintenance. Do not use chemical agents.
Meat grinder
These accessories are intended for processing meat without bones, tendons and fat. Do not try to grind bones,
poppy seeds, nuts or other hard objects. Never grind frozen meat.

English
English
8
• Take extra care when handling the cutting blades (especially when removing them and cleaning them),
the blades are very sharp and can cause injuries.
• Before replacing accessories that move during use, switch o the appliance and disconnect it from the
power supply.
• Tighten the locking ring of the machine carefully before starting. Never overtighten the nut!
• Never use your ngers, kitchen utensils or other objects to stu food into the grinder! Use only the tamper
supplied with the accessories. Use reasonable force. Excessive pressure could damage the appliance.
• Grind meat with tendons and bones removed and cut into pieces about 2.5 cm large.
• If the grinder gets jammed, switch o the appliance immediately and disconnect it from the mains. Only
then disassemble and clean the grinder.
• Allow the appliance to cool down before cleaning and storing. Use damp cloth for cleaning and
maintenance. Do not use chemical agents.
Grater
This accessory is designed for slicing and grating fruits, vegetables, nuts, chocolate and hard cheeses. Not
suitable for slicing extremely hard products (such as nutmeg, coee beans or cereal grains).
• Take extra care when handling the graters (especially when removing them and cleaning them), the
graters are very sharp and can cause injuries.
• Never use your ngers, kitchen utensils or other objects to push food into the grater! Use only the tamper
supplied with the accessories. Use reasonable force. Excessive pressure could damage the appliance.
• If food residues get stuck in the grater, switch o the appliance immediately and disconnect it from the
mains. Only then remove and clean the grater.
• Before replacing accessories that move during use, switch o the appliance and disconnect it from the
power supply.
• Use damp cloth for cleaning and maintenance. Do not use chemical agents.
ASSEMBLING THE KITCHEN ROBOT
• Before rst use, clean all accessories with lukewarm water and detergent rinse and dry thoroughly. Do
not immerse the body of the robot in water. Wipe it with a damp cloth. Do not use any abrasive or other
aggressive cleaning agents.
• Place the robot on a at, clean and dry table so that it has enough space around it.
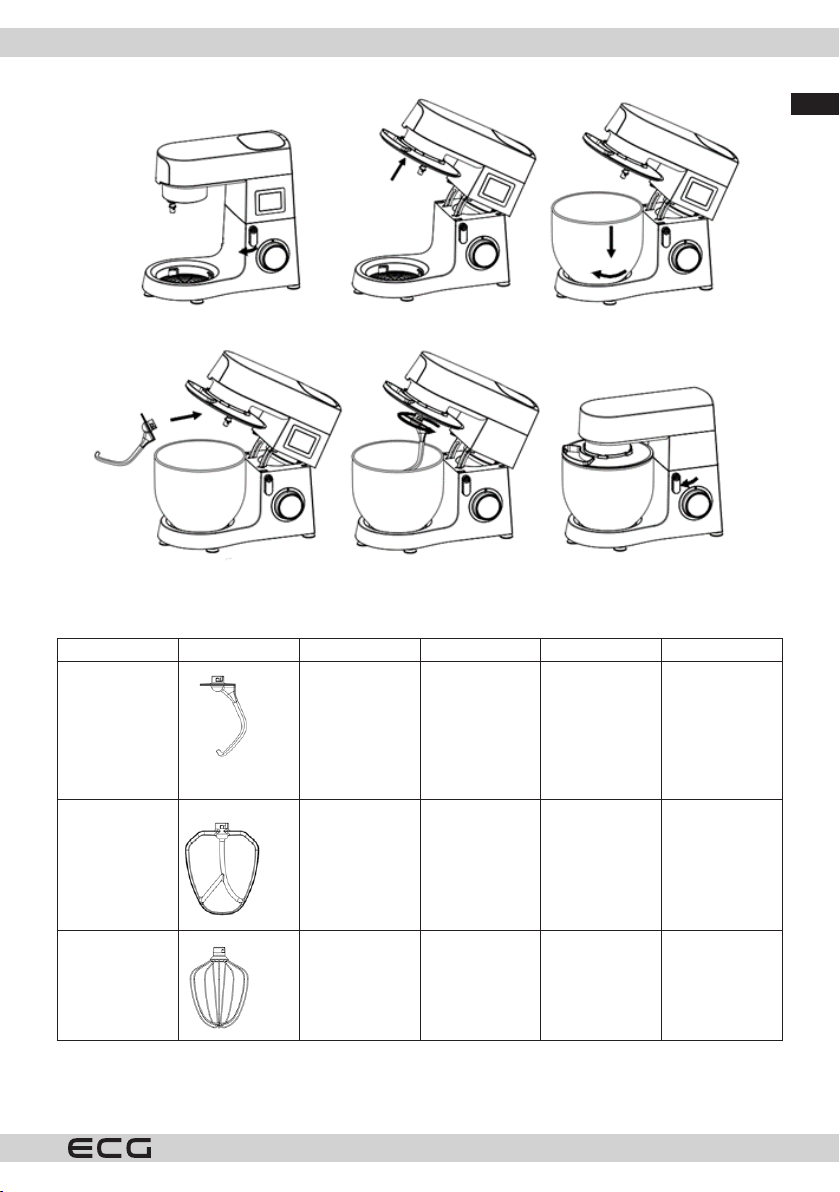
• Turn the multifunction head release lever 2 clockwise (see gure 1) and at the same time lift the
multifunction head (12) with your other hand until you hear a click. The head is now locked in the top
position (see gure 2).
• Place a stainless steel bowl 4 with ingredients on the base of the appliance 13 and secure it in place by
turning it clockwise (see gure 3).
• Make sure that the total amount of ingredients does not exceed 1.5 kg.
• Insert the bowl cover (8) on the multifunction head rst and then the required accessories (5, 6, 7) on
the head shaft (1). Push the accessory up and then turn it a quarter turn counterclockwise to the locking
position (Figures 4 and 5).
• Press the multifunction head release lever (2) while lowering the multifunction head (12) to a horizontal
position. The head must "click" into the base.
• Insert the plug into the socket and the display will light up.
• Select the time on the display. Select the speed with the rotary knob. After the set time has elapsed, the
kitchen robot automatically shuts o. Turn the mixer to the "0" position with the rotary knob. For more
information on controls see the chapter "DESCRIPTION OF THE CONTROL PANEL AND DISPLAY".
• Turn the multifunction head release lever (2) and lift the head (12). Turn the bowl counterclockwise,
remove and remove the nished dough.
Note: When the head is tilted, the control panel display turns o. Lights up again when the head is tilted back.
Note: It is not possible to use two accessories at the same time (e.g. whisk with a grinder, etc.).
WARNING: Do not leave the appliance running continuously for more than 15 minutes. Allow it to cool for at
least 30 minutes before starting again.

English
English
9
1 2 3
4 5 6
Selection of accessory
Use Picture Speed Time (min) Max. amount Instructions
Kneading hook 1–3 3–5 1000 g our and
538 g water
1st speed for 30
s, 2nd speed for
30 s and then
3rd speed for
2 min to 4 min
to knead the
dough.
Mixing whisk 2–4 3–10 660 g our and
840 g water
2nd speed for
20 s, 4th speed
at least 2 min.
and 40 s.
Beater 5–6 3–10 3 egg whites
(minimum)
5th/6th speed
at least 3 min.

English
English
10
DESCRIPTION OF THE CONTROL PANEL AND DISPLAY
Kitchen robot On/O
1. As soon as the mixer is connected to the power
supply, the display lights up and the mixer goes
into standby mode.
2. If it is in standby mode without any action for
3 minutes, the display turns o and the mixer
enters hibernation mode.
3. If you turn the control knob (3) in hibernation
mode, the display will light up again and the
mixer will go into standby mode.
Display of speed:
Use the rotary knob to select the speed (program).
The display shows the following:
Speed 01-02: "Kneading" LED is lit.
Speed 03-04: "Mixing" LED is lit.
Speed 05-06: "Whisking" LED is lit
Speed P: LED symbol "Pulse" is lit
Position 0: Power O
Timer setting function:
Tap the clock icon and use the +/- buttons to set the desired operating time. Then use the speed setting button
(3) to select the desired speed level (1-6). The set speed will be shown on the display and the mixer will start.
When the set timer time expires, the robot stops automatically.
The program can be stopped at any time by turning the knob to the "0" position.
Using the mixer and tips
The mixer can be used to mix dierent types of food. With this accessory you can prepare soups, sauces,
milkshakes, baby food, vegetables, drinks, desserts, purees, etc. Solid foods should be cut into small pieces.
Warning:
• First, assemble the mixer and seat it properly in the multifunction head. Make sure that the lid is tted
correctly. Only then connect the mixer to the mains and start the program.
• If you need to remove the mixer bowl from the arm, rst switch o the mixer and wait for the blade unit to
stop and disconnect the appliance from the mains.
• Do not remove the lid while the blender is running.
• Use the lling hole in the lid to add ingredients.
• We recommend setting the speed to 4-6 (or P-pulse).
• Do not add hot food above 80° C to the mixer.
• The maximum volume of liquid in the mixer is 1.5 l.
• WARNING: Do not remove the mixer jar or lid during operation.
• WARNING: Do not leave the appliance running continuously for more than 3 minutes. Allow it to cool for
at least 6 minutes before starting again. Do not exceed a total operating time of 15 minutes.

English
English
11
Assembling the mixer:
1. Remove the mixer cover 10 from the multifunction head
(see gure PG1).
2. Assemble the mixer. Place the lid B2 and the lling cap B3
on the container (see gure PG2, PG3).
3. Place the mixer in the multifunction head and secure it in
the appliance by turning the container counterclockwise
(see gure PG4).
Meat grinder
M1 Tamper
M2 Meat bowl
M3 Machine with funnel
M4 Screw conveyor
M5 Lock nut
M6 Blade
M7 Hole plate
• To install the meat grinder, rst place the M6 blade on the M4 screw conveyor and insert it into the M3
machine. Insert the hole plate M7 (depending on whether you require coarse, medium or ne grinding).
Make sure that the grooves in the hole plate t correctly into the grooves in the machine and tighten
everything with the M5 lock nut (see gure PG1).
Note: Do not tighten the lock nut too hard. Make sure that the cutting blade is oriented correctly (at, sharp
edge towards the hole plate - forwards). If you put it on incorrectly, it will not grind the meat.
• Remove the machine cover 9 from the multifunction head (see gure PG2).
• Insert the machine into the multifunction head at an angle of approx. 45° and secure it in the correct
position by turning it counterclockwise (see gure PG3).
Note: The step of attaching the machine to the multifunction head is the same for installing the machine
with other accessories (sausages, kebbe, confectionery, pasta) and for the grater.
• Attach the M2 meat bowl to the M3 funnel. Place a suitable container under the grinder outlet.
• Connect the robot to the mains. Select speed 3 on the rotary knob. Insert meat cleansed from tendons
and bones cut into pieces about 2.5 cm.
• Put the meat in the bowl of the grinder. Use the M1 tamper to gently push the meat into the grinder's
funnel. (Grind the meat twice for tartar steak.)
• After use, switch o the mixer to the "0" position with the rotary knob and disconnect it from the mains.
B1 Mixer bowl
B2 Lid
B3 Filling cap

English
English
12
WARNING: Never use your ngers to push the mixture into the machine.
WARNING: Do not let the appliance running continuously for more than 5 minutes. Allow it to cool for at least
15 minutes before starting again.
USING OTHER EXTENSIONS
Sausage attachment
M1 Tamper
M2 Meat bowl
M3 Machine with funnel
M4 Screw conveyor
M5 Lock nut
S1 Cutter sieve board
S2 Sausage attachment
Place the S1 cutter sieve board and the S2 sausage attachment on it on the M4 screw conveyor. Tighten lock M5
to M3. Note: Do not tighten the lock nut too hard. Attach the assembled machine to the multifunction head.
Proceed in the same way as described in the "Meat grinder" section.
• Attach the M2 meat bowl to the M3 funnel.
• Soak the sausage casing in lukewarm water for 10 minutes. Then thread the moist casing onto the S2
sausage lling attachment and close it with a knot.
• Connect the mixer to the mains and set the speed to 3-6
• Prepare a mixture of minced meat and spices on a M2 bowl. With the M1 tamper, gently push it into the
funnel of the machine and at the same time hold the lled casing at the outlet opening.
• If the casing sticks to the attachment, moisten it with water. Recommendation: It is good to allow the
sausages to dry for a while.
WARNING: Never use your ngers to push the mixture into the machine.
WARNING: Do not let the appliance running continuously for more than 5 minutes. Allow it to cool for at least
15 minutes before starting again.
Preparation of kibbe
Kibbe is a traditional Middle Eastern dish prepared primarily from ground lamb and bulgur, from which stued
dumplings are formed. You can ll the roll created by the grinder with minced meat, close it and fry it.

English
English
13
M1 Tamper
M2 Meat bowl
M3 Machine with funnel
M4 Screw conveyor
M5 Lock nut
S3 Kebbe attachment
S4 Insert for kebbe attachment
Place the kebbe attachment with the insert (S3, S4) on the M4 screw conveyor. Tighten lock M5 to M3. Note:
Do not tighten the lock nut too hard. Attach the assembled machine to the multifunction head. Proceed in the
same way as described in the "Meat grinder" section.
• Attach the M2 bowl to the M3 machine funnel.
• Plug to the mains. Select 3 – 6 speed.
• Fill the resulting hollow roll of the mixture with ground meat and divide as required.
WARNING: Never use your ngers to push the mixture into the machine.
WARNING: Do not let the appliance running continuously for more than 5 minutes. Allow it to cool for at least
15 minutes before starting again.
Cookies production
M1 Tamper
M2 Bowl
M3 Machine with funnel
M4 Screw conveyor
M5 Lock nut
S1 Cutter sieve board
C1 Confectionery attachment
C2 Cookie cutter
• Place the cutter sieve board S1 and the cookie attachment C1 on the M4 screw conveyor. Tighten lock M5
to M3. Note: Do not tighten the lock nut too hard. Insert the template C2 for cookies. Attach the assembled
machine to the multifunction head. Proceed in the same way as described in the "Meat grinder" section.
• Attach the M2 bowl.
• Connect the robot to the mains. Select 3 – 6 speed.
• Insert the dough, pre-cut into strips, into the funnel of the machine. Use the tamper if required. The
machine will push out the dough in the desired shape.You can change the shape of the cookies by moving
the cutter.
WARNING: Never use your ngers to tamp the dough into the machine.
WARNING: Do not let the appliance running continuously for more than 10 minutes. Allow it to cool for at least
30 minutes before starting again.
Making pasta
M1 Tamper
M2 Bowl
M3 Machine with funnel
M4 Screw conveyor
M5 Lock nut
P1 Pasta shapes

English
English
14
• Place the selected pasta template P1 on the M4 screw conveyor. Tighten lock M5 to M3. Note: Do not
tighten the lock nut too hard. Attach the assembled machine to the multifunction head. Proceed in the
same way as described in the "Meat grinder" section.
• Attach the M2 bowl to the M3 machine funnel.
• Connect the robot to the mains. Select 3 – 6 speed.
• Insert the dough, pre-cut into strips, into the funnel of the machine. Use the tamper if required. The
machine will push out the pasta in the desired shape.
WARNING: Never use your ngers to push the mixture into the machine.
WARNING: Do not let the appliance running continuously for more than 10 minutes. Allow it to cool for at least
30 minutes before starting again.
Grating and cutting vegetables
V1 Tamper
V2 Grater machine with funnel
V3 Fine grater
V4 Coarse grater
V5 Slicer
• Insert the selected attachment (ne grater V3, coarse grater V4 or slicer grater V5) into the grater V2 (see
gure PG1).
• Attach the assembled machine to the multifunction head (see gures PG2, PG3). Proceed in the same way
as described in the "Meat grinder" section.
• Place a suitable container under the grinder outlet.
• Cut the potatoes or other vegetables into pieces that are the same size as the grater feed.
• Connect the mixer to the mains and set the speed to 3-5.
• Use tamper V1 to push the vegetables into the funnel of the machine (see gure PG4).
WARNING: Never use your ngers to push the mixture into the machine. Be careful not to injure yourself when
handling the graters - the graters are sharp.
WARNING: Do not let the appliance running continuously for more than 5 minutes. Allow it to cool for at least
15 minutes before starting again.

English
English
15
TROUBLESHOOTING
Problem Cause Solution
The robot suddenly stops working
during use.
The mixer may run for too long or
the ambient temperature may be
too high, resulting in the mixer's
motor temperature being too
high. The overheat protection
program and automatic switch-o
start.
Set the speed to 0, disconnect
the power supply, wait for the
mixer to cool to room temperature
and restart (in general, the mixer
needs to be allowed to cool for
15-30 minutes depending on the
room temperature).
The robot will not start even after
setting the speed.
The plug is not properly inserted
into the socket.
Make sure the plug is rmly
inserted in the socket.
Power outage. Wait until the electricity is on
again.
The mixer's head is not well
inserted.
Make sure that the mixer head is
rmly seated.
Excessive noise when the mixer is
running.
1. At high speed level the robot
will work louder than at low
level.
2. The amount of mixed food
is too large, which leads to
overloading the mixer.
3. The voltage is unstable.
4. Operating time is too long.
1. Choose the right food mixing
accessories as recommended
in the manual.
2. Make less dough at one time.
3. If the voltage is unstable, wait
until it stabilizes before use.
4. If the operating time is too
long, let the robot cool down
for a while.
The mixer's speed is decreasing or
unstable.
1. Check that the room
temperature is not too low,
which causes the lubricant in
the mixer to solidify.
2. The dough is mixed too
vigorously and in too large
an amount, which leads to
overloading the mixer.
3. There is a sudden drop in
voltage.
1. Remove the bowl and let
the mixer idle for 5 minutes
to loosen the lubricant in
the mixer and restore speed
stability.
2. Reduce the mixing volume
and let the robot run
according to the normal
working speed.
3. Once the voltage is stable, try
restarting the robot.
The robot sways and shakes
during operation.
1. The feet of the base are loose.
2. The robot is not placed on a
smooth and level worktop.
1. Make sure that the feet are
rmly attached to the base of
the mixer.
2. Always place the robot on a
smooth and level surface.
MAINTENANCE AND CLEANING
Clean immediately after each use. Always wait for all parts to come to a complete stop before disassembling.
The appliance needs approximately 20 minutes to cool down for safe handling and cleaning.
Before cleaning the appliance, rst switch it o and unplug it.
Take extra care when cleaning, the blades and graters are very sharp.
• Do not use thinner, petrol, vinegar or other aggressive or abrasive cleaners or sharp and coarse tools such
as wire scrapers.
• Protect from direct sunlight, humid and dusty environment.

English
English
16
Accessories
Roughly clean the meat caught in the grinder by grinding a bun or a slice of bread.
Disassemble all parts of the machines in individual parts, remove from the robot whisks and kneading hook
incl. the plastic cover.
Wash the accessories in hot water with detergent. Rinse them with clean warm water and wipe them
immediately and let them dry properly.
We recommend coating the inside of the grinder, blades and sieves with edible oil, which prevents their
oxidation
Note: Do not wash any parts or accessories of this appliance (except the stainless steel bowl) in the dishwasher.
Appliance body
After it was used, wipe the body of the appliance with wet cloth and then dry thoroughly with dry cloth.
Protect the appliance
from water and high humidity! Do not immerse it in water.
The shaft (1) forms slightly black marks when the machine is operating due to high rotation speeds and friction.
Clean it immediately after each use and keep the part dry.
TECHNICAL DATA
Nominal voltage: 220-240 V~ 50-60 Hz
Nominal input power: 1500 W
Stainless steel bowl volume: 6.5 l
Mixer volume: 1.5 l
USE AND DISPOSAL OF WASTE
Wrapping paper and corrugated paperboard – deliver to scrapyard. Packing foil, PE bags, plastic elements – throw into plastic
recycling containers.
DISPOSAL OF PRODUCTS AT THE END OF LIFETIME
Disposal of electric and electronic equipment (valid in EU member countries and other European
countries with an implemented recycling system)
The represented symbol on the product or package means the product shall not be treated as domestic waste.
Hand over the product to the specied location for recycling electric and electronic equipment. Prevent negative
impacts on human health and the environment by properly recycling your product. Recycling contributes to
preserving natural resources. For more information on the recycling of this product, refer to your local authority,
domestic waste processing organization or store, where you purchased the product.
This product complies with the requirements of the EU directives on electromagnetic compatibility
and electrical safety and the issue of heavy metals in electrical and electronic equipment.
Furthermore, it meets the relevant energy requirements and requirements for direct contact with
food.
The operating manual is available at www.ecg-electro.eu.
Changes of text and technical parameters reserved.
08/05

Deutsch
Deutsch
17
KÜCHENMASCHINE
SICHERHEITSHINWEISE
Bitte aufmerksam lesen undgut aufbewahren!
Warnung:DieindieserAnleitungangeführtenSicherheitsvorkehrungen
und Hinweise umfassen nicht alle Umstände und Situationen, zu denen
es kommen könnte. Der Anwender muss begreifen, dass der gesunde
Menschenverstand, Vorsicht und Sorgfalt zu Faktoren gehören, die
sich in kein Produkt einbauen lassen. Diese Faktoren müssen durch
den Anwender bzw. mehrere Anwender bei der Verwendung und
Bedienung dieses Gerätes gewährleistet werden. Wir haften nicht
für Schäden, die durch Transport, eine unsachgemäße Verwendung,
Spannungsschwankungen sowie eine Änderung oder Modikation
des Gerätes entstehen. Um das Risiko von Bränden oder Stromschlägen
zu vermeiden, sollten bei der Verwendung elektrischer Geräte immer
grundlegende Vorsichtsmaßnahmen befolgt werden, einschließlich
der folgenden:
1. Vergewissern Sie sich, dass die Spannung an Ihrer Steckdose mit
der Spannung auf dem Etikett übereinstimmt und die Steckdose
ordnungsgemäß geerdet wurde. Die Steckdose muss gemäß
geltender elektrotechnischer Norm (EN) installiert werden.
2. Gerät niemals verwenden, falls das Netzkabel beschädigt ist.
Sämtliche Reparaturen und das Auswechseln des Netzkabels
muss ein Fachservice durchführen! Demontieren Sie niemals die
Schutzabdeckungen des Gerätes. Dies könnte zu einem Stromunfall
führen!
3. Das Netzkabel darf nicht mit heißen Teilen in Berührung kommen
oder über scharfe Kanten führen.
4. Schützen Sie das Gerät vor direktem Kontakt mit Wasser und
sonstigen Flüssigkeiten, um Stromunfällen vorzubeugen.
5. Verwenden Sie das Gerät nicht im Freien oder in einer feuchten
Umgebung. Netzkabel oder Gerät nicht mit nassen Händen
berühren. Es könnte zu einem Stromunfall kommen.
6. Das Gerät ist nicht für die Verwendung mit einer Zeitschaltuhr
und anderen Fernbedienungssystemen vorgesehen. Es besteht
Küchenmaschine
Deutsch

Deutsch
Deutsch
18
Brandgefahr, wenn das Gerät bei der Inbetriebnahme abgedeckt
oder am falschen Ort aufgestellt ist.
7. Basis mit Motor und das Netzkabel nicht in Wasser oder andere
Flüssigkeiten tauchen. Nicht unter ießendem Wasser abwaschen.
Vermeiden Sie, dass Flüssigkeiten in die Motoreinheit gelangen.
8. Seien Sie aufmerksam, falls Sie das Gerät in der Nähe von Kindern
verwenden.
9. Das Gerät sollte während des Betriebes nicht unbeaufsichtigt
gelassen werden.
10.Das Gerät sollte nicht unbeaufsichtigt gelassen werden, falls dieses
an das Stromnetz angeschlossen ist.
11.Schalten Sie das Gerät aus und trennen Sie es vom Stromnetz, bevor
Sie Wartungs-, Montage oder Demontagearbeiten durchführen,
das Zubehör auswechseln oder wenn Sie das Gerät nicht mehr
benutzen. Ziehen Sie nicht am Kabel, um den Stecker aus der
Steckdose zu ziehen. Ziehen Sie am Stecker, um das Kabel aus der
Steckdose zu ziehen.
12.Warten Sie immer, bis alle Teile vollständig zum Stillstand
gekommen sind, bevor Sie sie demontieren. Das Gerät benötigt
etwa 20 Minuten zum Abkühlen. Halten Sie diese Zeit ein, um eine
sichere Manipulation und Reinigung zu gewährleisten.
13.Verwenden Sie das Gerät nicht in der Nähe von Wärmequellen (z.B.
Öfen). Gerät vor direkter Sonnenstrahlung schützen.
14.Befestigen Sie das Gerät nicht an der Wand und stellen Sie es nicht
auf andere Geräte. Lassen Sie hinten und an den Seiten mindestens
10 cm und oberhalb des Geräts mindestens 10 cm Freiraum.
15.Gerät stets auf einer geraden und stabilen Oberäche verwenden.
Platzieren Sie auf den Verbraucher keine Gegenstände.
Vergewissern Sie sich, dass das Gerät mindestens 10 cm vom
Rand der Küchenarbeitsplatte aufgestellt ist. Auch sollten keine
Önungen blockiert sein.
16.Vor der Erstverwendung sollten alle Teile, die mit Lebensmitteln in
Berührung kommen, gewaschen werden, siehe Kapitel „Reinigung
und Wartung“.

Deutsch
Deutsch
19
17.Gerät niemals während des Betriebs zudecken oder in der Nähe
von brennbaren Materialien verwenden (z.B. Gardinen).
18.Niemals die beweglichen Geräteteile berühren!
19.Lange Haare, lose Kleidung oder Accessoires und Schmuck können
durch die rotierenden Teilen des Geräts erfasst werden. Achten Sie
darauf, dass Ihre Haare, Kleidung und Accessoires nicht gefährlich
nahe an die rotierenden Teile kommen!
20.Gerät niemals ohne eingelegte Lebensmittel (leer) einschalten!
21.Reinigen Sie das Gerät unmittelbar nach jedem Gebrauch. Wischen
Sie den Gerätekörper nur mit einem feuchten Tuch ab. Tauchen Sie
es nicht in Wasser ein.
22.Verwenden Sie kein Zubehör, das nicht vom Hersteller empfohlen
wurde. Dies könnte zur Nichtanerkennung der Garantie führen.
23.Überschreiten Sie nicht die maximale Dauerbetriebszeit des Geräts.
Lassen Sie das Gerät vor dem nächsten Gebrauch gut abkühlen.
Bemerkung: für jedes Zubehör gelten andere Zeiten, siehe
Informationen im Handbuch unten.
24.Verwenden Sie das Gerät ausschließlich gemäß den in dieser
Bedienungsanleitung aufgeführten Anweisungen.
25.Dieses Gerät ist ausschließlich für den Haushaltsgebrauch
vorgesehen. Es ist auch für den Gebrauch in Küchenbereichen für
Mitarbeiter, Geschäften, Büros und anderen Arbeitsumgebungen
geeignet. Das Gilt auch für Hotels, Motels, Herbergen und
Wohnheime. Sie ist nicht für kommerzielle Zwecke bestimmt.
26.Der Hersteller übernimmt keine Haftung für Schäden, die auf eine
unsachgemäße Verwendung zurückzuführen sind.
27.Nutzen Sie immer nur eine Funktion des Geräts. Nutzen Sie niemals
mehr als eine Funktion gleichzeitig.
28.Dieses Gerät darf nicht von Kindern bedient werden. Gerät sowie
Netzkabel außer Reichweite von Kindern halten. Personen mit
verminderten physischen, sensorischen und mentalen Fähigkeiten
sowie mangelnden Erfahrungen und Kenntnissen, können dieses
Gerät nur unter Aufsicht benutzen, oder nachdem diese über
einen gefahrlosen Gebrauch belehrt und mit möglichen Gefahren

Deutsch
Deutsch
20
bekannt gemacht wurden. Kinder dürfen nicht mit dem Gerät
spielen.
29.Gefahr von Sachschäden: Das Gerät darf nur dann verwendet
werden,wennesordnungsgemäßundvollständigzusammengebaut
ist.
30.Schalten Sie das Gerät aus und trennen Sie es von dem Stromnetz,
bevor Sie Zubehör auswechseln, das sich während des Gebrauchs
bewegt.
31.Lassen Sie das Gerät vor der Reinigung oder Lagerung abkühlen.
Wartung und Reinigung sollten mit einem feuchten Tuch
durchgeführt werden. Verwenden Sie niemals chemische Präparate
und Reinigungsmittel. Achten Sie bei der Reinigung besonders auf
Oberächen, die direkt mit Lebensmitteln in Berührung kommen.
32.Gehen Sie während der Manipulation mit den Hackmessern
besonders vorsichtig vor, insbesondere beim Herausnehmen
Hackmesser aus dem Behälter und während der Reinigung.
Do not immerse in water! – Nicht ins Wasser tauchen!
GEFAHR FÜR KINDER: Kinder dürfen nicht mit dem
Verpackungsmaterial spielen. Kinder dürfen
nicht mit den Kunststobeuteln spielen.
Erstickungsgefahr.
SICHERHEITSHINWEISE ZUM ZUBEHÖR
1. Setzen Sie Zusatzgeräte genau nach den Angaben in der Betriebsanleitung zusammen, andere
Kombinationen beim Zusammensetzen der Zusatzgeräte sind für eine einwandfreie Funktionsweise nicht
zulässig!
2. Befestigen und entfernen Sie das zusammengebaute Zusatzgerät nur dann, wenn das Gerät ausgeschaltet
und vom Stromnetz getrennt ist.
3. Verwenden Sie niemals ein Zusatzgerät, das nicht richtig arbeitet, zu Boden gestürzt ist oder beschädigt ist.
Bringen Sie das Zusatzgerät in solchen Fällen zu einer fachlichen Kundendienststelle, um seine Sicherheit
und richtige Funktionsweise zu überprüfen.
4. Setzen Sie die Zusatzgeräte niemals auf der Antriebseinheit zusammen!
5. Seien Sie beim Umgang mit den Hack- und Mixmessern und Reiben besonders vorsichtig (vor allem bei
der Reinigung), da die Messer und Reiben sehr scharf sind und Verletzungen verursachen können.
Knethaken und Schneebesen
Dieses Zubehör ist zum Kneten von Hefe- oder Backteig und zum Schlagen von Lebensmitteln vorgesehen.
• Bitte beachten Sie, dass das Gerät aufgrund der großen Arbeitsschüssel sehr kleine Mengen an Zutaten
nicht ausreichend schlagen/kneten kann. Damit Sie ein optimales Ergebnis erzielen, sollten Sie daher
Table of contents
Languages:
Other ECG Food Processor manuals