Eden Zero Threshold Birdlip User manual

EH1.02
CustomerHelpline:+44(0)1242676625 Mon
–
Fri9:00am
–
5:00pm mail@eden‐greenhouses.com
Zero
ThresholdTM
Hints and Tips
Handbook
www.edengreenhouses.com
Birdlip
Burford
Blockley
Bourton

Hints and Tips Handbook
EdenGreenhousesCustomerHelpline+44(0)12426766251
DearCustomer,
CongratulationsonpurchasingyournewEdenZero‐thresholdTMgreenhouse.
Beforeyoustart,pleasereadtheinstructionbookletsuppliedwithyourgreenhousethoroughly.ThisHintsandTipsHandbookisaimedtobeacompanionto
maketheerectionofyournewEdenZero‐thresholdTMgreenhouseassmoothaspossiblewhenreadinconjunctionwiththesuppliedinstructions.
Thecomponentsforyourgreenhouseareinnumberedbundlescorrespondingtothesectionsintheinstructionmanualandthishandbook.Theremaybe
morethan1bundlepersection.Buildonesectionatatimefromthestartsoastonotcauseanyconfusion.
ThishandbookisaimedatthenewEdenZero‐thresholdTMrangeasawholenotonespecificmodelorsize.(Picturesmaynotcorrespondwithyour
greenhousebutcanbeinterpretedforanymodel.)
The
newEdenZero‐thresholdTM
rangeofgreenhousesareconstructedusingboltchannels.Takenoteofwhereyouwill
needtoslideextraboltsintothechannelsforfixinghorizontalbars,bracingorroofventsillsaspertheexamplepictureto
theright.
Thesquareheadedboltsandnuts(50,51)aremadefromanaluminiumalloywhichcansheerifovertightened.To
preventtheinconvenienceofhavingtodismantleasectiontoreplaceasheeredbolt,pleaseensurethatyouonlytighten
themalittlemorethanfingertightasthisisallthatisrequired.
74
0
NOTE:THISISFORDIMENSIONMEASUREMENTSONLY
Section0
Thissectionshowsthemeasurementsrequiredtosituatethegroundanchors
ONLY,ifyouhavechosentositethegreenhouseonearth.Makesureyouhave
thecorrectsizeforyourspecificgreenhouse.
Ifyouhavechosentoprepareabaseofsomesortforyourgreenhousetobesited
onotherthanearth,pleaserefertothedimensionsonthefrontcoverofyour
instructionmanualorourEdenZero‐thresholdTMrangebrochureforthe
MINIMUMdimensionsofbaserequiredforyourmodelandsize.

Hints and Tips Handbook
2EdenGreenhousesCustomerHelpline+44(0)1242676625
Section1
Thissectionshowsyouhowtoassemblethereargableofyourgreenhouse.
TheEdenZero‐thresholdTMrangehasonlytwodifferentsizedbayswhenitcomes
tothereargable(illustratedbyarrows,rightandbelow).Thisistomakethe
assemblyeasyandtominimiseadjustmentsneededwhenitcomestoglazing.
Thetablebelowwillshowthemeasurementsneededforthebays.
(Measurementsaretakenfromthecentreoftheboltchanneltothenext.)
Model 386mm463mm618mm
Birdlip‐3Bays‐
Burford‐ ‐ 3Bays
Blockley‐ ‐ 4Bays
Bourton‐ 4Bays2Innerbays
1
1
9
5/13
5
(A)
Thesetipsaretomaketheassemblysimplewhen
itcomestosection4ASSEMBLE.
Anextrasquareheadedbolt(50)andnut(51)
shouldbelocatedinthereturnofcornerposts
(5)andgablebars(5,13)ateachendasshown
leftandabovewith(I)100mmfromtheendsfor
lateruse.
Whenconstructingthegables,thehorizontal
brace(10)shouldbelevelwiththetopofthe
cornerpost(5)asshownright(A).
Anotherwaytomakesuretherewillbeminimal
adjustmentneededwhenyoucometoassemble
thesectionstogetheristolooselyfitthegusset
plate(9)tothecornerpost(5)andthegablebar
(13).
Thenmeasureandadjustthegussetplate(9)into
thetopofthecornerpost(5)65mm,and70mm
upintothegablebar(13)asshownright(B).
(I)
(I)
(I)
(I)
(I)
(I) (I) (I)
(I)
(I)
(I)
(I)
(I)
(I)
(I)
(I)
65mm
(B)
10
(Outside)

Hints and Tips Handbook
EdenGreenhousesCustomerHelpline+44(0)12426766253
Section2
Thissectionshowsyouhowtoassemblethefrontgableofyourgreenhouse.
TheEdenZero‐thresholdTMrangehasfourdifferentsizedbayswhenitcomesto
thefrontgable(illustratedbyarrows,rightandbelow)tomaketheassembly
easyandtominimiseadjustmentsneededwhenitcomestoglazing.
Thetablebelowwillshowthemeasurementsneededforthebays.
(Measurementsaretakenfromthecentreoftheboltchanneltothenext.)
Model 386mm463mm618mm1236mm
Birdlip2bays‐DoorAperture‐
Burford‐ ‐2Bays/Door‐
Blockley‐ ‐ 2Bays DoorAperture
Bourton‐ 4Bays‐DoorAperture
2
2
Thesetipsaretomaketheassemblysimple
whenitcomestosection4ASSEMBLE.
Anextrasquareheadedbolt(50)andnut
(51)shouldbelocatedinthereturnof
cornerposts(5)andgablebars(5,13)at
eachendasshownleftandabove(I)
100mmfromtheendsforuselater.
Whenconstructingthegablesthehorizontal
brace(11)shouldbelevelwiththetopof
thecornerpost(5)
asshownright(A).
Anotherwaytomakesuretherewillbe
minimaladjustmentneededwhenyoucome
toassemblethesectionstogetheristo
looselyfitthegussetplate(9)tothecorner
post(5)andthegablebar(13).
Thenmeasureandadjustthegussetplate
(9)intothetopofthecornerpost(5)65mm,
and70mmupintothegablebar(13)as
shownright(B).
5/13
5
(A)
9
(I)
(I)
(I)
(I)
(I)
(I)
(I)
(I)
(I)
(I)
(I)
(I)
(I)
(I)
(I)
(I)
65mm
(B)
11
(Outside)

Hints and Tips Handbook
4EdenGreenhousesCustomerHelpline+44(0)1242676625
Section3
Thissectionshowsyouhowtoassemblethesidesofyourgreenhouse.
TheEdenZero‐thresholdTMrangehasonlyonesizeofbaywhenitcomestothe
sides(illustratedbyarrows,rightandbelow)tomaketheassemblyeasyandto
minimiseadjustmentsneededwhenitcomestoglazing.
Thetablebelowwillshowthemeasurementsneededforthebays.
(Measurementsaretakenfromthecentreoftheboltchanneltothenext.)
Model 618mm
BirdlipAll
BurfordAll
BlockleyAll
BourtonAll
3
3
Thistipistomakethe
assemblysimplewhenitcomes
tosection5ROOF.
Whenconstructingthesides,
anextrasquareheadedbolt
(50)andnut(51)arerequired
inthesideglazingbars(1)as
shownin(A).
Thisistoallowfortheeaves
brace(40)whenassembling
theroof.
(A)1
2
50,51

Hints and Tips Handbook
EdenGreenhousesCustomerHelpline+44(0)12426766255
Section4
Thissectionshowsyouhowtoassemblethesidestothegablesofyour
greenhouse(right).
Thesetipsandhintsaretoeasetheassemblyfromthissectionrightup
tothecompletionofyougreenhouse.
Usethe(I)tiponsections2and3when
assemblingthesidestothegablesateaves
level.Asshownleft(B)loosenthenutand
bolt(51,50),letitslidedownthentighten
backup.
Asshownleft(C),removethenutfromthe
bolt(51,50)toattachthediagonalbrace,
thenplacenutbackontheboltlooselywith
bracenowsecured.Thenplaceintotheslot
onundersideofgutterthentightennut.
Asshownright(D),fromtheoutside,theend
ofthegutter(2)shouldbeflushwiththe
gussetplate(9).
The(I)tiponsections2
and3nowcomesinto
play.Uponconnecting
thesidestothegables,
allthatisneededto
attachthesidebase(3,
6)(asshownleft)isto
loosenofftheboltand
nut(50,51)shownby
(A),letitslidedowninto
positionthentightenup.
(B)
(C)
(A)
(D)
4
3/6
3/6
292
9

Hints and Tips Handbook
6EdenGreenhousesCustomerHelpline+44(0)1242676625
12a2b
‐ x/x/
‐ x/x/
‐ x/x/
PRE‐LOAD
Section5
Thissectionshowsyouhowtoassembletheroofofyourgreenhouse.
TheEdenZero‐thresholdTMrangehasonlyonesizeofbaywhenitcomestothe
roof(illustratedbyarrows,right).Thisistomaketheassemblyeasyandto
minimiseadjustmentsneededwhenitcomestoglazing.
Thetablebelowwillshowthemeasurementsneededforthebays.
(Measurementsaretakenfromthecentreoftheboltchanneltothenext.)
Model 618mm
BirdlipAll
BurfordAll
BlockleyAll
BourtonAll
5
Thetable(left)inSection5ofyourinstructionsshowshow
manysquareheadedbolts/nuts(50,51)arerequiredtobe
pre‐loadedasshownbelowintotheroofglazingbars(1,
23).Modelandsizespecific.Doingthisbeforeassembling
theroofwillsavetimewhenitcomestofittingtheapex,
eavesbracesandventtransoms
(
40
,
60
,
41
,
and27
)
.
2a
2b
50,51
50,51
PRE
‐
LOAD
PRE
‐
LOAD
Atimesavingtipistopre‐loadtheridgebar(22)withsquareheaded
boltsandnuts(50,51)beforeplacingintopositionasshownbelowleft.
Insection3thetiptoplaceanextrasquareheadedboltandnut(50,51)
intothesideglazingbars(1)nowcomesintoplayasshownbelowright.
50,51
1,23
22
40
1
1,23
4
2
1/23
1/23

Hints and Tips Handbook
EdenGreenhousesCustomerHelpline+44(0)12426766257
Section6
Thissectionshowsyouhowtoassembletheroofventsforyour
greenhouse.
TheEdenZero‐thresholdTMrangehasonlyonestylewhenit
comestotheventsasshownright.
Thebestwaytoassembletheventsisfromtheundersideas
shownright.
Startbyapplyingtheglazingrubber(42)totheventsides(25).
Thenpre‐load2xsquareheadedboltsandnuts(50,51)intothe
holesprovidedateitherendoftheventhead,ventsill(24,26).
Usingthepre‐loadedboltandnutslidetheventhead(24)into
bothboltchannelsoftheventsidesx2(25)atthesametimethen
tighten(asshownin(A).
Followthesameinstructionsabovefortheventsill(26)asshown
in(B).
Thenscrewtheventstay/handle(71)usingscrewssuppliedinto
theholesprovidedintheventsill(26)asshownin(C).
24
26
25
25
71
42
24
25
25
(
A
)
(
B
)
(
B
)
26
26
25
25
(
C
)
26
71
6

Hints and Tips Handbook
8EdenGreenhousesCustomerHelpline+44(0)1242676625
Section7
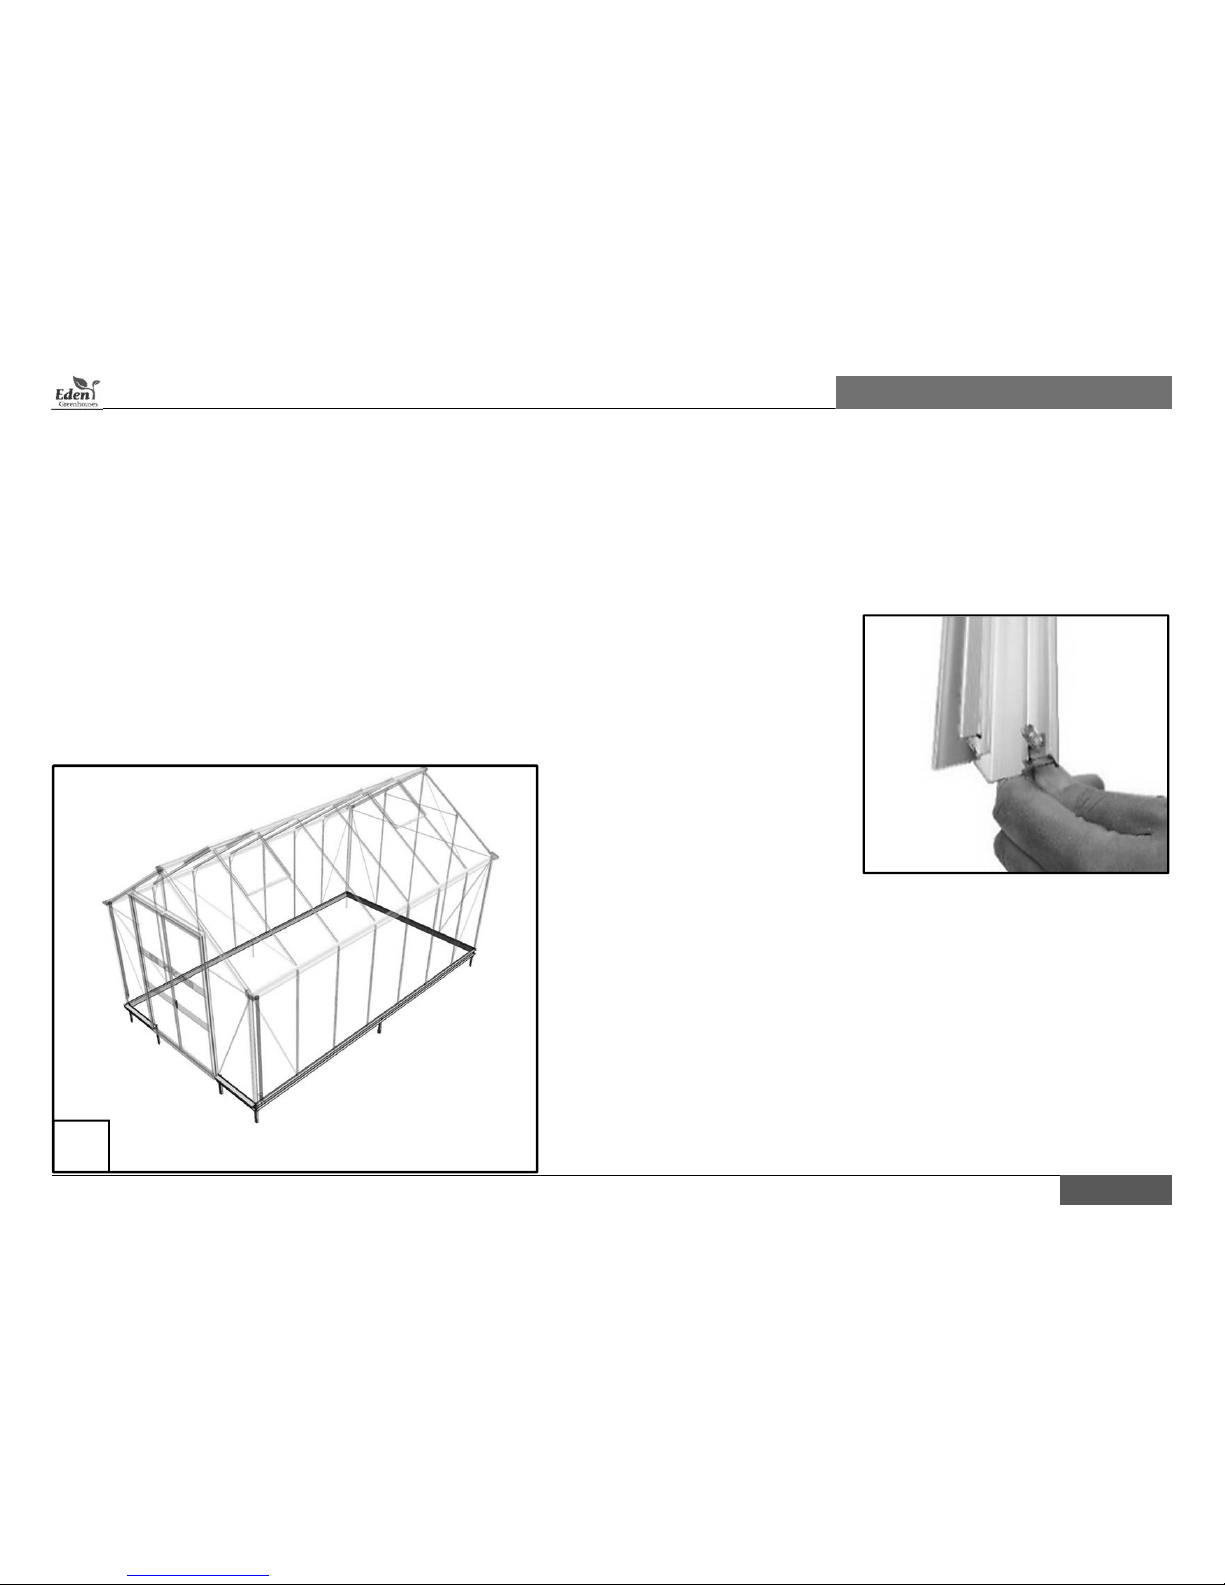
Thissectionshowsyouhowtoassemblethedoorsforyourgreenhouse.
TheEdenZero‐threshold
TMrangehasdifferentsizeswhenitcomestothe
doorsbutthemethodofassemblyisthesame.Below,findstepbystep
instructionstoconstructadoor.Thismethodcanbeusedonalldoorsboth
leftandright(notepictureshownrightisaright‐handdoorwhenviewed
fromoutside).
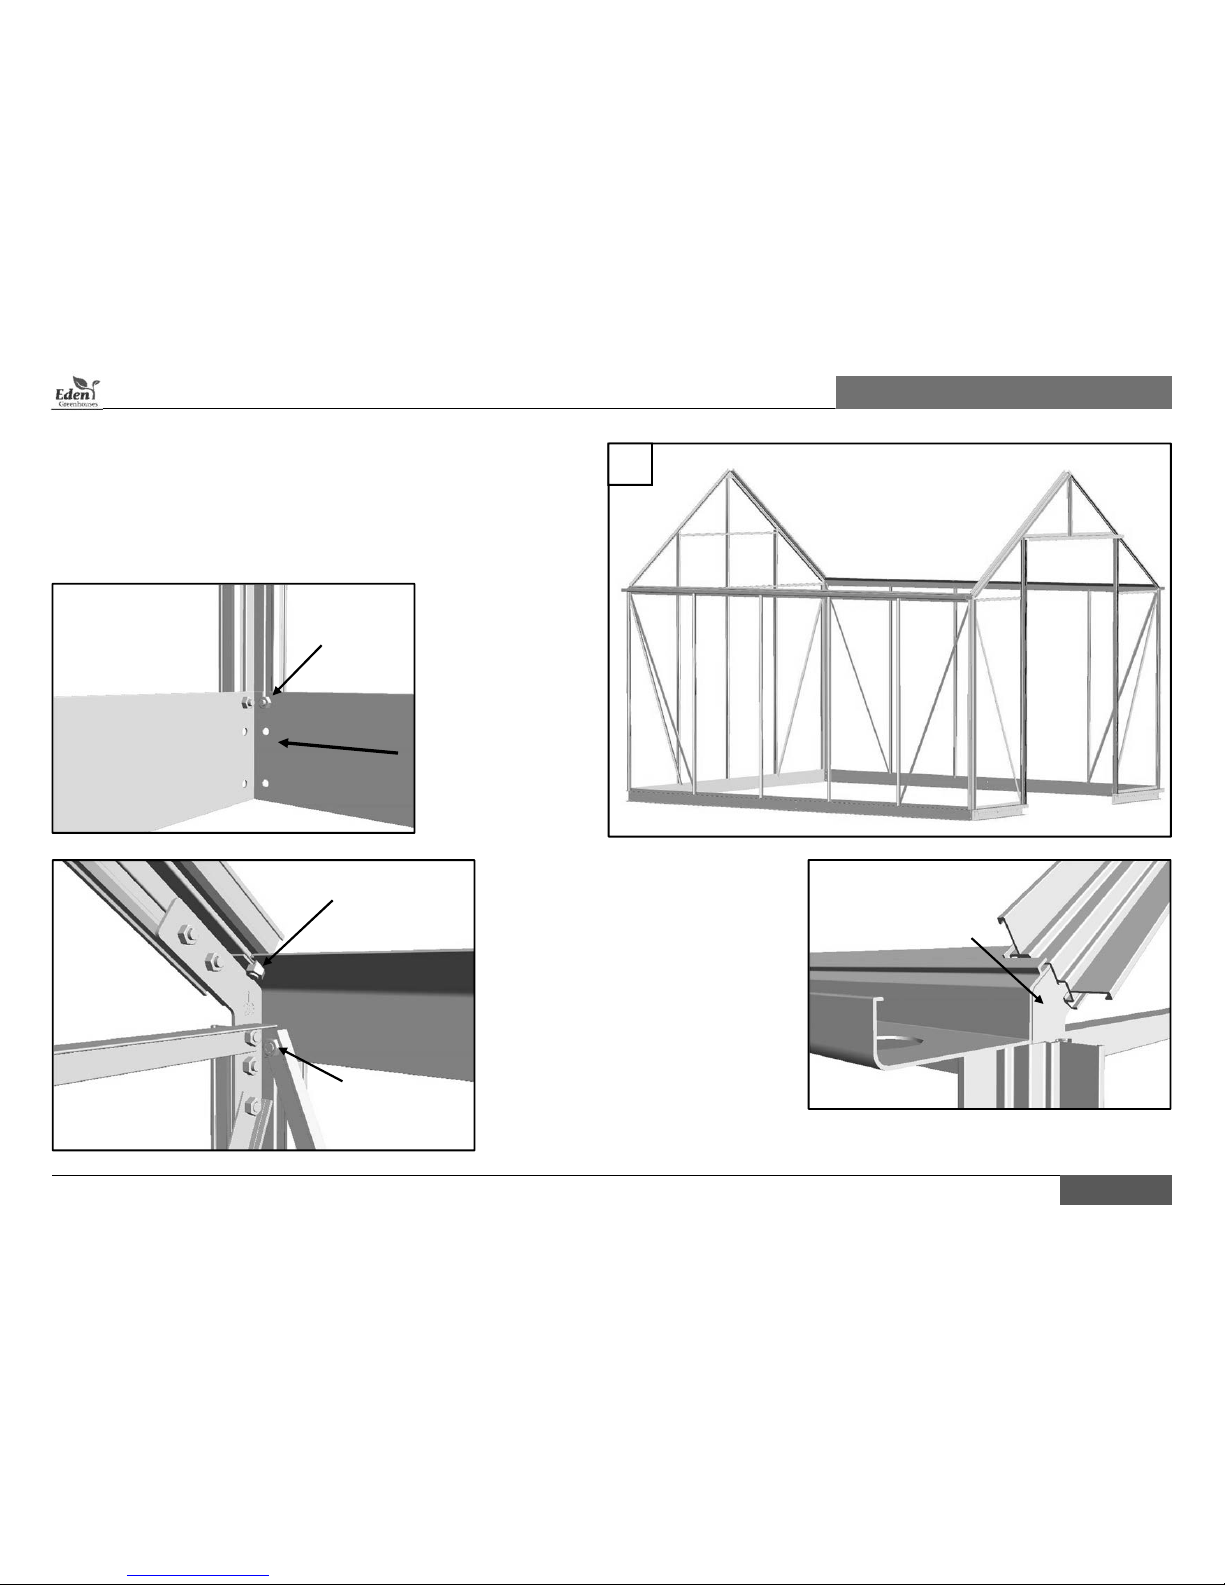
Startbyapplyingtheglazingrubber(42)tothedoorstile(28,65,and66)as
showninbox1inyourinstructionmanual.
Pre‐loadeachdoorstile(28,65,and66)with8squareheadedbolts(50)as
showninbox2inyourinstructionmanual.
Checkthedoorlayoutreferringtothelargepictureinthetopleftofthe
instructionmanual.Then,withbothdoorstiles(28,65,and66),attachthe
doortoprail(29)withadoorstop(52)ontheinsideofthedoor,with2pre‐
loadedsquareheadedbolts(50)andnut(51)asshowninbox3and4in
yourinstructionmanual.
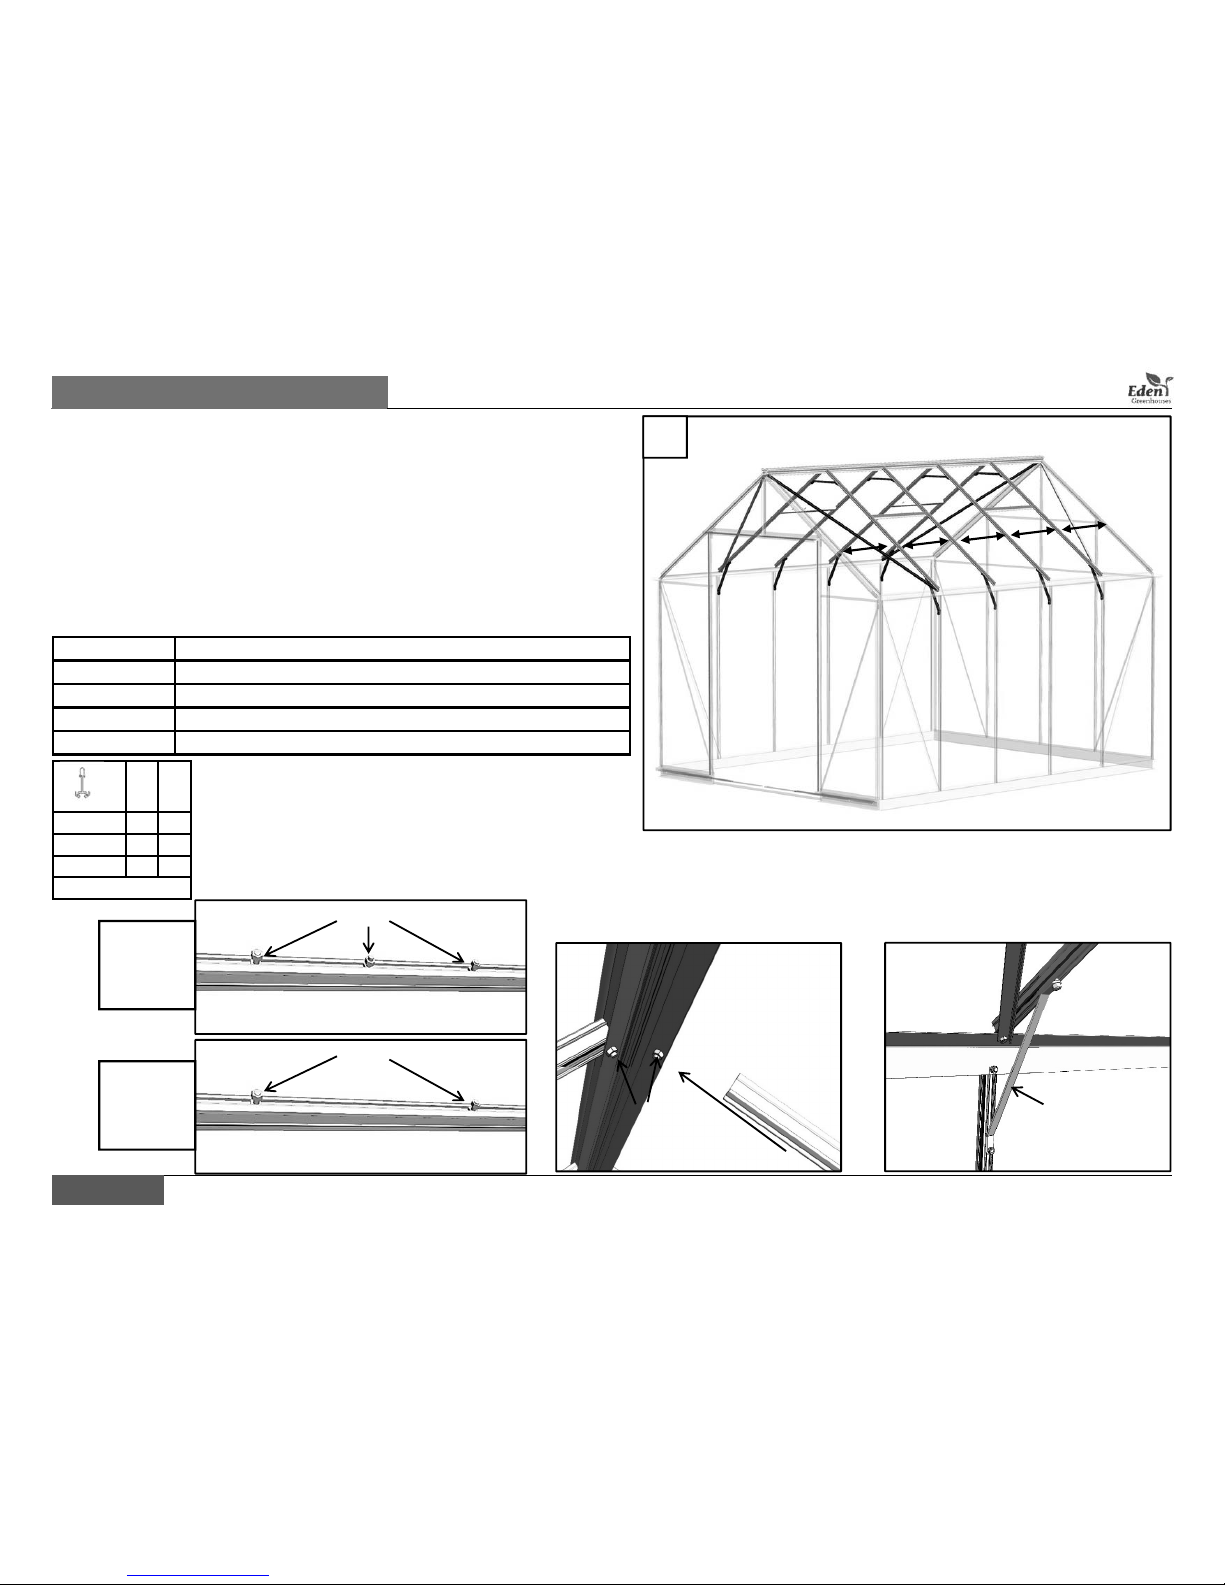
Slidethetoppaneofglassuptothetopdoorrail(29)referringtosection9
forcorrectsize,asshowninbox5inyourinstructionmanual.
Onthebackofthecentredoorrail(30)thereisachannelwhichtheblack
foampad(112)needstobeslidintoasshowninbox6.
Nextattachthecentredoorrailwithblackfoampad(30,112)using2pre‐
loadedsquareheadedbolts(50)andnuts(51)asshowninbox7inyour
instructionmanual.N.B.Makesureatthispointtheholesforthelockline
up.
Slidethenextpaneofglassuptothecentredoorrail(30)referringto
section9forcorrectsize,asshowninbox8inyourinstructionmanual.
Attachtheintermediatedoorrail(32)withtherelevantdoor/lockkeeper
(107,108)with2pre‐loadedsquareheadedbolts(50)andnuts(51)as
showninbox9inyourinstructionmanual.
Slidethenextpaneofglassuptotheintermediatedoorrail(32)referringto
section9forcorrectsize,asshowninbox10inyourinstructionmanual.
Attachthebottomdoorrail(32)withadoorstop(52)ontheinsideofthe
doorwith2pre‐loadedsquareheadedbolts(50)andnuts(51)asshownin
box11inyourinstructionmanual.
Asshowninbox12,13insertthepushlock(111)thensecureinpositionon
thecentredoorrail(30)withthebrassnut.
Attachthedoorhandle(48)tothesmallholeonthecentredoorrail(30)as
showninbox14inyourinstructionmanual.
Ifyouhaveadoubledoormodel,followtheseinstructionsusingthe
picturesinyourinstructionmanualasaguidefortheremainingdoor.
7

Hints and Tips Handbook
EdenGreenhousesCustomerHelpline+44(0)12426766259
Section7.#
Thissectionshowsyouhowtoassembletheslideassemblytothedoorsfor
yourgreenhouse(illustratedright).
TheEdenZero‐thresholdTMrangehasonlytwodifferentwidthswhenit
comestothedoorslideassemblywhichare300mm(Birdlip)and600mm
(Burford,Blockley,andBourton).
Below,findstepbystepinstructionstoconstructthedoorslideassembly.
Thismethodcanbeusedonalldoorsbothleftandright(notepicture
shownrightisaright‐handdoorwhenviewedfromoutside).
Startbyslidingthebrushstrip(109)intothebottomdoorassemblybracket
(95)andsecureinplacewiththegrubscrews(104)atbothendsasshownin
box1inyourinstructionmanual.
Asthepicturesbelowshow,removethesliderinner(114A)fromtheouter
oftheslider(114B)byextendingtheslidertofullextentthenasshownin
theinstructionmanual,squeezethelever.Bydoingthisyouwillbeableto
slide(114A)outfrom(114B).
Usingthesliderlayoutpageinyourin
yourinstructionmanualinsection7 shown
(right)lineupthesliderinner(114A)withthe
topraildependingonwhichhanddooryou’reconstructingthensecurewith
M4nut,boltandastarwasher(102,103and118)asshowninbox2.
Asshowninbox3securethesliderinner(114A)tothebottomdoor
assemblybracket(95)referringtothelayout,dependingonwhichhand
dooryou’reconstructing,withM4nut,boltandastarwasher(102,103and
118).
Box4showstosecuretheouterslider(114B)tothefrontbaseassembly
bracket(97),referringtothelayoutdependingonwhichhanddooryou’re
constructing,withM4nut,boltandastarwasher(102,103and118).
Asshowninboxes5,6,7and8,slidethesliderinner(114A)withattached
bottomdoorassemblybracket(95)intotheouterslider(114B)with
attachedfrontbaseassemblybracket(97)tocreatethecompletebottom
slideassembly.
Thensecurethecompletebottomslideassemblytothebottomofthedoor
with3squareheadedboltsandnuts(50,51)asshowninboxes9and10.
Ifyouhaveadoubledoormodel,followtheseinstructionsusingthe
picturesinyourinstructionmanualasaguidefortheremainingdoor.
29
31
7.#

Hints and Tips Handbook
10EdenGreenhousesCustomerHelpline+44(0)1242676625
Section8
Thissectionshowsyouhowtolocateyourgreenhouse.
TheEdenZero‐thresholdTMrangecomessuppliedwithtwodifferentmethodsof
securingthegreenhouse.
Atthispointintheconstruction,itistimetofitthechosenmethodofsecuring.
Ifyouhavechosentoanchorthegreenhousedownonearth,usingthesupplied
groundanchors(64),firstyouneedtosplaythemasshown(A),thenfitineach
cornerofthegreenhouseandeithersideofthethresholdasillustratedinbox1
ofyourinstructionmanual.Ifyouhaveagreenhouse10ftorlongeryoumustfit
groundanchors(64)alongthesides.Howtodothisisillustratedinyour
instructionmanual.
Ifyouhavechosentoanchorthegreenhousedownonabaseotherthanearth,
usingthesuppliedgroundanchors(64),youneedtohacksawthemto77mmas
shown(B),thenfitineachcornerofthegreenhouseandeithersideofthe
thresholdwithasecuringbracket(98)asillustratedinbox1ofyourinstruction
manual.Ifyouhaveagreenhouse10ftorlongeryoumustfitgroundanchors
(64)andsecuringbrackets(98)alongthesides.Howtodothisisillustratedin
yourinstructionmanual.
Thenapplytheglazingrubber(42)
asshownlefttoallhighlighted
verticalprofilesasshowntopright
andinyourinstructionmanual.
8
77mm
64
42
64
A
B

Hints and Tips Handbook
EdenGreenhousesCustomerHelpline+44(0)124267662511
Section8.1
Thissectionshowsyouhowtofitthedoorstoyourgreenhouse.
TheEdenZero‐thresholdTMrangehasdifferentsizeswhenitcomestothe
doorsbutthemethodofassemblyisthesame.Below,findstepbystep
instructions.Thismethodcanbeusedonalldoorsbothleftandright(note
pictureshownrightisarighthanddoor).
Startbyremovingthedoorstop(52)fromthetopofthedoorasshownin
boxes1and2inyourinstructionmanual.Thiswillbereattachedafterthe
doorisfittedinplace.
Theremainingouterslider(114B)needstobesecuredtothelintel(20,21).
Thebestwaytodothisisbyremovingthelintel(20,21)momentarilytofitthe
outerslider(114B).ThensecurewithM4nut,boltandastarwasher(102,103
and118)asshowninbox3,5inyourinstructionmanual.
Ifyouhaveremovedthelintel(20,21)tofittheouterslider(114B)please
reattach.Oncelintelisbackinpositionwecannowfitthedoor.
Asshowninbox4slidetheinnerslider(114A)(attachedtothetopofthe
door)intotheouterslider(114B)(attachedtothelintel)andslidethedoorall
thewayintotheclosedpositionasshowninboxes5or7.
Withthedoorintheclosedposition,slidethebottomslideassembly
underneaththetoplipofthefrontintegralbase(18)asshowninboxes6or8.
Lineuptheholesonthefrontbaseslidebracket(97)withtheholesonthe
frontintegralbase(18)asshowninboxes7or9and12.
Thensecurethetwowiththreesquareheadedboltsandnuts(50,51)as
showninboxes8or10and13.
Theremainingboxesinthissectionshowyouhowtomakeadjustments.
Ifthedoorisnotstraightwithintheaperture,itusuallymeansthatthefront
baseslidebracket(97)isnotlevelwiththelintel(20,21).Tomakethis
adjustment,takeastepbackandlooktoseewhethertheyarelevelby
checkingasshownaboverightby(A).Thiscanbeadjustedbymovingthe
frontbaseslidebracket(97)asshowninboxes9or11and14.
Furtheradjustmentscanbemadebylooseningoffthesquareheadedbolts
andnuts(50,51)asshowninboxes10or15and16.Thiswilllowertheside
ofthedoorwhichwillmakethedoorswingtheoppositeway.NOTETHIS
ADJUSTMENTCANBEONLYMADETOONESIDEOFTHEDOORATATIME.
Thenreattachthedoorstop(52)weremovedearlierasshowninboxes11,
12or17,18.Thensecurethepanesinthedoorusingthe“W”springwire
clipsprovided.
Ifyouhaveadoubledoormodel,followtheseinstructionsusingthe
picturesinyourinstructionmanualasaguidefortheremainingdoor.
Ifyouhavefollowedtheseinstructionsbutthedoorsdon’tlineup
correctlypleaserefertothenexttroubleshootingpage.
Thelouvresectionshowsthegreenhousebaysthatareableto
accommodatealouvreifyouwishtofitone.
8.1
(A)
(A)

Hints and Tips Handbook
12EdenGreenhousesCustomerHelpline+44(0)1242676625
Section8.1.1
Ifyouhavehungyourdoorsandtheyarenotfittingcorrectlywithinthe
aperture,thissectionwilltakeyouthroughthestepsneededtolineupthe
doorscorrectly.Iftheapertureofthedoorwayisnotsquareandplumb
thiswillhamperthewaythesliders(114)workandleadtovariousissues.
Thesestepswillworkonallmodels.Werecommendthatyouremovethe
doorsbeforeattemptingthis.1,2and3ofthefollowingstepsmustbe
carriedoutsimultaneousl
y
asthe
y
arede
p
endantoneachother.
1.Makesurethatthefrontbasesections(18)arelevel.
2.Makesurethatthedoorposts(16)arenotbowedbutstraightallthe
wayupbyplacingalevelorstraightedgetocheck.Anotherwaytocheck
thisistomeasurefromthecentreoftheboltchannelonbothdoorposts,
checkingtheyarethesamedistanceapartallthewaydown.(I.e.parallel)
11
2
3.Makesurethatthelintel(20,21)islevel.
4.Oncethepreviousstepshavebeencarriedoutandthedoorapertureis
nowlevelandsquare,wecannowreattachthedoor(s)asdetailedin
section8.1ofthisHintsandTipsHandbookaswellastheinstruction
manualprovidedwithyourgreenhouse.Leavethe3nutsandbolts(50,51),
whichconnectthefrontbasesection(18)tothebaseslidebracket(97),
loose.
4
3
5 5
05.Withthedoorsnowhungandthe3nutsandbolts(50,51)which
connectthefrontbasesection(18)tothebaseslidebracket(97)loose,step
insidethegreenhouseandshutthedoor(s)hard.Thiswillallowthebottom
sliderstofindtheirownposition,(paralleltothelintel).Oncehappywith
thedoors,tightenthe3nutsandbolts(50,51)tosecure.

Hints and Tips Handbook
EdenGreenhousesCustomerHelpline+44(0)124267662513
Section9
Thissectionshowsyouhowtoglazeyourgreenhousewithyourchosen
glazingmethod.
TheEdenZero‐thresholdTMrangehasthreedifferentglazingoptions.These
are3mmhorticulturalglass,3mmlongpanedtoughenedglassand6mmtwin
walledpolycarbonate.
Allthetipsandhintscoveredinthishandbook,iffollowedcorrectly,help
maketheglazingeasyandhelpminimiseadjustmentsneeded.
Forsafetyreasonswerecommendyoubeginby
glazingtheroof.First,youmustattachtheroof
glassretainingclips(58/R)tothetoplipofthe
gutter(2)asshownright.
Ifyouhavechosenthe3mmhorticulturalglazing
method,referringtoyourinstructionmanualfor
thedesiredpaneofglass,startbyplacingthe
bottomroofpanebetweenthetwoglazingbars
restingitonthe58/Rretainingclips.Thensecurethispaneinpositionwith
springwireglazingclips(W).Atleasttwopersideisrecommendedperpane
ofglass.Forthesides,placetwoz‐clipsroughly150mmfromeithersideon
top.Placethenextpaneonthez‐clipsasshownbelowright.Securethis
paneinpositionwithspringwireglazingclips(W).
NOTE:IF YOU HAVE HORTICULTURAL GLAZING AND YOURGREENHOUSE
ISINANEXPOSEDORWINDYAREA,MORESPRINGWIREGLAZINGCLIPS
ARERECOMMENDED.WESUGGESTINCREASINGTHEMTOFOURPERSIDE
OFEACHPANEOFGLASS.
Forsafetyreasonswerecommendyoubeginbyglazingtheroof.First,you
mustattachtheroofglassretainingclips(58/R)tothetoplipofthegutter
(2)asshownright.
Ifyouhavechosenthe3mmlongpane
toughenedglazingmethod,referringtoyour
instructionmanualforthedesiredpaneofglass,
startbyplacingtheroofpanebetweenthetwo
glazingbars,restingitonthe58/Rretainingclips
asshownright.
TheEdentoughenedglasscappingisdesignedto
beveryrobustandresistantagainstwindand
waterbutasaconsequenceitishardtofit.We
recommendsprayingsoapywaterdowneithersideoftheglasspaneto
lubricate,thencentretheglasswithinthebay.
Startbycappingbothsidesatthesametime,beginningatthetop.Put
roughly50mminoneitherside.Youshouldbeabletohearaclickifdone
correctly.Oncethishasbeendone,carryoncappingbothsidesalltheway
downthelengthofthepaneasshownbelow.Youshouldbeabletoheara
clickasyougo.SomeoftheC2cappingrequirescuttingfortheroofvent
baysonly.
Ifforanyreasontheglassdoesnotseem
squarewithinthebayspleaserefertothe
nextpageintheadjustmentsection.
R
/
58
R
/
58
R
/
58
R
/
58

Hints and Tips Handbook
14EdenGreenhousesCustomerHelpline+44(0)1242676625
Section9
Ifyouhavechosenthe6mmtwinwalledpolycarbonatemethod,referto
yourinstructionmanualforthedesiredsheetofpoly.
NOTE:Youmayfinditeasiertostartbyglazingtherooffirst.
Startbyplacingthepolysillcover(L1)overtheintegralbaselipatthe
bottomofthebaywiththechannelfacingtowardsyou.Thenfitanotherpoly
sillcover(L1)onthelipontheundersideofthegutter.
Withthesheetofpolyatroughlya45degreeangle,placeintheintegralbase
channelofthepolysillcover(L1)thenbendthesheetslightlytofitintothe
channelofthepolysillcover(L1)ontheundersideofthegutter.
TheEdenpolycarbonatecappingisdesignedtobeveryrobustandresistant
againstwindandwaterbutasa
consequenceitishardtofit.Werecommend
sprayingsoapywaterdowneithersideofthe
sheettolubricate,thencentrethesheetofpoly
withinthebay.Startbycappingboth
sidesatthesametime,beginningatthetop.
Putroughly50mminoneitherside.You
shouldbeabletohearaclickifdonecorrectly.
Oncethishasbeendone,carryoncapping
bothsidesallthewaydownthelengthofthepaneyoushouldbeableto
heartheclickasyougoasshownright.SomeoftheC2cappingrequires
cuttingfortheroofventbaysonly.
Toglazetheroof,thesameappliesasthesidesbutthepolysillcover(L1)is
fittedoverthetoplipofthegutter,andthe6mmaluminiumU‐Channel(L2)
isusedatthetopofthesheetwhichsimplyslideson.
Theventsusethe6mmaluminiumU‐Channel(L2)forbothtopandbottom.
Ifforanyreasonthepolycarbonatedoesnotseemsquarewithinthebays,
pleaserefertotheadjustmentsectionontheright.
Adjustmentsection.
Ifforanyreasontheglazingmethoddoesnotsitsquarelywithinthebays
ofthegreenhouse,itmeansthestructureisnotsquare.
Torectifythisonthesides,simplyloosenthesidebraces(4)withthe
squareheadedboltsandnuts(50,51)asshownby(A),thenpushthe
greenhouseateaveslevelasshownby(B)eitherwayuntiltheglazing
methodsitssquarelywithinthebay.Thentightenthesidebraces(4)back
upwiththesquareheadedboltsandnuts(50,51)asshownby(A).
Ifforsomereasontheglazingmethoddoesnotsitsquarelywithinthe
baysofthegable,itmeansthegable(s)arenotsquare.Torectifythis
pleaserefertothedimensionsgiveninsection1and2inthishandbook.
Followingthesedimensionswillstraightenupthegable(s)towhatthey
shouldbe.
(A)(A)
(A)(A)
(B)
4 4

Hints and Tips Handbook
EdenGreenhousesCustomerHelpline+44(0)124267662515
Section10
Thissectionshowsyouhowtodoallofthefinishingtouchestoyour
greenhouse.
Thefirstpartinthissectionshowsyouhowtofittheventsasshownright.
Tofitthevents,slidethemintothetwoJ‐shapedchannelsoftheridge(22)
asshowninyourinstructionmanualbox1.Thisiswhereyou’regoingto
slidethecorrespondingJontheventhead(24)infromtheend.
Todothisyoumustlifttheventparallelwiththefloorasshowninbox3
thenslideintotheridgeasinbox4.Slideitalongtheridgeintoposition
thenloweritdownintothebayasshowninbox5.
Ifforanyreasontheventstay(71)doesnotlineupwiththepegsinthe
venttransom(27),youcanlifttheventandslideitwithinthebaytomake
itlineup.Ifthisdoesnotsolvetheproblem,loosenthesquareheaded
boltsandnuts(50,51)thatsecuretheventtransom(27)andmoveitleft
orrightwithinthebaytomakeitlineup.
Thesecondpartofthissectionshowsyouhowtofittheplasticpartsto
yourgreenhouse.
Thissectionisprettyself‐explanatorybuttomakethegutterends(53,54)
watertight,werecommendsealingthemwithsiliconetotheendsofthe
gutters(2).
Thebestwaytofittheintegralbasecovers(115,116and117)istoopen
thechannelswhichgooverandunderneaththeprofilebystretchingthem.
Thiswillmakefittingmucheasier.
Thethirdpartofthissectionshowsyouhowtosecuredownthegreenhouse.
Tosecurethebasedownonearthusingthesuppliedgroundanchormethod,
withthegroundanchorssituatedinplacemakingsurethatthegreenhouseis
level,asshowninbox1,pourconcrete/post‐mixintoyourpre‐dugholes.
Checktoconfirmthegreenhouseislevelbeforetheconcrete/postmixsets,
whilealsotakingintoconsiderationwhichdirectionyouwanttherainwater
inthegutterstoflow.
Forslab/concretefoundation,usingtheL‐shapedbracketsprovided.Drillinto
theconcrete/slabsusinga7mmmasonrydrillbitandsecureusing8mmplugs
andscrews.Werecommendusingpennywashers(notsupplied)todistribute
forceoverawidersurfaceotherthanjustthescrewheadasshowninboxes2.
Thelastthingtodoistoremovethethresholdsettingbrace(19/78)asshown
inbox3.

Hints and Tips Handbook
16EdenGreenhousesCustomerHelpline+44(0)1242676625
This manual suits for next models
3
Table of contents
Other Eden Greenhouse Kit manuals