EDTM Glass-Chek PRO User manual
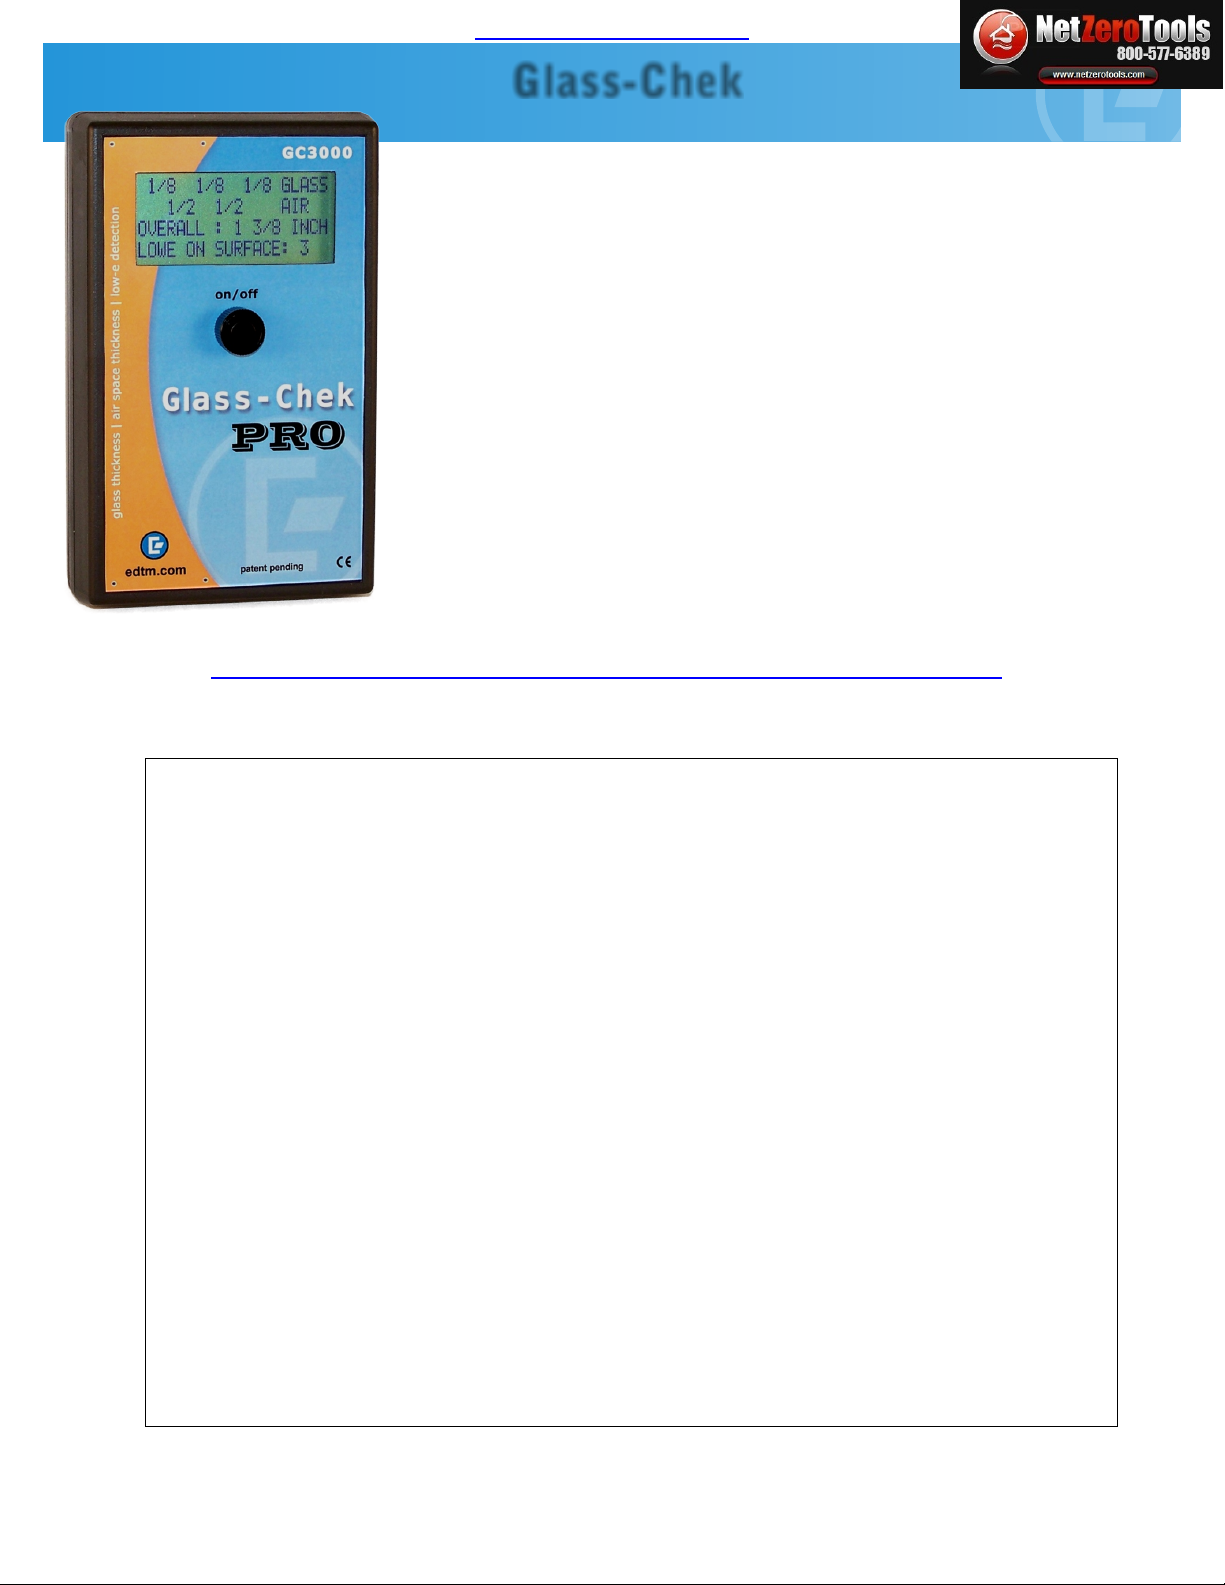
Glass Thickness Meter and Low-E Coating Detector
Glass-Chek
Model # GC3000
Operating Manual
Glass-Chek PRO - GC3000
Contents
The Glass-Chek PRO enables you to measure glass and air space
thickness of triple pane windows from a single side (also compatible with
double and single pane). Furthermore, the GC3000 allows you to
determine the presence, location and type of invisible low-E coatings.
This manual will outline how to use the meter, including choosing language
and measurement settings, explanations of “results” screens, proper use,
and maintenance of the meter. Additionally, it will outline appropriate
applications, technical details and warranty information.
Page 1 .................................................... Using Setup Mode
Page 2 .................................................... Choose Your Language in Setup Mode
• Choose Normal, Hi Res or Low-E Laminate
• Choose Display Units
Page 3 .................................................... Proper Operation of the Glass-Chek PRO
• Turning the meter off
• Proper Hand Placement
Page 4 .................................................... Explanation of Measurement Displays
Page 5 .................................................... Explanation of Error Messages
Page 6 .................................................... Troubleshooting Guide
Page 7 .................................................... Application Details
• Compatible Applications
• Low-E Detection Capabilities
Page 8 .................................................... Application Details
• Glass-Chek Pro Specifications
• Glass Thickness Range
• Laminated glass (continued on Page 9)
Page 9 .................................................... Glass-Chek PRO Specifications
• Laminated Glass with Low-E against the PVB
• GC3000 Standards Table
• Warranty Details
PRO
EDTM GC3000 Glass-Chek Pro Thickness Meter
netzerotools.com
netzerotools.com
netzerotools.com

Using Setup Mode
There are various selectable options available in the GC3000 meter. To access these options, you must use Setup Mode.
Push and HOLD DOWN the button to turn on the meter.
Continue to hold the button down as the following two messages are displayed:
Release the button after the following message is displayed:
Navigating Through Setup Mode
After releasing the button (as outlined in the previous step), the following message will briefly appear:
This message explains how to navigate through the menu system in setup mode. When you enter setup mode, a menu
will appear, and a small arrow will be next to one of the options. In the illustration below, the arrow is next to the “MODE”
option.
To scroll through the menu, gently touch the back of the meter (see figure 1). To select an option, push the meter’s button.
To exit the menu, touch the back of the meter until the arrow points to “EXIT” and push the button. The following screen
will appear.
CONTINUE TO HOLD
BUTTON TO ENTER MENU
RELEASE BUTTON TO
TAKE READING (#)
GLASS-CHEK PRO
MODEL # GC3000
VER: GC3016###
HOLD BUTTON FOR MENU
ENTERING SETUP MODE
RELEASE POWER BUTTON
TOUCH BACK OF METER
TO SCROLL THROUGH
OPTIONS. PUSH BUTTON
TO SELECT.
MODE: NORMAL
DISPLAY UNITS
LANGUAGE: ENGLISH
EXIT
DO NOT SAVE - EXIT
SAVE CHANGES - EXIT
As shown at right, gently touch the back of
the Glass-Chek PRO to scroll through the
menu options. Touching the back of the meter
will advance the arrow to the next line. Do not
hit or tap the meter with excessive force.
Push the meter’s button to make a selection.
Figure 1
Page 1
netzerotools.com
netzerotools.com
In the Setup Mode menu, select the “LANGUAGE” option.
Touch the back of the meter to scroll through the available languages. Push the
button to select your desired language when it appears on the display. Save
your changes.
Once the meter’s language is changed, the menu will immediately change to the language selected. If you choose
the wrong language and can’t get back to your desired language, stop navigating the menu and allow the meter to automatically
power down after about a minute of inactivity. When the meter powers back up, it will display the previously selected language.
The following languages are available in the GC3000: English, German, French, Spanish (Latin America), Dutch and Italian.
Choose From Normal, High Resolution and Low-E Laminate Modes:
Mode 1: Normal resolution - slightly less accurate than High Resolution, but it enables the meter to take quicker measurements.
Mode 2: High Resolution - more accurate than normal resolution, but measurements take longer. Accuracy differences are
outlined in the Technical Details section.
Mode 3: PVB WITH LOW-E - Used to identify the location of a Low-E coating against the PVB inner layer of laminated glass
(see page 9).
To choose your mode: In the Setup Mode menu, select the “MODE” option. (Normal resolution is the factory default setting)
Touch the back of the meter to scroll between the “NORMAL,” “HIGH RES” and “PVB WITH LOW-E” options. Press the button
to select your desired mode. Save your changes when you exit the menu.
Choosing Your Display Units:
The GC3000 can display thickness measurements in various units. You also have the option of rounding measurements
to the nearest “Glass Thickness Standard” (Refer to GC3000 Standards chart on page 9). To choose the display units
appropriate for your application, follow these steps:
In the Setup Mode menu, select the “DISPLAY UNITS” option. The following sub-menu will be displayed:
First, select the “DIMENSIONS” option. This option will determine whether your meter will display measurements in millimeters
or inches. Touch the back of the meter to find your desired setting. Push the button to select it.
Next, determine whether you want the meter to: 1.) round measurements to the nearest Standard, 2.) display the actual
dimensions or 3.) display both standard and actual. For more information about rounding to Standards, see the “GC3000
Standards Table” in this manual. To turn Standard rounding on or off, select the “STANDARD” option. If your dimensions are set
to inches, you will have the options: FRACTION, DECIMAL or OFF. If your dimensions are set to millimeters, you will have the
options: ON or OFF. Touch the back of the meter to find your desired setting and push the button to select it. PLEASE NOTE, if
the STANDARD option is selected in inches, the glass thickness designations will always be shown in fractions. If decimal
inches are chosen, only the air space thickness and overall IG unit thickness will be shown in decimal inches.
Next, choose your ACTUAL setting. If this setting is activated, your meter will display actual dimensions without rounding. If
your dimensions are set to inches, you will have the options: FRACTION, DECIMAL or OFF. If your dimensions are set to
millimeters, you will have the options: ON or OFF. Touch the back of the meter to find your desired setting and push the button
to select it.
NOTE: STANDARD and ACTUAL cannot both be set to OFF. If they are both activated, the measurements will alternate on the
screen after a measurement has been taken. For an illustration of this feature, see the “Measurement Examples” section.
When you exit the Display Units menu, the meter will show an example of what a reading will look like according to your
selections. This will help you determine whether you chose the correct options. Push the button to exit the example display.
WARNING:
Choose Your Language in Setup Mode
MODE: NORMAL
DISPLAY UNITS
LANGUAGE: ENGLISH
EXIT
LANGUAGE: ENGLISH
MODE: NORMAL
DISPLAY UNITS
LANGUAGE: ENGLISH
EXIT
MODE: NORMAL
DISPLAY UNITS
LANGUAGE: ENGLISH
EXIT
MODE: NORMAL MODE: HIGH RES. MODE: PVB WITH LOW-E
DIMENSIONS: INCH
STANDARD: OFF
ACTUAL: DECIMAL
EXIT & SHOW EXAMPLE
Display Units
Sub-Menu
Page 2
netzerotools.com
netzerotools.com
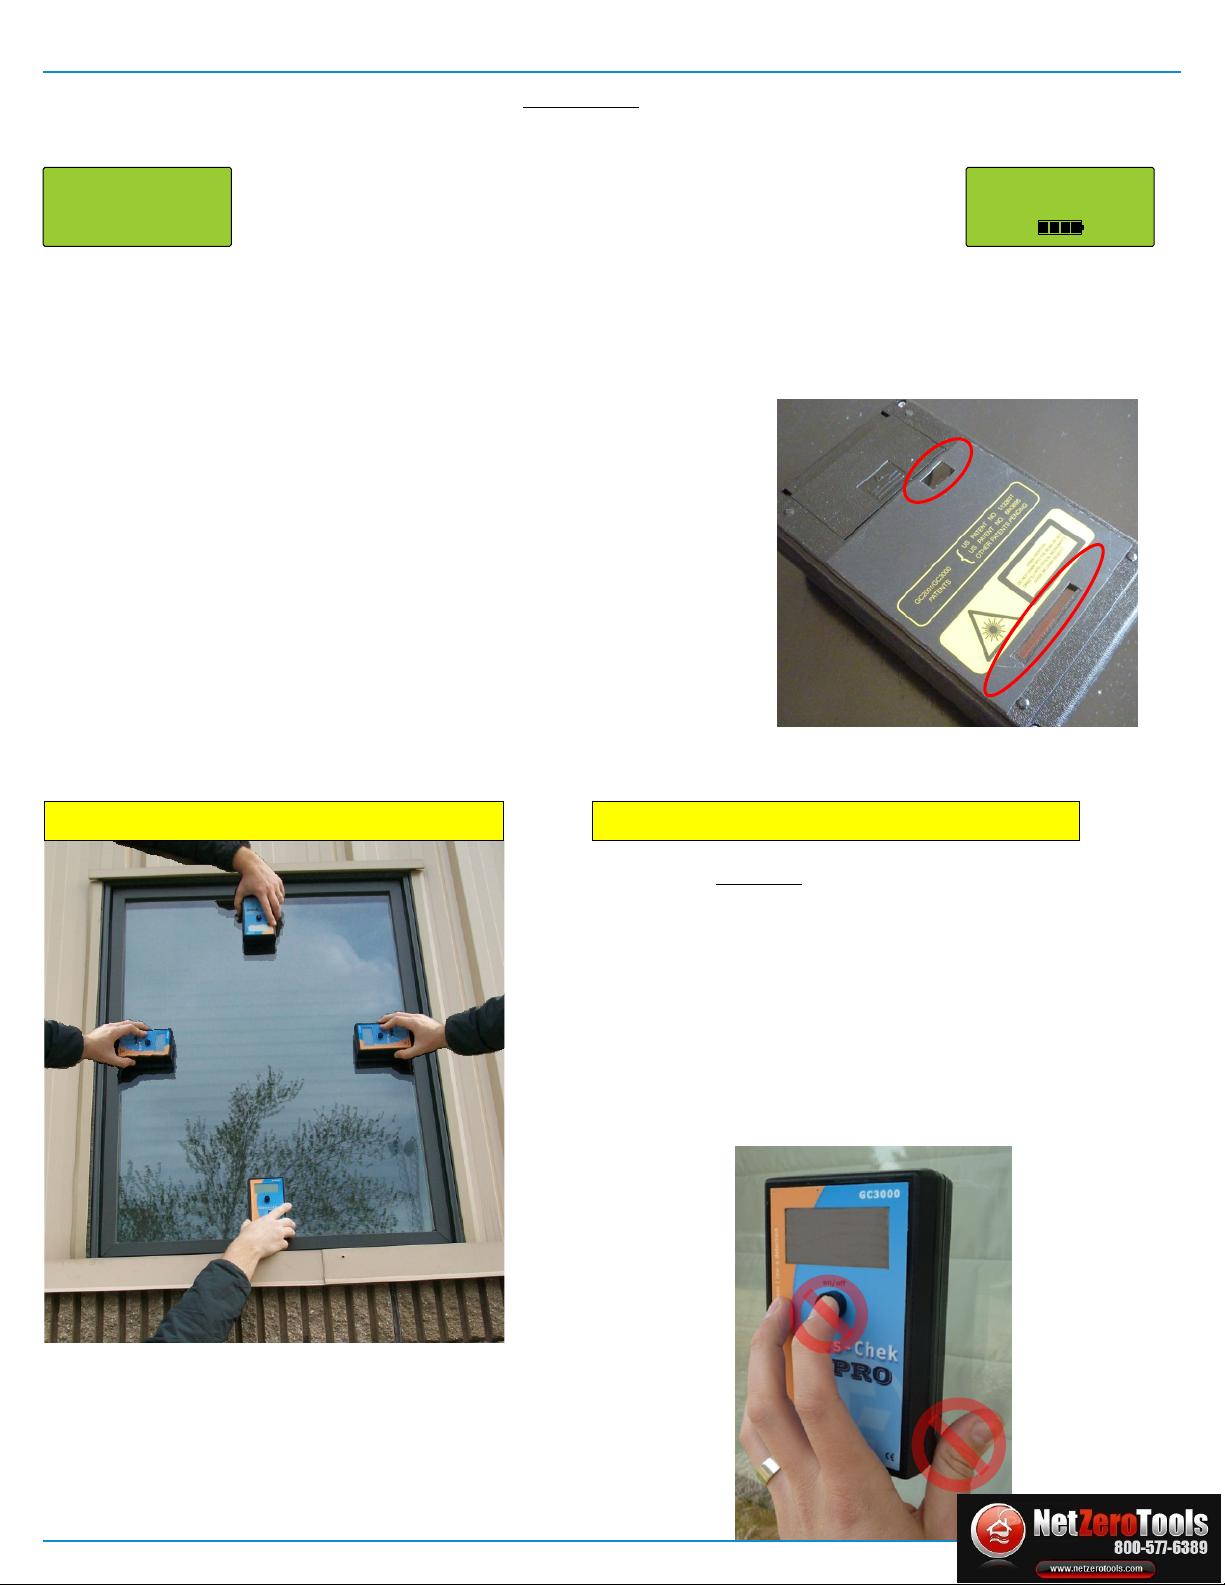
Proper Operation of the Glass-Chek PRO Page 3
Place the meter on the window to be tested. Press and release the button to turn the meter on and take a measurement.
As the initial message (below at left) is displayed, the meter is already taking a reading. Do not hold the button down, as
this will cause you to enter setup mode.
In all other instances, the meter will indicate it is taking a reading with the
“TAKING READING” message displayed at right. The “TAKING READING”
screen also indicates the amount of voltage remaining in your battery.
Continuing to hold the button down at this time will turn the meter off.
Turning The Meter Off
Hold the button down for several seconds to turn off the meter. A message will display on the screen notifying you that the
meter is about to power down. Continue holding the button down until the screen goes blank. If the meter is left unused
for a period of time, the unit will automatically shut off. To conserve battery life, it is recommended to turn the meter off
manually when you are finished using it.
Guidelines For Most Accurate Results:
•Hold the meter steady and flat against the test surface during measurement
•Do not touch the glass with your hand while taking the reading
•Take readings at the bottom center of the window for best thickness
accuracy (see explanation below)
•Take multiple readings to verify results
•Make sure the window being measured is clean
•Make sure the two lenses on the back of the GC3000 are clean
Use only clean compressed air to clean the lenses. Only use a lint
free cloth if absolutely necessary to clean smudges, fingerprints, etc.
•Make sure nothing is touching the far side surface of the window during the
reading
•It is best to test windows in free air (not resting on a tabletop surface)
TAKING READING
Above: Back of GC3000 meter with the two lenses
circled. Use clean compressed air to clean the
lenses.
GLASS-CHEK PRO
MODEL # GC3000
VER: GC3016###
HOLD BUTTON FOR MENU
At Right: Incorrect placement for accurate results.
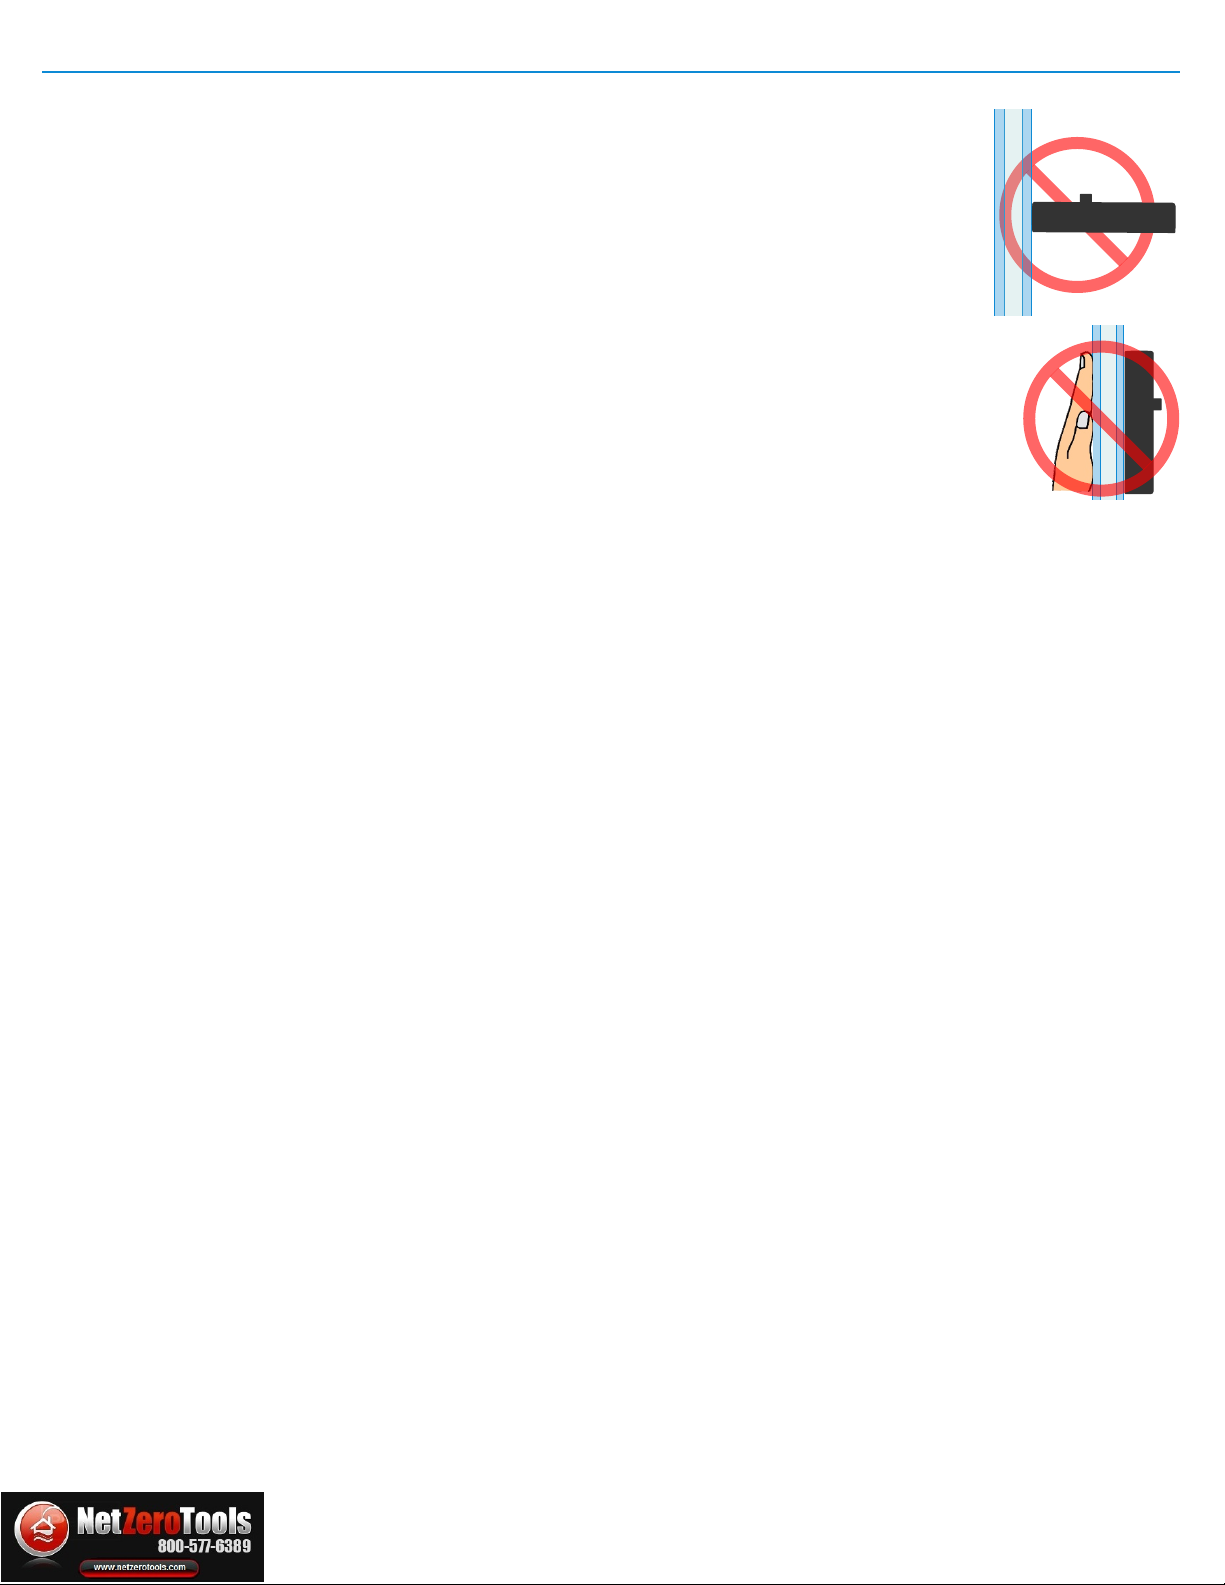
• DO NOT hold the button down while taking a measurement. This will cause
the meter to turn off. Rest your index finger next to the button as shown above.
• DO NOT touch the glass with your hand while taking readings. The picture at
right shows the user’s thumb resting on the window while taking a reading. This
could cause incorrect results for the low-E measurement.
4 OPTIMAL TEST LOCATIONS FOR MOST ACCURATE RESULTS
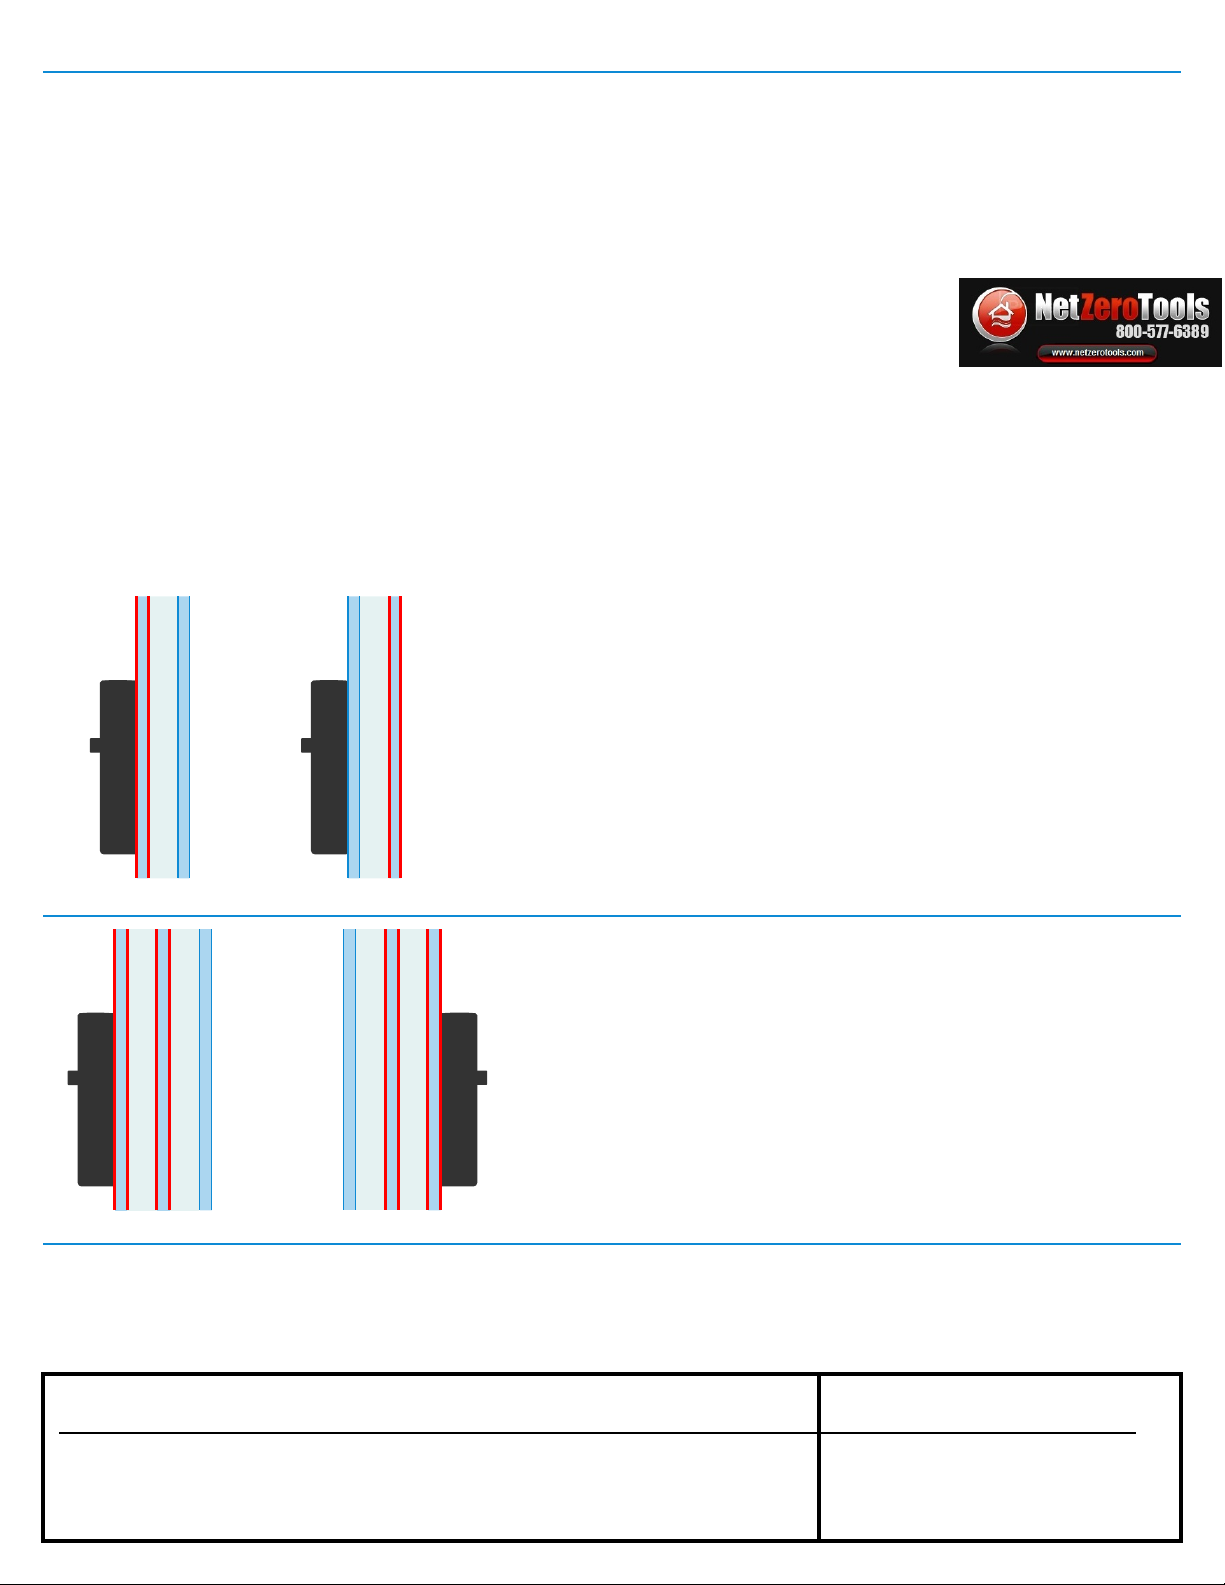
At Left: Recommended placement of meter:
• Hold the meter steady AND FLAT against the glass during measurement.
• The meter should be centered on one of the four edges of the window with the
bottom edge of the meter placed parallel to the edge of the window (please see
the image to the left). This will minimize the effect of a concave window. As you
move away from the edge of a window, many windows will bow inward (concave).
Because the sensor runs parallel to the bottom edge of the meter, it is important to
place the bottom edge of the meter along the edge of the window as shown.
• DO NOT touch the glass with your hand while taking readings. Note the hand
placement used in the picture at left. The user’s thumb is resting on the GC3000
without touching the glass being measured. Also, be sure there are no other
metallic objects touching the glass
• DO NOT hold down the button while taking a reading.
• Place your index finger next to the button as shown at left.
netzerotools.com
netzerotools.com
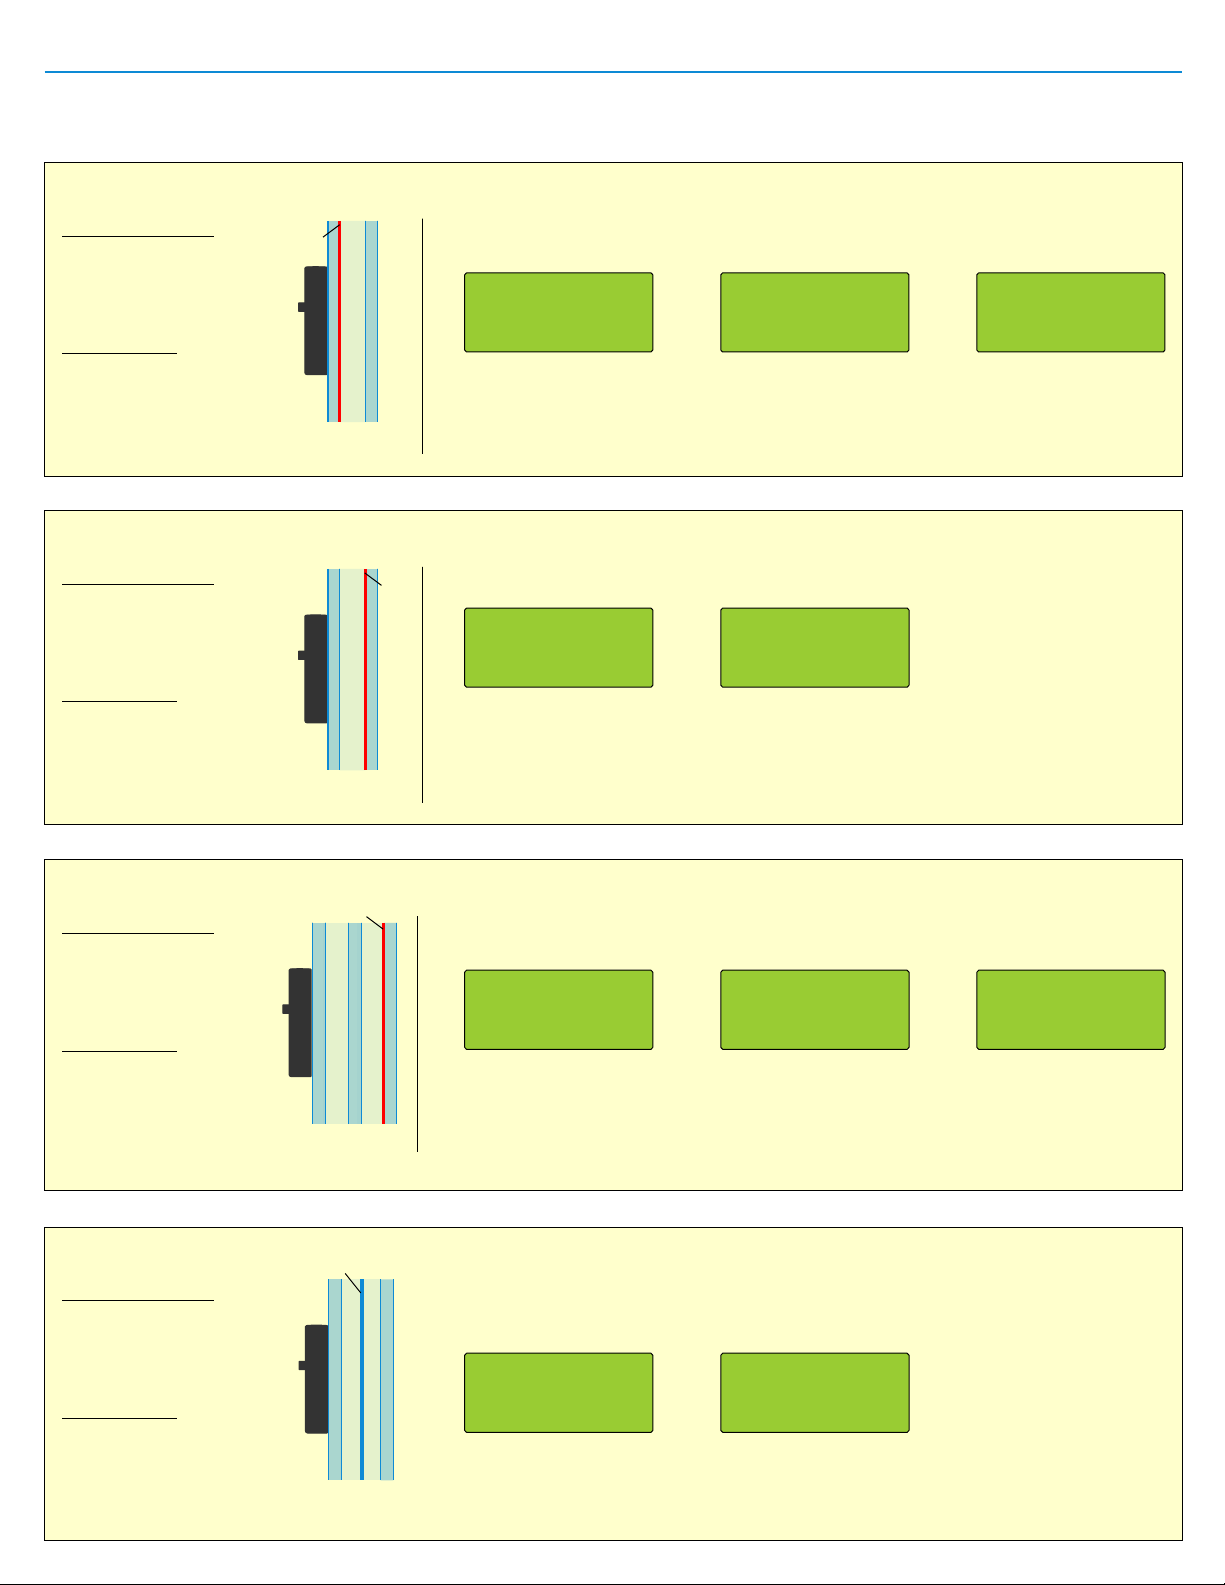
Explanation of Measurement Displays Page 4
The Glass-Chek Pro offers various display formats. The following illustrations are examples of measurement displays with
explanations of the application being tested and how the display format was configured.
Display Format
• Dimensions: Inch
• Standard: Fraction
• Actual: Decimal
Application
• Double pane window
• Soft Coat Low-E on
surface 2
Display Format
• Dimensions: Inch
• Standard: Fraction
• Actual: Decimal
Application
• Triple pane window
• Low-E on surface 5
Display Format
• Dimensions: MM
• Standard: OFF
• Actual: ON
Application
• Double Pane Window
• No Low-E Coating
• Suspended Film
between panes
Display Format
• Dimensions: MM
• Standard: ON
• Actual: OFF
Application
• Double pane window
• Hard Coat Low-E on
surface 3
Resulting Measurement Displays: Due to the application and display format,
the measurement will alternate the following three messages:
Resulting Measurement Displays: Due to the application and display format,
the measurement will alternate the following three messages:
Resulting Measurement Displays: Due to the application and display format,
the measurement will alternate the following 2 messages:
Resulting Measurement Displays: Due to the application and display format,
the measurement will alternate the following two messages:
Display 1 shows fractional inches rounded to the nearest standard. Display 2 shows the actual
measurements in decimal inches. Notice how the actual measurements in 2 are slightly different
than the measurements in 1 because Display 1 shows the readings rounded to the nearest
standard. Display 3 shows that the low-E coating is on surface 2, and it indicates that the coating
properties are soft coat and have the performance of double-silver Low-E.
Display 1 shows fractional inches rounded to the nearest standard. Display 2 shows the
actual measurements in decimal inches. Notice how the actual measurements in 2 are
slightly different than the measurements in 1 because Display 1 shows the readings rounded
to the nearest standard. Display 3 shows that the meter did not detect a low-E coating on
pane 1 or pane 2. Since the GC3000 only detects coatings on the first 2 panes, you may be
required to test both sides of a triple pane window to verify the presence of low-E.
Display 1 shows the actual dimensions of the window in millimeters. Since the “Standard”
setting is set to OFF, the standard dimensions are not displayed. The word “FILM” indicates
suspended film between the two panes of glass. Display 2 indicates both panes of glass are
“CLEAR” of any low-E coating, but there is a suspended film between the panes.
***Note*** On triple pane measurement displays, “G” = Glass and “A” = Air Space
Display 1 shows millimeters rounded to the nearest standard. Since the “Actual” setting is
set to OFF, there is no display showing the actual dimensions of the glass - only the
dimensions rounded to the nearest standard. Display 2 shows that the low-E coating is on
surface 3 or 4. This means that the meter is only indicating that the coating is on the
second pane of glass. To verify the exact location of the coating, the user must test the
window from the opposite side. The meter also indicates the coating is a hard coat low-E.
PANE 1: 1/8 STANDARD
AIR 1: 1/2
PANE 2: 1/8
TOTAL: 3/4 INCHES
PANE 1: 4 STANDARD
AIR 1: 16.0
PANE 2: 4
TOTAL: 24.0 MM
PANE 1: .123 ACTUAL
AIR 1: .50
PANE 2: .124
TOTAL: .747 INCHES
LOW-E SURFACE: 2
PROPERTIES: SOFT COAT
SILVER LAYERS: DOUBLE
PANE 1PANE 1
PANE 2PANE 2
AIR SPACE AIR SPACE SURFACE 2
SURFACE 3
Double Pane
Window
Triple Pane
Window
Double Pane
Window
Low-E
Low-E
Low-E
1)
1)
1)
1)
2)
2)
2)
2)
3)
3)
— Measurement Display Example One —
— Measurement Display Example Three —
— Measurement Display Example Four —
— Measurement Display Example Two —
LOW-E SURFACE: 3or4
PROPERTIES: HARD COAT
PANE 1
PANE 2
AIR SPACE 1
AIR SPACE 2
PANE 3
SURFACE 5
P1: 1/8 A1: 3/8
P2: 1/8 A2: 3/8
P3: 1/8 STANDARD
TOTAL: 1 1/8 INCHES
P1: .122 A1: .389
P2: .119 A2: .383
P3: .119 ACTUAL
TOTAL: 1.132 INCHES
CLEAR GLASS
CLEAR GLASS
SUSPENDED FILM
P1: 3.2 A1: 11.1
G2: FILM A2: 11.0
P3: 3.1 ACTUAL
TOTAL: 28.9 MM
Double Pane with
Suspended Film
Suspended
Film
PANE 1
AIR SPACE 1
AIR SPACE 2
PANE 2
netzerotools.com
netzerotools.com

Explanation of Error Messages Page 5
This error indicates a problem with the measurement. Be sure
you are following the guidelines for most accurate results outlined
on Page 3, and attempt to take the reading again.
If the window area under test is excessively dirty or contaminated,
the Glass-Chek PRO may give improper thickness or low-E
results or issue an error message. The window area under test
must be CLEAN as well as the lenses on the back of the meter.
Clean the lenses on the back of the GC3000 with compressed air.
Use a lint-free cloth if absolutely necessary to clean smudges,
fingerprints, etc.
LOW BATTERY
REPLACE SOON
REPLACE BATTERY NOW
GC3000 WILL POWER
DOWN IN:
GLASS EXCEEDS LOW-E
RANGE: GLASS IS
TOO THICK
MEASUREMENT ERROR: 1
CLEAN, MOVE & RETEST
PRESS BUTTON TO TAKE
NEW READING
RECAL. UNIT:
EXCESS LIGHT: MOVE
TO OPPOSITE SIDE
USER SELECTIONS WERE
RESET. THE DISPLAY
TYPE MUST BE RESET AT
NEXT POWER UP
ENSURE GLASS AND
METER ARE CLEAN.
TEST AGAIN TO VERIFY
READING.
Error Messages: Explanations:
The Glass-Chek PRO uses a light/laser beam to measure the thickness
of the glass and air space. The unit may be affected by extremely bright
lights or facing the sun directly. The screen will display this error
message if this condition occurs. Simply move to a different location,
go to the other side of the window, or shade the laser aperture. If the
window is operable you may be able open the window and reach
through the opening to block the incident light from the back side of the
meter.
This error message indicates that your application is most likely out of the maximum thickness range
for low-E measurement. See the “Specifications” section of this manual for more details on the
GC3000’s maximum thickness ranges.
On rare occasions, the user settings (determined in setup mode) will reset to the factory default.
Follow the directions on Page 1: “Using Setup Mode” to re-select your user settings.
This message means your Glass-Chek PRO must be re-calibrated. Please contact us prior to
sending your meter for re-calibration to receive a RMA# (Return Merchandise Auhtorization).
International Users: When returning equipment for repair, recalibration, or simply returning
product, the customer must clearly state on the commercial invoice that the product is being returned
for repair. The commercial invoice must also clearly state that the invoice is for "CUSTOMS
PURPOSES ONLY", and that the goods have "NO COMMERCIAL VALUE". If you must put a commercial value on the
products, place $1 or $10 value on it so there will be no customs impact. Please note that EDTM will not be responsible
for any customs or government processing fees. Any amount that EDTM is charged for receiving the goods, will be added
to the cost of the repair.
Battery and replacement: The GC3000 meter is powered by a 9-volt alkaline battery. When the
battery is starting to get low, an error message will appear that recommends replacing the battery soon.
This gives the user plenty of warning that a battery replacement is needed, and the meter will still function
for a period after this initial warning. Once the battery voltage gets below a dangerous level that could
impact the performance of the instrument, an error message appears that tells you to replace the battery
immediately. The instrument will NOT be able to take measurements once it reaches this level.
Please remember to ALWAYS replace the battery with a 9-volt ALKALINE battery.
UNABLE TO TAKE
READING
If you are having difficulty obtaining an accurate reading, please follow the corrective action steps
outlined in the Troubleshooting Guide on Page 6.
Important Safety Consideration:
The GLASS-CHEK family of glass thickness and air space meters use a Class 2M
laser to take its measurements. Do NOT push the power button and point the
instrument laser at a persons’ eyes. Always check the other side of the window
being tested to ensure that no one will be looking directly into the laser.
netzerotools.com
netzerotools.com
Troubleshooting Guide Page 6
If you are having difficulty obtaining an accurate reading, please follow these steps:
1)
manual.
2) Ensure that the Glass-Chek PRO is placed flat against the glass surface and that you are testing
at one of the four optimal locations detailed on Page 3. The meter must be used with the surface
opposite the Power button against the window. Using the small end surface of the unit or tilting the
unit away from the surface will give improper results.
3) Clean the glass surface or move to a cleaner area of the glass.
4) Remove dust particles from the two lenses on the back of the Glass-Chek PRO.
To clean the lenses: WE STRONGLY RECOMMEND USING CLEAN COMPRESSED AIR ONLY TO
CLEAN THE LENSES. However, if there are fingerprints or other smudge marks on the lenses that can
not be removed in any other way, a lint free cloth can be used to wipe off the smudges.
5) Check that the two window surfaces are relatively parallel to each other and the Glass-Chek PRO unit.
6) If only a partial reading occurs, move to another location on the glass or take a reading from the other side.
7) Be sure nothing is touching the glass while taking readings. Placing your hand or a metallic object against the lite of
glass you are testing may cause the Glass-Chek PRO to yield improper Low E results. Remove your hand or object. Do
not touch any part of the glass with your hand while taking readings.
8) Verify the operating temperature range
For operating in cold temperatures:
1) Keep the unit in a warmer environment until you are ready to take the readings. The meter will record accurate
readings until the point the electronics reach the temperature below the operating range. Depending on the degree of
coldness, this will allow for several readings to be taken.
2) Carry the meter in your pocket or in some other manner which will keep the unit near a warmer temp.
3) When temperature is only slightly below the temperature range, operate the unit several times repeatedly in attempt to
warm up the laser.
For operating in hot temperatures:
Keep the unit in a cooler environment until you are ready to take the readings. The meter will record accurate readings
until the point the electronics reach the temperature above the operating range. Depending on the degree of heat, this will
allow for several readings to be taken.
If measurements seem to take a long time:
The amount of time it takes the GC3000 to complete a measurement will vary by application. This does not mean your
meter is defective, it simply takes varying amounts of time depending on the application. Be sure to hold the meter steady
against the window until the results are displayed.
Be sure you are following the guidelines for most accurate results outlined on Page 3 of this
netzerotools.com
netzerotools.com
Glass-Chek PRO Application Details Page 7
Will Test:
• Flat glass applications
• Clear glass or glass with low-E coatings, self-clean coatings or other specialty coatings as long
as the glass/coating is transparent
• Laminated glass with low-E coatings positioned against the laminate (see page 9)
• Tinted glass as long as it has a visible light transmission value of approximately 35% or above
Will Not Test:
• Glass coated with reflective (mirror-like) coatings
• Tinted glass with visible light transmission value at approximately 35% or below
Double Pane Windows
The GC3000 will specify if the coating is located on Surface 1,
Surface 2, or Surface 3or4. By moving to the other side of the
window, the meter can differentiate between surface 3 and 4.
Triple Pane Windows
The GC3000 will specify if the coating is located on Surface 1,
Surface 2, or Surface 3or4. By moving to the other side of the
window, the meter can specify Surface 5 and Surface 6. The
GC3000 detects the presence of low-E coatings on the inner
pane of a triple pane unit, but it will not specify which surface the
coating is on. If there are multiple low-E coatings, the GC3000
will only identify the nearest coating.
Low-E Detection Capabilities
The electronics that detect the presence of the Low-E coatings are impacted by the surroundings of the meter. This has
been explained previously in the manual by showing proper hand placement on the meter and positioning of the glass
when testing. The Low-E detection circuitry is affected by conductive materials that are detected by the meter.
Conductive materials could include the metal spacer in the window or muntin bars (grid) inside the window itself, just to
name a few. Keeping the meter at least 2 inches away from any metal/conductive material when taking measurements
will result in the most accurate Low-E measurements.
The GC3000 detects the presence and location of low-E coatings on the following applications:
PANE 1
PANE 2
AIR SPACE 1
AIR SPACE 2
PANE 3
Triple Pane Window
SURFACE 1
SURFACE 2
PANE 1
PANE 2
AIR SPACE 1
AIR SPACE 2
PANE 3
Triple Pane Window
SURFACE 5
SURFACE 6
PANE 1
PANE 2
AIR SPACE
SURFACE 1
SURFACE 2
Double Pane Window
PANE 1
PANE 2
AIR SPACE
SURFACE 1
SURFACE 2
Double Pane Window
Identifying the type of low-E:
In addition to identifying the location of low-E coatings, the GC3000 determines the type of low-E on your glass application.
The meter will specify it as “hard coat” or “soft coat.” If soft coat, the meter will also specify the number of silver-layers as
single, double, or triple, based on the coating’s energy performance. If you happen to know the manufacturer of the glass, in
many cases you can identify the exact type of low-E coating used to make the window. Here are some examples:
SOFT COAT (sputtered)
Triple Silver Double Silver Single Silver
-Cardinal 366 -Cardinal 270 & 272 -Cardinal 179 -Pilkington Energy Advantage
-PPG SolarBan 70 -PPG SolarBan 60 -PPG Sungate 100 -PPG Sungate 500
-AFG TIPS, TIR, & TIAC -Guardian ClimaGuard 75/68 -AFG Comfort E2
-Guardian ClimaGuard 71/38
HARD COAT (pyrolytic)
netzerotools.com
netzerotools.com
Glass-Chek Pro Application Details Page 8
Glass Thickness Range
• Minimum Glass Thickness Allowed: 0.080 inch or 2.0mm
• Minimum Air Space Allowed: 0.187 inch or 4.7mm
• Glass Thickness Allowed for Low-E readings: up to 0.5 inch or 12.7mm
Triple Pane Windows
The GC3000 will display the thickness of each pane of glass, the thickness of each air space, and the
total IG thickness. Depending on the thickness of the glass, the maximum allowable range for the total
IG thickness changes according to the data below:
Double Pane Windows (Including windows with suspended film)
The GC3000 will display the thickness of each pane of glass, the thickness of each air
space, and the total IG thickness. Depending on the thickness of the glass, the
maximum thickness range for the total IG thickness changes according to the data
below. **Note** these same dimensions apply when measuring a double pane window
with suspended film.
Single Pane Glass
The GC3000 will display the
thickness of single panes of glass
up to 2.75 inches or 70mm thick.
Laminated Glass
The GC3000 will measure the overall thickness as
long as there is no low-E coating against the laminate
inner-layer. The laminate assembly can be a single
piece or combined into an insulating unit. The
GC3000 will NOT measure the PVB inner-layer or the
individual pieces of glass making up the laminated
glass; it will simply give the overall thickness of the
laminated piece.
PANE 1
PANE 1
GLASS
PANE 1
SINGLE LITE GLASS
PANE 2
SUSPENDED FILM
PVB LAYER
PANE 2
AIR SPACE 1
AIR SPACE 1
AIR SPACE 1 AIR SPACE 2
AIR SPACE 2
PANE 3
PANE 2
GLASS
3/32” or 2.5mm
5/32” or 4mm
1/4” or 6mm
1/2” or 12mm
1.9” or 48mm
2.0” or 50mm
2.1” or 53mm
2.5” or 63mm
Glass Thickness Maximum Overall Thickness Range
3/32” or 2.5mm
1/4” or 6mm
1/2” or 12mm
1.9” or 48mm
2.0” or 50mm
2.2” or 55mm
Glass Thickness Maximum Overall Thickness Range
• Power Source:
• Physical Dimensions:
• Weight:
• Maximum Laser Output:
• Laser Wavelength:
• Storage Temperature:
• Operating Temperature:
• Display:
• Accuracy:
Low Resolution Mode (Default)
Pane 1: 0.008 inch (0.2mm)
Air Space: 0.012 inch (0.3mm)
Pane 2: 0.012 inch (0.3mm)
9 volt alkaline battery (NEDA 1604A) only
3.5” x 5.5” x 1.7 inch (89 x 140 x 43mm)
0.75 pounds
<1mW (2M laser product)
650 - 680 nm
-10 to +60 degrees Celsius
0 to +40 degrees Celsius
4 Lines x 20 Characters
Hi Resolution Mode
Pane 1: 0.004 inch (0.1mm)
Air Space: 0.012 inch (0.3mm)
Pane 2: 0.006 inch (0.15mm)
This product complies with IEC 60825-1 and FDA regulation 21 CFR 1040.10. The thickness tolerance is calibrated to NIST traceable
standard No. 821/268634-03.
Specifications
netzerotools.com
netzerotools.com
Page 9
GC3000 Warranty
The manufacturer warrants all models of the GC3000 to be free from defects in material and workmanship under normal use and service as specified within the
operator's manual. The manufacturer shall repair or replace the unit within twelve (12) months from the original date of shipment after the unit is returned to the
manufacturers factory, prepaid by the user, and the unit is disclosed to the manufacturers satisfaction, to be thus defective. This warranty shall not apply to any
unit that has been repaired or altered other than by the manufacturer. The aforementioned provisions do not extend the original warranty period of the unit which
has been repaired or replaced by the manufacturer. Batteries are not covered by warranty.
EDTM, Inc. assumes no liability for the consequential damages of any kind through the use or misuse of the GC3000 product by the purchaser or others. No
other obligations or liabilities are expressed or implied. All damage or liability claims will be limited to an amount equal to the sale price of the GC3000, as
established by EDTM, Inc.
Application Details: PVB WITH LOW-E Mode (Laminated glass with Low-E)
GC3000 Standards Table
GC3000 Standards - Tolerance Specifications for Flat Glass
Based on the American Society for Testing and Materials (ASTM) Standards
When operating the GC3000 in “STANDARD” mode, the measurements will be rounded to the nearest standard according
to the table below:
Tolerance
Traditional Designation mm inches
Designation mm inches min max min max
3/32 in. (single) 2.5 0.09 2.16 2.57 0.085 0.101
1/8 in. (double) 3 0.12 2.92 3.40 0.115 0.134
5/32 in. 4 0.16 3.78 4.19 0.149 0.165
3/16 in. 5 0.19 4.57 5.05 0.180 0.199
1/4 in. 6 0.23 5.56 6.20 0.219 0.244
5/16 in. 8 0.32 7.42 8.43 0.292 0.332
3/8 in. 10 0.39 9.02 10.31 0.355 0.406
1/2 in. 12 0.50 11.91 13.49 0.469 0.531
LAMINATED PANE 1 (0.124”)
LAMINATED PANE 2 (0.124”)
AIR SPACE (0.5”)
WINDOW PANE 2 (0.124”)
PANE 1: .283 ACTUAL
AIR 1: .500
PANE 2: .124
TOTAL: .907 INCHES
PANE 1: .159 ACTUAL
PVB W/ LOW-E
PANE 2: .124
TOTAL: .283 INCHES
LOW-E SURFACE: 2 OR 3
PROPERTIES: SOFT COAT
SILVER LAYERS: DOUBLE
1) 2) 3)
Laminated Glass
Whole Window
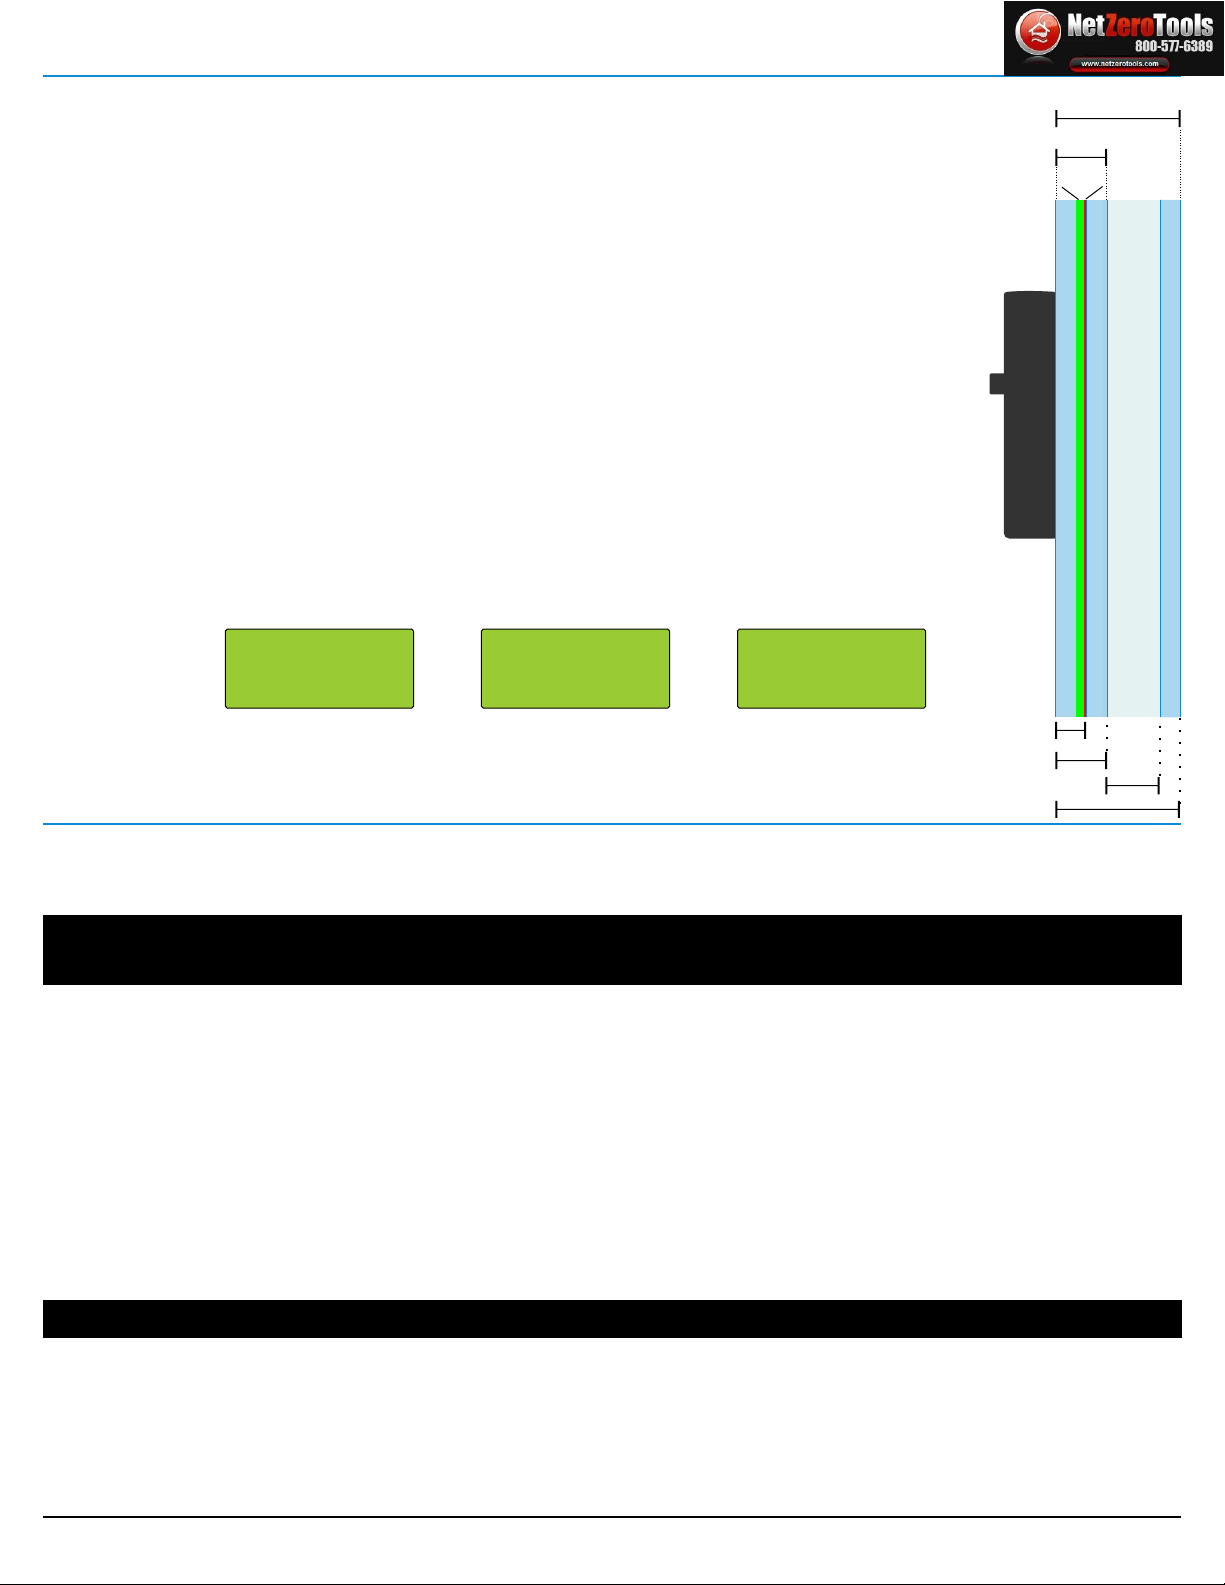
Pane 1 (0.124”) + PVB Layer (0.035”) = 0.159” on near side of coating (Screen 2 Line 1)
Pane 1 (0.124”) + PVB Layer (0.035”) + Pane 2 (0.124”) = 0.283” total laminated glass thickness (Screen 1 Line 1 and Screen 2 Line 4)
Air Space Thickness (.500”) (Screen 1 Line 2)
Glass Surface # 1 23456
Total Window Thickness (0.907”) (Screen 1 Line 4)
When working with laminated glass that has a low e coating placed against the PVB inner-layer, the Glass-
Chek PRO is capable of helping you identify which surface has the low-E coating. To perform this function, the
meter must be switched into “PVB WITH LOW-E” mode (see page 2).
When testing laminated glass with Low-E, the meter will test laminated pieces of glass alone, and it will also
test laminated low-E glass that has been built into a double pane window assembly. For double pane window
assemblies, the GC3000 meter must be placed against the side of the window that contains the laminated low-
E piece of glass. The first screen that appears will show the thickness of the overall laminated piece of glass,
the air space, the second pane of glass thickness, and also the overall thickness of the double pane window
assembly. The second screen will show the make-up of the laminated low-e piece of glass. The meter has
been designed to add the thickness of the PVB layer to the thickness of the glass that contains no low-E
coating. For the piece of glass coated with low-E, the meter will display the actual thickness of the glass itself.
This means that the piece of glass that has an abnormal (larger) glass thickness (caused by adding
the PVB layer thickness to the glass thickness) will be the pane that is clear of any low-E coating.
The piece of glass that is displayed as a “normal” thickness (0.124” for example) is the pane that has
the low-E coating on it.
The display examples below correspond with how the meter would read the example at right. Screen 1
displays the thickness of the entire window. The “PANE 1” result on the first screen refers to the thickness of
the laminated low-E glass assembly. Screen 2 displays the details of the laminated low-E glass assembly only.
Screen 3 confirms the presence of a low-E coating and displays the type of Low-E.
The “normal” thickness of .124” (Screen 2 / Line 3) indicates the low-E coating is on the 2nd pane (surface 3) of
the laminated portion of the window.
PVB Layer
(.035”)
Low-E
netzerotools.com
netzerotools.com
This manual suits for next models
1
Table of contents
Other EDTM Measuring Instrument manuals


Popular Measuring Instrument manuals by other brands


PCB Piezotronics
PCB Piezotronics 333B55 Installation and operating manual

Extech Instruments
Extech Instruments PH210 user guide

ColorLite
ColorLite ColorCube quick start guide

Tektronix
Tektronix MTS415 user manual

AEMC instruments
AEMC instruments 6527 user manual

Xylem
Xylem WTW Multi 9430 operating manual


