EKSA E910 User manual

5.8GHz Wireless
Gaming Headset
E910
User Manual

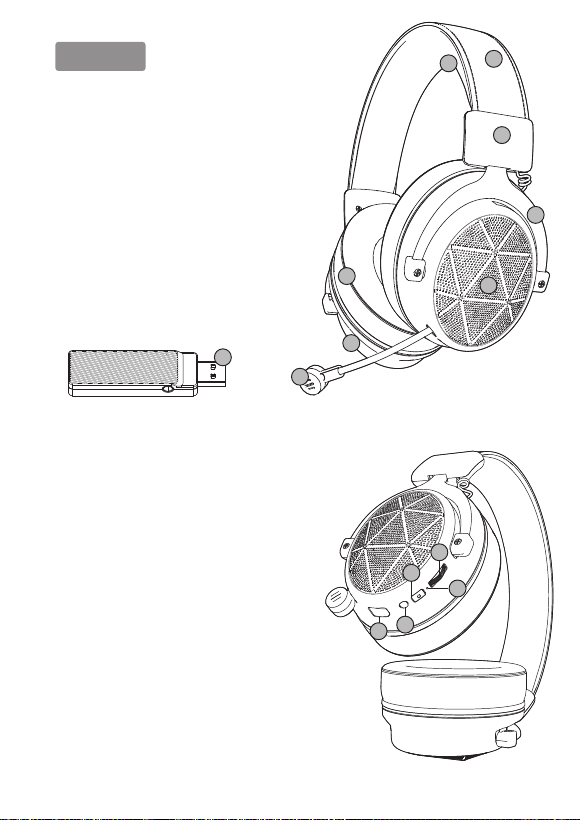
11, Headband: PU Leather + Stainless Steel
2, Head Clip: ABS
3, Fork: Aluminum Alloy
4, Shell: ABS
5, Stretchable Mic: ABS
6, Earmuffs: PU Leather Memory Foam
7, LED Light: Red EKSA Logo
8, Headbeam: Protein Leather Memory Foam
9, 5.8GHz USB Dongle
1
2
3
4
5
67
8
9
11
13
14
12
10
Overviews:
10, Volume Control Wheel: Volume Up/Down
11, LED Indicator
12, Mic Mute Button
13, Power Button: Headphones on/Headphones off
14, Charging Port: Type C

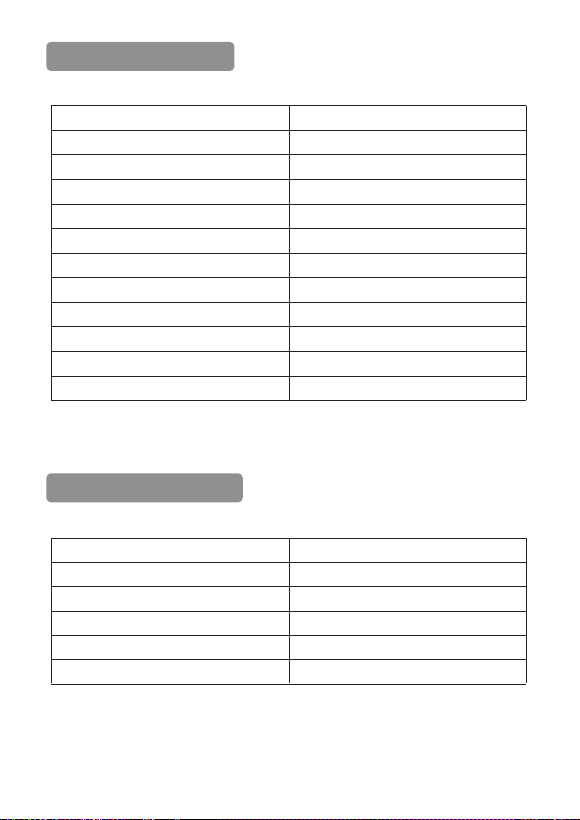
2Headphone Parameters:
USB Dongle Parameters:
Speaker Diameter
Signal Reception Strength
Signal Transmission Strength
Transmission Delay
Libattery Capacity
Charging Time
Working Time
Connection Status Standby Time
Off Status Standby Time
Working Voltage
Working Current
Charging Port
Φ50mm
-85dBm
3dBm
15 milliseconds
1200mA
about 4 hours
about 10 hours (at 70% Volume)about 200 hours
about 900 hours
DC 5V
100mA
Type C
Frequency
Signal Reception Strength
Signal Transmission Strength
Transmission Distance
Working Voltage
Working Current
5.8GHz
-85dBm
8dBm
15m/49ft (360°)
DC 5V
68mA

3Speaker Parameters:
Microphone Parameters:
Package Includes:
1* EKSA E910 Wireless Gaming Headset
1* 5.8G USB Dongle
1* 3.5mm Audio Cable
1* Leather Carry Pouch
1* Type C Charging Cable
1* User Manual
Speaker Diameter
Frequency Response
Speaker Sensitivity
Speaker Impedance
Standard Input Power
Max Input Power
Φ50mm Neodymium Driver
20Hz -20KHz
115dB ± 3dB
32Ω±15%
10mW
20mW
Working Voltage
Output Sound Pressure
Frequency Response
Microphone Directivity
3.2V-4.2V
-42±3dB
50Hz -10KHz
Unidirectional

4Key Descriptions:
1)Volume Control Wheel:
In the music or call status, the volume of dialing "+" will increase, and the volume of
dialing "-" will decrease;
2)LED Indicator:
a, Blue light flashes slowly, in Searching Signal status;
b, Blue light always on, in Connected status;
c, Red light always on, in Charging status;
d, Red light off, in Fully Charged status;
3)Mic Mute Button:
Shortly press the " " button to turn off the microphone, and headphones accompanied
by a "microphone off" prompt;
Press the " " button again to turn on the microphone, and headphones accompanied by
a "microphone on" prompt;
4)Power Button:
Press the “ ” button for 2-3 seconds to turn on the headphone, and accompanied by a
"Power on" prompt, the Blue light flash slowly; Press again the “ ” button for 2-3
seconds to turn off the headphone, and accompanied by a "Power off" prompt, the Blue
light off;
( Note 1: In the music or gaming status, shortly press the “ ” button, the Surround Sound
will turn on/off;
Note 2: If you hear a beep from the headset, it means that the battery is low, and the
headset will shut down in 20 minutes. You need to charge it; )

5How to Use?
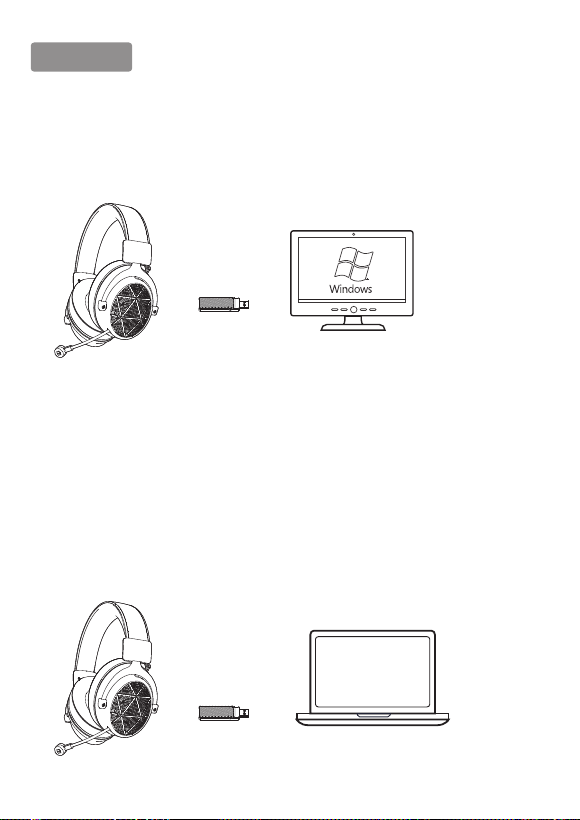
1, Usage on Windows 7/8/10 PC
Plug the 5.8G USB Dongle into any USB ports that can work normally on PC. The headset will
automatically paired when it is turned on. Then you can use it without installing any
drivers.
2, Usage on Laptop
Step 1:
1. Insert the 5.8G USB Dongle into the USB port on the Laptop;
2. Open your ''Sound'' settings from ''Control Panel'' and select ''Hardware and Sound'' and
then select ''Sound''. (You can also right-click your sound icon on the system tray and select
Playback devices).
Step 2:
In the Playback tab, select ''USB Audio Devices'' from the list and click ''Set as Default Device''.

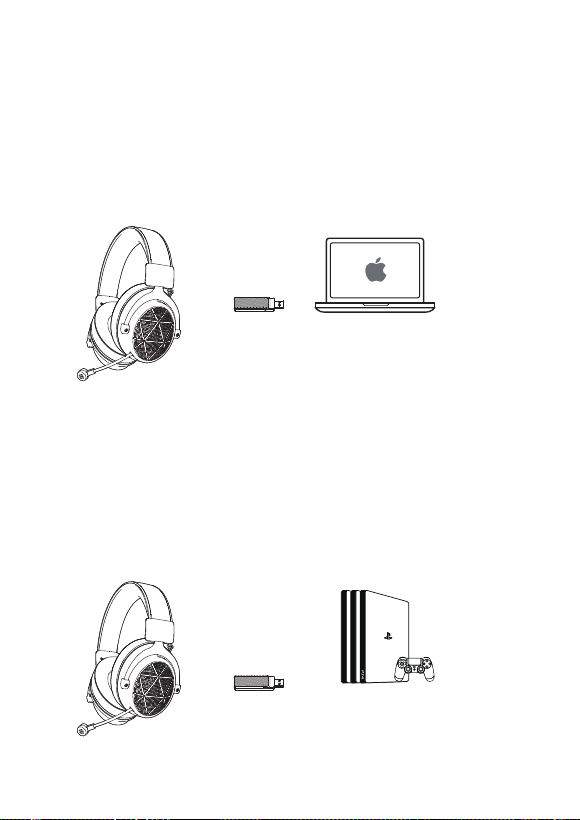
63, Usage on Mac/ Mac OS
Step 1, Insert the 5.8G USB Dongle into the USB port on Mac;
Step 2, In "System Preferences", click on the “Sound" icon;
Step 3, Click on the Input tab and select the “USB Audio Device" for default sound input;
Step 4, Click on the Output tab and select the “USB Audio Device" for default sound output;
4, Usage on PS4/PS5
Insert the 5.8G USB Dongle directly to the Playstation 4 Console and
follow these steps:
Step 1, Navigate to the Settings Menu and select it;
Step 2, Highlight the ''Devices '' menu option and select it;
Step 3, Scroll down to ''Audio Devices'' and select it;
Step 4, Choose ''Output to Headphones'' and select ''All Audio'';

7
TV
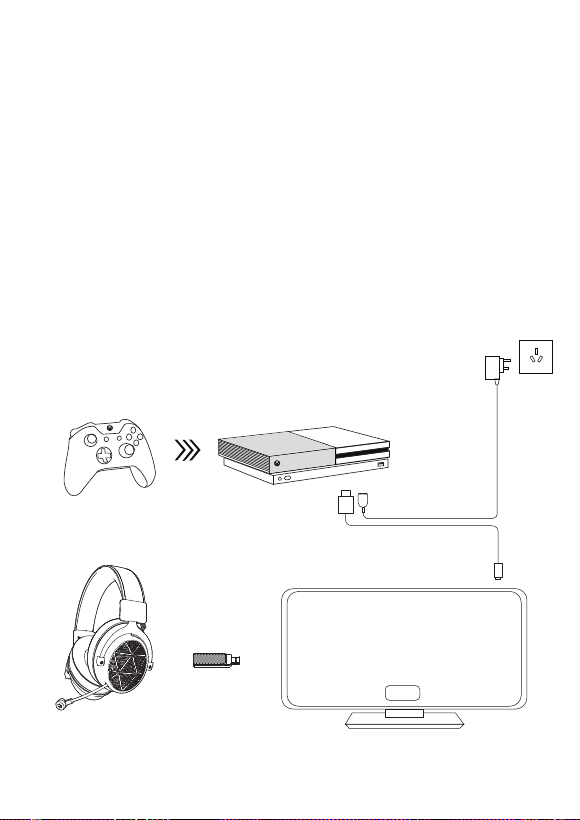
5, Usage on Xbox One (TV Mode)
Step 1, Power up the Xbox One console;
Step 2, Connect one side of the HDMI cable to “HDMI OUT TO TV” socket on Xbox One
console;
Step 3, Connect another side of the HDMI cable to TV;
Step 4, Turn on the TV power and switch the input mode to HDMI. Please make sure
the screen displays normally;
Step 5, Insert the 5.8G USB dongle to TV and play;
(Tips: Only suitable for the TV with USB 2.0 or USB 3.0 port!)
HDMI

86, Usage on Nintendo Switch (TV Mode)
Step 1, Open the back cover of the Nintendo Switch Dock;
Step 2, Connect the AC transformer to the top jack of Nintendo Switch Dock, and the
HDMI cable to the bottom jack. Close the back cover of the Nintendo Switch Dock;
Step 3, Connect the AC transformer to the outlet;
Step 4, Connect the HDMI cable to TV;
Step 5, Remove the left and right Joy-Cons from the console;
Step 6, Place the console in the center of the Nintendo Switch Dock and slowly
insert it from the top into the Nintendo Switch Dock. Once inserted to the bottom, the
console screen will disappear;
Step 7, Turn on the TV power and switch the input mode to HDM. Please make sure
the screen displays normally;
Step 8, Connect the 5.8G USB transmitter to TV and play;
(Tips: Only suitable for the TV with USB 2.0 or USB 3.0 port!)
TV

Vital Tips:
1, This wireless gaming headset is compatible with almost game devices, such as Win
7/8/10 PC, Xbox One, PS4/PS5, Nintendo Switch, Laptop, Mac/Mac OS, TV;
2, Please fully charge the headset before using it for the first time. And unplug the USB
charging cable immediately after fully charged;
3, Please make sure that the headset is off before charging it;
9After-Sales Service
Thank you for choosing EKSA, we hope you enjoy our products! If there is any questions
you can contact us via
HongKong Customer Center: +852 6940 4955
(Mon. to Fri. 9:00 a.m- 6:30 p.m, UTC+8 HKT)
India Customer Center: +91 8929 369 620
(Mon. to Fri. 9:30 a.m-5:30 p.m, IST)
Warm Notices
If you can’t connect the headset/headphones to your devices, please ask us for
complete FAQ guidance. You can find the solution finally;
Depending on your head/ear size/shape, it may be a little tight (feels like “on ear") for
someone to wear which is designed to avoid sound leakage. In case of that and to get
both audio and wearing comfort, please take off the headphone every 1~2 hours to get
your ears relaxed and protect them from the muggy environment in use;
Please read this User Manual carefully before using it, thank you!

E910
Manuale d’uso
5.8GHz cuffie
gaming wireless

10Archetto: pelle sintetica + acciaio inossidabile
Clip per la testa: ABS
Forcella: alluminio
Scocca: ABS
Microfono estendibile: ABS
Paraorecchie: memory foam in pelle sintetica
Luce Led: logo EKSA rosso
Archetto interno: memory foam in pelle vera
5,8 Ghzis ricevitore USB
1
2
3
4
5
67
8
9
11
13
14
12
10
Caratteristiche:
Rotella per il controllo del volume:
abbassa/alza il volume
Indicatore LED
Pulsante di disattivazione del microfono
Pulsante di accensione:
cuffie accese/cuffie spente
Porta di ricarica: tipo C

11Caratteristiche delle cuffie:
Caratteristiche ricevitore USB:
Frequenza
Potenza di recezione del segnale
Potenza di trasmissione del segnale
Distanza di trasmissione
Voltaggio utilizzato
Corrente utilizzato
5.8GHz
85dBm
8dBm
15m/49ft (360°)
DC 5V
68mA
Φ50mm
85dBm
3dBm
15 millesecodi
1200 mA
circa 4 ore
circa 10 ore (con volume al 70%)
circa 200 ore
circa 900 ore
DC 5V
100mA
tipo C
Diametro cuffie
Potenza di ricezione del segnale
Potenza di trasmissione del segnale
Ritardo di trasmissione
Capacità della batteria
Tempo di ricarica
Autonomia
Tempo in standby
Tempo di standby modalità spegnimento
Voltaggio utilizzato
Corrente utilizzata
Porta di ricarica

12Caratteristiche altoparlante:
Caratteristiche microfono:
Il pacco contiene:
1* EKSA E910 cuffie gaming wireless
1* Ricevitore USB 5.8G
1* Cavo audio da 3,5 mm
1* Custodia di trasporto in pelle
1* Cavo di ricarica tipo C
1* Manuale d’uso
Diametro altoparlante
Frequenza
Potenza altoparlante
Impedenza altoparlanti
Potenza di input standard
Potenza massima di input massima
Φ50mm Neodymium driver
20Hz -20KHz
115dB ± 3dB
32Ω±15%
10mW
20mW
Voltaggio utilizzato
Potenza sonora in uscita
Frequenza
Direzione del microfono
3.2V-4.2V
42±3dB
50Hz -10KHz
unidirezionale

13Descrizioni dei tasti
1)Rotella di controllo del volume:
durante l’ascolto di musica o in chiamata il volume aumenterà “+” o si abbasserà “-“
2)Indicatore LED:
a) la luce blu lampeggia lentamente quando è in cerca di collegamento,
b) la luce blu è sempre accesa quando il dispositivo è connesso,
c) la luce rossa è sempre accesa quando è in carica,
d) la luce rossa è spenta quando il dispositivo è completamente carico
3)Tasto di silenziamento microfono:
Premere brevemente " " per disattivare il microfono, le cuffie saranno accompagnate
da “microfono disattivato” nei comandi;
Premi ancora " " per attivare il microfono, le cuffie saranno accompagnate da
“microfono attivato” nei comandi.
4)Tasto di accensione:
Premi “ ” per 2-3 secondi per accendere le cuffie, la luce blu lampeggerà lentamente.
Premi “ ” per 2-3 secondi per spegnere le cuffie, la luce blu sarà spenta.
Nota 1: nello stato della musica o del gioco, premere brevemente il pulsante " ", il suono
surround si accenderà/spegnerà;
Nota 2: se si sente un segnale acustico dall'auricolare, significa che la batteria è scarica
e l'auricolare si spegnerà entro 20 minuti. Devi caricarlo;

14Come usarle?
1. Usarle su Windows 7/8/10
Inserisci il ricevitore USB 5.8G in qualsiasi porta USB funzionante del pc. Le cuffie si connetteranno
automaticamente quando saranno accese. Potrai utilizzarle senza installare driver.
2. Usarle su laptop
Passaggio 1.
1. Inserisci il ricevitore USB 5.8G nella porta USB del laptop;
2. Apri le impostazioni del “suono” dal “pannello di controllo” e seleziona “hardware e suono”
e seleziona “suono”. (Puoi anche fare click destro sull’icona del volume nella barra di
sistema e selezionare dispositivi di riproduzione)
Passaggio 2.
Nella scheda riproduzione, seleziona “dispositivi audio USB” dall’elenco e fai clic su “imposta
come dispositivo predefinito”

153. Usarle su Mac/ Mac OS
Passaggio 1. Inserire il ricevitore USB 5.8G nella porta USB del Mac
Passaggio 2.In “preferenze di sistema” clicca sull’icona del “suono”
Passaggio 3. Clicca nell’elenco di input e seleziona “dispositivi audio USB” per il suono
input di default
Passaggio 4. Clicca nell’elenco di output e seleziona “dispositivi audio USB” per il suono
output di default
4. Usarle su PS4/PS5
Inserisci il ricevitore USB 5.8G direttamente nella console playstation 4 e segui questi step:
Passaggio 1.Cercare il menù impostazioni e cliccarlo
Passaggio 2. Evidenzia l’opzione “Dispositivi” e selezionala
Passaggio 3. Scorri in basso a “dispositivi audio e seleziona
Passaggio 4.Clicca “uscita delle cuffie” e seleziona tutto l’audio.

16
TV
5. Utilizzo su Xbox One (modalità TV)
Passaggio 1, Accendi la console Xbox One;
Passaggio 2, Collega un lato del cavo HDMI alla presa "HDMI OUT TO TV" sulla console
Xbox One;
Passaggio 3, Collega un altro lato del cavo HDMI alla TV;
Passaggio 4, Accendere il televisore e impostare la modalità di ingresso su HDMI.
Assicurati che lo schermo venga visualizzato normalmente;
Passaggio 5, Inserisci il dongle USB 5.8G sulla TV e riproduci;
(Suggerimenti: adatto solo per TV con porta USB 2.0 o USB 3.0!)
HDMI

176.Utilizzo su Nintendo Switch (modalità TV)
Passaggio 1, apri il coperchio posteriore del Nintendo Switch Dock;
Passaggio 2, collega il trasformatore CA al jack superiore del Nintendo Switch Dock e
il cavo HDMI al jack inferiore. Chiudi la cover posteriore della Nintendo Switch Dock;
Passaggio 3, collegare il trasformatore CA alla presa;
Passaggio 4, collegare il cavo HDMI alla TV;
Passaggio 5, rimuovere i Joy-Contro sinistro e destro dalla console;
Passaggio 6, posiziona la console al centro del Nintendo Switch Dock e inseriscila
lentamente dall'alto nel Nintendo Switch Dock. Una volta inserito in basso, la
schermata della console scomparirà;
Passaggio 7, accendere la TV e cambiare la modalità di ingresso su HDM. Assicurati
che lo schermo venga visualizzato normalmente;
Passaggio 8, collegare il trasmettitore USB 5.8G alla TV e riprodurre;
(Suggerimenti: adatto solo per TV con porta USB 2.0 o USB 3.0!)
TV

18Suggerimenti importanti:
1. Questa cuffia da gioco wireless è compatibile con quasi tutti i dispositivi di gioco, come
Win 7/8/10 PC, Xbox One, PS4/PS5, Nintendo Switch, Laptop, Mac/Mac OS, TV;
2. Si prega di ricaricare completamente le cuffie prima di utilizzarlo per la prima volta. E
scollegare il cavo USB di ricarica dopo aver completato la ricarica.
3. Assicurati che le cuffie siano spente prima di metterle in carica
Assistenza post-vendita
Avviso
Se non riesci a collegare le cuffie/auricolari ai tuoi dispositivi chiedici la guida alle
FAQ. Potrai finalmente trovare una soluzione
A seconda delle dimensioni/forma della testa/orecchio potrebbe essere un po’ stretto
da indossare per qualcuno, poiché è progettato per evitare perdite del suono. In
questo caso per ottenere sia l’audio che il comfort togliere le cuffie ogni 1-2 ore per
rilassare le tue orecchie e proteggerle dall’ambiente afoso creato.
Si prega di leggere attentamente il manuale utente prima dell’utilizzo del prodotto
Grazie per aver scelto EKSA, ci auguriamo che i nostri prodotti siano di vostro gradimento!
In caso di domande o suggerimenti sui nostri prodotti, non esitate a contattarci tramite
[email protected], oppure potete contattarci tramite
Centro clienti di Hong Kong: +852 6940 4955
(da lunedì a venerdì 9:00-18:30, UTC+8 HKT)
Centro clienti India: +91 8929 369 620
(dal lunedì al venerdì 9:30-17:30, IST)
Other manuals for E910
2
Table of contents
Languages:
Other EKSA Headset manuals

EKSA
EKSA STAR ENGINE E5000 Pro User manual

EKSA
EKSA E1 User manual

EKSA
EKSA E800 Assembly instructions

EKSA
EKSA Telecom H16 User manual

EKSA
EKSA E3000 User manual

EKSA
EKSA H12E User manual

EKSA
EKSA Air Joy Reference manual

EKSA
EKSA Air Joy Plus Assembly instructions

EKSA
EKSA Fenrir User manual

EKSA
EKSA H1 User manual

EKSA
EKSA H1 Plus User manual

EKSA
EKSA E3000 User manual

EKSA
EKSA StarEngine E5000 Pro User manual

EKSA
EKSA H12E User manual

EKSA
EKSA E1000WT User manual

EKSA
EKSA E900 Plus User manual

EKSA
EKSA Easy E900 Assembly instructions

EKSA
EKSA Telecom H16 User manual

EKSA
EKSA E1000WT User manual

EKSA
EKSA Easy E900 Assembly instructions