Elecom M-D18DR Series User manual

- 1 -
Batteries
CAUTION
Use AAA alkaline batteries, AAA manganese batteries, or AAA
nickel hydride batteries with this product.
If this product will be unused for a long period of time, remove
the battery to avoid battery leakage and failure.
Cleaning the Mouse
If the product body becomes dirty, wipe it with a soft, dry cloth.
Use of a volatile liquid (paint thinner, benzene, alcohol, etc.)
may affect the material quality and colour of the product.
Cautions forWireless Equipment
This product is wireless equipment using the entire range
of the 2.4 GHz band and it is possible to avoid the band of
mobile object identification systems. DS-SS is used for the radio wave
method. The interference distance is 10 m.
The 2.4 GHz band is also used by medical equipment, Bluetooth, and
wireless LAN equipment conforming to the IEEE802.11b/11g standard.
Before using this product, check that there are no other“radio stations”*
•
operating nearby.
If electromagnetic interference occurs between this product and other
•
“radio stations”, move this product to another location or stop using this
product.
* Other “radio stations” refer to industrial, scientific and medical devices
using the 2.4 GHz band like this product, other radio stations of this type,
licensed radio station premises for mobile object identification system
that is used in factory production lines, certain non-licensed low power
radio stations and amateur radio stations.
WARNING
Do not use this product with a device that may have
●
a serious function or influence. There are rare cases
where an external radio wave at the same frequency
or the radio wave emitted from a mobile phone
causes this product to malfunction, slow down, or fail
to operate.
Do not use this product in a hospital or other
●
locations where the use of radio waves is prohibited.
The radio waves of this product may aect electronic
and medical devices (e.g. pacemaker).
The use of a wireless mouse in an aircraft is prohibited
●
by aviation law because doing so may interfere with
flight safety. Turn off the power of the mouse body
before boarding an aircraft and do not use it in the
aircraft.
* E LE COM is not liable for any a cc id en t or s oc ia l
damages incurred by the failure of this product.
Package Contents
This product's packaging contains the items listed below. Before
using the product, check that all items are present. We make
every eort to ensure that all products are packaged correctly.
However, in the event that an item i s missing or dam aged,
contact the retailer from whom you purchased the product.
Mouse x1
•
Receiver unit x1
•
AAA alkaline battery x2
•
User’s Manual x1
•
Safety Precautions
Part Names
Installing·Replacing the Battery
Before using this product, insta ll two AAA battery in the
mouse body.
Remove the battery cover.
Insert the battery.
Make sure that the
●
polarity is correct.
Install the battery cover.
Replacing batteries
Remove the battery cover.
Remove the battery by using
the battery removal sheet.
Insert the battery.
Do not mix different
●
types of batteries or
use old batteries with
new batteries to avoid
battery leakage and
failure.
Install the battery cover.
Turning On and O the Mouse
Turning on the mouse
When using this product, turn the mouse body power
on.
Slide the power switch to the ON position
The remaining battery level indicator lamp is illuminated in
red for a certain period. When the battery level gets low, the
indicator lamp flashes red continuously.
*Flashes for a certain period when the remaining battery level gets low.
Turning off the mouse
When not using this product, turn the mouse body
o to save battery power.
Slide the power switch to the OFF position
Restoring from sleep state
Click the right mouse button.
To reduce battery drain, the mouse enters sleep mode
automatically if it is left without being operated for a
certain period of time with the power or switch turned
on.
Inserting and Taking Out the Receiver Unit
Inserting the receiver unit
Remove the battery cover.
Place the receiver unit into
the receiver unit housing.
Install the battery cover.
Taking out the receiver unit
Remove the battery cover.
Take the receiver unit
out of the receiver unit
housing.
Install the battery cover.
Preparation before Use
S
tep
1
Check USB ports
Check the USB port on your computer.
USB port
Any USB port may be used.
●
This product can be connected to a USB hub. However,
●
it may not work depending on the power supply
capability of the USB hub.
S
tep2
Installing the Receiver Unit
Activate the PC.
If Windows® prompts you to choose an account (a user
●
name) when it starts up, be sure to log on using an
administrator account.
Wait until Windows® has started up completely.
●
Insert the receiver unit into the USB port of the PC.
USB port
Receiver unit
Insert here.
Carefully check the orientation of the connector
●
and the place where you will connect the receiver
unit.
If you feel strong resistance when inserting
●
the receiver unit, check that the shape and
orientation of the connector is correct. Using
excessive force may damage the connector and
cause injury.
Do not touch the USB connector terminals.
●
The mouse driver is installed automatically.
S
tep3
Checking operation
Check t hat t he mouse scr olls up and down corre ctly in
Windows® Internet Explorer.
From the [Start] menu, select [All Programs], and
then [Internet Explorer].
Internet Explorer will launch.
Display your favourite web site in Internet Explorer
and change the size of the window so that the
vertical scrollbar appears.
* The sample website used here is the ELECOM homepage.
Scrollbar
Scroll the tilt wheel back and
forth.
In applications that do not support scrolling,
●
the screen will not move when you scroll the tilt
wheel.
In order to use this product's horizontal scrolling
function, you must download and install ELECOM
MouseAssistant 2 for Windows from our company's web
site.
Proceed to "Using the horizontal scrolling and
button allocation functions" on the reverse of this
sheet.
When using Windows®
Meaning of symbols
WARNING
Failure to observe precautions
may result in serious personal
injury or death due to fire,
electric shock, or other causes.
CAUTION
Failure to observe precautions
may result in personal injury
due to electric shock or other
causes, and may damage other
equipment.
Prohibited action
Mandatory action
Situation that needs attention
Notes and reference information
Information that is handy to know
Ob se rve these p re ca ut io ns c ar ef ully to avoid
personal injury, damage, re, and other problems
WARNING
If an abnormality is found with this product
(emission of heat, smoke or abnormal smell from
the product), or if a foreign object (water, metal
chip, etc.) enters the product, immediately stop
using the product and disconnect the receiver
unit from the PC, and remove the battery from
the mouse. After doing this, contact the retailer
from whom you purchased the product.
If you continue to use the product under these
conditions, it may cause a fire or electric shock.
Do not drop or hit this product.
If this product is damaged, immediately stop
using the product and disconnect the receiver
unit from the PC, and remove the battery from
the mouse. After doing this, contact the retailer
from whom you purchased the product.
If you continue to use the product in a damaged
condition, it may cause a fire or electric shock.
Do not attempt to disassemble, modify or repair
this product by yourself, as this may cause a fire,
electric shock or product damage.
Do not put this product in fire, as the product
may burst, resulting in a fire or injury.
WARNING
Do not connect or disconnect the receiver unit
with a wet hand, modify the receiver unit or bend
it forcibly, as this may cause a fire or electric shock.
CAUTION
Do not place this product in any of the following
environments:
In a car exposed to sunlight, a place exposed•
to direct sunlight, or a place that becomes hot
(around a heater, etc.)
In a moist place or a place where condensation•
may occur
In an uneven place or a place exposed to•
vibration
In a place where a magnetic eld is generated•
(near a magnet, etc.)
In a dusty place•
This product does not have a waterproof
structure. Use and store this product in a place
where the product body will not be splashed
with water or other liquid.
Rain, water mist, juice, coffee, steam or sweat
may also cause product damage.
Do not use this product with any device that
●
may significantly affect other equipment in
the event that it malfunctions.
If this product is used on a transparent surface
●
such as glass or a highly reflective surface such
as a mirror, the optical sensor will not function
correctly and mouse cursor movement will
become unstable.
When not using the mouse for one month or
●
more, disconnect the receiver unit from the
PC.
When you no longer need to use this product,
●
be sure to dispose of it in accordance with the
local ordinances and laws of your area.
Avoid looking directly at the light of the
●
sensor as doing so may cause eye damage.
Always keep the receiver unit out of the
●
reach of children as there is a danger that
they may swallow it.
Mouse
Receiver unit
Tilt wheel
The tilt wheel can be turned back and forward with your nger or
pressed like a button to operate the PC.
Tilting the tilt wheel to the right or left lets you scroll horizontally.
You must download and install ELECOM MouseAssistant
2 for Windows from our company's web site to use the
horizontal scrolling function with Windows.
Using the horizontal scrolling and button allocation
functions (See reverse)
Right button
Used for right-click operation.
Left button
Used for left-click operation.
Remaining battery level indicator lamp
Indicates when to replace the batteries.
When a battery has been inserted, if there are sufficient*
remaining battery levels, it will illuminate in red for a certain
period of time, and if low, it will ash continuously.
If the remaining battery level becomes low during use, it will
ash continuously in red for a certain period of time.
Battery cover
This cover is removed to install batteries.
Power switch
Used to turn the mouse body on and o.
Optical sensor
Illuminates red when the mouse body is turned on. When the
mouse body is moved, this sensor detects mouse movement.
Avoid looking directly at the light of the sensor as doing so may*
cause eye damage.
Receiver unit housing
Used to store the receiver unit.
Battery housing
Batteries are inserted here.
Battery removal sheet
Used to remove the batteries from the battery housing.
USB connector (Male)
Connected to a PC USB port.
S
tep
1
Check USB ports
Check the USB port on your computer.
USB port
Any USB port may be used.
●
This product can be connected to a USB hub. However,
●
it may not work depending on the power supply
capability of the USB hub.
S
tep2
Installing the Receiver Unit
Activate the Macintosh.
Wait until Mac OS X has started up completely.
●
Insert the receiver unit into a USB port on your
Macintosh.
USB port
Receiver unit
Insert here.
Carefully check the orientation of the
●
connector and the place where you will
connect the receiver unit.
If you feel strong resistance when inserting
●
the receiver unit, check that the shape and
orientation of the connector is correct. Using
excessive force may damage the connector and
cause injury.
Do not touch the USB connector terminals.
●
The mouse driver is installed automatically.
S
tep3
Checking operation
Check that the vertical and horizontal scrolling functions are
working correctly in Safari.
Click the Safari icon in the Dock.
Safari will launch.
If Safari is not in the Dock, double-
click the Safari icon in the Applications
folder.
Display your favourite web site in Safari and
change the size of the window so that the vertical
and horizontal scrollbars appear.
* The sample website used here is the ELECOM homepage.
Scrollbar
Scroll the tilt wheel back and forth and move it from
side to side.
The mouse is operating normally if the screen moves up
and down or from side to side as you scroll or move the tilt
wheel.
In applications that do not support scrolling,
●
the screen will not move when you scroll the tilt
wheel.
In order to use this product's button allocation
●
function with a Mac, you must download and
install ELECOM MouseAssistant 2 for Mac OS X
from our company's web site.
Proceed to "Using the horizontal scrolling and
button allocation functions" on the reverse of
this sheet.
When using Mac OS X®
Thank you for purchasing the ELECOM M-D18DR Series wireless optical mouse.
This manual describes the operating instructions and safety precautions for using the M-D18DR
Series. Ensure that you have read this manual before using the product. After reading this manual,
store it somewhere safe for future reference.
* Except in certain cases, the M-D18DR Series is referred to as "this product" in this manual.
Wireless Optical Mouse
M-D18DR Series
User's Manual
The mouse is operating normally if the screen
moves up and down as you scroll the tilt wheel.

- 2 -
Troubleshooting
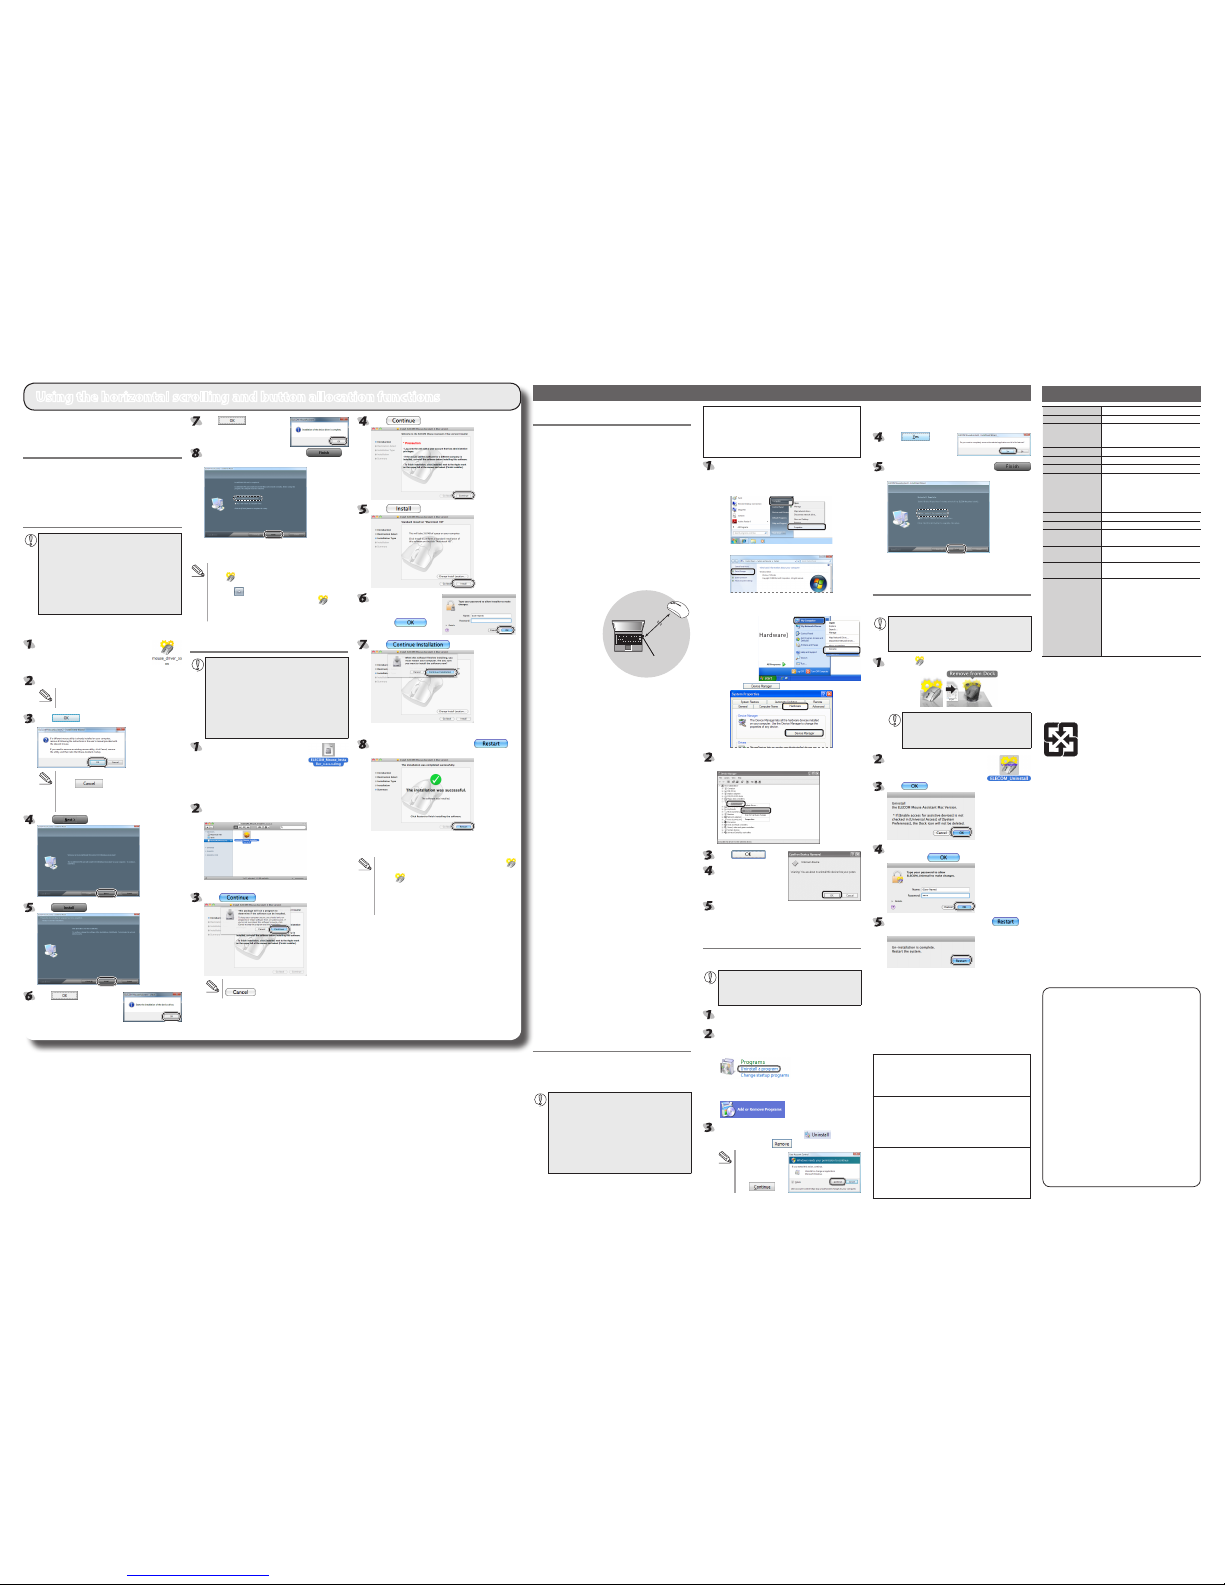
With the receiver unit connected to the PC, follow the
procedure below to remove the unknown device.
* Be sure to log on using an administrator account when
Windows starts up.
* Screen display may differ depending on operating
system, but the procedure remains the same.
Display Device Manager.
Windows® 7 and Windows Vista®
●
1. From the [Start] menu, right-click [Computer].
2. Click [Properties].
3. Click [Device Manager].
Windows® XP
●
1. From the [Start] menu, right-click [My Computer].
2. Click [Properties].
3. Click the [Hardware]
tab.
4. Click .
The Device Manager window appears. Right-click
the unknown device, and click [Uninstall].
Click .
Disconnect the receiver
unit and restart the PC.
Repeat the procedure from "Step 2 - Installing the
Receiver Unit" on the front of this sheet.
Uninstalling ELECOM MouseAssistant 2
for Windows
To reinstall ELECOM MouseAssistant 2 for Windows, uninstall
the existing version of ELECOM MouseAssistant 2 rst.
Login with a user account that has administrative
●
privileges.
It is recommended that all Windows programs
●
(application software) be terminated.
From the [Start] menu, select [Control Panel].
The Control Panel appears.
Do one of the following:
Windows® 7 and Windows Vista®
●
Under [Programs], click "Uninstall a program".
Windows® XP
●
Click "Add or Remove Programs".
Select [ELECOM Mouse Assistant 2] from the list of
installed programs, and then click (Windows®
7/Windows Vista®) or (Windows® XP).
*
When the User
Account Control
screen is displayed in
Windows Vista, click
the .
*Though the subsequent screens of the uninstallation
program dier depending on the OS, the procedure is the
same.
Click .
The uninstallation begins.
When the software is uninstalled, click
and then restart the PC.
This completes the unistallation process.
Uninstalling ELECOM MouseAssistant 2
for Mac OS X
To reinstall ELECOM MouseAssistant 2 for Mac OS X, uninstall
the existing version of ELECOM MouseAssistant 2 rst.
Login with a user account that has administrative
●
privileges.
It is recommended that all programs (application
●
software) be terminated.
Delete the icon that is registered in the Dock.
To remove icons from the Dock, the "Enable
access for assistive devices" check box in
Universal Access under System Preferences
must be selected.
Double-click [ELECOM_Uninstall]
in the utilities folder in the Finder
application folder.
Click .
Type an administrator username and password,
and then click .
When the software is uninstalled, click and
then restart your Mac.
This completes the unistallation process.
Basic specications
Product name Wireless Optical Mouse
Article No. M-D18DR Series
OS Windows 7, Windows Vista (up to SP2),
Windows XP (SP2 to SP3)
Mac OS X (10.5 to 10.5.8, 10.6 to 10.6.4)
Resolution (dpi) 1000
Interface USB
Radio frequency 2.4 GHz bandwidth
Radio wave outreach Non-magnetic substance (e.g. wooden
desk): Approx. 10 m
Magnetic substance (e.g. metal desk):
Approx. 3 m
*Test values in the ELECOM environment
Mouse body dimensions 53.4(W ) x 99.5 (D) x 32.8 (H) mm
Receiver unit dimensions 15.0 (W ) x 18.8 (D) x 6.5 (H) mm
Operating temperature/
humidity
5 to 40°C, 90% RH max. (no condensation)
Storing temperature/
humidity
-10 to 60°C, 90% RH max. (no condensation)
Batteries AAA alkaline battery, AAA manganese
battery, AAA nickel hydride battery
Operating time Measure of the operating time when an
AAA alkaline battery is used
Continuous operating time: Approx. 69
hours
Continuous standby time: Approx. 75 days
Estimated serviceable time: Approx. 31
days
(when the PC is operated for eight hours
a day and 25% of the PC operation is
assigned to mouse operation)
Wireless Optical Mouse
M-D18DR Series User's manual
1st edition, September 1, 2010
ELECOM Co., Ltd
This manual is copyright of ELECOM Co., Ltd.
•
Unauthorised copying and/or reproducing of all or part of this
•
manual is prohibited.
The specifications and appearance of this product may be
•
changed without prior notice for product improvement
purposes.
ELECOM Co., Ltd. shall bear no responsibility for any and all
•
affects resulting from the use of this product regardless of the
above reasons.
Export or service transaction permission under the Foreign
•
Exchange and Foreign Trade Control Law is required in order
to export this product or parts of this product that constitute
strategic materials or services.
Windows and the Windows logo are trademarks of the
•
Microsoft group of companies.
Mac, Mac OS, and Macintosh are registered trademarks
•
or trademarks of Apple Inc., in the United States
Company names, product names, and other names
•
in this manual are generally trademarks or registered
trademarks.
©2010 ELECOM Co., Ltd. All Rights Reserved.
When the product appears to be
malfunctioning
When the mouse pointer on the screen does
not move, or moves unstably, when the mouse
is moved
It is possible that the reectivity of the surface on which
this product is being used is not suitable for an optical
mouse. Use this product on a mouse pad that is designed
for use with optical mice.
When using this product on a metallic surface such as a
steel desk, radio wave outreach may be shortened. In such
cases, move the receiver unit closer to the mouse until
mouse operation stabilises.
It is possible that the receiver unit is not connected correctly
to the USB port. Disconnect the receiver unit from the USB
port and reconnect it.
The receiver unit and the mouse body are too far apart
or there is a possibility that the receiver unit is facing in a
direction from which it cannot receive radio signals. Adjust
the position of the receiver unit.
Approximately
10 m
Receiver unit
The ope ra ble range
of this product is the
area within a circle
with a radius of 10 m
from the receiver unit.
Depending on the
usage environment,
the mouse may not
operate even when it is
within approximately
10 m of the receiver unit. In such cases, move the mouse closer
to the receiver unit until operation stabilises.
Interference may occur if multiple units of this product are
used together or if this product is used with other wireless
devices. In this case, change the channel of other wireless
devices.
(Multiple units of this product have an automatic channel
avoidance function.)
Operation becomes unstable when battery power is low. See
"Installing·Replacing the Battery" on the reverse of this sheet,
and replace the batteries as soon as possible.
The alkaline batteries supplied with this product are
•
for checking product operation. These batteries may
discharge and drain during storing and shipping.
* When not using the mouse, turn it off to save battery
power.
It is possible that the standard Windows mouse driver did
not install correctly and that this product is detected as
an unknown device by Windows®. This product is usually
detected as a USB human interface device. If it is detected as
an unknown device, see "Removing an unknown device," and
after removing the device from Device Manager, repeat "Step
2 - Installing the Receiver Unit" on the front of this sheet.
If you have installed drivers and settings utilities produced by
the original manufacturer for a previous mouse, uninstall them
rst. This product may not operate correctly if a driver made
by another company is installed. See the instruction manual
that was supplied with your previous mouse for uninstall
instructions.
It is possible that the driver is conflicting with another
driver such as that for a laptop touch pad. To use this
product correctly, you must delete the touch pad driver.
However, if you delete this driver, you may not be able to
use the touch pad or touch pad functions. Contact the PC
manufacturer for more details.
The wheel moves, but the mouse cursor does not
In certain applications that do not support the scrolling
function, the mouse cursor will not move when you move
the wheel.
Removing an unknown device
If the standard Windows mouse driver did not install correctly
and this product is detected as an unknown device, remove the
unknown device from Device Manager, and then repeat "Step 2 -
Installing the Receiver Unit" on the front of this sheet.
If there are multiple unknown devices, before
●
removing a device, check that it is actually this
product. Disconnect the receiver unit and check
which unknown device disappears. The device that
disappears is this product.
If the unknown device does not disappear even
●
after you have deleted the driver following the
instructions below, it is possible that there is
something wrong with the PC. Contact the PC
manufacturer.
To use the horizontal scrolling function with the tilt wheel of
this product, you need to install the ELECOM MouseAssistant
2 that can be downloaded from the ELECOM website.
Obtaining ELECOM MouseAssistant 2
Access the ELECOM website using the following URL and
download the latest driver.
http://www.elecom.co.jp/global/
download/utility/mouse_assistant/
Installing the ELECOM MouseAssistant
2 for Windows
Before installation....
Keep the mouse installed. For details, see "Step 2
●
- Installing the Receiver Unit" on the front of this
sheet.
If mouse utility software from ELECOM or another
●
company is installed, uninstall it.
Login with a user account that has administrative
●
privileges.
It is recommended that all programs (application
●
software) be terminated.
* Though the subsequent screens of the installation program
dier depending on the OS, the procedure is the same.
Double-click the downloaded "mouse_
driver_xxxx(.exe)".
* The le name may be dierent depending
on the version of the driver.
The installer is activated.
When the "user account control" screen is displayed,
click [Permit] or [Continue].
Click .
If other mouse utilities have been installed,
•
click to uninstall them.
If a previous version of MouseAssistant has been
•
installed, follow the instructions on the screen to
uninstall it.
Click .
Click .
Click .
Installation starts.
Click .
After installation is complete, click to
restart the PC.
Now, the installation of the ELECOM MouseAssistant 2 for
Windows is complete.
After restart, mouse functions can be set. Right-click
•
the icon in the task tray or notication area and
select [Properties].
*
If the icon is displayed in the Notification Area in
Windows® 7, click it and then right click the icon and
then click the [Properties].
For the setting method, see the Help le.
•
Installing the ELECOM
MouseAssistant 2 for Macintosh
Before installation....
Keep the mouse installed. For details, see “Step 2
●
- Installing the Receiver Unit” on the front of this
sheet.
If mouse utility software from ELECOM or another
●
company is installed, uninstall it.
Login with a user account that has administrative
●
privileges.
It is recommended that all programs (application
●
software) be terminated.
Double-click the downloaded
"ELECOM_Mouse_Installer_
X.X.X.X.dmg".
The disk image is mounted on the desktop and a window is
displayed.
* The file name may be different depending on the
version of the driver.
Double-click the "ELECOM_Mouse_Installer_
x.x.x.x" that has been displayed.
The installer is activated.
Click .
If “MouseAssistant” has been installed, click
and uninstall.
Click .
Click .
Enter a user name
and password with
administrative privileges
and click .
Click .
File copying starts.
After installation is complete, click to
restart the Macintosh.
Now, the installation of the ELECOM MouseAssistant 2 for
Macintosh is complete.
After restart, mouse functions can be set. Clicking the
•
icon registered in the Dock causes the utilities to start.
(The icon is only registered in the Dock for the user
who installed the software. If you are not the user who
installed the software, click [Applications] -> [Utilities] and
double-click "ELECOM_Mouse_Util".
For the setting method, see the help le.
•
Using the horizontal scrolling and button allocation functions
廢電池請回收
低功率電波輻射性電機管理辦法
第十二條
經型式認證合格之低功率射頻電機,非經許可,公司、商號或使
用者均不得擅自變更頻率、加大功率或變更原設計之特性及功
能。
第十四條
低功率射頻電機之使用不得影響飛航安全及干擾合法通信;
經發現有干擾現象時,應立即停用,並改善至無干擾時方得繼續
使用。
前項合法通信,指依電信規定作業之無線電通信。
低功率射頻電機須忍受合法通信或工業、科學及醫療用電波輻射
性電機設備之干擾。
당해 무선설비는 운용 중 전파혼신 가능성이 있음 .
B 급 기기 ( 가정용 정보통신기기 )
이 기기는 가정용으로 전자파적합등록을 한 기기로서
주거지역에서는 물론 모든 지역에서 사용할 수 있습니다 .
ELECOM CO., LTD.
1-1 Fushimi-machi 4-Chome Chuoku, Osaka Japan 541-8765
宜麗客(上海)貿易有限公司
上海市徐匯区肇嘉浜路1065甲号飛雕国際大厦704号
電話 : 86-21-33680011
FAX : 86-21-64271706
URL : http://www.elecom-china.com/
ELECOM (SHANGHAI) TRADING CO. , LTD.
Rm 704 , Feidiao International Bldg , 1065 ZhaoJiaBang Rd ,
Shanghai , China 200030
TEL : 86-21-33680011
FAX : 86-21-64271706
URL : http://www.elecom-china.com/
Elecom Korea Co., Ltd.
5F Suam Bldg. 1358-17, Seocho2-dong, Seocho-gu, Seoul
137-862, Korea
TEL : 1588-9514
FAX : (02)3472-5533
URL : www.elecom.co.kr
Other Elecom Mouse manuals

Elecom
Elecom M-XG1DB User manual

Elecom
Elecom M-EG3DR Series User manual

Elecom
Elecom M-XGS20DL User manual

Elecom
Elecom M-SODL Series User manual

Elecom
Elecom M-DWS01DB User manual

Elecom
Elecom M-DY5DR Series User manual

Elecom
Elecom Kasane M-NE3DL Series User manual

Elecom
Elecom M-XG1UB User manual

Elecom
Elecom M-XGS10DB User manual

Elecom
Elecom M-PG3DL series User manual

Elecom
Elecom M-XT3DR User manual

Elecom
Elecom M-SH10BB Series User manual

Elecom
Elecom M-SN1UL Series User manual

Elecom
Elecom M-XGS30BB User manual

Elecom
Elecom M-XG2DB User manual

Elecom
Elecom M-BY10BR User manual

Elecom
Elecom M-XT1DR User manual

Elecom
Elecom M-CCP1BB User manual

Elecom
Elecom M-TP20DB User manual

Elecom
Elecom oppopet M-NE2DR Series User manual