ELNA eXcellence 680+ User manual

| Instruction Manual |
eXcellence 680+


1
IMPORTANT SAFETY INSTRUCTIONS
When using an electrical appliance, basic safety precautions should always be followed, including the
following:
This sewing machine is designed and manufactured for household use only.
Read all instructions before using this sewing machine.
DANGER— To reduce the risk of electric shock:
1. An appliance should never be left unattended when plugged in. Always unplug
this sewing machine from the electric outlet immediately after using and before
cleaning.
WARNING— To reduce the risk of burns, re, electric shock, or injury to persons:
1. Do not allow to be used as a toy. Close attention is necessary when this sewing machine is used
by or near children.
2. Use this appliance only for its intended use as described in this owner’s manual.
Use only attachments recommended by the manufacturer as contained in this owner’s manual.
3. Never operate this sewing machine if it has a damaged cord or plug, if it is not working properly, if
it has been dropped or damaged, or dropped into water.
Return this sewing machine to the nearest authorized dealer or service center for examination,
repair, electrical or mechanical adjustment.
4. Never operate the appliance with any air opening blocked. Keep ventilation openings of this
sewing machine and foot controller free from accumulation of lint, dust and loose cloth.
5. Never drop or insert any object into any opening.
6. Do not use outdoors.
7. Do not operate where aerosol (spray) products are being used or where oxygen is being
administered.
8. To disconnect, turn all controls to the off (“O”) position, then remove plug from outlet.
9. Do not unplug by pulling on cord. To unplug, grasp the plug, not the cord.
10. Keep ngers away from all moving parts. Special care is required around the sewing machine
needle and/or cutting blade.
11. Always use the proper needle plate. The wrong plate can cause the needle to break.
12. Do not use bent needles.
13. Do not pull or push fabric while stitching. It may deect the needle causing it to break.
14. Switch this sewing machine off (“O”) when making any adjustment in the needle area, such as
threading the needle, changing the needle, threading the bobbin or changing the presser foot, and
the like.
15. Always unplug this sewing machine from the electrical outlet when removing covers, lubricating, or
when making any other adjustments mentioned in this owner’s manual.
SAVE THESE INSTRUCTIONS
Please note that on disposal, this product must be safely recycled in accordance with relevant
National legislation relating to electrical/electronic products. If in doubt please contact your
retailer for guidance. (European Union only)
For Europe only:
This appliance can be used by children aged from 8 years and above and persons with reduced
physical, sensory or mental capabilities or lack of experience and knowledge if they have been given
supervision or instruction concerning use of the appliance in a safe way and understand the hazards
involved. Children shall not play with the appliance. Cleaning and user maintenance shall not be made
by children without supervision.
For outside Europe (except U.S.A and Canada):
This appliance is not intended for use by persons (including children) with reduced physical, sensory or
mental capabilities, or lack of experience and knowledge, unless they have been given supervision or
instruction concerning use of the appliance by a person responsible for their safety.
Children should be supervised to ensure that they do not play with the appliance.

2
TABLE OF CONTENTS
ESSENTIAL PARTS
Names of Parts............................................................... 3
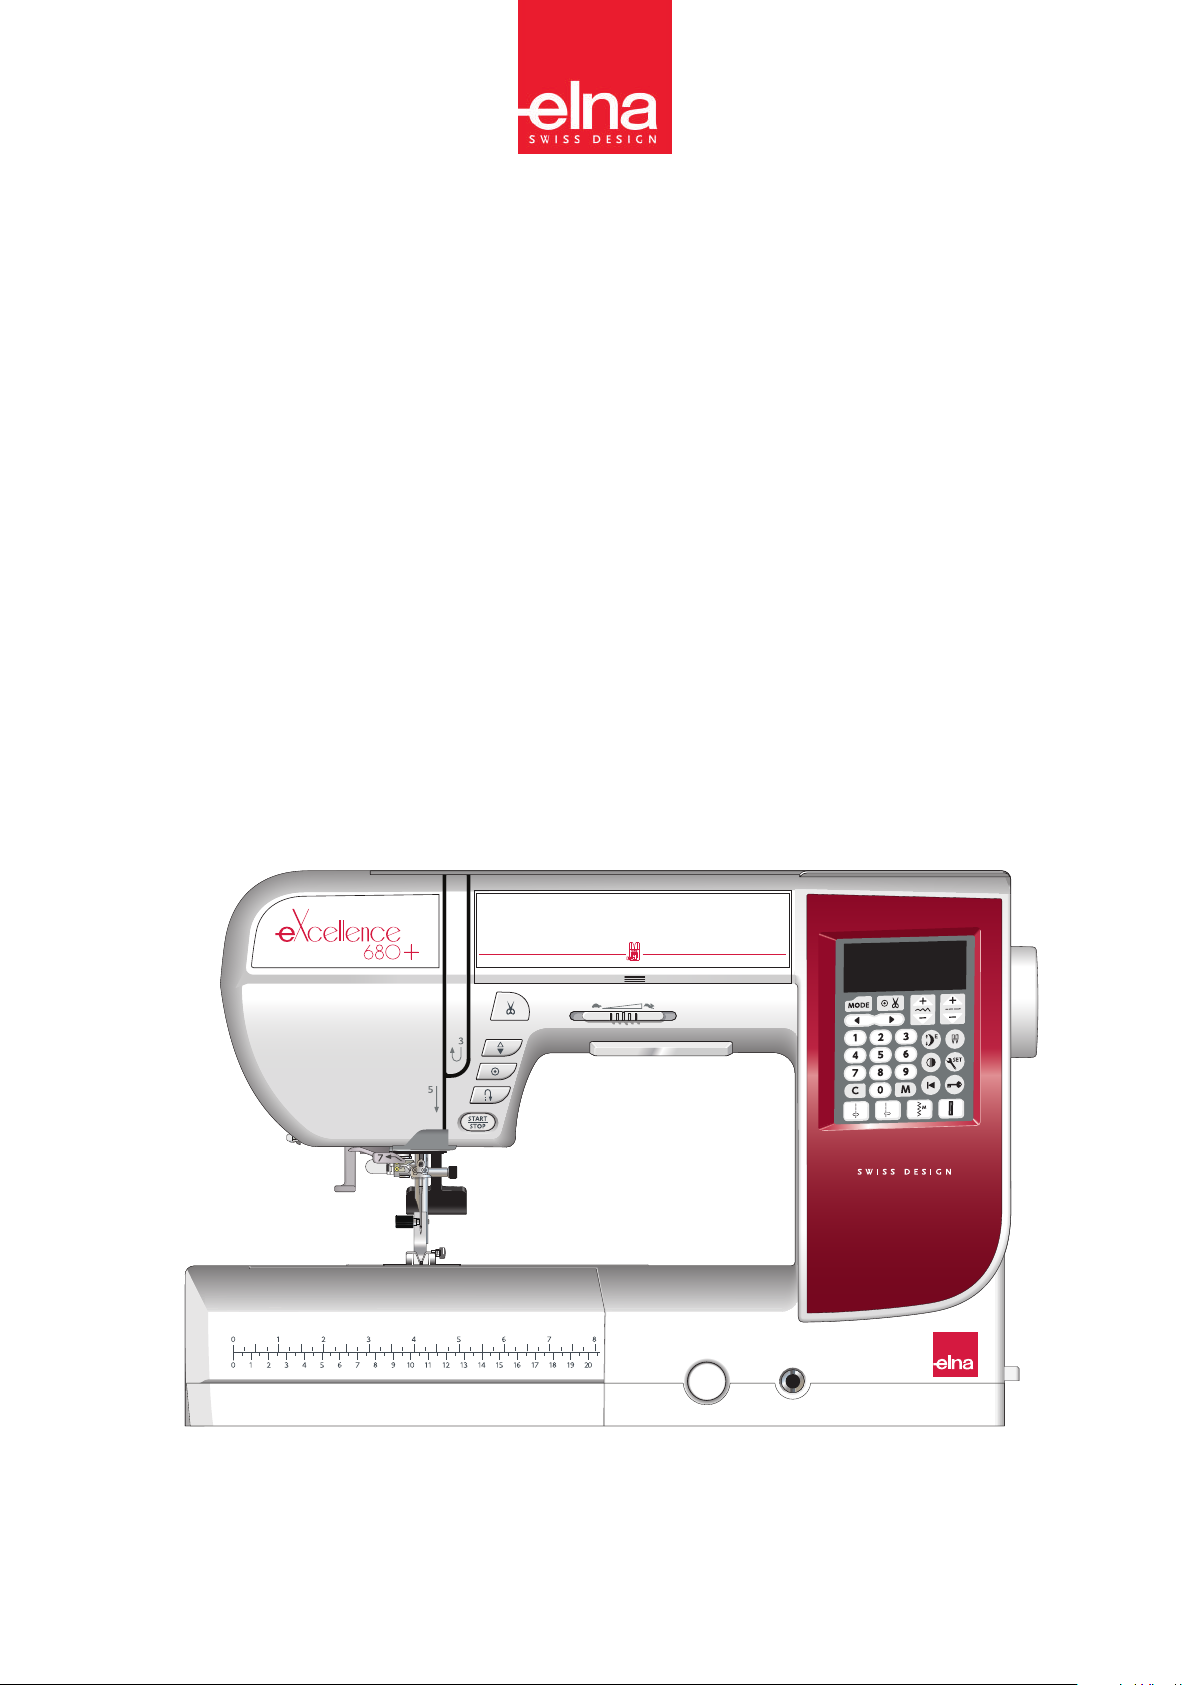
Accessories Storage ...................................................... 4
Standard Accessories .................................................... 5
Extension Table.............................................................. 6
Free-arm sewing ............................................................ 6
Extra Wide Table......................................................... 6-7
GETTING READY TO SEW
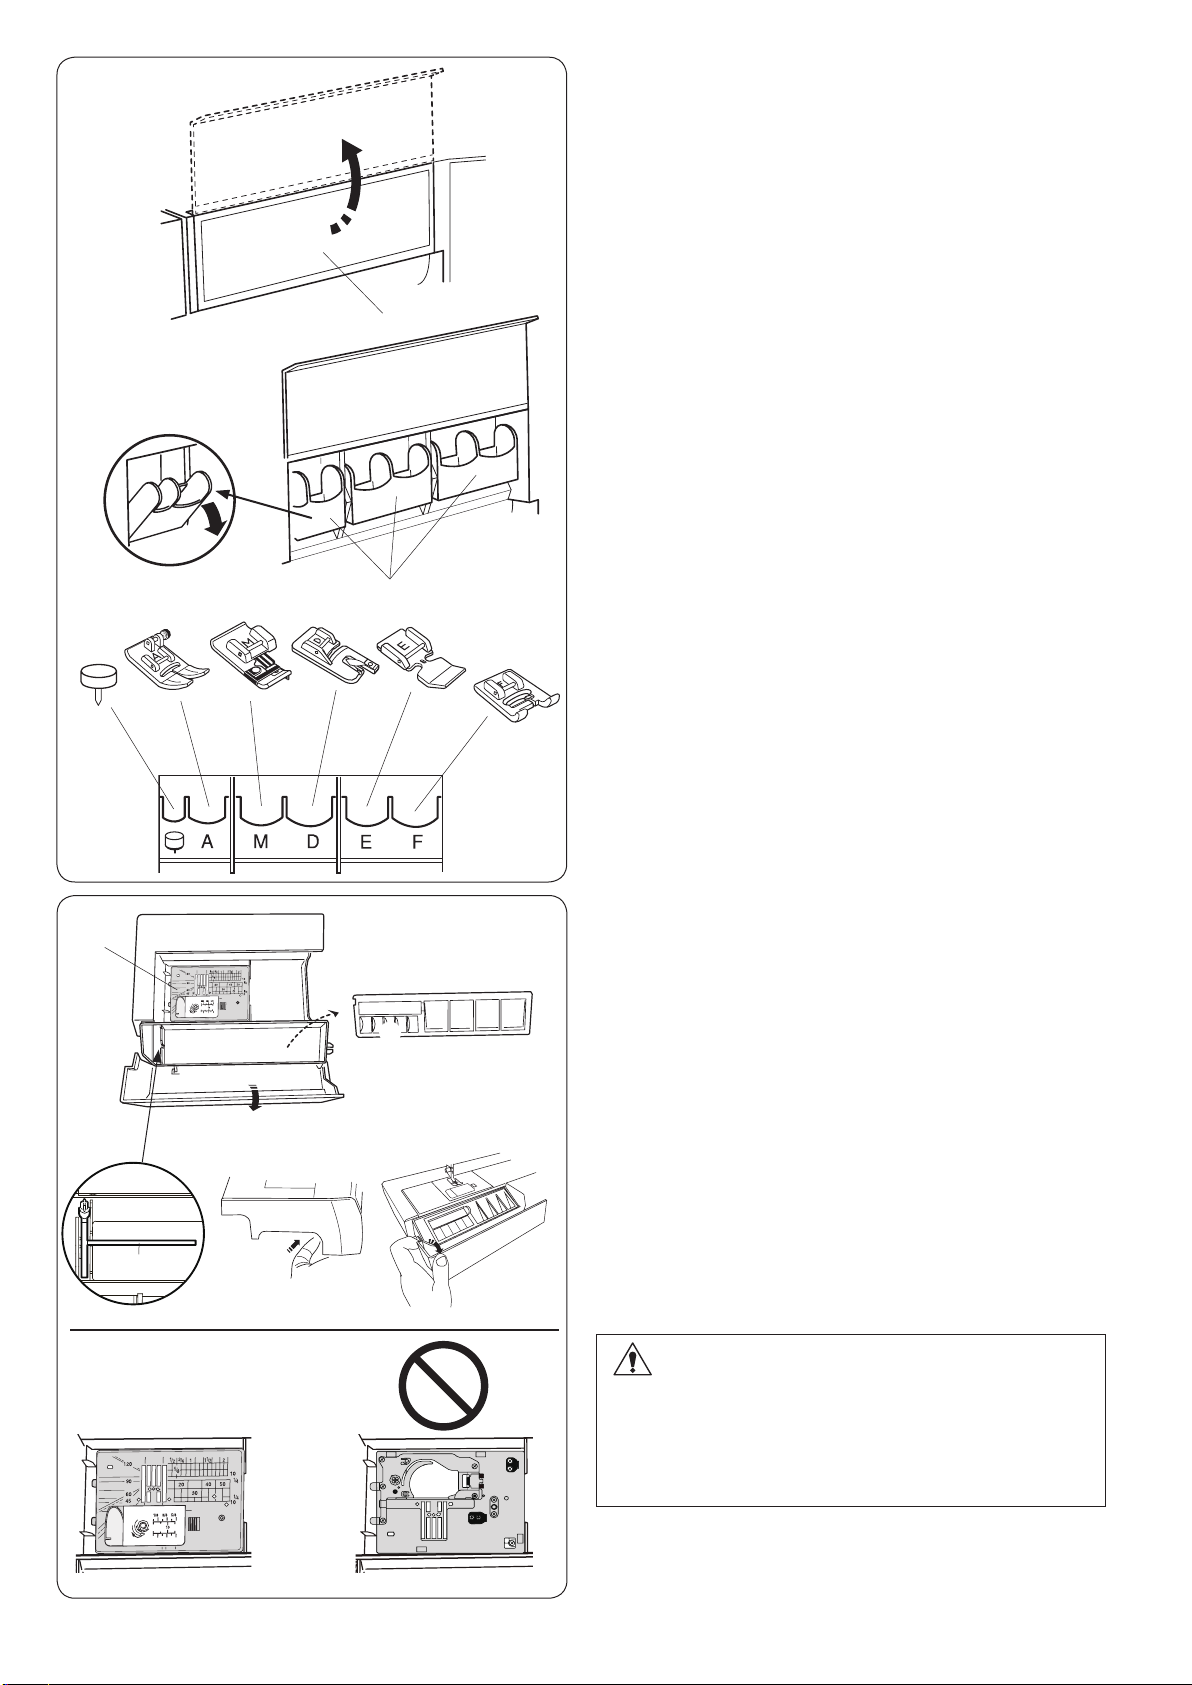
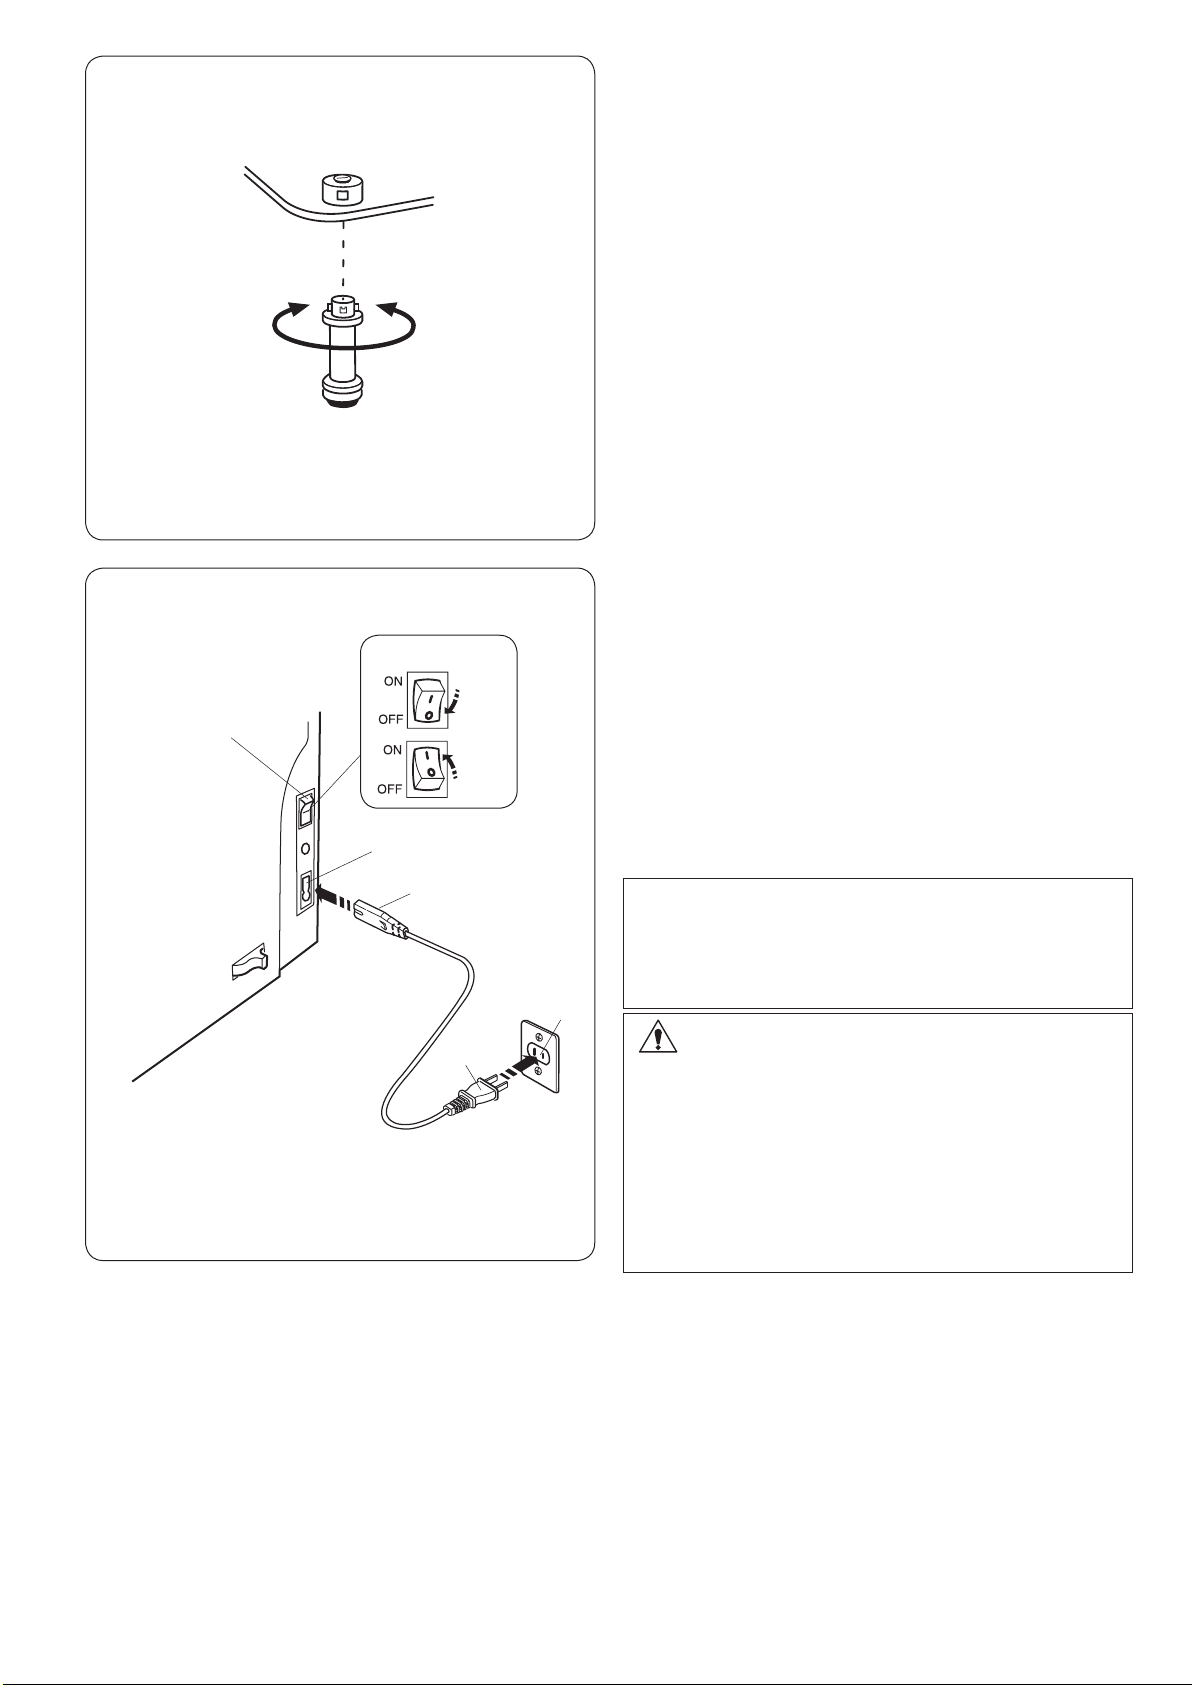
Connecting the Power Supply..................................... 7-8
Operating Instructions: ................................................... 8
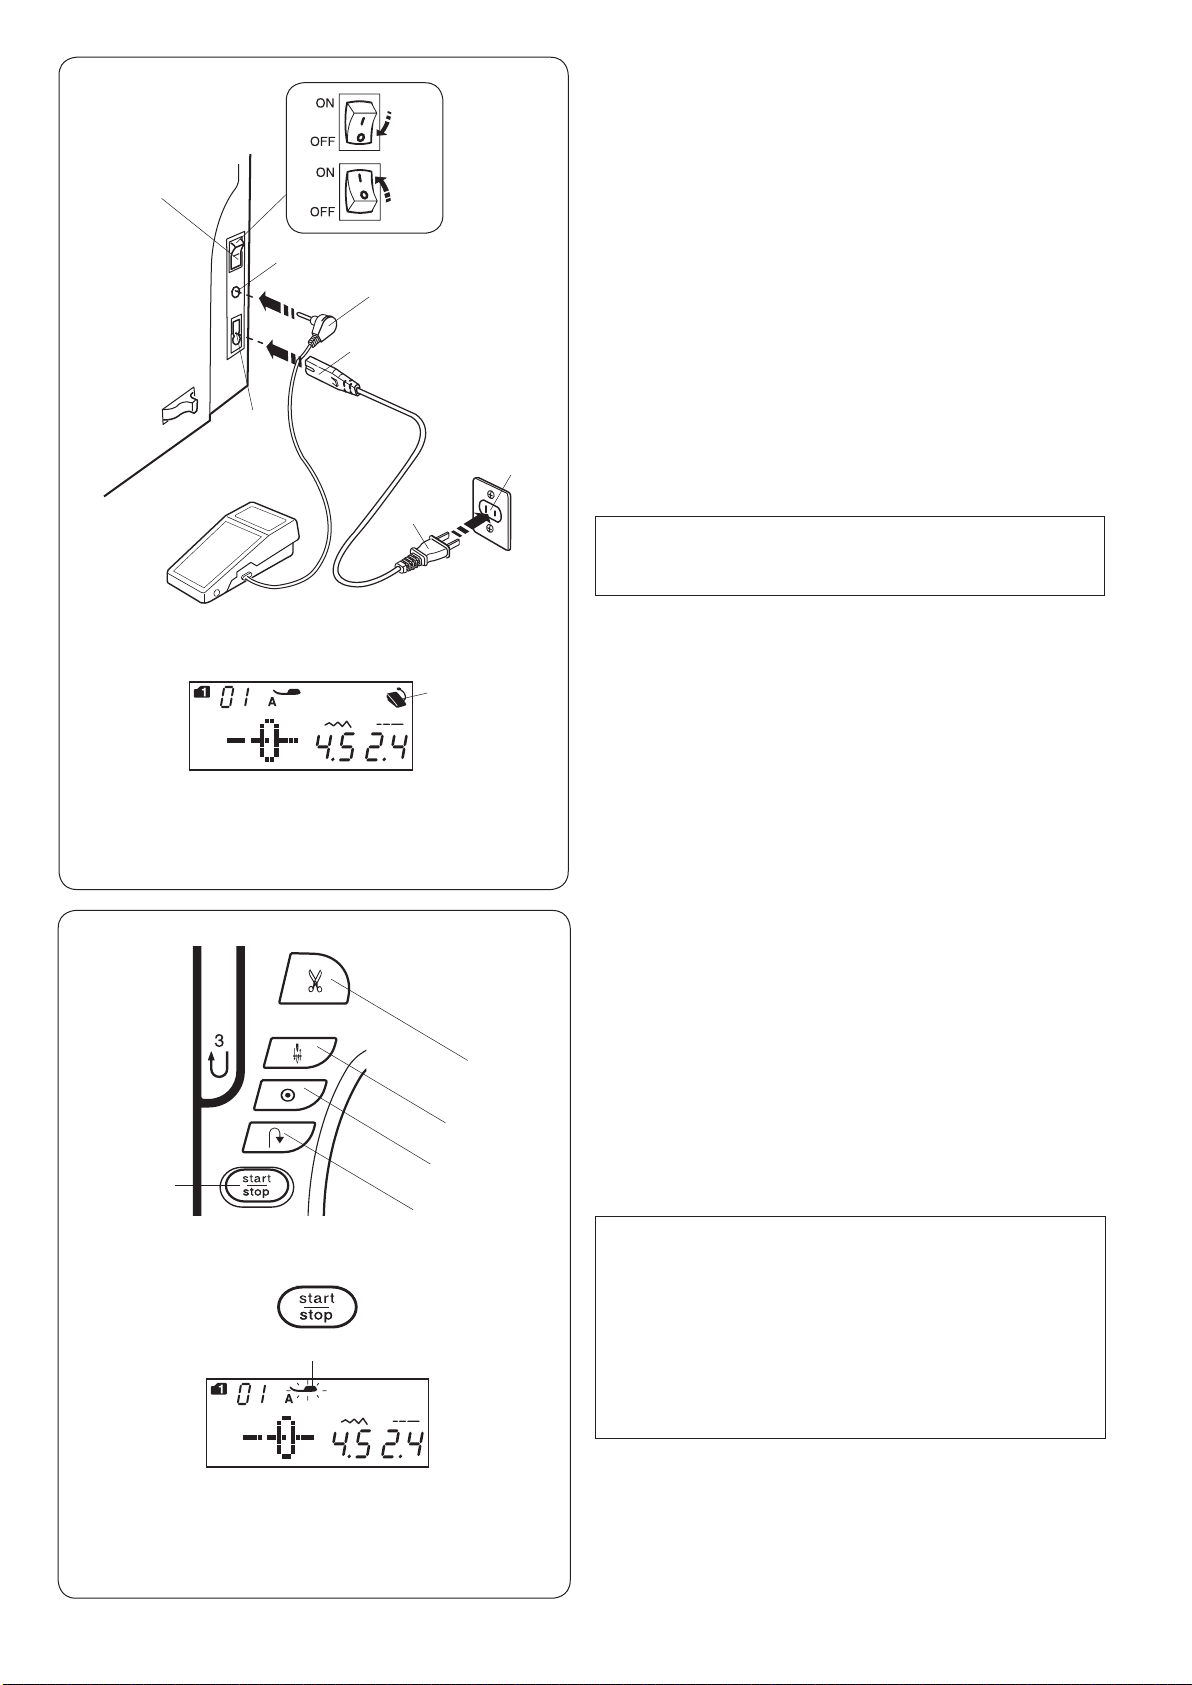
Machine Operating Buttons.........................................8-9
Controlling Sewing Speed.............................................. 9
Foot Control.................................................................... 9
Function Keys............................................................... 10
Raising and Lowering the Presser Foot ........................11
Knee Lifter.....................................................................11
Adjusting the Foot Pressure ......................................... 12
Dropping the Feed Dog................................................ 12
Balancing Thread Tension............................................ 13
Lockout Key.................................................................. 14
Changing the Presser Foot .......................................... 14
Removing and Attaching the Foot Holder .................... 15
Replacing the Needle Plate.......................................... 16
Changing Needles........................................................ 17
Fabric and Needle Chart .............................................. 17
Needle Denitions ........................................................ 18
Winding the Bobbin ...................................................... 19
Threading the Machine................................................. 22
Built-in Needle Threader .............................................. 23
Drawing up the Bobbin Thread .................................... 24
Selecting the Patterns .................................................. 25
Customizing Machine Settings..................................... 26
BASIC SEWING
Straight Stitch ............................................................... 29
Securing Seams ........................................................... 29
Sewing from the Edge of Thick Fabric ......................... 29
Changing Sewing Direction.......................................... 29
Cutting Threads............................................................ 30
Needle Plate Guides .................................................... 30
Cornering Guide ........................................................... 30
Adjusting the Needle Drop Position ............................. 31
Adjusting the Stitch Length .......................................... 31
Needle Plate for Straight Stitch .................................... 32
Lock-a-Matic Stitch....................................................... 32
Locking Stitch............................................................... 32
Straight Stitch with Left Needle Position ...................... 33
Triple Stretch Stitch ...................................................... 33
Knit Stitch ..................................................................... 33
Sewing with Even Feed Foot (Walking foot)................. 34
Zipper Sewing .............................................................. 35
Rolled Hem................................................................... 38
Gathering...................................................................... 39
Pintucking..................................................................... 39
Zigzag Stitch................................................................. 40
Multiple Zigzag Stitch (Tricot stitch) ............................. 41
Overcasting Stitch ........................................................ 41
Knit Stitch ..................................................................... 42
Double Overcasting Stitch............................................ 42
Blind Hemming............................................................. 43
Attaching Elastic........................................................... 44
Lingerie Stitch............................................................... 45
Super Overlock Stitch................................................... 45
Buttonholes .................................................................. 46
Square Buttonhole........................................................ 47
Using the Stabilizer Plate ............................................. 51
Round End and Fine Fabric Buttonholes ..................... 52
Keyhole Buttonholes .................................................... 52
Stretch Buttonholes...................................................... 52
Corded Buttonhole ....................................................... 53
Welted Buttonhole ........................................................ 54
Button Sewing .............................................................. 56
Darning......................................................................... 57
Tacking ......................................................................... 59
Eyelet............................................................................ 60
DECORATIVE STITCHING
Applique ....................................................................... 61
Fringing......................................................................... 62
Drawn Work.................................................................. 62
Smocking...................................................................... 63
Fagoting........................................................................ 64
Scallop.......................................................................... 64
French Knots ................................................................ 64
Patchwork Piecing ........................................................ 65
Patchwork..................................................................... 65
Quilting ......................................................................... 66
Circular Sewing ............................................................ 67
Stippling........................................................................ 67
Clasp Stitches .............................................................. 67
Free Motion Quilting (1) ................................................ 68
Free Motion Quilting (2)................................................ 69
Hand-look Quilt Stitches............................................... 69
Satin Stitches ............................................................... 70
Elongation ratio ............................................................ 70
Twin Needle Sewing ..................................................... 71
PROGRAMMING A PATTERN COMBINATION
Pattern Combination..................................................... 73
Programming Auto-lock Stitch.......................................74
Programming Automatic Thread Cutting...................... 75
Pattern Combination with a Mirror Image..................... 76
Resuming a Pattern from the Beginning ...................... 77
Resuming a Pattern Combination from the Beginning. 77
Bridge Stitches ............................................................. 78
Monogramming ............................................................ 80
Editing a Pattern Combination...................................... 82
Deleting and Inserting a Pattern................................... 83
Duplicating a Pattern .................................................... 83
Uniform Stitch Adjustment............................................ 84
Unied Needle Drop Position ....................................... 84
Individual Stitch Adjustment ......................................... 85
Correcting Distorted Stitch Patterns............................. 86
CARE AND MAINTENANCE
Cleaning the Hook Area ............................................... 87
Cleaning the Inside of the Thread Guide ..................... 88
Problems and Warning Signals .................................... 89
Troubleshooting............................................................ 91
EC DECLARATION OF CONFORMITY ....................... 92

3
Thread take-up lever
Foot pressure dial
Reference chart
Top cover
Touch panel stylus holder
Bobbin thread cutter B
Bobbin winder spindle
Bobbin thread cutter A
Hole for extra spool pin
Spool pin
Spool holder (large)
Thread tension dial
Face cover
Thread cutter
Extension table (accessory storage)
Needle plate release lever
Holes for circular pivot pin
Start/stop button
Reverse button
Auto-lock button
Needle up/down button
Thread cutter button
Feed balancing dial
Knee lifter socket
Speed control slider
Touch panel (Function keys)
LCD screen
Foot storage compartment
Lower thread guide
Needle clamp screw
Needle bar thread guide
Needle
Zigzag foot A
Needle plate
Hook cover release button
Hook cover plate
Thread cutter
Feed dog
Foot holder
Setscrew
Lever
Needle threader
Buttonhole lever
Needle threader guide
Carrying handle
Handwheel
Ventilation opening
Thread cutter switch jack*
Drop feed lever
Machine socket
Foot control jack
Power switch
Presser foot lifter
ESSENTIAL PARTS
Names of Parts
q
w
e
r
t
y
u
i
o
!0
!1
!2
!3
!4
!5
!6
!7
!8
!9
@0
@1
@2
@3
@4
@5
@6
@7
@8
@9
#0
#1
#2
#3
#4
#5
#6
#7
#8
#9
$0
$1
$2
$3
$4
$5
$6
$7
$8
$9
%0
%1
%2
%3
NOTE:
To carry the sewing machine, hold the carrying handle
with your hand, and support the sewing machine with
the other hand.
NOTE:
Sewing machine design and specications are subject
to change without prior notice.
* Thread cutter switch is an optional item.
q
w
e
rty
u
i
o
!0
!1
!2
!3
!4
!5 !6
!8
!9
@0
@1
@2
@3 @4 @5
@6
@7
$5
$6
$9
$8
%0 %1 %2
%3
@8
!7
@9
#0
#1
#2
#3
#4
#5
#6
#7
#8
#9
$0
$1
$2
$3 $4
$7

4
q
w
e
rt y
u
i
Accessories Storage
The accessories can be conveniently stored in the foot
storage compartment and in the extension table.
In front compartment:
Open the cover to the front.
Each pockets can be tilted forward for easy access.
q Cover
w Pocket
e Circular pivot pin
r Zigzag foot A
t Overedge foot M
y Rolled hem foot D
u Zipper foot E
i Satin stitch foot F
In extension table:
q Straight stitch needle plate
w Extra spool pin
e Bobbins
Other accessories can be stored in the compartment.
q
w
CAUTION:
Do not store the needle plate upside down in the
compartment. Otherwise, the needle plate spring may
break.
q Correct
w Wrong
q w
e

5
Zigzag foot A (set on the machine)
Rolled hem foot D
Zipper foot E
Satin stitch foot F
Open-toe satin stitch foot F2
Blind hemming foot G
Overcast foot M
1/4˝ seam foot O
Darning foot PD-H
Convertible free motion quilting foot QB-S
Closed-toe foot
Open-toe foot
Clear view foot
Automatic buttonhole foot R (in the
accessory storage)
Buttonhole stabilizer plate (in the
accessory storage)
Even feed foot
Quilting guide bar (for even feed foot)
Button sewing foot T
Quilting guide bar
Circular pivot pin (in the front compartment)
Bobbin (5 pcs.) (1 set on the machine)
Easy bobbin (10 pcs.)
Spool holder (large, 1 set on the machine)
Spool holder (small)
Spool holder (special)
Extra spool pin
Needle set
Screwdriver
Lint brush
Seam ripper (Buttonhole opener)
Knee lifter
Needle plate for straight stitch
Touch panel stylus
Power cable*
Foot control
Extra wide table
Semi-hard fabric cover
Instruction book
Standard Accessories
q
w
e
r
t
y
u
i
o
!0
!1
!2
!3
!4
!5
!6
!7
!8
!9
@0
@1
@2
@3
@4
@5
@6
@7
@8
@9
#0
#1
#2
#3
#4
#5
#6
#7
#8
q w e r t
y u i o
!4 !5
!6 !7
!8 !9 @0 @1
@3 @5 @6
#2 #3 #4
#7 #8
#5
!0
!1
!2 !3
@4 @7
@8 @9 #0 #1
@2
#6
*The power supply cable included may differ
from the illustration.

6
Extension Table
The extension table provides an extended sewing area
and can be removed for free-arm sewing.
q Extension table
w Free-arm
To detach:
Draw the table out to the left.
To attach:
Slide the table on the base and push the table to the
right.
w
w
q
Extra Wide Table
CAUTION:
Do not use the Extra Wide Table as an ironing table
or for purposes other than explained in this manual.
Doing so may cause damage or injury.
Assembling the wide table:
zPeel off the backing paper from the rubber soles and
attach to the bottom of the legs.
q Rubber sole
w Leg
xAttach the 4 legs to the table top with the setscrew.
e Setscrew
cAttach the table support to the underside of the table
by inserting the hooks into the slots.
r Table support
vRemove the extension table.
Place the assembled table on the machine.
Adjust the height of the table top by turning the
adjusting screw.
t Adjusting screw
Free-arm sewing
Free-arm sewing is used for stitching sleeves,
waistbands, pant legs or any other tubular garments.
It is also useful for darning socks or mending knees or
elbows.
w Free-arm
q
w
e
r
t
z x c
v

7
WARNING:
While in operation, always keep your eyes on the
sewing area, and do not touch any moving parts such
as the thread take-up lever, handwheel or needle.
Always turn off the power switch and unplug the
machine from the power supply:
- when leaving the machine unattended.
- when attaching or removing parts.
- when cleaning the machine.
Do not place anything on the foot control.
Connecting the Power Supply
zFirst make sure the power switch qis off.
xInsert the machine plug wof the power supply cord
into the machine socket e.
cInsert the power supply plug rinto the wall outlet t,
and turn the power switch qon.
q Power switch
w Machine plug
e Machine socket
r Power supply plug
t Wall outlet
e
w
q
z
c
r
t
GETTING READY TO SEW
NOTE:
Make sure to use the power supply cable that came
with the machine.
If you turn off the power switch, wait for 5 seconds
before turning it on again.
To remove:
zTo remove the legs from the table top, you do not have
to loosen the setscrews.
Turn the leg clockwise to remove the leg from the
table top.
xTo attach the leg to the table top again, insert the
leg into the attachment of the leg, then turn the leg
counterclockwise until it stops.
z x

8
Machine Operating Buttons
q Start/stop button
Press this button to start or stop the machine.
The machine starts running slowly for the rst few
stitches, it then runs at the speed set by the speed control
slider. The machine runs slowly as long as this button is
pressed.
The button will turn red when the machine is running, and
green when it has been stopped.
Pressing and holding this button while sewing will slow
down the sewing speed and the machine will stop when
the button is released.
NOTE:
• The start/stop button cannot be used when the foot
control is connected to the machine.
• The machine will not run and the presser foot mark
ywill blink if you start the presser foot in the up
position. Lower the presser foot and press the start/
stop button.
• You can select the desired start-up speed from
slow, medium or high (refer to page 27).
qe
r
t
q
y
w
If you wish to use the foot control, insert the pin
connector into the jack on the machine.
zFirst make sure the power switch qis off.
xInsert the pin connector w into the jack eon the
machine.
cInsert the machine plug rof the power supply cord
into the machine socket t.
vInsert the power supply plug yinto the wall outlet u,
and turn the power switch on.
The foot control sign iwill be displayed when the foot
control is connected to the machine.
q Power switch
w Pin connector
e Jack
r Machine plug
t Machine socket
y Power supply plug
u Wall outlet
i Foot control sign
NOTE:
The start/stop button does not work when the foot
control is connected.
z
v
q
e
w
r
y
u
i
t
Operating Instructions:
The symbol “O” on a switch indicates the “off” position of
the switch.
For the U.S.A. and Canada only
Polarized plug (one blade wider than the other):
To reduce the risk of electric shock, this plug is intended
to t in a polarized outlet only one way. If it does not t
fully in the outlet, reverse the plug. If it still does not t,
contact a qualied electrician to install the proper outlet.
Do not modify the plug in any way.

9
w
e
r
t
NOTE:
Use the thread cutter on the face cover if the thread is
#30 or thicker (refer to page 30).
Foot Control
Pressing on the foot control can vary sewing speed.
The harder you press the foot control, the faster the
machine runs.
NOTE:
The machine runs at the maximum speed set by
the speed control slider when the foot control is fully
depressed.
Operating Instructions:
Foot control model YC-485EC is for use with this sewing
machine.
Controlling Sewing Speed
Speed control slider
You can limit the maximum sewing speed with the speed
control slider according to your sewing needs.
To increase the sewing speed, move the slider to the
right.
To decrease the sewing speed, move the slider to the left.
w Reverse button
When sewing stitch pattern 01, 04-07, 11-13, 01S,
04S-07S, (mode 1) or 38-39 (mode 2), the machine will
sew in reverse as long as the reverse button is pressed.
If stitch pattern 01, 04-07, 11-13, 01S, 04S-07S, (mode 1)
or 38-39 (mode 2) has been selected and the foot control
is not connected, the machine will start sewing in reverse
as long as the reverse button is pressed.
If you press the reverse button when sewing any other
patterns, the machine will immediately sew locking
stitches and automatically stop.
e Auto-lock button
When sewing stitch pattern 01, 04-07, 11-13, 01S,
04S-07S, (mode 1) or 38-39 (mode 2) the machine will
immediately sew locking stitches and automatically stop
when the auto-lock button is pressed.
When sewing all other patterns, the machine will sew to
the end of the current pattern, sew locking stitches and
stop automatically.
The machine will trim the threads automatically after
locking the stitch when the auto thread cutting is turned
on (refer to page 75).
r Needle up/down button
Press this button to bring the needle bar up or down.
The machine will stop with the needle in down position.
However, you can change the needle stop position in the
machine setting mode (refer to page 27).
tThread cutter button
After nish sewing, press this button to trim the threads.
The needle bar automatically rises after trimming the
threads (refer to page 30).

10
!5 Direct pattern selection keys (refer to page 25)
You can select the stitch patterns 01 , 04 , 11 , and 23
in mode 1 directly.
When the needle plate for straight stitch is being attached,
you can select the stitch patterns 01S or 04S only.
!6 Elongation key (refer to page 70)
Press this key to elongate satin stitch patterns.
!7 Twin needle key (refer to page 71)
Press this key when sewing with a twin needle.
!8 Mirror image key (refer to page 76)
Press this key to sew a mirror image of the selected
pattern.
!9 Set key (refer to page 26-28)
Press this key to enter the machine setting mode for
customizing the machine settings.
@0 Startover key (refer to page 77)
Press this key to sew a pattern combination from the
beginning.
@1 Lockout key (refer to page 14)
Press this key to lockout the machine when threading the
machine, replacing the accessories etc.
To reduce the risk of injury, all the buttons and keys are
deactivated.
To unlock the machine, press this key again.
@2 Memory key (refer to page 73)
Press this key to register programmed pattern
combinations.
Up to 50 stitch patterns combination can be memorized.
uw
Function Keys
qLCD screen
The LCD screen shows the following information when the
machine is turned on:
w Stitch pattern
e Mode
r Stitch pattern number
t Recommended type of presser foot
y Stitch width
u Stitch length
iCursor key (refer to pages 26, 27, 82)
Press “ ” or “ ” to move the cursor to check or edit the
pattern combination.
oAutomatic thread cutting key (refer to page 75)
Press this key if you wish to cut the threads automatically
after nish sewing with a locking stitch.
When programming a pattern combination, press this key
to cut the threads automatically after nish sewing.
!0 Stitch width adjusting key (refer to pages 31, 40, 50
Press this key to alter the stitch width.
!1 Stitch length adjusting key (refer to pages 31, 40, 50)
Press this key to alter the stitch length.
!2 Mode key (refer to pages 25, 26)
Press the mode key to select the mode.
When the power is turned on, the pattern selection mode 1
is set automatically.
!3 Number keys (refer to page 25)
Enter a 2-digit pattern number to select the desired stitch
pattern in modes 1 to 6.
!4 Clear key (refer to pages 27, 83)
Press the clear key to clear the memorized stitch pattern.
Press and hold this key until the buzzer sounds to delete
the whole pattern combination.
i!0 !1
!3
y
e
r
q
!2
!7
!8
@2
!4
!9
!6
@1
@0
!5
o
t

11
Raising and Lowering the Presser Foot
The presser foot lifter raises and lowers the presser foot.
q Presser foot lifter
You can raise the presser foot higher than the normal up
position. This allows for changing the needle plate, and
also helps you to place thick layers of fabrics under the
foot.
w Extra lifted position
Knee Lifter
The knee lifter is extremely helpful when sewing
patchwork, quilting etc, since it allows you to handle the
fabric while your knee controls the presser foot.
Attaching the knee lifter
Match the ribs on the knee lifter with the notches in the
knee lifter socket and insert the knee lifter.
q Knee lifter
w Rib
e Knee lifter socket
Adjusting the knee lifter
The angle of the knee lifter can be adjusted to t you.
Loosen the setscrew and slide the angle bar in or out to
adjust the angle of the knee lifter.
Tighten the setscrew to secure the angle bar.
r Setscrew
t Angle bar
Using the knee lifter
Push the knee lifter with your knee to easily move the
presser foot up and down.
You can control how high the foot rises by the amount of
knee pressure you exert.
NOTE:
Do not touch the knee lifter while stitching, otherwise
the fabric will not be fed smoothly.
q
w
q
e
w
NOTE:
Do not turn the hand wheel of press the up/down
needle button when the presser foot is in the extra
lifted position.
r
t

12
Adjusting the Foot Pressure
The foot pressure can be adjusted with the foot pressure
dial located under the top cover.
The dial has 7 setting positions from 1 to 7.
For ordinary sewing, set 5 at the setting mark.
qFoot pressure dial
w Setting mark
Reduce the pressure when sewing ne synthetics and
stretch fabrics.
To reduce the pressure, set the dial at a lower number.
Increase the pressure when sewing heavy weight fabrics.
To increase the pressure, set the dial at a higher number.
Dropping the Feed Dog
The feed dog can be lowered for sewing on buttons, free
motion quilting etc.
Shift the drop feed lever toward you to lower the feed
dog.
qDrop feed lever
wFeed dog
Shift the drop feed lever away from you to raise the feed
dog, it will return to the up position when you start the
machine.
NOTE:
If you start the machine with the feed dog lowered, a
message will appear on the LCD screen.
The machine will not run with the feed dog lowered
when selected following pattern numbers; 23 to 32, 34
to 36 in mode 1, stitch patterns in mode 3 to 6.
q
w
q
w

13
For general sewing, set the thread tension dial at AUTO,
which covers a wide range of sewing conditions.
q Thread tension dial
Balancing Thread Tension
Auto-thread tension
Manual thread tension adjustment
You may need to adjust tension manually depending
on the sewing conditions such as the type of fabric and
number of layers.
If the needle thread is too tight, the bobbin thread
appears on the right side of the fabric.
q Wrong side of fabric
w Right side of fabric
e Needle thread
r Bobbin thread
Turn the thread tension dial to a lower number to
decrease the thread tension.
q
q
w
e
r
q
w
e
r
q
w
e
r
q
w
e
r
Balanced thread tension
For straight stitch sewing, both needle and bobbin
threads will join at the middle of the fabrics.
For zigzag stitch sewing, the needle thread will appear
slightly on the wrong side of the fabric.
q Wrong side of fabric
w Right side of fabric
e Needle thread
r Bobbin thread
NOTE:
Manual thread tension adjustment may be required
when the stitch width is set more than “7.0”.
If the needle thread is too loose, the needle thread loops
on the underside of the fabric.
q Wrong side of fabric
w Right side of fabric
e Needle thread
r Bobbin thread
Turn the thread tension dial to a higher number to
increase the thread tension.

14
Changing the Presser Foot
CAUTION:
Always make sure to press the lockout key to lockout
the machine or turn the power switch off before
replacing the presser foot.
Raise the needle to its highest position and raise the
presser foot lifter.
Press the black lever on the back of the foot holder.
The presser foot will drop off.
q Lever
w Presser foot
Lockout Key
Press this key to lockout the machine when threading the
machine, replacing the accessories etc.
To reduce the risk of injury, all the buttons and keys are
deactivated.
q
t
w
Attaching the presser foot
Place the presser foot so that the pin on the foot lies just
under the groove of the foot holder.
Lower the presser bar to lock the foot in place.
Each foot is marked with an identication letter.
e Groove
r Pin
t Identication letter
e
r
To unlock the machine, press this key again.

15
Attaching the foot holder
Attach the foot holder to the presser bar from the rear.
Tighten the thumbscrew securely with the screwdriver.
Removing and Attaching the Foot Holder
CAUTION:
Always make sure to press the lockout key to lockout
the machine or turn the power switch off before
replacing the presser foot.
Removing the foot holder
Raise the presser foot and loosen the setscrew.
Remove the foot holder.
qPresser bar
wFoot holder
e Setscrew
q
w
q
e
w
e

16
Replacing the Needle Plate
Use the straight stitch needle plate when sewing ne
fabrics or sewing with straight stitches.
CAUTION:
Always make sure to press the lockout key to lockout
the machine or turn the power switch off before
replacing the needle plate.
z Slide the extension table to the left to remove it.
Turn the handwheel and raise the needle to the
highest position.
Raise and hold the presser foot lifter to the extra lifted
position.
q Presser foot lifter
w Needle
xPush down the needle plate release lever and the
needle plate will snap off.
e Needle plate release lever
r Needle plate
q
w
cPlace the straight stitch needle plate on the machine.
Set the left edge of the needle plate into the opening.
vPush down on the needle plate mark until the needle
plate locks in place.
Turn the power switch on or press the lockout key to
unlock.
Turn the handwheel slowly and make sure that the
needle does not hit the needle plate.
tNeedle plate mark
CAUTION:
Never press the needle plate release lever while
running the machine.
z
x
c
v
r
e
t

17
Changing Needles
CAUTION:
Always make sure to press the lockout key to lockout
the machine or turn the power switch off before
changing the needle.
Raise the needle by pressing the needle up/down button
and lower the presser foot.
Press the lockout key to lockout the machine or turn the
power switch off.
Loosen the needle clamp screw and remove the needle
from the clamp.
qNeedle clamp screw
Insert a new needle into the needle clamp with the at
side of the needle to the rear.
When inserting the needle into the needle clamp, push it
up against the stopper pin and tighten the needle clamp
screw rmly with a screwdriver.
wFlat side
e Stopper pin
To check needle straightness, place the at side of the
needle onto something at (a needle plate, glass etc.)
The gap between the needle and the at surface should
be consistent.
Never use a blunt needle.
rGap
r
Fabric Thread Needle
Fine
Lawn
Georgette
Tric ot
Organza
Crepe
Silk #80-100
Cotton #80-100
Synthetic #80-100
Blue tip needle
Universal needle
#9/65-11/75
Medium
Sheeting
Jersey
Broadcloth
Fleece
Silk #50
Cotton #50-80
Synthetic #50-80
Red tip needle
Purple tip needle
Universal needle
#11/ 7 5 -14 /9 0
Heavy
weight
Denim
Tweed
Coating
Quilting
Silk #30-50
Cotton #40-50
Synthetic #40-50
Red tip needle
Purple tip needle
Universal needle
#14/90 -16/100
Fabric and Needle Chart
• For general sewing, use red needle.
• Fine threads and needles should be used for sewing
ne fabrics.
• In general, use the same thread for both needle and
bobbin.
• Use a blue tip needle for sewing ne fabrics, stretch
fabrics, tricot and buttonholes to prevent skipped
stitches.
• Use a purple tip needle for sewing knits, free quilting
and across the hem to prevent skipped stitches.
• Use a stabilizer or interface to stretch or ne fabrics
to prevent seam puckering.
• Always test the thread and needle size on a small
piece of the same fabric you will use for actual
sewing.
NOTE:
1 x twin needle, 2 x blue tip needle (#11/75), 1 x red tip
needle (#14/90) and 1 x purple tip needle (#14/90) are
included in the needle case (Part No. 859856005).
e
w
q

18
Needle Denitions
The illustration identies the main parts of a sewing
machine needle.
qBody
w Shaft
eLong groove (round side of needle)
r Short groove (at side of needle)
tEye
yPoint
Universal – an all-purpose needle that handles most
woven and knit fabrics.
Ball point – the point spreads the bers, preventing tears
and is especially suited for loose knits and interlock knits.
Not recommended for embroidery.
Stretch – specially designed to prevent skipped stitches
in synthetic suedes and elasticized knits (swimwear).
Denim – the sharp point effectively pierces densely
woven fabrics such as denim and canvas.
Topstitching – the extra sharp point penetrates layers of
fabrics; extra large eye and large groove accommodate
heavyweight topstitching thread.
Metallic – the large grooved shaft helps prevent delicate
metallic threads from shredding. Another plus, a larger
than average eye makes for easier threading.
Self-Threading – the needle eye has a slit opening on
the side to allow the thread to be easily inserted.
Leather – the cutting point creates small holes in leather
and suede. Holes remain after stitching is removed.
Quilt – the tapered point easily penetrates through
multiple layers and crossed seams.
Wing/Hemstitch – wide at edges (wings) extend
outwards near the eye; they separate bers and create
holes for beautiful heirloom stitches.
Twin /Double – 2 needles are joined on a crossbar and
share a single shaft. Sews two parallel rows of stitching.
Available in universal and ballpoint.
q
w
e
r
t
y
Table of contents
Other ELNA Sewing Machine manuals

ELNA
ELNA 6200 - User manual

ELNA
ELNA 500 ELECTRONIC User manual

ELNA
ELNA 8007 Wiring diagram

ELNA
ELNA Elinita EF72 User manual

ELNA
ELNA 6003 - LEAFLET User manual

ELNA
ELNA Elina 21 User manual

ELNA
ELNA 8007 Owner's manual

ELNA
ELNA 945 User manual

ELNA
ELNA eXplore 320 User manual

ELNA
ELNA EN VISION CE 20 - LEAFLET User manual
Popular Sewing Machine manuals by other brands

Consew
Consew 733R-5 Operating instructions, parts list, maintenance procedures

Joustra
Joustra J46038 quick start guide

UnionSpecial
UnionSpecial BC200 ORIGINAL INSTRUCTIONS ENGINEERS, AND ILLUSTRATED PARTS MANUAL

Brother
Brother ULT-2002D Operation manual

Siruba
Siruba Sew Reach ABF Series Instruction book / parts list

Singer
Singer 503 manual