ELSA ECOMO 640 User manual

ELSA ECOMO
TM
640

© 2000 ELSA AG, Aachen (Germany)
While the information in this manual has been compiled with great care, it may not be deemed an assurance of product
characteristics. ELSA shall be liable only to the degree specified in the terms of sale and delivery.
The reproduction and distribution of the documentation and software supplied with this product and the use of its contents
is subject to written authorization from ELSA. We reserve the right to make any alterations that arise as the result of
technical development.
ELSA is a DIN EN ISO 9001 certified company. With the certificate of June 15, 1998, the authorized certification institute
TÜV-CERT has confirmed the conformity of ELSA AG with the worldwide quality standard DIN EN ISO 9001. The certificate
number of ELSA is 09 100 5069.
You can find all declarations and approvals for the products, as long as they were available at the time of publication, in
the appendix of this documentation.
Trademarks
Windows®, Windows NT®and Microsoft®are registered trademarks of Microsoft, Corp.
Apple®and Macintosh®are registered trademarks of Apple Computer, Inc.
The ELSA logo is a registered trademark of ELSA AG. All other names mentioned may be trademarks or registered
trademarks of their respective owners.
Subject to change without notice. No liability for technical errors or omissions.
ELSA AG
Sonnenweg 11
52070 Aachen
Germany
www.elsa.com
Aachen, August 2000

|
|ELSA ECOMO 640 |
EN
Preface
Thank you for placing your trust in this product.
With the ELSA ECOMO 640 you have selected one of ELSA's high-end
monitors. ELSA products are subject to the highest of standards in production
and quality control which are the foundation for consistently high product
quality. This monitor was especially designed to satisfy the ergonomic
requirements of professional users, and distinguishes itself with an
extraordinary degree of reliability.
This documentation was compiled by several members of our staff from a
variety of departments in order to ensure you the best possible support when
using your ELSA product.
Further information on the Internet at 'www.elsa.com'
Our online services 'www.elsa.com' are available to you around the clock
should you have any queries regarding your ELSA ECOMO 640 or require any
further support.
Our KnowledgeBase can be found at 'www.elsa.com/support'. In the
'Support' file section under 'Know-How', you can find answers to frequently
asked questions (FAQs). Current drivers, firmware, tools and manuals can be
downloaded at any time.
The KnowledgeBase can also be found on the CD.

|
|ELSA ECOMO 640 |
EN

|
EN
|ELSA ECOMO 640 |
Contents
1 Introduction . . . . . . . . . . . . . . . . . . . . . . . . . . . . . . . . . . . . . . . . . . . . . . . . . . . . . . . . . . . . . . . 7
1.1 Monitor features. . . . . . . . . . . . . . . . . . . . . . . . . . . . . . . . . . . . . . . . . . . . . . . . . . . . . 7
1.2 Operating instructions . . . . . . . . . . . . . . . . . . . . . . . . . . . . . . . . . . . . . . . . . . . . . . . . 8
1.2.1 Setup and operation . . . . . . . . . . . . . . . . . . . . . . . . . . . . . . . . . . . . . . . . . . . . . 8
1.2.2 Cleaning the monitor. . . . . . . . . . . . . . . . . . . . . . . . . . . . . . . . . . . . . . . . . . . . . 8
2 Unpacking and connecting . . . . . . . . . . . . . . . . . . . . . . . . . . . . . . . . . . . . . . . . . . . . . . . . . 9
2.1 Is it all there? . . . . . . . . . . . . . . . . . . . . . . . . . . . . . . . . . . . . . . . . . . . . . . . . . . . . . . . 9
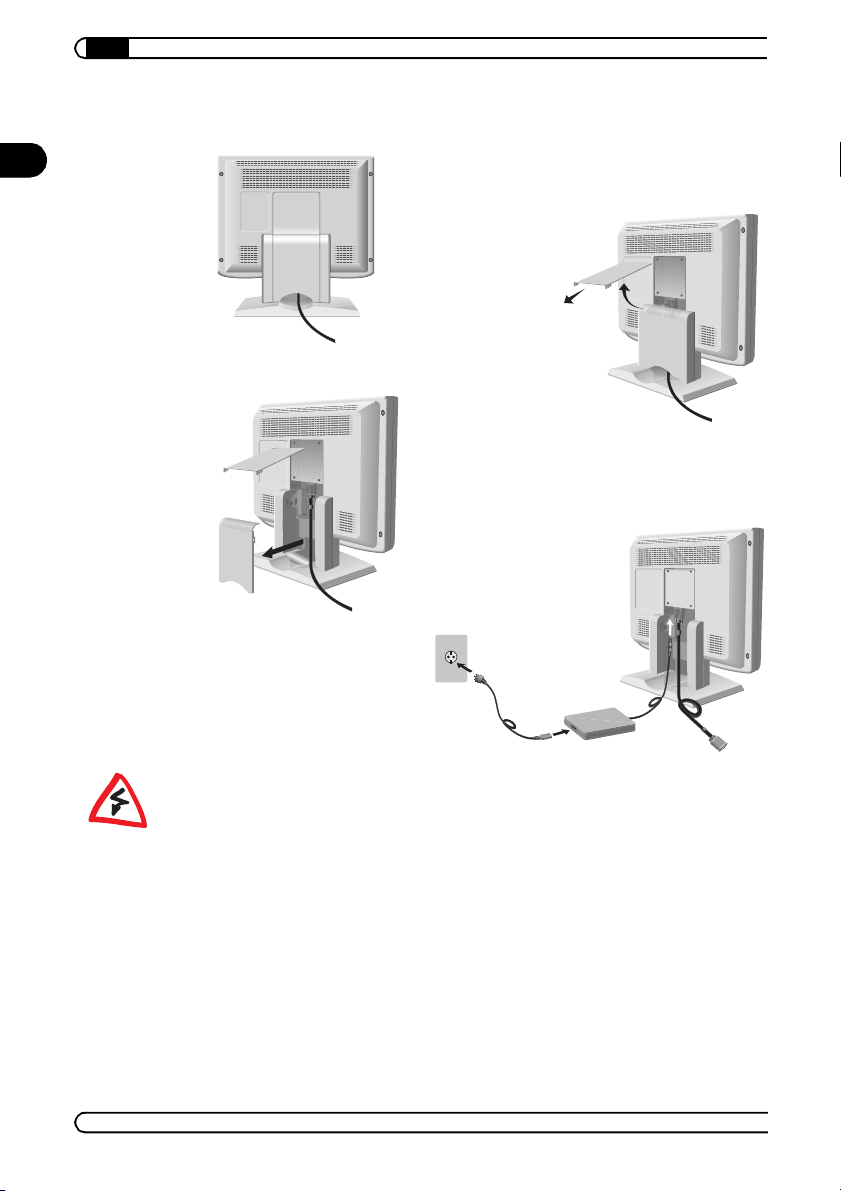
2.2 Cable connections . . . . . . . . . . . . . . . . . . . . . . . . . . . . . . . . . . . . . . . . . . . . . . . . . . 10
2.3 Connecting a second computer . . . . . . . . . . . . . . . . . . . . . . . . . . . . . . . . . . . . . . . . 10
3 Operating and adjusting . . . . . . . . . . . . . . . . . . . . . . . . . . . . . . . . . . . . . . . . . . . . . . . . . . . 11
3.1 Controls on the front. . . . . . . . . . . . . . . . . . . . . . . . . . . . . . . . . . . . . . . . . . . . . . . . . 11
3.2 The connections at the rear . . . . . . . . . . . . . . . . . . . . . . . . . . . . . . . . . . . . . . . . . . . 12
3.3 The on-screen display. . . . . . . . . . . . . . . . . . . . . . . . . . . . . . . . . . . . . . . . . . . . . . . . 13
4 Registration and configuration . . . . . . . . . . . . . . . . . . . . . . . . . . . . . . . . . . . . . . . . . . . . . 15
4.1 Registration with the Operating System . . . . . . . . . . . . . . . . . . . . . . . . . . . . . . . . . 15
4.2 Adjusting the display . . . . . . . . . . . . . . . . . . . . . . . . . . . . . . . . . . . . . . . . . . . . . . . . 15
4.3 On-screen menu language . . . . . . . . . . . . . . . . . . . . . . . . . . . . . . . . . . . . . . . . . . . . 16
4.4 Overview of all OSD functions . . . . . . . . . . . . . . . . . . . . . . . . . . . . . . . . . . . . . . . . . 16
4.4.1 Automatic correction function . . . . . . . . . . . . . . . . . . . . . . . . . . . . . . . . . . . . 18
4.4.2 Automatic zoom function (full screen) . . . . . . . . . . . . . . . . . . . . . . . . . . . . . . 18
4.4.3 Automatic input selection. . . . . . . . . . . . . . . . . . . . . . . . . . . . . . . . . . . . . . . . 18
4.4.4 Automatic brightness function . . . . . . . . . . . . . . . . . . . . . . . . . . . . . . . . . . . . 19
4.4.5 Advanced color settings . . . . . . . . . . . . . . . . . . . . . . . . . . . . . . . . . . . . . . . . . 19
4.4.6 Blocking the on-screen display . . . . . . . . . . . . . . . . . . . . . . . . . . . . . . . . . . . . 20
4.5 Messages on display . . . . . . . . . . . . . . . . . . . . . . . . . . . . . . . . . . . . . . . . . . . . . . . . 20
4.5.1 POWER-SAVE Function is 'Off' . . . . . . . . . . . . . . . . . . . . . . . . . . . . . . . . . . . . 21
4.5.2 POWER-SAVE Function is 'On' . . . . . . . . . . . . . . . . . . . . . . . . . . . . . . . . . . . . 21
4.5.3 POWER-SAVE Function either 'On' or 'Off' . . . . . . . . . . . . . . . . . . . . . . . . . . . 22

|
|ELSA ECOMO 640 |
EN
5 Advice and help . . . . . . . . . . . . . . . . . . . . . . . . . . . . . . . . . . . . . . . . . . . . . . . . . . . . . . . . . . 23
5.1 The monitor does not respond when you start the computer . . . . . . . . . . . . . . . . . 23
5.2 The display does not properly show individual pixels . . . . . . . . . . . . . . . . . . . . . . . 23
5.3 The picture is too dark . . . . . . . . . . . . . . . . . . . . . . . . . . . . . . . . . . . . . . . . . . . . . . . 23
5.4 The monitor displays colors incorrectly . . . . . . . . . . . . . . . . . . . . . . . . . . . . . . . . . . 23
5.5 Two computers on a single display . . . . . . . . . . . . . . . . . . . . . . . . . . . . . . . . . . . . . 24
5.6 The picture isn't sharp . . . . . . . . . . . . . . . . . . . . . . . . . . . . . . . . . . . . . . . . . . . . . . . 24
5.7 The display of circles and squares is distorted . . . . . . . . . . . . . . . . . . . . . . . . . . . . 24
5.8 How can I change the resolution? . . . . . . . . . . . . . . . . . . . . . . . . . . . . . . . . . . . . . . 24
5.9 How can I change the refresh rate?. . . . . . . . . . . . . . . . . . . . . . . . . . . . . . . . . . . . . 24
5.10 Does the display also work under Linux and MacOS?. . . . . . . . . . . . . . . . . . . . . . 25
6 Technical data . . . . . . . . . . . . . . . . . . . . . . . . . . . . . . . . . . . . . . . . . . . . . . . . . . . . . . . . . . . 27
6.1 Performance data and specifications. . . . . . . . . . . . . . . . . . . . . . . . . . . . . . . . . . . . 27
6.2 The power save function . . . . . . . . . . . . . . . . . . . . . . . . . . . . . . . . . . . . . . . . . . . . . 28
6.3 Factory default settings . . . . . . . . . . . . . . . . . . . . . . . . . . . . . . . . . . . . . . . . . . . . . . 28
6.4 The VGA D-shell socket . . . . . . . . . . . . . . . . . . . . . . . . . . . . . . . . . . . . . . . . . . . . . . 29
7 Appendix . . . . . . . . . . . . . . . . . . . . . . . . . . . . . . . . . . . . . . . . . . . . . . . . . . . . . . . . . . . . . . . . 31
7.1 TCO ’99 . . . . . . . . . . . . . . . . . . . . . . . . . . . . . . . . . . . . . . . . . . . . . . . . . . . . . . . . . . . 31
7.2 CE conformity and FCC radiation standard. . . . . . . . . . . . . . . . . . . . . . . . . . . . . . . . 31
7.3 ELSA-ServiceDirect for ELSA ECOMO monitors . . . . . . . . . . . . . . . . . . . . . . . . . . . 32
7.4 Warranty conditions. . . . . . . . . . . . . . . . . . . . . . . . . . . . . . . . . . . . . . . . . . . . . . . . . 33

|Introduction 7
|ELSA ECOMO 640 |
EN
1 Introduction
This chapter provides you with important operational advice and general
information about your new LCD monitor.
1.1 Monitor features
쎲The ELSA ECOMO 640 is compatible with most analog RGB signals (red,
green, blue). It displays text and graphics in conjunction with VGA,
SVGA, XGA (non-interlaced) and the common Macintosh-compatible
color graphics boards.
쎲Auto-Scanning is performed digitally by a microprocessor. The monitor
synchronizes itself automatically on all horizontal frequencies between
24.0kHz and 82.5kHz and on all vertical frequencies between 30.0Hz and
105.0Hz (up to 125 Hz refresh rate at horizontal frequencies up to 65 kHz).
The micro-processor-based control mechanism allows the monitor to
operate in any frequency mode with the precision of a fixed frequency
monitor.
쎲In addition to the preprogrammed monitor display standards, the ELSA
ECOMO 640 also provides the option of saving user-specific settings for
these and other timings.
쎲The ELSA ECOMO 640 supports a maximum resolution of 1280 horizontal
pixels by 1024 vertical lines. This makes it excellent for graphical user
interfaces like Windows, Apple MacOS or Linux.
쎲The ELSA ECOMO 640 includes the DDC1 and DDC2B functions. DDC
(Display Data Channel) is a transmission channel by which the monitor
can automatically inform the computer of its capabilities (e.g. supported
graphics modes). The system can only perform this function if both the
monitor and the computer (the graphics board) support the DDC function.
쎲The ELSA ECOMO 640 has an energy saving function conforming to the
VESA DPMS standard. When properly set, the power consumption is
reduced to less than 3 watts when the monitor is not in use.
쎲The automatic adjustment to the input signal (Auto Adjust), the automatic
brightness control and the digital sharpness function ensure that the
display quality is always optimum.
쎲The sRGB mode supports the platform-independent standard color space
of modern display systems.

Introduction |
|ELSA ECOMO 640 |
8
EN
1.2 Operating instructions
1.2.1 Setup and operation
Please keep the following in mind when setting up and using the monitor:
쎲To avoid straining youreyes,do not placing the monitor in front of abright
background or where sunlight or other light sources shine directly onto
the monitor. To ensure the best ergonomical position, the monitor should
be below eye-level.
쎲Do not cover the monitor's air vents. Make sure that there is sufficient
ventilation so that heat from the monitor can properly dissipate.
쎲Avoid exposing the monitor to damp and dust as this can cause fire or
electric shock hazard.
쎲Ensure that neither the monitor, nor any other heavy item is placed on the
power supply cord. A damaged power supply cord can cause fire or short
circuits.
쎲When transporting the monitor, handle it with care.
쎲Do not shake or scratch the monitor because it is fragile.
1.2.2 Cleaning the monitor
Please follow these guidelines when cleaning the monitor:
쎲Always remove the power plug from the socket before cleaning.
쎲Clean the display and the casing with a soft cloth.
쎲If the monitor requires more than dusting, clean it with a mild cleaning
solution and a soft cloth.
Do not clean the device with benzene, thinner or other volatile substances
because the surface could get damaged. Never leave the monitor in contact
with rubber or vinyl products for an extended time period.

|Unpacking and connecting 9
|ELSA ECOMO 640 |
EN
2 Unpacking and connecting
2.1 Is it all there?
After unpacking the ELSA ECOMO 640, check that all parts are there. The
scope of supply includes:
Monitor ELSA ECOMO 640
Power supply cord
Power supply adapter
User's Guide
Disk (CD or diskette)
쐃
쐇쐋
쐏
쐄
or

Unpacking and connecting |
|ELSA ECOMO 640 |
10
EN
2.2 Cable connections
If the monitor is to remain switched off for an extended period, please remove
the power cord from the socket to disconnect the unit from the power supply.
Therefore, the power socket should be close to the device and easily
accessible. Do not use the power supply adapter for other devices as this can
cause damage or fire!
2.3 Connecting a second computer
The ELSA ECOMO 640 has a second socket for connecting a second
computer. You will need a VGA connector cable for this to connect the socket
on your monitor to the graphics board outlet of the other computer. The
signals are selected by using the SIGNAL A/B key on the ELSA ECOMO 640.
Position the monitor so that you can view the rear of the
device.
햲
Release the upper flap, pull it
upwards and remove the flap
from its hinges.
햳
Now remove the lower flap by slightly pressing it.
햴
Insert the power adapter cable into
the left socket below the cover.
Connect the power supply cord with
the power supply adapter and the
power socket.
햵

|Operating and adjusting 11
|ELSA ECOMO 640 |
EN
3 Operating and adjusting
Due to its LCD technology the ELSA ECOMO 640 generates a geometrically
perfect image that normally does not require correction after Auto Setup
(page 15) has been run. For manual adjustments use the controls on the ELSA
ECOMO 640.
3.1 Controls on the front
There is a row of keys on the front of your monitor with which you can perform
the fine adjustment of the display in the OSD menu.
Function
쐃Signal A/B and OSD OFF – When the on-screen display (OSD) is not active:
change the signal input. When the OSD is active: close the OSD.
쐇Select – You can select the individual positions on the OSD menu with these keys.
쐋Adjust –To modify the settings on the selected OSD menu page.
쐏Power switch –Switches the monitor on and off.
쐄Power indicator–This indicator lights up when the monitor is switched on.
쐇쐋 쐏쐄쐃

Operating and adjusting |
|ELSA ECOMO 640 |
12
EN
3.2 The connections at the rear
쐋
쐇
PC
Notebook
Power supply adapter
Function
Power socket –Plug the power adapter in here.
Graphics input no. 1 –Connect your PC with this cord.
Graphics input no. 2 –You can connect a second computer or a second graphics
board to the monitor at this socket.
쐏Connector for theft protection –The Kensington MicroSaver security system
connector is attached to this connection socket.

|Operating and adjusting 13
|ELSA ECOMO 640 |
EN
3.3 The on-screen display
The on-screen display menu (OSD) is a useful utility for the precise
configuration and adjustment of the display on your monitor. If you press one
of the select keys on the monitor's keypad, the OSD menu will appear on the
screen. Use the keys to access the individual menu pages within the OSD
menu.
How to navigate the OSD
햲Press one of the SELECT buttons to display the OSD screen.
햳Select the group icon within
the main menu by pressing
the 왔button.
햴Select the item within the
sub menu by pressing the 왘
button.
햵Adjust values and functions
by pressing the +/-buttons.
SELECT
SELECT
ADJUST

Operating and adjusting |
|ELSA ECOMO 640 |
14
EN
After 30 seconds of inactivity, the OSD screen automatically disappears.
Press the OSD OFF button to switch the OSD off immediately.
Signal A/B
OSD OFF

|Registration and configuration 15
|ELSA ECOMO 640 |
EN
4 Registration and configuration
You learnt how to operate the keypad and the On Screen Display menu on
page 13, 'The on-screen display'. This chapter will explain how you should
continue.
4.1 Registration with the operating system
The monitor can be registered with some operating systems. The advantage
is that the system can be supplied with the monitor's particulars, thereby
enabling an optimum interaction between the computer system and the
monitor.
Registration under Windows 95, Windows 98 and Windows 2000
After you connect the monitor and start Windows the system normally
detects the new device and requests the manufacturer's driver. Insert the
accompanying disk (CD or diskette) into the computer, and follow the
Windows prompts. Indicate the drive on the computer into which you have
inserted the disk.
To make sure you get a viewable image when you connect the monitor, you
should set a resolution and a refresh rate that is supported by the monitor
before connecting it. If the system is a new installation, start it with the
standard VGA driver and a plug&play monitor driver. This will enable you to
configure the system starting from the default settings.
4.2 Adjusting the display
Because different graphics boards have different signal characteristics it is
usually necessary to adjust the display settings. You do not need to do any
of this work: the ELSA ECOMO 640 has an Auto Setup function. This function
automatically optimizes the monitor display. This function can be called
within the OSD menu.

Registration and configuration |
|ELSA ECOMO 640 |
16
EN
4.3 On-screen menu language
The ELSA ECOMO 640 can display its on-
screen menus in a variety of languages.
To change the language used for the on-
screen menu, simply call up the menu
page illustrated here and select the
language you want.
4.4 Overview of all OSD functions
The following overview has been drawn up to help you navigate your way
through the nine menu pages and their contents.
왘
왔
Main
menu Symbol Function Key '–'Key '+'
Brightness To decrease the
brightness
To increase the
brightness
Contrast To decrease the
contrast
To increase the
contrast
Black level To increase the
proportion of black
To decrease the
proportion of black
Automatic
brightness
Switch on the
'Automatic brightness'
function
Switch off the
'Automatic brightness'
function
Clock To reduce the width of
the image on the
screen to the left
To expand the width of
the image on the
screen to the right
Clock phase To change the snow noise of the image
Horizontal
position
To move the image to
the left
To move the image to
the right
Vertical
position
To move the image
down
To move the image up
H-Resolution The displayed image
becomes narrower
The displayed image
becomes wider

|Registration and configuration 17
|ELSA ECOMO 640 |
EN
V-Resolution To reduce the height of
the image on the
screen
To increase the height
of the image on the
screen
Auto Setup –To conduct Auto Setup
Automatic
correction
Switching off the
automatic correction
function
Switching on the
automatic correction
function
Automatic Zoom
(full screen)
To switch off the full-
screen mode
To switch on the full-
screen mode
Sharpness Increase image
sharpness
Reduce image
sharpness
Display mode To display by TEXT
mode
To display by GRAPHIC
mode
Color mode Select the desired color mode: 'sRGB', 'VIDEO',
'NATIVE' or 'User'
Color
temperature1) To decrease the color
temperature
To increase the color
temperature
Color control1) Correcting individual colors: red, yellow, green,
cyan, blue, magenta and black. The selected color
is shifted in the color spectrum with '+' and '–'.
Reset color1) –Resets color
temperature and color
control to default
values
Reset all values –To restore to the
factory preset mode
OSD position To move the OSD position for 5 places
Power save
function
To select the constant
power mode
To select the power
save mode
Automatic input
selection
Switch off automatic
input selection
Switch on automatic
input selection
Main
menu Symbol Function Key '–'Key '+'
1) These functions are only available in the 'User' color mode.

Registration and configuration |
|ELSA ECOMO 640 |
18
EN
4.4.1 Automatic correction function
The ELSA ECOMO 640 has an automatic correction function with which the
clock phase and the horizontal and vertical display position can be optimized.
This function is not activated in new monitors. It can be called in the on-
screen display with 왘and activated there.
When activated the automatic correction function automatically adjusts the
monitor settings to the input signal and the ambient temperature at 30-
minute intervals. When animations are running or during mouse movements
it may happen that the display seems to stop moving –this is not a
malfunction but is caused by the automatic correction function.
4.4.2 Automatic zoom function (full screen)
This function automatically enlarges resolutions of 1024 x 768 or less on the
full screen and smooths any edges. This enables clear display even of lower
resolutions. With some less common resolutions the enlarged display may
not cover the entire screen area or may not be enlarged in one direction. In
addition, the display may not be completely sharp. The function is called in
the on-screen display with 왘.
4.4.3 Automatic input selection
When automatic input selection is activated, the input that receives an input
signal is automatically selected. When two computers (or two graphics
boards) are connected simultaneously, the display of the computer that was
Clamp pulse
position
The clamp pulse position prevents an
overwhelmingly green or white background
Clamp pulse position
to the front clamp
pulse (default)
Clamp pulse position
to the rear clamp pulse
(common with older
Macintosh computers)
Language To choose the language used for the OSD:
ENG...English FRA....French
ITA.....Italian GER ...German
ESP....Spanish JPN ...Japanese
Main
menu Symbol Function Key '–'Key '+'

|Registration and configuration 19
|ELSA ECOMO 640 |
EN
ready for operation first appears on the monitor. If a computer switches to
energy-saving mode, the other computer will have access to the monitor after
a short time. The function is switched on and off in the on-screen display
with 왘.
4.4.4 Automatic brightness function
This function can be used to reduce distracting glare. Glare tends to occur
when there are large areas of white on the monitor. In this case the
automatic brightness function reduces the luminosity of the monitor. It can
be switched on and off in the on-screen display with 왘.
4.4.5 Advanced color settings
The color display mode 왘can be selected from four options in
the screen function:
Mode sRGB
The sRGB mode provides a worldwide standardized RGB color environment.
This allows true-color display of RGB data on different standardized output
devices without requiring additional color management software. However,
the sRGB color range has significantly fewer colors than the ECOMO 640 can
display. The sRGB mode is provided for working with fixed colors without a
color management system. To obtain brilliant screen displays that fully use
the entire color spectrum of the monitor the native or user mode should be
selected.
VIDEO mode
Ideal for showing animations or films.
Native mode
The default mode of the ECOMO 640. It shows the entire color spectrum.
User mode
Selection of user mode providesthree additional functions for configuring the
color reproduction:
쎲Color temperature
The color temperature can be set to any value between 5000K and
9600K.

Registration and configuration |
|ELSA ECOMO 640 |
20
EN
쎲Color control
This function allows you to set the six base colors of red, green, blue,
cyan, magenta and yellow and the color saturation (black) independently
of one another. Every one of the seven sliders in the '+' field and the '–'
field shows the target color, which can be changed to the selected color
with the '+' and the '–' key.
쎲Color reset
Use this function to reset color temperature and color control to the
default factory values.
4.4.6 Blocking the on-screen display
You can block access to the pages of the
OSD menu. You can then only regulate
the brightness of the monitor display.
The SIGNAL A/B / OSD OFF key will
also remain active. Other functions
cannot be selected.
To remove the lock, press the '–' key first
and then one of the SELECT or ADJUST
keys. When the OSD menu is removed
from the display, you can access the ADJUST-LOCK page again and remove
the lock by pressing the '–' key.
4.5 Messages on display
If the monitor detects no synchronization signal, an incorrect input connection
or an input frequency outside its frequency range, the following warnings will
be shown on the display.
In such a case please check the connections of the video signal cable and the
settings of your graphics board. These should lie within the permissible
ranges.
왖 왖
Press both these keys simultaneously to
access the 'CONTROL LOCK' page.
왖
Then press the '+' key to lock the OSD
menu.
Table of contents
Other ELSA Monitor manuals

ELSA
ELSA ECOMO 21S99 User manual

ELSA
ELSA ECOMO 117LCD User manual

ELSA
ELSA ECOMO 20DFP99 User manual

ELSA
ELSA ECOMO 320 User manual

ELSA
ELSA Ecomo 750 User manual

ELSA
ELSA ECOMO 20LCD9 User manual

ELSA
ELSA ECOMO 17DFP99 User manual

ELSA
ELSA ECOMO 22H99 User manual

ELSA
ELSA ECOMO 660 User manual

ELSA
ELSA ECOMO Office User manual