manuals.online logo
Brands
  1. Home
  2. •
  3. Brands
  4. •
  5. Emerson
  6. •
  7. Controllers
  8. •
  9. Emerson CASH VALVE A-360 Manual

Emerson CASH VALVE A-360 Manual

© 2020 Emerson. All rights reserved.Emerson.com
Before installation, these instructions must be read carefully and understood.
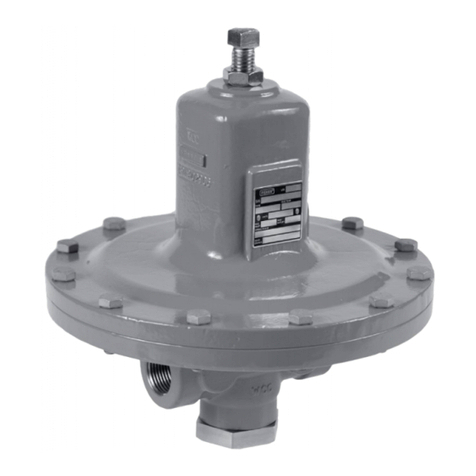
CASH VALVE™ A-360 AND A-361 PRESSURE REGULATORS
INSTALLATION, OPERATION AND MAINTENANCE INSTRUCTIONS
DESCRIPTION
Types A-360 and A-361 pressure reducing and
regulating valves automatically reduce a high
inlet pressure to a lower delivery pressure and
maintain that lower pressure within reasonably
close limits, even during high flow rates.
Type A-360 is 2-way; Type A-361 is 4-way with
gauge taps on sides of body.
SPECIFICATION DATA
Service: Air, water, oil, gases
(except steam) and other
non-corrosive liquids
Sizes: ¼" (6.35 mm),
⅜" (9.53 mm), and
½" (12.7 mm)
Connections: Threaded female inlet
and outlet, A-361 has side
gauge connections
Body: Brass - A-360
Bronze - A-361
Max.
Temperature: 180°F (82°C)
Max.
Inlet Pressure: 400 psi (27.57 bar)
Outlet Pressure
Range: 0-250 psi (0-17.23 bar)
INSTALLATION INSTRUCTIONS
Types A-360 and A-361 regulators can
be installed in any position. For ease of
maintenance and repair however, it is
suggested that the valve be installed in a
horizontal line with the spring chamber upright.
For convenient operation and maintenance,
manual shut-off valves should be installed
upstream and downstream from the valve.
Before installing the valve, the piping should be
thoroughly flushed out to remove any foreign
material. Install the valve with the inlet pipe in
proper relationship to the flow arrow stamped
on the valve body.
OPERATING INSTRUCTIONS
Adjusting the Delivery Pressure
The regulator's delivery pressure setting is
adjusted by turning the adjusting screw (1) at
the top of the spring chamber after loosening
the adjusting screw lock nut (2). To increase
the delivery pressure, turn the adjusting
screw clockwise (into the spring chamber).
To decrease the delivery pressure, turn the
adjusting screw counter-clockwise (out of the
spring chamber). Tighten the adjusting screw
lock nut after the adjustment has been made.
NOTE:
When adjusting the delivery pressure, draw
flow and shutoff downstream to check
pressure set.
VCIOM-14994-EN 22/01
WARNING
Failure to follow these instructions or to properly
install and maintain this equipment could result in
an explosion, fire and/or chemical contamination
causing property damage and personal injury or
death.
Cash Valve regulators must be installed, operated
and maintained in accordance with federal,
state and local codes, rules and regulations
and Emerson Process Management Regulator
Technologies, Inc. (Emerson) instructions.
If the regulator vents gas or a leak develops in
the system, service to the unit may be required.
Failure to correct trouble could result in a
hazardous condition.
Installation, operation and maintenance
procedures performed by unqualified personnel
may result in improper adjustment and unsafe
operation. Either condition may result in
equipment damage or personal injury. Only a
qualified person shall install or service the types
A-360 or A-361 regulators.
CALIFORNIA PROPOSITION 65 WARNING
This product can expose you to chemicals
including lead, which is known to the State of
California to cause cancer, birth defects, or other
reproductive harm. For more information,
go to www.P65Warnings.ca.gov
INTRODUCTION
Scope of the Manual
This manual provides instructions for the
installation, adjustment, and maintenance for
the types A-360 and A-361 pressure regulators.
2
CASH VALVE™ A-360 AND A-361 PRESSURE REGULATORS
INSTALLATION, OPERATION AND MAINTENANCE INSTRUCTIONS
MAINTENANCE INSTRUCTIONS
The following procedures are provided for
servicing the recommended spare parts for the
Types A-360 and A-361 regulators. Repair parts

can easily be installed without removing the
regulator from the line.
CAUTION
Before attempting to replace any spare parts be
sure to shut off all pressure connections to the
valve. With the valve closed, however, system
pressure could still be locked between the shut
off valve and the inlet and/or outlet sides of the
regulator. Before proceeding with any valve
service be certain to relieve the pressure from
BOTH sides of the regulator.
Servicing Diaphragm(s), Top O-Ring, and
Pressure Spring
1. Loosen the lock nut and turn the adjusting
screw counterclockwise until the pressure
spring is no longer under tension. When
reassembling, run the adjusting screw down
until the lock nut almost touches the spring
chamber. This will give you approximately
the same set as before disassembly.
2. Remove the spring chamber from the
body. When reassembling, torque to
50-60 ft-lbs (67.8-81.3 N•m).
REPAIR PARTS INFORMATION
Refer to the regulator exploded view for parts identification.
Item No. Description Material Quantity
1Adjusting Screw (Square Head) Steel 1
1+Adjusting Screw (T-Handle) Set Brass 1
2Lock Nut (Hex for Sq. Hd. Screw) Steel 1
2+Lock Nut (Hex for T-Handle) Steel 1
2+Lock Nut (Wing for Panel Mounting) Steel 1
3Identification Tag Aluminum 1
4Bushing (for Panel Mounting only) Brass 1
5Spring Chamber (for Sq. Hd. Screw) Brass 1
5+Spring Chamber (for T-Handle) Brass 1
5+Spring Chamber (for Panel Mounting) Brass 1
6Spring Button Brass 1
7Pressure Spring (see Ranges chart) Stainless steel 1
8Diaphragm Stop Brass 1
9Pressure Plate Nut Steel 1
10 Lock Washer Steel 1
11 Pressure Plate Brass 1
12* Diaphragm Neoprene 1
13 Pusher Post Button (A-360, A-361) Brass 1
14 Retainer Plate Screws Brass 2
15 Retainer Plate Brass 1
16* O-Ring (Top) Buna-N(1) 1
17 Body (A-360 2 Way) Brass 1
17+Body (A-361 4 Way) Brass 1
18* Pusher Post (A-360, A-361) Stainless steel 1
19* Seat Disk Buna-N(1) 1
20* Piston Brass 1
21 Piston Spring Stainless steel 1
22* O-Ring (Bottom) Buna-N(1) 1
23 Bottom Plug Brass 1
* Recommended Spare Parts
+Not pictured
1 Depending on construction. Seat Material also available in Viton and Teflon. Seat Material
selection determines O-ring material.
3. Remove the spring button, pressure
spring, diaphragm stop, and diaphragm
subassembly. When reassembling,
torque diaphragm nut to approximately
75 in-lbs (8.48 N•m).
4. If the top o-ring is to be serviced, remove
the two retainer plate screws and remove
the retainer plate and top o-ring. Lubricate
top o-ring with Dow Corning Molykote 111 or
equivalent before installing.
5. Inspect all parts for wear and damage and
replace if necessary. Reassemble parts
in reverse order. DO NOT OVERTIGHTEN.
Follow the Operation Instructions to reset
the delivery pressure.
3
CASH VALVE™ A-360 AND A-361 PRESSURE REGULATORS
INSTALLATION, OPERATION AND MAINTENANCE INSTRUCTIONS
SPECIFICATIONS
Each Type A-360 or A-361 pressure regulator
is equipped with a pressure spring selected to
provide the desired outlet or reduced pressure
setting. The range of adjustment or satisfactory
"working range" of individual springs is shown
above for each valve size. Every regulator has
the "set" pressure and range of adjustment
stamped on a tag fastened to the valve. The
ranges shown below are recommended for
best performance.
Size,
in. (mm.) Range of Adjustment, psi (bar)
¼
(6.35)
0-5
(0-0.35)
2-35
(0.14-2.41)
20-70
(1.38-4.83)
60-125
(4.14-8.62)
75-200
(5.17-13.8)
100-250
(6.89-17.2)
⅜
(9.53)
0-5
(0-0.35)
2-35
(0.14-2.41)
20-70
(1.38-4.83)
60-125
(4.14-8.62)
75-200
(5.17-13.8)
100-250
(6.89-17.2)
½
(12.7)
0-5
(0-0.35)
2-25
(0.14-1.72)
20-60
(1.38-4.14)
40-80
(2.76-5.52)
75-125
(5.17-8.62)
100-250
(6.89-17.2)
SPRING RANGES
DIMENSIONS
Description Dimensions, in. (mm) Ship. Wt.,
lbs. (kg)
Type Size, in. (mm) Style A B C
A-360
¼ (6.35) 2-Way 2½ (64) 4½ (114) 1⅛ (29) 2 (0.9)
⅜ (9.53) 2-Way 2½ (64) 4½ (114) 1⅛ (29) 2 (0.9)
½ (12.7) 2-Way 2⅞ (73) 4½ (114) 1⅝ (41) 2½ (1.1)
A-361
¼ (6.35) 4-Way 2½ (64) 4½ (114) 1⅛ (29) 2⅛ (1.0)
⅜ (9.53) 4-Way 2½ (64) 4½ (114) 1⅛ (29) 2⅛ (1.0)
½ (12.7) 4-Way 2⅞ (73) 4½ (114) 1⅝ (41) 2⅝ (1.2)
VCIOM-14994-EN © 2020, 2022 Emerson Electric Co. All rights reserved 01/22. Cash Valve is a mark owned by one of the companies in the Emerson Automation
Solutions business unit of Emerson Electric Co. The Emerson logo is a trademark and service mark of Emerson Electric Co. All other marks are the property of their
prospective owners.
The contents of this publication are presented for informational purposes only, and while every effort has been made to ensure their accuracy, they are not to be
construed as warranties or guarantees, express or implied, regarding the products or services described herein or their use or applicability. All sales are governed
by our terms and conditions, which are available upon request. We reserve the right to modify or improve the designs or specifications of such products at any time
without notice.
Emerson Electric Co. does not assume responsibility for the selection, use or maintenance of any product. Responsibility for proper selection, use and maintenance
of any Emerson Electric Co. product remains solely with the purchaser.
Emerson.com
HOW TO ORDER
To order repair parts, refer to the exploded view
of the Type A-360 to identify the part required.
When ordering, please use the part names
listed and provide the valve serial number
stated on the identification tag. Also state the
following: "Repair Parts for A-360 or A361"
and provide:
1. Valve size
2. Service (air, water, oil, non-corrosive liquids,
or gas)
3. Inlet pressure
4. Outlet or delivery pressure range and setting
5. Part description
6. Quantity of each part
7. Valve assembly or serial number stated
on the metal identification tag under the
adjusting screw lock nut.
Servicing the Seat Disk and Bottom O-Ring
1. Loosen the lock nut and turn the adjusting
screw counterclockwise until the pressure
spring is no longer under tension. When
reassembling, run the adjusting screw down
until the lock nut almost touches the spring
chamber. This will give you approximately
the same set as before disassembly.
2. Remove the bottom plug. Take care, as
the bottom plug is under slight tension
as a result of the piston spring acting
against the bottom plug. Remove the
piston subassembly, piston spring, and
bottom o-ring. Lubricate bottom o-ring with
Dow Corning Molykote 111 or equivalent
before installing. Unscrew the pusher
post from the piston to remove the seat
disk. Do not lubricate the seat disk. When
reassembling, ensure that the pusher post
is seated completely against the seat disk;
torque the bottom plug to approximately
10 ft-lbs (13.6 N•m).
3. Remove any debris from the valve body.
4. Inspect all parts for wear and damage and
replace if necessary.
5. Reassemble the valve in reverse order. DO
NOT OVERTIGHTEN. Follow the Operation
Instructions to reset the delivery pressure.

This manual suits for next models

1

Other Emerson Controllers manuals

Emerson Bettis 2000 Series Manual

Emerson

Emerson Bettis 2000 Series Manual

Emerson AVENTICS Sentronic TWIN 615 User manual

Emerson

Emerson AVENTICS Sentronic TWIN 615 User manual

Emerson Fisher EZL User manual

Emerson

Emerson Fisher EZL User manual

Emerson Rosemount 3490 Series User manual

Emerson

Emerson Rosemount 3490 Series User manual

Emerson Fisher R622 User manual

Emerson

Emerson Fisher R622 User manual

Emerson XEV EX48 User manual

Emerson

Emerson XEV EX48 User manual

Emerson MR98 Series User manual

Emerson

Emerson MR98 Series User manual

Emerson EL-O-Matic F-Series User manual

Emerson

Emerson EL-O-Matic F-Series User manual

Emerson PACSystems RSTi-EP User manual

Emerson

Emerson PACSystems RSTi-EP User manual

Emerson OPM4001 User manual

Emerson

Emerson OPM4001 User manual

Emerson Alco Controls CS1 Series User manual

Emerson

Emerson Alco Controls CS1 Series User manual

Emerson FB3000 User manual

Emerson

Emerson FB3000 User manual

Emerson Asset Management Tag User manual

Emerson

Emerson Asset Management Tag User manual

Emerson PACSystems RSTi-EP EPSCPE100 User manual

Emerson

Emerson PACSystems RSTi-EP EPSCPE100 User manual

Emerson Bettis Q series User manual

Emerson

Emerson Bettis Q series User manual

Emerson TARTARINI PS/79 User manual

Emerson

Emerson TARTARINI PS/79 User manual

Emerson EXD-SH1 User manual

Emerson

Emerson EXD-SH1 User manual

Emerson Tescom 44-3400 Series User manual

Emerson

Emerson Tescom 44-3400 Series User manual

Emerson E2 User manual

Emerson

Emerson E2 User manual

Emerson Fisher FIELDVUE DVC6200 SIS User manual

Emerson

Emerson Fisher FIELDVUE DVC6200 SIS User manual

Emerson Fisher CT88 User manual

Emerson

Emerson Fisher CT88 User manual

Emerson Fisher L2e User manual

Emerson

Emerson Fisher L2e User manual

Emerson Unidrive SPM User manual

Emerson

Emerson Unidrive SPM User manual

Emerson E2 RX Series Manual

Emerson

Emerson E2 RX Series Manual

Popular Controllers manuals by other brands

Jung 230061SR operating instructions

Jung

Jung 230061SR operating instructions

Nexmosphere XM-350 quick start guide

Nexmosphere

Nexmosphere XM-350 quick start guide

Panasonic CZ-RE2C2 installation manual

Panasonic

Panasonic CZ-RE2C2 installation manual

DLC OMNI CONTROL installation guide

DLC

DLC OMNI CONTROL installation guide

Convex VMEBUS Configuration guide

Convex

Convex VMEBUS Configuration guide

Honeywell Home Lyric LCP500-L User reference guide

Honeywell Home

Honeywell Home Lyric LCP500-L User reference guide

Toshiba TS3000 Series instruction manual

Toshiba

Toshiba TS3000 Series instruction manual

National Instruments CompactRIO cRIO-9066 Getting started

National Instruments

National Instruments CompactRIO cRIO-9066 Getting started

Topmodel XPower XREG80HV user manual

Topmodel

Topmodel XPower XREG80HV user manual

Mitsubishi CMB-P-V-F installation manual

Mitsubishi

Mitsubishi CMB-P-V-F installation manual

Plum ecoMAX920P1-K Installation and operating manual

Plum

Plum ecoMAX920P1-K Installation and operating manual

Herth+Buss Elparts Reanimator 1400 manual

Herth+Buss

Herth+Buss Elparts Reanimator 1400 manual

PRESONUS FaderPort 16 owner's manual

PRESONUS

PRESONUS FaderPort 16 owner's manual

Doli EDC580 Assembly instruction

Doli

Doli EDC580 Assembly instruction

Renogy Commander Series manual

Renogy

Renogy Commander Series manual

Curtis 1268-5403 Pre-installation instructions

Curtis

Curtis 1268-5403 Pre-installation instructions

Mitsubishi FX2N-4AD-PT user guide

Mitsubishi

Mitsubishi FX2N-4AD-PT user guide

Roller Control instruction manual

Roller

Roller Control instruction manual

manuals.online logo
manuals.online logoBrands
  • About & Mission
  • Contact us
  • Privacy Policy
  • Terms and Conditions

Copyright 2025 Manuals.Online. All Rights Reserved.