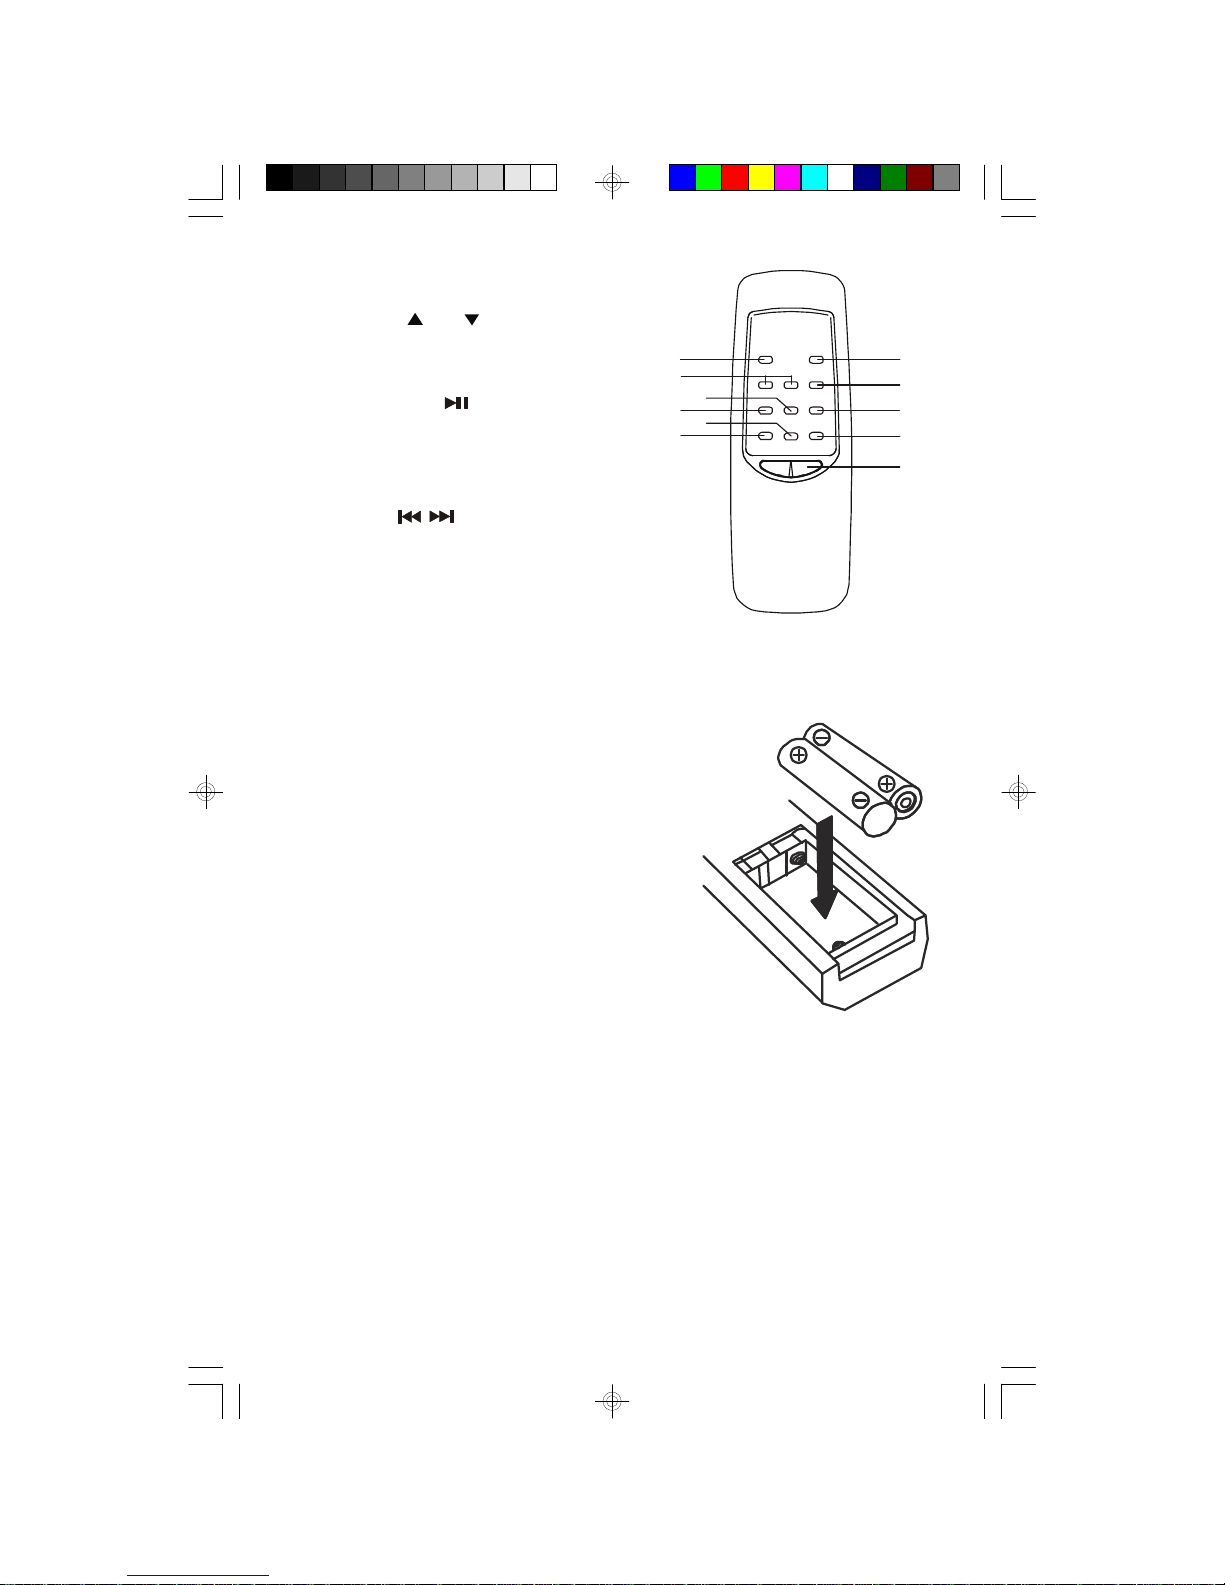
Emerson ES50 User manual

OWNER'SMANUAL
ES50
MICRO AUDIO SYSTEM
withCD PLAYER
and DIGITALTUNER
Visitourweb siteatwww.emersonradio.com
ES50_ib071403.p65 14/7/2003, 11:4025

1
TO PREVENT FIRE OR SHOCK HAZARD, DO NOT USE THIS PLUG WITH AN
EXTENSION CORD, RECEPTACLE OR OTHER OUTLET UNLESS THE BLADES
CAN BE FULLY INSERTED TO PREVENT BLADE EXPOSURE. TO PREVENT FIRE
ORSHOCKHAZARD,DONOTEXPOSETHISAPPLIANCETORAINORMOISTURE.
IMPORTANTSAFETYINSTRUCTIONS
1.) Read these instructions.
2.) Keep these instructions.
3.) Heed all warnings.
4.) Follow all instructions.
5.) Do not use this apparatus near water.
6.) Clean only with dry cloth.
7.) Do not block any ventilation openings. Install in accordance with the manufacturer’s
instructions.
8.) Do not install near any heat sources such as radiators, heat registers, stoves, or other
apparatus (including amplifiers) that produce heat.
9.) Do not defeat the safety purpose of the polarized or grounding-type plug. A polarized plug
has two blades with one wider than the other. A grounding type plug has two blades and a
third grounding prong. The wide blade or the third prong are provided for your safety. If the
provided plug does not fit into your outlet, consult an electrician for replacement of the
obsolete outlet.
10.) Protect the power cord from being walked on or pinched particularly at plugs, convenience
receptacles, and the point where they exit from the apparatus.
11.) Only use attachments / accessories specified by the manufacturer.
12.) Unplug this apparatus during lightning storms or when unused for long periods of time.
13.) Refer all servicing to qualified service personnel. Servicing is required when the apparatus
has been damaged in any way, such as power-supply cord or plug is damaged, liquid has
been spilled or objects have fallen into the apparatus, the apparatus has been exposed to
rain or moisture, does not operate normally, or has been dropped.
14.) This appliance shall not be exposed to dripping or splashing water and no object filled with
liquids such as vases shall be placed on the apparatus.
15.) Do not overload wall outlet. Use only power source as indicated.
16.) Use replacement parts as specified by the manufacturer.
17.) The product may be mounted to a wall only if recommended by the manufacturer.
18.) Upon completion of any service or repairs to this product, ask the service technician to
perform safety checks.
CAUTION
!
CAUTION
RISK OFELECTRICSHOCK
DONOTOPEN
The lightning flashwithar-
rowhead symbol,withinan
equilateraltriangleisintented
toalertthe usertothe pres-
enceofuninsulated ‘dan-
gerousvoltage’withinthe
product’s enclosurethatmay
be ofsufficientmagnitude
toconstitutearisk ofelectric
shock topersons.
The exclamation pointwithin
an equilateraltriangleisin-
tended toalertthe userto
the presenceofimportant
operating and maintenance
(servicing)instructionsinthe
literatureaccompanying the
appliance.
WARNING:TOREDUCETHE
RISK OFELECTRICSHOCK
DONOTREMOVE COVER
(ORBACK),NOUSER
SERVICEABLEPARTSINSIDE
REFERSERVICINGTO
QUALIFIEDSERVICE
PERSONNEL.
ES50_ib071403.p65 14/7/2003, 11:401

2
BEFORE WE BEGIN
Thank you for purchasing this Emerson audio product. The Emerson brand is
your assurance of quality, performance and value.
Our engineers have included many useful and convenient features in this product.
Please be sure to read this Owner’s Manual completely to make sure you are
getting the maximum benefit from each feature.
Thisproduct wasmanufactured usingthe highestquality componentsand standards
of workmanship. It was tested by Emerson inspectors and found to be in perfect
working order before it left our factory. However, there is always the chance that
some problem may occur because of rough handling during shipment to the retail
store or to the final consumer.
If, after reading this Manual, you experience any problems with the operation of
this product, please refer to the instructions for obtaining service at the end of this
Manual. Emerson and Emerson retailers are committed to your satisfaction.
Once again, thanks for purchasing this Emerson audio product.
For future reference, record the serial number in the space provided.
Model No: ES50
Serial No:
ES50_ib071403.p65 14/7/2003, 11:402

3
•Operatecontrolsand switchesas
described inthe manual.
•Beforeturning ‘On’the power,make
certainthatpowercordisproperly
installed.
•StoreyourCDs,inacoolarea toavoid
damage fromheat.
•When moving the set, be suretofirst
disconnectthe powercord.
•Avoidinstalling thisunitinplaces
exposed todirectsunlightorcloseto
heatradiating appliancessuchas
electricheaters,on top ofotherstereo
equipmentthatradiatestoo muchheat,
placeslackingventilationordustyareas,
placessubjecttoconstantvibrationand/
orhumidormoistareas.
•Donotattempttoclean thisunitwith
chemicalsolventsasthismightdamage
the finish.Useaclean drycloth.
CLASS 1LASERPRODUCT
CLASS 1LASERPRODUCT
APPAREILÁLASERDECLASSE 1
PRODUCTOLASERDECLASE 1
CAUTION
INVISIBLELASERRADIATION
WHENOPENAND INTERLOCKS
DEFEATED.
AVOIDEXPOSURETOBEAM
ThisproductcontainsalowpowerLaserDevice.
FCC INFORMATION
Thisequipmenthasbeen tested and found tocomplywiththe limitsforaClass Bdigital
device,pursuanttoPart15oftheFCCRules.Theselimitsaredesignedtoprovidereasonable
protectionagainstharmfulinterferenceinaresidentialinstallation.Thisequipmentgenerates,
uses,andcan radiateradiofrequencyenergyand,ifnotinstalledandusedinaccordancewith
theinstructions,maycauseharmfulinterferencetoradiocommunications.However,thereis
noguarantee thatinterferencewill notoccurinaparticularinstallation.Ifthisequipmentdoes
causeharmfulinterferencetoradioortelevisionreception,whichcanbedeterminedbyturning
the equipmentoff and on,the userisencouraged totrytocorrectthe interferencebyone or
moreofthe following measures:
•Reorientorrelocatethereceiving antenna.
•Increasethe separation between the equipmentand receiver.
•Connectthe equipmentintoan outleton acircuitdifferentfromthattowhichthe receiveris
connected.
•Consultthe dealeroran experienced radio/TVtechnician forhelp.
ThisdevicecomplieswithPart15 oftheFCC Rules.Operation issubjecttothe following two
conditions:
(1)Thisdevicemaynotcauseharmfulinterference,and
(2)Thisdevicemustacceptanyinterferencereceived,including interferencethat
maycauseundesired operation.
IMPORTANTNOTES
ES50_ib071403.p65 14/7/2003, 11:403

4
UNPACKINGAND SET-UP
•Carefullyremovethe unitfromthe carton and removeall packing materialfrom
the unit.
•Removeanylabelsorstickerswhichmaybe on the frontortop ofthe set, but
do notremoveanylabelsfromthe back orbottom.
•Wesuggestthatyou retainthe originalcarton and packing materialsincaseit
everbecomesnecessarytoreturnyourunitforservice.Thisisthe onlysure
waytoprotectthe unitfromdamage intransit.
• Remove any small strips of tape that may have been used to prevent the CD
door from opening in transit.
• Unwind the lead wire FM antenna on the back of the unit and extend it to its full
length.
• The unit is shipped with a “dummy CD” display card in the CD player. This
“dummy CD” card must be removed before you can use the CD player. Refer
to the “PLAYING COMPACT DISCS” instructions on Page 15.
SPEAKERCONNECTION
Connecteachspeakertothe corresponding speakerterminalson the back panel
ofthe mainunit. Makesurethatthe left speakerplug isconnected tothe left (L)
speakerjack and the rightspeakerplug isconnected tothe right(R)speakerjack.
PREPARATIONFORUSE
SPEAKER
R
AC IN
L
ES50_ib071403.p65 14/7/2003, 11:404

5
POWERSOURCE
Thissystemisdesigned tooperateon 120V60HzAChousecurrent.Connecting
thissystemtoanyotherpowersupplycouldresultindamage tothe unitwhichis
notcovered byyourwarranty.You will notethatthissystemisequipped witha
polarizedACpowerplughaving one
blade widerthan the other.Thisisa
safetyfeature.If thisplug doesnot
fitintoyourexisting ACoutlet, do
nottrytodefeatthissafetyfeature
byfiling the wide blade tomakeitfit
intoyouroutlet. If thisplug will not
fitintoyouroutlet, you probablyhavean out-dated non-polarized ACoutlet. You
shouldhaveyouroutletchanged byaqualified licensed electrician.
AC Operation
1.)Unwind theACPowerCordcompletely.
2.)Insertthe plug intoanyconvenient120V60HzACoutlet.
AC Plug
AC Outlet
PROTECT YOUR FURNITURE
Thismodelisequipped withnon-skidrubber'feet'topreventthe productfrom
moving when you operatethe controls.These'feet'aremade fromnon-migrating
rubbermaterialspeciallyformulated toavoidleaving anymarks orstainson your
furniture.Howevercertaintypesofoil based furniturepolishes,wood preservatives,
orcleaning sprays maycausethe rubber'feet'tosoften,and leavemarks ora
rubberresidue on the furniture.Topreventanydamage toyourfurniturewestrongly
recommend thatyou purchasesmall self-adhesivefeltpads,availableathardware
storesand homeimprovementcenterseverywhere,and applythesepadstothe
bottomofthe rubber'feet'beforeyou placethe producton fine wooden furniture.
ES50_ib071403.p65 14/7/2003, 11:405

6
1.)CDCompartment.
2.)MUTEButton.
3.)PresetEQButton.
4.)MEMORY/CLOCK-ADJButton.
5.)MEM.UP/REPEATButton.
6.)ReverseSkip/Search
/TUNEDOWNButton.
7.)Stop /BAND Button.
8.)Play/PauseButton.
9.)ForwardSkip/Search
/TUNEUPButton.
10.)CD Button.
11.)TUNERButton.
12.)RANDOMButton.
13.)POWEROn/Off Button.
14.)CD OPEN/CLOSE Button.
15.)VOLUMEUp/DownButtons.
16.)PHONES Jack.
17.)MultiFunction Display.
18.)RemoteControlSENSOR.
19.)STANDBY Indicator.
20.)FMWireAntenna.
21.)SpeakerJacks.
22.)ACPowerCord.
LOCATION OFCONTROLS AND INDICATORS
1
2
3
4
5
6
7
8
9
10
11
12
13
14
15
16
17
18
19
20 21
22
ES50_ib071403.p65 14/7/2003, 11:406

7
78
910
11
5
4
3
2
1
6
1.)VOLUMEUp/DownButtons.
2.)POWEROn/Off Button.
3.)STOP/BANDButton.
4.)PLAY/PAUSE Button.
5.)FUNCTIONButton.
6.)RANDOMButton.
7.)TuningUP/DOWN/
CD SkipButtons.
8.)MEMORY/CLOCKButton.
9.)M-UP/REPEATButton.
10.)EQButton.
11.)MUTEButton.
REMOTECONTROL
BATTERYINSTALLATION
1.)Open the batterycompartmentcover.
2.)Inserttwo"AAA"(UM4)batteries(notincluded)
tomatchthe polaritiesasindicated inside the
batterycompartment.
3.)Closethe cover.
NOTE:When the batteriesbecometoo weak,the operating distanceofthe
remotecontrollerisgreatlyreduced and you will need toreplacethe batteries.
ES50_ib071403.p65 14/7/2003, 11:407

8
USINGTHEREMOTECONTROLLERCORRECTLY
•Pointthe remotecontrolleratthe RemoteSensor.
•The functionsofthe buttonson the remotecontrolarethe sameasthe
corresponding controlson the mainunit.
•When thereisastrong ambientlightsource,the performanceofthe infrared
RemoteSensormaybe degraded,causing unreliableoperation.
•The maximumeffectivedistanceforremotecontroloperation isabout15 feet.
BATTERYPRECAUTIONS
Followtheseprecautionswhen using batteriesinthisdevice:
1.Useonlythe sizeand type ofbatteriesspecified.
2.Besuretofollowthe correctpolaritywhen installing the batteriesasindicated inthe battery
compartment. Reversed batteriesmaycausedamage tothe device.
3.Donotmixdifferenttypesofbatteriestogether(e.g.Alkalineand Carbon-Zinc)oroldbatteries
withfreshones.
4. Ifthedeviceisnottobeusedforalongperiodoftime,removethebatteriestopreventdamage
orinjuryfrompossiblebatteryleakage.
5.Donottrytorecharge batteriesnotintendedtobe recharged;theycan overheatand rupture.
(Followbatterymanufacturer’s directions.)
ES50_ib071403.p65 14/7/2003, 11:408

9
OPERATINGINSTRUCTIONS
• Make sure that the FM Antenna is fully extended.
• Make sure that you have installed batteries in the remote control.
• Make sure that the AC power cord is connected to an outlet that
is always “live”. Do not connect to an outlet that is controlled by
a wall switch.
GENERAL CONTROLS
Volume Adjustments
Press the VOLUME UP or DOWN buttons on the front panel or the remote
control to increase or decrease the volume. The volume level indicator appears in
the main display. The range is from “00 db” (Minimum) to “80 db” (Maximum). The
system remembers the volume level when the power is switched ‘Off’ and returns to
the same level when the power is switched ‘On’ again.
Preset Equalizer (EQ)
This system has a 3-Band Preset Electronic Equalizer that allows you to adjust the
tone output for the most popular types of music. The settings are “CLASSIC”,
“ROCK”, “POP” or flat (no EQ).
To change the EQ setting press the EQ button on the top panel or on the remote
control until the desired setting appears in the main display.
MUTE Button
To temporarily shut off the sound from the speakers press the MUTE button. The
MUTE indicator will appear in the display and the sound will stop. Press the MUTE
buttonagainto cancelMuteand restorethesound.TheMUTEindicatorwill disappear
from the display.
PHONES Jack
Forprivatelistening withoutdisturbing othersconnectasetofstereo headphones
(notincluded)tothe PHONES Jack on the frontpanel.The speakersare
automaticallyshutoff when stereo headphonesareconnected tothe headphone
jack.When using stereo headphonesalways startwiththe volumecontrolsettoa
lowleveland graduallyincreaseuntil you find the desired level.
ES50_ib071403.p65 14/7/2003, 11:409

10
SETTING THE CLOCK
1.) Switch the unit to Standby mode by pressing the POWER button.
2.) Pressandhold the MEMORY/CLOCK-ADJbutton. “ 24 H ”(24 Hour format) will
flashin thedisplay. Pressthe or buttontoselect “12H”(12Hour format).
3.) Press the MEMORY/CLOCK-ADJ button. The hour digit will flash.
Press the or buttons to set the correct hour. Be sure to set correctly for
AM or PM.
4.) Press the MEMORY/CLOCK-ADJ button again. The Hour is now set and the
Minute digits start to flash in the display.
5.) Press the or buttons to set the correct minute.
6.) PresstheMEMORY/CLOCK-ADJbuttonagain.TheMinutesarenowsetandthe
clock will start to run.
NOTE:
• Clock time is only retained while the unit is plugged into the AC outlet. In
the event of a power failure the clock will need to be reset when the power
supply resumes.
• Clock time is only shown when unit is in Standby mode.
ES50_ib071403.p65 14/7/2003, 11:4010

11
LISTENING TO THE RADIO
1.) Press the POWER button on the main unit or the remote control. The main
display turns “On” and the STANDBY indicator goes “Off”.
2.) If necessary, press the TUNER button on the top panel of main unit or the
FUNCTION button on remote control to select the Tuner function. The display
will show an AM or FM station frequency. To select a different band, press the
STOP/BAND button.
3.) Tune to the desired frequency as follows:
• ManualTuning
Repeatedly press the or buttons until the frequency of the desired
station appears on the display.
•Automatic Tuning
Press and hold the or buttons until the display begins to move, then
release the buttons. The tuner will search up or down the band for the next
strong station and stop on that station. Repeat this procedure until the tuner
stops on your desired station.
4.) Adjust the VOLUME and EQ controls as desired.
5.) If you tuned to an FM Stereo station the STEREO indicator will appear in the
display.
6.) When you are finished listening press the POWER button on the main unit or
remote control to return to the Standby (Power Off) mode. The STANDBY LED
Indicator comes “On”.
AM
ES50_ib071403.p65 14/7/2003, 11:4011

12
Antenna Information
AM
The AM antenna is inside the cabinet. IFAM reception is unsatisfactory try rotating
the entire unit until you find the position that provides the best reception.
FM
Vary the direction of the FM antenna to find the position that provides the best
reception.
FM antenna
ES50_ib071403.p65 14/7/2003, 11:4012

13
PRE-SETTING STATIONS IN THE TUNER MEMORY
This system includes a 20 station preset memory. You can store up to 10 FM
stationsand10 AMstations inthe tunermemory forimmediate recall.The procedure
for storing stations in memory is as follows:
1.) Follow step 3 under LISTENING TO THE RADIO in page 11 to select the first
station you wish to memorize. Example: FM 103.5 MHz.
2.) When the desired station appears on the display press the MEMORY button
on the front panel or the remote control. The Channel # “01” indicator appears
and the “MEMORY” indicator flashes in the display.
3.) Press the MEM-UP/REPEAT button on the front panel or remote control to
select a preset channel number. (Example: Preset channel # 03.)
4.) Press the MEMORY button on the front panel or the remote control once more
to enter the station in preset memory number 03.
5.) Repeat steps 1 through 4, selecting a different preset number in Step 3 each
time until you have entered up to 10 FM stations in the tuner memory.
6.) Press the STOP/BAND button to select the AM band and follow the same
procedure to enter up to 10 AM stations in the tuner memory.
ES50_ib071403.p65 14/7/2003, 11:4013

14
RECALLING PRESET STATIONS
Turn the unit ‘On’ and select the desired band. Press the MEM-UP/REPEAT button
on the front panel or the remote control repeatedly to scroll through the preset
memories until the display shows the desired station.
CHANGING PRESET STATIONS
To change any preset station memory select the desired band and tune to the new
station you wish to memorize. Press the MEMORY button and then press the
MEM-UP/REPEAT button to display the memory number you wish to change.
Press the MEMORY button again to enter the new station in the memory. The new
station is memorized and the previous station is deleted from the memory.
ES50_ib071403.p65 14/7/2003, 11:4014

15
PLAYING COMPACT DISCS
IMPORTANT: This CD player can play normal CDs plus CD Recordable
(CD-R) and CD Rewriteable (CD-RW) discs. However the playability of
CD-R and CD-RW discs may be affected by the type of software that
was used in ‘ripping’ the tracks from the original discs and ‘burning’ the
tracks onto the blank media. Playability may also be affected by the
quality and condition of the blank media you use for recording. 100%
compatibility cannot be guaranteed. This is not an indication of any
problems with your player.
1.) Press the POWER button to turn the system ‘On’.
2.) Press the CD button on the top panel of the main unit or the FUNCTION button
on the remote controls to select the CD function.
3.) Press the OPEN/CLOSE button on the top panel to open the CD door. The
main display shows “– – – –”. If you have not already done so, remove the
‘dummy CD’ from the player and discard it.
4.) Place a CD properly seated on the center spindle with the printed label side
facing upward. Gently pressing down on the disc near the center hole to make
sure that it is properly seated on the spindle.
5.) Close the CD door. The disc will spin and ‘00 00:00’ will flash in the display as
the player reads the table of contents on the disc. Within a few seconds the
disc will stop spinning and the display will show the total playing time and total
tracks on the disc.
Note: If the disc is inserted upside down or if the disc is badly scratched
and unreadable, playback will not be possible. In this case the main
display will show “no dISC”. Remove the disc and re insert it properly,
or try another disc.
Track Number Playing Time
ES50_ib071403.p65 14/7/2003, 11:4015

16
6.) Press the PLAY/PAUSE button on the top panel of the main unit or on the
remote control to begin playback on track 1. The display will show the elapsed
playing time of each track as it plays.
7.) Adjust the VOLUME and EQ controls as desired.
8.) When the last track has played the player stops automatically and the display
again shows the total playing time and tracks on the disc. You may also stop
playback at any time by pressing the STOP button on the top panel of the
main unit or on the remote control.
9.) When you are finished listening press the OPEN/CLOSE button to open the
CD door and remove the disc.
10.)Press the POWER button to return the system to the Standby (Power Off)
mode.
Pause Control
To pause momentarily during CD playback press the PLAY/PAUSE button on
the front panel of the main unit or the remote control again. The sound stops and
the elapsed time display flashes but the disc continues to spin. Press the PLAY/
PAUSE button once more to cancel Pause mode and resume playback. The
elapsed time display stops flashing.
ES50_ib071403.p65 14/7/2003, 11:4016

17
Skip/Search ( / ) Controls
• To skip to higher or lower numbered tracks during playback, repeatedly press
the or buttons until the desired track number appears in the display.
Playback will begin on the desired track.
• Toperformhigh speedsearch withinatrack tolocate a specificmusical passage
depress and hold the or button. The player will move rapidly forward or
backward as long as the buttons are depressed. When you hear the desired
passage release the buttons and normal playback will resume at that point.
To Start Playback On A Specific Track
Load the disc as usual and wait until the total playing time and track numbers
appear on the display. Press the or button until the desired track number
appears in the display, then press the PLAY/PAUSE button to begin playback
on that track.
RANDOM Playback
This feature allows you to play all the tracks on a disc in random order.
Load the disc as usual and wait until the display shows the total playing time and
number of tracks. Press the RANDOM button. The RANDOM indicator appears in
the display. The tracks will be played in random order.After all tracks have played
the player stops and the display again shows the total playing time and number of
tracks.
Tocancel theRandommode pressthe RANDOMbutton untilthe RANDOMindicator
disappears. Random mode can also be canceled by pressing the STOP/BAND
button.
ES50_ib071403.p65 14/7/2003, 11:4017

18
REPEAT Playback
You can program the player to continuously repeat a single track or the entire disc.
The Repeat function can be activated while a disc is playing or while the disc is
stopped.
One Track Repeat
Press the or button until the desired track number appears in the display,
then press the REPEAT button once. The REPEAT indicator flashes in the display.
Press the PLAY/PAUSE button to begin playback on that track. The selected
track will be repeated continuously.
All Tracks Repeat
Load the disc as usual and wait until the total playing time and track numbers
appear on the display. Press the REPEAT button twice. The REPEAT indicator
remains ‘On’. Press the PLAY/PAUSE button to begin playback. The entire
disc will be repeated continuously.
To cancel Repeat Playback continue pressing the REPEAT button until the REPEAT
indicator disappears. Repeat is also canceled by opening the CD Door or switching
to Tuner function.
ES50_ib071403.p65 14/7/2003, 11:4018

19
Programmed Playback
You can program up to 20 tracks on a disc to playback in any desired order. You
may also program a specific track to play several times within the same program.
Note: The player cannot be programmed while a disc is playing. If a disc is
playing press the STOP button to stop playback before you begin the
programming steps below.
1.) Press the FUNCTION button on the remote control or CD button on top panel to
select CD mode. Insert your disc in the player, close the door, and wait until
the total track number appears in the display.
2.) Press the MEMORY button once. The MEMORY Indicator flashes and program
memory “P-01”, Track “01” appears in the display.
3.) Use the or buttons to select the first track to be programmed.
(Example: Track 08).
4.) When track number “08” appears in the display, press the MEMORY button
once again to enter the track “08” in program memory number “01”. The track
number returns to “00” and the program memory advances to “P-02” indicating
that you may now select a track to be entered in program memory number
“02”.
ES50_ib071403.p65 14/7/2003, 11:4019
Table of contents
Other Emerson Stereo System manuals

Emerson
Emerson MS3100 User manual

Emerson
Emerson MS3103 User manual

Emerson
Emerson NR290TTC User manual

Emerson
Emerson RS1008 User manual

Emerson
Emerson NR101TT User manual

Emerson
Emerson CKD9906 User manual

Emerson
Emerson ES28 User manual

Emerson
Emerson PD6511 User manual

Emerson
Emerson MS7608 User manual

Emerson
Emerson ES920 User manual

Emerson
Emerson MS7616R User manual

Emerson
Emerson MS3106 User manual

Emerson
Emerson ES13 User manual

Emerson
Emerson ES11 User manual

Emerson
Emerson SpongeBob SquarePants SB230 User manual

Emerson
Emerson ES3 User manual

Emerson
Emerson NR303TTC User manual

Emerson
Emerson ES30 User manual

Emerson
Emerson MS9920TT User manual

Emerson
Emerson ES79 User manual