Enel X JuiceBox User manual

/ Manual
/ Manual
/ Manuel
JuiceBox®


3
GB
PACKAGE CONTENTS
JuiceBox
Cable holder keys
Wall bracket
2 wall bracket screws for installation into wood (#10 self-tapping
Phillips head wood screws)
2 wall bracket anchors and screws for installation into brick or
concrete
2 screws to hang JuiceBox onto wall bracket (#10-32 Phillips head
machine screws)
REQUIRED TOOLS
Phillips Screwdriver (No. 2 drive size)
For buildings with wood construction
Stud sensor
For buildings with brick or concrete construction:
Hammer
10mm masonry drill bit

4
INSTALLATION PREREQUISITES
JuiceBox requires a hardwired electrical connection that is rated
to at least 125% of the device’s continuous load. JuiceBox must
be be installed by a qualied electrician. An external enclosure
rated at IP66 shall be used to house the connection between the
JuiceBox input cable and the AC supply circuit.
NOTE: Ensure that all power connection wiring conforms to the rules and
regulations of any national and local codes.
Device Protection: JuiceBox requires a dedicated overcurrent
protection device that includes both a Curve D MCB (miniature
circuit breaker) and Type A RCD (Residual Current Device).
When selecting a location to install the hardwire connection, keep
in mind that the charging unit should be positioned:
Within reach of the vehicle’s charge port
0.5m - 1.5m above the oor or ground
If applicable, within range of a cellular connection or the local
WiFi network

5
GB
WARNING: Do not continue with the installation or repair until the electrical circuit
is proven electrically dead.
INSTALLATION
Fully read and understand the directions before installation.
Refer to addi tional safety information at the end of this
document.
1
2
3
Isolate the electrical circuit.
Use a 2-pole voltage detector to ensure that there is no
power at the hardwire connection.
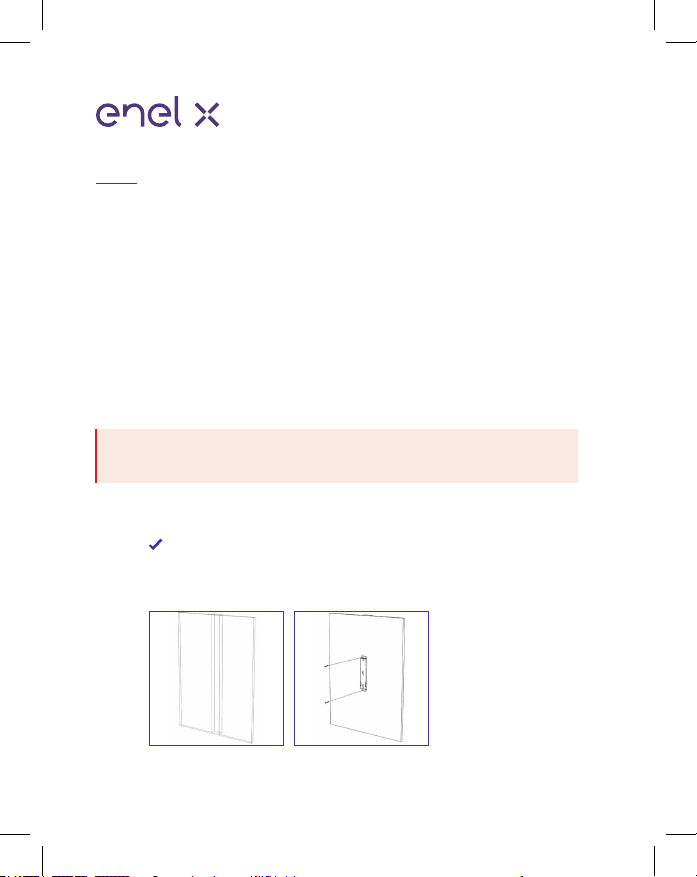
Use the 2 screws to secure the wall bracket to the wall:
Wood installation: Use a stud sensor to determine an
appropriate mounting location, then use the 2 screws to
secure the wall bracket.

6
Concrete or brick installation:
a) Position the wall bracket as desired. While holding the wall
frame in place, use the 2 mounting holes in the wall frame as a
template to mark drill points on the wall
b) Using a 10 mm bit, drill holes in the wall at the points marked
in the previous step. Install the 2 wall anchors.
c) Use the screws to install the wall bracket.

7
GB
4
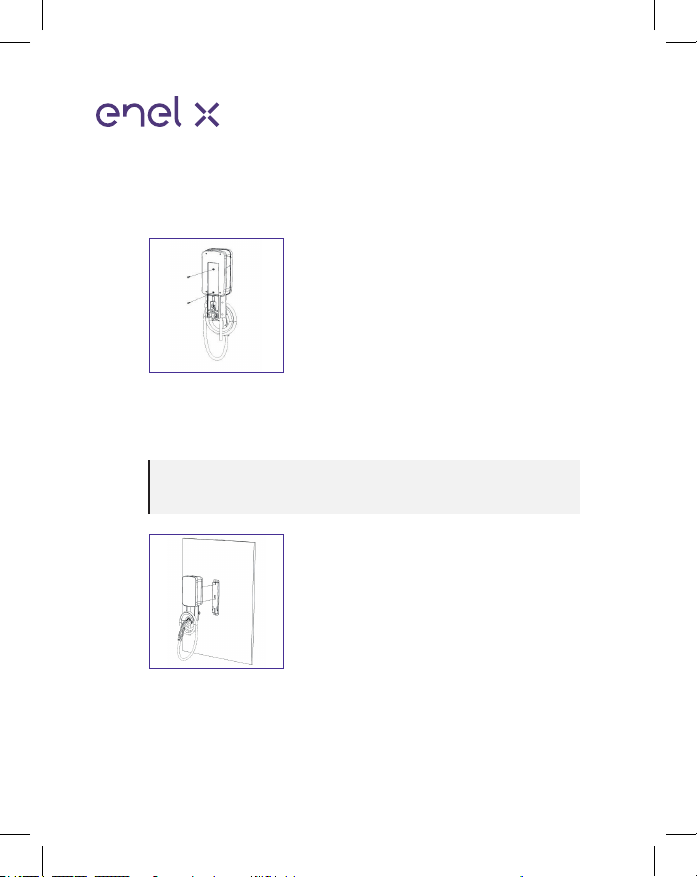
5NOTE: If the JuiceBox does not hang securely, adjust the screws
that were installed in step 3.
Insert the enclosure screws into the enclosure, as shown.
Tighten the screws until approximately 2 mm of thread are
visible.
Hang the JuiceBox onto the wall bracket.

8
After installing your JuiceBox, use the included keys to lock the
JuiceBox to the wall frame.
LOCKING YOUR JUICEBOX
8
7
6
To connect JuiceBox to the internet, download the EV
JuiceNet app and follow the onscreen instructions. For
more information, refer to
support-emobility.enelx.com
Turn on the circuit breaker that supplies power to the
hardwired electrical connection.
Brown
Blue
Green/Yellow
Black
Grey
L1
Neutral
Earth
Not connected.
Isolate and
terminate
Not connected.
Neutral Earth Isolate
and terminate.
1-Phase Hardwired
Version
3-Phase Hardwired
Version
L1
Neutral
Earth
L2
L3
Connect the harness to the wiring terminal:

9
GB
IMPORTANT SAFETY INFORMATION
Read all safety information before installing this product.
WARNING: This device should be supervised when used around children.
WARNING: Do not put ngers into the electric vehicle connector.
WARNING: Do not use this product if the exible power cord is frayed, has
broken insulation, or shows any other signs of damage.
WARNING: For use with electric vehicles only.
WARNING: Do not use this device with an extension cord.
WARNING: Do not remove cover or attempt to open the enclosure. No user
serviceable parts inside. Refer servicing to qualied service personnel.
WARNING: Install and use the JuiceBox away from ammable, explosive,
harsh or combustible vapors, materials or chemicals.
WARNING: Do not operate the JuiceBox outside its temperature rating of
-40°C to +60°C.
WARNING: This device is intended only for electric vehicles not requiring
ventilation during charging.
WARNING: This product must be earthed. If it should malfunction or break
down, earthing provides a path of least resistance for electric current to
reduce the risk of electric shock.
WARNING: Improper connection of the equipment-earthing conductor is able
to result in a risk of electric shock. Check with a qualied electrician or service-
man if you are in doubt as to whether the product is properly earthed.

10
VERPACKUNGSINHALT
JuiceBox
JuiceBox Sicherungsschlüssel
Wandhalterung
2x Wandhalterungsschrauben zur Montage in Holz (10
selbstschneidende Kreuzschlitz-Holzschrauben)
2x Dübel und Schrauben zur Montage in Ziegeln oder Beton
2x Schrauben zum Einhängen der JuiceBox in die Wandhalterung
(10-32-Kreuzschlitz-Maschinenschrauben)
BENÖTIGTE WERKZEUGE
Kreuzschlitz-Schraubendreher (Größe Nr. 2)
Hammer
10-mm-Mauerwerkbohrer

11
DE
INSTALLATIONSVORAUSSETZUNGEN
Die JuiceBox erfordert einen fest verdrahteten elektrischen
Anschluss. Die JuiceBox muss von einem qualizierten Elektriker
installiert werden. Die JuiceBox erfordert einen dedizierten
Schutzschalter, der auf 125% des maximalen Dauerstroms
ausgelegt und ausreichend geerdet sein muss.
HINWEIS: Stellen Sie sicher, dass alle Stromanschlusskabel jegliche nationalen
und lokalen Vorschriften erfüllen.
Geräteschutz: Die JuiceBox erfordert eine spezische
Überstromschutzeinrichtung, die sowohl einen MCB
(Miniaturleistungsschalter) mit Kennlinie D als auch einen RCD
(Fehlerstrom-Schutzschalter) des Typs A umfasst.
Beachten Sie bei der Auswahl des Installationsortes für den
fest verdrahteten Anschluss, dass die die JuiceBox wie folgt
positioniert werden sollte:
In Reichweite des Ladeanschlusses des Fahrzeugs
0,5m - 1,5m über dem Boden
Sofern verfügbar, im Bereich einer Mobilfunkverbindung oder
des lokalen WLAN-Netzwerk
12
ACHTUNG: Fahren Sie erst mit der Installation fort, wenn das Multimeter anzeigt,
dass am fest verdrahteten Anschluss keine Spannung anliegt.
MONTAGE
Lesen und verstehen Sie die Anweisungen vor der Installation.
Beachten Sie die zusätzlichen Sicherheitshinweise am Ende dieses
Dokuments
1
2
3
Überprüfen Sie mit einem Multimeter, dass am fest
verdrahteten Anschluss keine Spannung anliegt.
Schalten Sie Schutzschalter am fest verdrahteten
elektrischen Anschluss aus.
Fixieren Sie die Wandhalterung mit den 2 Schrauben:
Montage in Holz: Suchen Sie eine geeignete und
stabile Montageposition. Fixieren Sie dann die
Wandhalterung mit den 2 Schrauben

13
DE
Montage in Beton oder Ziegeln:
a) Platzieren Sie die Wandhalterung nach Wunsch. Während Sie
die Wandhalterung in Position halten, verwenden Sie die 2
Montagebohrungen in der Wandhalterung als Schablone, um
die Positionen der Bohrlöcher in der Wand zu markieren.
b) Bohren Sie mit einem 10-mm-Bohrer Löcher an den Positionen,
die Sie im vorherigen Schritt markiert haben. Bringen Sie die 2
Dübel an.
c) Montieren Sie die Wandhalterung c) mit den Schrauben.
14
4
5HINWEIS: Wenn die JuiceBox nicht sicher hängt, justieren Sie die
Schrauben, die Sie in Schritt 4 angebracht haben.
Setzen Sie die Gehäuseschrauben wie abgebildet in das
Gehäuse ein. Ziehen Sie die Schrauben an, bis nur noch ca.
2 mm des Gewindes sichtbar sind.
Hängen Sie die JuiceBox an die Wandhalterung.
6Schließen Sie die JuiceBox an:

15
DE
Ohne diese Sicherung kann die JuiceBox jederzeit von Unbefugten
von der Wand abgenommen werden. Durch den Einsatz der
Sicherung kann dies verhindert werden.
DIEBSTAHLSICHERUNG
8
7
Um JuiceBox mit WiFi zu verbinden, laden Sie die EV
JuiceNet-App herunter und folgen Sie den
Anweisungen auf dem Bildschirm. Weitere
Informationen nden Sie auf
support-emobility.enelx.com
Schalten Sie Schutzschalter ein, der den fest
verdrahteten elektrischen Anschluss mit Strom versorgt.
Braun
Blau
Grün/Gelb
Schwarz
Grau
L1
Neutral
Erde
Nicht verbunden. Isolieren
und abschließen oder
alternativ die nicht benötigte
Leitung entfernen.
Nicht verbunden. Isolieren
und abschließen oder
alternativ die nicht benötigte
Leitung entfernen.
Einphasiger Anschluss Dreiphasiger Anschlus
L1
Neutral
Erde
L2
L3

16
Lesen Sie alle Sicherheitshinweise, bevor Sie dieses Produkt
installieren.
ACHTUNG: Dieses Gerät muss überwacht werden, wenn es in der Nähe von
Kindern verwendet wird
ACHTUNG: Stecken Sie keine Finger in die Steckverbindung des
Elektrofahrzeugs.
ACHTUNG: Verwenden Sie dieses Produkt nicht, wenn das exible Netzkabel
des Elektrofahrzeugs ausgefranst ist, die Isolierung brüchig ist oder das Kabel
andere Anzeichen einer Beschädigung aufweis
ACHTUNG: Nur für den Einsatz mit Elektrofahrzeugen.
ACHTUNG: Verwenden Sie dieses Gerät nicht mit einem Verlängerungskabel.
ACHTUNG: Entfernen Sie die Abdeckung nicht und versuchen Sie nicht, das
Gehäuse zu öffnen. Es gibt keine vom Benutzer zu wartenden Teile im Inneren.
Wenden Sie sich an qualiziertes Servicepersonal.
ACHTUNG: Installieren und verwenden Sie die JuiceBox nicht in der Nähe von
brennbaren, explosiven, aggressiven oder brennbaren Dämpfen, Materialien
oder Chemikalien.
ACHTUNG: Betreiben Sie die JuiceBox nicht außerhalb ihres
Betriebstemperaturbereichs von -40 °C bis +60 °C.
ACHTUNG: Dieses Gerät ist nur für Elektrofahrzeuge bestimmt, die während
des Ladevorgangs keine Belüftung benötigen.
ACHTUNG: Dieses Produkt muss geerdet werden. Bei einer Fehlfunktion oder
einem Ausfall bietet die Erdung einen Weg mit dem geringsten Widerstand
für elektrischen Strom, um die Gefahr eines Stromschlags zu verringern.
ACHTUNG: Ein unsachgemäßer Anschluss des Geräteerdleiters kann zu einem
Stromschlag führen. Wenden Sie sich an einen qualizierten Elektriker oder
Servicetechniker, wenn Sie Zweifel haben, ob das Gerät ordnungsgemäß
geerdet ist.
WICHTIGE SICHERHEITSHINWEISE

17
FR
CONTENU DE L’EMBALLAGE
JuiceBox
Clés de verrouillage de la JuiceBox au support mural
Support mural
2 vis du support mural pour bois (vis à bois cruciformes
autoperceuses n° 10)
2 chevilles et vis du support mural pour briques ou béton
2 vis pour accrocher la JuiceBox à un support mural (vis à métaux
cruciformes n° 10-32)
OUTILS REQUIS
Tournevis cruciforme (n° 2)
Pour la construction boi
Détecteur de matériaux
Pour la construction briques ou béton:
Marteau
Foret à béton 10 mm

18
PRÉREQUIS DE L’INSTALLATION
La JuiceBox requiert un raccordement électrique câblé conforme
aux normes IRVE et NFC 15-100 pour bornes de recharge. La
JuiceBox doit être instalée par un électricien qualié IRVE. Une
alimentation dédiée pour la JuiceBox doit être protégée en amont
par un disjoncteur courbe D monophasé ou tétraphasé selon
type de circuit (monophasé ou triphasé). Ce disjoncteur doit être
dimensionné pour gérer une intensité 25% supérieure à l’intensité
nominale. Aussi un dispositif différentiel 30mA type A est requi
REMARQUE: Assurez-vous que tous les raccordements sont conformes aux règles
et réglementations des codes nationaux et locaux.
En choisissant l’emplacement d’installation du raccordement câblé
ou de la prise, gardez à l’esprit que le JuiceBox doit être placé:
À portée du port de recharge du véhicul
0,5m - 1,5m du sol
Le cas échéant, à portée d’une connexion mobile ou du réseau
Wi-Fi local

19
FR
AVERTISSEMENT: Ne poursuivez pas l’installation tant que le VAT n’indique pas
l’absence de tension du raccordement câblé.
INSTALLATION
Veillez à lire et comprendre entièrement les instructions avant
l’installation. Rapportez-vous aux informations de sécurité
supplémentaires disponibles à la n du présent document.
1
2
3
Mettez le circuit hors tension, mettez en position “off” les
disjoncteurs du circuit dedié à la JuiceBox.
Véricateur d’absence de tension (VAT selon norme
NFC18-510)
Utilisez les 2 vis pour xer le support mural:
Installation en bois: Utilisez un détecteur de matériaux
pour déterminer l’emplacement approprié, puis utilisez
les 2 vis pour xer le support mural.

20
Installation en béton ou en briques:
a) Placez le support mural à votre guise. Tout en maintenant
le support mural en place, utilisez les 2 trous de xation du
support en tant que patron an de marquer les points de
perçage sur le mur.
b) Utilisez un foret de 10 mm pour percer les points marqués au
mur à l’étape précédente. Installez les 2 chevilles.
c) Fixez le support au mur c) à l’aide des 2 vis.
Table of contents
Languages:
Other Enel X Batteries Charger manuals

Enel X
Enel X JUICEBOX PRO User guide

Enel X
Enel X JuicePump 150 User manual

Enel X
Enel X JuicePump User manual

Enel X
Enel X Waypole User manual

Enel X
Enel X Waypole User manual

Enel X
Enel X Waymedia 2 User manual

Enel X
Enel X JUICEBOX PRO User manual

Enel X
Enel X JUICEBOX PRO User manual

Enel X
Enel X Way JuiceBox OpenPay User manual

Enel X
Enel X Way Next Gen JuiceBox User manual


Popular Batteries Charger manuals by other brands


FRONIUS
FRONIUS Acctiva Professional 35 A operating instructions

1 BY ONE
1 BY ONE 508US-0001 instruction manual

HARDKORR
HARDKORR HKPDCDC25BT instruction manual

Ultra Power
Ultra Power UP1200AC PLUS user manual

ISAFE MOBILE
ISAFE MOBILE IS-MC540.1 operating manual

Tripp Lite
Tripp Lite APSX1250 Specification sheet