Enel X Way JuiceBox User manual
JuiceBox
User Manual
ENGLISH

2
Table of contents
Welcome to JuiceBox 3
Package Contents 3
Required Tools 3
Installation 4
Installation Prerequisites 4
Installation 5
Load Balancing 9
Wi-Fi Setup 10
JuiceBox Conguration 11
Know Before Charging 17
Troubleshooting 18
Common Solutions 18
Indicator Lights 18
Audible Error Codes 18
Using the Dashboard 19
Enterprise Dashboard Manual 19
Business Dashboard Manual 19
Impoant Safety Information 20

3
Welcome to JuiceBox
Package Contents
› JuiceBox
› Enclosure mounting bracket
› Enclosure screws (x4)
› Wall mounting bracket
› Wall screws (x3)
› EV charging cable holder
› EV charging cable holder screws (x4)
Required Tools
› Phillips screwdriver
› Stud nder
› Beam level
› Pencil or marker

4
Installation
Installation Prerequisites
OVERVIEW
JuiceBox requires one of the following to be installed by a qualied technician:
› NEMA 14-50 outlet
› Hardwired electrical connection
› The JuiceBox may require a disconnecting means if:
› Not within line of sight of the Electrical Panel
› Required by local code
LOCATION
When selecting a location to install the outlet or hardwire connection, keep in mind that
JuiceBox should be positioned:
› Within range of the local Wi-Fi network
› Within reach of the vehicle’s charge po
› Away from direct sunlight (for outdoor installation)
› Protected from rain (for outdoor installation)
› With sucient veical clearance:
›Mounted indoors: 24 - 48 in (61 - 122 cm) above the oor
›Mounted outdoors: 18 - 48 in (46 - 122 cm) above the ground
›Plug-In Version Only: Within reach of the NEMA 14-50 outlet so that the cable does not
strain. The cable is 1 foot (30 cm) long.
›Hardwire version: Only the pre-installed, hard wire whip shall be used to connect to a
junction box or disconnect. It is not long enough, nor is it meant to go directly into the
electrical panel.
CAUTION: Do NOT drill any additional holes into the JuiceBox enclosure as it can
cause damage to the PCB and/or electronics inside.

5
32A 40A 80A
OUTPUT
POWER
32A Max 7.7 kW at
240V 1-phase
40A Max 9.6 kW at
240V 1-phase
80A Max 19.2kW at
240V 1-phase
CIRCUIT
REQUIREMENTS
40 Amp
2 pole breaker
50 Amp
2 pole breaker
100 Amp
2 pole breaker
WIRING AND CIRCUIT REQUIREMENTS
Installation
Fully read and understand the directions before installation. Refer to impoant safety
information at the end of this document.
This section describes installing the JuiceBox Pro onto a wall mount. If installing onto a
JuiceStand, refer to the JuiceStand Manual.
1. Turn o the circuit breaker to the NEMA 14-50 outlet or hardwired electrical connection.
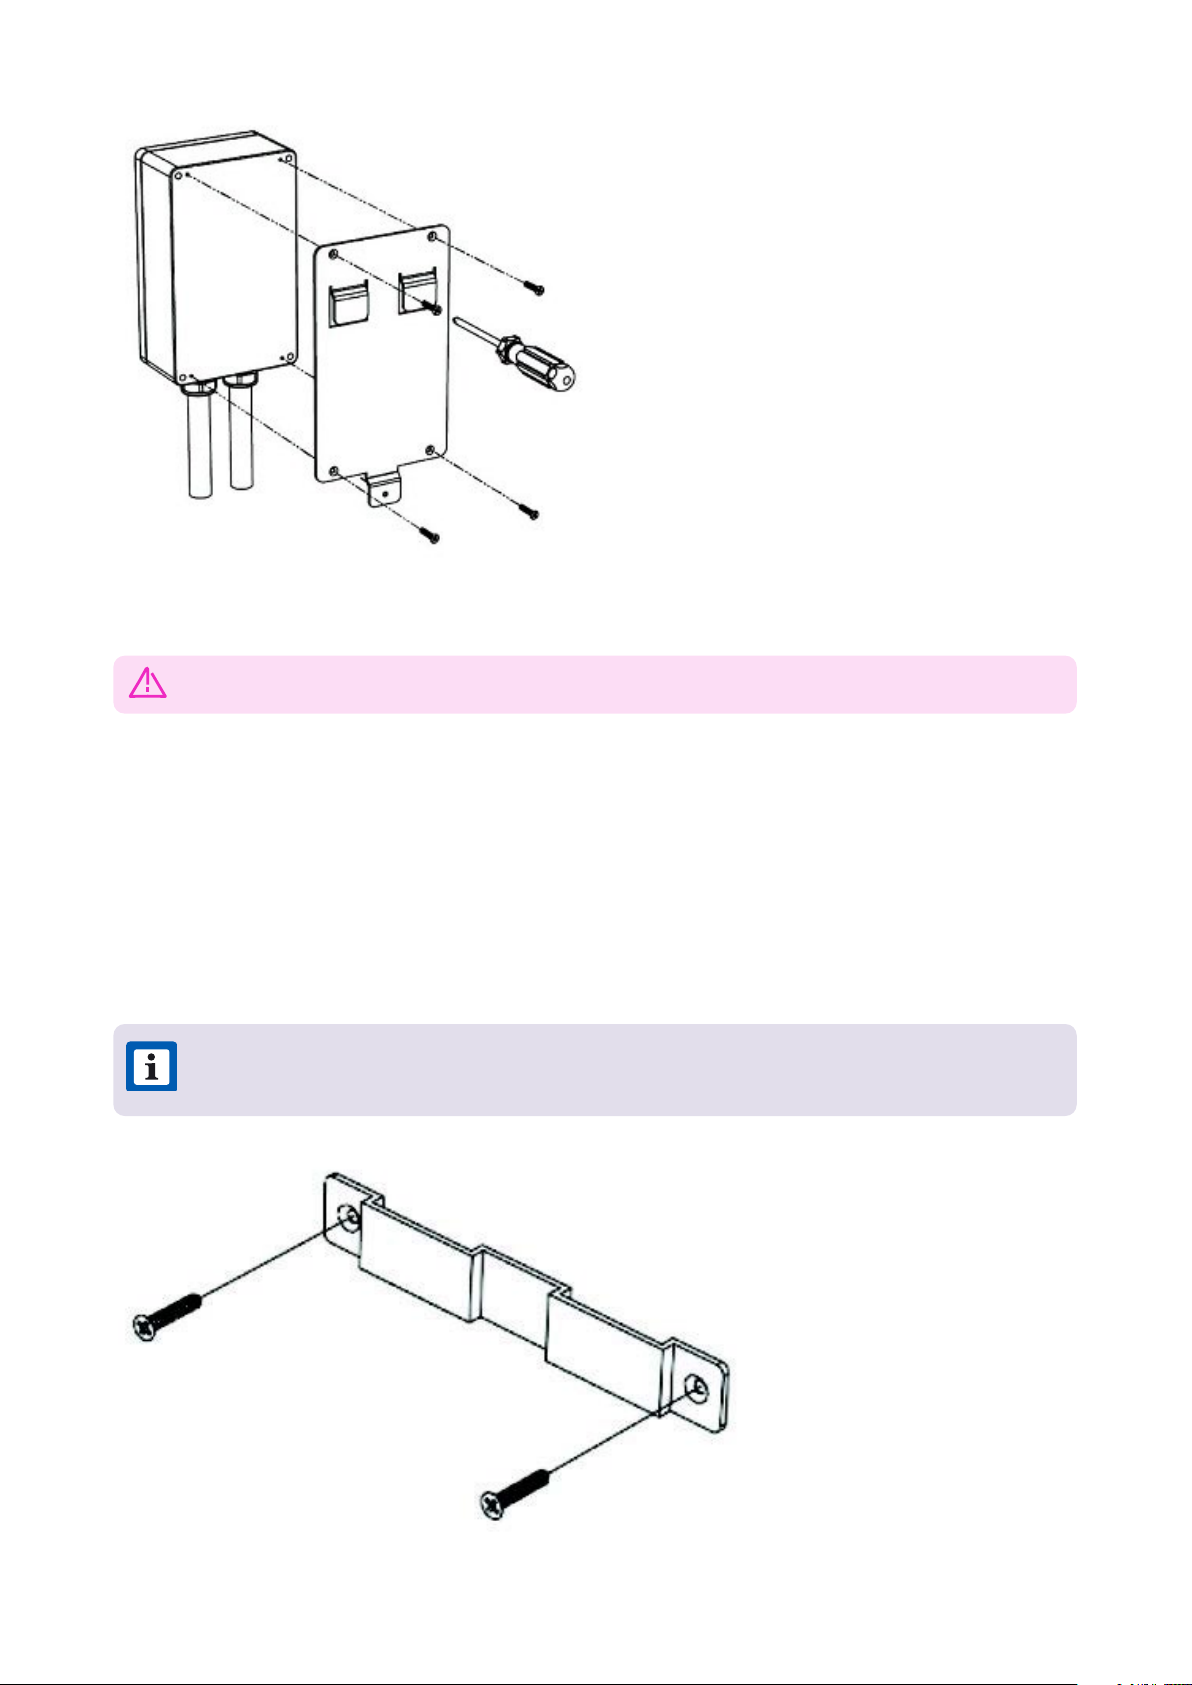
2. Use the enclosure screws (x4) to secure the enclosure bracket onto the back of the
JuiceBox.
NOTE: For the installation wiring , please have your electrician size the conductors
for both rated wire temperature and 125% continuous load. Please refer to both
the National Electrical Code (NEC) and your local Authority Having Jurisdiction
(AHJ) for any additional requirements.1
1The neutral wire is not used, but may need to be present in the receptacle.
6
3. Install the locking bracket:
›Standard: Use a wall screw (x1) to secure one side of the wall bracket into the stud closest
to the installation area. Use a beam level to ensure that the bracket is level horizontally,
then use a wall screw (x1) to secure the other side of the bracket into the wall.
WARNING: Do not continue this installation until the circuit breaker is turned o.
NOTE: Mount to wood, a stud, or use concrete or dry wall anchors.
7
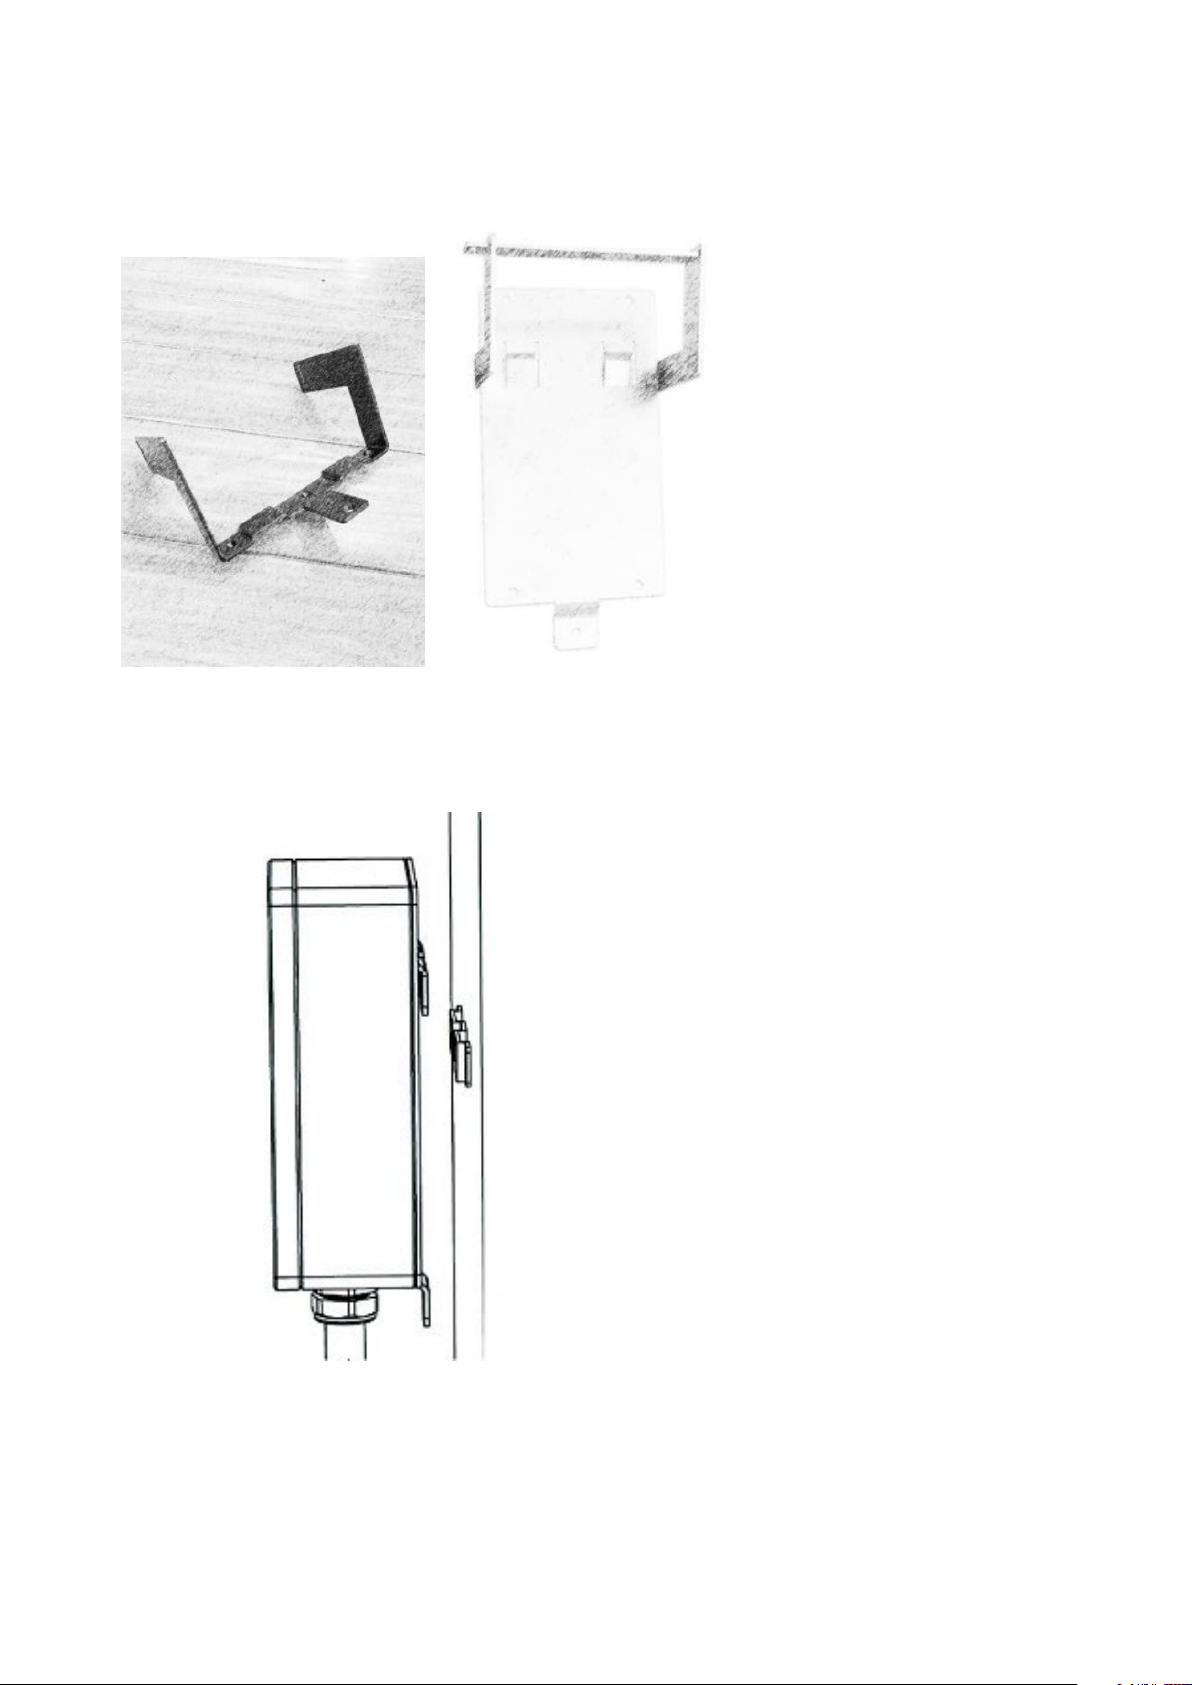
›Locking: Mount the locking bracket to the wall with the center tab facing downwards;
the side posts protrude out from the wall and point upwards.
4. Hang the JuiceBox onto the wall bracket.

8
6. Locking Bracket: Slide the locking bar through the holes in the side posts of the bracket.
Secure the locking bar with a padlock.
7. Connect the JuiceBox to the hardwired connection:
›Plug-In Version: Plug the JuiceBox into the NEMA 14-50 outlet.
›Hardwire Version: Connect the pigtail harness to the wiring terminal:
RED BLACK GREEN
L1 L2 Ground
5. Optional: Use a wall screw (x1) to secure the boom of the enclosure bracket to the wall.
NOTE: No neutral (white) line is used.
CAUTION: Do not use wire nuts. They might melt at high current.
WARNING: Do not use this device with an extension cord.

9
8. Turn on the circuit breaker that supplies power to the JuiceBox. Wait 10 seconds.
Verify that the JuiceBox is powered by checking that the “Power” indicator light on the
enclosure is solid green.
9. Optional: Install the charging cable holder.
Load Balancing
› Load balance to Circuit only.
› Load balance to panel is NOT recommended.
› Can only balance stations with the same specications (Pro40 with Pro40).
› Balancing specications cannot exceed the rated continuous load of the circuit. (50
amp circuit = 40 amp continuous load allowed) (NEC 625.41 & 42) 2017 code.
› Per NEC 625.42 additional outlets per circuit can be added due to the JuiceNet Automated
Load Management System.
› Recommend no more than 3 per circuit. The maximum number of stations per circuit is
determined by dividing the number of continuous load amps allowed based on circuit
size by 8. (e.g. 40 amps / 8 amps = 5 stations maximum). Note this may result in a slower
charge per car.
NOTE: Mount to wood, a stud, or use concrete or dry wall anchors.

10
Wi-Fi Setup
1. Reset the circuit breaker that supplies power to the JuiceBox.
2. Open Wi-Fi seings on your personal device. Connect to the “JuiceBox-###” or
“JuiceNet-###” Wi-Fi network. If the network requires a password, use the password
“GoElectric” (case-sensitive).
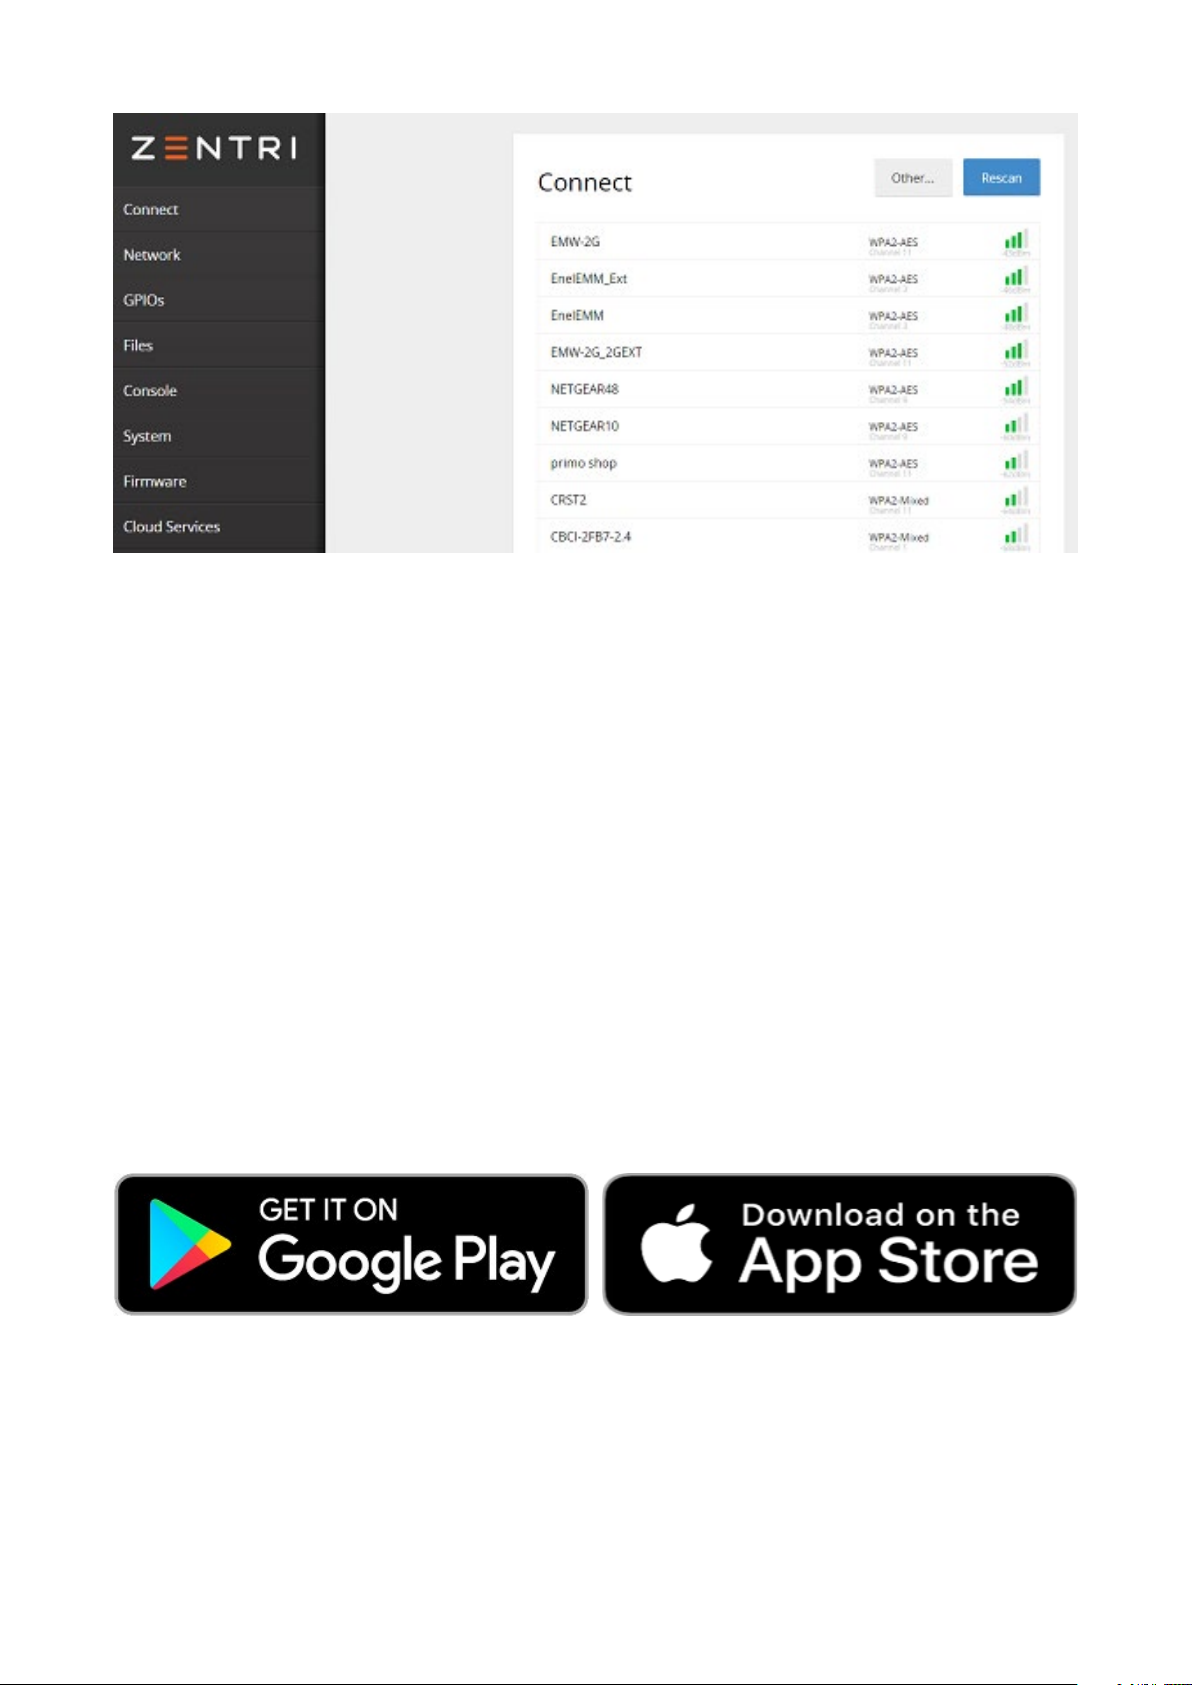
3. In a web browser, navigate to 10.10.10.1 or to setup.com to view a list of available Wi-Fi
networks.
IP ADDRESS PROTOCOL PORTS FQDN
dynamic HTTPS 443 directory-api.emotorwerks.com
dynamic HTTPS 443 ota.zentri.com
dynamic HTTPS 443 dms.zentri.com
138.91.137.23 UDP 8042 jbv1.emotorwerks.com
40.118.171.20 UDP 8042 emwjuicebox.emotorwerks.com
dynamic HTTPS 443 device-backend.juice.net
NOTE: If there are problems connecting, ensure that the following addresses are
not blocked:
NOTE: The following steps must be completed within 2 minutes of reconnecting
power to the JuiceBox.
NOTE: The actual name of the network varies by device, such as “JuiceBox-123”.
11
JuiceBox Conguration
For best results, peorm this procedure while standing within 5 ft (1.6m) of the JuiceBox.
1. Download and install the “JuiceCongure” app onto your mobile device.
4. Select the desired Wi-Fi network. Enter the Wi-Fi network password, if necessary. Click
Connect.
Verify that the JuiceBox is connected by checking that the “Network” indicator on the
enclosure is solid blue.


13
4. Select Congure via Wi.
5. Have the Wi-Fi network password ready, then select NEXT.
NOTE: If the JuiceBox is already power on before this step, disconnect it from
power and re-connect again before proceeding.

14
6. Navigate to the Wi-Fi seings on your mobile device. Connect to the “JuiceBox-###”
or “JuiceNet-###” Wi-Fi network. If the network requires a password, use the password
“GoElectric” (case-sensitive).
NOTE: The actual name of the network varies by device, such as “JuiceBox-123”.
NOTE: After powering the JuiceBox, complete the steps 6 through 9 within 2
minutes.

15
7. Return to the JuiceCongure app.
8. In the JuiceCongure app, select the preferred local Wi-Fi network.

16
10. The app connects the JuiceBox to the Wi-Fi network, then select CONTINUE.
9. Enter the Wi-Fi network password, if necessary, then select CONNECT CHARGER TO
WI-FI.

17
11. You did it! The JuiceBox is now online and ready to charge.
Know Before Charging
Ensure that the vehicle has stopped charging before removing the charging cable or any
adapters from the vehicle charge po. If necessary, check any vehicle indicator lights to
verify that charging has stopped. If you are unsure, wait at least 5 seconds to remove the
charging cable after pressing down on the latch.
For Tesla owners using an adapter, refer to this document on how to best remove the
charging cable with the adapter.
NOTE: After connecting, JuiceBox checks its rmware version and peorms any
necessary updates. Wait 10 minutes before plugging in a vehicle.

18
Troubleshooting
Common Solutions
› Ensure that the latch on the EV charging cable handle is locked into place. If the handle
is not latched securely, the vehicle will not charge. If the latch is pressed down during
charging, charging automatically stops.
› If the vehicle is not charging as expected, ensure that the vehicle is not set up to begin
charging at a specic time of day. Refer to the app or JuiceNet dashboard for more
information.
Indicator Lights
Audible Error Codes
If a system error occurs, the JuiceBox emits an audible sequence of tones that indicates its
error state.
Refer to the complete list of error codes.
POWER (GREEN) NETWORK (BLUE) CHARGING (ORANGE)
Solid: Unit is powered and
ready
Solid: Connected to Wi-Fi
network Solid: Charging
O: Not powered or error Slow ashing: Searching for
congured network
Flashing: Time of use or
delayed charging in eect
Flashing: Contact
suppo.
Rapid ashing: Setup
mode


20
Impoant Safety Information
Read all safety information before installing this product. Save this information card.
WARNING: This device should be supervised when used around children.
WARNING: Do not put ngers into the electric vehicle connector.
WARNING: Do not use this product if the exible power cord or EV cable is frayed, has
broken insulation, or shows any other signs of damage.
WARNING: Do not use this product if the enclosure or the EV connector is broken,
cracked, open, or shows any other indication of damage.
WARNING: For use with electric vehicles only.
WARNING: Do not use if unit or EV cable is damaged.
WARNING: Do not remove cover or aempt to open the enclosure. No user serviceable
pas inside. Refer servicing to qualied service personnel.
WARNING: Install and use JuiceBox away from ammable, explosive, harsh or combustible
vapors, materials or chemicals.
WARNING: Do not operate the JuiceBox outside its temperature rating of -22°F to 122°F
(-30°C to 50°C).
WARNING: This device is intended only for electric vehicles not requiring ventilation
during charging.
WARNING: This product must be grounded. If it should malfunction or break down,
grounding provides a path of least resistance for electric current to reduce the risk of electric
shock. This product is equipped with a cord having an equipment grounding conductor and
a grounding plug. The plug must be plugged into an appropriate outlet that is properly
installed and grounded in accordance with all local codes and ordinances.
WARNING: Improper connection of the equipment-grounding conductor is able to
result in a risk of electric shock. Check with a qualied electrician or serviceman if you are
in doubt as to whether the product is properly grounded. Do not modify the plug provided
with the product - if it will not t the outlet, have a proper outlet installed by a qualied
electrician.
WARNING: In accordance to National Electric Code, breakers should be rated for at
least 125% of the device’s continuous load.
Table of contents
Other Enel X Batteries Charger manuals

Enel X
Enel X JUICEBOX PRO User manual

Enel X
Enel X Waybox Pro User guide

Enel X
Enel X Waypole User manual

Enel X
Enel X Waymedia 2 User manual

Enel X
Enel X JUICEBOX PRO User manual

Enel X
Enel X JuicePump 150 User manual

Enel X
Enel X JuicePump User manual

Enel X
Enel X JuiceBox User manual

Enel X
Enel X Waypole User manual

Enel X
Enel X Way JuiceBox OpenPay User manual


Popular Batteries Charger manuals by other brands


Altronix
Altronix AL176X220 quick start guide

Parkside
Parkside 380775 2110 instructions

Panasonic
Panasonic EY0L11 operating instructions

Spektrum
Spektrum SMART TECHNOLOGY S1200 G2 instruction manual

SmartEv
SmartEv Scatalo installation manual

Analytic Systems
Analytic Systems BCD1050-32 Installation & operation manual