Erfal Rodin Disc User manual
Montage- und
Bedienungsanleitung
Rodin Disc
D Wartung und Pflege
Das Kettenzuggetriebe ist wartungsfrei und darf nicht geölt werden.
• um den Stobehang zu waschen,
die Ravorhangtechnik in die
unterste Position fahren
• das Flauschband vom Klettstrei-
fen entfernen
• die Aufzugsschnüre bleiben im
Aufzugsband
• Beschwerungsstab herausneh-
men
• Behang nach Herstellerangaben
waschen (verwenden Sie dabei
immer ein Wäschenetz)
Gardinenring
Beschwerungsstab
Raffvorhangtechniken
7
technische Änderungen vorbehalten
04 / 2015
subject to technical change
sous réserve de modications techniques
Achtung
Kinder können sich in den Schlingen von Schnü-
ren, Ketten oder Gurten zur Bedienung von Sicht-
und Sonnenschutzeinrichtungen verfangen oder
sich Schnüre um den Hals wickeln und sich unter
Umständen dadurch strangulieren. Schnüre,
Ketten und Gurte sind außer Reichweite von Kin-
dern zu halten, um Verwicklungen und Strangu-
lierungen zu vermeiden. Betten, Kinderbetten
und Möbel sind entfernt von Bedienungen für
Sicht- und Sonnenschutzeinrichtungen aufzu-
stellen.
Entspricht EN 13120
Attention – Attention
Children can get caught in the loops of cords,
chains or straps that operate window coverings or
they can wrap cords around their necks and stran-
gle thereby. Keep cords, chains and straps out of
reach of children to avoid entanglement and stran-
gulation. Move beds, cots and furniture away from
window covering operations.
according to EN 13120 – selon EN 13120
Les enfants peuvent se prendre dans cordons, chaî-
nettes ou courroies qui actionnent les stores de
protection solaire et visuelle ou ils peuvent enrou-
ler les cordons autour leur cou et ainsi s’étrangler.
Maintenez les cordons, chaînettes et courroies hors
de portée des enfants pour éviter de s’étrangler ou
de s’emmêler. Placez les lits, berceaux et meubles à
l’écart des manipulations des stores de protection
solaire et visuelle.
Assembly and operating instructions
Notice de montage et mode d’emploi
weighted rod
prolé de lestage
curtain ring
anneau de rideau
Service and maintenance - Maintenance et entretien
The chain gear is maintenance-free and shall not be oiled.
Le treuil de chaînes est sans entretien et ne doit pas être huilé.
• for washing the fabric, please move the roman
blind technique to the lowermost position
• remove the frieze band from the velcro stripe
• lifting cords remain in the lifting tape
• take out the weighted rod
• wash the fabric according to manufacturers’
instructions (always use a laundry net)
• pour laver le tissu, veuiller mettre la technique
de store bateau à la position la plus basse
• enlever le ruban-velours de la bande velcro
• les cordons de levage restent au ruban de
levage
• retirer le prolé de lestage
• laver le tissu selon les instructions du fabricant
(utiliser toujours un let à linge sale)
Roman blind techniques - Techniques de stores
bateaux
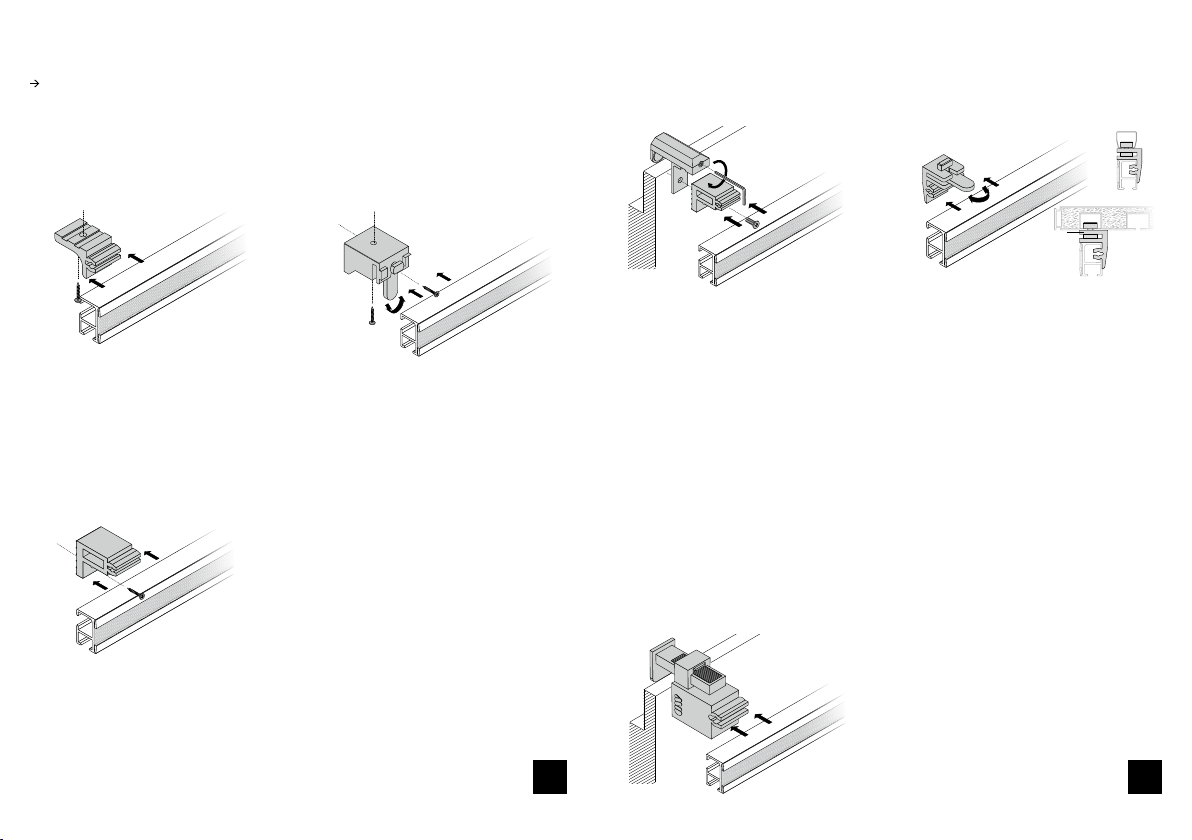
Bei der Montage der Decken- bzw.Wandhalter bitte beachten, dass der Abstand zwischen
Halter und Rarolloende max. 50–100 mm beträgt. Rarollo waagerecht montieren.
ATrägermontage
DECKENMONTAGE
WANDTRÄGER
• Träger an Decke montieren
• Ravorhangtechnik in Deckenträger
einclippen
Klemmträger universal
Klemmträger Rodin
• Träger an Wand montieren
• Ravorhangtechnik in Wandträger
einclippen
• Träger an Wand oder Decke mon-
tieren
• Ravorhangtechnik auf den Träger
stecken (Lasche zeigt nach unten)
• Lasche nach links oder rechts dre-
hen, um den Träger im Prol zu
arretieren
WAND / DECKENMONTAGE
KLEMMMONTAGE INNENLAUF / USCHIENENMONTAGE
• Wandträger auf Klemmträger
schrauben
• Klemmträger am Fensterügel
befestigen
• Rarollo Rodin in Wandträger
einclippen
1. Ravorhangtechnik in Adapter
einclippen
2. Adapter mit nach vorn gerichteter
Lasche in Innenlauf- bzw.U-Schiene
stecken
3. Lasche zum Verriegeln nach links
oder rechts drehen
12
FIXATION OF INTERIOR TRACK RAIL / U-RAIL
FIXATION DU RAIL À GLISSIÈRE INTÉRIEUR OU RAIL-U
block holder Rodin
support pour fenêtre PVC Rodin
FIXATION WITH BLOCK HOLDERS
FIXATION AVEC SUPPORTS POUR FENÊTRES PVC
Please respect a distance of max. 50-100 mm between the bracket and the end of the Roman blind when xing
the clips or rather wall brackets. Fix the Roman blind technique horizontally!
CEILING FIXATION - FIXATION PLAFOND WALL/CEILING FIXATION- FIXATION PLAFOND/MURALE
Fixation of brackets - Fixation des supports
• screw the wall bracket on the block holder
• x the block holder on the window sash
• click the Roman blind Rodin into the wall bracket
• visser le support mural au support pour fenêtre PVC
• xer le support pour fenêtre PVC au battant de
fenêtre
• encliqueter le store bateau Rodin au support mural
1. click the Roman blind technique into the adapter
2. put the adapter (lug is in front) into the interior
track or U-rail
3. turn the lug for bolting to the left or right
1. encliqueter le store bateau à l’adaptateur
2. mettre l’adaptateur (la patte est devant) au rail à
glissière intérieur ou rail-U
3. tourner la patte de verrouillage à droite ou
gauche
block holder universal
support pour fenêtre PVC universal
• x the brackets on the wall
• clicktheRoman blind technique intothewallbracket
• xer le support au mur ou plafond
• encliqueter la technique de store bateau au
support mural
WALL BRACKET - SUPPORT MURAL
• x the brackets on the ceiling
• click the Roman blind technique into the ceiling clip
• xer le support au plafond
• encliqueter la technique de store bateau au clip
plafond
• x the brackets on the wall or ceiling
• put the Roman blind technique on the bracket
(lug is in front)
• turn the lug to the left or right to lock the bracket in
the prole
• xer le support au mur ou plafond
• mettre la technique de store bateau sur le support
(patte est devant)
• tourner la patte à droite ou gauche an d‘ajuster le
support au prolé
En xant les clips ou bien les équerres, veuillez respecter une distance de 50-100 mm au maximum entre
l’équerre et le n du store bateau. Fixer la technique de store bateau horizontalement !

min. 5 cm min. 5 cm
ca. 17–30 cm ca. 17–30 cm ca. 17–30 cm
Gardinenring
BBehang vorbereiten
• Stobehang gemäß Nähanleitung vorfertigen
Schnurfeststeller
• Schnur U-förmig durch den Schnurfeststeller, das jeweilige Raband sowie
den Gardinenring fädeln
• Schnur nach Fädelplan in den Behang bzw. Technik einziehen
• auf gleiche Schnurlängen achten
Schnurclip
Aufzugsband
• Beschwerungsstab in den Saum schieben
• durch die eingenähten variablen Schnurfeststeller ist ein leichtes Einstellen
des Behanges möglich
Aufzugsschnur
Beschwerungsstab
Schnurfesteller
3 4
Prepare the hanging - Préparer le tissu
prefabricate the hanging according to the sewing instructions
préfabriquer le tissu selon les instructions de coudre
curtain ring
anneau de rideau
cord stopper
arrêt de cordon
lifting cord
cordon de levage
cord stopper
arrêt de cordon
weighted rod
prolé de lestage
• push the weighted rod into the seam
• because of the sewn in variable cord stopper a simple adjusting of the hanging is possible
• pousser le prolé de lestage à l’ourlet
• des arrêts de cordon variables cousus facilitent le réglage du tissu
• thread the cord like an U through the cord stopper, the corresponding gathering tape as well as the curtain ring
• draw the cord into the hanging according to the threading scheme
• pay attention on the same cord lengths
• enler le cordon comme un U par l‘arrêt de cordon, la bande à froncer aussi bien que par l‘anneau de rideau
• enler le cordon au tissu selon le schéma d’enlage
• faire attention aux mêmes longueurs des cordons

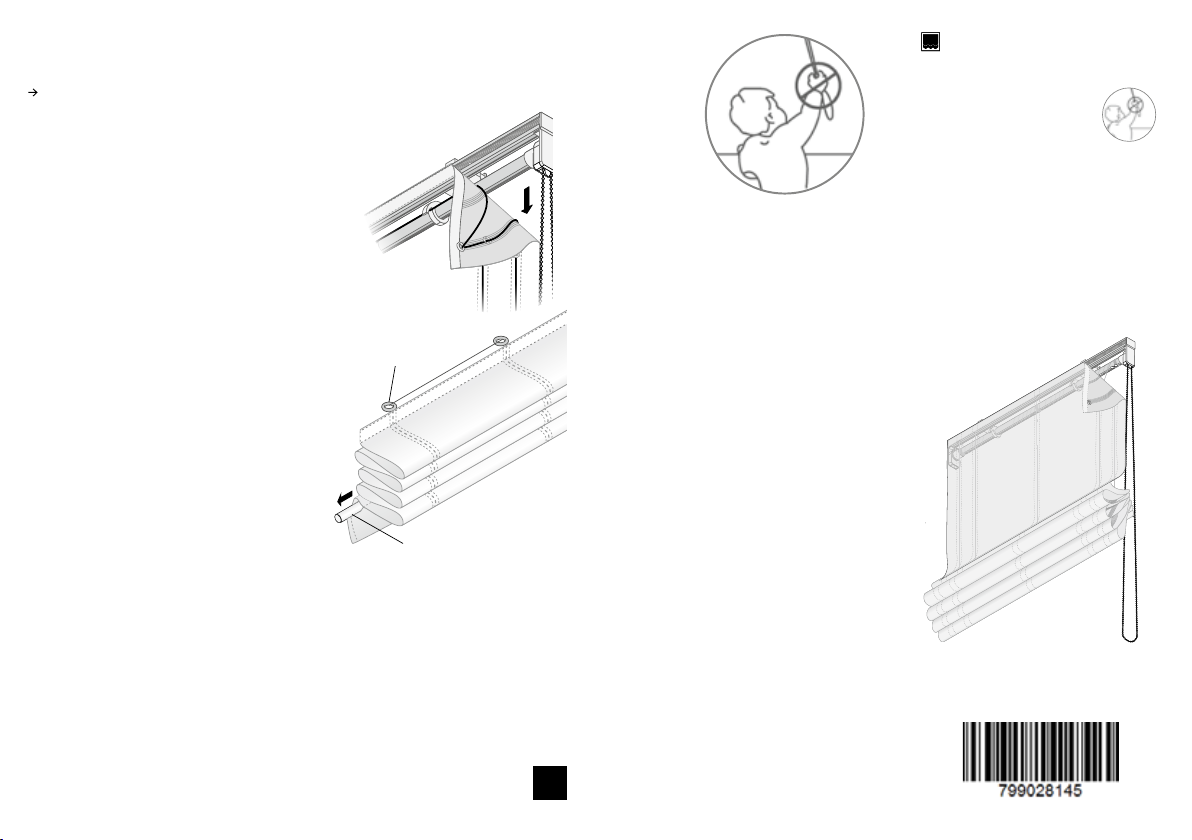
• Die Mitnehmerscheiben posi-
tionieren Sie in der Mitte der
U-geführten Aufzugschüre, so
dass diese beim Bedienen selbst-
ständig eingefädelt werden kön-
nen.
• Für eine einwandfreie Funktion
der Mitnehmerscheibe, muss die
Aufzugsschnur zwischen den
Einnähösen stra gespannt sein.
• nach dem Ankletten des Behanges ist eine Feinjustierung der Schnur mittels
variablen Schnurfeststeller möglich, um ein einwandfreies Hängeverhalten
des Behanges zu ermöglichen
Flauschband
Aufzugsschnur
Aufzugsband
Gardinenring
• Behang gerade an die Technik ankletten
CBehang anbringen
5 6
frieze band
ruban-velours
lifting cord
cordon de levage
lifting tape
ruban de levage
curtain ring
anneau de rideau
x the hanging straight on the technique
xer le tissu droitement à la technique
Fix the hanging - Fixer le tissu
after the xation of the hanging it is possible to adjust the cord nely with the help of a variable cord stopper,
to enable a perfect hanging of the fabric
• Position the carrier disks in the middle of the U-leaded lifting cords, so that can be thread during the operating process.
• To guarantee a sound function of the carrier disks, the lifting cord has to be tightened strongly between the sewn eyelets.
• Positionner les disques d’entrainement au milieu des cordons de levage guidés comme un U, an qu’ils peuvent être
enlés pendant la Manipulation.
• Le cordon de levage doit être tendu fortement entre les œillets cordon à coudre, an de garantir une fonction
impeccable..
après la xation du tissu il est possible d’ajuster le cordon nement à l’aide d’un arrêt de cordon, an de garan-
tir un comportement parfait du tissu
Other Erfal Window Blind manuals


Popular Window Blind manuals by other brands


weinor
weinor VertiTex ZipR Maintenance Instructions and Directions for use for the end user

Roto
Roto ZAR M R4/R7 Mounting instructions

Benthin
Benthin P1614 quick start guide

MDT
MDT KNX Smart 55 BE-JTA5504.01 Technical manual

Victoria M
Victoria M SYSTEM VS 1 Original instructions

SOMFY
SOMFY Movelite WT Series instructions