EUFY RobVac G15 User manual

Quick Start Guide
RobVac G15
Gufa
de lnicio Rapido
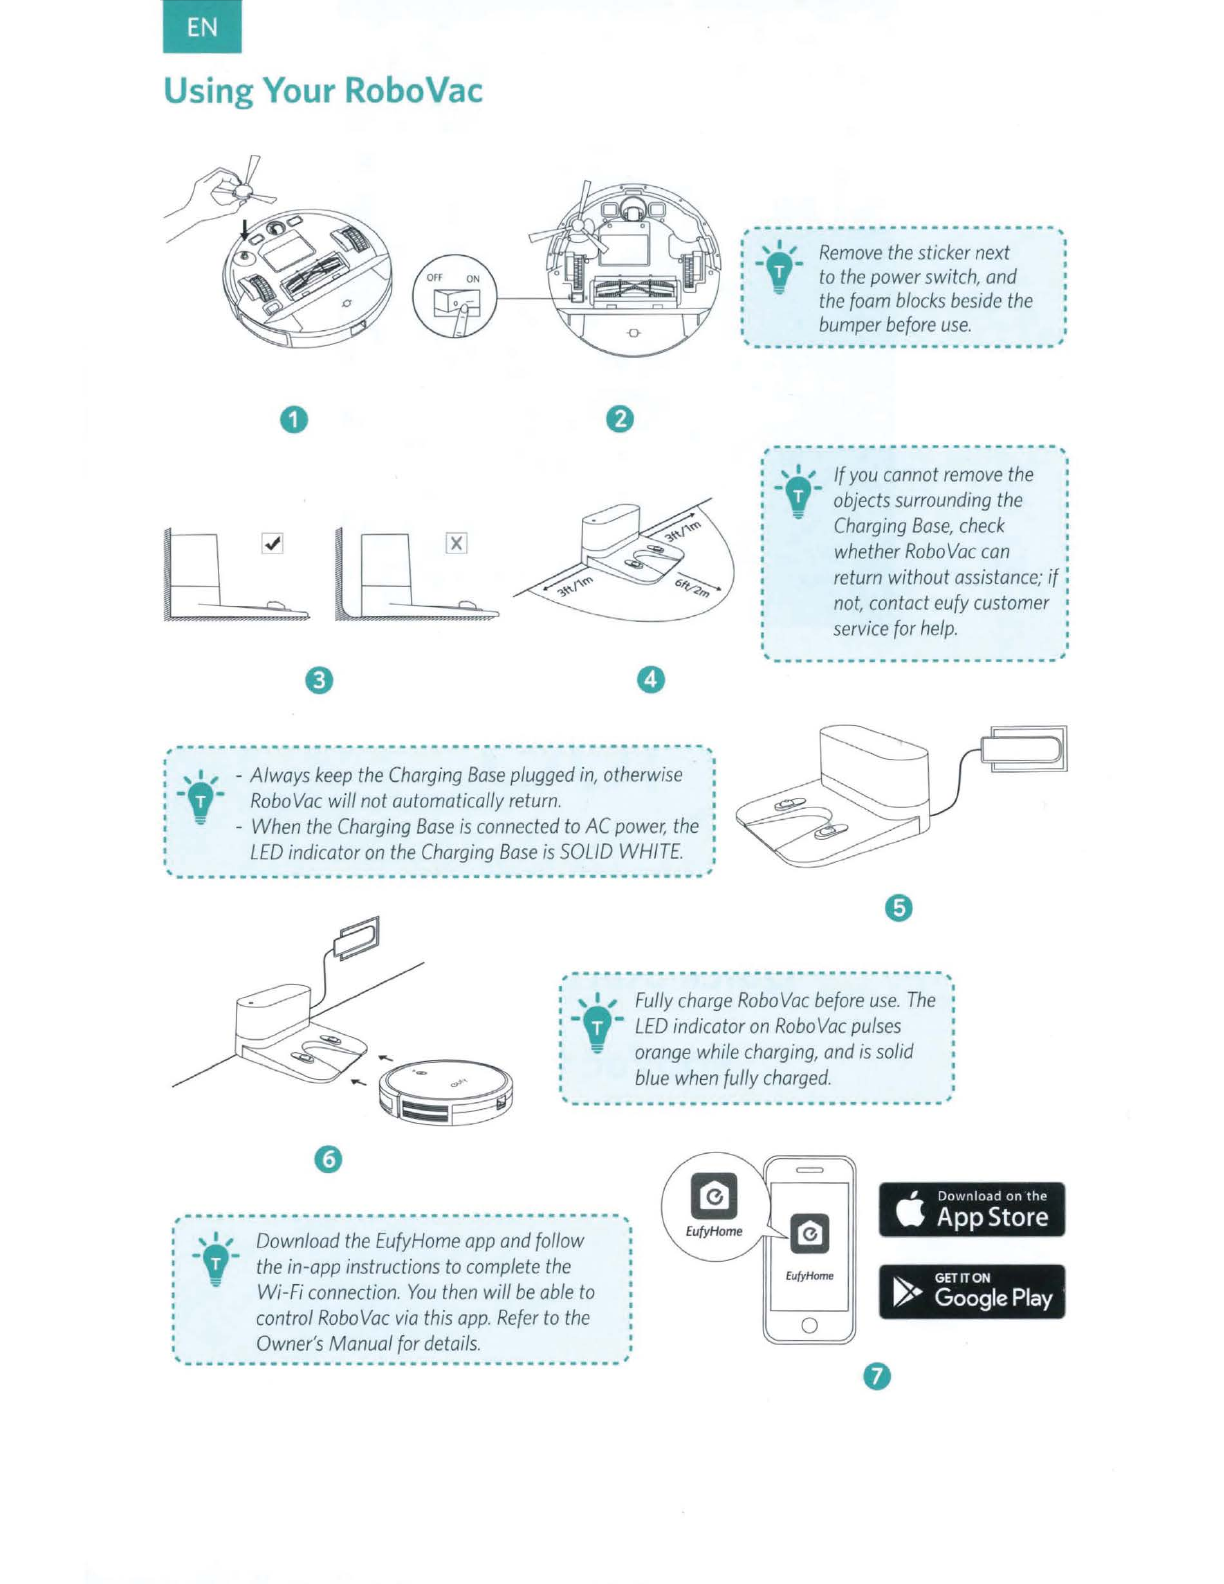
Using
Your
RoboVac
,-----------------------------,
:
_,,,
'-
Remove
the
stickernext
,
to
the
power
switch,
and
:
the
foam
blocks
beside
the
bumper
before
use.
I
I
I
I
,
_____________________________
,
0
x
e e
,---------------
-----------
'I
: , 1 , - Always
keep
the
Charging
Base
plugged
in,
otherwise
:
-,-
RoboVac
will not automatically
return.
: - -
When
the
Charging
Base
is
connected
to
AC
power,
the
:
LED
indicator
on
the
Charging
Base
is
SOLID
WHITE.
,
___________________________
_
______________________
,
'I
,
-,-
-If
you
cannot
remove
the
objects
surrounding
the
Charging
Base,
check
whether
RoboVac
can
return without
assistance;
if
not,
contact eufy customer :
service
for
help.
0
,-----------------------
'
0
:,0
,,
Fully
charge
RoboVac
before
use.
The
: - -
LED
indicator
on
RoboVac
pulses
'
'=
orange
while
charging,
and
is
solid
blue
when
fully
charged.
,
__
_
________________________________
,
,-----------------------------
-
-----------,
-l-
Download
the
EufyHome
app
and
follow
the
in-app instructions
to
complete
the
Wi-Fi
connection.
You
then
will
be
able
to
control
RoboVac
via
this
app.
Refer
to
the
Owner's
Manual for
details.
EufyHome
0
~
GETITON
~•
Google
Play
0

Important Tips
When
using for the first
tim
e,
follow RoboVac
to
observe and
re
solve any problems that may occur.
A B C
D
A Remove power cords and small objects from the floor
that
may entangle RoboVac. Use the
supplied cable ties
to
organize your wires and power cords.
B
Fold
tasseled edges
of
area rugs underneath
to
prevent tangling RoboVac. Avoid cleaning very
dark-colored high-pile rugs or rugs thicker than 1.02 in/
26
mm
as
they may cause RoboVac to
malfunction.
C
It
is strongly recommended
to
place boundary strips (sold separately) in front
of
fireplaces
and certain areas (i.e.air vents)
that
may cause damage
to
RoboVac
if
entered.
D Keep RoboVac away from
wet
areas during cleaning.
E RoboVac may climb on top
of
objects less than 0.67 in/
17
mm
in height. Remove these
objects
if
possible.
F
Anti-drop
sensors will prevent RoboVac from
tumbling
downstairs and steep drops in
most
cases. Sensors are less effective
if
dirty
or
used on carpeted/reflective/very dark-colored
floors. It is recommended
to
place physical barriers
to
block
off
areas where RoboVac
may
fall.

0ufy
For
FAQs and more information, please visit:
www.eufylife.com
T2257
51005003240
V01

RoboVac
G15
Owner's
Manual
Table of contents
Other EUFY Vacuum Cleaner manuals

EUFY
EUFY MACH V1 User manual

EUFY
EUFY RoboVac T2253 User manual

EUFY
EUFY HomeVac H20 User manual

EUFY
EUFY RoboVac G30 User manual

EUFY
EUFY RoboVac G20 Hybrid User manual

EUFY
EUFY RoboVac 30C User manual
 User manual")
EUFY
EUFY RoboVac 11c Pet Edition (T2111) User manual

EUFY
EUFY RoboVac 11 User manual

EUFY
EUFY ROBOVAC 20 User manual

EUFY
EUFY RoboVac LR30 Hybrid+ User manual

EUFY
EUFY RoboVac LR30 Hybrid+ User manual

EUFY
EUFY RoboVac 30 User manual

EUFY
EUFY T2194 User manual

EUFY
EUFY CLEAN RoboVac 11S User manual

EUFY
EUFY RoboVac User manual

EUFY
EUFY RoboVac Series User manual

EUFY
EUFY HOMEVAC T2401 User manual

EUFY
EUFY X8 Pro User manual

EUFY
EUFY L35 Series Installation guide

EUFY
EUFY MACH V1 User manual


