everActive NC 1000 User manual

Professional Battery Charger
NC 1000
EN USER’S MANUAL
page 3
DE BEDIENUNGSANLEITUNG
seite 17
PL INSTRUKCJA OBS UGI
strona 33
www.everactive.pl

2

3
EN USER’S MANUAL
1. General information.
Thank you for buying our new genuine product.
Everactive NC 1000 is a professional Ni MH/Ni Cd battery
charger, discharger and analyzer. Four operating modes
include: charge, discharge, test and refresh/recovery.
Specifications
Supported battery
types
1 4pcs of R03 AAA / R6 AA, Ni MH / Ni CD
any capacity
Charge current adjustable: 200, 500, 700 and 1000 mA
USB output 5V DC, 1000mA
Discharge current adjustable: 100, 250, 350 and 500 mA
Safety
microprocessor controlled,
–dV charge termination method,
battery overheat protection,
charger overheat protection,
alkaline, damaged and non rechargeable battery
detection
Operating modes charge / discharge / refresh / capacity test
LCD Display multi segment with separate, digital readout for
each charging slot
Number of buttons 7
Power Supply 12V DC, 1500mA,
100 240V AC and 12V DC adapters included
Dimensions 129 x 75 x 29 mm
Warranty 2 years limited warranty

4
2. Intended use.
This product is intended to charge and discharge Ni
MH and Ni Cd rechargeable batteries of AA (R6) and AAA
(R03) sizes.
It is equipped with four independent charging slots. It
uses highly optimized charging process with -∆V full charge
termination method for maximum battery performance.
Refresh mode can restore battery's full capacity and
minimize memory and "lazy battery" effects.
NC 1000 is able to charge batteries of different types, sizes
and capacities at the same time. Charge and discharge
currents are fully adjustable for each cell. At the end of
charge process batteries are switched to trickle charge
mode to maintain their full charge state.
Charger should be only used with provided AC/DC
adapters.
This product is in conformity with all
provisions of Directive LVD 2006/95/EC,
Directive EMC 2004/108/EMC and it
complies with relevant European
Standards (EN).
3. Package contents.
Each box contains:
everActive NC 1000 charger,
user’s manual,
AC/DC power adapter,

5
12V DC car adapter.
4. Safety Instructions.
1. Read the instructions before using this charger.
2. This charger is intended for use with Ni MH and Ni Cd
rechargeable batteries only. Attempting to charge other
types of batteries may cause personal injury, damage to
the charger or lead to a fire.
3. The charger is intended for indoor use only. Exposure to
any liquids or moisture can cause damage to the charger
and batteries.
Do not allow foreign objects to enter the
charger. This could result in electrical shock or fire.
4. Disconnect the charger and its power adapter from the
power socket when not in use.
5. Never use an extension cord or any attachment not
recommended by the manufacturer.
6. Do not operate the charger if it has been subjected to
shock or damage. Take it to a qualified serviceman for
repair.
7. Do not attempt to disassemble the charger or its power
adapters as it may result in a risk of electric shock or fire.
8. Unplug the charger from the power supply before
attempting any cleaning.
Use only a soft damp cloth. Do
not use water, detergents or alcohol.
9. The charger is not intended for use by young children
without adult supervision.
10. Intended for use with original power adapters only.
6
11. Do not use batteries with their + (positive) and
(negative) ends (terminals) reversed.
12. Batteries can become hot during the charging process.
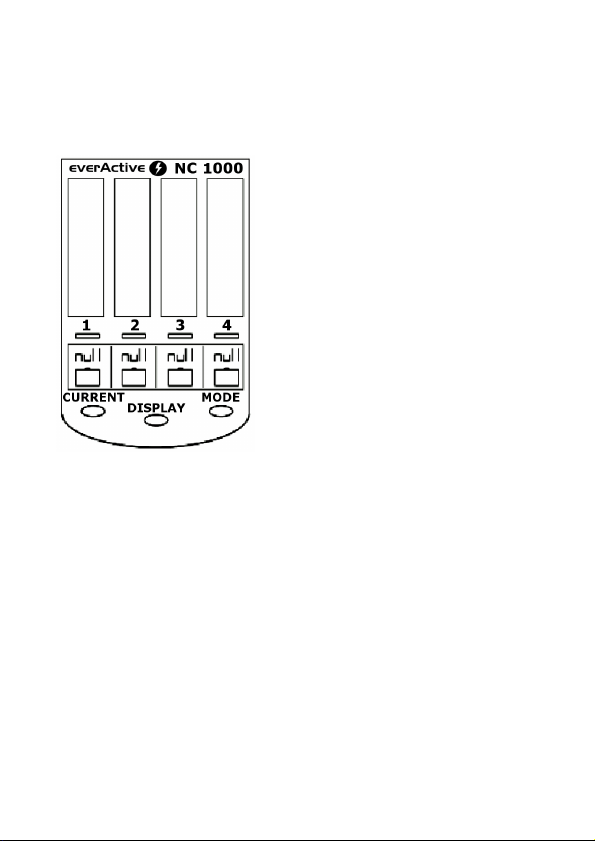
5. Charger overview. Main controls.
1,2,3,4 – selects battery slot for
additional operation mode /
electric current changes.
MODE – selects charger
operation mode: charge,
discharge, refresh, test. This
button needs to be pressed for
more than one second to
activate, it can be used together
with “1,2,3,4” button for setting
individual operating modes of
each charging slot.
DISPLAY – switches between
various information: charging/discharging currents,
elapsed time, cell’s voltage, capacity.
CURRENT – selects charging/discharging current for
inserted batteries. Button works for the first eight seconds
after inserting batteries. Can be also used after pressing
MODE button.

7
Power supply.
This charger should be used with
original power adapters only. When the
charger is powered up, LCD display
turns ON, if there are no batteries
inserted the “null” icon should appear.
6. Basic operation.
Once rechargeable batteries are inserted, their voltage
level will be shown on the
LCD display (for example
1.12V). Voltage readings will
be shown for first 4 seconds,
and afterwards for next 4
seconds display will show
“200mA” as default charging current. If not interrupted by
“Mode” and “Current” buttons within 8 seconds, the
default charge mode will start automatically. Operation
mode can be changed for all inserted batteries
simultaneously, anytime by holding “Mode” button, and if
change of electric current value is desired this operation
should be followed by pressing “Current” button. These
changes can be also made individually for each charging
slot by selecting “1,2,3,4” before holding “Mode” button.

8
Defective or completely empty (“0”
voltage) batteries may be
unrecognized by NC 1000 charger,
then “null” icons will be shown and
no further operation will be
possible*.
*Sometimes the most basic, simple charger
with small, 50 150mA charging current is able to revive such completely
discharged cells. If successful they can be charged with NC 1000
afterwards.
Mode selection.
Pressing and holding “Mode” button for about 1 second
activates mode change for all charging slots. Then short
pressing of “Mode” button will cycle between available
operating modes: “Charge”, “Discharge”, “Refresh”, “Test”.
For 4 seconds after selecting the desired operation mode
the user can adjust charging/discharging current by
pressing the “Current” button.
Additional mode/current changes can be applied to
individual cells by selecting each charging slot (pressing
“1,2,3,4” buttons) before using “Mode/Current” buttons.

9
Charging current selection.
For the first 8 seconds after the batteries are inserted user
can adjust charging current by pressing the “Current”
button. Possible values are: 200, 500, 700 and 1000mA.
Changes are applied for all inserted batteries. Charging will
start automatically after 8 seconds from the moment last
button was pressed. If further changes are needed, user
can select desired charging slot (“1,2,3,4” button) and
change mode/current anytime by using “Mode” followed
by “Current” button.
Please note that the recommended charging current
should be set to about 1/4 value in relation to inserted
battery’s rated capacity. For example for the 2000mAh
R6/AA batteries the recommended charging current is
500mA. For the 800mAh R03/AAA batteries the
recommended charging current is 200mA.
Full charge termination method ∆V is less accurate with
lower than recommended charging currents.
7. Overheat protection.
This charger is equipped with
overheat protection. Protected are
both the inserted batteries and the
charger. If temperature of any of the
inserted cells rises over 55 degrees
Celsius or the charger’s internal
circuitry temperature rises over 70
10
degrees then the operation will be interrupted and
“000mA” icon will be shown on display. The process will
resume when the battery’s temperature drops to 40
degrees Celsius or the charger’s internal circuitry
temperature drops below 50 degrees.
8. Operation modes and display readings.
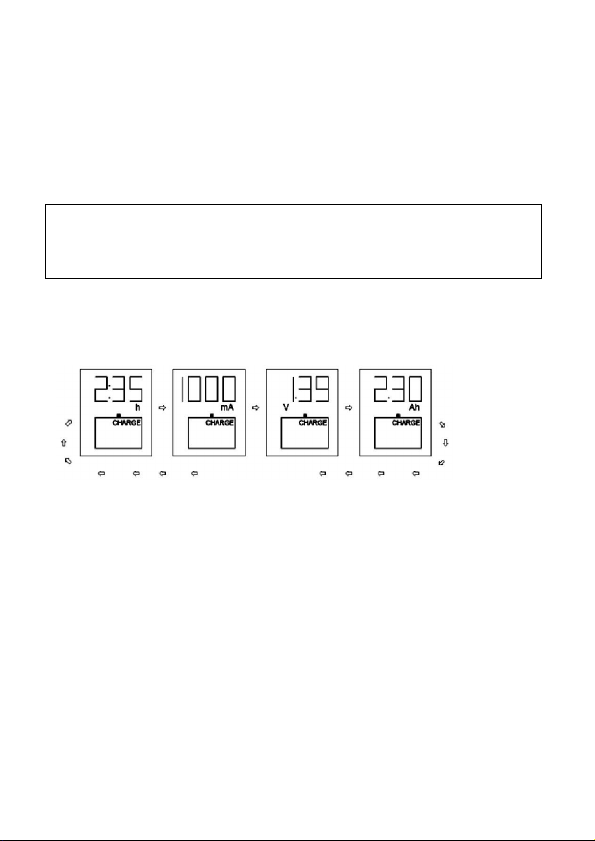
Charge mode – inserted batteries will be charged
automatically with the (pre)selected charging current.
Stage 1. Charging.
Various information can be read by pressing “Display” button – time of
operation, charging current, voltage level, charged capacity in mAh/Ah.
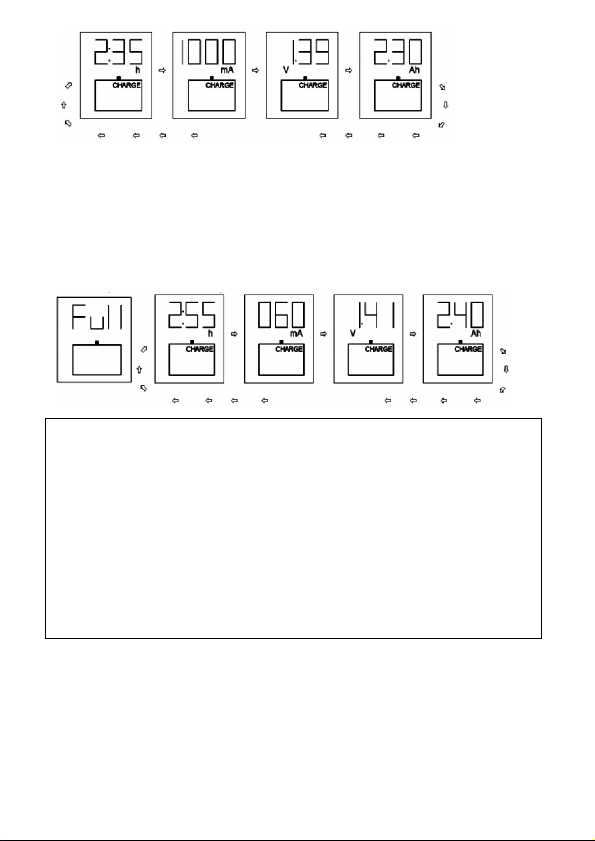
Stage 2. End of charging process, trickle charge is applied
to maintain full charge of the inserted batteries.
Icon “Full” will be shown on display. Pressing “Display” button will show
various information – time, trickle charging current, voltage level, charged
capacity in mAh/Ah please note it’s not the same value as battery’s
rated capacity.

11
.
Discharge mode – can be used to reduce and minimize
memory effect and lazy battery effect. Such cell will be
discharged to level of 0.9V. Once the discharge is finished,
the battery will be fully charged with a preprogrammed
charging current – please note that NC1000’s charging
current is always double the value of the selected
discharge current.
Stage 1. Discharging.
Pressing “Display” button will show various information – time,
discharging current, voltage level, momentary capacity in mAh/Ah.
Stage 2. Charging.
Pressing “Display” button will show various information – time, charging
current, voltage level, charged capacity in mAh/Ah.
12
Stage 3. End of charging process. Trickle charge is applied
to maintain full charge of the inserted batteries.
Icon “Full” will be shown on display. Pressing “Display” button will show
various information – time, trickle charging current, voltage level, charged
capacity in mAh/Ah please note it’s not the same value as battery’s
rated capacity.
Refresh mode – a special combination of several charge
and discharge cycles. The charger tries to maximize the
capacity of older cells, which were not used for an
extended period of time. Can be used to initialize/form
new batteries and check their real capacity or to reduce
the memory effect. Please take note that this process can
take even few days to complete. At the end of the process
maximum cell capacity can be read from LCD display.
Stage 1. Several charge/discharge cycles with capacity test.
Pressing “Display” button will show various information – time,
discharging current, voltage level, capacity in mAh/Ah.
13
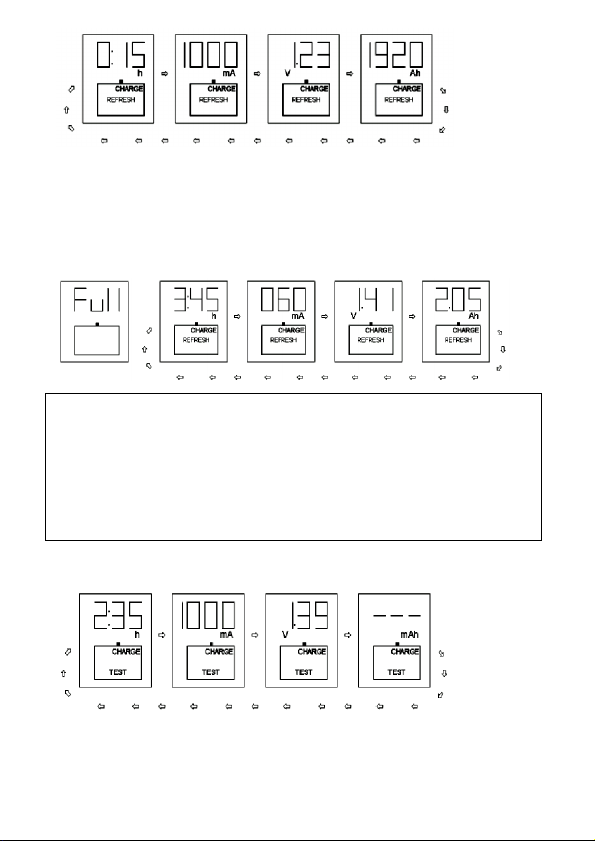
Stage 2. End of refresh process. Trickle charge is applied to
maintain full charge of the inserted batteries.
Icon “Full” will be shown on display. Pressing “Display” button will show
various information – time, trickle charging current, voltage level,
maximum capacity in mAh/Ah.
Test mode – can be used to test rated capacity of inserted
batteries. Please take note that new rechargeables may
need few charge/discharge cycles to reach their maximum
capacity. Batteries with much lower results than declared
should not be used and may need replacing.
Stage 1. Charging.

14
Stage 2. Discharging.
Stage 3. End of discharge process. Charge is re applied. At
this moment reading of measured capacity is available (by
pressing “Display” button).
Stage 4. End of test mode. Batteries are fully charged and
trickle charge is applied to maintain full charge of the
inserted batteries.
Pressing “Display” button will show various information – time, trickle
charging current, voltage level, measured capacity in mAh/Ah.

15
9. Product disposal.
The crossed out wheeled bin
symbol on your product, battery,
literature or packaging, reminds
you that all electrical and electronic
products, batteries and
accumulators must be taken to
separate collection at the end of
their working life. This requirement
applies in the European Union. Do
not dispose any of these products as unsorted municipal
waste.
10. Warranty.
Baltrade will repair or replace your charger free of
charge if it is proven to be defective within two years from
the date of purchase. Baltrade shall not be held liable for
any damage caused by misuse or not using the product in
accordance with this manual. Warranty will be invalid if
the charger was modified in any way, disassembled,
exposed to moisture, liquids, ingression of solid objects,
extreme thermal or environmental conditions, rapid
changes in such conditions that result in damage to the
charger's electronics.
If the charger was proven to be defective, it will be
repaired or replaced. In the event of a warranty claim,
please contact the retailer from whom you purchased your

16
charger. You can also send it together with all accessories,
to the address below:
Baltrade R. Czesnowski, B. Czesnowska sp.j.
J. Hallera 132
80 416 Gdansk, Poland
E mail: support@baltrade.eu
Receipt or invoice as a proof of purchase should be
provided.
This warranty does not affect and is in addition to legal
(statutory) rights under applicable national laws relating to
the sale of consumer products.

17
DE BEDIENUNGSANLEITUNG
1. Allgemeine Informationen.
Vielen Dank, dass Sie sich für unser professionelles
Ladegerät EverActive NC 1000 entschieden haben. Mit
diesem Ladegerät können Sie Ni MH/Ni Cd Akkus in der
Größe R6 (AA) i R03 (AAA) Laden, Entladen, Prüfen und
Erfrischen.
Spezifikation
Unterstützte
Batterien
1 4stk. R03 AAA / R6 AA, Ni MH / Ni Cd
In
Ladestrom Einstellbar: 200, 500, 700, 1000 mA
USB Buchse 5V DC, 1000mA
Entladestrom Einstellbar: 100, 250, 350, 500 mA
Sicherheit
Mikroprozessorgesteuerte Ladeerkennung dV,
Schutz vor Überhitzung der Akkus und des Ladegerätes,
Erkennung von beschädigten Akkus und Batterien, die
nicht zum Laden geeignet sind
Betriebsmodi Laden / Entladen / Erfrischen / Kapazitätsmessung
LCD Display Getrennte LCD Anzeige für jeden der 4 Kanäle
Anzahl der
Tasten 7
Spannung
12V DC, 1500mA,
Spannung 100 240V AC mit 12V DC Adapter im
Lieferumfang
Größe 129 x 75 x 29 mm
Garantie 2 Jahre Garantie

18
2. Verwendungszwecks des Ladegerätes
NC-1000.
Das Ladegerät ist zum Laden, Entladen, Erfrischen und
Prüfen von AA (R6) und AAA (R03) Ni MH/Ni Cd Akkus
geeignet. Es verfügt über vier unabhängige Kanäle. Die
Beendigung des Ladevorgangs wird durch einen
Mikroprozessor gesteuert, dies gewährleistet eine volle
Ladung der Akkus. Der Erfrischungs Modus bringt die volle
Akkukapazität wieder und minimiert den Memory Effekt,
so wie den „Lazy Battery” Effekt. Das Ladegerät NC 1000
kann Akkus gleichzeitig unterschiedlicher Typen und
Größen mit verschiedenen Kapazitäten Laden. Die Lade
und Entladeströme können für jede der vier einzelnen
Ladeschächte eingestellt werden. Nach Beenden des
Ladevorgangs, schaltet das Ladegerät auf
Erhaltungsladung, dass ermöglicht die Kapazität der Akkus
stehst voll zu halten. Das Ladegerät darf nur mit dem
mitgelieferten AC/DC Netzteil betrieben werden.
Es erfüllt alle Bestimmungen der Richtlinie
LVD 2006/95/EC, Richtlinie EMC
2004/108/EMC und entspricht den
relevanten europäischen Normen (EN).

19
3. Inhalt.
Das Paket beinhaltet:
EverActive Ladegerät NC 1000
Bedienungsanleitung
Netzteil AC/DC
12V DC Auto Adapter
4. Sicherheit
1. Vor der Verwendung des Ladegerätes, lesen Sie bitte die
Bedienungsanleitung durch.
2. Das Ladegerät wurde entwickelt, um mit wieder
aufladbaren Ni MH und Ni Cd Akkus zu arbeiten. Der
Versuch, andere Arten von Akkus oder Batterien zu laden,
kann zu Beschädigungen am Ladegerät führen, zu
Feuerschäden und Verletzungen an dem Benutzer.
3. Das Ladegerät darf nur in Innenräumen verwendet
werden. Flüssigkeiten und Feuchtigkeit können das
Ladegerät und die Akkus beschädigen. Das Einfügen von
anderen Objekten in das Ladegerät kann zu einem
Kurzschluss führen oder zu Strom und Brandschäden.
4. Trennen Sie das Ladegerät und das Netzteil von der
Steckdose, wenn dieses nicht im Gebrauch ist.
5. Das Ladegerät darf ausschließlich nur mit dem
mitgelieferten Netzteil an das Stromnetz angeschlossen
werden.
6. Verwenden Sie das Ladegerät nicht, wenn dies
beschädigt ist. Das Ladegerät sollte zu einer Fachwerkstatt
für die Reparatur oder den Austausch gebracht werden.

20
7. Das Ladegerät darf nicht geöffnet werden, denn dies
kann zu einem Stromschlag oder Brand führen.
8. Nach dem Trennen der Stromversorgung vom
Ladegerät, können Sie das Ladegerät mit einem trockenen
weichen Tuch reinigen. Das Ladegerät darf nicht mit
Wasser, Reinigungsmittel oder Alkohol in Berührung
kommen.
9. Minderjährige Kinder dürfen das Ladegerät ohne
Aufsicht von Erwachsenen nicht benutzen.
10. Das Ladegerät darf nur mit einer der mitgelieferten
Netzteile benutzt werden.
11. Legen Sie die Akkus, entsprechend ihrer Polarität: (+)
positiv und ( ) negativ ,in das Ladegerät.
12. Die Akkus können während des Ladevorgangs heiß
werden.
Table of contents
Languages:
Other everActive Batteries Charger manuals

everActive
everActive CBC-10 User manual

everActive
everActive LC 200 User manual

everActive
everActive NC 1000M User manual

everActive
everActive CBC-40 User manual

everActive
everActive NC-1600 User manual

everActive
everActive NC-3000 User manual

everActive
everActive LC 100 User manual

everActive
everActive NC-800 User manual

everActive
everActive CBC-1 User manual

everActive
everActive NC 900U User manual


