manuals.online logo
Brands
  1. Home
  2. •
  3. Brands
  4. •
  5. Jamara
  6. •
  7. Batteries Charger
  8. •
  9. Jamara Lipo 20 413117 User manual

Jamara Lipo 20 413117 User manual

25/23
Lipo 20
Charger 2S/3S
No. 413117
1 2 3
4
Deklaracja zgodności
Niniejszym rma JAMARA e.K. oświadcza, że produkty‚ „LiPo 20 Charger 2S/3S, No.
413117“ jest zgodny z dyrektywami 2014/30/UE, 2014/35/UE oraz 2011/65/UE .
Pełny tekst deklaracji zgodności UE jest dostępny pod następującym adresem interne-
towym: www.jamara-shop.com/Conformity
Certicate of Conformity
Hereby JAMARA e.K. declares that the product „LiPo 20 Charger 2S/3S, No. 413117“
complies with Directive 2014/30/EU, 2014/35/EU and 2011/65/EU.
The full text of the EU Declaration of Conformity is available at the following Internet
address: www.jamara-shop.com/Conformity
Wykluczenie odpowiedzialności
Firma JAMARA e.K. nie ponosi żadnej odpowiedzialności za szkody powstałe na samym produkcie
bądź za jego pośrednictwem jeżeli szkody te wynikają z nieprawidłowej obsługi bądź z niepoprawn-
ego posługiwania się produktem. Wyłącznie klient ponosi całkowitą odpowiedzialność za poprawną
obsługę i poprawne posługiwanie się produktem: obejmuje to w szczególności montaż, proces
ładowania, użytkowanie aż po wybór obszaru zastosowania. Prosimy zapoznać się w tym celu z
instrukcją obsługi i użytkowania, która zawiera ważne informacje oraz wskazówki ostrzegawcze.
General information
JAMARA e.K. is not liable for any damage caused to the product itself or through this, provided this
is due to improper operation or handling errors. The Customer alone bears the full responsibility for
the proper use and handling, including without limitation, the assembly, the charging process, the
use and choice of the operation area. Please refer to the operating and user instructions, it contains
important information and warnings.
Dane techniczne:
Napięcie wejściowe: AC 100 - 240V | 50/60Hz | 25W
Napięcie wyjściowe: 8,4 V (2S 7,4 V) / 12,6 V (3S 11,1 V)
Typy akumulatorów/ogniw: LiPo / 2S 7,4 V; 3S 11,1 V
Prąd ładowania: 1,6 A | 20 W
Technical data:
Input: AC 100 - 240V | 50/60Hz | 25W
Output: 8,4 V (2S 7,4 V) / 12,6 V (3S 11,1 V)
Battery types/Cells LiPo / 2S 7,4 V; 3S 11,1 V
Charging current: 1,6 A | 20 W
Najważniejsze cechy:
• Zintegrowany balanser ładowania dla 2 do 3 ogniw lipo
• Maksymalne bezpieczeństwo (nie ładuje głęboko rozładowanych ogniw)
• Prąd ładowania do 20 W przy 1,6 A
• Automatyczne zatrzymanie ładowania po osiągnięciu napięcia końca ładowania
• Obsługuje akumulatory litowo-polimerowe 2S;7.4V i 3S;11.1V ze złączem XH od 1600mAh w
górę
• 2 kolorowe diody LED stanu
Highlights:
• Integrated charge balancer for 2 to 3 lipo cells
• Maximum safety (does not charge deeply discharged cells)
• Charging current up to 20 Watt at 1.6Ampere
• Automatic charge stop when nal charge voltage is reached
• Supports 2S;7.4V and 3S;11.1V lithium polymer batteries with XH connector from 1600mAh
• 2 colored status LED‘s
Ważne uwagi dotyczące przydatności akumulatora:
Należy upewnić się, że używane są wyłącznie akumulatory litowo-polimerowe ze złączem
balansera XH. Tylko one mogą być używane z ładowarką. Inne połączenia i typy akumulatorów
nie mogą być używane (ryzyko pożaru z powodu odwrotnej polaryzacji lub przeładowania).
Sprawdź u producenta akumulatora, czy jest on odpowiedni. Tylko akumulatory LiPo
o pojemności co najmniej 1600 mAh (w przeciwnym razie istnieje ryzyko pożaru z powodu
nadmiernego prądu ładowania). W przypadku korzystania z akumulatorów o pojemności mniejszej
niż 1600 mAh, akumulatory muszą być zatwierdzone do ładowania prądem 1600 mA (szybkie
ładowanie). Należy sprawdzić u producenta akumulatora, czy spełnia on te wymagania.
Do ładowarki można podłączyć tylko jedną baterię na raz. Ładowanie 2 akumulatorów w
tym samym czasie NIE jest dozwolone i spowoduje uszkodzenie akumulatora lub ładowarki
(ryzyko pożaru).
Important notes on the suitability of the battery:
Make sure to use only lithium polymer batteries with XH balancer connector. Only these may
be used with the charger. Other connections and battery types must not be used (re hazard due
to reverse polarity or overcharging may result).
Please contact the manufacturer of your battery to nd out whether your battery is suitable. Only
LiPo batteries with a capacity of at least 1600mAh must be used (otherwise there is a risk of
re due to excessive charging current). If you use batteries with a capacity below 1600mAh, the
batteries must be approved for a charging current of 1600mA (Speedcharging). Please ask the
manufacturer of your battery if your battery meets these requirements.
You may only connect one single battery to the charger at a time. Charging 2 batteries at
the same time is NOT allowed and will cause damage to the battery or charger (re hazard).
1. wejście 100 - 240 V
2. połączenie balansera 2 ogniwa
3. podłączenie balansera 3 ogniw
4. diody LED stanu
1. Power Slot 100 - 240 V
2. 2S Balancer
3. 3S Balancer
4. Status LEDs
Przed uruchomieniem modelu prosimy o staranne przeczytanie całej instrukcji obsługi
i informacji dotyczących bezpieczeństwa.
Uwaga! Ostrzeżenia / instrukcje bezpieczeństwa muszą zostać przeczytane w
całości! Służą one Państwa bezpieczeństwu i mogą zapobiec wypadkom / urazom.
Read the complete instructions and security instructions carefully before using the model.
Caution! Please fully and carefully read warnings/ safety instructions. These are for
our own security and can avoid accidents/injuries.
PL - Instrukcja użytkowania
GB - Instruction
JAMARA e.K.
Inh. Manuel Natterer
Am Lauerbühl 5 - DE-88317 Aichstetten
Tel. +49 (0) 75 65/94 12-0 - Fax +49 (0) 75 65/94 12-23
[email protected] ●www.jamara.com
Service - Tel. +49 (0) 75 65/94 12-777
[email protected]
1 2
DE - Servicehändler | GB - Service centre | FR - Revendeur de service | IT - Centro assistenza | ES - Servicio asistencia | CZ - Servisní centrum
DE - Reitter Modellbau Versand, Patricia Reitter, Degerfeldstrasse 11, 72461 Albstadt, Tel. 07432 9802700, Fax 07432 2009594, [email protected], www.modellbauversand.de
DE - Bay-Tec, Martin Schaaf, Am Bahndamm 6, 86650 Wemding, Tel. 07151 5002192, Fax 07151 5002193, [email protected], www.bay-tec.de
CH - Modellbau Zentral, Peter Hofer, Bersteneggstrasse 2, CH-6460 Altdorf, Tel. +41 (0) 794296225, Fax +41 (0) 418700213, [email protected], www.modellbau-zentral.ch
EU - JAMARA e.K., Manuel Natterer, Am Lauerbühl 5, DE-88317 Aichstetten, Tel. +49 (0) 75 65/94 12-0, Fax +49 (0) 75 65/94 12-23, [email protected], www.jamara.com
CZ - PenTec s.r.o., distributor Jamara for Czech Republic and Slovakia, Veleslavínská 30/19, CZ -162 00 Praha 6, Tel. +420 235 364 664, Mobil +420 739 075 380, servis@topdrony.cz, www.topdrony.cz
Z wyjątkiem błędów i modykacji technicznych. Copyright JAMARA e.K. 2023
Kopiowanie i przedruk, również we fragmentach, wyłącznie za zgodą JAMARA e.K.
All rights reserved. Copyright JAMARA e.K. 2023
Copying or reproduction in whole or part, only with the expressed permission of JAMARA e.K.
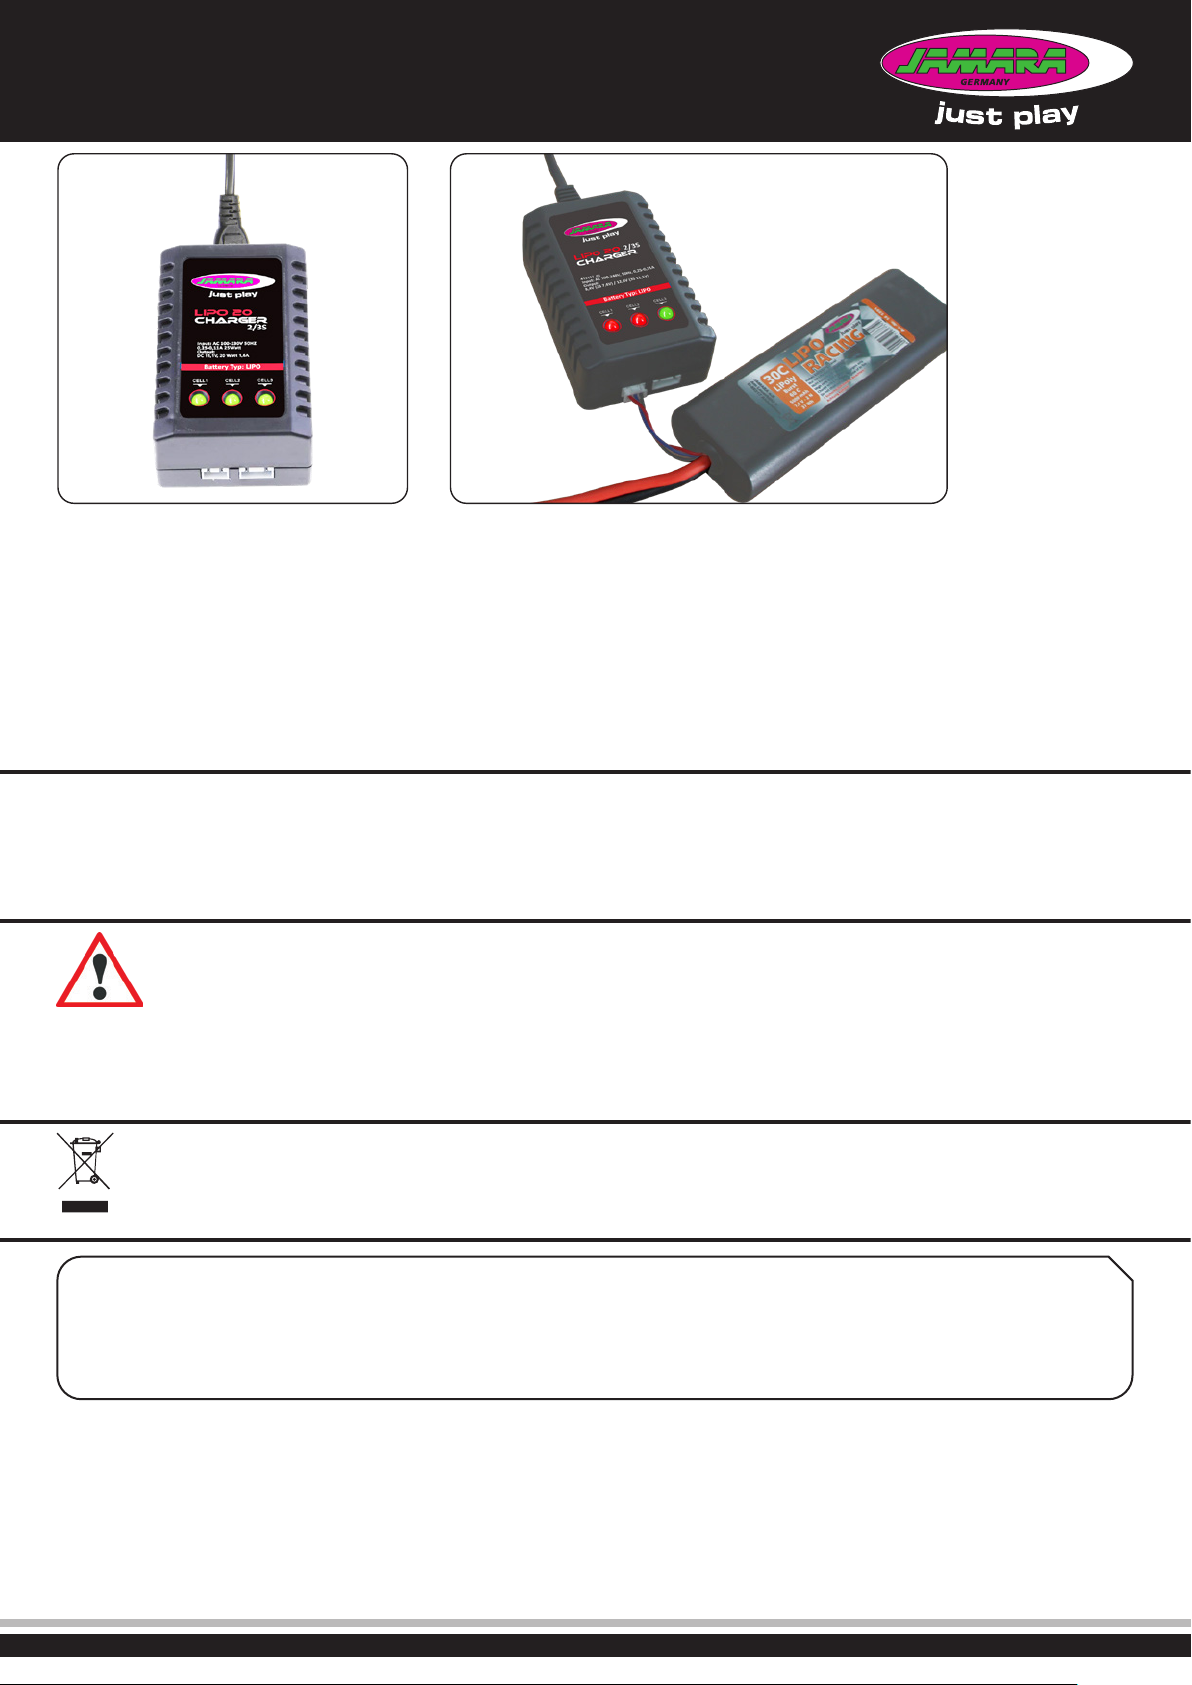
Ładowanie akumulatora
1. Podłącz kabel sieciowy ładowarki do odpowiedniego gniazdka. Diody LED zaświecą się
na zielono, sygnalizując gotowość do ładowania.
2. Podłącz pusty akumulator do ładowarki. Akumulatory 7,4 V 2S do 3-pinowego złącza lub
akumulatory 11,1 V 3S do złącza 4-stykowego. Nie używaj siły i uważać, aby nie odwrócić
polaryzacji. Po kilku sekundach diody LED zmienią kolor na czerwony, wskazując, że ogniwa
akumulatora są ładowane.
Uwaga!
Podczas podłączania akumulatora 2S tylko pierwsze 2 diody LED (Cell1-2) zmieniają
kolor na czerwony, dioda LED 3 (Ogniwo 3) pozostaje zielona. Po podłączeniu
akumulatora 3S wszystkie diody LED (Cell1-3) zmieniają kolor na czerwony.
Gdy tylko ogniwo akumulatora zostanie w pełni naładowane, odpowiednia dioda LED zmieni
kolor na zielony. ogniwa są ładowane indywidualnie, możliwe jest, że jedno ogniwo zostanie w
pełni naładowane wcześniej niż inne. Akumulator należy zawsze pozostawiać podłączony do
ładowarki, dopóki ogniwa są w pełni naładowane (kolor zielony), aby umożliwić ładowarce
zrównoważenie akumulatora.
Charging a battery
1. Plug the power cord of the charger into a suitable socket. The LEDS light up green and indicate
that the charger is ready for charging.
2. Now connect the empty battery to the charger. 7.4V 2S batteries to the 3 pin connector or 11.1V
3S batteries to the 4 pin connector. Do not use force and pay attention to reverse polarity. The
LEDs change to red after a few seconds and indicate that the battery cells are charging.
Attention:
When connecting a 2S battery, only the rst 2 LEDs (Cell1-2) change to red, LED 3 (Cell 3)
will remain green. When 3S batteries are connected, all LEDs are red (Cell1-3).
As soon as a the battery cell is full, the corresponding LED changes to green. Because the cells
are charged individually in a balanced way, it is possible that one cell is fully charged earlier than
the others. Always leave the battery on the charger until all connected cells are fully charged
(green) to allow the charger to balance your battery
Wykrywanie pełnego akumulatora.
Po podłączeniu pełnego akumulatora do ładowarki diody LED zmienią kolor na czerwony na kilka
sekund, a następnie ponownie zmienią kolor na zielony. Oznacza to, że akumulator jest już w pełni
naładowany.
Wykrywanie uszkodzonego akumulatora.
Jeśli diody LED pozostają zielone po podłączeniu pustego akumulatora, oznacza to, że akumulator
jest uszkodzony. (defekt ogniwa lub głębokie rozładowanie). W takim przypadku należy natychmiast
odłączyć akumulator od ładowarki i użyć innego akumulatora.
Detecting a full battery.
When you connect a full battery to the charger, the LEDs will turn red for a few seconds and then
turn green again. This means that the battery is already fully charged.
Detecting a defective battery.
If the LEDs remain green when an empty battery is connected, there is a defect in the battery (cell
defect or deep discharge). In this case, immediately disconnect the battery from the charger and
use another battery.
Informacje dotyczące utylizacji
Urządzeń elektrycznych nie wolno wyrzucać ze śmieciami z gospodarstw domowych, lecz
należy usuwać je oddzielnie. Użytkownik jest zobowiązany– jeżeli jest to możliwe – do
wyciągnięcia baterii oraz do oddania urządzenia elektrycznego w komunalnym punkcie
zbiórki odpadów. Jeżeli na urządzeniu znajdują się dane osobowe, wtedy należy usunąć je
samodzielnie.
Disposal restrictions
Electrical appliances must not be disposed of in domestic waste and must be disposed of se-
parately. You are obliged to take out the batteries, if possible, and to dispose of the electrical
equipment at the communal collection points. Should personal data be stored on the electrical
appliance you must remove them by yourself.
Instrukcje bezpieczeństwa
• Ładowanie może być przeprowadzane wyłącznie przez osoby dorosłe.
• Wyłącznie do użytku w pomieszczeniach.
• Ładowarkę należy chronić przed kurzem, brudem, wilgocią i bezpośrednim
działaniem promieni słonecznych.
• Po użyciu należy odłączyć ładowarkę od źródła zasilania i wyjąć podłączone baterie.
• Nie należy otwierać ładowarki w celu jej naprawy. Jest to niebezpieczne i utracić
wszelkie prawa gwarancyjne. Aby naprawić ładowarkę, należy do naszego działu
serwisowego.
• Postępuj zgodnie z instrukcjami producenta akumulatora
Safety Information
• Charging may only be carried out by adults
• Only for indoor use.
• Never expose the charger to dust, dirt, moisture and direct sun light.
• After use always disconnect the charger from the power source and remove any
connected batteries.
• Do not open the charger to do repairs. This will void the guarantee and may be
dangerous. If the charger is damaged or faulty, return it to our service department
for repairs.
• Follow the instructions of the battery manufacturer.

Other Jamara Batteries Charger manuals

Jamara Lipo 20 User manual

Jamara

Jamara Lipo 20 User manual

Jamara X-Peak 80 BAL V2 User manual

Jamara

Jamara X-Peak 80 BAL V2 User manual

Jamara LiPo 2S User manual

Jamara

Jamara LiPo 2S User manual

Jamara Lipo 20 User manual

Jamara

Jamara Lipo 20 User manual

Jamara Lipo 20 User manual

Jamara

Jamara Lipo 20 User manual

Jamara X-Peak 80 BAL V2 User manual

Jamara

Jamara X-Peak 80 BAL V2 User manual

Jamara LiPo 2S User manual

Jamara

Jamara LiPo 2S User manual

Jamara Ride-on Strong Bull User manual

Jamara

Jamara Ride-on Strong Bull User manual

Jamara X-Peak 90 Touch User manual

Jamara

Jamara X-Peak 90 Touch User manual

Jamara X-Peak Touch USB 2L User manual

Jamara

Jamara X-Peak Touch USB 2L User manual

Jamara Ecological Wind User manual

Jamara

Jamara Ecological Wind User manual

Jamara X-Peak 80 BAL V2 User manual

Jamara

Jamara X-Peak 80 BAL V2 User manual

Jamara Lipo 20 Charger 2S User manual

Jamara

Jamara Lipo 20 Charger 2S User manual

Jamara X-Peak 80 BAL Pult Edition User manual

Jamara

Jamara X-Peak 80 BAL Pult Edition User manual

Jamara X-Peak 100 Touch Dual USB User manual

Jamara

Jamara X-Peak 100 Touch Dual USB User manual

Jamara Lipo 20 User manual

Jamara

Jamara Lipo 20 User manual

Jamara X-Peak Touch USB 2L User manual

Jamara

Jamara X-Peak Touch USB 2L User manual

Jamara Lipo 20 User manual

Jamara

Jamara Lipo 20 User manual

Jamara Lipo 20 User manual

Jamara

Jamara Lipo 20 User manual

Jamara X-Peak Touch USB 2L User manual

Jamara

Jamara X-Peak Touch USB 2L User manual

Jamara Lipo 20 User manual

Jamara

Jamara Lipo 20 User manual

Jamara X-Peak 80 BAL Pult Edition User manual

Jamara

Jamara X-Peak 80 BAL Pult Edition User manual

Jamara Lipo 20 User manual

Jamara

Jamara Lipo 20 User manual

Jamara Lipo 20 User manual

Jamara

Jamara Lipo 20 User manual

Popular Batteries Charger manuals by other brands

Universal Power Group 24BC8000-L-1 Specification sheet

Universal Power Group

Universal Power Group 24BC8000-L-1 Specification sheet

Widex WPT103 User instructions

Widex

Widex WPT103 User instructions

CTEK MXS 5.0 Polar manual

CTEK

CTEK MXS 5.0 Polar manual

Quikcell POWER PROP quick start guide

Quikcell

Quikcell POWER PROP quick start guide

KUSSMAUL 091-75-XX instruction manual

KUSSMAUL

KUSSMAUL 091-75-XX instruction manual

Inca RM-42 manual

Inca

Inca RM-42 manual

HindlePower UMC Series Operating and service instructions

HindlePower

HindlePower UMC Series Operating and service instructions

Bosch Performance Line Series Original instructions

Bosch

Bosch Performance Line Series Original instructions

Black & Decker 2 AMP CHARGE RATE AUTOMATIC BATTERY... instruction manual

Black & Decker

Black & Decker 2 AMP CHARGE RATE AUTOMATIC BATTERY... instruction manual

Schumacher SE-1072 Important safety instructions

Schumacher

Schumacher SE-1072 Important safety instructions

AmazonBasics B07348B5KC Welcome guide

AmazonBasics

AmazonBasics B07348B5KC Welcome guide

CTEK MXTS 70 quick guide

CTEK

CTEK MXTS 70 quick guide

Beyerdynamic WA-CDb operating instructions

Beyerdynamic

Beyerdynamic WA-CDb operating instructions

Growatt Power Technology ATESS EVA-03S Quick user manual

Growatt Power Technology

Growatt Power Technology ATESS EVA-03S Quick user manual

Mastervolt ChargeMaster 12/15-2 user manual

Mastervolt

Mastervolt ChargeMaster 12/15-2 user manual

Brusa NLG4 user manual

Brusa

Brusa NLG4 user manual

blackburn 144-CHR-LI operating instructions

blackburn

blackburn 144-CHR-LI operating instructions

Smartgen BAC1205N user manual

Smartgen

Smartgen BAC1205N user manual

manuals.online logo
manuals.online logoBrands
  • About & Mission
  • Contact us
  • Privacy Policy
  • Terms and Conditions

Copyright 2025 Manuals.Online. All Rights Reserved.