Exalto MD1 223BD User manual

ITEM NO. 2197.300
WIPER SYSTEMS
Exalto external
housing type 223BD

Window height Up to 1100 mm Up to 1600 mm Between
1100-2500 mm
Nm range 15 23-35 40 55 85-120
Motor series 215 223
232
240 255 285
2120
Arms series LD
(LD)
MD1
(PU)
MD2
(PF)
HD1
(P10)
HD2
(P12)
Exalto window wiper systems
Complete range of products
We oer a wide range of wiper systems
for all types of vessels, both leisure and
commercial. For the leisure market we
cover all windows with our LD and MD
wipers. For commercial use we have our
HD wipers to oer perfect wiping of large
window sizes. We also can provide linked
or straight line systems. Please see the
below table as an overview.
After sales support
We have an excellent after sales support.
Our wiper specialists can provide a
comprehensive advice to ensure the
system works accurately and to your
wishes. Should problems occur with the
product, it is always our main priority to
solve it quickly and accurately, with the
help of your local dealer close by you.
Dear Customer,
Thank you for buying our products.
Exalto wiper systems are designed and manufactured to the highest standards for marine
applications. We guarantee you a clear view for many years.
2
MANUAL WIPER SYSTEMS

Safety
2.1 general
2.2 mounting
2.3 Deutsch connector
2.4 electrical connection
2.5 asembly overview
2.6 drill template
1. Content of package
2. Installation
3
Exalto type External housing 223BD
MANUAL WIPER SYSTEMS

Use of the manual
Read the entire manual before installation. With this user manual we want to guide you in the
installation and use of the Exalto external wiper housing. This external wiper housing is strictly for use
with Exalto 223BD wiper system. Please follow all instructions and install all safety provisions.
In this manual you can nd the following expressions and symbols:
Hint!
Gives you advice on how to perform a task more easily.
Aention!
Alerts you to possible problems and safety warnings.
Safety
Exalto windscreen wipers are easy to install, yet a fair amount of technical knowledge
(mechanical and electrical) is required of the installer. Please consult the manual or
contact your vendor in case of doubt during installation or operation.
Main Precaution
Disconnect all the electric connections of the wiper before making any change to the
wiper system.
Safety symbols
An exclamation mark in front of the text warns you, that injury or damage
can occur if a procedure is badly performed.
Dangers
The installation and use of Exalto wipers will not inict any personal dangers
or damage, provided that installation is done according to the procedures
specied in the manual.
• Never remove covers or other safety provisions, unless maintenance is being
performed and all safety requirements are obeyed.
• The installer must provide all necessary covers.
• Always disconnect the electrical power when performing maintenance.
• Prevent the installation from being started (accidentally) by others.
4
MANUAL WIPER SYSTEMS

Safety provisions
The safety provisions will protect the user against contact with moving, electrical
or hot parts. Some of these have to be provided by the installer. There are several
safety provisions:
• This wiper comes complete with a built-on cover. It prevents users from direct contact with
moving parts of the motor. Never remove this safety provision.
• Make sure the wiper has enough ventilation when placing it behind a panel or cover.
• Place a fuse (see specications) sized to protect the motor.
Safety requirements
Before the Exalto wiper is installed, we strongly recommend the following:
• Read the entire manual before installation.
• Make sure your working environment as well as the wiper parts are clean.
• Check to be sure no parts are missing or damaged.
• Use only high quality tools and have them within reach when installing.
• Handle the parts with care.
• Never install or maintain the wiper with the electrical voltage applied, unless this is
specically mentioned in the manual.
• Clear your tools after installation.
Environmental factors
Some materials used in the construction of the wiper housing maybe harmful to the environment.
These parts of the wiper housing may not be re-used or recycled.
No harmful substances are released when using or disassembling the wiper housing.
Modified use and warranty conditions
All modications or defects in the product are subject to the Orgalime General Conditions of Sale.
Please contact your vendor in case of any questions or if you want to use Exalto wipers in a non-
maritime environment or other applications.
5
Exalto type External housing 223BD
MANUAL WIPER SYSTEMS

1. Content of package
Content Quantity
Wiper housing welded (2197.305) 1
Mounting leg (2197.310) 2
Gasket (2197.320) 1
Frontplate (2197.315) 1
Neopreen blind rivet locking nut M6 (2100.084) 4
Washer M6 14
Hexagon bolt M6×25mm 4
Hexagon bolt M5×12mm 2
Hexagon nut M6 10
Drilling template 1
Manual 1
Check if all parts are present in the box. If a part is missing, please contact your vendor and we will
send the missing parts ASAP.
6
MANUAL WIPER SYSTEMS

2. Installation
Before starting the installation read the chapter on safety. Check before installation that all parts are
present and undamaged. In case of errors, contact your vendor.
2.1 General instructions for use and mounting
Make sure that plastic and rubber parts do not come in contact with solvents or cleaning uids with
solvents. Also no chlorine containing cleaning uids may be used.
• Gaskets that are used must be clean and also the corresponding faces must be clean.
• Bolts and nuts must be a little lubricated on the thread and on the contact surface under the
head and under the nut for correct tension. Standard grease or lubricant is sucient.
• Use a calibrated torque wrench.
2.2 Mounting
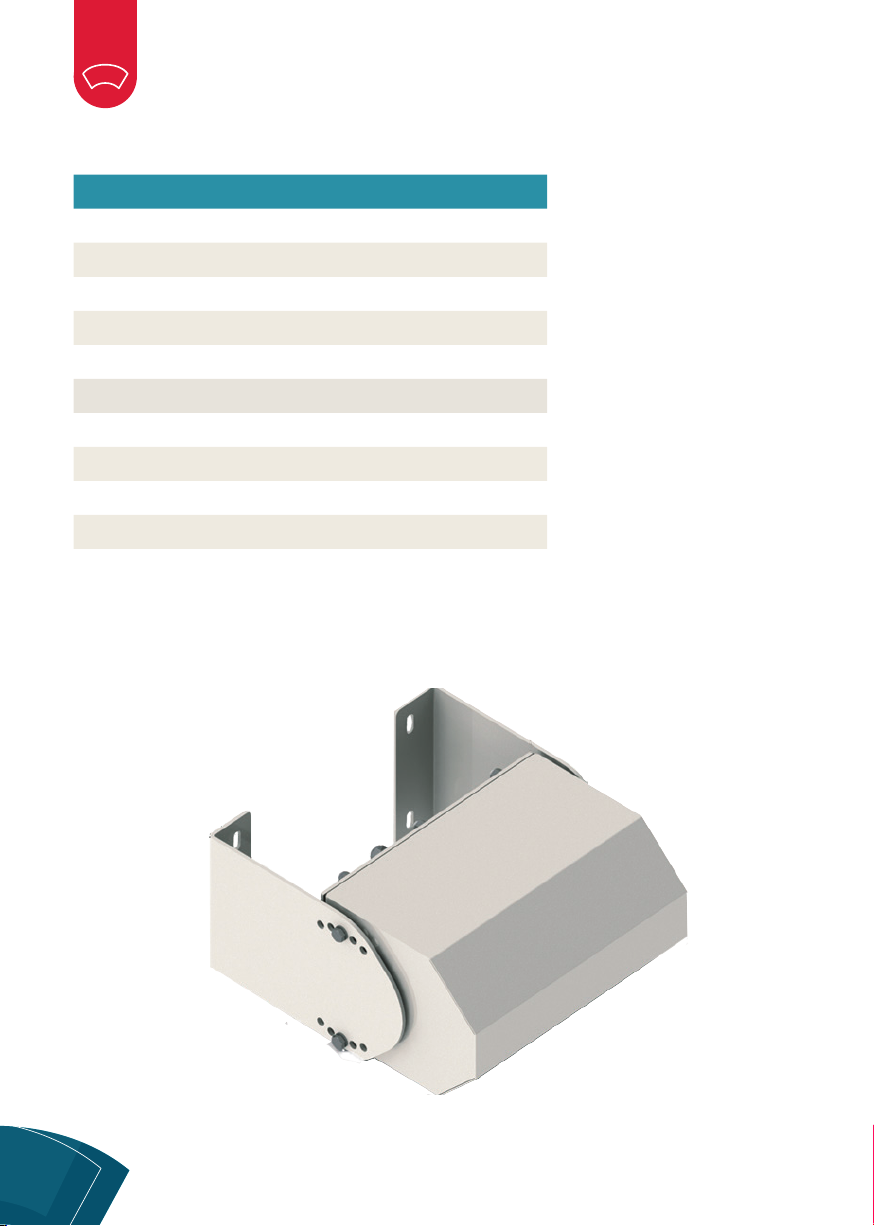
Step 1: Prepare the Exalto 233BD Wiper system for mounting in the external housing.
• Remove the locking nut M8, rubber Weather cap, Nut M20 and the washer plates.
• Check if the Wiper has the correct connector, for waterproof assembly a DEUTSCH connector is
necessary.
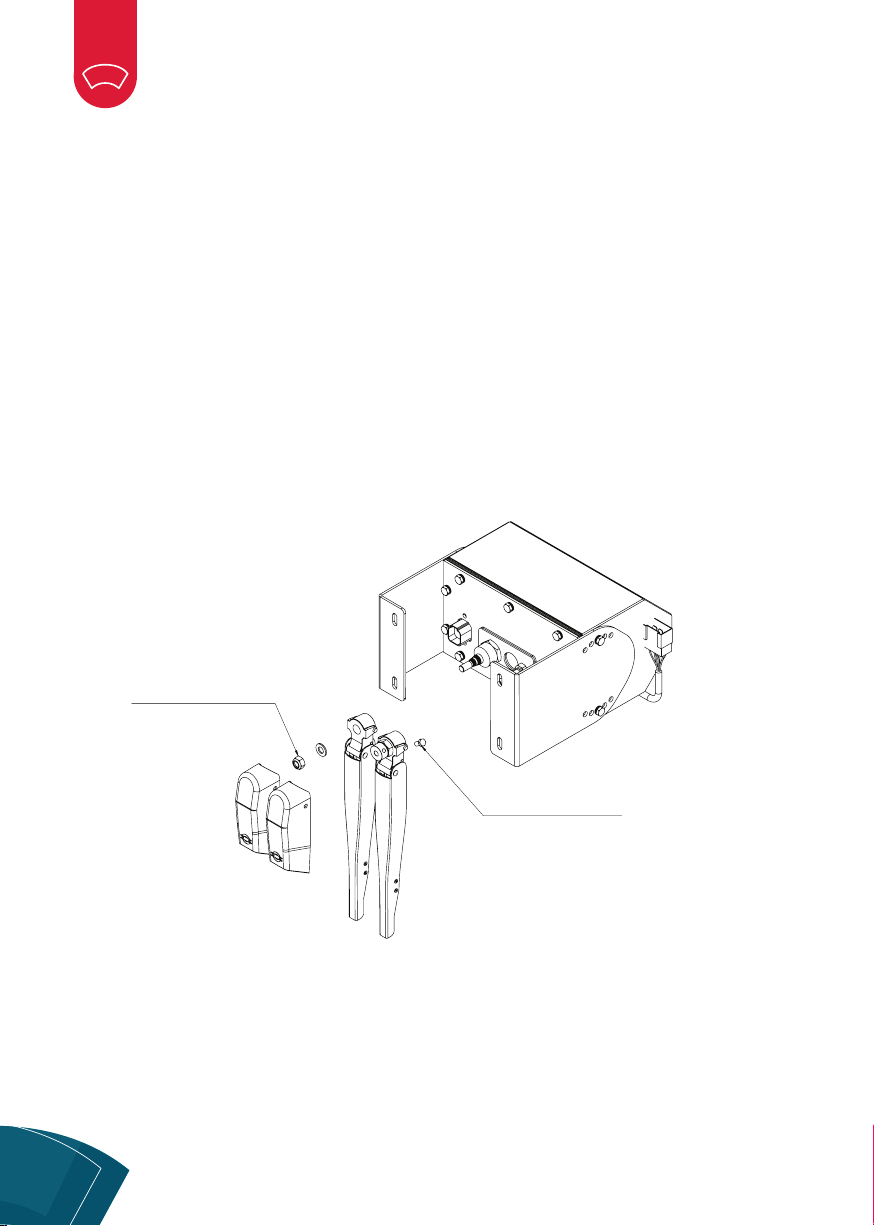
Step 2: Mount the Front plate (2197.315) on the 223BD Wiper.
• Place a washer plate Nitril (2100.491) over the spindles onto the wiper housing face
• Place a the front plate (2197.315) over the spindles in the correct orientation
• Place another washer plate Nitril (2100.491) over the spindles and onto the front plate
• Place the metal washer plate (2100.481) onto the spindles and Nitril gasket
• Mount the nuts M20 and M8 (not the lock nut) with a little lubricant as prescribed before and
tighten to the correct torque*.
• Place the Weathercap over the M20 wiper axis.
• Place the M8 lock nut loose on the wiper spindle , do not damage the locking part.
• Mount the Deutsch connector with M5×12mm with the correct torque*.
Step 3: Mount the wiper with the front plate in the external housing.
• Place the rubber gasket (2197.320) over the M6 threads of the housing
• Place the wiper with the front plate in the external housing (2197.305) so that the holes in the
front plate t the M6 threads.
• Make sure both faces are clean that the gasket sits on
• Place the washers and tighten the M6 nuts semi loose in the sequence (from inside to outside).
• Next tighten the nuts to half the required torque in the sequence (from inside to outside).
• Then tighten the nuts to the required torque* in the sequence (from inside to outside).
7
Exalto type External housing 223BD
MANUAL WIPER SYSTEMS

Step 4:
• Determine the place where the wipers need to be on the outside and drill with use of the
drilling template the holes for mounting the housing.
• Mount the Mounting legs (2197.310) on the outside wall
• Place the Neopreen blind rivet (2100.084) locking nut M6 in the housing
• Mount the housing with the wiper motor between the Mounting legs using the 4 M6 Bolts with a
little lubricating as described and tighten these with the correct torque*.
Note!
The mounting legs can also be placed with the mounting side pointing outwards, be aware that the
drilling template included is not intended for mounting this way.
Arm and blade
For mounting the arm and blade please read the manual of the Exalto 223BD Wiper system.
Bearing
Dogbone
Nut M10
Tightening 33Nm/24ft. lbs
Nut M8
Tightening 17Nm/12ft. lbs
Arc Disc
Spindle Lever
Half Nut M8
Tightening 17Nm/12ft. lbs
Pin
Tightening 16.3Nm/12ft. lbs
Hexagon socket head cap screw
Tightening 8Nm/6ft. lbs
Bearing
Spacer
Glass or Bulkhead
Glass or Bulkhead
Glass
Glass
Tightening 4.5Nm/3.3ft. lbs
Tightening 16.3Nm/12ft. lbs
8
MANUAL WIPER SYSTEMS

2.3 Deutsch connector (not included, order separately)
For a waterproof housing it is necessary that it is provided with a waterproof connector Brand
Deutsch, DT series. Grease the contacts and the rubber gasket with a little Vaseline before use.
Description Item no. Quantity
connector female DT04-6P-CL09 1
connector wig W6P 1
plug male DT06-6S-E004 1
plug wig W6S 1
closing plug 114017 1
pin contact 1.0-2.0 mm2046021516141 5
socket contact 1.0-2.0 mm2046220916141 5
closing plug with strain relief 1011-268-0605 1
If the existing connector needs to be replaced cut the cable just behind the old connector.
Attention!
When removing the Plug out of the Connector the sealing rubber often releases! You
must remount this correctly to remain a guaranteed waterproof connection. If parts of the
housing are opened or loosened then the concerning gasket must be replaced to
guarantee waterproof!
2.4 Electrical connection
Function Polarity Motorcode Switch code Cable 12/24V Code Deutsch
high speed + 53b H white 2
low speed + 53 L yellow 1
earth - 31b black 3
common leg 53e P blue 5
self parking + 53a B red 4
9
Exalto type External housing 223BD
MANUAL WIPER SYSTEMS

2.5 Assembly overview
10
MANUAL WIPER SYSTEMS

2.6 Drill template
Attention!
This drill template is NOT in true size.
11
Exalto type External housing 223BD
MANUAL WIPER SYSTEMS

exaltowipers.com
Exalto Wiper Technologies
Nijverheidsstraat 12
3371 XE Hardinxveld-Giessendam
The Netherlands
+31 (0)184 615 800
wipers@exalto.com
Version 05-2022
This manual suits for next models
1
Table of contents
Other Exalto Marine Equipment manuals