manuals.online logo
Brands
  1. Home
  2. •
  3. Brands
  4. •
  5. Exsys
  6. •
  7. Switch
  8. •
  9. Exsys EX-6002 User manual

Exsys EX-6002 User manual

4 x USB 2.0 A-Buchse
7-24V T-Block für optionales
externes Netzteil
Because there are large differences between PC’s and network’s, we can give you only a general
installation guide for the EX-6002. Please refer your computer’s reference manual or contact your
network admin whenever in doubt.
1. Connect the EX-6002 with the included power supply then connect it to the wall outlet.
2. Now connect a RJ45 patch cable (optional) with the device server and the other end to your
network switch or directlyin your PC.
3. If you use a DHCP network the EX-6002 will now be automatically configured and set to your
predefined IP range.
4. If you use a non DHCP network it is necessary to change the IP address of the EX-6002
(169.254.10.10) manually to your IP range. In order to do so please change the IP address of
the computer you are using to 169.254.10.20 and the Subnet mask to 255.255.0.0. Only then
you can change the address later by the configuration tool.
5. Nowyou can install the software as described at software installation.
HARDWARE INSTALLATION
6
5
EX
EX
EX-
-
-6002
6002
6002
English
English
English
EX
EX
EX-
-
-6002
6002
6002
English
English
English
1
AUFBAU
Die EX-6002 ist mit 4 USB 2.0 A-Buchsen für Endgeräte, 1 USB 2.0 B-Buchse und 1 RJ45
Anschluss für den PC ausgestattet. Die EX-6002 ermöglicht Ihnen auf einfachste Weise, exter-
ne USB Festplatten, USB Sticks, USB Scanner, Drucker, Tastaturen etc. über das Netzwerk zu
verbinden. Sie können bis zu 4 USB Geräte an die EX-6002 anschließen. Sie ermöglicht Ihnen
somit eine erweiterte Flexibilität und Reichweite zum Anschluss der USB Geräte. Durch die
externe Stromversorgung per Netzteil werden an jedem Port die vollen 500mA zur Verfügung
gestellt. Sie können die EX-6002 einfach in jedes bestehende Netzwerk einbinden. Die Daten-
übertragungsrate beträgt bis zu 1000Mbit/s. Das Einbinden und die Ansteuerung der Geräte
erfolgt über die beiliegende Software.
BESCHREIBUNG & TECHNISCHE DATEN
Kompatibilität: TCP/IP 10/100/1000
Betriebssysteme: Windows XP/ Vista/ 7/ 8/ Server 20xx
Anschlüsse: 4x USB 2.0 A-Buchse, 1x USB 2.0 B-Buchse, 1x RJ45 Ethernet
Anschluss, 1x T-Block 7-24V, 1x 5V Buchse
Lieferumfang: EX-6002, Treiber CD, Anleitung, Netzteil
Zertifikate:
CE
CECE
CE /FCC / RoHS / WEEE DE97424562
ANSCHLÜSSE
RJ45 Anschluss:
USB 2.0 A-Buchse
Pin Signal Pin Signal
1 VCC 3 DATA+
2 DATA- 4 GND
USB 2.0 A-Buchse:
Pin Signal Pin Signal Pin Signal
1 BI_DA+ 4 BI_DC+ 7 BI_DD+
2 BI_DA- 5 BI_DC- 8 BI_DD-
3 BI_DB+ 6 BI_DB-
RJ45 Anschluss
RJ45 Anschluss
mit Status LED´s
Reset Knopf
USB B-Buchse
5V DC Buchse
für beiliegendes
Netzteil
Betriebs LED
USB 2.0 B-Buchse:
Achtung!
Stecker nie umge-
kehrt oder mit
Gewalt einstecken.
Achtung!
Stecker nie umge-
kehrt oder mit
Gewalt einstecken.
USB 2.0 B-Buchse
Pin Signal Pin Signal
1 VCC 3 DATA+
2 DATA- 4 GND
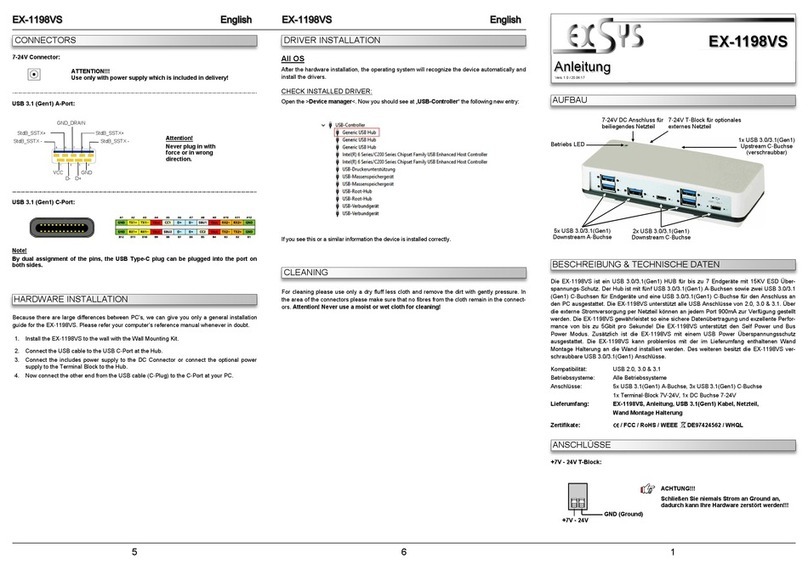
CONNECTORS
ATTENTION!!!
Use only with included power supply!!!
5 Volt Connector:
LINK / Connected
ACT / LAN Data
Status LED´s:
+7V ~ 24V T-Block:
+7V ~ 24V GND (Ground)
ATTENTION!!!
Never connect power to GND it will destroy your Hardware!!!
SOFTWARE INSTALLATION
Windows XP/ Vista/ 7/ 8/ Server 20xx
After you already installed the Hardware you can now install the USB Server Software to any
client PC that should be able to access the USB devices who connected to the EX-6002.
Please insert the Driver CD into your CD-Rom drive and start the „USBServer_Setup“ who is
located in the „E3868“ folder (see picture):
Please note that you can access each device only with one client PC at a time.
The manual with details for the USB Server Software is located in the same “E3868” folder on
the driver CD. To read it please open the following file on the CD:
USBServer_UserManual.pdf
Anleitung
Anleitung
Vers. 1.4 / 11.02.15
EX
EX-
-6002
6002
2 3 4
EX
EX
EX-
-
-6002
6002
6002
Deutsch
Deutsch
Deutsch
EX
EX
EX-
-
-6002
6002
6002
Deutsch
Deutsch
Deutsch
LAYOUT
HARDWARE INSTALLATION
Beachten Sie bitte die folgenden Installationshinweise. Da es große Unterschiede zwischen PC‘s
und Netzwerken gibt, können wir Ihnen nur eine generelle Anleitung zum Anschluss geben. Bei
Unklarheiten halten Sie sich bitte an die Bedienungsanleitung Ihres Computersystems oder wen-
den Sie sich bitte an Ihren Netzwerkadministrator.
1. Verbinden Sie zuerst die EX-6002 mit dem mitgeliefertem Netzteil und schließen Sie das
Netzteil an den Stromanschluss an.
2. Schließen Sie jetzt ein Netzwerkkabel (optional) mit RJ45 Stecker an die EX-6002 an und
verbinden Sie es mit einemNetzwerkswitch oder direkt an Ihrem PC.
3. Wenn Sie ein DHCP Netzwerk verwenden, wird der EX-6002 automatisch eine IP Adresse
aus demvorgegeben IP Bereich zugewiesen.
4. Sollten Sie ein Netzwerk ohne DHCP verwenden, ist es erforderlich die IP Adresse der EX-
6002 manuell anzupassen. Dazu müssen Sie allerdings die IP Adresse Ihres PC‘s, zuerst auf
den IP Bereich der EX-6002 (169.254.10.10) einstellen. Stellen Sie Ihren PC z.B. auf die IP
Adresse 169.254.10.20 ein und die Subnetzmaske auf 255.255.0.0 ein. Damit können Sie
später die IPAdresse der EX-6002 einfach in der Software umstellen.
5. Jetzt können Sie die zugehörige Software auf Ihren PC installieren. Folgen Sie dazu den
Hinweisen unter Software Installation.
The EX-6002 provides 4 USB 2.0 A-Ports for devices and 1 USB 2.0 B-Port and 1 RJ45 con-
nector for the host PC. The EX-6002 is designed to connect your USB devices such as a
external Hard drive, Flash Memory, USB Scanners, USB Printers etc. to the network. It delivers
simple, reliable and cost effective network connectivity for USB devices. Via the external power
supply it provides a maximum of power on each USB port of 500mA. It uses data transfer rates
up to 1000Mbit/s. The EX-6002 can easily be integrated to the network via DHCP or manually
set by the configuration software.
DESCRIPTION & TECHNICAL INFORMATION
Compatibility: TCP/IP 10/100/1000
Operating system: Windows XP/ Vista/ 7/ 8/ Server 20xx
Connectors: 4x USB 2.0 A-Port, 1x USB 2.0 B-Port, 1x RJ45 Ethernet Connector,
1x T-Block 7-24V, 1x 5V Connector
Extent of delivery: EX-6002, Driver CD, Manual, Power Supply
Certificates:
CE
CECE
CE /FCC / RoHS / WEEE DE97424562
CONNECTORS
RJ45 Connector:
USB 2.0 A-Port:
ANSCHLÜSSE
ACHTUNG!!!
Nur zur Verwendung mit im Lieferumfang enthaltenem Netzteil!!!
5 Volt Buchse:
LINK / Verbunden
ACT / LAN Daten
Status LED´s:
+7V ~ 24V T-Block:
+7V ~ 24V GND (Ground)
ACHTUNG!!!
Schließen Sie niemals Strom an Ground an, da dies Ihre Hardware
zerstören kann!!!
4 x USB 2.0 A-Port
7-24V T-Block for optional
external power supply
RJ45 connector
with Status LED´s
Reset switch
USB B-Port
for host PC
5V Connector for
power supply
Power LED
Attention!
Never plug in with
force or in wrong
direction.
USB 2.0 A-Port
Pin Signal Pin Signal
1 VCC 3 DATA+
2 DATA- 4 GND
USB 2.0 B-Port:
USB 2.0 B-Port
Pin Signal Pin Signal
1 VCC 3 DATA+
2 DATA- 4 GND
Attention!
Never plug in with
force or in wrong
direction.
Pin Signal Pin Signal Pin Signal
1 BI_DA+ 4 BI_DC+ 7 BI_DD+
2 BI_DA- 5 BI_DC- 8 BI_DD-
3 BI_DB+ 6 BI_DB-
RJ45 Connector
SOFTWARE INSTALLATION
Windows XP/ Vista/ 7/ 8/ Server 20xx
Nachdem Sie die Hardware Installation abgeschlossen haben, können Sie die USB Server
Software auf allen PC‘s installieren, von denen Sie auf die USB Geräte zugreifen möchten.
Legen Sie dazu nun die Treiber CD in Ihr CD-Rom Laufwerk (z.B. Laufwerk D:) ein und starten
Sie das „USBServer_Setup“ welches sich im Ordner „E3868“ befindet (siehe Abbildung):
Bitte beachten Sie, dass Sie immer nur von einem PC auf das gleiche Gerät zugreifen können.
Das Handbuch mit Details zur Software Installation finden Sie ebenfalls in dem Ordner „E3868“
auf der CD. Öffnen Sie hierfür die folgende Datei auf der CD:
USBServer_UserManual.pdf
Manual
Manual
Vers. 1.4 / 11.02.15
EX
EX-
-6002
6002
Other Exsys Switch manuals

Exsys EX-1179HMVS User manual

Exsys

Exsys EX-1179HMVS User manual

Exsys EX-1188HMS-2 User manual

Exsys

Exsys EX-1188HMS-2 User manual

Exsys EX-1110HMVS User manual

Exsys

Exsys EX-1110HMVS User manual

Exsys EX-1189HMVS-2 User manual

Exsys

Exsys EX-1189HMVS-2 User manual

Exsys EX-6685HMV User manual

Exsys

Exsys EX-6685HMV User manual

Exsys EX-1180HMS User manual

Exsys

Exsys EX-1180HMS User manual

Exsys EX-1240HMVS User manual

Exsys

Exsys EX-1240HMVS User manual

Exsys EX-1147HMVS User manual

Exsys

Exsys EX-1147HMVS User manual

Exsys EX-1504HMS User manual

Exsys

Exsys EX-1504HMS User manual

Exsys EX-1177HMVS User manual

Exsys

Exsys EX-1177HMVS User manual

Exsys EX-6007POE User manual

Exsys

Exsys EX-6007POE User manual

Exsys EX-1187HMVS-2 User manual

Exsys

Exsys EX-1187HMVS-2 User manual

Exsys EX-6685HMV User manual

Exsys

Exsys EX-6685HMV User manual

Exsys EX-1526HMVS User manual

Exsys

Exsys EX-1526HMVS User manual

Exsys EX-3460 User manual

Exsys

Exsys EX-3460 User manual

Exsys EX-1188HMS-3 User manual

Exsys

Exsys EX-1188HMS-3 User manual

Exsys EX-1189HMVS-3 User manual

Exsys

Exsys EX-1189HMVS-3 User manual

Exsys EX-1134-2 User manual

Exsys

Exsys EX-1134-2 User manual

Exsys EX-1144HMVS User manual

Exsys

Exsys EX-1144HMVS User manual

Exsys EX-1183HMVS-2W User manual

Exsys

Exsys EX-1183HMVS-2W User manual

Exsys EX-1178 User manual

Exsys

Exsys EX-1178 User manual

Exsys EX-1116HMVS User manual

Exsys

Exsys EX-1116HMVS User manual

Exsys EX-1191HMVS-PD User manual

Exsys

Exsys EX-1191HMVS-PD User manual

Exsys EX-1113HMS User manual

Exsys

Exsys EX-1113HMS User manual

Popular Switch manuals by other brands

Aruba Instant On 1430 Installation and getting started guide

Aruba

Aruba Instant On 1430 Installation and getting started guide

Altusen ALTUSEN KH1508 Brochure & specs

Altusen

Altusen ALTUSEN KH1508 Brochure & specs

Topex multiSwitch user manual

Topex

Topex multiSwitch user manual

D-Link DSS-8+ user guide

D-Link

D-Link DSS-8+ user guide

HP 3600 v2 Series Configuration guide

HP

HP 3600 v2 Series Configuration guide

FS S3150-8T2FP Configuration guide

FS

FS S3150-8T2FP Configuration guide

Festo PE-PK Series operating instructions

Festo

Festo PE-PK Series operating instructions

Allied Telesis Rapier 48w Hardware installation guide

Allied Telesis

Allied Telesis Rapier 48w Hardware installation guide

NETGEAR ProSafe GS105 installation guide

NETGEAR

NETGEAR ProSafe GS105 installation guide

Cisco Catalyst Series Switch 2940 datasheet

Cisco

Cisco Catalyst Series Switch 2940 datasheet

Nice Plug-Control Instructions and warnings for installation and use

Nice

Nice Plug-Control Instructions and warnings for installation and use

AOpen AOH-605 user guide

AOpen

AOpen AOH-605 user guide

Advantech SNMP-1000-B1 user manual

Advantech

Advantech SNMP-1000-B1 user manual

RectorSeal Safe-T-Switch SS610E manual

RectorSeal

RectorSeal Safe-T-Switch SS610E manual

UTICOR Touch PRLS Getting started

UTICOR

UTICOR Touch PRLS Getting started

Hawking UH204 Specifications

Hawking

Hawking UH204 Specifications

Altronix HubSat4Di installation guide

Altronix

Altronix HubSat4Di installation guide

Schrack Technik TEMPUS ANALOG BZT26448 operating instructions

Schrack Technik

Schrack Technik TEMPUS ANALOG BZT26448 operating instructions

manuals.online logo
manuals.online logoBrands
  • About & Mission
  • Contact us
  • Privacy Policy
  • Terms and Conditions

Copyright 2025 Manuals.Online. All Rights Reserved.