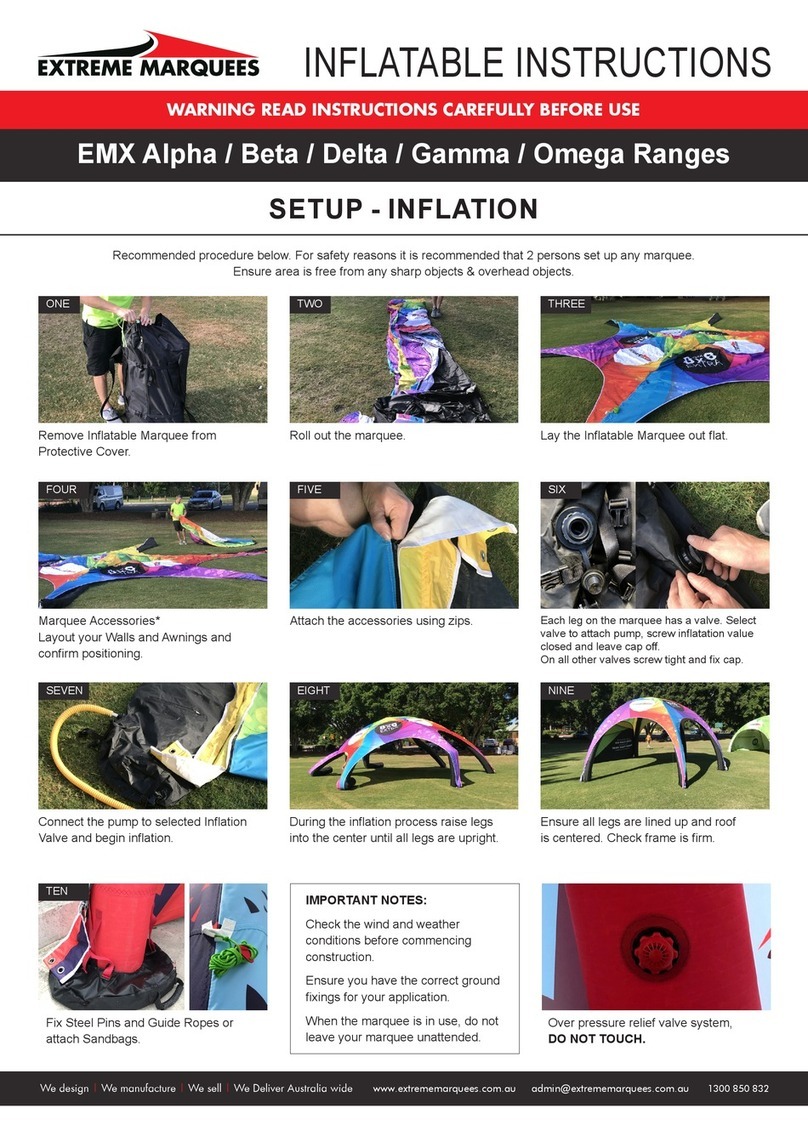
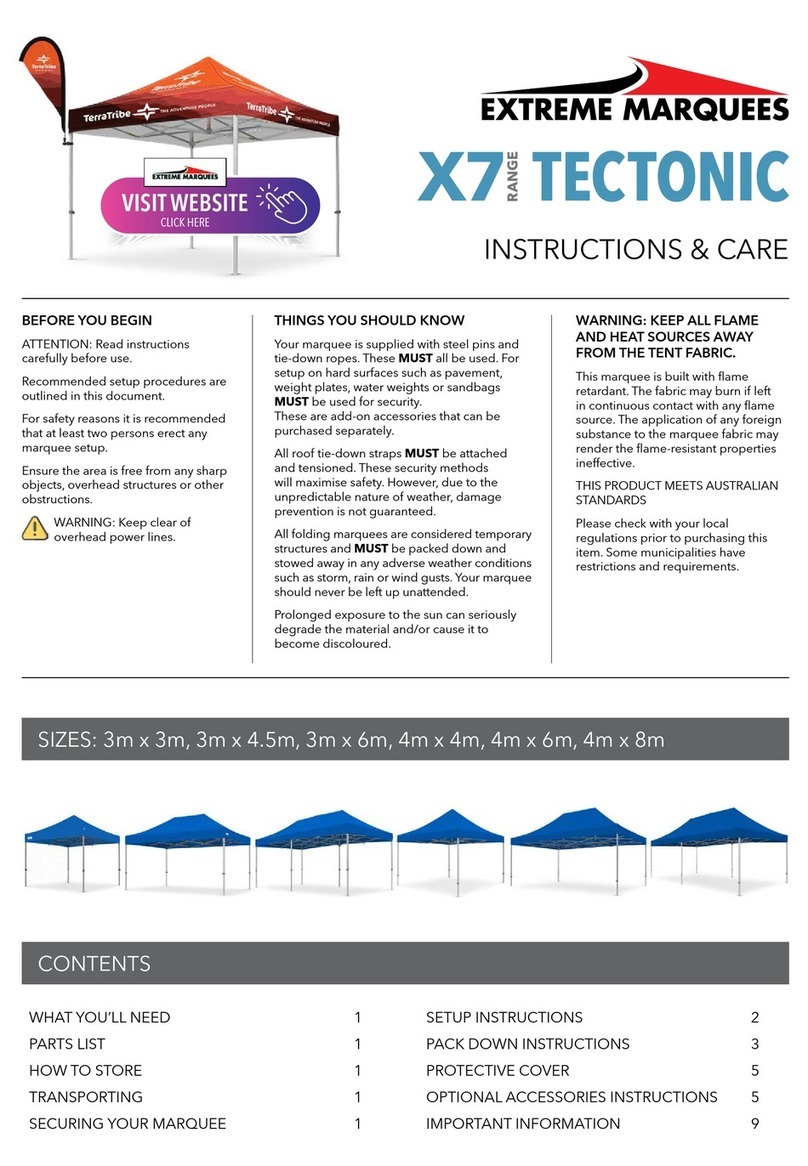
Extreme marquees X7 Tectonic Series User manual

BEFORE YOU BEGIN
ATTENTION: Read instructions
carefully before use.
Recommended setup procedures are
outlined in this document.
For safety reasons it is recommended
that at least two persons erect any
marquee setup.
Ensure the area is free from any sharp
objects, overhead structures or other
obstructions.
WARNING: Keep clear of
overhead power lines.
SIZES: 5x5m, 6x6m
CONTENTS
WHAT YOU’LL NEED 1
PARTS LIST 1
HOW TO STORE 1
TRANSPORTING 1
SECURING YOUR MARQUEE 1
5X5M SETUP INSTRUCTIONS
SECURING YOUR MARQUEE 2
5X5M PACK DOWN INSTRUCTIONS 3
6X6M SETUP INSTRUCTIONS
SECURING YOUR MARQUEE 4
6X6M CORRECT ROOF PLACEMENT 5
6X6M PACK DOWN INSTRUCTIONS 5
OPTIONAL ACCESSORIES INSTRUCTIONS 6-9
IMPORTANT INFORMATION 10
INSTRUCTIONS & CARE
THINGS YOU SHOULD KNOW
Your marquee is supplied with steel pins and
tie-down ropes. These MUST all be used. For
setup on hard surfaces such as pavement,
weight plates, water weights or sandbags
MUST be used for security.
These are add-on accessories that can be
purchased separately.
All roof tie-down straps MUST be attached
and tensioned. These security methods
will maximise safety. However, due to the
unpredictable nature of weather, damage
prevention is not guaranteed.
All folding marquees are considered temporary
structures and MUST be packed down and
stowed away in any adverse weather conditions
such as storm, rain or wind gusts. Your marquee
should never be left up unattended.
Prolonged exposure to the sun can seriously
degrade the material and/or cause it to
become discoloured.
WARNING: KEEP ALL FLAME
AND HEAT SOURCES AWAY
FROM THE TENT FABRIC.
This marquee is built with flame
retardant. The fabric may burn if left
in continuous contact with any flame
source. The application of any foreign
substance to the marquee fabric may
render the flame-resistant properties
ineffective.
THIS PRODUCT MEETS AUSTRALIAN
STANDARDS
Please check with your local
regulations prior to purchasing this
item. Some municipalities have
restrictions and requirements.
VISIT WEBSITE
CLICK HERE

1
IMPORTANT NOTES BEFORE TRANSPORTING
1. CLEAN & DRY 2. PACK DOWN
Pack down individual items and store
in protective covers.
If your marquee needs to be positioned
horizontally during transit you MUST
remove the roof to prevent damage.
Ensure that the marquee is firmly
secured to prevent moving whilst
in transit.
3. TRANSPORT
The marquee must be stood upright during transit if the roof is kept on the frame.
4. STORAGE
WHAT YOU’LL NEED
Stanley Knife / Scissors to open boxes. Only cut where symbol is shown on boxes.
Mallet / Hammer to secure steel pins.
HOW TO STORE
1x Marquee Roof1x Marquee Frame
1x Protective Cover
PARTS LIST
Standard package items listed below. Please note accessories are not listed here.
Fit Tie-Down Straps, Sandbags, Steel Pins or Weight Plates and anchor marquee into position. Please check/download engineer certificates from
website for applicable hold down weight methods. www.extreme-marquees.com.au/resource-centre/
SECURING YOUR MARQUEE
UPGRADE
15KG SANDBAG
UPGRADE
10-16KG WATER WEIGHT
UPGRADE
15KG STEEL WEIGHT PLATE
STANDARD PACKAGE
STEEL PINS
STANDARD PACKAGE
TIE-DOWN STRAPS
12 x Pins
5x5m 4x300mm 8x400mm
13 x Pins
6x6m 4x300 9x400mm
4 x Tie-Down Straps

2
5X5M SETUP INSTRUCTIONS
Please read instructions completely before setting up your marquee. Make sure you have all the parts identified on the Parts List.
Recommended procedure below. For safety reasons it is recommended that 2 persons set up / pack down any marquee.
4. Lift all four roof connectors until pins lock
in to position. Stand on foot plate and lift with
two hands until you hear a ‘Click’.
6. Using two hands, push the lower centre
pole upwards until locked in to position.
11. REFER TO SECURING YOUR MARQUEE
ON PAGE 1.
2. Grasp Marquee Truss Bars where ‘LIFT
HERE‘ label is shown.
1. Remove all your items from packaging and
clear a safe area.
8. Extend the left corner legs to desired
height by stepping on the marquee foot
plate and releasing the middle leg by
engaging the pull ring.
7. Ensure protective flaps are over the truss
connectors. Attach them by looping the
straps around the truss and engaging the
clips, then tighten.
5. Standing underneath the frame, extend the
upper centre pole until it clicks in to position.
3. Ensure there are no trip hazards. Walk
backwards and open frame fully.
9. Extend middle leg on left side to match left
corner legs already extended.
10. Extend the front marquee legs to full
height. Repeat for back and middle legs.
CORRECT ROOF ATTACHMENT
REFER TO PAGE 3 >>

3
5X5M CORRECT ROOF PLACEMENT
Recommended procedure below. For safety reasons it is recommended that 2 persons set-up any Marquee.
1. Open frame 75% of full extension and fit
the roof to the frame.
2. Connect the velcro on roof corners to the
velcro on the corners of the marquee legs.
3. Fit the peak of the roof to the centre poles
of the marquee and tighten the toggle.
5X5M PACK DOWN INSTRUCTIONS
Recommended procedure below. For safety reasons it is recommended that 2 persons pack down any marquee. Be sure to remove any items used
to secure the marquee to ground before packing it up.
1. Release lower leg pins and fully retract left
middle leg followed by corner legs. Repeat
for right side legs.
5. Walk marquee in by grasping ‘LIFT HERE‘
section. At a quarter of the way, undo the
velcro straps to remove roof for transport.
2. Unclip roof straps from truss bars. 3. Pull the lower pin to release the centre pole,
followed by upper pin to retract upper centre.
pole.
4. Release all roof corner pins. 6. Fit the protective cover to frame and store
roof in a protective bag.

4
3. Connect the velcro on roof corners to the
velcro on the corners of the marquee legs.
7. Lift all roof connectors until pins lock in to
position. Stand on foot plate and lift with two
hands until you hear a ‘Click’.
6. Ensure there are no trip hazards. Walk
backwards and open frame fully.
11. Insert the centre leg and extend
completely. REFER TO SECURING YOUR
MARQUEE ON PAGE 1.
2. Open frame 75% of full extension.1. Remove all your items from packaging and
clear a safe area.
4. Fit the peak of the roof to the centre poles
of the marquee and tighten the toggle.
8. Ensure protective flaps are over the truss
connectors. Attach them by looping the straps
around the truss and engaging the clips, then
tighten.
5. Refer to ‘LIFT HERE’ sticker. Grasp the
marquee truss bars.
9. Extend the front legs halfway. Repeat for
back and middle legs. Using one foot, stand
on the marquee foot plate, release the pull
ring on the middle leg connector and extend
front legs to desired height.
10. Extend the front legs to full height. Repeat
for back and middle legs.
CORRECT ROOF PLACMENT
REFER TO PAGE 5 >>
6X6M SETUP INSTRUCTIONS
Please read instructions completely before setting up your tent. Make sure you have all the parts identified on the Parts List.
Recommended procedure below. For safety reasons it is recommended that 3 persons set up / pack down a 6x6m marquee.

5
6X6M PACK DOWN INSTRUCTIONS
For safety reasons it is recommended that 3 people pack down a 6x6m marquee. Be sure to remove any items used to secure the marquee to
ground before packing it up.
1. Retract and remove the centre leg pole,
followed by the outer middle legs.
5. Walk marquee in by grasping ‘LIFT HERE‘
section. At a quarter of the way, undo the
velcro straps to remove roof for transport.
2. Retract front and back legs to halfway. Once
all legs are 50% retracted, begin completely
retracting all legs.
3. Unclip all roof straps from the truss bars.
4. Release all roof pins. 6. Fit the protective cover to frame and store
roof in a protective bag.
6X6M CORRECT ROOF PLACEMENT
Recommended procedure below. For safety reasons it is recommended that 3 persons set up a 6x6m marquee.
The centre 3 roof poles are higher than the remaining 4 poles. These 3 poles need to line
up with the reinforced section of the roof fabric. This is to accommodate for the extra pole
height and also help prevent wear and tear of the roof fabric over time.
FRAMEROOF
CORRECT INCORRECT

OPTIONAL ACCESSORIES INSTRUCTIONS
FULL WALL INSTRUCTIONS
3. Completed Wall.2. Attach velcro tabs to marquee legs.1. Put wall hooks through the eyelet holes of
inner roof flap (face hooks inwards).
6
HALF WALL INSTRUCTIONS
1. Attach half wall display connector to
marquee leg. Repeat on other side.
3. Insert half wall dislay bar into connector and
tighten the connector. Repeat.
4. Attach velcro tabs to marquee legs.
2. Insert half wall display bar through half wall
sleeve.
5. Attach the half wall support to the display
bar.
6. Adjust the height of the support leg until
securely in position.
Position marquees side by side, attach leg
connector and tighten.
Attach rain gutter strip to marquee wall.Put gutter hooks through eyelets in roof flap
(face hooks inwards).
RAIN GUTTER INSTRUCTIONS

HOOK AND EYELET AWNING INSTRUCTIONS
VELCRO AWNING INSTRUCTIONS
1. Attach awning leg connector to
marquee frame.
Repeat on other side.
1. Attach awning leg connector to
marquee frame. Repeat.
5. Fit the awning centre connector
+ pole to the truss bar and then
tighten.
4. Fit the awning end poles to the
connector and attached fabric.
Repeat on other side.
4. Fit the awning end poles to the
connector and attached fabric.
Repeat on other side.
8. Velcro Awning.
6. Insert the ends of the adjustable
poles in to the holes found in the
horizontal awning rod.
7. Twist the awning poles to
extend or shorten and then
reverse twist the poles to tighten.
8. Hook and Eyelet Awning.
2. Put wall hooks through eyelets
in roof flap.
2. Attach awning velcro to the
velcro on marquee roof.
6. Insert the ends of the adjustable
poles in to the holes found in the
horizontal awning rod.
3. Insert the (three piece) awning
pole into the awning sleeve.
3. Insert the (three piece) awning
pole into the awning sleeve.
7. Twist the awning poles to
extend or shorten and then
reverse twist the poles to tighten.
5. Fit the awning centre connector
+ pole to the truss bar and then
tighten.
7

8
WHEELED MARQUEE - ATTACHING WHEELS
3. Tighten the wing nuts on the left/right until
finger tight. Repeat until all wheels are fitted
to marquee legs.
2. Locate ‘dimples’ on foot plate, position
the wheel on foot plate so wing nuts and
positioned over the ‘dimples’
1. On a bench or on the ground lay marquee
on side, extend inner leg of marquee.
WHEELED MARQUEE MOVING INSTRUCTIONS
1. Ensure brakes are
engaged.
3. Hold marquee with 2 hands. 4. Disengage the brakes.
5. Open frame slightly. Never wheel a fully
collapsed marquee.
6. Grasp one leg and pull marquee in the
desired direction. Never push.
7. Engage the breaks and refer to the “Set Up
Instructions”.
2. Remove standard marquee protective
cover. NEVER wheel with the cover on.

9
BANNER INSTRUCTIONS
1. Layout of banner fabric, three stage banner
pole, banner tip pole and protective cover.
6. Insert the banner pole into the banner sleeve.
5. Insert the tip of banner in to the larger
banner pole.
7. Secure the banner fabric on the pole.
Loop the rope around the hook.
Secure the bauble around the screw fastener.
8. Position the banner pole on the base, slide
the white ring down to secure.
2. Small Banners / 2m
Extend the banner pole to the designated line 2m line and twist and
keep twisting the pole to secure.
3. Medium Banners / 3m
Extend the banner pole to the designated line 3m line and twist and keep twisting the pole to secure.
4. Large Banners / 4m
Extend the banner pole to the designated 4m line and twist the pole until secure.

IMPORTANT INFORMATION
Your marquee is supplied with steel pins and tie-down
ropes. These MUST all be used. For setup on hard surfaces
such as pavement, weight plates, water weights or sandbags
MUST be used for security. These are add-on accessories
that can be purchased separately.
All roof tie-down straps MUST be attached and tensioned.
These security methods will maximise safety. However, due
to the unpredictable nature of weather, damage prevention
is not guaranteed.
All canopies are considered temporary structures and MUST
be packed down and stowed away during adverse weather
conditions such as heavy rain, strong winds or other storm
events.
WARRANTY
Warranty covers manufacture’s defaults only. Warranty does
NOT cover products or parts which have been altered or
modified in any manner. This warranty does NOT apply to
damage caused by wind, rain, storms or other forces of
nature, nor does it cover accidental or deliberate damage
of the product. Damage caused by these events may be
covered under your home or business insurance policy. This
warranty does NOT apply if the setup of the product does
not conform to product instructions. This express warranty is
provided in lieu of all other warranties, explicit or implied.
Extreme Marquees is NOT responsible for products
damaged in transit.
If you are making a warranty claim for a manufacturer fault
for reasons other than the above, please complete our
Warranty Claim Form - https://www.extreme-marquees.com.
au/resource-centre/ - and email it to the following address:
logistics@extreme-marquees.com.au
Please complete the form and return it to us with photos to
preview the manufacturer fault cited.
Alternatively, if seeking replacement parts outside of
warranty please fill out the Replacement Parts form and
will arrange a quotation and dispatch the required parts as
soon as possible - https://www.extreme-marquees.com.au/
marquee-spare-parts/
MANUFACTURER’S WARRANTY
PRODUCT WARRANTY
X5 True Blue Frame 1 Years
X6 Velocity Frame 3 Years
Classic Summit 7 Years
X7 Tectonic Frame 10 Years
Q8 Quasar Frame 10 Years
Wave / Flare Banner Hardware 1 Year
Cafe Umbrellas Frame 3 Year
Star Shade Pole 1 Year
Arch Tent Frame 3 Years
EMX Inflatable Frame 5 Years
Pavilion Frame 5 Years
Pinnacle Frame 10 Years
Crest Tent Frame 10 Years
Table Covers 1 Year
Pop Banner 1 Year
Custom Banners / Fence Wraps 1 Year
Roller Banner 1 Year
FABRICS
Plain 500D PVC Coated Polyester 1 Year
Printed 600D PU Coated Polyester 1 Year
Printed UV Fabric Fade Resistant 2 Years
Plain 580gsm PVC / Crest PVC 5 Years
Printed 550gsm PVC 2 Years
Clear PVC 2 Years
Banner Fabric 6 Months
Your product not listed? Contact us for warranty information.
PRODUCTION & DELIVERY
TIME FRAMES
Extreme Marquee will endeavour to meet all customer due
dates and deadlines. However, as there are many aspects
out of our direct control such as third party freight providers,
we can never guarantee an arrival date. As such, Extreme
Marquees does not accept liability for any missed due dates,
nor do we accept any refund request based on this premise.
Extreme Marquees has an outstanding reputation for
meeting the tightest deadlines and our team will continue to
strive for excellence in this regard.
RETURNS POLICY
100% Satisfaction Guaranteed
As part of the Extreme Marquee experience, it is our
commitment to provide superior products. If you are not
completely satisfied with your Extreme Marquee purchase
for any reason, we will do our best to rectify. You can return
your product for a replacement or refund within thirty (30)
days of your purchase. The product must be in new, unused
condition. Extreme Marquees does NOT accept returns for
any custom printed products unless the custom printed
product has a fault under our manufacturers warranty.
Extreme Marquees’ guarantee does not cover ordinary wear
and tear or damage caused by improper use, or weather-
caused damage such as storms, rain or wind.
If you have received your Extreme Marquee purchase and it
has a manufacturing defect in the materials or workmanship,
please fill out our Warranty Claim Form - https://www.
extreme-marquees.com.au/resource-centre/ - and email it to
the following address: logistics@extreme-marquees.com.au
Additional products may be excluded from the returns
policy. To find out more information on excluded items
please contact Extreme Marquees.
10

call 1300 850 832
email admin@extreme-marquees.com.au
www.extreme-marquees.com.au
RETURNING ITEMS
Before returning any part or product to Extreme Marquees
please contact us to obtain specific return shipping
instructions at logistics@extreme-marquees.com.au or call us
on 1300 850 832.
Extreme Marquees can arrange the product return for a
change of mind, however, the customer will be invoiced
for the shipping costs. In addition, when processing a
refund due to change of mind a component of the original
price will be non-refundable. This amount will be equal to
the delivery fees charged by the courier company. If you
receive a faulty or damaged product, a replacement will be
provided to you.
You can return your purchase from Extreme Marquees by
courier regardless of if you have made your purchase on
www.extreme-marquees.com.au or over the phone.
MAINTENANCE
PROTECTIVE COVERS
Ensure all protective covers are clean and dry before fitting
to any of your marquee products.
SCREWS
Regularly check that all screws are firm (not too tight). This
can be done by using an allen key and/or screw driver. If a
truss bar screw is missing, replace it immediately as this will
put additional pressure on the frame when setting up.
LEGS
When retracting or extending the legs on your marquee it
is important that both the inner and outer segments of the
leg are clean and free of obstructions such as: sticky tape,
masking tape, rope, string and cable ties. When sticky tape,
string etc are left on the tent frame legs it can cause the
inner and outer segments to jam.
TRUSS BARS
The truss bars (cross bars) are an integral part of the
marquee structure. If a truss bar is broken or damaged it
is recommended that you do not use the marquee until
it’s repaired or replaced. If operated correctly in normal
weather conditions the truss bars should not break.
CLEANING
Do not use solvents on any part of the Marquee.
ROOF & WALLS
When cleaning your marquee (roof, walls or valance panels)
use a soft mop and any mild household cleaning fluid such
as dish detergent mixed with warm water.
When cleaning the roof of your marquee we recommend
that the tent is fully opened and secured into position.
Remove any leg extensions or accessories such as side walls
as these can be cleaned separately.
We recommend that the roof of your marquee be cleaned
regularly in proportion to the frequency of use.
Allow your marquee to completely dry before packing down
and fitting the protective cover. This will prevent mildew and
mould growth.
SMALL STAINS
Simply clean with a general-use mild household detergent
and a clean cloth.
FRAME
We recommend that the marquee frame be cleaned
regularly. Use a silicone spray on the frame after extended
use or in damp weather conditions. This will ensure your
frame operates easily and will maintain a clean look. Be sure
to remove any excess spray before attaching the roof.
TRANSPORTATION
The marquee should be stood upright during transit. If your
marquee needs to be positioned horizontally you MUST
remove the rooftop to prevent potential damage.
REPAIRS & SPARE PARTS
ROOF
Should your marquee roof be damaged, please contact the
Extreme Marquees Office. We will assess the damage and
either suggest a repair centre or arrange to return the roof
to our Warehouse/Office. In the case of an issue covered
under warranty, claim forms can be found on our website -
https://www.extreme-marquees.com.au/resource-centre/
FRAME
Should your marquee frame be damaged the following
options are available.
Contact the Extreme Marquees Office, advise which
connector, truss bar or leg requires replacement. Use
an allen key or screw driver to remove the damaged
component, and replace it with the new part.
https://www.extreme-marquees.com.au/marquee-spare-
parts/
OR
In the case of a warranty claim, a Warranty Claim Form must
first be completed. Forms are available online at -
https://www.extreme-marquees.com.au/resource-centre/
NOTE: Fit the protective cover to the marquee frame top to
bottom, leaving Marquee to stand on its feet or wheels.
DO NOT drag marquee protective covers as this can cause
wear and tear and may cause damage to your marquee.
Other manuals for X7 Tectonic Series
1
Table of contents
Other Extreme marquees Tent manuals

Extreme marquees
Extreme marquees X6 VELOCITY User manual

Extreme marquees
Extreme marquees CREST User manual

Extreme marquees
Extreme marquees SINGLE POLE STAR SHADE User manual

Extreme marquees
Extreme marquees EMX ALPHA User manual

Extreme marquees
Extreme marquees X7 Tectonic Series User manual

Extreme marquees
Extreme marquees EMX Beta Series User manual

Extreme marquees
Extreme marquees Q8 QUASAR User manual

Extreme marquees
Extreme marquees PAVILION User manual

Extreme marquees
Extreme marquees FS 84 Series User manual