Fahrenheit 28523 User manual

Fixing Ring
Rögzítőgyűrű
Inel de xare
Fixačný krúžok Relling valve
Újratöltő szelep
Ventil de reîncărcare
Plniaci ventil
Flame adjusment lever
Lángszabályzó
Maneta de reglare a intensităţii ăcării
Regulátor plameňa
Continuous ame switch
Folyamatos láng kapcsoló
Buton acără continuă
Tlačítko stáleho plameňa
Flame o button
Lángkioltó gomb
Buton oprire acără
Vypínač plameňa
Soldering Tip
Forrasztó páka hegy
Vârf ciocan de lipit
Spájkovací hrot
Ignition button
Begyújtó gomb
Buton aprindere
Zapaľovacie tlačítko
Safety lock button
Biztonsági gomb
Buton de siguranţă
Bezpečnostná poistka
3 IN 1 MULTIFUNCTIONAL GAS SOLDERING SET
3AZ1BEN GÁZÜZEMŰ FORRASZTÓ MULTIFUNKCIÓS SZETT
SET 3 ÎN 1 PT. LIPIT CU GAZ
3 V 1 SADA S MINI PLYNOVOU SPÁJKOVAČKOU
28523
PT600B

EN User Manual
Please read the following operational information thoroughly before using the soldering iron.
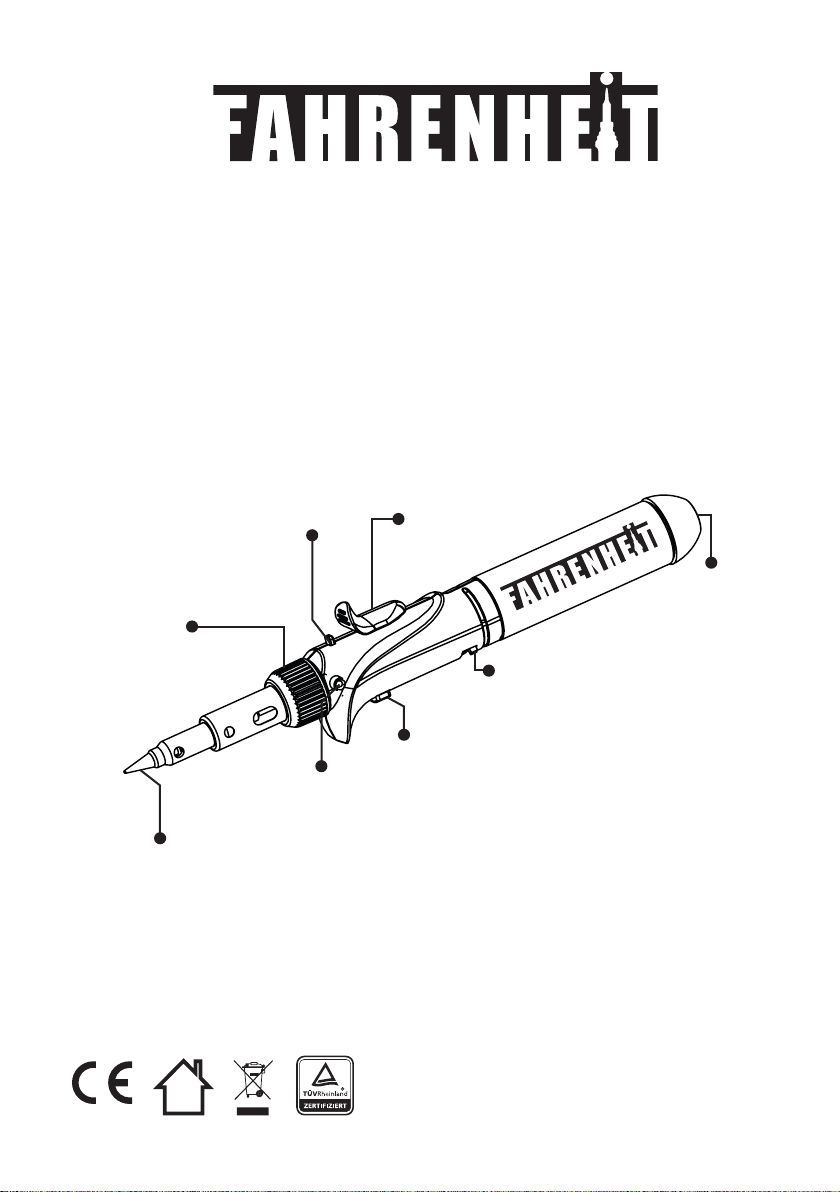
Soldering iron ignition and extinguishing
1. Make sure the exhaust vent is facing upward.
2. Press the safety lock button and using your thumb of free hand to pull down the ignition button in the
same time. This action will ignite the soldering iron.
3. Hold the ignition button and release the safety lock button, to move the continuous ame button to
right for a constant ame.
4. Press the ame o button about 1 second to turn o the ame, gas ows trough internal catalyst after
ignition will generate heat. If you don’t press the ame o button, the temperature of soldering iron
will be too high.
5. Move the continuous ame button to left, and this will cut o the gas supply and extinguish the ame
Flame adjustment
Move the adjusment lever ont he side toward „4” to increase the ame strenght or „1„ to decrease the
ame strenght.
Hot Blower
Disassemble the soldering tip by rotating the assembly lock counterclockwise. Take assembly will now be
used as hot blower without the soldering tip. Operation will be the same as above for the soldering iron.
Pencil Torch (Jet function)
Disassemble the soldering assembly by rotating the assembly lock counterclockwise. Take o the sol-
dering device and install the metal sleeve back to the unit. Operation will be the same as above for the
soldering iron. Except do not use the ame o button.
Relling gas tank
1. Turn o the soldering iron and make sure the ame is o.
2. Wait until the soldering iron temperature to cool down naturally before relling gas.
3. Hold the soldering iron in an upside down position.
4. Insert and press down the butane canister nozzle into the soldering iron relling valve.
5. Stop relling once gas starts to overow. The soldering iron should never be completely lled.
Overlling will cause the ame to spit.
6. Please allow a few minutes for gas to become stabilize before operation.
Warning!
1. Keep teh soldering iron out of reach of children.
2. Ignite the soldering iron away from face, hand, clothing, or combustible materials.
3. Contains ammable gas under pressure. Never expose the soldering iron to heat above 40°C or 104°F
or to prolonged sunlight.
4. Do not disassemble the unit on your own.
5. Never puncture or put in re.
6. Work in a reproof and well ventilated area.
7. Never operate the soldering iron in a closed container holding combustible vapors, ammable liquids
or explosive materials.

Használati utasítás HU
Kérjük olvassa át gyelmesen a használati utasítást mielőtt a forrasztó pákát használatba venné.
Forrasztó páka üzemmód be- és kikapcsolás
1. Tartsa felfelé a páka hegyét bekapcsolás előtt.
2. Nyomja be a biztonsági gombot, majd húzza hátra a hüvelykujjával a begyújtó gombot, ezzel a forrasztó
páka bekapcsol.
3. Tartsa nyomva a begyújtó gombot és engedje fel a biztonsági gombot, majd tolja el a folyamatos láng
kapcsolót.
4. Nyomja meg a lángkioltó gombot 1 mp-re a gyújtóláng kioltásához. A gáz tovább áramlik a katalizáto-
ron keresztül és ezzel hőt fejleszt. Ha nem nyomja meg a gombot a páka túlmelegedhet.
5. Tolja vissza alaphelyzetbe a folyamatos láng kapcsolót alaphelyzetbe a páka kikapcsolásához.
Láng szabályzó
A láng szabályzó kapcsoló eltolása a „4”-es érték felé növeli, az„1”-es érték felé tolása pedig csökkenti a
láng mértékét.
Hőlégfúvó
Csavarja ki a forrasztó páka hegyét, így a készülék hőlégfúvóként funkcionál. A működés és kezelés
ugyanaz mint a forrasztó páka üzemmód esetében.
Szúróláng (Jet funkció)
Csavarja le a rögzítőgyűrűs csúcshüvelyt és távolítsa el a forrasztóhegyet rögzítő hengert, majd csavarja
vissza a csúcshüvelyt a készülékre. A működés és kezelés ugyanaz mint a forrasztó páka üzemmód ese-
tében.
Gáztartály újratöltés
1. Kapcsolja ki a forrasztó pákát, győződjön meg róla, hogy a láng teljesen elaludt.
2. Várja meg míg a készülék lehűl (kb. környezeti hőmérsékletre).
3. Tartsa a pákát a hegyével lefelé.
4. Helyezze az utántöltő palackot a töltőszelepbe és nyomja meg azt.
5. A feltöltöttséget jelzi a gáz túlcsordulása. Soha ne töltse teljesen teljesen a gáztartályt.
6. Feltöltés után kérjük várjon pár percet mielőtt ismét használatba venné a készüléket.
Figyelmeztetés!
1. Gyerekektől távol tartandó.
2. Begyújtáskor ügyeljen rá, hogy ne legyen a páka arc, kéz, ruházat és gyúlékony anyag közelében.
3. Nyomás alatt lévő gáz, ne tegyek ki 40°C vagy 104°F-nál nagyobb hőmérsékletnek, napfénynek és su-
gárzó hőhatásnak.
4. Ne szerelje szét a készüléket.
5. Ne dobja tűzbe.
6. Csak tűzbiztos és megfelelő szellőzéssel rendelkező helyen használja.
7. Soha ne használja szűk, zárt helyeken, gyúlékony és robbanékony anyagok közelében.

RO Manual de utilizare
Vă rugăm să citiţi cu atenţie aceste instrucţiuni.
Mod ciocan de lipit Pornire / Oprire
1. Ţineţi vârful ciocanului înspre sus.
2. Apăsaţi butonul de siguranţă, trageţi înspre spate butonul de pornire cu degetul mare şi aparatul
porneşte.
3. Ţineţi apăsat butonul de pornire şi eliberaţi butonul de siguranţă, după care împingeţi butonul de
acără continuă.
4. Apăsaţi butonul de stingere a ăcării timp de 1 sec. pt. stingerea ăcării. Gazul se scurge în continuare
prin catalizator generând căldură. Dacă nu apăsaţi butonul, ciocanul se supraîncălzeşte.
5. Apăsaţi butonul de acără continuă în poziţia iniţială pt. stingerea ciocanului.
Reglarea ăcării
Împingând butonul de reglare a intensităţii ăcării înspre valoare„4”, acăra va creşte, înspre valoarea„1”
va descreşte.
Suantă de aer cald
Deşurubaţi vârful ciocanului de lipit, astfel aparatul va funcţiona ca şi suantă de aer cald. Funcţionarea şi
mânuirea este acelaşi ca şi în cazul folosirii în mod ciocan de lipit.
Funcţia Flacără Jet
Deşurubaţi tubul din vârf şi îndepărtaţi cilindrul de xare al ciocanului, după care reînşurubaţi tubul pe
aparat. Funcţionarea şi mânuirea este acelaşi ca şi în cazul folosirii în mod ciocan de lipit.
Reîncărcarea rezervorului de gaz
1. Opriţi aparatul şi convingeţi-vă dacă acăra este stinsă.
2. Aşteptaţi până la răcirea completă a aparatului.
3. Ţineţi aparatul cu vârful înspre sus
4. Aşezaţi aconul pe ventilul de încărcare şi apăsaţi
5. Starea de încărcare este indicată de refularea excedentului de gaz. Nu umpleţi rezervorul până la refuz.
6. După reîncărcare aşteptaţi câteva minute până la o nouă utilizare.
Atenţionări!
1. Aparatul va ferit de accesul copiilor.
2. La aprindere acordaţi atenţie ca acăra să nu e în apropierea feţei, mâinilor, îmbrăcămintei, sau altor
materiale inamabile.
3. Gaz sub presiune, nu va expus la temperatură peste 40°C sau la acţiune razelor solare directe.
4. Nu demontaţi aparatul.
5. Nu incineraţi aparatul.
6. Se va folosi în spaţii bine ventilate, fără pericol de incendiu.
7. Nu se va folosi în spaţii restrânse, închise, sau în apropierea materialelor inamabile sau explozive.

Uživateľská príručka SK
Prosíme prečítajte si podrobne tento návod na použitie pred použitím spájkovačky.
Uvedenie spájkovačky do prevádzky a vypnutie
1. Pred zapnutím držte hrot spájkovačky smerom nahor.
2. Stlačte bezpečnostnú poistku, potom potiahnite smerom dozadu zapaľovacie tlačítko, týmto dôjde k
zapáleniu spájkovačky.
3. Držte stlačené zapaľovacie tlačítko a pustite bezpečnostnú poistku, potom posuňte prepínač, na druhej
strane, do polohy stály plameň.
4. Stlačte vypínač plameňa asi na 1 s pre vypnutie zapaľovacieho plameňa. Plyn bude naďalej prúdi do
trysky a ohrieva hrot, so spájkovačkou môžete začať pracovať. Ak tlačítko po zapálení nestlačíte môže
dôjsť k prehriatiu hrotu.
5. Pre vypnutie spájkovačky posuňte prepínač do polohy„OFF”.
Regulácia plameňa
Posunutím regulátora plameňa do polohy„4”dôjte k zväčšeniu plameňa a posunutím do polohy„1”k jeho
zmenšeniu.
Teplovzdušná pištoľ
Odskrutkujte hrot spájkovačky a takto môžete použiť pájkovačku a teplovzdušnú pištoľ. Prevádzka a obs-
luha je úplne rovnaká ako pri režime spájkovačka.
Rezný plameň (Jet režim)
Odskrutkujte hrot a tak isto odmontujte valcovitý držiak hrotu spájkovačky, potom namontujte späť hrot
na spájkovačku. Prevádzka a obsluha je úplne rovnaká ako pri režime spájkovačka.
Plnenie spájkovačky
1. Vypnite spájkovačku a ubezpečte sa o tom, že plameň úplne vyhasol.
2. Počkajte dokiaľ spájkovačka nevychladne (zhruba na teplotu okolia).
3. Držte spájkovačku hrotom smerom dole.
4. Umiestnite tlakovú nádobu s plynom k plniacemu ventilu a dobre pritlačte.
5. Naplnenie signalizuje pretekanie plynu. Nikdy neplňte spájkovačku až úplne do plna.
6. Po naplnení spájkovačky počkajte chvíľku predtým, ako ju budete zase používať.
Upozornenia!
1. Skladujte mimo dosah detí.
2. Pri zapaľovaní dávajte pozor nato, aby spájkovačka nebola v blízkosti tváre, rúk, oblečenia alebo akého
koľvek iného horľavého materiálu.
3. Pozor. Tlaková nádoba nevystavujte teplotám nad 40°C alebo 104°F, priamemu slnečnému žiareniu a
sálavému teplu.
4. Spájkovačku nerozoberajte.
5. Nevhadzujte do ohňa.
6. Používajte iba tam, kde nehrozí nebezpečenstvo požiaru, a na dobre vetraných miestach.
7. Nikdy nepoužívajte v tesných, uzavretých priestoroch, v blízkosti horľavých alebo výbušných látok.
This manual suits for next models
1
Table of contents
Languages:
Other Fahrenheit Soldering Gun manuals