Fastway FLASH STBM DT-STBM6400 Quick reference guide

STBM
Anti-rattle Adjustable
Aluminum Ball Mount
Use and Care Instructions
For Ball Mount Models
2 Inch Receiver: DT-STBM6400, DT-STBM6600, DT-STBM6800, DT-STBM7000
2.5 Inch Receiver: DT-STBM6425, DT-STBM6625, DT-STBM6825, DT-STBM7025
Congratulations on your purchase of a new Fastway® Flash™ STBM ball
mount. e anti-rattle features of the STBM ball mount allow you to
enjoy the beauty and convenience of a premium adjustable aluminum
ball mount, with the least amount of receiver clunk and rattle noise
possible. Read these instructions thoroughly to become familiar with
proper set up and maintenance procedures. is will ensure that your
Flash ball mount will give you maximum performance, and years of
service.
KEEP THESE INSTRUCTIONS in a safe place for future reference.
IMPORTANT SAFETY INFORMATION
Failure to follow all safety warnings may result in severe
injury or death.
WARNING
Please register your product warranty. See warranty information on back.
Proudly Made in the USA
1
2
3
4
5
6
7
8
9
10
Date of Purchase:
BALL
SIZE
MAX
TRAILER
WT. LBS.
MAX
TONGUE
WT. LBS.
2” 8,000 1,000
25
/16 ”10,000
1. Receiver tension pin
2. Drop bar (shown in down or drop position)
3. Positioning indicator notches
4. Safety lock bolt
5. 5/16” security hex tool
6. Ball holder tension bolt
7. Ball holder
8. Dual hitch ball
9. Height adjustment holes
10. Receiver tube tension bolt
• Read, understand, and follow all safety warnings,
setup, use, and maintenance instructions of your
trailer, tow vehicle, and hitching equipment before
installing your Flash ball mount or towing your trailer.
• Never cut, weld, grind, bend, heat, or modify ball
mount components in any way.
• It is the driver’s responsibility to properly install and
adjust the equipment and to adjust driving habits to
match towing conditions. e driver is responsible for
their own safety and the safety of passengers.
• Never exceed the specied weight ratings for the
trailer, tow vehicle, receiver hitch, ball mount, hitch
ball, or any other towing equipment.
• Always use a hitch ball size that correctly matches
your trailer coupler size and make sure it is coupled
securely before towing.
• Do not impact the ball mount on the ground. Do not
back into things with your ball mount or an attached
trailer (i.e. loading docks, trees, etc.). If your ball
mount has been impacted in any way, thoroughly
inspect it for damage before towing, and if it is bent or
damaged DO NOT tow; replace it.
• Do not loosen ball holder tension bolt while the ball
mount is under load from an attached trailer.
• Check all towing hardware before each trip. Do not tow
your trailer until all pins and bolts have been checked
for wear, visually verifying that the ball holder tension
bolt is properly seated into the height adjustment hole,
and the safety lock bolt is properly tightened.
• Do not tow with ball mount if height adjustment holes
show excessive wear.
CAUTION
• Always tow with the hitch ball adjusted to the correct
height for the trailer being towed.
• Always load the trailer correctly. Follow the trailer
and tow vehicle manufacturers’ recommendations for
placement and quantity of cargo.
• Do not tow the trailer on excessively rough roads.
• Do not tow the trailer through profound ditches, dips,
or swales.
• Replace all worn, faded, or unreadable warning stickers
on the ball mount immediately.
• Do not loosen the ball holder tension bolt without rst
loosening the safety lock bolt.
Make sure the Ball Holder Tension Bolt is completely seated
INTO the adjustment hole with the Safety Lock Bolt engaged
before towing.
Installation and Use Instructions
Drop Bar Installation
1. Install the drop bar in the receiver tube and secure it with a
standard or locking 5/8” hitch pin.
2. If the drop bar is in the UP or RISE position DO NOT
engage the receiver tension pin. Instead, back the receiver
tube tension bolt out two full turns.
3. If the drop bar is in the DOWN, or DROP position (see
image on front), engage the receiver tension pin by rmly
hand tightening the receiver tube tension bolt with the
provided 5/16” security hex tool.
Ball Holder Adjustment
1. Loosen the safety lock bolt one full turn and then unscrew
the ball holder tension bolt to the point that it will allow easy
movement of the ball holder to the desired towing height.
2. Using the positioning indicator notches visible on each side
of the drop bar face, position the ball holder at the desired
height, with the correct hitch ball size for your coupler on
the top. When the top of the ball holder is aligned with the
indicator notch, the ball holder tension bolt is alligned with
the height adjustment hole. Use the hex tool to rmly hand
tighten the ball holder tension bolt into the adjustment hole.
3. Visually verify the ball holder tension bolt is seated INTO
the adjustment hole and not between adjustment holes. If
the ball holder tension bolt protrudes past the face of the
ball holder, it is not seated correctly.
4. Firmly hand tighten the safety lock bolt with the hex tool.
5. Never tighten the receiver tube tension bolt, ball holder
tension bolt or safety lock bolt by using a hammer to pound
on the hex key, nor a ‘cheater-bar’ to give you added leverage
on it. Over tightening these bolts can damage the aluminum
threads. Remember - clockwise to tighten, counterclockwise
to release.
6. Frequently check the bolts of the ball mount and re-tighten
as needed.
Determining Correct Ball Height
e most important consideration when setting up your Flash
ball mount is to make sure the trailer is as close to level (parallel
to the ground) as possible while being towed. To do this, you
must set the ball height to compensate for any drop or sag caused
by the tongue weight of the trailer.
1. Level the trailer by parking it on a smooth, at surface.
Measure from the ground to the frame at both the front and
rear of the trailer. Use the tongue jack to make adjustments
until it is level (both front and rear measurements are the
same).
2. Back the tow vehicle up to the trailer, leaving a few feet of
working space between them.
3. Slide the drop bar into the tow vehicle’s receiver hitch and
pin it into place.
4. Measure from the ground to the bottom of the coupler on
the trailer, then lock the ball holder into place on the drop
bar at that height, with the correctly sized hitch ball for your
trailer coupler facing up. See Figure 2. You may need to
invert the drop bar and use it in the rise position to reach
the correct ball height for your particular trailer.
5. Couple the trailer to the tow vehicle, and drop the full
tongue weight of the trailer on the ball mount.
6. Re-measure the coupler height, and compare it to the rst
measurement. e dierence between these is the distance
the ball mount should be adjusted upward to compensate
for the trailer’s tongue weight.
7. Uncouple the trailer.
8. Raise the ball holder to the adjusted towing height, and re-
pin it into place. It is better to tow with the trailer level, or
with the tongue angled slightly downward. If the adjusted
towing height falls between two adjustment holes, choose
the lower of the two.
9. Repeat this process if the loading of your trailer changes, or
to set the ball mount up for a dierent trailer.
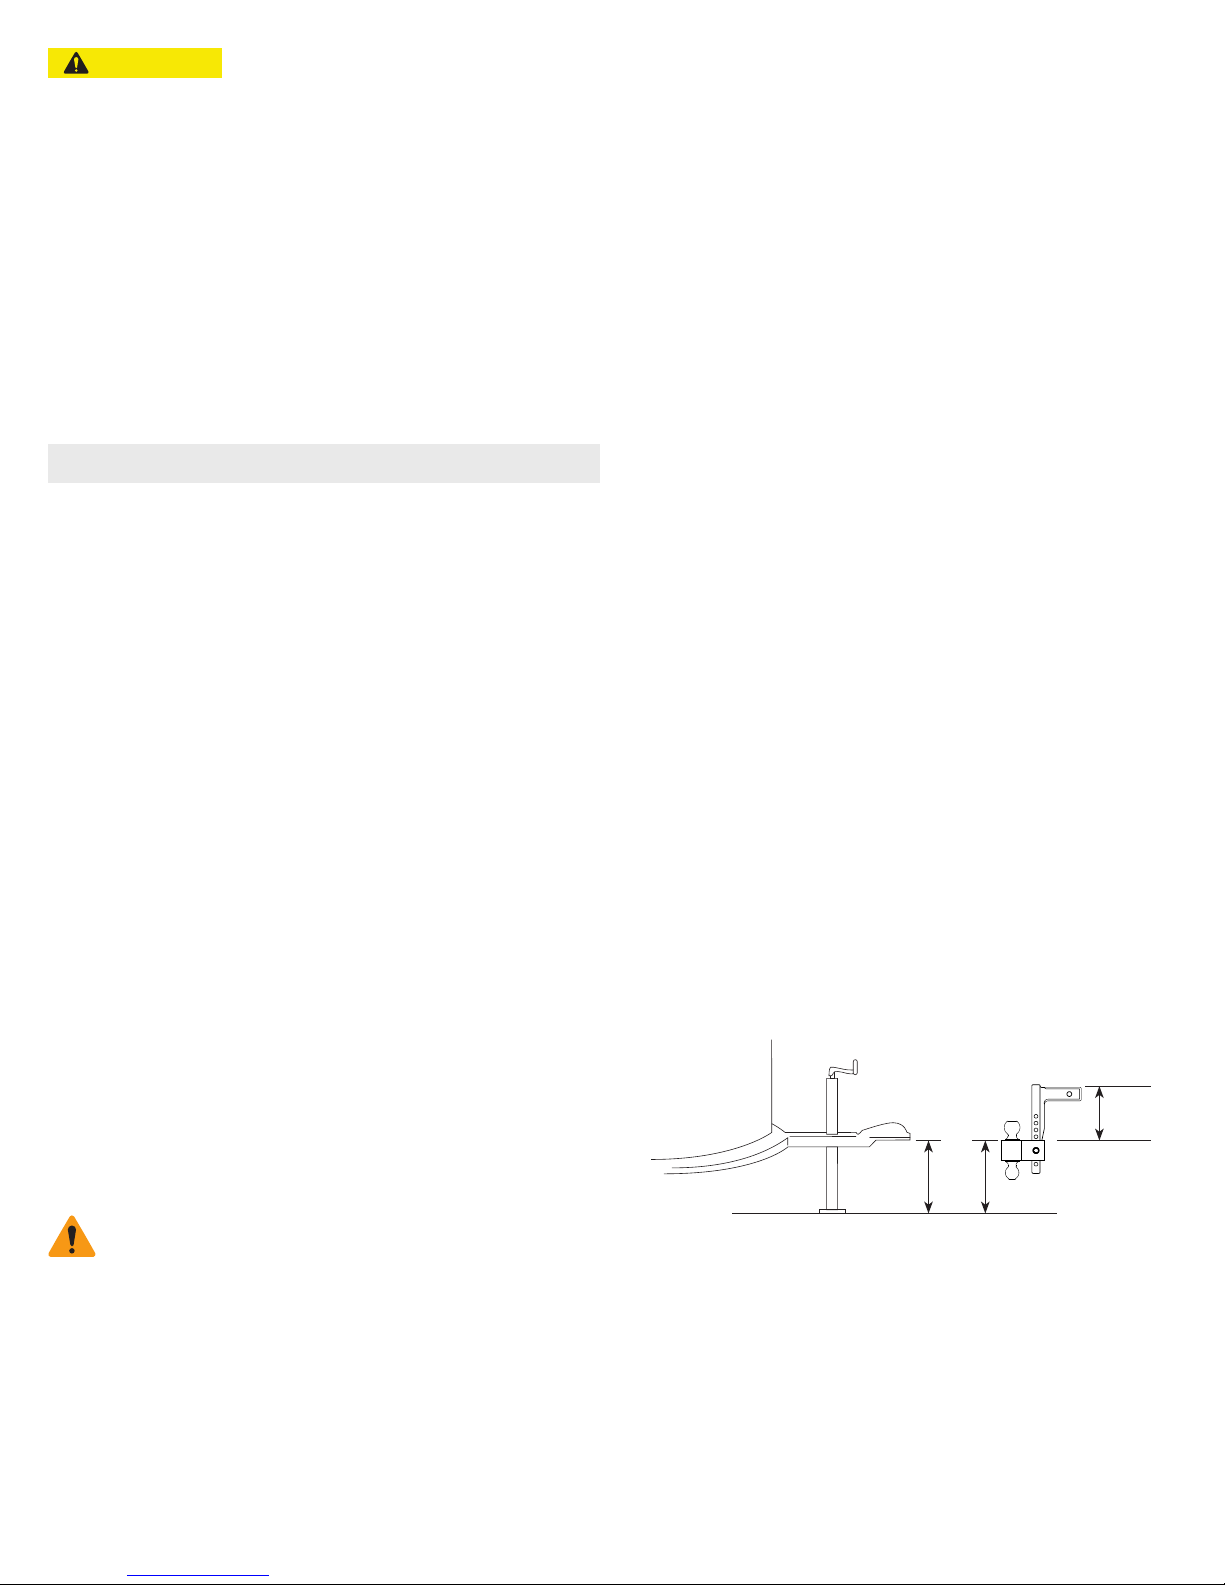
Figure 2: Top of ball holder height should initially be
set equal to the bottom of the coupler socket height with
the trailer parallel to ground, then adjusted upward to
compensate for the distance it drops when the tongue weight
is being carried.
Rise or drop is measured from the top of the receiver opening
to the top of the ball holder.
Figure 2
Drop
Set
Equal

FLIN1216 Part # DTBM446
Fastway Trailer Products, 353 South 1100 West, Provo, UT 84601 • FastwayTrailer.com • 877-523-9103
DO NOT RETURN THIS PRODUCT TO THE RETAILER
For Warranty Claims or Customer Support Contact Fastway Trailer Products Directly
8:00 – 5:00 Mon. – Fri. MST at 877.523.9103 or CustomerService@FastwayTrailer.com
Limited 1 Year Warranty: Fastway Trailer Products warrants the Flash STBM ball mount, excluding chrome and corrosion, against latent defects in
materials and workmanship under normal use and service, ordinary wear and tear is excepted, to the original owner for a period of 1 year from the
rst date of purchase at retail up to the value of its original purchase price. If this product is latently defective it will be replaced or repaired when a
proper return authorization is obtained and the product is returned with transportation charges prepaid to Fastway Trailer Products. Fastway Trailer
Products shall not be required to replace or repair any products damaged as a result of improper installation, alteration, unreasonable use, or improper
maintenance including, without limitation, loading the product beyond the factory rated load capacity. This warranty does not include labor charges
nor does it include transportation charges for returning the product to the consumer. To the extent allowed by law, Fastway Trailer Products shall not
be liable for any incidental, consequential, or any other damages including, without limitation, breach of any implied warranty, merchantability, or
tness for a particular purpose of any Fastway product. In no event shall Fastway Trailer Products be liable for any damages other than the replacement
or repair of the aected part. Authorization and warranty procedure may be obtained by calling Fastway customer support at 877.523.9103.
Great products to make towing Faster and Easier. Get more info at FastwayTrailer.com
The Fastway® Zip™ breakaway
cable’s coiled design keeps
your cable from dragging!
automatic
jack foot
TM
TM
Trailer Breakaway
Cable
TM
Fastest and easiest tandem
axle wheel chock ever!
Chain-Up
Fastest and easiest way
to keep your safety
chains from dragging!
Fastest and easiest automatic
trailer tongue Jack foot.
YouTube.com/FastwayTrailer
Facebook.com/FastwayTrailer
Twitter.com/FastwayTrailer
Visit our YouTube channel for a detailed video of the Flash STBM.
Care Instructions
1. Storage - Regularly remove your Flash ball mount from the
receiver tube and wipe away any moisture from the hitch
pin and the inside of the hitch pin bore in the drop bar. Keep
a thin lm of grease on the hitch pin. Doing so will help
prevent galvanic corrosion around the hitch pin, which can
cause it to become stuck in the receiver tube.
If you live in an area where salt and sand are used during
winter to treat roadways, remove your Flash ball mount and
store it inside the tow vehicle instead of in the receiver during
winter months. ese elements are extremely abrasive and
can damage the hand-polished nish of your ball mount.
2. Cleaning - Wipe away dirt and grime with a so cloth. When
cleaning the drop bar and ball holder surfaces, DO NOT use
degreasers or harsh cleaners - simple mild soap and water is
best for aluminum. Aluminum rim cleaner and automobile
wax can help maintain the polished luster of the aluminum.
3. Towing - Always lubricate the hitch ball with heavy multi-
purpose grease or wheel bearing grease.
4. Polish - Maintain the shine of the ball mount by using
aluminum wheel cleaner and polish.
5. Lubrication - If the bolts of your ball mount become sticky
or tight, it can be disassembled (see #6), cleaned, and zinc
anti-seize compound may be applied lightly to all of the
threaded bolts before reassembly.
6. Do not attempt to remove the ball holder tension bolt by
unscrewing it through the front of the ball holder. is bolt
can only be removed by threading it completely through the
ball holder (in, not out) and only when the ball holder is
removed from the drop bar. To replace it, thread it in from
the back side of the ball holder hex head rst.
This manual suits for next models
7
Other Fastway Automobile Accessories manuals


Popular Automobile Accessories manuals by other brands

Rockford Fosgate
Rockford Fosgate RFX8310 Installation reference sheet

Yakima
Yakima WheelHouse instructions

MBRP
MBRP Off Camber Fabrications 130872 quick start guide

Car Solutions
Car Solutions IW04-MB14-N instruction manual

APS
APS IA06SJD4B installation instructions

Steinhof
Steinhof B-041 FITTING AND OPERATION MANUAL

Steeda
Steeda Tri-Ax installation instructions

SportRack
SportRack FRONTIER A21004S installation manual

Racelogic
Racelogic Performance Box Touch Accel Mode quick start guide

Monster
Monster AirTalk User guide & warranty information

ULTIMATE SPEED
ULTIMATE SPEED 340578 1910 Assembly and Safety Advice

Simple
Simple ISMGM510E instruction manual


