manuals.online logo
Brands
  1. Home
  2. •
  3. Brands
  4. •
  5. Fein
  6. •
  7. Power Screwdriver
  8. •
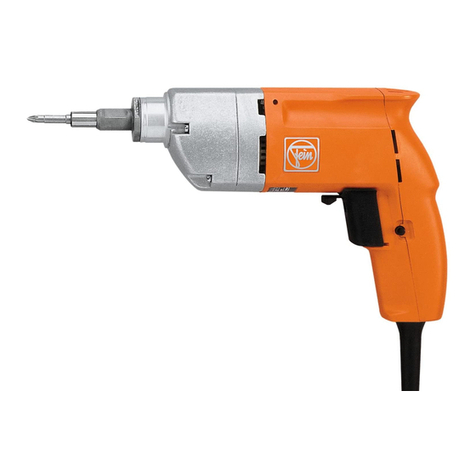
  9. Fein ASs 636-1 b User manual

Fein ASs 636-1 b User manual

ASs
636-1
b
To be handed to the workshop
Operating instructions
for the double insulated and interference-suppressed
Electric Screw-Driver Type ASs 636-1 b
and ASs 736-1 b
(42
Volts)
1.
Specifications
Type
of
current:
(single-phase
A.C.)
double
insulation
in
accordance
with
VDE 0740
Interference-suppress
ed
to
VDE 0875
Self
drilling
screws
Speed
rpm
Square
Net
weight
Ty
pe
up
to
Input
Watts
in. I
mm
full
load
ASs
636-1 b
3f,6
4,2 2150
ASs
736-1 b
2.
Construction
This
screw-driver
is
an
electric
tool
of
Class
II
with
protective
insulation
without
earthing
con
ductor
and
is
in
accordance
with
the
VDE
regulations
0740.
The
protecti
ve
insul
a
tion
is
attained
by
the
shock-proofed
motor
housing
made
of
Polyamide
and
by
insulating
the
armature
against
the
pinion.
The
protective
insulation
is
tested
with
the
prescribed
test
voltage
of
4000 V.
The
machine
is
radio-screened
in
accordance
with
radio
inter-
ference
degree
N.
It
is
supplied
with
a
two-core
cab
le
without
earthing
cond
uctor
and
must
not
be
earthed.
Type
ASs
736-1 b
for
low
tension
(42 V)
is
of
th
e
same
design,
but
without
double
insulation
and
not
radio-screened.
The
machine
is
provided
with
a
reversing
switch
for
clockwise
and
anticlockwise
rotation.
It
must
not
be
operated
when
the
machine
is
running.
To
prevent
the
overbridging
of
the
insulation
no
additional
marking
plates
and
signs
must
be
riveted
or
screw
ed
on
the
housin
g.
We
recommend
the
use
of
transfers
only.
3.
Connection
Before
plugging
in
the
tool
check
that
voltage
stated
on
the
rating
plate
is
in
accordance
with
the
voltage
of
the
mains
supply.
Switch
must
be
in
the
"Off"
position
when
connecting.
BE 370/e
XEW
10.12
Printed
in
Germany
drive
I
no
load
lbs.
I
kg
1/4,
3450 230 h
exagon
3,5 1,6
socket
4.
Adjustment
of
the
torque
The
machine
is
provided
with
a
positive
clutch.
The
torqu
e is
adjus
ted
by
changing
the
position
of
the
clutch
claws;
the
deeper
the
gripping
of
the
claws,
th
e
high
er
the
torque.
In
order
to
adjust
the
claws,
turn
screw
(46)
after
having
screwed
off
bearing
sleeve
(48
)
and
loosed
grub
screw
(47)
.
Moreover
,
the
torque
is
dependent
on
the
pressur
e
of
the
driver
against
the
screw.
5.
Setting
of
the
depth
stop
With
ad
justing
sleeve
(102)
you
can
set
in
the
screwing
depth.
A
turn
of
90o
corresponds
of
25
mm
(1
")
screwing
depth
. A
deeper
stop
results
from
right
turning.
In
order
to
change
the
blades,
loosen
screw
(105),
re
move
depth
stop,
cha
nge
the
blade
and
r
emove
plaster
dust.
Push
depth
stop
on
t
he
machin
e
up
to
str
i
king
and
pull
on
screw
(105).
6.
Maintenance
Before
carrying
out
any
maintenance
work
always
remember
to
pull
out
the
plug.
To
guarantee
the
securi
ty
provided
by
the
double
in
s
ulation
clean
the
machine
regularl
y
every
300
duty
hours.
Th
is
is
done
with
a
brus
h
or
by
blowing
out
the
carbon
holders
a
nd
the
insulated
parts
with
dry
pneuma
t
ic
air.
Aft
er
checking
the
carbon
brushes
make
sure
to
ref
it
them
in
their
original
position
and
check
that
they
mo
ve
easi
ly
in
their
hold
er.
40
Netz
---
·--
49
41
53
Umschalter
EZ1-89-2
Ausschalter
EZ
1-58
milKP9-7 einqektebt
102
103
101
704
105
3 1 8 9
27
28
~~
52
56
23
54
22
21
20
19
18
'
17
16
Tiefenanschlag
MZ
27-20-1
I
lli
-
~11
24
b
a
a
a
a
a
a
b
b
b
Part
No.
1-15,
18-25
1
2
3
4
4a
5-7
8
9
10
11
12
13
13a
14
15
16
16
17
18
19
20-23
24
25
26-32
30
31
32
34-51
34
35-51
Order
Reference
MK
1-18-13 1)
MK
1-18
EZ 1-58
FD 1-196
EZ 22-63
EZ 1-89-2
SA
18-14
EZ 19-45
EZ 19-46
EZ 12-43-1
EZ 11-59
EZ 13-8
SR2-M3,5x12
BF 19-42-1
State ty
pe
and
voltage
SR2-M3,5x50
PT
6-M
3,5
JS
28-4
JS
15-11
EZ 7-101
EZ 6-126
I
JS
13-7
PT
31-21
SR3-M3,5x10
GH
1-18-1
SR2-M3,5x15
SR6k-M3,5x8
State type
and
voltage
ZR 4-42
SR 2-M3,5x6
PT
5d-M
3,5
LA
8-148-2
LA
6-206
LA 8-148-1
>.
....
Description
a
1 motor
housing
assembly
1
motor
housing
1
switch
1
compression
spring
1
capacitor
1
reversing
switch
1
switch
casing
1
conn
e
ction
cable,
140
mm
long
1
connection
cable,
70
mm
long
2
carbon
holder
assembled
2
carbon
brushes
2
sliding
cover
4
fillister
head
cap
screw
1
locking
pin,
assembled
1
pole
housing
with
winding
2
fillister
head
cap
screw
2
lock
washer
1
insulating
ring
1
bolster
1
cable
with
plug
1
cable
without
plug,
for
42 V
1 I
cable-protection
sleeve
1
cable
clamping
bridge
2
fillister
head
countersunk
screws
1
cover
with
spare
carbons
2
fillister
he
ad
cap
screws
1
fillister
head
screws
1
armature
with
winding,
commutator
and
fan
whe
el
1
armature
pinion,
6
teeth
3
fillister
head
cap
screw
3
lock
washer
1
gear
head
assembly
1
intermediate
bearing
1
outer
bearing
assembly
I
Component Parts
Part
Order
>.
No.
Reference
0
Description
35
LA
8-148 1
outer
bearing
36 LK
1-1
1
ball
bearing
37
PT
15-42 1
compression
washer
38 LK 15-11 1
needle
bearing
b 39 ZR 15-60x0,75 1
gear,
43
teeth
40
WE
8-20 1
claw-shaft
41
LK 1-32 1
ball
bearing
b 42 FD 1-232 1
compression
spring
43 BF 20-28 1
pressure
pin
44-45 A 4-55-1 1
tool
holder
assembly
44 A 4-55 1
tool
holder
45
RJ
15-92 1
retaining
ring
46 SR 18-9 1
adjusting
screw
47 SR 58-2 1
grub
screw
b 48-49 BU 4-76-1 1
bearing
sleeve
50
JS
15-9 1
securing
plug
51
DJ
1-81 1
felt
ring
b 52 LK 16-35 2
ball
bearing
53
RJ
12-47 1
sealing
ring
54
SR2-M3,5x30
2
fillister
head
cap
screw
55
SR2-M3,5x40
2
fillister
head
cap
screw
56
PT
5d-M
3,5 4
lock
washer
101-
MZ
27-20-1 1
depth
stop
105
101
BU 5-36 1
guide
bush
102
MZ
27-20 1
end
sleeve
103
DJ
1-81 1
felt
ring
104 SR 21-48 1
pressure
piece
105
SR35-M5x30
1
socket
head
cap
screw
Accessories
Z
92k-2H
t I
screwdriver
tool
EZ 11-59 2
carbon
brushes
z 10-10 1
hexagon
socket
screw
spanner
I
They
should
be
replaced
at
the
latest
when
they
have
worn
down
to
7
mm
Cf4
").
Please,
only
use
original
Fein
carbon
brushes.
After
fitting
new
brushes
run
tool
unloaded
for
about
15
minutes
to
allow
brushes
to
bed
in.
One
pair
of
spare
carbon
brushes
(21)
will
be
found
in
the
cover
of
the
handle,
please,
do
not
forget
to
reorder
them
in
time.
In
order
to
prevent
accidents
check
cable
at
regular
intervals.
To
replace
the
cable
take
off
the
screws
(24, 25),
then
take
off
the
handle
cover
(20),
loosen
the
two
screws
(19)
of
the
terminal
clamp
(18)
and
clamp
off
the
cable
from
the
switch
(2).
7. Lubrication
We
recommend
to
ren
ew
the
gear
grease
after
300
duty
hours.
Please,
only
use
the
Fein
special
grease
Sst
1.
For
ball
bearings
which
should
be
lubricated
after
approx
. 900
duty
hours
we
re-
commend
our
ball
bearing
grease
Sst
1.
The
ball
bearings
are
to
be
rinsed
in
clean
solvent
and
packed
with
new
grease.
The
space
between
inner
and
outer
ring
is
to
be
one
third filled
with
grease
in order
to
prevent
that
the
bearings do
not
over-
heat.
Quantity
Contents
Type
of
grease
Order
Reference
oz
I g
oz
I g
-
Sst
1
for
gearing
1/J 10
MZ
60-3/Sst 1 31/J 90
I
and
ba
ll
I
No
claims
can
be
entertained
for
damage
due to
negligent
main-
tenance
and
inadequate
lubrication.
8.
Overhaul
After
900
duty
hours
th
e
machine
should
be
co
mplet
ely
dis-
mantled
as
described
under
paragraph
9
and
all
parts
should
be
thoroughly
cleaned.
Rinse
ball
bearings
and
gears
in
clean
solvent
and
pack
with
fresh
grease
as
per
paragraph
7.
Please
be
sure
that
all
electric
parts are
only
cleaned
dry.
9.
Dismantling
The
tool
should
only
be
taken
apart
by
an
expert
.
I.
Unscrew
fillister
head
screw
(25)
and
the
two
cylindrical
screws
(24),
then
take
off
handle
cover
(20).
2.
Remove
supply
cable
from
switch,
draw
out
switch
and
disconnect
motor
cable.
3.
After
unscrewing
the
screws
(10)
draw
out
carbon
holder
(5).
Push
reversing
switch
(4,
4 a)
backwards.
Distribution
of
con-
nections
see
connecting
plan
.
4.
Loosen
cylindrical
screws
(54,
55),
remove
outer
bearing
(35)
with
intermedia
te
bearing
(34)
and
take
apart.
5.
Pull
out
armature
(26),
unscrew
three
screws
(31)
and
remove
armature
drive
(30).
6.
Draw
insulation
ring
(14)
out
of
mo
tor
housing
(1),
unscrew
cylindrical
screws
(13)
and
remove
po
le
housing
(12).
Re-assemble
in
reverse
sequence.
Please
bear
in
mind that
existing
washers
are
to
be
placed
in
the
right
places.
Their
loss
would
lead
to damage.
10.
Repair
and
spare parts
We
recommend
our
Fein
Service
Stat
io
ns
to
carry
out
all
over-
haul
and
repair
work
quickly
and
expertly.
Please
quote
Order Reference
when
ordering spare parts or
send
in
sample
part,
stating
the
type
of
the
machine.
We
draw
your
attention
to
the
need
to
carry
out
a
high
voltage
test
in
accordance
with
your
local
r
eg
ulations
(or VDE
regu-
lation
0740)
before
taking
a
tool
into
service
after
any
repair
carried
out
by
your
own
staff.
(
(

This manual suits for next models

3

Other Fein Power Screwdriver manuals

Fein ASCS4.8 User manual

Fein

Fein ASCS4.8 User manual

Fein SCT 5-40 U User manual

Fein

Fein SCT 5-40 U User manual

Fein ASM Series User manual

Fein

Fein ASM Series User manual

Fein SCS4.8-25 User manual

Fein

Fein SCS4.8-25 User manual

Fein ASM14-2 PC User manual

Fein

Fein ASM14-2 PC User manual

Fein ASW14-6 Setup guide

Fein

Fein ASW14-6 Setup guide

Fein ABSU 12 User manual

Fein

Fein ABSU 12 User manual

Fein SCU7-9 User manual

Fein

Fein SCU7-9 User manual

Fein ASW18-6 Series User manual

Fein

Fein ASW18-6 Series User manual

Fein M55 X User manual

Fein

Fein M55 X User manual

Fein ASCS6.3 User manual

Fein

Fein ASCS6.3 User manual

Fein ASse 636 2b Kinetik User manual

Fein

Fein ASse 636 2b Kinetik User manual

Fein SCS4.8-25 User manual

Fein

Fein SCS4.8-25 User manual

Fein Handy Master ABS9 User manual

Fein

Fein Handy Master ABS9 User manual

Fein M55 User manual

Fein

Fein M55 User manual

Fein ASCT14M User manual

Fein

Fein ASCT14M User manual

Fein ASsd 715 User manual

Fein

Fein ASsd 715 User manual

Fein ASW 10-6 Setup guide

Fein

Fein ASW 10-6 Setup guide

Fein ASCM14 User manual

Fein

Fein ASCM14 User manual

Fein ASCM 14 Setup guide

Fein

Fein ASCM 14 Setup guide

Fein ASW18-6 Series User manual

Fein

Fein ASW18-6 Series User manual

Fein ASM14-4 User manual

Fein

Fein ASM14-4 User manual

Fein SCT5-40X User manual

Fein

Fein SCT5-40X User manual

Fein ASs 636 User manual

Fein

Fein ASs 636 User manual

Popular Power Screwdriver manuals by other brands

SNOWJOE SUNJOE SJ4VSD Operator's manual

SNOWJOE

SNOWJOE SUNJOE SJ4VSD Operator's manual

Kilews IMPACT Series Operation and maintenance manual

Kilews

Kilews IMPACT Series Operation and maintenance manual

Skil 3060 Original instructions

Skil

Skil 3060 Original instructions

Parkside RAPIDFIRE 2.0 Translation of the original instructions

Parkside

Parkside RAPIDFIRE 2.0 Translation of the original instructions

BorMann BCD1330 user manual

BorMann

BorMann BCD1330 user manual

Bosch GSR 7,2-1 operating instructions

Bosch

Bosch GSR 7,2-1 operating instructions

DeWalt DW252 instruction manual

DeWalt

DeWalt DW252 instruction manual

Dexter Power CDT112LD.T user manual

Dexter Power

Dexter Power CDT112LD.T user manual

Stomer Professional SCD-500 user manual

Stomer Professional

Stomer Professional SCD-500 user manual

Fieldmann FDV 10301-A user manual

Fieldmann

Fieldmann FDV 10301-A user manual

SW-Stahl S3245 instruction manual

SW-Stahl

SW-Stahl S3245 instruction manual

EINHELL DL-SS Operating and maintenance instructions

EINHELL

EINHELL DL-SS Operating and maintenance instructions

Urrea TB912 User's Manual and Warrantly

Urrea

Urrea TB912 User's Manual and Warrantly

Parkside PWBM A1 Operation and safety notes translation of the original instructions

Parkside

Parkside PWBM A1 Operation and safety notes translation of the original instructions

Bosch WEU Uneo Original instructions

Bosch

Bosch WEU Uneo Original instructions

YATO YT-27930 manual

YATO

YATO YT-27930 manual

ANLIDAR MYTORQ MYBT-SC0612 Operation and maintenance manual

ANLIDAR

ANLIDAR MYTORQ MYBT-SC0612 Operation and maintenance manual

Parkside KH 3101 2 SPEED RECHARGEABLE ELECTRIC DRILL... manual

Parkside

Parkside KH 3101 2 SPEED RECHARGEABLE ELECTRIC DRILL... manual

manuals.online logo
manuals.online logoBrands
  • About & Mission
  • Contact us
  • Privacy Policy
  • Terms and Conditions

Copyright 2025 Manuals.Online. All Rights Reserved.