Flow Hive User manual

FLOW®
INSTRUCTION
MANUAL

The Terms and Conditions of Sale on the Flow website of purchase, apply to the
receipt and use of all Flow Products. You should read these carefully to understand
your obligations and the warranty that applies to your Flow product.
This manual details the installation and operation of your
Flow Hive and Flow Frames. Welcome to this innovative
method of honey-harvesting.
To discover more about Flow technology and the fascinating
world of bees, visit our website to access our educational
videos and resources or consult with the Flow community
on our Forum: forum.honeyflow.com
We always appreciate your feedback and stories on how
our products work for you and your bees. Just tag #flowhive
or contact us at info@honeyflow.com
Before getting started, please familiarise yourself with the
information in this Flow sponsored Beekeeping Safety
pamphlet produced by Accredited First Aid:
www.honeyflow.com/beekeeping-safety
Happy Beekeeping!
honeyflow.com
honeyflow.com.au
eu.honeyflow.com
ru.honeyflow.com

TABLE OF CONTENTS
1GENERAL PRECAUTIONS 2
2SAFETY PRECAUTIONS 3
3COMPONENTS OF A FLOW® HIVE 4
4ADJUST FLOW FRAMES TO FIT INTO
THE FLOW SUPER 7
5FLOW HIVE CONFIGURATIONS 9
6HOW FLOW WORKS 10
7EXTRACTING HONEY FROM A FLOW FRAME 12
8CARING FOR YOUR FLOW FRAMES 15
9ADDITIONAL EQUIPMENT REQUIRED 17
10 WHERE TO LOCATE YOUR FLOW HIVE 18
11 SOURCE SOME BEES 19
12 PROCESSING AND STORING YOUR HONEY 20
13 MONITORING YOUR HIVE HEALTH 20
14 ADDITIONAL SKILLS FOR
SUCCESSFUL BEEKEEPING 21
15 TROUBLESHOOTING 22

2
1GENERAL PRECAUTIONS
Beekeeping requires specialist skills, carries inherent dangers
and is often subject to regulation.
Honey bees are wild insects. Highly organised, endlessly fascinating, and to be
treated with care, respect and caution at all times.
Get Educated: If you are new to beekeeping there are a number of skills that
you need to acquire in order to safely and successfully keep bees. We strongly
recommend taking a beekeeping course before you put bees in your hive. We
also encourage you to keep learning: take advanced courses, join your local
beekeepers’ association, and meet and network with other beekeepers.
Follow the Rules: Regulations and guidelines for keeping bees vary greatly.
Check with your local council, local and state primary industries and agriculture
authorities, and link up with your nearest beekeepers’ association to find
out what is required in your jurisdiction. Some jurisdictions ban or restrict
beekeeping, or require hives to be registered.
Understand the Risks: Bees can sting humans, pets and other animals. Make
sure you understand the risks and take precautions. See ‘Safety Precautions’
for further information.

3
l
! Information in this manual is a general guide only, is not exhaustive,
and may not be applicable to your circumstances. For specific
assistance, seek advice from your local authority, a professional
service or your nearest beekeepers’ association.
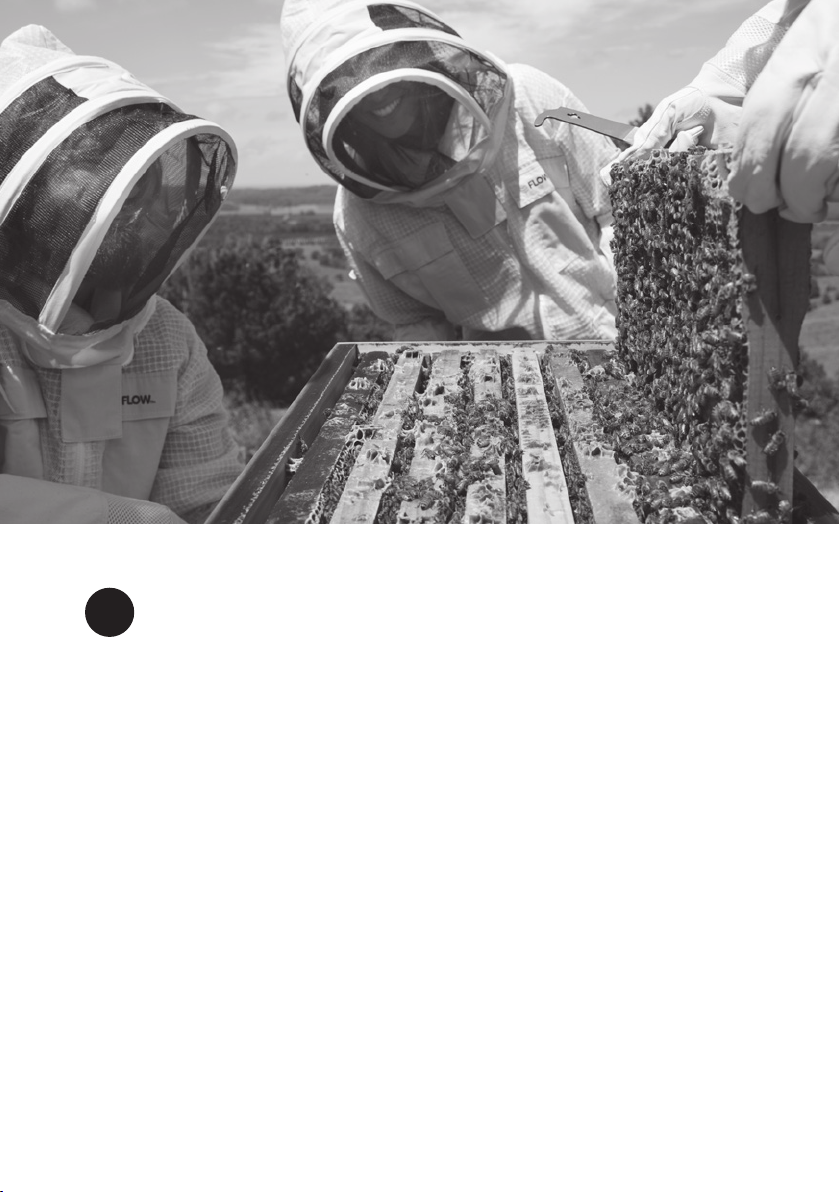
Take Responsibility: We are a worldwide community of beekeepers.
To succeed, each one of us must act responsibly to keep our bees, and
the humans and pets around them, safe, happy and healthy. If you have
neighbours, it’s especially important to consider and inform them.
Additional Resources: www.honeyflow.com has regularly updated educational
information and is a a great place to start looking.
• Search our extensive FAQs at www.honeyflow.com/faqs
• Join the conversation or ask a question of fellow Flow beekeepers on
forum.honeyflow.com
• Follow our blog www.honeyflow.com/blog
• Check out our instructional videos www.honeyflow.com/beginner-videos
2SAFETY PRECAUTIONS
All beekeepers get stung at some point. Before you begin beekeeping please
read the Accredited First Aid Beekeeping Safety pamphlet.
This pamphlet will help you understand the safety precautions and first aid
responses in relation to:
• bee stings,
• the safe use of smokers, and
• safe lifting
We recommend you wear a protective beekeeping suit and use a smoker
whenever you are working with your bees.
l
! For information on dealing with bee stings and bee sting first aid see
www.honeyflow.com/beekeeping-safety

4
FLOW HIVE
FLOW HIVE ROOF
INNER COVER
WITH PLUG
FLOW SUPER
OBSERVATION WINDOW COVER
OBSERVATION WINDOW
REAR WINDOW
REAR WINDOW COVER
FLOW KEY ACCESS SLOT
AND CAP
FLOW KEY ACCESS COVER
QUEEN EXCLUDER
BROOD BOX
BROOD FRAMES
SHELF BRAKET
OPTIONAL
BASE
TRAY
VENTED COVER
LEG KIT
OPTIONAL
FLOW FRAME
FLOW FRAME
FLOW KEY ACCESS CAP
FLOW KEY
HONEY TUBE
HONEY TROUGH CAP
1
2
3
4
5
6
7
8
9
10
11
12
13
18
19
20
21
22
14
15
16
17
3COMPONENTS OF A FLOW® HIVE
*Please note, if you have a Flow Hive Classic, some components may vary.

5
21
1
2
3
5
4
6
7
8
9
10
11
12
14
13
15
16
17
20
22
18
19

6
List of part names
Brood box – the part of the beehive that holds the comb that bee eggs are laid
in. These eggs hatch into bee larvae, which then pupate and turn into bees.
Flow Super – a honey super that has been modified to accommodate Flow
Frames. This is the box on a bee hive that the bees store most of their honey in.
Usually this box is placed on top of the brood box.
Flow Frame – the self-contained honeycomb frame that hangs in the Flow
Super. This has the patented ‘split cell’ technology allowing a beekeeper to
harvest honey without opening the hive.
Flow Key – the long steel rod that is inserted in the Flow Key access slot(s) to
operate the Flow Frames.
Flow Key access slots – these are the rectangular slots at the top of each Flow
Frame that the Flow Key fits in to operate the mechanism and harvest honey.
Honey trough – the enclosed gutter at the base of the Flow Frame that the
honey flows along and out of the hive.
Honey tube – the tube extension that is inserted in the honey trough when
harvesting honey.
Honey leak-back gap – looking at the opening to the honey trough on the
back end of the Flow Frame you can see a gap between the inner yellow
plastic blade and the clear end of the frame. This leak-back gap allows residual
honey to flow back into the hive after harvest, which the bees will clean up.
This means it is not necessary to harvest every last drop from your Flow Frame.
Front of hive – the side of the hive that has the bee entrance. This is a solid wall.
Rear of hive – the side on most hives that is opposite to the bee entrance. This
is usually where the Flow Frame’s clear end is accessible with the operation
slots and honey trough for harvesting honey.

7
4ADJUST FLOW FRAMES
TO FIT INTO THE FLOW SUPER
Before placing your Flow Super on the hive it is necessary to adjust
each Flow Frame individually. This will ensure correct operation of your
Flow Frames.
Check the tension on the wires
They should be tight. If the wires are loose see instructional video at
www.honeyflow.com/troubleshooting-frames
Reset your Flow Frame ready for your bees
We recommend testing the frame mechanism outside the hive prior to
installation. This will help you to get to know how your Flow Frames work.
l
! IMPORTANT: Ensure the Flow Frames are reset to the closed position prior
to installing in your hive, so the bees can complete the comb.
• Remove access cap
on each Flow Frame
• Insert the Flow Key
in the UPPER
operating slot
• Turn the key 90˚
• Remove the
key by twisting
it back to
horizontal
• Replace key
access cap.
Adjust each Flow Frame to fit in the super
1. Identify the front and back of each Flow Frame.
2. Frames sit into the Flow Super as illustrated on right. Tighten or loosen the
adjustment screw so that the back (window) end of the Flow Frame pushes
firmly against the back wall of the hive, in this way all the frames line up to
form the clear rear window.
3. Slot each Flow Frame into the honey super ensuring that frames are packed
firmly together.
4. Check that any gap in the back window is less than 3 mm (1
/8”) so that bees
cannot escape at the back of the hive.

8
If you have correctly adjusted the
fit of your Flow Frames the back
faces should now be lined up to
create a flat ‘window’ into the
hive. The frames should fit snugly
with little movement front-to-
back or side-to-side and there
should be no gaps greater than
3mm (1/8”).
Adjust
screw
for
snug
fit
The back
of the
frame sits
on this
ledge
Frame
should
push firmly
against
inside of
box
FRONTBACK
Adjustment
screw
Ensure any gaps are
less than 3mm
*SIDE OF SUPER - CUTAWAY
Spacer -
for extra
adjustment
l
! WARNING: Before adding the Flow Super to your hive make sure
there are no gaps >3mm.

9
5FLOW HIVE CONFIGURATIONS
The Flow Super should be managed in the same way as a regular honey super.
Only add it once your colony is strong and established.
Your bees may not take to the Flow frames straight away. The two main things
we have found that increase the rate at which bees fill the frames for the first
time are lots of bees on the frames and a good nectar flow. For suggestions on
encouraging the bees to get working on the Flow Frames sooner, see:
www.honeyflow.com/troubleshooting-bees
STARTING YOUR COLONY
CONFIGURATION
It’s important to get your brood box
humming before you add your Flow
Super. First set up your base, brood
box with frames, inner cover and roof
(as shown below) while your bees
are growing in number and building
comb. You can use the inner cover
plug to control bee access to your
roof while the colony is establishing.
ESTABLISHED COLONY
CONFIGURATION
Add your Flow Super with Flow
Frames once your colony is strong
and established. Place the queen
excluder between the brood box and
Flow Super. The inner cover is placed
on top of the super. It is possible
to add extra brood boxes or supers
once your colony is established
and expanding. Speak to your local
beekeeping club for region specific
advice.
Inner
cover
Roof
Brood
box
Base
Inner
cover
Roof
Brood
box
Super
Queen
excluder
Base

10
6HOW FLOW WORKS
Finally capping
the cells
Then fill the cells
with honey
The bees complete the
comb with their wax
When the frame is full it’s ready to harvest
THE FLOW FRAME CONSISTS OF
PARTLY FORMED HONEYCOMB CELLS

11
The bees remain undisturbed on the surface of the
comb. If there does happen to be a bee down an
empty cell it wont get injured as there is enough
space between the comb walls.
INSIDE THE HONEYCOMB THE CELLS HAVE NOW SPLIT AND
TURNED INTO CHANNELS FOR THE HONEY TO FLOW DOWN.
HONEY
TROUGH
CAP
HONEY TUBE
FLOW
KEY
KEY
ACCESS
CAP
*Frame remains in
the hive for harvest, shown
separately for illustrative
purposes only
1 Remove the key access cap and honey trough cap
2 Insert honey tube into hole
3 Insert Flow Key into LOWER slot
4 Rotate key 90 degrees downwards to split the
honeycomb cells

12
7EXTRACTING HONEY FROM A FLOW FRAME
The timing of your honey harvest will depend on local conditions and the
nectar flow in your area. Your bees need honey to get them through times
when there is no nectar available. Honey should only be extracted in warmer
months when there is sucient nectar flow for the bees to replenish their
supplies.
The number of frames of honey that you leave through winter depends on
your climate. It’s a good idea to consult local beekeepers for advice on region
specific overwintering practices. The Flow Frames make it a lot easier to see
how much honey is in your frames at any time, so you can learn to manage
how much honey to harvest and how much to leave for the bees.
Flow Frames take nearly all the hard work out of the honey-extraction process,
but there are a few important points to remember…
1. Wear protective attire and have a smoker on hand whenever
you approach your hive
All beekeepers get stung at some point. Wearing
a beekeeping suit and other personal protective
equipment will minimise the risk of bee stings.
You should also use a smoker any time you are
undertaking beekeeping activities. It is not
uncommon for beekeepers to get stung through their
suit, even when using a smoker, so it is important for
all beekeepers to be well-versed in appropriate first
aid. See the Accredited First Aid Safety Pamphlet for
more information.
2. Check the hive has a slope towards your
honey outlets
The hive should have a 2.5 to 5-degree slope. You
can check this with a level or app on your phone or
simply make sure it is visually obvious that it has a
good slope toward your jars. The Flow Hive Classic
has a slope built into the baseboard, so when on a
level surface, setup should be optimal.
The Flow Hive 2 base has inbuilt side and rear spirit
levels which will both be aligned when the hive has
the optimal honey harvesting angle of 3° toward the
honey outlets.
3°
3°

13
3a. Clean out your base tray prior to
harvesting (Flow Hive 2)
Remove pest treatments and hive debris.
3b. Make sure the baseboard corflute is in
the top slot (Flow Hive Classic)
The top slot pushes the corflute up against the
mesh so that any dribbles of honey which may
occur stay within reach of the bees. They will
lick up the honey and re-use it. If you have a
solid bottom board, ignore this step.
4. Attach your harvesting shelf brackets
(optional) or find a suitable stand for
your honey jars.
Check each bracket is secure and fit the Flow
Super rear window cover to create a shelf.
Alternatively, find a suitable table to hold your
honey collecting jars which allows enough space
and stability.
5. Check each Flow Frame you are
harvesting is ready and capped
Look in the end-frame view. If the cells are mostly
full and capped with wax, it’s a good indication
that it’s ready for harvest. The best way to get to
know how your colony uses the frames is to open
the super (with smoker and protective gear) and
inspect the Flow Frames before your first few
harvests.
6. Remove the covers and caps
Sometimes the caps on Flow Frames can be tight
fitting. You can use the end of the Flow Key to
lever them o.
7. Be sure your tubes are inserted
correctly
The little tab on the end of the tube goes into the
Flow Frame and blocks the honey leak-back gap.
Ensure it is firmly inserted into the hole.

14
8. Have enough containers ready to fill and
have covers for them
Each Flow Frame can hold up to 2.3L (2.4qt) or 3.2kg
(7lbs) of honey. Just in case bees come for the honey,
some netting, plastic kitchen wrap, or cloth can be used
to cover the honey jars while harvesting.
8. Harvest some honey
Each Flow Frame has two key access slots at the TOP of
the frame. When harvesting, insert the Flow Key into the
LOWER slot, push the key all the way to the back, and
turn 90 degrees.
Typically the honey will fill the honey tube within the
first few minutes. If the honey flows at a trickle, repeat
above procedure to make sure the honeycomb cells are
open. It may take 20 minutes to over two hours to drain
the honey from a frame, depending on the temperature
and the viscosity of the honey.
The Flow Key may be hard to turn
to make it easier you can open the frame in stages.
Insert the key part way, turn, then insert further and
turn again.
9. Reset your frames and replace caps
It is not necessary to drain every drop of honey from
the Flow Frame. We have designed the honey trough so
that any remaining honey can drip back into the hive for
the bees to use. Reset your frames after harvesting by
inserting the Flow Key in the UPPER slot and turning to
close the cells.
Ensure you reset the frame fully by pushing the Flow
Key all the way to the back of the frame. The bees will
not fill open cells.
The key access cap can only be replaced when the Flow
Frame is in the closed position.
CAUTIONS
• Honey is hygroscopic (it attracts moisture). Do not leave your honey
container open for extended periods.
• Do not allow bees to eat honey outside the hive. This encourages robber
activity and may spread disease. Cover your honey vessel during harvest
and clean up any spills in your base tray to prevent attracting bees and ants.

15
8CARING FOR YOUR FLOW FRAMES
Cleaning and frame maintenance – on the hive
Inspect the honey trough at the bottom of the frame prior to harvest. We have
designed the honey trough so that any leaked or residual honey can drip back
into the hive for the bees to use. If the honey leak-back gap remains clear this
works well; however, if the bees block it up some honey may remain in the
honey trough after harvest. Clear the leak-back gap prior to harvest and during
regular inspections by twisting the cap or honey tube back and forth in the
honey trough opening.
If necessary, the honey trough can be cleaned prior to harvest from outside the
hive using a long-handled bottle brush or even a long strip of cloth wrapped
around the Flow Key handle.
Preparing Flow Frames for storage
In our experience, the Flow Frames do not require cleaning if they stay within
the hive. The bees do a great job of this. However, if you remove your Flow
Frames for storage it is a good idea to at least clean o the honey. You can do
this using warm water (maximum 65°C/150°F). Set the Flow cells to the ‘open’
position. This allows the water to flow easily through all parts of the frame.
Allow to dry thoroughly before storing.
It is not necessary to remove propolis and wax prior to storage. To avoid wax
moth damage to the drawn wax comb, frames can be frozen for 48 hours to kill
eggs and larvae prior to storage in sealed containers.
If you are storing your Flow Frames for any length of time outside the hive,
ensure they are kept away from the light as the Flow Frames are UV sensitive.
Store the frames in a cool, dry, dark location.
To discuss cleaning and maintenance of the Flow Frames join the conversation
at forum.honeyflow.com
Sterilisation
There are some diseases, such as American foulbrood, that require sterilisation
of equipment. One method of sterilisation is irradiation. Please refer to our
website for technical specifications on this. High or repeat doses of gamma
irradiation will damage your Flow Frames.
For more information on sterilisation options please visit the FAQs at
www.honeyflow.com/faqs

16
WARNINGS
• Do not use excessive force. If something is stuck, try repeated gentle
movements until it loosens. If it’s still stuck, contact us
• Do not bend the Flow Frame. This may cause the frame to fall apart.
In the event that your frame falls apart it can be reassembled.
See www.honeyflow.com for further instructions
• Do not expose the frames to direct sunlight for long periods
• Do not expose the frames to extreme heat (once inside an operating
hive, the bees will keep the temperature consistent)
• Do not use chemical solvents that are not recommended. See the FAQs
on honeyflow.com for recommendations
• Do not use a blow torch or flame device on frames
• Refer to our website for up to date irradiation information.
Following these recommendations will greatly extend the useful life of your
Flow Frames.

17
9ADDITIONAL EQUIPMENT REQUIRED
(additional equipment can be purchased through our website)
Protective gear – bee hat and veil
or beekeeping suit/jacket, gloves
We recommend you wear a protective
beekeeping suit whenever you are
working with your bees. For more
information refer to the Accredited First
Aid Beekeeping Safety pamphlet.
Additional Langstroth frames for
Flow Hybrid packages
If you have purchased the Flow Hybrid
package you will need to add the four
additional standard frames to completely
fill your super.
It is important to provide your bees with
a full box of frames. If you do not the
bees will create ‘free-form’ honey cells,
called burr comb, in the empty space
beside your frames. This is dicult
and extremely messy to harvest and
will prevent easy removal of your Flow
Frames.
Queen excluder
We recommend the use of a queen
excluder. The queen excluder is a mesh
panel which prevents the queen from
accessing and laying eggs in your honey
super. This ensures that the honey super
is not contaminated with brood.
Smoker
The smoker reduces defensive
behaviour when the hive is disturbed.
We recommend that you have a smoker
on hand any time you are undertaking
beekeeping activities, and that you use

18
it when you are opening and inspecting your beehive.
You can read more about using your smoker safely in the
Accredited First Aid Beekeeping Safety pamphlet.
Hive tool
The hive tool is a multi functional tool made of steel. It is
used to lever and remove frames, to lever apart boxes, as
well as scrape and remove burr comb from the hive.
10 WHERE TO LOCATE YOUR FLOW HIVE
It is important to consider the location of your new beehive prior to installing
your bees. You can’t move a beehive around your paddock, yard or rooftop
easily. Bees have highly developed navigational skills. If the hive is moved they
become confused and will return to the original site. For advice on moving
a bee hive once the bees are housed consult a beekeeping book, forum.
honeyflow.com or your local beekeepers’ association.
There are three important things to consider when selecting a site for your
new hive – your bees, your neighbours and yourself.
The location of your beehive will aect the overall strength of your colony.
Choose a sheltered position. In cool climates look for a dry sunny position, in
hot climates the hive will benefit from some shade, particularly in summer. Face
the hive entrance away from the prevailing winds. Ideally, face the entrance in a
southerly direction if you’re in the northern hemisphere and northerly direction
for the southern hemisphere.
You should also read the Accredited First Aid Safety Pamphlet for an
introduction to some important safety considerations to keep in mind when
locating your hive.
Other considerations
• Bees excrete waste to a distance of about 15 metres from the hive. This
appears as little orange dots that can stain washing and soil light coloured
cars. Situate your hive to avoid this. It’s a good idea to place your hive so
that the flight path is over an area of your yard or roof which has little use.
• The hive should sit firmly, without any wobble on a stable base with clear
access for when you are working with the colony. Placing the hive on a stand
prevents rotting of base timbers and improves accessibility (options include
bricks, concrete blocks, steel posts etc).
• During harvest the hive should have a 3° slope towards the honey outlets (a
tilt of about 15mm (1/2") is enough). Our optional leg kit provides a handy
This manual suits for next models
1
Table of contents
Other Flow Farm Equipment manuals