Fluggeräte ALFAcross Series User manual

ALFAcross series
manual
Version 1.2 from 02/2022
ALFAcross 80
ALFAcross 100
ALFAcross 115
ALFAcross 120
ALFAcross 140
ALFAcross 220

ALFACROSS SERIES - user’s manual
Congratulations on your purchase of a FLUGGERÄTE GMBH product.
We remind you that all our products are the result of meticulous
research in constant collaboration with pilots from all over the world.
That’s why your opinion is so important. Your experien-
ce and collaboration help us constantly improve our products, to
always get the best out of every Fluggeräte GmbH creation.
MANUFACTURER INFORMATION:
FLUGGERÄTE GMBH
Hütte 30
6345 Kössen
AUSTRIA
+43 664 20 12345
office@gleitschirm-retter.at
SAFETY NOTE
By purchasing Fluggeräte GmbH equipment, you are responsible for
being a certified paraglider pilot and you accept all risks inherent with
paragliding activities including injury and death. Improper use or misuse of
equipment greatly increases these risks. In no case shall Fluggeräte GmbH or
Fluggeräte GmbH equipment resellers be held liable for personal or third party
injuries or damages under any circumstances. If any aspect of the use of our
equipment remains unclear, please contact your local reseller or Fluggeräte
GmbH directly.
EN
2

ALFACROSS SERIES - user’s manual
INDEX
1 - GENERAL INFORMATION
2 - TECHNICAL DATA
3 - TO GET TO KNOW YOUR QUARO
3.1 - What to do when it happens?
4 - PACKING INSTRUCTIONS
4.1 - Packing preparations
4.2 - Pulling the packing line trough the fixing loops
4.3 - Sorting the panels
4.4 - Folding the canopy into thirds
4.5 - S-folding canopy to fit into inner container
5- INSTALLATION ON THE HARNESS
5.1 - Connecting the reserve parachute to the harness
5.1.1 - Attachment of the connection bridle with the harness
5.1.2 - Installing your rescue handle
5.1.3 - Installation of the rescue parachute in an external container
5.1.4 - Connection of the tandem reserve parachute
5.1.5 - Specifics for paraglider winch launch
5.1.6 - Important points
5.1.7 - Compatibility- check
6 - CARE, MAINTENANCE AND REPAIR
6.1 - Care instructions
6.2 - Repairs
6.3 - Use limitations, packing- and check intervals
6.3.1 - Packing interval
6.3.2 - Check interval
6.3.3 - Use limitation
6.4 - Spare parts
6.5 - Responsible disposal
6.6 - Regulations for behaviour in natural environments
7 - TERMS OF THE GUARANTEE
7.1 - WHAT IS NOT COVERED BY THE RESCUE GUARANTEE?
8 - DESCRIPTION OF THE RESCUE SYSTEM
9 - MAINTAINCE AND PACK-INTERVAL OVERVIEW
EN
3

ALFACROSS SERIES - user’s manual
1 - GENERAL INFORMATION
Congratulations on buying your ALFACROSS rescue system.
Before you get to know your system please read the manual which
includes important information.
This manual gives you information on the entire specific and general
characteristics of the rescue ALFACROSS series.
All technical data and instructions in this manual were drawn up with
great care. Fluggeräte GmbH cannot be made responsible for any possible
errors in this manual.
Should you decide to sell this rescue system at a later date, please
pass on this manual to the new owner.
No guarantee of any kind can be made against accidents, injury,
equipment failure, and/or death. It is assumed that the pilot is in possession of
the necessary qualifications and provisions of any relevant laws are observed.
The use of this rescue system is entirely at your own risk.
Every pilot bears the responsibility of his/her own safety. The
manufacturer or distributor assumes no responsibility for accidents occurring
while using it.
It is strictly prohibited to use the ALFACROSS series:
- beyond the maximum recommended weight
- for skydiving
- with damaged canopy, lines, connection belt or seams or- without regular
check (check interval).
ATTENTION:
The rescue system is not suitable for speeds in excess of 32 m/s (115
km/h). Every pilot must ensure that the rescue system is properly checked at
regular intervals.
EN
4

ALFACROSS SERIES - user’s manual
2 - TECHNICAL DATA
ALFAcro
ss
80
ALFAcross
100
ALFAcross
115
ALFAcross
120
ALFAcross
140
ALFAcross
220
Certification
LTF / EN
LTF / EN
LTF / EN
LTF / EN
LTF / EN
LTF / EN
Working load
80 kg
100 kg
115 kg
120 kg
140 kg
220 kg
Number of
certification
EP
323.202
1
EP
218.2018
EP
220.2018
EP
321.2021
EP
242.2018
EP
263.2019
Area (m2)
23,02
25,92
33,50
35,50
40,16
62,96
Number of cells
20
20
20
24
24
28
Weight including
container (kg)
0,913
0,987
1,322
1,313
1,506
2,428
Minimum Volume
(cm3)
3600
4100
4260
5200
5600
9000
Maximum payload
(kg)
80
100
115
120
140
220
Minimum payload
(kg)
52
65
75
80
95
150
Middle line
1
1
1
1
1
1
Rate of descent
max.
payload
5,24 m/s
5,20 m/s
5,46 m/s
5,20 m/s
5,21 m/s
5,13 m/s
Opening time (s)
3,35
3,23
3,99
3,12
3,99
The ALFAcross is not steerable!
EN
5

ALFACROSS SERIES - user’s manual
3 - TO GET TO KNOW YOUR ALFACROSS
The ALFACROSS series is a manually deployable rescue system it is
for suitable paragliding pilots in an emergency situation and is made by high
quality materials and has a quadratic canopy with one middle line which pull
down apex.
Rescue systems from Fluggeräte GmbH are characterized by a high
level of reliability and maximum material strength. Fastest inflation while
maintaining moderate sink rates are features of these systems.
The material is air permeable, strong nylon. There are bands sewn into
the main seams to strengthen the canopy. The base and side edges are
reinforced with bands. The apex is pulled. The lines are grouped into a strap.
This strap generates the connection between rescue system and harness.
The rescue system is sewn to NATO standards which means that all
rescue systems are sewn by professionals and delivered only after inspection
and approvals..
The specially designed inner container prevents the lines cannot get
caught up in the cap and the opening speed is accelerated with this inner
container.
ATTENTION:
When using a different inner container it is important to ensure that the
rescue system can be thrown without problem. This parachute system has
been tested and found compliant using the original manufacturer’s inner
container. The use of any other inner container may produce different
results, including failures.
EN
6

ALFACROSS SERIES - user’s manual
If you find yourself in an uncontrollable situation in the air, pull hard on
the deployment handle. This will open the outer reserve container and release
the reserve parachute. Then throw the reserve package forcefully away from
you. As the suspension lines become tight, the container will fall away and the
reserve will open.
In an emergency situation, the handle of the rescue system is given a
sharp pull. If your glider is rotating it pays to throw the reserve against the
rotation as this will speed up the inflating process. If you have had a collision
and find yourself entangled with someone else’s glider try to make sure you
don’t throw the reserve into the entanglement, as this will delay the opening.
When you fly, train to reach the rescue handle so you can act promptly
in case of emergency!
If you have enough height, first try to resolve the problem and stabilize
the glider as far as possible. If you have not enough height, do not wait to pull
the rescue. Do not forget to release the rescue handle!
EN
7
ALFACROSS SERIES - user’s manual
4 - PACKING INSTRUCTIONS
It is advisable that the reserve parachute be folded by qualified and
experienced folders before installation in the harness. The effectiveness of
your reserve parachute depends on correct folding.
If you wish to perform the folding process yourself, we recommend that
you follow the instructions carefully and, in case of any doubt, contact qualified
and experienced staff.
4.1 - Packing preparations
Before you pack the rescue system it is important that the canopy is
spread out on the ground for about six hours.
If possible, it would be even better to air it one night long by hanging it
up by the top lines. Before the rescue system gets packed, a release control
must be carried out. The release force should be between 5 and 7 daN.
It is helpful to pack the rescue system with two people.
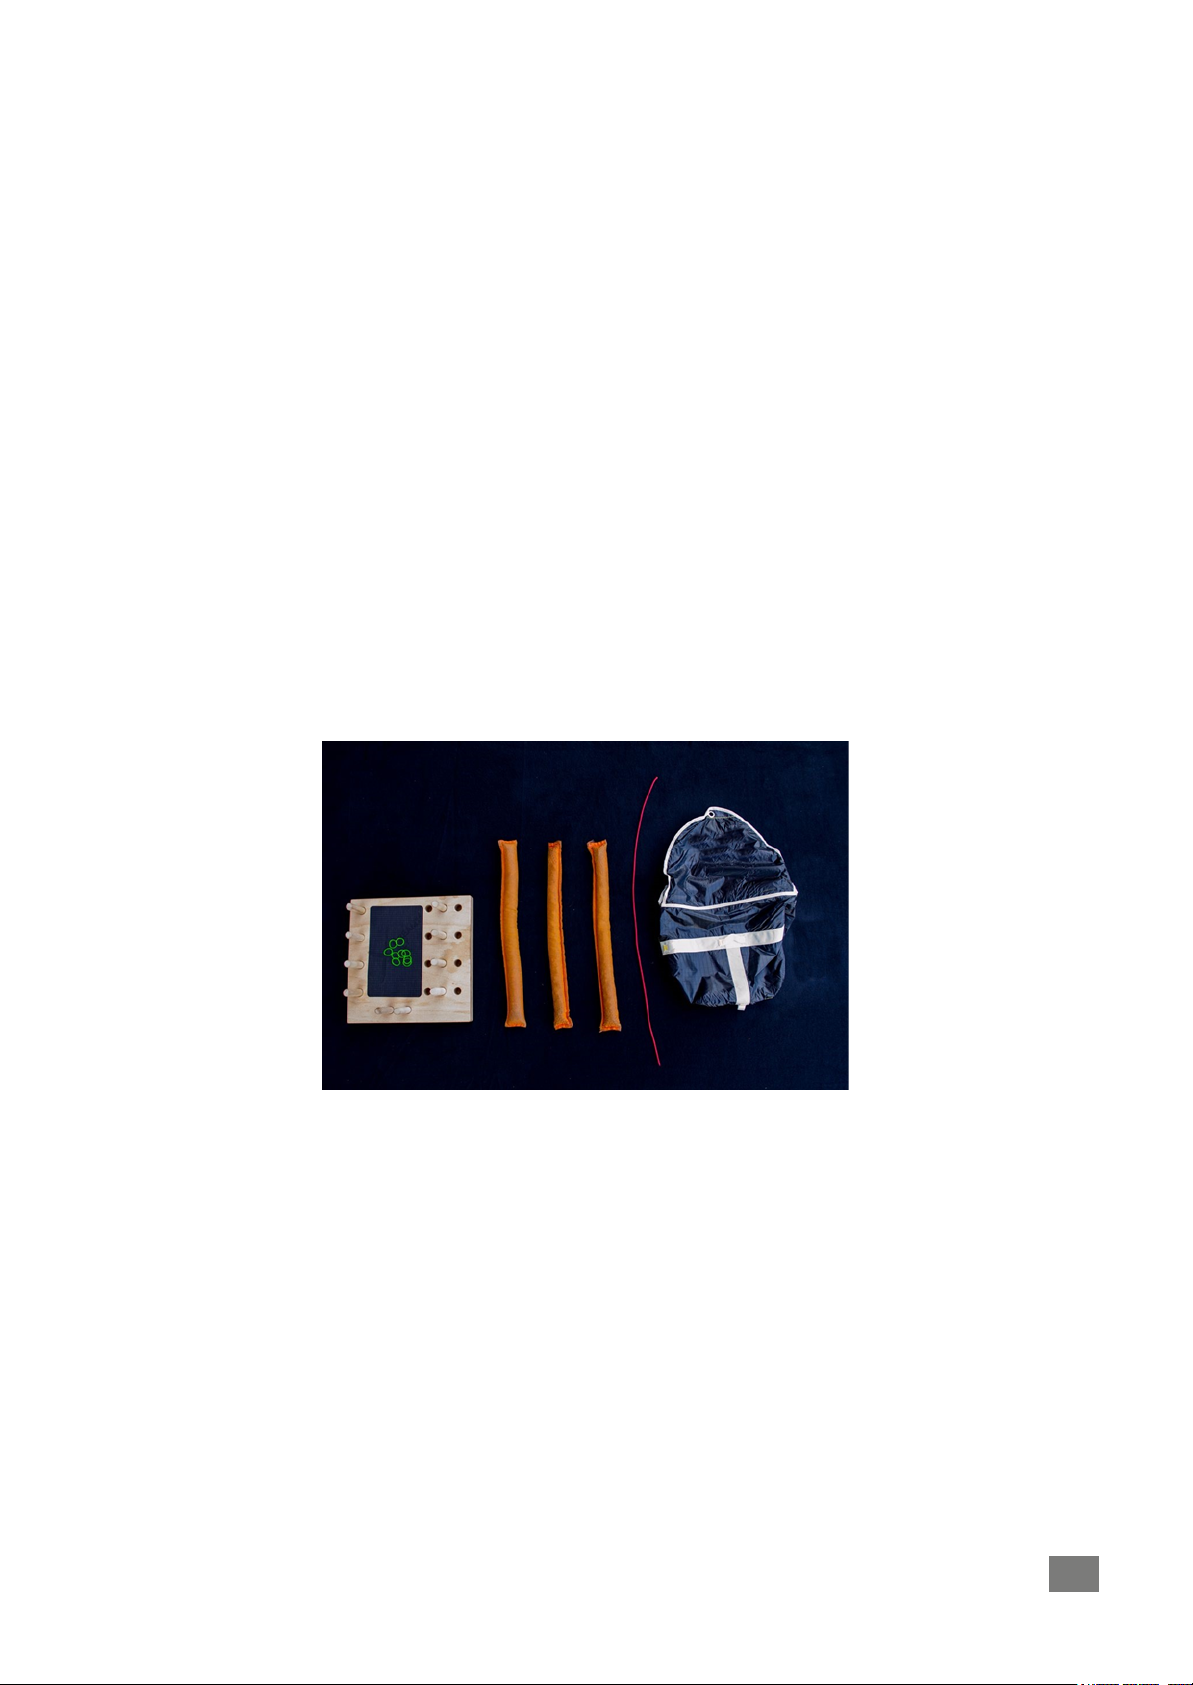
The rescue should be packed on a clean surface and helpful tools are
packing weights, one line to fix the packing loops.
Mandatory tools are packing rubbers and the original container or the
container belonging to the harness in which the ALFACROSS will be stored.
We suggest having two fixing points to tension the lines.
Upwards, used in the following text means toward the apex, downwards
towards the riser. Left and right are meant while looking from the riser to the
apex.
4.2 - Check for the lines and fixing the packing loops
Layout the parachute on the ground and keep the parachute ruffled.
EN
8

ALFACROSS SERIES - user’s manual
Secure the main belt on a fixed point to keep it stretched and under
tension.
Check for the lines to run freely from the main riser loop connection to
the canopy edge.
ATTENTION: There should not be any tangles or knots in the lines. All lines
must have a straight course and may not have any twists.
For easy control divide the lines in two sections with the same
numbers of lines, the apex line must be placed in the middle.
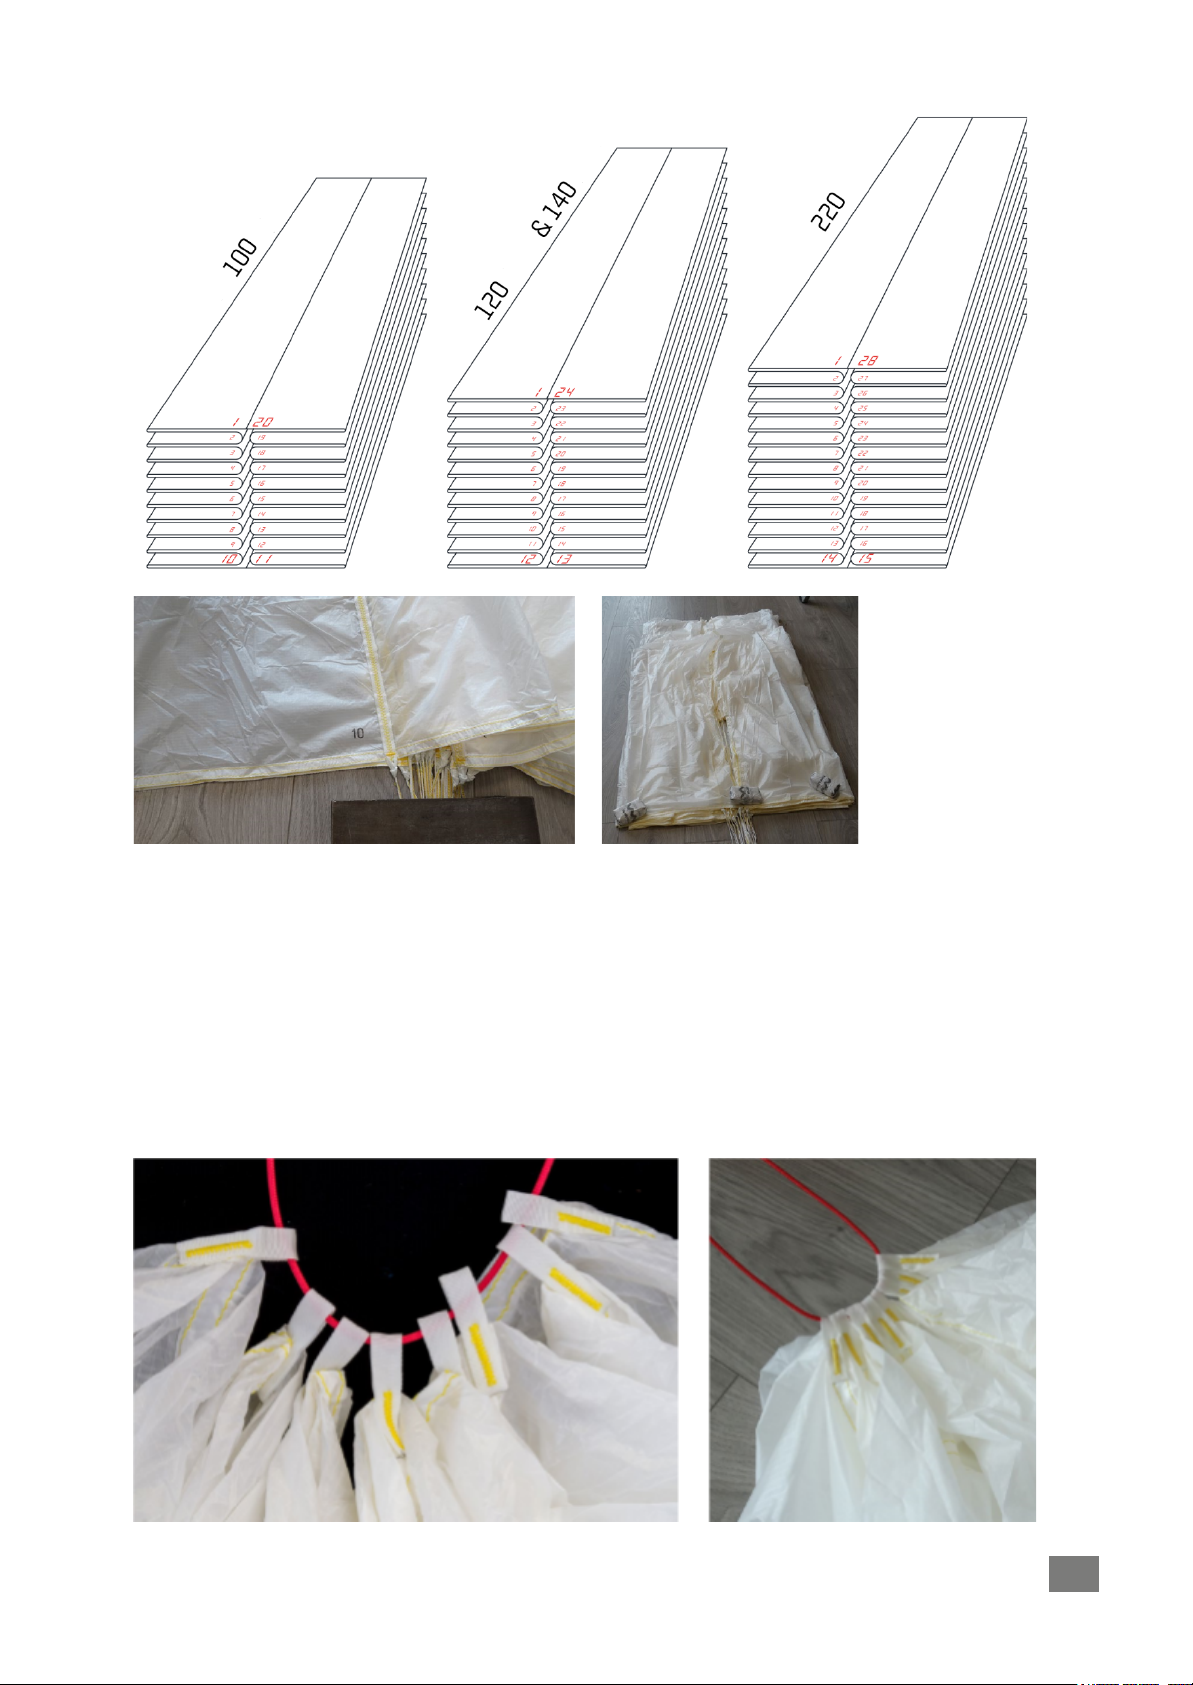
Start sorting your emergency from the panel:
- number 10 for ALFAcross 80 and 100
- number 12 for ALFAcross 120 and ALFAcross 140
- number 14 for ALFAcross 220
Hold it to your left, as in the picture below. You do not need to be
precise at this stage; the important thing is to have the same amount of
“segments” on both the left and right side.
In this way, your emergency is already in order for the next steps.
EN
9
ALFACROSS SERIES - user’s manual
To help you pack the rescue system, use a short piece of old paraglider
line and thread it through all the apex fixing loops. The fixing loops are sewn
on the canopy.
Depending on the model the ALFAcross series have different numbers
of packing loops attached to the canopy to enable an easy repack:
ALFAcross 80 and 100 has 8 packing loops
ALFAcross 120 has 10 packing loops
ALFAcross 140 has 20 packing loops
ALFAcross 220 has 20 packing loops
EN
10

ALFACROSS SERIES - user’s manual
It is advisable to tension the emergency to facilitate folding.
4.3 - Sorting the panels
Put all the panels to the right side and fold over each panel from the
right side onto left side like turning the pages in a book and pull the top of the
opening outward.
Start with panel 10 for ALFAcross 80 and 100, instead, respectively,
with panel 12 for ALFAcross 120 or for ALFAcross 140 and panel 14 for
ALFAcross 220.
The last one is panel 1, which should be the top panel on the left side.
Panels with slots are laid out as cone.
Put a packing weight for fixation on the last panel and than all the panel
from the right side can be shifted to the that side.
EN
11
ALFACROSS SERIES - user’s manual
Now fold all panels stored above the packing weight to the right side.
The panel on the bottom is panel 11 at ALFAcross 80 and 100, panel 13 at
ALFAcross 120 and ALFAcross 140, panel 15 for ALFAcross 220.
Afterwards check both sides.
On each side there must be the same amount of panels.
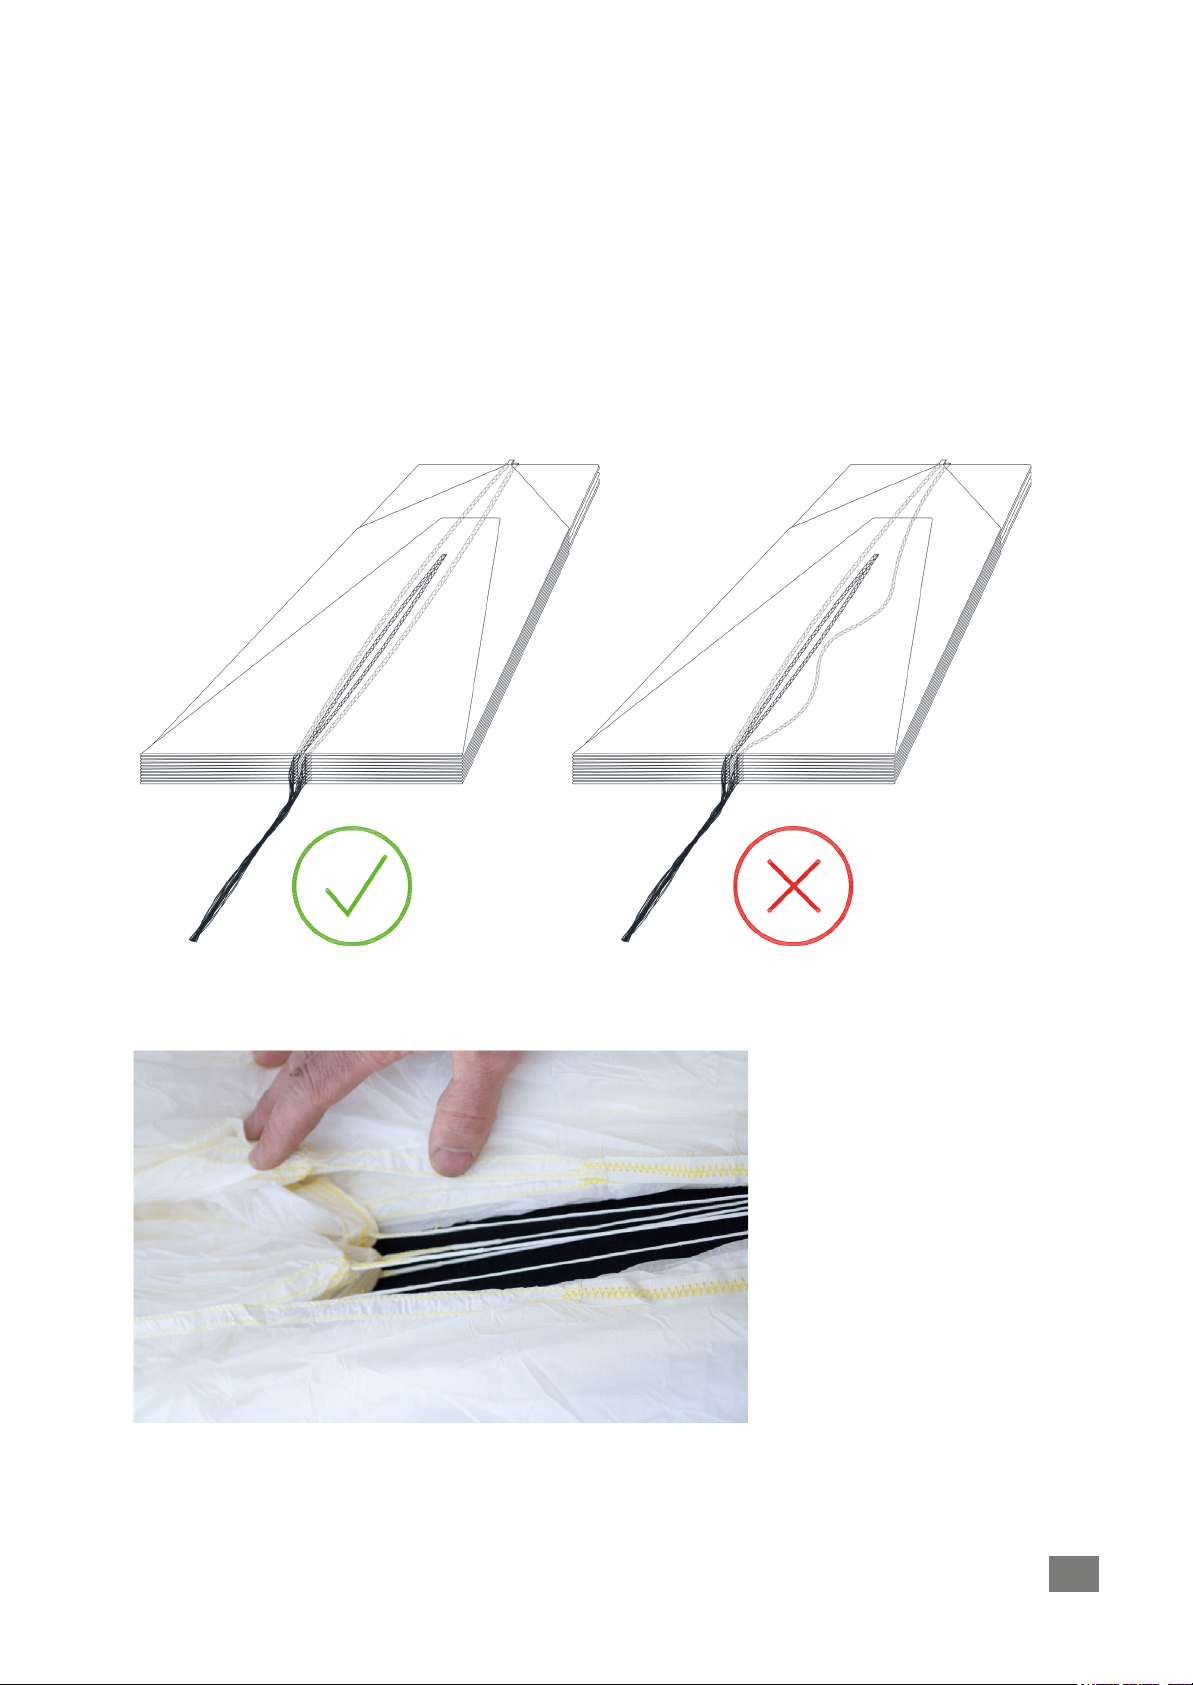
Once more check the lines. You can divide the lines in to three parts:
the left ones, the right ones and the middle line.
All lines must have a straight course and may not have any twists.
Take care that the internal edges between the panels are neat and
properly tensioned.
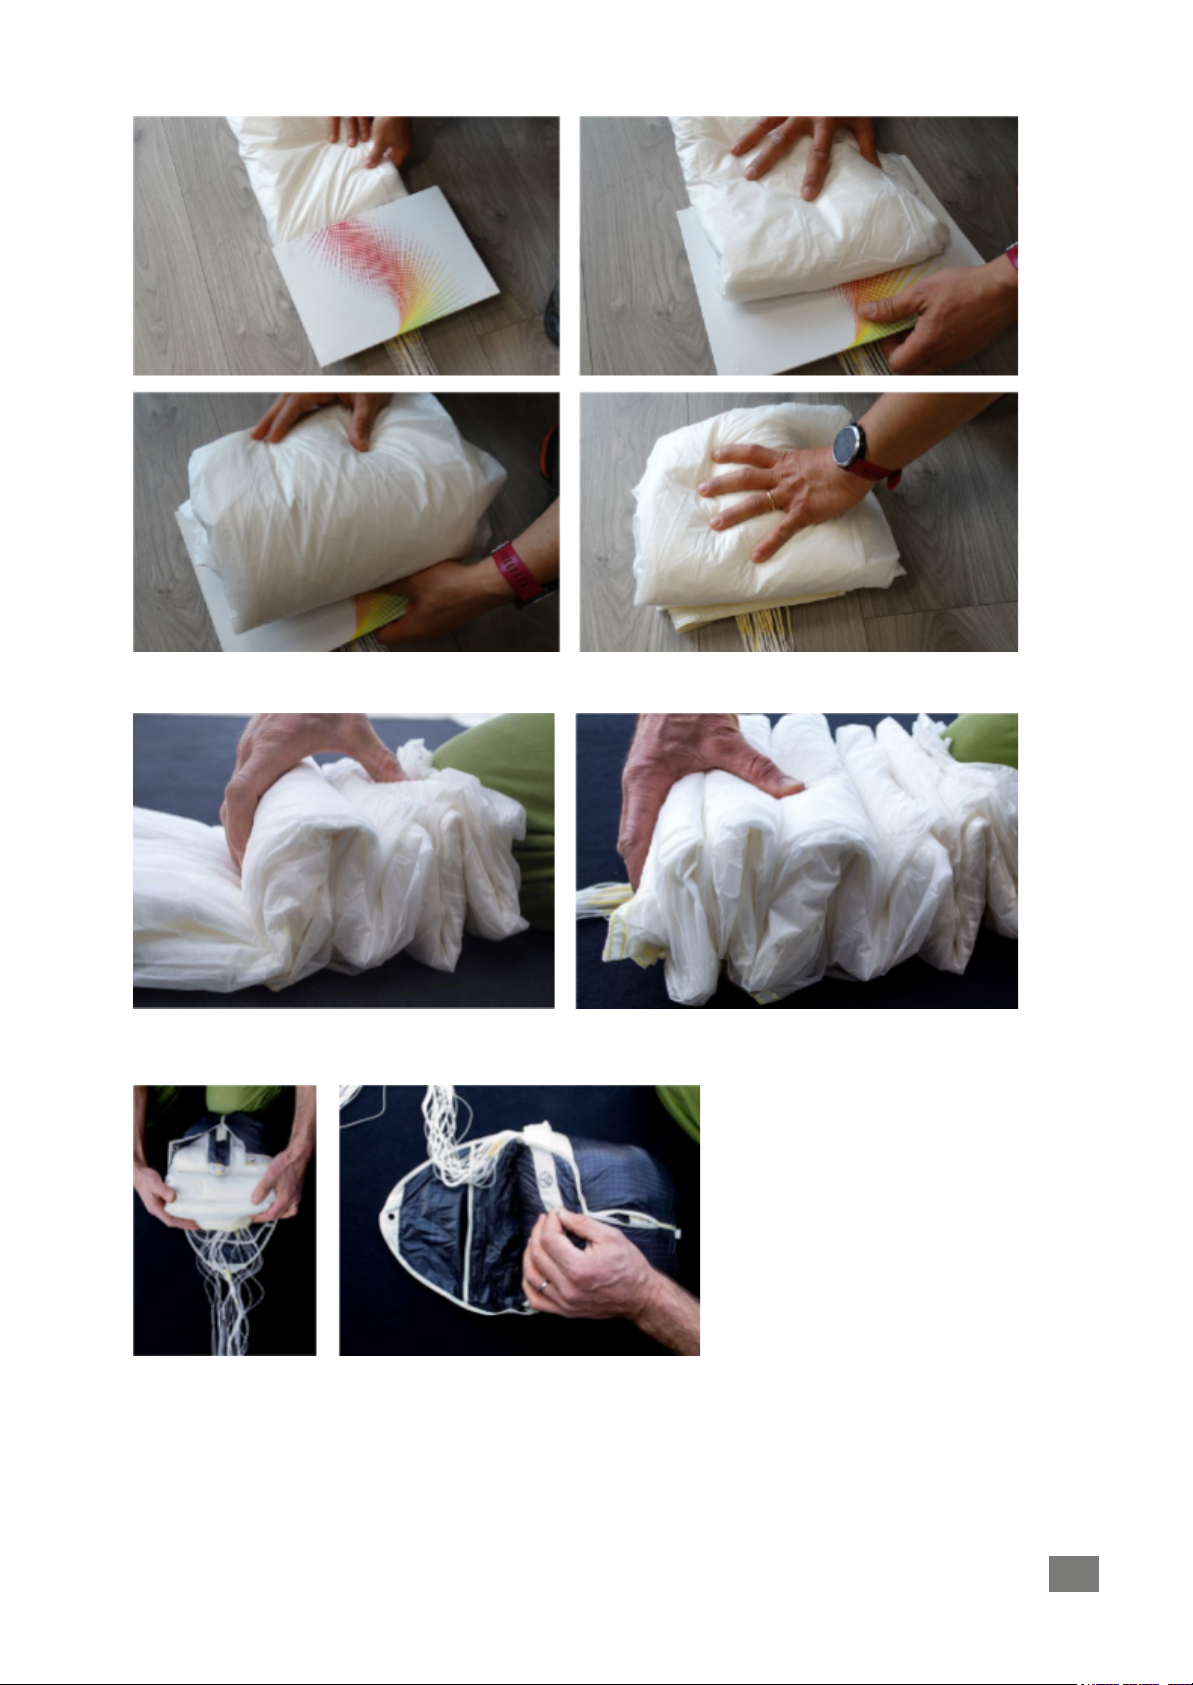
4.4 - Folding the canopy into thirds
EN
12
ALFACROSS SERIES - user’s manual
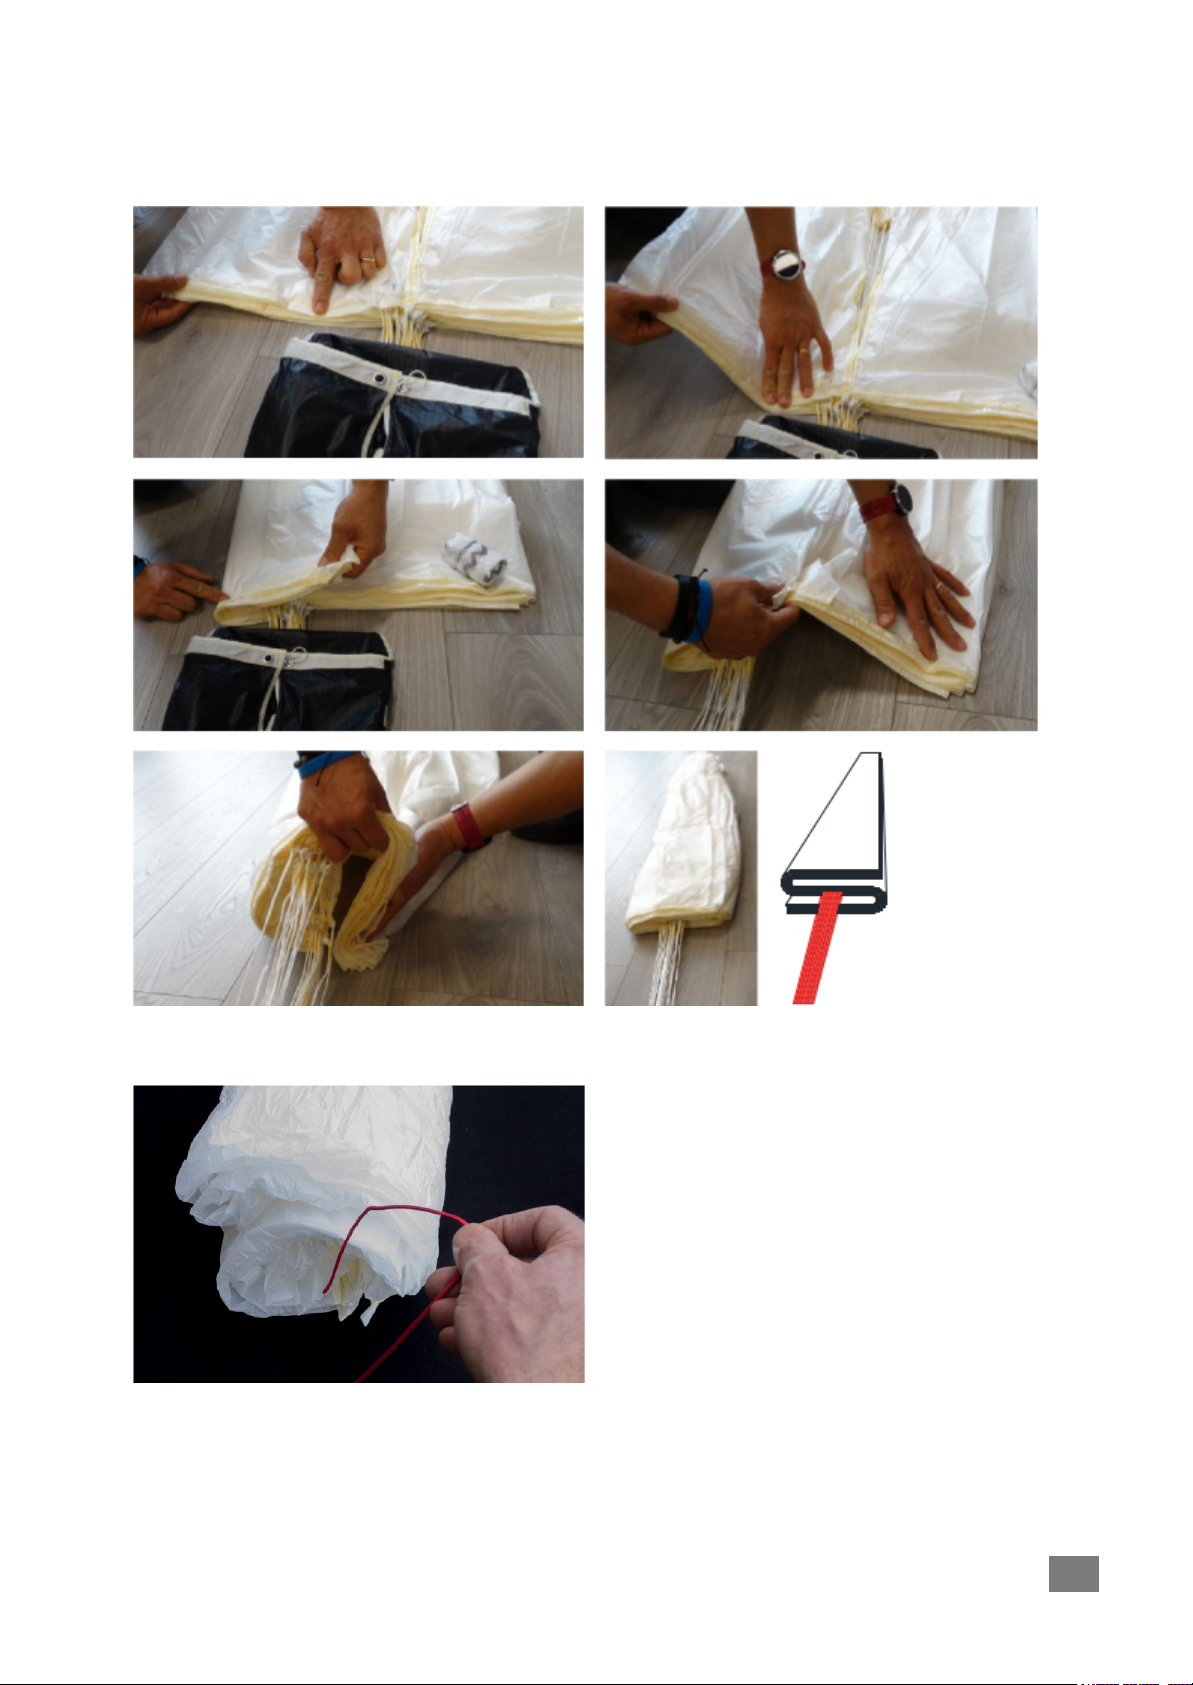
The left third is folded into the middle and then the right third is folded
under the middle. Do the same on top of the canopy. Pay attention to the size
of the container!
ATTENTION: Remove the line from the fixing loops!
4.5 - S-folding canopy to fit into inner container (standard version)
Release the riser from the fixing point and fold the canopy in “S” folds
from the top right down to the base, so that it fits into the inner container. This
is the last chance to check, that the line fixing the packing loops was removed.
EN
13
ALFACROSS SERIES - user’s manual
Alternative way to refold:
Fold the whole canopy into the container.
Close both sides of the inner container and the top pocket with the
rubber, which you fix with one loop of all the suspension lines.
ATTENTION:
EN
14

ALFACROSS SERIES - user’s manual
These are special rubber bands which you can buy from the manufacturer
and you must renew them each time you repack.
The suspension lines are sorted in three bundles, which are fixed by
rubbers. These bundles are stored in the pocket of the container.
Use the last 20 cm of the suspension lines for the final closing of the
inner container with the black rubber.
With the rest of the suspension lines you finalize the closing of the inner
container by pulling the suspension lines through the black rubber loop.
Don’t make the closing loop to big.
Now the packing is finished. Control your packing tools on being
complete.
Make a note of the date of packing in the pack control booklet.
5- INSTALLATION ON THE HARNESS
The ALFACROSS series rescue parachutes are compatible with all
FLUGGERÄTE GMBH harnesses. They can also be used with most other
manufacturers’ harnesses, as long as you first make sure with your
instructor/dealer everything works properly.
5.1 - Connecting the reserve parachute to the harness
EN
15

ALFACROSS SERIES - user’s manual
Follow the instructions from your harness manual to place your rescue
system inside the container.
5.1.1 - Attachment of the connection bridle with the harness
For attaching the reserve parachute bridle to the harness bridle use a
screw-lock karabiner with a breaking strength of at least 2,400 kg. The bridles
should be held in position within the karabiner using elastic bands, to prevent
the karabiner from rotating and taking the strain laterally instead of vertically.
The karabiner’s screw-lock should be tightly screwed shut to avoid any
possibility of it opening accidentally.
There is also the possibility to loop the bridles into each other if at least one of
them has a big enough loop to pass the rescue through.
5.1.2 - Installing your rescue handle
Most harnesses have their rescue handle connected to their rescue
inner container. The ALFAcross inner container has three loops to which a
handle can be attached: one in middle and two on the sides. Please read the
instructions in the harness manual to know exactly which loop you must
connect your rescue handle to.
ATTENTION:
Note the instructions for the rescue unit in the operating instructions of your
harness. If there is no handle of the harness or it does not fit with your inner
container, please ask the dealer of your harness or your paragliding school.
The handle must be firmly connected to the loop on the inner container.
5.1.3 - Installation of the rescue parachute in an external container
If your harness does not have a built-in container, you can still use the
ALFACROSS series rescue parachutes using an external front container.
FLUGGERÄTE GMBH can provide an optional front rescue container
with rescue handle in different versions. We recommend that you carefully
follow the instructions in the manual and connect the bridle on both main
carabiners. The possible use of other manufacturer’s front container depends
EN
16

ALFACROSS SERIES - user’s manual
on its size and therefore you must make sure it is not too small. If in doubt,
look for professional advice.
5.1.4 - Connection of the tandem reserve parachute
The tandem emergency connection need the exclusive addition of the V
line for TANDEM. Then connect the V line with the main or exclusive rescue
attachment point to the top of each spreader bar (at the main loop). If your V
line have auxiliary suspender it must be connected to risers B and C of
theglider after passing through the main carabiners. The tandem emergency
will make the B-C- stall in case of opening of the emergency parachute. Follow
carefully the instructions from your tandem harness manual.
5.1.5 - Specifics for paraglider winch launch
For winch towing please pay attention to the harness, paraglider and
winch manufacturers’ instructions. If you use a frontcontainer, you must be
ensured that rescue system deployment is possible at any situation.
5.1.6 - Important points
Additionally, the following points must be strictly adhered to:
- Only use the original release handle that is delivered with the harness. Other
release handles must not be used as they do not guarantee faultless
operation.
- The container must have a suitable volume.
- When using an inner container with asymmetric attachment loop, it must be
placed inside the harness container in such a way that the attachment loop
remains as close as possible to the release handle and that the rescue
system does not get twisted during deployment.
- When placing the rescue system inside the harness container, it is absolutely
necessary to make sure the connection between release handle and safety
pin is shorter than the connection between release handle and inner
container.
- Install the release handle at the intended position in such a way that the
connecting line is not under tension and the safety pin is not pulled out of the
closing loop.
- After each packing, a test deployment must be carried out to ensure the
proper operation of the rescue system! Deployment from the flying position
must be possible without any difficulty and according to the specifications of
the manufacturer.
- Insert your rescue parachute into your harness only after its back protection
has been installed.
EN
17

ALFACROSS SERIES - user’s manual
5.1.7 - Compatibility- check
A control of every new combination of rescue system and harness/outer
container has to be carried out by either the producer of the harness or the
rescue system or an authorized person (dealer or flight instructor). The
activation of the rescue system in flight position has to be correct and in
conformity to the construction guidelines.
The check has to be recorded in the documentation of the rescue
system. The throwing movement should be practiced every time the rescue
system is repacked.
EN
18

ALFACROSS SERIES - user’s manual
Check (regularly):
• connection of the rescue system to your harness
• connection of the harness and deployment handle
• Check compatibility of rescue system and harness
In addition to a normal preflight check (see manual of the glider/harness
or maybe towing device), you have to check before every take off that the
rescue container is closed correctly and the release handle is placed correctly.
If the rescue parachute connection V line is removed after every flight (for
example: when you use a frontcontainer) you also have to check the correct
attachment of the bridle.
6 - CARE, MAINTENANCE AND REPAIR
6.1 - Care Instructions
• Please do not store your rescue system in the vicinity of acids, gre-ase, oils
or paint. To ensure safe operation, the system needs proper maintenance
and care.
•Do not store your rescue system in extreme temperatures or humidity
(more than 30 C or 55-65% humidity).
• A humid or wet canopy needs repacking.
• Exposure to UV-rays causes deterioration of the fabric.
• Please only use clean and fresh water to clean your rescue system or
container.
• Wet cloth stored in warm conditions will begin to mould and signi-ficantly lose
structural strength. Rescue systems in this condition must be brought to the
manufacturer to be checked.
ATTENTION:
A wet rescue system may take several days to dry thoroughly, and its lines
may take even longer.
Do not fold or store your rescue system unless it is completely dry.
6.2 - Repairs
The seal of approval can only be preserved if original parts are used. If
you discover any damaged parts to the rescue system which might impede
deployment, please end it back to the manufacturer to get repaired. Repairs
can only be carried out by the manufacturer or from the manufacturer
authorized persons.
EN
19

ALFACROSS SERIES - user’s manual
6.3 - Use limitations, packing- and check intervals
In the ALFACROSS series rescue parachutes, there is nothing that can
or should be adjusted.
6.3.1 - Packing interval
6 to12 month: the rescue system also must be aired recurrent.
6.3.2 - Check interval
2 years: if the rescue system was opened after a flight accident, the
rescue system must be checked.
ATTENTION:
Without regular certified inspections, your rescue will loose its pattern
test result and guarantee.
6.3.3 - Use limitation
15 years: Our rescue system ALFACROSS have a lifer span of 15
Years by observance of the regulations for packing and checking. Certification
is no longer valid thereafter.
The certified life span can be extended by a further three years, if the
rescue system is checked by the manufacturer.
ATTENTION:
Packing and checks of the rescue system must be documented otherwise
guarantee is cancelled.
6.4 - Spare parts
The spare parts are the rubber bands and the deployment bag, that can
be bought from you local dealer or Fluggeräte GmbH.
6.5 - Responsible disposal
The materials of which a rescue parachute is made requires a special
waste disposal, please ensure the right treatment at the end of the operating
period or send it to FLUGGERÄTE GMBH where we’ll take care of its
disposal.
6.6 - Regulations for behaviour in natural environments
EN
20
This manual suits for next models
6
Table of contents
Other Fluggeräte Safety Equipment manuals


